check engine LINCOLN NAVIGATOR 2018 User Guide
[x] Cancel search | Manufacturer: LINCOLN, Model Year: 2018, Model line: NAVIGATOR, Model: LINCOLN NAVIGATOR 2018Pages: 649, PDF Size: 4.96 MB
Page 195 of 649
Press the push button ignition switch oncewithout your foot on the brake pedal. It is onthe instrument panel near the steering wheel.All electrical circuits and accessories areoperational and the warning lamps andindicators illuminate.
Press the push button ignition switch againwithout your foot on the brake pedal toswitch the ignition off.
STARTING A GASOLINE ENGINE
When you start the engine, the idle speedincreases.
This helps to warm up the engine. If theengine idle speed does not slow downautomatically, have your vehicle checked byan authorized dealer.
Note: You can crank the engine for a totalof 60 seconds without the engine startingbefore the starting system temporarilydisables. The 60 seconds does not have tobe all at once. For example, if you crank theengine three times for 20 seconds each time,without the engine starting, you reached the60-second time limit. You cannot attemptto start the engine for at least 15 minutes. After 15 minutes, you are limited to a15-second engine cranking time. You needto wait 60 minutes before you can crank theengine for 60 seconds again.
Before starting your vehicle, check thefollowing:
•Make sure all occupants have fastenedtheir seatbelts.
•Make sure the headlamps and electricalaccessories are off.
•Make sure the parking brake is on.
•Make sure the transmission is in park (P).
Note:Do not touch the accelerator pedal.
Note:You must have your intelligent accesskey in your vehicle to shift the transmissionout of park (P).
1. Fully depress the brake pedal.
2. Press the push button ignition switch.
The system does not function if:
•The passive key frequencies are jammed.
•The key battery has no charge.
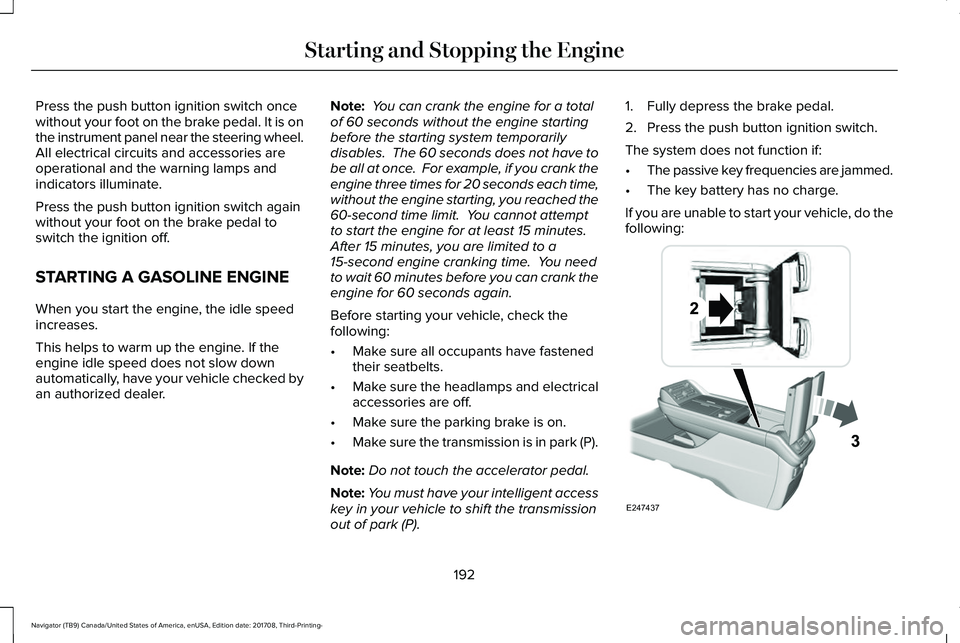
If you are unable to start your vehicle, do thefollowing:
192
Navigator (TB9) Canada/United States of America, enUSA, Edition date: 201708, Third-Printing-
Starting and Stopping the EngineE247437
Page 198 of 649
WARNING: Do not use your heaterwith ungrounded electrical systems ortwo-pronged adapters. There is a risk ofelectrical shock.
WARNING: Do not fully close thehood, or allow it to drop under its ownweight when using the engine blockheater. This could damage the power cableand may cause an electrical short resultingin fire, injury and property damage.
Note:The heater is most effective whenoutdoor temperatures are below 0°F (-18°C).
The heater acts as a starting aid by warmingthe engine coolant. This allows the climatecontrol system to respond quickly. Theequipment includes a heater element(installed in the engine block) and a wireharness. You can connect the system to agrounded 120-volt AC electrical source.
We recommend that you do the following fora safe and correct operation:
•Use a 16-gauge outdoor extension cordthat is product certified by Underwriter’sLaboratory (UL) or Canadian StandardsAssociation (CSA). This extension cordmust be suitable for use outdoors, in coldtemperatures, and be clearly markedSuitable for Use with OutdoorAppliances. Do not use an indoorextension cord outdoors. This couldresult in an electric shock or become afire hazard.
•Use as short an extension cord aspossible.
•Do not use multiple extension cords.
•Make sure that when in operation, theextension cord plug and heater cord plugconnections are free and clear of water.This could cause an electric shock or fire.
•Make sure your vehicle is parked in aclean area, clear of combustibles.
•Make sure the heater, heater cord andextension cord are firmly connected.
•Check for heat anywhere in the electricalhookup once the system has beenoperating for approximately 30 minutes.
•Make sure the system is unplugged andproperly stowed before starting anddriving your vehicle. Make sure theprotective cover seals the prongs of theblock heater cord plug when not in use.
•Make sure the heater system is checkedfor proper operation before winter.
Using the Engine Block Heater
Make sure the receptacle terminals are cleanand dry prior to use. Clean them with a drycloth if necessary.
The heater uses 0.4 to 1.0 kilowatt-hours ofenergy per hour of use. The system does nothave a thermostat. It achieves maximumtemperature after approximately three hoursof operation. Using the heater longer thanthree hours does not improve systemperformance and unnecessarily useselectricity.
195
Navigator (TB9) Canada/United States of America, enUSA, Edition date: 201708, Third-Printing-
Starting and Stopping the Engine
Page 207 of 649
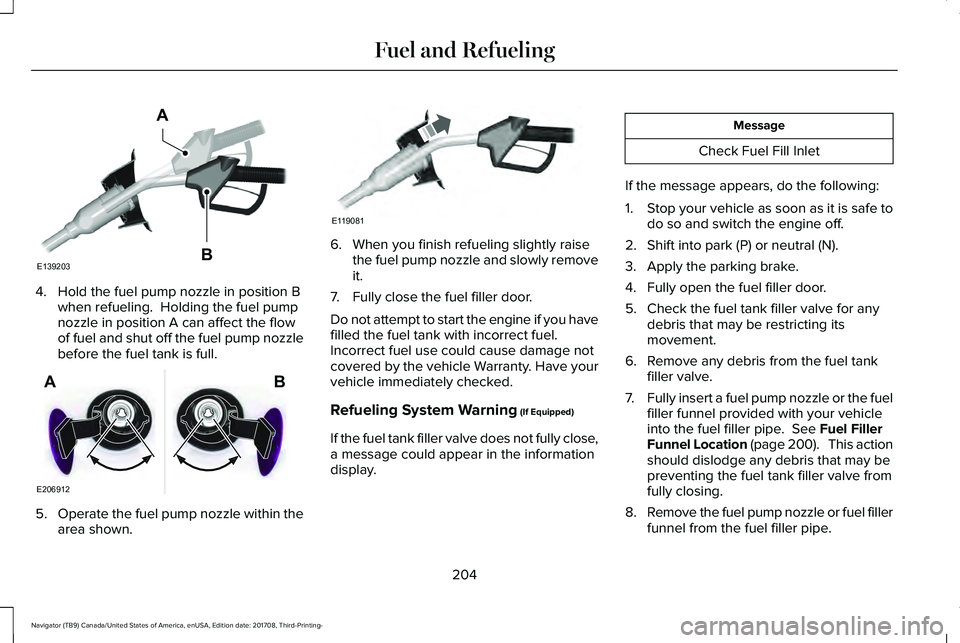
4. Hold the fuel pump nozzle in position Bwhen refueling. Holding the fuel pumpnozzle in position A can affect the flowof fuel and shut off the fuel pump nozzlebefore the fuel tank is full.
5.Operate the fuel pump nozzle within thearea shown.
6. When you finish refueling slightly raisethe fuel pump nozzle and slowly removeit.
7. Fully close the fuel filler door.
Do not attempt to start the engine if you havefilled the fuel tank with incorrect fuel.Incorrect fuel use could cause damage notcovered by the vehicle Warranty. Have yourvehicle immediately checked.
Refueling System Warning (If Equipped)
If the fuel tank filler valve does not fully close,a message could appear in the informationdisplay.
Message
Check Fuel Fill Inlet
If the message appears, do the following:
1.Stop your vehicle as soon as it is safe todo so and switch the engine off.
2. Shift into park (P) or neutral (N).
3. Apply the parking brake.
4. Fully open the fuel filler door.
5. Check the fuel tank filler valve for anydebris that may be restricting itsmovement.
6. Remove any debris from the fuel tankfiller valve.
7.Fully insert a fuel pump nozzle or the fuelfiller funnel provided with your vehicleinto the fuel filler pipe. See Fuel FillerFunnel Location (page 200). This actionshould dislodge any debris that may bepreventing the fuel tank filler valve fromfully closing.
8.Remove the fuel pump nozzle or fuel fillerfunnel from the fuel filler pipe.
204
Navigator (TB9) Canada/United States of America, enUSA, Edition date: 201708, Third-Printing-
Fuel and RefuelingE139203
A
B E206912
AB E119081
Page 208 of 649
9. Fully close the fuel filler door.
Note:The message may not immediatelyreset. If the message continues to appearand a warning lamp illuminates, have yourvehicle checked as soon as possible.
FUEL CONSUMPTION
Advertised Capacity
The advertised capacity is the maximumamount of fuel that you can add to the fueltank after running out of fuel. Included in theadvertised capacity is an empty reserve. Theempty reserve is an unspecified amount offuel that remains in the fuel tank when thefuel gauge indicates empty.
Note:The amount of fuel in the emptyreserve varies and should not be relied uponto increase driving range.
Fuel Economy
Your vehicle calculates fuel economy figuresthrough the trip computer average fuelfunction.
The first 1,000 mi (1,500 km) of driving is thebreak-in period of the engine. A moreaccurate measurement is obtained after2,000 mi (3,000 km).
Impacting Fuel Economy
•Incorrect tire inflation pressures.
•Fully loading your vehicle.
•Carrying unnecessary weight.
•Adding certain accessories to yourvehicle such as bug deflectors, rollbarsor light bars, running boards and skiracks.
•Using fuel blended with alcohol. SeeFuel Quality (page 200).
•Fuel economy may decrease with lowertemperatures.
•Fuel economy may decrease whendriving short distances.
•You may get better fuel economy whendriving on flat terrain than when drivingon hilly terrain.
205
Navigator (TB9) Canada/United States of America, enUSA, Edition date: 201708, Third-Printing-
Fuel and Refueling
Page 209 of 649
EMISSION LAW
WARNING: Do not remove or alterthe original equipment floor covering orinsulation between it and the metal floorof the vehicle. The floor covering andinsulation protect occupants of the vehiclefrom the engine and exhaust system heatand noise. On vehicles with no originalequipment floor covering insulation, do notcarry passengers in a manner that permitsprolonged skin contact with the metal floor.Failure to follow these instructions mayresult in fire or personal injury.
U.S. federal laws and certain state lawsprohibit removing or rendering inoperativeemission control system components. Similarfederal or provincial laws may apply inCanada. We do not approve of any vehiclemodification without first determiningapplicable laws.
Tampering with emissions controlsystems including related sensorsor the Diesel Exhaust Fluid systemcan result in reduced engine power and theillumination of the service engine soon light.
Tampering With a Noise ControlSystem
Federal laws prohibit the following acts:
•Removal or rendering inoperative by anyperson other than for purposes ofmaintenance.
•Repair or replacement of any device orelement of the design incorporated intoa new vehicle for the purpose of noisecontrol prior to its sale or delivery to theultimate purchaser or while it is in use.
•The use of the vehicle after any personremoves or renders inoperative anydevice or element of the design.
The U.S. Environmental Protection Agencymay presume to constitute tampering asfollows:
•Removal of hood blanket, fender apronabsorbers, fender apron barriers,underbody noise shields or acousticallyabsorptive material.
•Tampering or rendering inoperative theengine speed governor, to allow enginespeed to exceed manufacturerspecifications.
If the engine does not start, runs rough,experiences a decrease in engineperformance, experiences excess fuelconsumption or produces excessive exhaustsmoke, check for the following:
•A plugged or disconnected air inletsystem hose.
•A plugged engine air filter element.
•Water in the fuel filter and waterseparator.
•A clogged fuel filter.
•Contaminated fuel.
•Air in the fuel system, due to looseconnections.
206
Navigator (TB9) Canada/United States of America, enUSA, Edition date: 201708, Third-Printing-
Engine Emission Control
Page 210 of 649
•An open or pinched sensor hose.
•Incorrect engine oil level.
•Incorrect fuel for climatic conditions.
•Incorrect engine oil viscosity for climacticconditions.
Note:Some vehicles have a lifetime fuel filterthat is integrated with the fuel tank. Regularmaintenance or replacement is not needed.
Note:If these checks do not help you correctthe concern, have your vehicle checked assoon as possible.
Noise Emissions Warranty, ProhibitedTampering Acts and Maintenance
On January 1, 1978, Federal regulationbecame effective governing the noiseemission on trucks over 10,000 lb (4,536 kg)Gross Vehicle Weight Rating (GVWR). Thepreceding statements concerning prohibitedtampering acts and maintenance, and thenoise warranty found in the Warranty Guide,are applicable to complete chassis cabs over10,000 lb (4,536 kg) GVWR.
CATALYTIC CONVERTER
WARNING: Do not park, idle or driveyour vehicle on dry grass or other dryground cover. The emission system heatsup the engine compartment and exhaustsystem, creating the risk of fire.
WARNING: The normal operatingtemperature of the exhaust system is veryhigh. Never work around or attempt torepair any part of the exhaust system untilit has cooled. Use special care whenworking around the catalytic converter.The catalytic converter heats up to a veryhigh temperature after only a short periodof engine operation and stays hot after theengine is switched off.
WARNING: Exhaust leaks may resultin entry of harmful and potentially lethalfumes into the passenger compartment. Ifyou smell exhaust fumes inside yourvehicle, have your vehicle inspectedimmediately. Do not drive if you smellexhaust fumes.
Your vehicle has various emission controlcomponents and a catalytic converter thatenables it to comply with applicable exhaustemission standards.
To make sure that the catalytic converter andother emission control components continueto work properly:
•Do not crank the engine for more than10 seconds at a time.
•Do not run the engine with a spark pluglead disconnected.
•Do not push-start or tow-start yourvehicle. Use booster cables. See JumpStarting the Vehicle (page 329).
•Use only the specified fuel listed.
•Do not switch the ignition off when yourvehicle is moving.
•Avoid running out of fuel.
•Have the items listed in scheduledmaintenance information performedaccording to the specified schedule.
Note:Resulting component damage maynot be covered by the vehicle Warranty.
207
Navigator (TB9) Canada/United States of America, enUSA, Edition date: 201708, Third-Printing-
Engine Emission Control
Page 212 of 649
If the service engine soon indicator remainson, have your vehicle serviced at the firstavailable opportunity. Although somemalfunctions detected by the OBD-II may nothave symptoms that are apparent, continueddriving with the service engine soon indicatoron can result in increased emissions, lowerfuel economy, reduced engine andtransmission smoothness and lead to morecostly repairs.
Readiness for Inspection andMaintenance (I/M) Testing
Some state and provincial and localgovernments may haveInspection/Maintenance (I/M) programs toinspect the emission control equipment onyour vehicle. Failure to pass this inspectioncould prevent you from getting a vehicleregistration.
If the service engine soon indicatoris on or the bulb does not work,your vehicle may need service.See On-Board Diagnostics.
Your vehicle may not pass the I/M test if theservice engine soon indicator is on or notworking properly (bulb is burned out), or ifthe OBD-II system has determined that someof the emission control systems have notbeen properly checked. In this case, thevehicle is not ready for I/M testing.
If the vehicle’s engine or transmission hasjust been serviced, or the battery hasrecently run down or been replaced, theOBD-II system may indicate that the vehicleis not ready for I/M testing. To determine ifthe vehicle is ready for I/M testing, turn theignition key to the on position for 15 secondswithout cranking the engine. If the serviceengine soon indicator blinks eight times, itmeans that the vehicle is not ready for I/Mtesting; if the service engine soon indicatorstays on solid, it means that your vehicle isready for I/M testing.
The OBD-II system checks the emissioncontrol system during normal driving. Acomplete check may take several days.
If the vehicle is not ready for I/M testing, youcan perform the following driving cycleconsisting of mixed city and highway driving:
1. 15 minutes of steady driving on anexpressway or highway followed by 20minutes of stop-and-go driving with atleast four 30-second idle periods.
2.Allow your vehicle to sit for at least eighthours with the ignition off. Then, start thevehicle and complete the above drivingcycle. The vehicle must warm up to itsnormal operating temperature. Oncestarted, do not turn off the vehicle untilthe above driving cycle is complete.
If the vehicle is still not ready for I/M testing,you need to repeat the above driving cycle.
209
Navigator (TB9) Canada/United States of America, enUSA, Edition date: 201708, Third-Printing-
Engine Emission Control
Page 217 of 649
Brake-Shift Interlock Override
WARNING: When doing thisprocedure, you need to take thetransmission out of park (P) which meansyour vehicle can roll freely. To avoidunwanted vehicle movement, always fullyapply the parking brake prior to doing thisprocedure. Use wheels chocks ifappropriate.
WARNING: Do not drive your vehicleuntil you verify that the stoplamps areworking.
WARNING: If the parking brake isfully released, but the brake warning lampremains illuminated, the brakes may notbe working properly. Have your vehiclechecked as soon as possible.
Note:See your authorized dealer as soonas possible if this procedure is used.
Note:For some markets this feature isdisabled.
Note:This feature only functions if your12-volt battery has power.
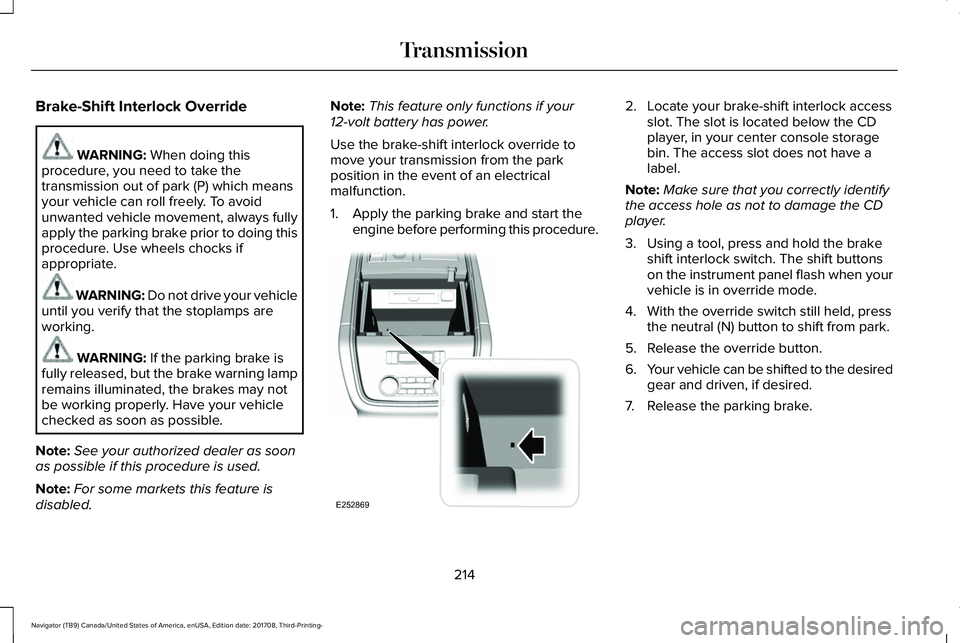
Use the brake-shift interlock override tomove your transmission from the parkposition in the event of an electricalmalfunction.
1. Apply the parking brake and start theengine before performing this procedure.
2. Locate your brake-shift interlock accessslot. The slot is located below the CDplayer, in your center console storagebin. The access slot does not have alabel.
Note:Make sure that you correctly identifythe access hole as not to damage the CDplayer.
3. Using a tool, press and hold the brakeshift interlock switch. The shift buttonson the instrument panel flash when yourvehicle is in override mode.
4. With the override switch still held, pressthe neutral (N) button to shift from park.
5. Release the override button.
6.Your vehicle can be shifted to the desiredgear and driven, if desired.
7. Release the parking brake.
214
Navigator (TB9) Canada/United States of America, enUSA, Edition date: 201708, Third-Printing-
TransmissionE252869
Page 228 of 649
GENERAL INFORMATION
Note: Occasional brake noise is normal. Ifa metal-to-metal, continuous grinding orcontinuous squeal sound is present, thebrake linings may be worn-out and anauthorized dealer should check them. If thevehicle has continuous vibration or shudderin the steering wheel while braking, anauthorized dealer should check your vehicle.
Note:Brake dust may accumulate on thewheels, even under normal drivingconditions. Some dust is inevitable as thebrakes wear and does not contribute tobrake noise. See Cleaning the Wheels(page 389).
See Warning Lamps andIndicators (page 113).
Wet brakes result in reduced brakingefficiency. Gently press the brake pedal afew times when driving from a car wash orstanding water to dry the brakes.
Brake Over Accelerator
In the event the accelerator pedal becomesstuck or entrapped, apply steady and firmpressure to the brake pedal to slow thevehicle and reduce engine power. If youexperience this condition, apply the brakesand bring your vehicle to a safe stop. Switchthe engine off, move the transmission to park(P) and apply the parking brake. Inspect theaccelerator pedal and the area around it forany items or debris that may be obstructingits movement.If none are found and thecondition persists, have your vehicle towedto the nearest authorized dealer.
Emergency Brake Assist
Emergency brake assist detects when youbrake heavily by measuring the rate at whichyou press the brake pedal. It providesmaximum braking efficiency as long as youpress the pedal. Emergency brake assistcan reduce stopping distances in criticalsituations.
Anti-lock Brake System
This system helps you maintain steeringcontrol during emergency stops by keepingthe brakes from locking.
This lamp momentarily illuminateswhen you switch the ignition on. Ifthe light does not illuminate duringstart up, remains on or flashes, the anti-lockbraking system may be disabled. Have thesystem checked by an authorized dealer. Ifthe anti-lock brake system is disabled,normal braking is still effective.
If the brake warning lampilluminates with the parking brakereleased, have your brake systemserviced immediately.
It also illuminates momentarily when youswitch the ignition on to confirm the lamp isfunctional. If it does not illuminate when youswitch the ignition on, or begins to flash atany time, have the system checked by anauthorized dealer.
225
Navigator (TB9) Canada/United States of America, enUSA, Edition date: 201708, Third-Printing-
BrakesE138644 E138644
Page 313 of 649
This feature applies your vehicle brakes atindividual wheels and, if necessary, reducesengine power. If the trailer begins to sway,the stability control light flashes and themessage TRAILER SWAY REDUCE SPEEDappears in the information display. The firstthing to do is slow your vehicle down, thenpull safely to the side of the road and checkfor proper tongue load and trailer loaddistribution. See Load Carrying (page 288).
RECOMMENDED TOWING
WEIGHTS
Note:Do not exceed the trailer weightfor your vehicle configuration listed inthe chart below.
Note:Make sure to take intoconsideration trailer frontal area. Do notexceed 36.5 feet² (3.39 meters²) if yourvehicle is equipped with the standardtowing package, or 60 feet² (5.57meters²) if your vehicle is equipped withthe optional heavy duty package.
Note:Exceeding this limitation maysignificantly reduce the performance ofyour towing vehicle. Selecting a trailerwith a low aerodynamic drag androunded front design helps optimizeperformance and fuel economy.
Note:For high altitude operation,reduce the gross combined weight by2% per 1,000 ft (300 m) starting at the1,000 ft (300 m) elevation point.
Note:Certain states require electrictrailer brakes for trailers over a specifiedweight. Be sure to check stateregulations for this specified weight. Themaximum trailer weights listed may belimited to this specified weight, as thevehicle’s electrical system may notinclude the wiring connector needed to
activate electric trailer brakes.
Your vehicle may tow a trailer providedthe maximum trailer weight is less thanor equal to the maximum trailer weightlisted for your vehicle configuration onthe following chart.
To calculate the maximum loaded trailerweight for your vehicle:
1.Start with the gross combined weightrating for your vehicle model andaxle ratio. See the following chart.
2.Subtract all of the following that
apply to your vehicle:
•Vehicle curb weight
•Hitch hardware weight, such as adraw bar, ball, locks or weightdistributing
•Driver weight
•Passenger(s) weight
•Payload, cargo and luggageweight
•Aftermarket equipment weight.
3. This equals the maximum loadedtrailer weight for this combination.
Note:The trailer tongue load figuresinto the payload for your vehicle.Reduce the total payload by the finaltrailer tongue weight.
310
Navigator (TB9) Canada/United States of America, enUSA, Edition date: 201708, Third-Printing-
Towing