tow LINCOLN NAVIGATOR 2019 Owners Manual
[x] Cancel search | Manufacturer: LINCOLN, Model Year: 2019, Model line: NAVIGATOR, Model: LINCOLN NAVIGATOR 2019Pages: 645, PDF Size: 5.02 MB
Page 5 of 645
Liftgate
Power Liftgate.................................................79
Security
Passive Anti-Theft System...........................83
Anti-Theft Alarm - Vehicles With: InteriorSensor..........................................................85
Anti-Theft Alarm - Vehicles With: Anti-TheftAlarm System.............................................86
Power Running Boards
Using Power Running Boards .....................87
Steering Wheel
Adjusting the Steering Wheel....................89
Audio Control.................................................90
Voice Control..................................................90
Cruise Control................................................90
Information Display Control.........................91
Heated Steering Wheel...............................92
Pedals
Adjusting the Pedals.....................................93
Wipers and Washers
Autowipers......................................................94
Windshield Washers.....................................95
Rear Window Wiper and Washers............95
Lighting
General Information......................................97
Lighting Control..............................................97
Autolamps.......................................................98
Instrument Lighting Dimmer.......................99
Headlamp Exit Delay....................................99
Daytime Running Lamps..............................99
Automatic High Beam Control.................100
Front Fog Lamps...........................................101
Headlamp Leveling......................................101
Adaptive Headlamps...................................101
Direction Indicators.....................................102
Welcome Lighting........................................102
Interior Lamps...............................................103
Ambient Lighting..........................................104
Windows and Mirrors
Power Windows............................................105
Global Opening and Closing....................106
Exterior Mirrors.............................................106
Interior Mirror................................................108
Childminder Mirror.......................................109
Toll Reader.....................................................109
Sun Visors.......................................................110
Moonroof.........................................................110
Liftgate Window..............................................111
Instrument Cluster
Gauges.............................................................113
Warning Lamps and Indicators..................114
Audible Warnings and Indicators..............119
Information Displays
General Information....................................120
Information Messages................................125
Head Up Display..........................................148
Climate Control
Automatic Climate Control........................152
Hints on Controlling the Interior Climate.......................................................................154
2
Navigator (TB9) Canada/United States of America, enUSA, Edition date: 201808, First-Printing
Table of Contents
Page 7 of 645
Using Traction Control................................231
Stability Control
Principle of Operation................................232
Using Stability Control...............................233
Hill Descent Control
Principle of Operation................................235
Using Hill Descent Control.......................235
Parking Aids
Principle of Operation................................236
Rear Parking Aid..........................................237
Front Parking Aid........................................238
Side Sensing System.................................239
Active Park Assist.......................................240
Rear View Camera......................................249
360 Degree Camera..................................252
Cruise Control
Principle of Operation................................255
Using Cruise Control..................................255
Using Adaptive Cruise Control................256
Driving Aids
Driver Alert....................................................264
Lane Keeping System................................265
Blind Spot Information System.................271
Cross Traffic Alert........................................275
Steering.........................................................279
Pre-Collision Assist.....................................280
Drive Mode Control....................................284
Load Carrying
Rear Under Floor Storage.........................287
Cargo Nets....................................................289
Roof Racks and Load Carriers.................290
Load Limit......................................................292
Towing
Towing a Trailer............................................297
Trailer Reversing Aids................................298
Trailer Sway Control...................................308
Recommended Towing Weights.............309
Essential Towing Checks.............................311
Towing the Vehicle on Four Wheels.......319
Driving Hints
Breaking-In....................................................323
Reduced Engine Performance.................323
Economical Driving.....................................323
Driving Through Water..............................324
Floor Mats.....................................................324
Roadside Emergencies
Roadside Assistance..................................326
Hazard Flashers...........................................327
Fuel Shutoff...................................................327
Jump Starting the Vehicle.........................328
Post-Crash Alert System...........................330
Transporting the Vehicle............................331
Towing Points................................................331
Customer Assistance
Getting the Services You Need...............333
In California (U.S. Only)..............................334
The Better Business Bureau (BBB) AutoLine Program (U.S. Only).......................335
Utilizing the Mediation/Arbitration Program(Canada Only)..........................................336
4
Navigator (TB9) Canada/United States of America, enUSA, Edition date: 201808, First-Printing
Table of Contents
Page 18 of 645
PROTECTING THE ENVIRONMENT
You should play your part in protecting theenvironment. Correct vehicle usage and theauthorized disposal of waste, cleaning andlubrication materials are significant stepstoward this aim.
For details about Ford Motor Company'ssustainability progress and initiatives visit:
Web Address
www.sustainability.ford.com
15
Navigator (TB9) Canada/United States of America, enUSA, Edition date: 201808, First-Printing
Environment
Page 21 of 645
GENERAL INFORMATION
See the following sections for directions onhow to properly use safety restraints forchildren.
WARNING: Always make sure yourchild is secured properly in a device thatis appropriate for their height, age andweight. Child safety restraints must bebought separately from your vehicle.Failure to follow these instructions andguidelines may result in an increased riskof serious injury or death to your child.
WARNING: All children are shapeddifferently. The National Highway TrafficSafety Administration and other safetyorganizations, base their recommendationsfor child restraints on probable child height,age and weight thresholds, or on theminimum requirements of the law. Werecommend that you check with a NHTSACertified Child Passenger SafetyTechnician (CPST) to make sure that youproperly install the child restraint in yourvehicle and that you consult yourpediatrician to make sure you have a childrestraint appropriate for your child. Tolocate a child restraint fitting station andCPST, contact NHTSA toll free at
1-888-327-4236 or go towww.nhtsa.dot.gov. In Canada, contactTransport Canada toll free at1-800-333-0371 or go to www.tc.gc.ca tofind a Child Car Seat Clinic in your area.Failure to properly restrain children in childrestraints made especially for their height,age and weight, may result in an increasedrisk of serious injury or death to your child.
WARNING: On hot days, thetemperature inside the vehicle can risevery quickly. Exposure of people or animalsto these high temperatures for even a shorttime can cause death or serious heatrelated injuries, including brain damage.Small children are particularly at risk.
18
Navigator (TB9) Canada/United States of America, enUSA, Edition date: 201808, First-Printing
Child Safety
Page 24 of 645
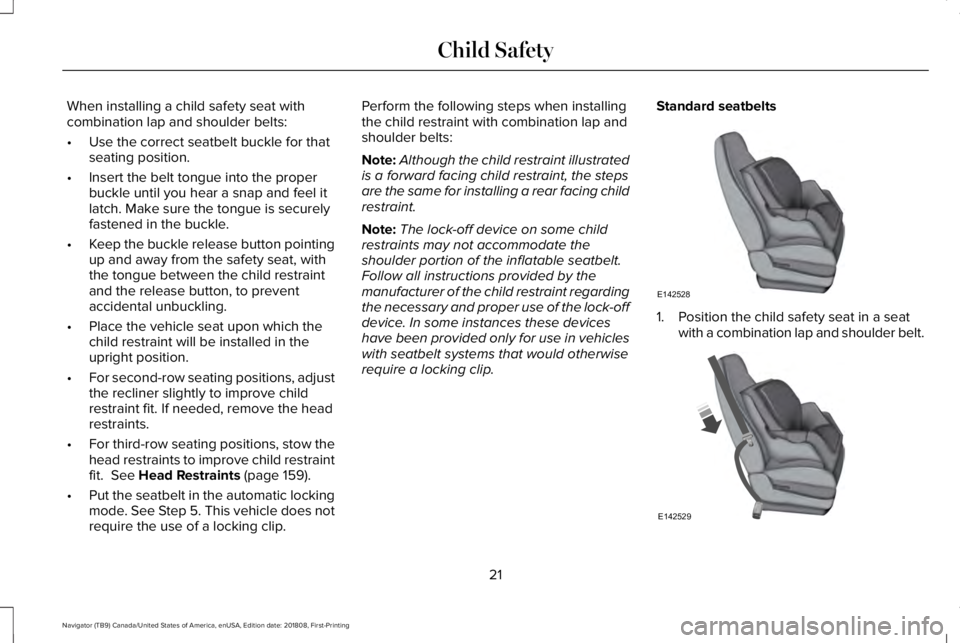
When installing a child safety seat withcombination lap and shoulder belts:
•Use the correct seatbelt buckle for thatseating position.
•Insert the belt tongue into the properbuckle until you hear a snap and feel itlatch. Make sure the tongue is securelyfastened in the buckle.
•Keep the buckle release button pointingup and away from the safety seat, withthe tongue between the child restraintand the release button, to preventaccidental unbuckling.
•Place the vehicle seat upon which thechild restraint will be installed in theupright position.
•For second-row seating positions, adjustthe recliner slightly to improve childrestraint fit. If needed, remove the headrestraints.
•For third-row seating positions, stow thehead restraints to improve child restraintfit. See Head Restraints (page 159).
•Put the seatbelt in the automatic lockingmode. See Step 5. This vehicle does notrequire the use of a locking clip.
Perform the following steps when installingthe child restraint with combination lap andshoulder belts:
Note:Although the child restraint illustratedis a forward facing child restraint, the stepsare the same for installing a rear facing childrestraint.
Note:The lock-off device on some childrestraints may not accommodate theshoulder portion of the inflatable seatbelt.Follow all instructions provided by themanufacturer of the child restraint regardingthe necessary and proper use of the lock-offdevice. In some instances these deviceshave been provided only for use in vehicleswith seatbelt systems that would otherwiserequire a locking clip.
Standard seatbelts
1. Position the child safety seat in a seatwith a combination lap and shoulder belt.
21
Navigator (TB9) Canada/United States of America, enUSA, Edition date: 201808, First-Printing
Child SafetyE142528 E142529
Page 26 of 645
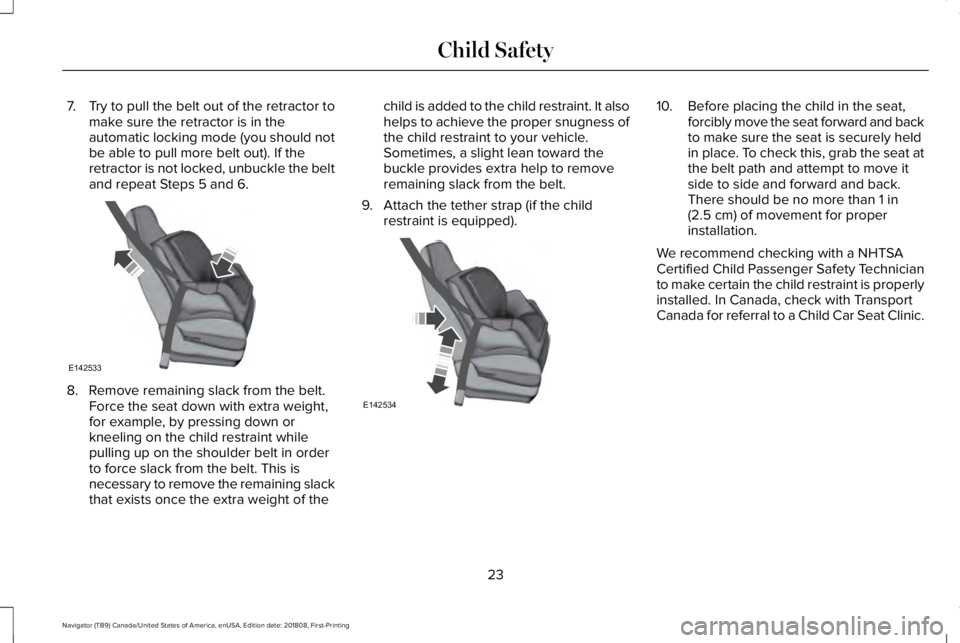
7.Try to pull the belt out of the retractor tomake sure the retractor is in theautomatic locking mode (you should notbe able to pull more belt out). If theretractor is not locked, unbuckle the beltand repeat Steps 5 and 6.
8. Remove remaining slack from the belt.Force the seat down with extra weight,for example, by pressing down orkneeling on the child restraint whilepulling up on the shoulder belt in orderto force slack from the belt. This isnecessary to remove the remaining slackthat exists once the extra weight of the
child is added to the child restraint. It alsohelps to achieve the proper snugness ofthe child restraint to your vehicle.Sometimes, a slight lean toward thebuckle provides extra help to removeremaining slack from the belt.
9. Attach the tether strap (if the childrestraint is equipped).
10. Before placing the child in the seat,forcibly move the seat forward and backto make sure the seat is securely heldin place. To check this, grab the seat atthe belt path and attempt to move itside to side and forward and back.There should be no more than 1 in(2.5 cm) of movement for properinstallation.
We recommend checking with a NHTSACertified Child Passenger Safety Technicianto make certain the child restraint is properlyinstalled. In Canada, check with TransportCanada for referral to a Child Car Seat Clinic.
23
Navigator (TB9) Canada/United States of America, enUSA, Edition date: 201808, First-Printing
Child SafetyE142533 E142534
Page 29 of 645
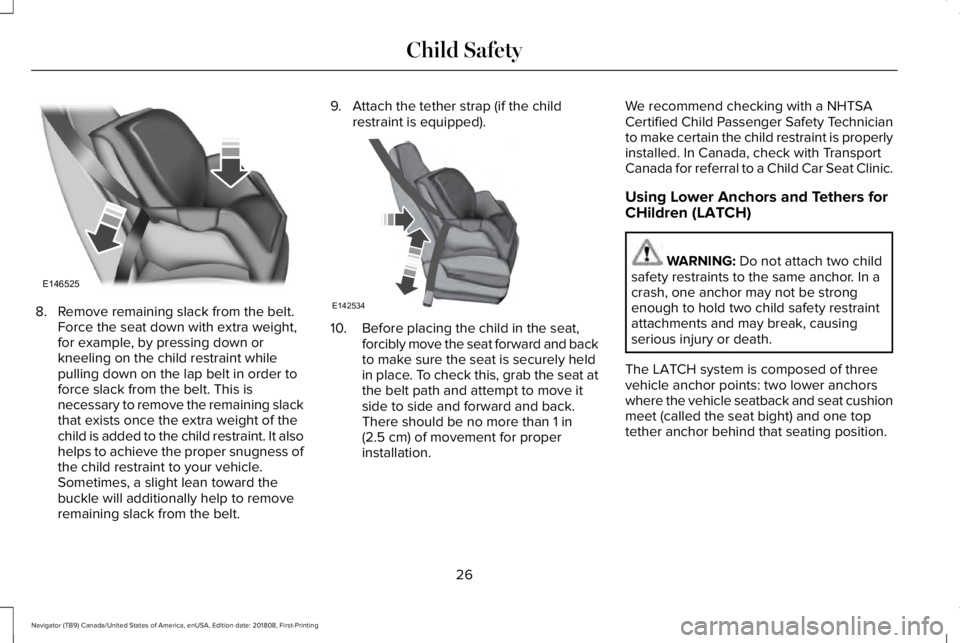
8. Remove remaining slack from the belt.Force the seat down with extra weight,for example, by pressing down orkneeling on the child restraint whilepulling down on the lap belt in order toforce slack from the belt. This isnecessary to remove the remaining slackthat exists once the extra weight of thechild is added to the child restraint. It alsohelps to achieve the proper snugness ofthe child restraint to your vehicle.Sometimes, a slight lean toward thebuckle will additionally help to removeremaining slack from the belt.
9. Attach the tether strap (if the childrestraint is equipped).
10. Before placing the child in the seat,forcibly move the seat forward and backto make sure the seat is securely heldin place. To check this, grab the seat atthe belt path and attempt to move itside to side and forward and back.There should be no more than 1 in(2.5 cm) of movement for properinstallation.
We recommend checking with a NHTSACertified Child Passenger Safety Technicianto make certain the child restraint is properlyinstalled. In Canada, check with TransportCanada for referral to a Child Car Seat Clinic.
Using Lower Anchors and Tethers for
CHildren (LATCH)
WARNING: Do not attach two childsafety restraints to the same anchor. In acrash, one anchor may not be strongenough to hold two child safety restraintattachments and may break, causingserious injury or death.
The LATCH system is composed of threevehicle anchor points: two lower anchorswhere the vehicle seatback and seat cushionmeet (called the seat bight) and one toptether anchor behind that seating position.
26
Navigator (TB9) Canada/United States of America, enUSA, Edition date: 201808, First-Printing
Child SafetyE146525 E142534
Page 39 of 645
If the booster seat slides on the vehicle seatupon which it is being used, placing arubberized mesh sold as shelf or carpet linerunder the booster seat may improve thiscondition. Do not introduce any item thickerthan this under the booster seat. Check withthe booster seat manufacturer's instructions.
CHILD RESTRAINT POSITIONING
WARNING: Do not place a rearwardfacing child restraint in front of an activeairbag. Failure to follow this instructioncould result in personal injury or death.
WARNING: Properly secure children12 years old and under in a rear seatingposition whenever possible. If you areunable to properly secure all children in arear seating position, properly secure thelargest child on the front seat. If you mustuse a forward facing child restraint on thefront seat, move the seat as far back aspossible. Failure to follow theseinstructions could result in personal injuryor death.
WARNING: Always carefully followthe instructions and warnings provided bythe manufacturer of any child restraint todetermine if the restraint device isappropriate for your child's size, height,weight, or age. Follow the child restraintmanufacturer's instructions and warningsprovided for installation and use inconjunction with the instructions andwarnings provided by your vehicle
manufacturer. A safety seat that isimproperly installed or utilized, isinappropriate for your child's height, age,or weight or does not properly fit the childmay increase the risk of serious injury ordeath.
WARNING: Do not allow a passengerto hold a child on their lap when yourvehicle is moving. Failure to follow thisinstruction could result in personal injuryor death in the event of a sudden stop orcrash.
WARNING: Do not use pillows, booksor towels to boost your child's height.Failure to follow this instruction could resultin personal injury or death.
WARNING: Properly secure childrestraints or booster seats when they arenot in use. They could become projectilesin a sudden stop or crash. Failure to followthis instruction could result in personalinjury or death.
36
Navigator (TB9) Canada/United States of America, enUSA, Edition date: 201808, First-Printing
Child Safety
Page 46 of 645
length of webbing back toward the stowedposition. For rear seatbelts, recline the rearseat backrest or push the seat backrestcushion away from the seatbelt. Feed a smalllength of webbing back toward the stowedposition.
Automatic Locking Mode
In this mode, the shoulder belt automaticallypre-locks. The belt still retracts to removeany slack in the shoulder belt. The automaticlocking mode is not available on the driverseatbelt.
When to Use the Automatic Locking Mode
Use this mode when you install a child safetyseat, except a booster, in the passenger frontor rear seating positions. Properly restrainchildren 12 years old and under in a rearseating position whenever possible. SeeSeatbelts (page 39).
How to Use the Automatic Locking Mode
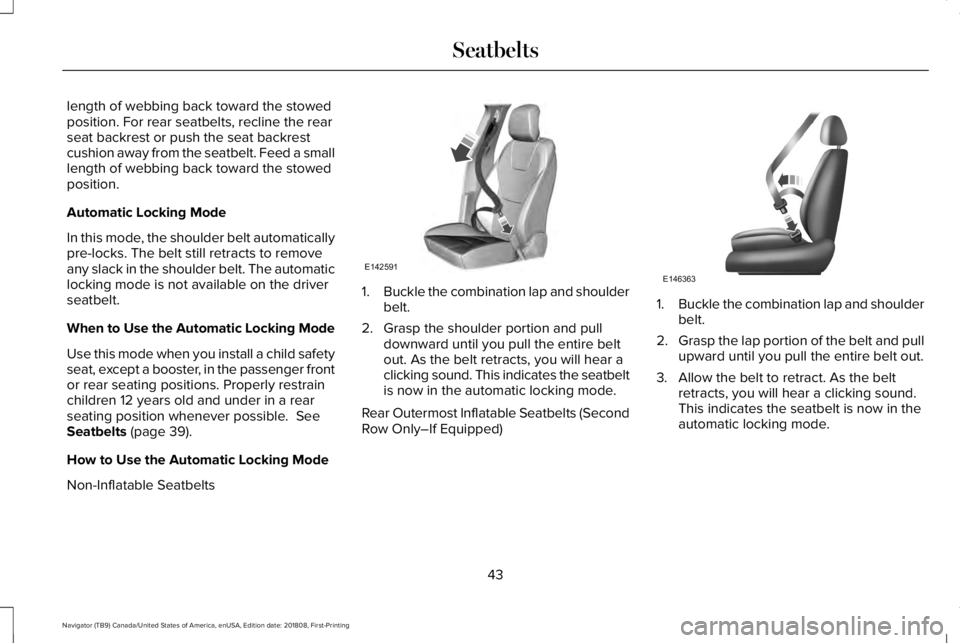
Non-Inflatable Seatbelts
1.Buckle the combination lap and shoulderbelt.
2. Grasp the shoulder portion and pulldownward until you pull the entire beltout. As the belt retracts, you will hear aclicking sound. This indicates the seatbeltis now in the automatic locking mode.
Rear Outermost Inflatable Seatbelts (SecondRow Only–If Equipped)
1.Buckle the combination lap and shoulderbelt.
2.Grasp the lap portion of the belt and pullupward until you pull the entire belt out.
3. Allow the belt to retract. As the beltretracts, you will hear a clicking sound.This indicates the seatbelt is now in theautomatic locking mode.
43
Navigator (TB9) Canada/United States of America, enUSA, Edition date: 201808, First-Printing
SeatbeltsE142591 E146363
Page 58 of 645
The front passenger sensing system workswith sensors that are part of the frontpassenger seat and seatbelt. The sensorsare designed to detect the presence of aproperly seated occupant and determine ifthe front passenger frontal airbag should beenabled.
•When the front passenger sensingsystem enables the front passengerfrontal airbag (may inflate), the passengerairbag status indicator illuminates the onlamp and remains illuminated.
If a person of adult size is sitting in the frontpassenger seat, but the passenger airbagstatus indicator off lamp is lit, it is possiblethat the person is not sitting properly in theseat. If this happens:
•Switch your vehicle off and ask theperson to place the seatback in anupright position.
•Have the person sit upright in the seat,centered on the seat cushion, with theperson's legs comfortably extended.
•Restart your vehicle and have the personremain in this position for about twominutes. This allows the system to detectthat person and enable the passengerfrontal airbag.
•If the indicator off lamp remains lit evenafter this, you should advise the personto ride in the rear seat.
Note:When the passenger airbag statusindicator off lamp illuminates, the passengerside airbag (seat mounted) may be disabledto avoid the risk of airbag deploymentissues.
After all occupants have adjusted their seatsand put on seatbelts, it is very important thatthey continue to sit properly. A properlyseated occupant sits upright, leaning againstthe seatback, and centered on the seatcushion, with their feet comfortably extendedon the floor. Sitting improperly can increasethe chance of injury in a crash event. Forexample, if an occupant slouches, lies down,turns sideways, sits forward, leans forwardor sideways, or puts one or both feet up, thechance of injury during a crash greatlyincreases.
If you think that the state of the passengerairbag status indicator lamp is incorrect,check for the following:
•Objects lodged underneath the seat.
•Objects between the seat cushion andthe center console.
•Objects hanging off the seat backrest.
•Objects stowed in the seat backrest mappocket.
•Objects placed on the occupant's lap.
•Cargo interference with the seat
•Other passengers pushing or pulling onthe seat.
•Rear passenger feet and knees restingor pushing on the seat.
The conditions listed above may cause theweight of a properly seated occupant to beincorrectly interpreted by the front passengersensing system. The person in the frontpassenger seat may appear heavier or lighterdue to the conditions described in theprevious list.
55
Navigator (TB9) Canada/United States of America, enUSA, Edition date: 201808, First-Printing
Supplementary Restraints System