light LINCOLN NAVIGATOR 2020 User Guide
[x] Cancel search | Manufacturer: LINCOLN, Model Year: 2020, Model line: NAVIGATOR, Model: LINCOLN NAVIGATOR 2020Pages: 622, PDF Size: 6.47 MB
Page 62 of 622
The driver and passenger front airbag system
consists of:
•
Driver and passenger airbag modules.
• Front passenger sensing system. · Crash sensors and monitoring
system with readiness indicator.
See Crash Sensors and Airbag
Indicator (page 65).
Proper Driver and Front Passenger
Seating Adjustment WARNING:
National Highway Traffic
Safety Administration (NHTSA)
recommends a minimum distance of at
least
10 in (25 cm) between an occupant's
chest and the driver airbag module.
To properly position yourself away from the
airbag:
• Move your seat to the rear as far as you
can while still reaching the pedals
comfortably.
• Recline the seat slightly (one or two
degrees) from the upright position. After all occupants have adjusted their seats
and put on seatbelts, it is very important that
they continue to sit properly. Properly seated
occupants sit upright, lean against the seat
back, and center themselves on the seat
cushion, with their feet comfortably extended
on the floor. Sitting improperly can increase
the chance of injury in a crash event. For
example, if an occupant slouches, lies down,
turns sideways, sits forward, leans forward
or sideways, or puts one or both feet up, the
chance of injury during a crash greatly
increases.
Children and Airbags
WARNING: Airbags can kill or injure
a child in a child restraint. Never place a
rear-facing child restraint in front of an
active airbag. If you must use a
forward-facing child restraint in the front
seat, move the seat upon which the child
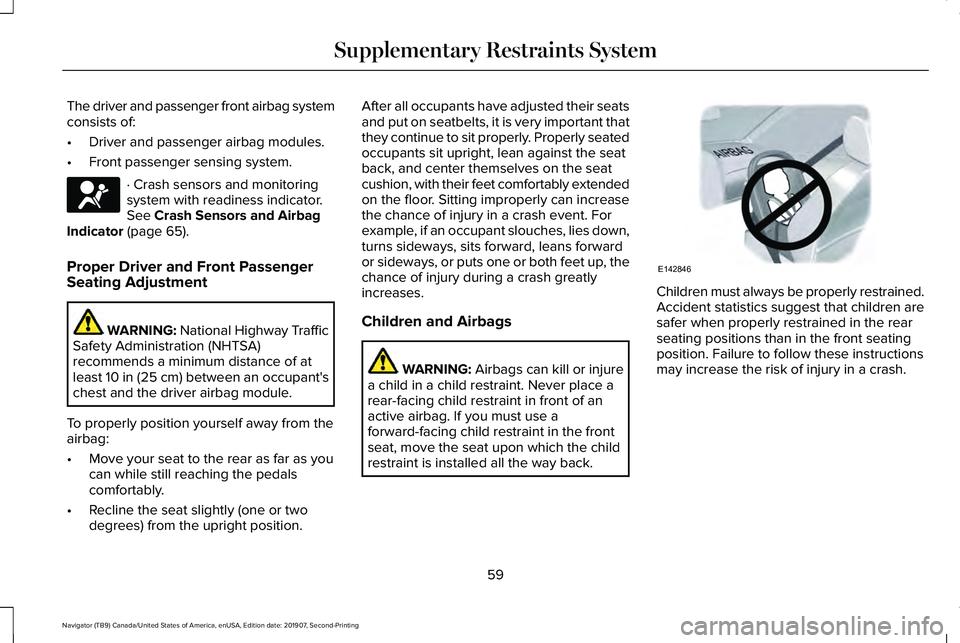
restraint is installed all the way back. Children must always be properly restrained.
Accident statistics suggest that children are
safer when properly restrained in the rear
seating positions than in the front seating
position. Failure to follow these instructions
may increase the risk of injury in a crash.
59
Navigator (TB9) Canada/United States of America, enUSA, Edition date: 201907, Second-Printing Supplementary Restraints SystemE67017 E142846
Page 64 of 622
The front passenger sensing system works
with sensors that are part of the front
passenger seat and seatbelt. The sensors
are designed to detect the presence of a
properly seated occupant and determine if
the front passenger frontal airbag should be
enabled.
•
When the front passenger sensing
system enables the front passenger
frontal airbag (may inflate), the passenger
airbag status indicator illuminates the on
lamp and remains illuminated.
If a person of adult size is sitting in the front
passenger seat, but the passenger airbag
status indicator off lamp is lit, it is possible
that the person is not sitting properly in the
seat. If this happens:
• Switch your vehicle off and ask the
person to place the seat backrest in an
upright position.
• Have the person sit upright in the seat,
centered on the seat cushion, with the
person's legs comfortably extended. •
Restart your vehicle and have the person
remain in this position for about two
minutes. This allows the system to detect
that person and enable the passenger
frontal airbag.
• If the indicator off lamp remains lit even
after this, you should advise the person
to ride in the rear seat.
After all occupants have adjusted their seats
and put on seatbelts, it is very important that
they continue to sit properly. A properly
seated occupant sits upright, leaning against
the seat backrest, and centered on the seat
cushion, with their feet comfortably extended
on the floor. Sitting improperly can increase
the chance of injury in a crash event. For
example, if an occupant slouches, lies down,
turns sideways, sits forward, leans forward
or sideways, or puts one or both feet up, the
chance of injury during a crash greatly
increases. If you think that the state of the passenger
airbag status indicator lamp is incorrect,
check for the following:
•
Objects lodged underneath the seat.
• Objects between the seat cushion and
the center console.
• Objects hanging off the seat backrest.
• Objects stowed in the seat backrest map
pocket.
• Objects placed on the occupant's lap.
• Cargo interference with the seat.
• Other passengers pushing or pulling on
the seat.
• Rear passenger feet and knees resting
or pushing on the seat.
The conditions listed above may cause the
weight of a properly seated occupant to be
incorrectly interpreted by the front passenger
sensing system. The person in the front
passenger seat may appear heavier or lighter
due to the conditions described in the
previous list.
61
Navigator (TB9) Canada/United States of America, enUSA, Edition date: 201907, Second-Printing Supplementary Restraints System
Page 65 of 622
Make sure the front passenger
sensing system is operating
properly. See Crash Sensors and
Airbag Indicator (page 65).
If the airbag readiness light is lit, do the
following:
The driver and adult passengers should
check for objects lodged underneath the
front passenger seat or cargo interfering with
the seat.
If objects are lodged or cargo is interfering
with the seat, take the following steps to
remove the obstruction:
• Pull your vehicle over.
• Switch your vehicle off.
• Driver or adult passengers should check
for any objects lodged underneath the
front passenger seat or cargo interfering
with the seat.
• Remove the obstruction(s) (if found).
• Restart your vehicle. •
Wait at least two minutes and verify that
the airbag readiness light in the
instrument cluster is no longer
illuminated.
• If the airbag readiness light in the
instrument cluster remains illuminated,
this may or may not be a problem due to
the front passenger sensing system.
Do not attempt to repair or service the
system. Take your vehicle immediately to an
authorized dealer.
If it is necessary to modify an advanced front
airbag system to accommodate a person
with disabilities, contact your Customer
Relationship Center. SIDE AIRBAGS WARNING: Do not place objects or
mount equipment on or near the airbag
cover, on the side of the front or rear
seatbacks, or in areas that may come into
contact with a deploying airbag. Failure to
follow these instructions may increase the
risk of personal injury in the event of a
crash. WARNING:
Do not use accessory
seat covers. The use of accessory seat
covers may prevent the deployment of the
side airbags and increase the risk of injury
in an accident. WARNING:
Do not lean your head
on the door. The side airbag could injure
you as it deploys from the side of the
seatback.
62
Navigator (TB9) Canada/United States of America, enUSA, Edition date: 201907, Second-Printing Supplementary Restraints SystemE67017
Page 68 of 622
The design and development of the Safety
Canopy included recommended testing
procedures that were developed by a group
of automotive safety experts known as the
Side Airbag Technical Working Group. These
recommended testing procedures help
reduce the risk of injuries related to the
deployment of side airbags (including the
Safety Canopy).
CRASH SENSORS AND AIRBAG
INDICATOR
WARNING: Modifying or adding
equipment to the front end of your vehicle
(including hood, bumper system, frame,
front end body structure, tow hooks and
hood pins) may affect the performance of
the airbag system, increasing the risk of
injury. Do not modify or add equipment to
the front end of your vehicle. Your vehicle has a collection of crash and
occupant sensors which provide information
to the restraints control module which
deploys (activates) the front seatbelt
pretensioners, the adaptive steering column,
driver airbag, passenger airbag, rear
inflatable belts, seat mounted side airbags,
and the Safety Canopy. Based on the type
of crash, the restraints control module will
deploy the appropriate safety devices.
The restraints control module also monitors
the readiness of the above safety devices
plus the crash and occupant sensors. The
readiness of the safety system is indicated
by a warning indicator light in the instrument
cluster or by a backup tone if the warning
light is not working. See Instrument Cluster
(page
126). Routine maintenance of the
airbag is not required.
A difficulty with the system is indicated by
one or more of the following: The readiness light will not
illuminate immediately after you
switch the ignition on.•
The readiness light either flashes or stays
lit.
• A series of five beeps will be heard. The
tone pattern will repeat periodically until
the problem, the light or both are
repaired.
If any of these things happen, even
intermittently, have the supplemental
restraint system serviced at an authorized
dealer immediately. Unless serviced, the
system may not function properly in the
event of a crash.
65
Navigator (TB9) Canada/United States of America, enUSA, Edition date: 201907, Second-Printing Supplementary Restraints SystemE67017
Page 101 of 622
USING POWER RUNNING BOARDS
WARNING: In extreme climates,
excessive ice buildup may occur, causing
the running boards not to deploy. Make
sure that the running boards have
deployed, and have finished moving before
attempting to step on them. The running
boards will resume normal function once
the blockage is cleared. WARNING:
Switch off the running
boards before jacking or placing any object
under your vehicle. Never place your hand
between the extended running board and
your vehicle. A moving running board may
cause injury.
Note: Do not use the running boards, front
and rear hinge assemblies, running board
motors, or the running board underbody
mounts to lift your vehicle when jacking.
Always use proper jacking points.
Note: The running boards may operate more
slowly in cool temperatures. Note:
The running board mechanism may
trap debris such as mud, dirt, snow, ice and
salt. This may cause unwanted noise. If this
happens, manually set the running boards
to the deployed position. Then, wash the
system, in particular the front and rear hinge
arms, with a high-pressure car wash wand.
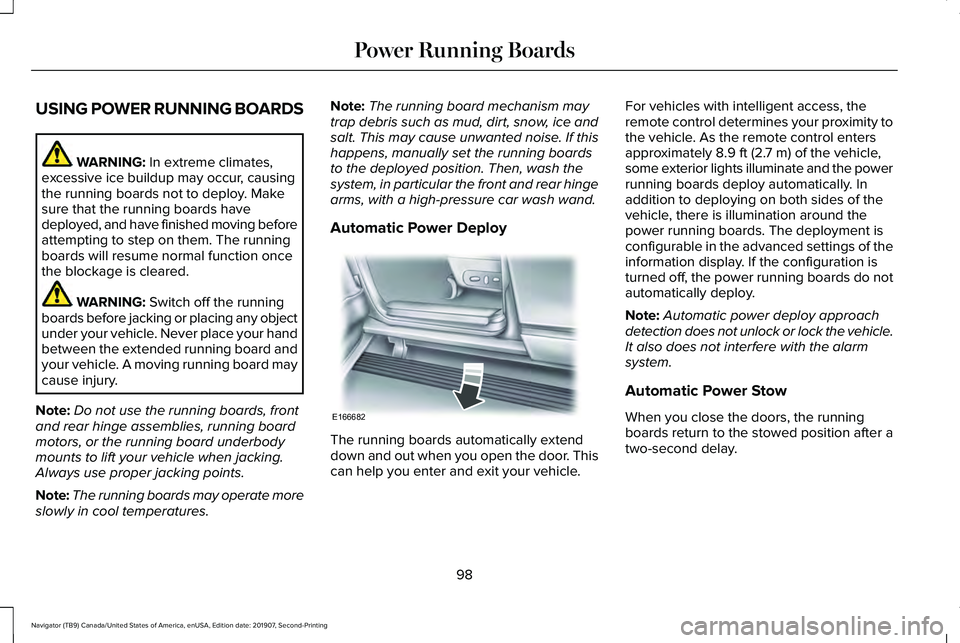
Automatic Power Deploy The running boards automatically extend
down and out when you open the door. This
can help you enter and exit your vehicle.For vehicles with intelligent access, the
remote control determines your proximity to
the vehicle. As the remote control enters
approximately
8.9 ft (2.7 m) of the vehicle,
some exterior lights illuminate and the power
running boards deploy automatically. In
addition to deploying on both sides of the
vehicle, there is illumination around the
power running boards. The deployment is
configurable in the advanced settings of the
information display. If the configuration is
turned off, the power running boards do not
automatically deploy.
Note: Automatic power deploy approach
detection does not unlock or lock the vehicle.
It also does not interfere with the alarm
system.
Automatic Power Stow
When you close the doors, the running
boards return to the stowed position after a
two-second delay.
98
Navigator (TB9) Canada/United States of America, enUSA, Edition date: 201907, Second-Printing Power Running BoardsE166682
Page 112 of 622
GENERAL INFORMATION
Condensation in the Exterior Front
Lamps and Rear Lamps
Exterior front lamps and rear lamps have
vents to accommodate normal changes in
air pressure.
Condensation can be a natural by-product
of this design. When moist air enters the
lamp assembly through the vents, there is a
possibility that condensation can occur when
the temperature is cold. When normal
condensation occurs, a fine mist can form on
the interior of the lens. The fine mist
eventually clears and exits through the vents
during normal operation.
Clearing time may take as long as 48 hours
under dry weather conditions.
Examples of acceptable condensation are:
•
The presence of a fine mist (no streaks,
drip marks or large droplets).
• A fine mist covers less than 50% of the
lens. Examples of unacceptable condensation are:
•
A water puddle inside the lamp.
• Streaks, drip marks or large droplets
present on the interior of the lens.
If you see any unacceptable condensation,
have your vehicle checked by an authorized
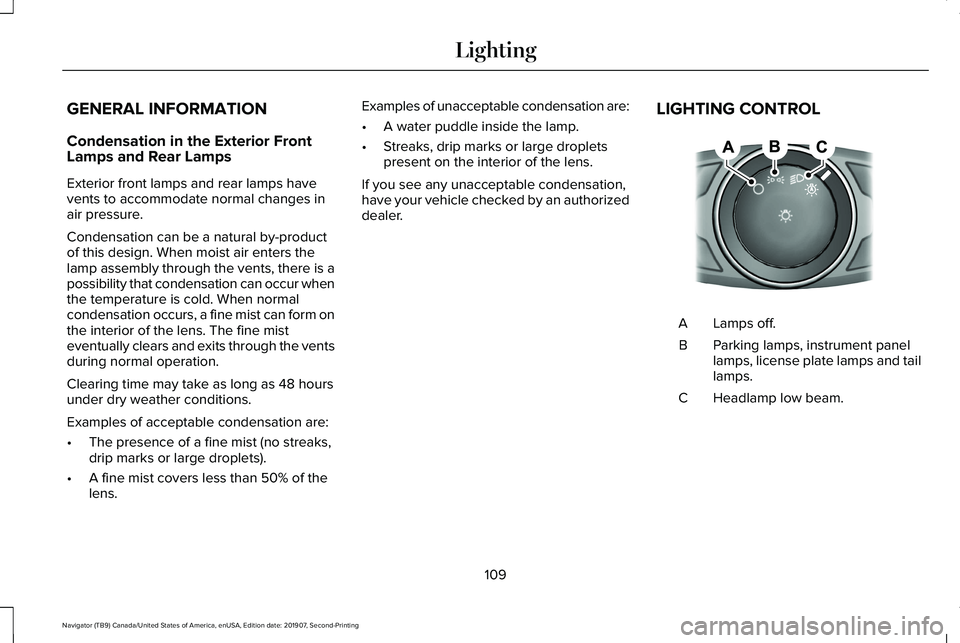
dealer. LIGHTING CONTROL Lamps off.
A
Parking lamps, instrument panel
lamps, license plate lamps and tail
lamps.
B
Headlamp low beam.
C
109
Navigator (TB9) Canada/United States of America, enUSA, Edition date: 201907, Second-Printing LightingE142449
Page 113 of 622
Headlamp High Beam
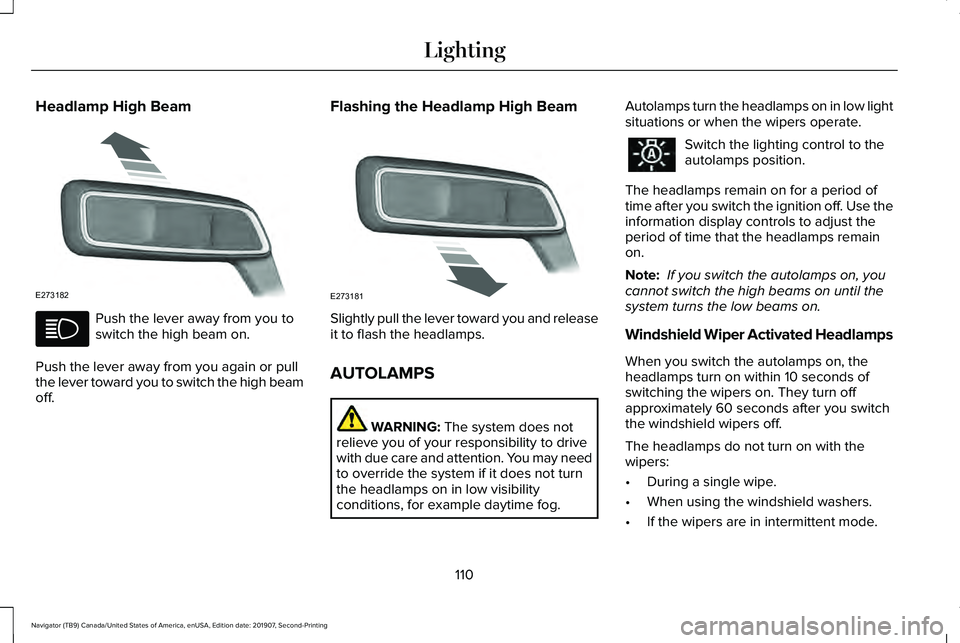
Push the lever away from you to
switch the high beam on.
Push the lever away from you again or pull
the lever toward you to switch the high beam
off. Flashing the Headlamp High Beam
Slightly pull the lever toward you and release
it to flash the headlamps.
AUTOLAMPS
WARNING: The system does not
relieve you of your responsibility to drive
with due care and attention. You may need
to override the system if it does not turn
the headlamps on in low visibility
conditions, for example daytime fog. Autolamps turn the headlamps on in low light
situations or when the wipers operate. Switch the lighting control to the
autolamps position.
The headlamps remain on for a period of
time after you switch the ignition off. Use the
information display controls to adjust the
period of time that the headlamps remain
on.
Note: If you switch the autolamps on, you
cannot switch the high beams on until the
system turns the low beams on.
Windshield Wiper Activated Headlamps
When you switch the autolamps on, the
headlamps turn on within 10 seconds of
switching the wipers on. They turn off
approximately 60 seconds after you switch
the windshield wipers off.
The headlamps do not turn on with the
wipers:
• During a single wipe.
• When using the windshield washers.
• If the wipers are in intermittent mode.
110
Navigator (TB9) Canada/United States of America, enUSA, Edition date: 201907, Second-Printing LightingE273182 E273181
Page 114 of 622
Note:
If you switch the autolamps and the
autowipers on, the headlamps turn on when
the windshield wipers continuously operate.
INSTRUMENT LIGHTING DIMMER
The instrument lighting dimmer buttons are
on the lighting control. Repeatedly press one of the
buttons to adjust the brightness.
HEADLAMP EXIT DELAY
After you switch the ignition off, you can
switch the headlamps on by pulling the
direction indicator lever toward you. You will
hear a short tone. The headlamps will switch
off automatically after three minutes with any
door open or 30 seconds after the last door
has been closed. You can cancel this feature
by pulling the direction indicator toward you
again or switching the ignition on. DAYTIME RUNNING LAMPS -
VEHICLES WITH: CONFIGURABLE
DAYTIME RUNNING LAMPS WARNING: The daytime running
lamps system does not activate the rear
lamps and may not provide adequate
lighting during low visibility driving
conditions. Make sure you switch the
headlamps on, as appropriate, during all
low visibility conditions. Failure to do so
may result in a crash.
Switch the daytime running lamps on or off
using the information display.
See General
Information (page 133).
The daytime running lamps turn on when:
1. The lamps are on in the information display.
2. You switch the ignition on.
3. The transmission is not in park (P) for vehicles with automatic transmissions or
you release the parking brake for
vehicles with manual transmissions. 4. The lighting control is in the autolamps
position.
5. The headlamps are off.
The other lighting control switch positions
do not turn on the daytime running lamps.
If the daytime running lamps are off in the
information display, the lamps stay off in all
switch positions.
DAYTIME RUNNING LAMPS -
VEHICLES WITH: DAYTIME
RUNNING LAMPS (DRL) WARNING: The daytime running
lamps system does not activate the rear
lamps and may not provide adequate
lighting during low visibility driving
conditions. Make sure you switch the
headlamps on, as appropriate, during all
low visibility conditions. Failure to do so
may result in a crash.
The system turns the lamps on in daylight
conditions.
111
Navigator (TB9) Canada/United States of America, enUSA, Edition date: 201907, Second-Printing LightingE291299 E291298
Page 115 of 622
To switch the system on, switch the lighting
control to any position except headlamps.
FRONT FOG LAMPS
Switching the Front Fog Lamps On or
Off
Only switch the front fog lamps on during
reduced visibility.
You can switch the front fog lamps on if any
of the following occur:
•
You set the lighting control to the parking
lamps position.
• You set the lighting control to the
headlamps position.
• You set the lighting control to the
autolamps position and the headlamps
are on.
The front fog lamp button is on the lighting
control. Press the button to switch the front
fog lamps on or off. Note:
The brightness of the daytime running
lamps may decrease when the front fog
lamps are switched on.
Front Fog Lamp Indicator It illuminates when you switch the
front fog lamps on.
HEADLAMP LEVELING
This vehicle is equipped with a dynamic
automatic leveling system. The headlamps
do not require additional aim adjustment.
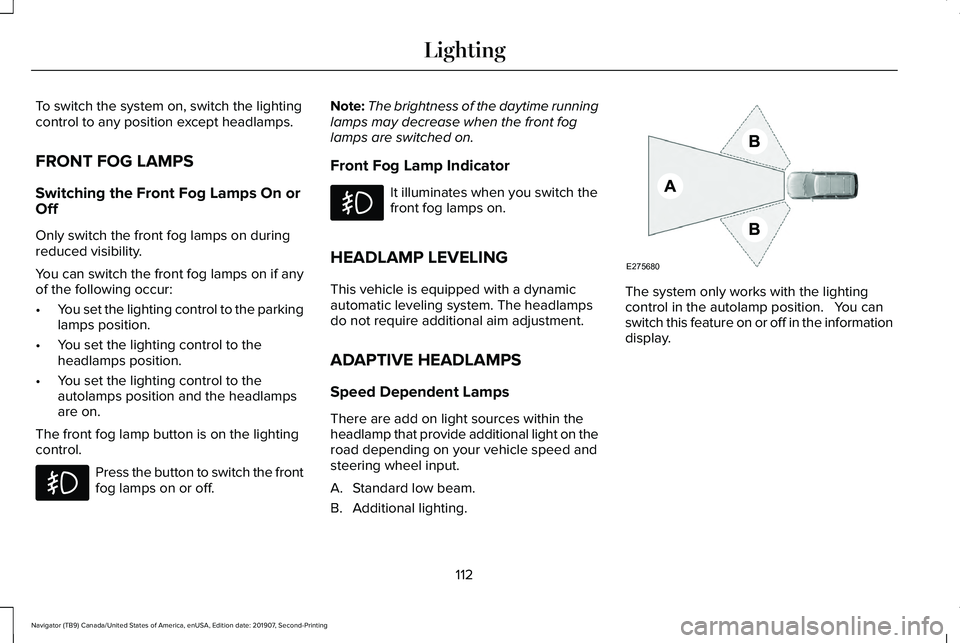
ADAPTIVE HEADLAMPS
Speed Dependent Lamps
There are add on light sources within the
headlamp that provide additional light on the
road depending on your vehicle speed and
steering wheel input.
A. Standard low beam.
B. Additional lighting. The system only works with the lighting
control in the autolamp position. You can
switch this feature on or off in the information
display.
112
Navigator (TB9) Canada/United States of America, enUSA, Edition date: 201907, Second-Printing Lighting E275680
Page 116 of 622
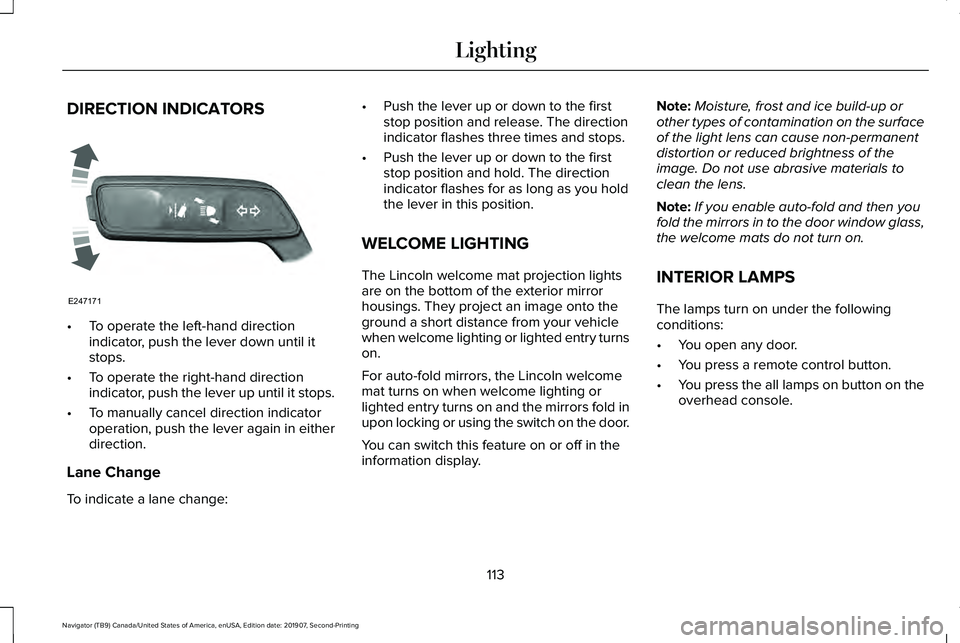
DIRECTION INDICATORS
•
To operate the left-hand direction
indicator, push the lever down until it
stops.
• To operate the right-hand direction
indicator, push the lever up until it stops.
• To manually cancel direction indicator
operation, push the lever again in either
direction.
Lane Change
To indicate a lane change: •
Push the lever up or down to the first
stop position and release. The direction
indicator flashes three times and stops.
• Push the lever up or down to the first
stop position and hold. The direction
indicator flashes for as long as you hold
the lever in this position.
WELCOME LIGHTING
The Lincoln welcome mat projection lights
are on the bottom of the exterior mirror
housings. They project an image onto the
ground a short distance from your vehicle
when welcome lighting or lighted entry turns
on.
For auto-fold mirrors, the Lincoln welcome
mat turns on when welcome lighting or
lighted entry turns on and the mirrors fold in
upon locking or using the switch on the door.
You can switch this feature on or off in the
information display. Note:
Moisture, frost and ice build-up or
other types of contamination on the surface
of the light lens can cause non-permanent
distortion or reduced brightness of the
image. Do not use abrasive materials to
clean the lens.
Note: If you enable auto-fold and then you
fold the mirrors in to the door window glass,
the welcome mats do not turn on.
INTERIOR LAMPS
The lamps turn on under the following
conditions:
• You open any door.
• You press a remote control button.
• You press the all lamps on button on the
overhead console.
113
Navigator (TB9) Canada/United States of America, enUSA, Edition date: 201907, Second-Printing LightingE247171