sensor LINCOLN NAVIGATOR 2020 User Guide
[x] Cancel search | Manufacturer: LINCOLN, Model Year: 2020, Model line: NAVIGATOR, Model: LINCOLN NAVIGATOR 2020Pages: 622, PDF Size: 6.47 MB
Page 87 of 622
you press the unlock button once. The
unlocking mode applies to the remote
control, keyless entry keypad and intelligent
access. You can also change between the
unlocking modes using the information
display. See General Information (page 133).
Reprogramming the Unlocking Function
Note:
When you press the unlock button,
either all the doors are unlocked or only the
driver door is unlocked. Pressing the unlock
button again unlocks all the doors.
Press and hold the unlock and lock buttons
on the remote control simultaneously for at
least four seconds with the ignition off. The
direction indicators flash twice to confirm the
change.
To return to the original unlocking function,
repeat the process.
Locking the Doors Press the button to lock all doors.
The direction indicators will flash. Press the button again within three seconds
to confirm that all the doors are closed. The
door lock again, the horn sounds and the
direction indicators flash if all the doors and
the liftgate are closed.
Note:
If the system does not function, use
the key blade to lock and unlock your
vehicle.
Mislock
If any door or the liftgate is open, or if
the hood is open on vehicles with an
anti-theft alarm or remote start, the horn
sounds twice and the direction
indicators do not flash. You can switch
this feature on or off in the information
display. See General Information (page
133).
Opening the Liftgate Press twice within three seconds
to open the liftgate.Activating Intelligent Access
General Information
You can unlock and lock the vehicle without
taking the keys out of your pocket or purse
when your intelligent access key is within
3 ft (1 m)
of your vehicle. Intelligent access
uses a sensor on the back of the door handle
for unlocking and a separate sensor on the
face of each door handle for locking.
The system does not function if:
• Your vehicle battery has no charge.
• The key battery has no charge.
• The key frequencies are jammed.
Note: The system may not function if the key
is close to metal objects or electronic
devices, for example keys or a cell phone.
Note: If the system does not function, use
the key blade to lock and unlock your
vehicle.
See Remote Control (page 69).
84
Navigator (TB9) Canada/United States of America, enUSA, Edition date: 201907, Second-Printing Doors and LocksE138623 E267940
Page 88 of 622
Unlocking Using Intelligent Access
With your intelligent access key within 3 ft
(1 m) of your vehicle, touch the unlock sensor
on the back of the door handle for a brief
period and then pull on the door handle to
unlock, being careful to not touch the lock
sensor at the same time or pulling the door
handle too quickly. The intelligent access
system requires a brief delay to authenticate
your intelligent access key fob.
Locking Using Intelligent Access With your intelligent access key within
3 ft
(1 m) of your vehicle, touch the outer door
handle lock sensor for approximately one
second to lock, being careful to not touch
the unlock sensor on the back of the door
handle at the same time. After locking, you
can immediately pull on the door handle to
confirm locking occurred without
inadvertently unlocking. At the Luggage Compartment With your intelligent access key within
3 ft
(1 m) of your vehicle, press the exterior
release button.
85
Navigator (TB9) Canada/United States of America, enUSA, Edition date: 201907, Second-Printing Doors and LocksE248553 E248554 E247050
Page 99 of 622
ANTI-THEFT ALARM (IF EQUIPPED)
The active anti-theft system is designed to
warn you in the event of unauthorized
vehicle entry and is also designed to help
prevent unwanted towing of your vehicle.
You can choose what is monitored by arming
the system in different ways.
See
Information Displays (page 133).
The direction indicators flash and the horn
sounds if the system triggers while the alarm
is armed.
Take all remote controls to an authorized
dealer if there is any potential alarm problem
with your vehicle.
Using the System
You can select two levels of alarm security.
You can change the level of security when
the ignition is switched off through the
information display with the two options
below: Perimeter Only (If Equipped)
Perimeter only monitors the following:
•
Doors.
• Hood.
• Liftgate.
All Sensors (If Equipped)
All sensors monitors the following:
• Doors.
• Hood.
• Liftgate.
• Movement inside your vehicle.
• Change in vehicle inclination, for
example, unwanted towing.
Note: Do not choose all sensors monitor
mode when the vehicle is in transport or if
movement within the vehicle is likely to
occur. Note:
For correct operation of the interior
motion detection system, make sure you
close all the windows prior to arming the
system. This helps prevent accidental alarm
activation due to external influences.
Additionally, the interior motion sensing
system does not arm if any door is ajar.
Arming the Alarm
The alarm is ready to arm when there is not
a key in the ignition. Lock your vehicle using
the remote control or keyless entry keypad.
You can also lock your vehicle using the lock
sensor on the exterior door handle if your
vehicle is equipped with intelligent access.
See
Locking and Unlocking (page 83).
The direction indicators flash once after you
lock your vehicle. This indicates the alarm is
in the pre-armed mode. It fully arms after 20
seconds.
96
Navigator (TB9) Canada/United States of America, enUSA, Edition date: 201907, Second-Printing Security
Page 100 of 622
Disarming the Alarm
Disarm the alarm by any of the following
actions:
•
Press the power door unlock button
within the 20-second pre-armed mode.
• Unlock the doors with the remote control
or keyless entry keypad. If equipped with
intelligent access, you can use the unlock
sensor on the exterior door handle. See
Locking and Unlocking (page 83).
• Switch the ignition on or start your
vehicle.
• Use a key in the driver door lock cylinder
to unlock your vehicle, then switch the
ignition on within 12 seconds.
97
Navigator (TB9) Canada/United States of America, enUSA, Edition date: 201907, Second-Printing Security
Page 106 of 622
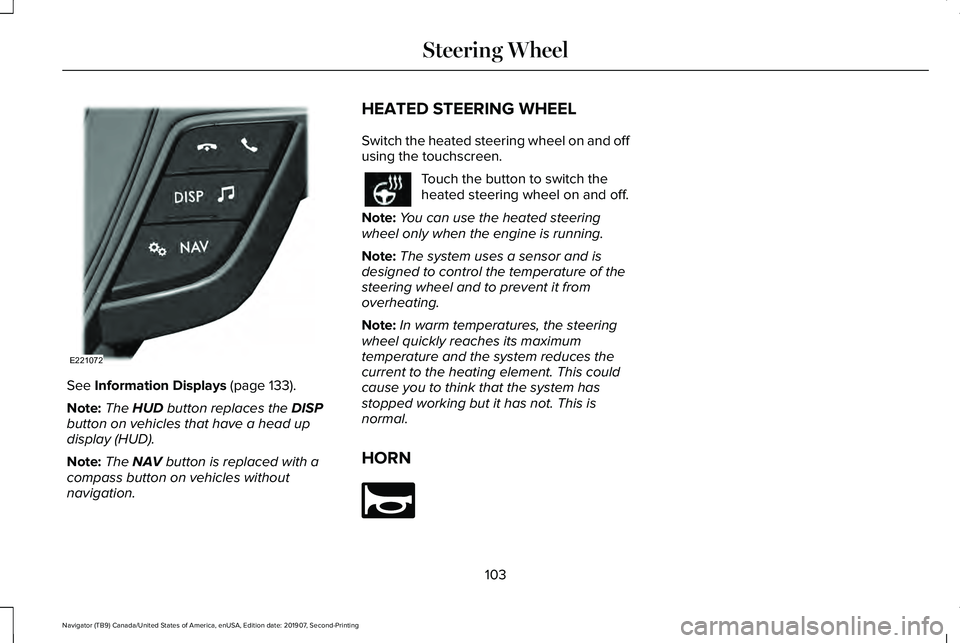
See Information Displays (page 133).
Note: The
HUD button replaces the DISP
button on vehicles that have a head up
display (HUD).
Note: The
NAV button is replaced with a
compass button on vehicles without
navigation. HEATED STEERING WHEEL
Switch the heated steering wheel on and off
using the touchscreen. Touch the button to switch the
heated steering wheel on and off.
Note: You can use the heated steering
wheel only when the engine is running.
Note: The system uses a sensor and is
designed to control the temperature of the
steering wheel and to prevent it from
overheating.
Note: In warm temperatures, the steering
wheel quickly reaches its maximum
temperature and the system reduces the
current to the heating element. This could
cause you to think that the system has
stopped working but it has not. This is
normal.
HORN 103
Navigator (TB9) Canada/United States of America, enUSA, Edition date: 201907, Second-Printing Steering WheelE221072 E270945
Page 109 of 622
AUTOWIPERS
Wet or winter driving conditions with ice,
snow or salty road mist can cause
inconsistent and unexpected wiping or
smearing.
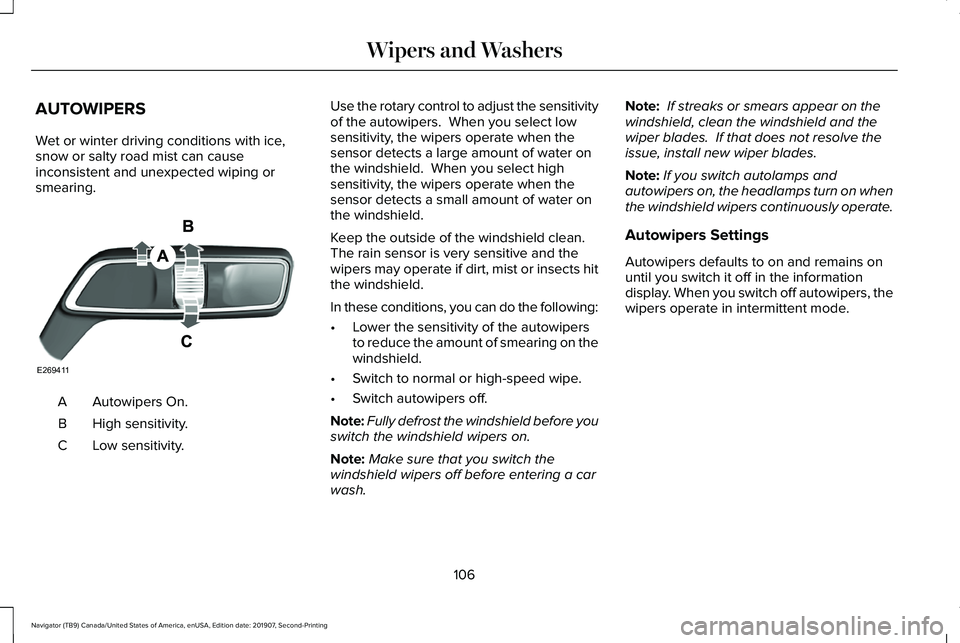
Autowipers On.
A
High sensitivity.
B
Low sensitivity.
C Use the rotary control to adjust the sensitivity
of the autowipers. When you select low
sensitivity, the wipers operate when the
sensor detects a large amount of water on
the windshield. When you select high
sensitivity, the wipers operate when the
sensor detects a small amount of water on
the windshield.
Keep the outside of the windshield clean.
The rain sensor is very sensitive and the
wipers may operate if dirt, mist or insects hit
the windshield.
In these conditions, you can do the following:
•
Lower the sensitivity of the autowipers
to reduce the amount of smearing on the
windshield.
• Switch to normal or high-speed wipe.
• Switch autowipers off.
Note: Fully defrost the windshield before you
switch the windshield wipers on.
Note: Make sure that you switch the
windshield wipers off before entering a car
wash. Note:
If streaks or smears appear on the
windshield, clean the windshield and the
wiper blades. If that does not resolve the
issue, install new wiper blades.
Note: If you switch autolamps and
autowipers on, the headlamps turn on when
the windshield wipers continuously operate.
Autowipers Settings
Autowipers defaults to on and remains on
until you switch it off in the information
display. When you switch off autowipers, the
wipers operate in intermittent mode.
106
Navigator (TB9) Canada/United States of America, enUSA, Edition date: 201907, Second-Printing Wipers and WashersE269411
Page 119 of 622
WHAT IS AUTOMATIC HIGH BEAM
CONTROL
The system turns on high beams if it is dark
enough and no other traffic is present. If it
detects an approaching vehicle
’s headlamps
or tail lamps, or street lighting ahead, the
system turns the high beams off. Low beams
remain on.
A camera sensor, centrally mounted behind
the windshield of your vehicle, continuously
monitors conditions to turn the high beams
on and off.
SWITCHING AUTOMATIC HIGH
BEAM CONTROL ON AND OFF
Switch the system on or off using the
information display. See General
Information (page 133). Activating the Automatic High Beam
Control Switch the lighting control to the
autolamps position to activate.
See
Autolamps (page 110).
Note: Automatic high beams are not
available when autolamps are not turned
on.
When active, the high beams turn on if:
• The ambient light level is low enough.
• There is no traffic in front of your vehicle.
• The vehicle speed is greater than
approximately
32 mph (52 km/h).
When active, the high beams turn off if:
• The ambient light level is high enough
that high beams are not required.
• The system detects an approaching
vehicle's headlamps or tail lamps.
• The system detects severe rain, snow or
fog.
• The camera is blocked.
• The vehicle speed falls below
approximately
27 mph (44 km/h). Note:
The deactivation speed is lower on
curves.
Note: High beam reactivation may be
delayed in certain curvy road situations.
Note: The system may not operate properly
if the sensor is blocked. Keep the windshield
free from obstruction or damage.
Note: The system may not operate properly
in cold or inclement conditions. You can
switch on the high beams by overriding the
system.
Note: If the system detects a blockage, for
example bird droppings, bug splatter, snow
or ice, the system goes into low beam mode
until you clear the blockage. A message may
appear in the information display if the
camera is blocked.
Note: Using much larger tires or equipping
vehicle accessories such as snowplows can
modify your vehicle's ride height and
degrade automatic high beam control
performance.
116
Navigator (TB9) Canada/United States of America, enUSA, Edition date: 201907, Second-Printing Automatic High Beam Control
Page 125 of 622
Auto-Dimming Mirror
Note:
Do not block the sensors on the front
and back of the mirror. A rear center
passenger or raised rear center head
restraint may also block light from reaching
the sensor.
The mirror dims to reduce the effect of bright
light from behind. It returns to normal when
the bright light from behind is no longer
present or if you shift into reverse (R).
CHILDMINDER MIRROR
On overhead consoles, the childminder
mirror allows the driver to view the rear
seating area. WARNING: Do not use the
childminder mirror to view rearward traffic,
do not allow rear passengers to distract
you from the driving task, and make sure
the rear view mirror has a clear view of
rearward traffic. Failure to do so could
increase the risk of a crash from an unseen
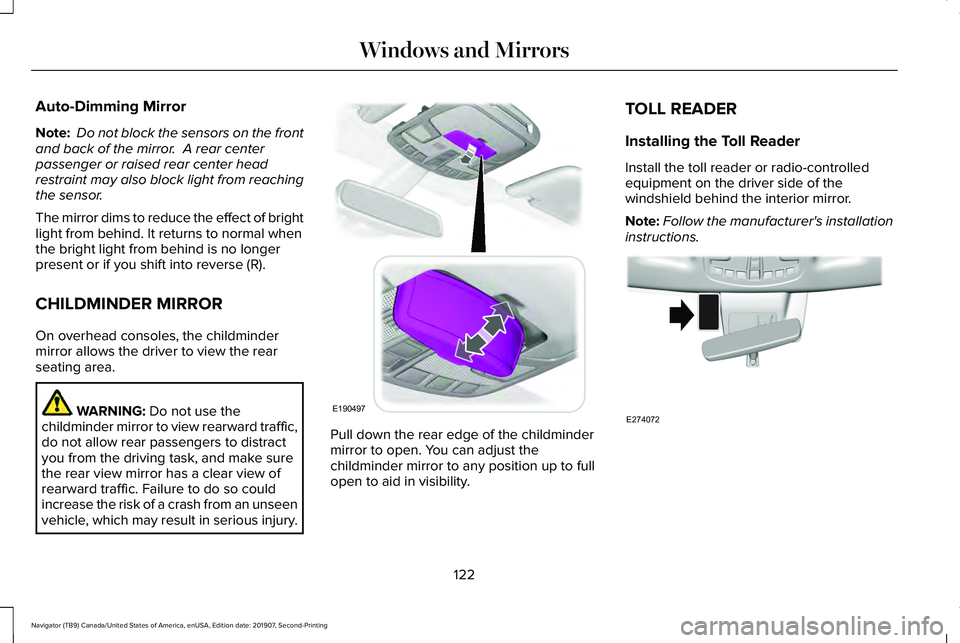
vehicle, which may result in serious injury. Pull down the rear edge of the childminder
mirror to open. You can adjust the
childminder mirror to any position up to full
open to aid in visibility.TOLL READER
Installing the Toll Reader
Install the toll reader or radio-controlled
equipment on the driver side of the
windshield behind the interior mirror.
Note:
Follow the manufacturer's installation
instructions. 122
Navigator (TB9) Canada/United States of America, enUSA, Edition date: 201907, Second-Printing Windows and MirrorsE190497 E274072
Page 142 of 622
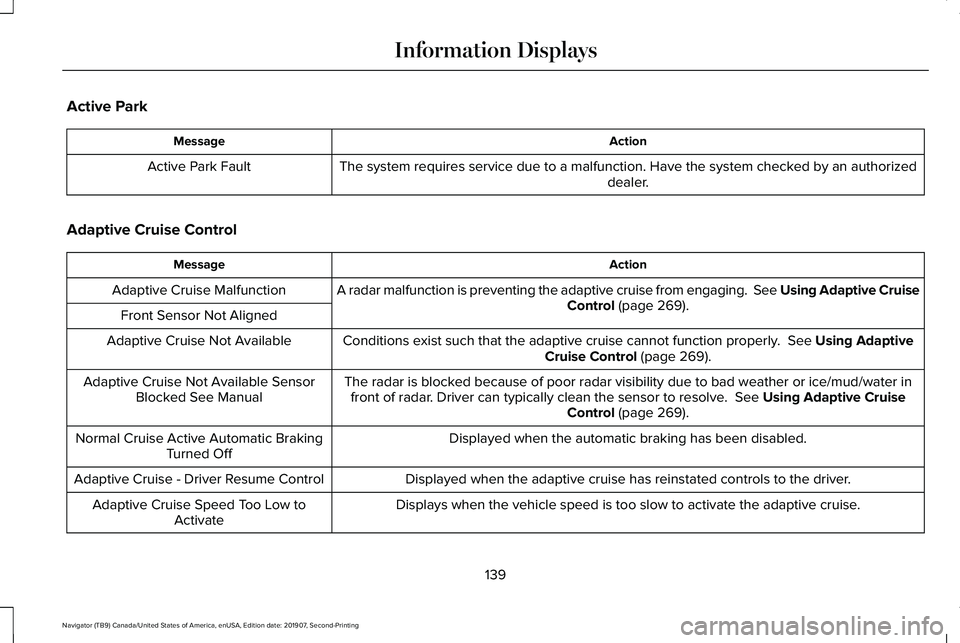
Active Park
Action
Message
The system requires service due to a malfunction. Have the system checked by an authorized dealer.
Active Park Fault
Adaptive Cruise Control Action
Message
A radar malfunction is preventing the adaptive cruise from engaging. Se\
e Using Adaptive Cruise Control (page 269).
Adaptive Cruise Malfunction
Front Sensor Not Aligned Conditions exist such that the adaptive cruise cannot function properly.
See Using Adaptive
Cruise Control (page 269).
Adaptive Cruise Not Available
The radar is blocked because of poor radar visibility due to bad weather or ice/mud/water \
infront of radar. Driver can typically clean the sensor to resolve.
See Using Adaptive Cruise
Control (page 269).
Adaptive Cruise Not Available Sensor
Blocked See Manual
Displayed when the automatic braking has been disabled.
Normal Cruise Active Automatic Braking
Turned Off
Displayed when the adaptive cruise has reinstated controls to the driver\
.
Adaptive Cruise - Driver Resume Control
Displays when the vehicle speed is too slow to activate the adaptive cru\
ise.
Adaptive Cruise Speed Too Low to
Activate
139
Navigator (TB9) Canada/United States of America, enUSA, Edition date: 201907, Second-Printing Information Displays
Page 145 of 622
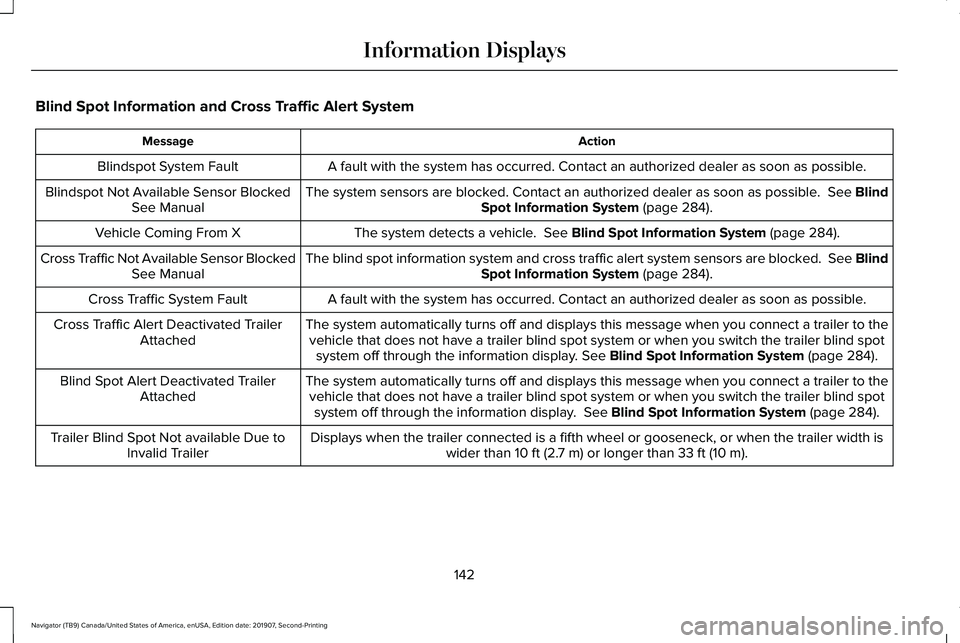
Blind Spot Information and Cross Traffic Alert System
Action
Message
A fault with the system has occurred. Contact an authorized dealer as so\
on as possible.
Blindspot System Fault
The system sensors are blocked. Contact an authorized dealer as soon as possible. See Blind
Spot Information System (page 284).
Blindspot Not Available Sensor Blocked
See Manual
The system detects a vehicle.
See Blind Spot Information System (page 284).
Vehicle Coming From X
The blind spot information system and cross traffic alert system sensors\
are blocked. See BlindSpot Information System
(page 284).
Cross Traffic Not Available Sensor Blocked
See Manual
A fault with the system has occurred. Contact an authorized dealer as so\
on as possible.
Cross Traffic System Fault
The system automatically turns off and displays this message when you co\
nnect a trailer to thevehicle that does not have a trailer blind spot system or when you switc\
h the trailer blind spot system off through the information display.
See Blind Spot Information System (page 284).
Cross Traffic Alert Deactivated Trailer
Attached
The system automatically turns off and displays this message when you co\
nnect a trailer to thevehicle that does not have a trailer blind spot system or when you switc\
h the trailer blind spot system off through the information display.
See Blind Spot Information System (page 284).
Blind Spot Alert Deactivated Trailer
Attached
Displays when the trailer connected is a fifth wheel or gooseneck, or wh\
en the trailer width iswider than
10 ft (2.7 m) or longer than 33 ft (10 m).
Trailer Blind Spot Not available Due to
Invalid Trailer
142
Navigator (TB9) Canada/United States of America, enUSA, Edition date: 201907, Second-Printing Information Displays