window LINCOLN NAVIGATOR 2020 Owner's Manual
[x] Cancel search | Manufacturer: LINCOLN, Model Year: 2020, Model line: NAVIGATOR, Model: LINCOLN NAVIGATOR 2020Pages: 622, PDF Size: 6.47 MB
Page 123 of 622
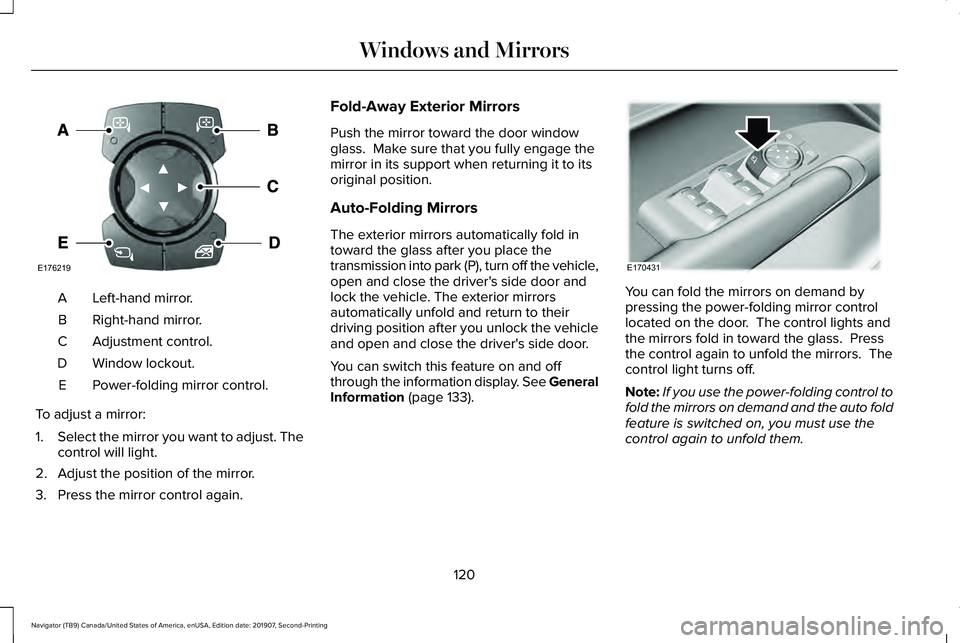
Left-hand mirror.
A
Right-hand mirror.
B
Adjustment control.
C
Window lockout.
D
Power-folding mirror control.
E
To adjust a mirror:
1. Select the mirror you want to adjust. The
control will light.
2. Adjust the position of the mirror.
3. Press the mirror control again. Fold-Away Exterior Mirrors
Push the mirror toward the door window
glass. Make sure that you fully engage the
mirror in its support when returning it to its
original position.
Auto-Folding Mirrors
The exterior mirrors automatically fold in
toward the glass after you place the
transmission into park (P), turn off the vehicle,
open and close the driver's side door and
lock the vehicle. The exterior mirrors
automatically unfold and return to their
driving position after you unlock the vehicle
and open and close the driver's side door.
You can switch this feature on and off
through the information display. See General
Information (page 133).
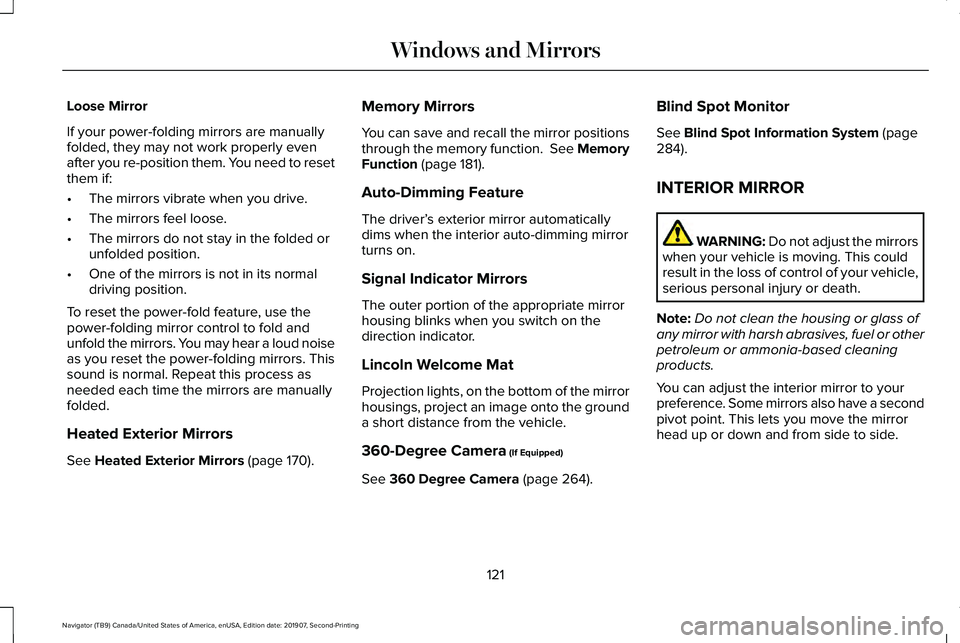
You can fold the mirrors on demand by
pressing the power-folding mirror control
located on the door. The control lights and
the mirrors fold in toward the glass. Press
the control again to unfold the mirrors. The
control light turns off.
Note:
If you use the power-folding control to
fold the mirrors on demand and the auto fold
feature is switched on, you must use the
control again to unfold them.
120
Navigator (TB9) Canada/United States of America, enUSA, Edition date: 201907, Second-Printing Windows and MirrorsE176219 E170431
Page 124 of 622
Loose Mirror
If your power-folding mirrors are manually
folded, they may not work properly even
after you re-position them. You need to reset
them if:
•
The mirrors vibrate when you drive.
• The mirrors feel loose.
• The mirrors do not stay in the folded or
unfolded position.
• One of the mirrors is not in its normal
driving position.
To reset the power-fold feature, use the
power-folding mirror control to fold and
unfold the mirrors. You may hear a loud noise
as you reset the power-folding mirrors. This
sound is normal. Repeat this process as
needed each time the mirrors are manually
folded.
Heated Exterior Mirrors
See Heated Exterior Mirrors (page 170). Memory Mirrors
You can save and recall the mirror positions
through the memory function. See Memory
Function
(page 181).
Auto-Dimming Feature
The driver’ s exterior mirror automatically
dims when the interior auto-dimming mirror
turns on.
Signal Indicator Mirrors
The outer portion of the appropriate mirror
housing blinks when you switch on the
direction indicator.
Lincoln Welcome Mat
Projection lights, on the bottom of the mirror
housings, project an image onto the ground
a short distance from the vehicle.
360-Degree Camera
(If Equipped)
See
360 Degree Camera (page 264). Blind Spot Monitor
See
Blind Spot Information System (page
284).
INTERIOR MIRROR WARNING: Do not adjust the mirrors
when your vehicle is moving. This could
result in the loss of control of your vehicle,
serious personal injury or death.
Note: Do not clean the housing or glass of
any mirror with harsh abrasives, fuel or other
petroleum or ammonia-based cleaning
products.
You can adjust the interior mirror to your
preference. Some mirrors also have a second
pivot point. This lets you move the mirror
head up or down and from side to side.
121
Navigator (TB9) Canada/United States of America, enUSA, Edition date: 201907, Second-Printing Windows and Mirrors
Page 125 of 622
Auto-Dimming Mirror
Note:
Do not block the sensors on the front
and back of the mirror. A rear center
passenger or raised rear center head
restraint may also block light from reaching
the sensor.
The mirror dims to reduce the effect of bright
light from behind. It returns to normal when
the bright light from behind is no longer
present or if you shift into reverse (R).
CHILDMINDER MIRROR
On overhead consoles, the childminder
mirror allows the driver to view the rear
seating area. WARNING: Do not use the
childminder mirror to view rearward traffic,
do not allow rear passengers to distract
you from the driving task, and make sure
the rear view mirror has a clear view of
rearward traffic. Failure to do so could
increase the risk of a crash from an unseen
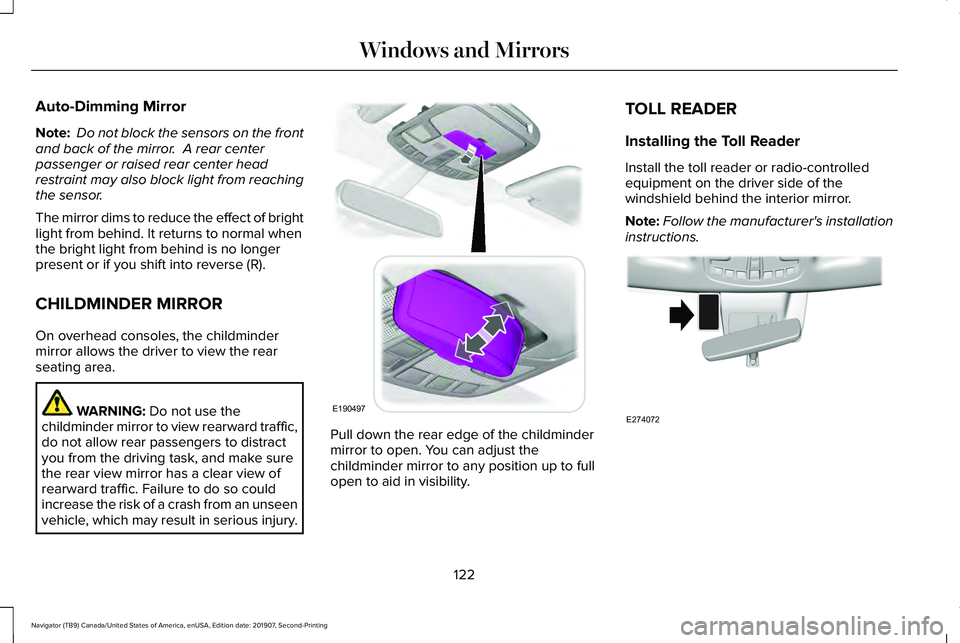
vehicle, which may result in serious injury. Pull down the rear edge of the childminder
mirror to open. You can adjust the
childminder mirror to any position up to full
open to aid in visibility.TOLL READER
Installing the Toll Reader
Install the toll reader or radio-controlled
equipment on the driver side of the
windshield behind the interior mirror.
Note:
Follow the manufacturer's installation
instructions. 122
Navigator (TB9) Canada/United States of America, enUSA, Edition date: 201907, Second-Printing Windows and MirrorsE190497 E274072
Page 126 of 622
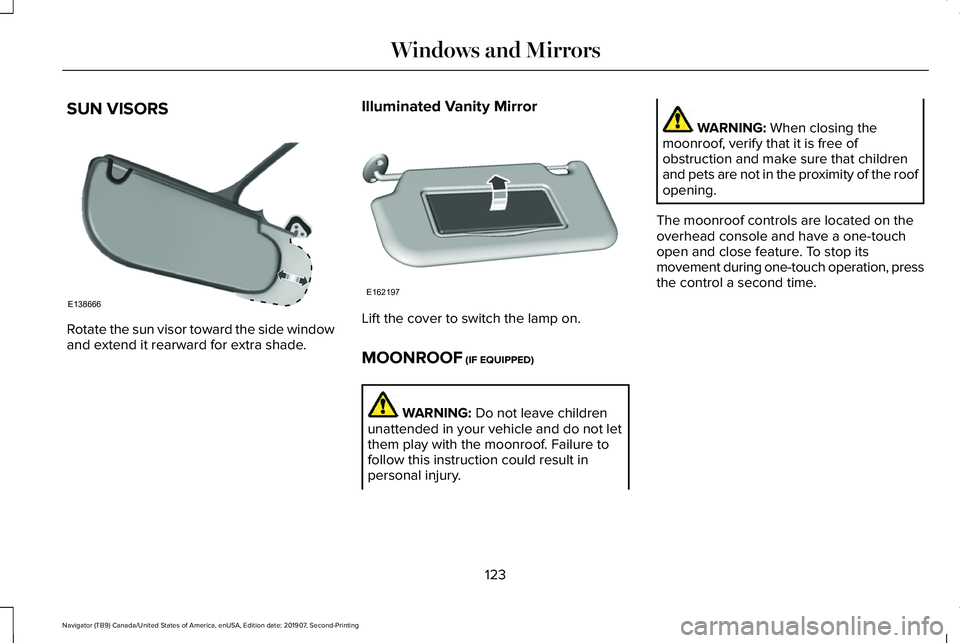
SUN VISORS
Rotate the sun visor toward the side window
and extend it rearward for extra shade.
Illuminated Vanity Mirror Lift the cover to switch the lamp on.
MOONROOF (IF EQUIPPED)
WARNING:
Do not leave children
unattended in your vehicle and do not let
them play with the moonroof. Failure to
follow this instruction could result in
personal injury. WARNING:
When closing the
moonroof, verify that it is free of
obstruction and make sure that children
and pets are not in the proximity of the roof
opening.
The moonroof controls are located on the
overhead console and have a one-touch
open and close feature. To stop its
movement during one-touch operation, press
the control a second time.
123
Navigator (TB9) Canada/United States of America, enUSA, Edition date: 201907, Second-Printing Windows and MirrorsE138666 E162197
Page 127 of 622
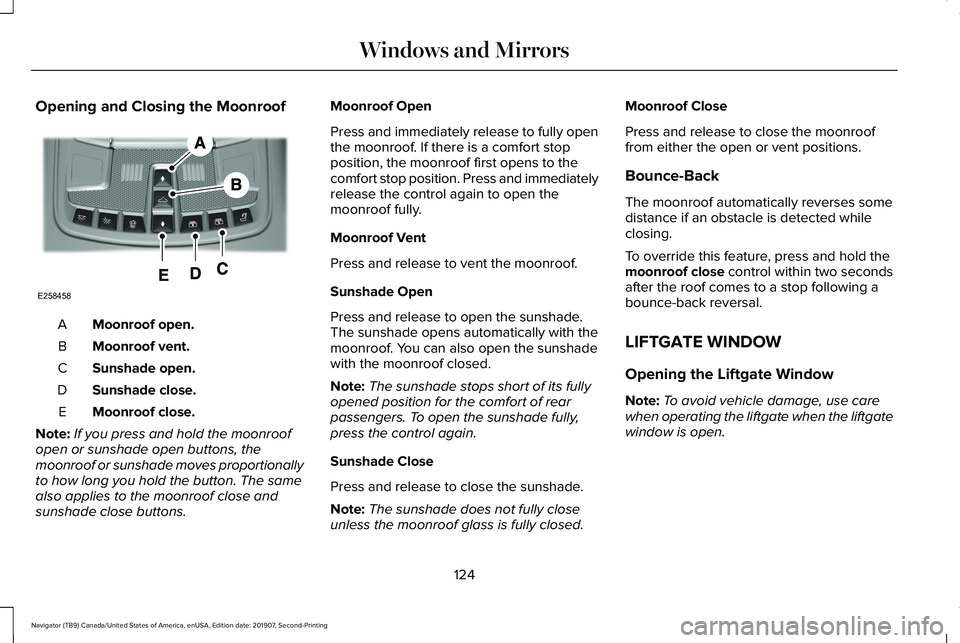
Opening and Closing the Moonroof
Moonroof open.
A
Moonroof vent.
B
Sunshade open.
C
Sunshade close.
D
Moonroof close.
E
Note: If you press and hold the moonroof
open or sunshade open buttons, the
moonroof or sunshade moves proportionally
to how long you hold the button. The same
also applies to the moonroof close and
sunshade close buttons. Moonroof Open
Press and immediately release to fully open
the moonroof. If there is a comfort stop
position, the moonroof first opens to the
comfort stop position. Press and immediately
release the control again to open the
moonroof fully.
Moonroof Vent
Press and release to vent the moonroof.
Sunshade Open
Press and release to open the sunshade.
The sunshade opens automatically with the
moonroof. You can also open the sunshade
with the moonroof closed.
Note:
The sunshade stops short of its fully
opened position for the comfort of rear
passengers. To open the sunshade fully,
press the control again.
Sunshade Close
Press and release to close the sunshade.
Note: The sunshade does not fully close
unless the moonroof glass is fully closed. Moonroof Close
Press and release to close the moonroof
from either the open or vent positions.
Bounce-Back
The moonroof automatically reverses some
distance if an obstacle is detected while
closing.
To override this feature, press and hold the
moonroof close control within two seconds
after the roof comes to a stop following a
bounce-back reversal.
LIFTGATE WINDOW
Opening the Liftgate Window
Note: To avoid vehicle damage, use care
when operating the liftgate when the liftgate
window is open.
124
Navigator (TB9) Canada/United States of America, enUSA, Edition date: 201907, Second-Printing Windows and MirrorsE258458
Page 128 of 622
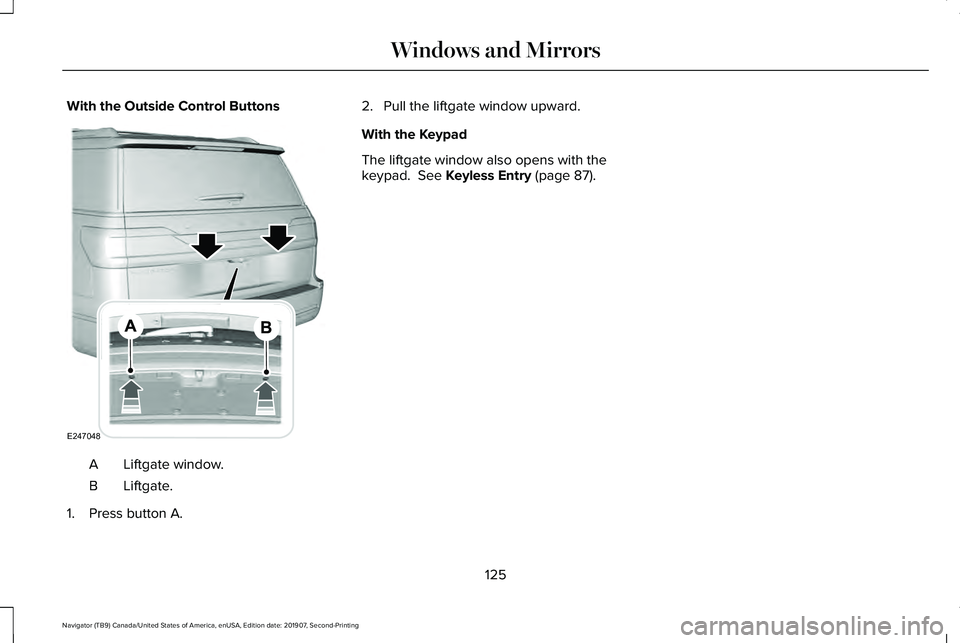
With the Outside Control Buttons
Liftgate window.
A
Liftgate.
B
1. Press button A. 2. Pull the liftgate window upward.
With the Keypad
The liftgate window also opens with the
keypad. See Keyless Entry (page 87).
125
Navigator (TB9) Canada/United States of America, enUSA, Edition date: 201907, Second-Printing Windows and MirrorsE247048
Page 140 of 622
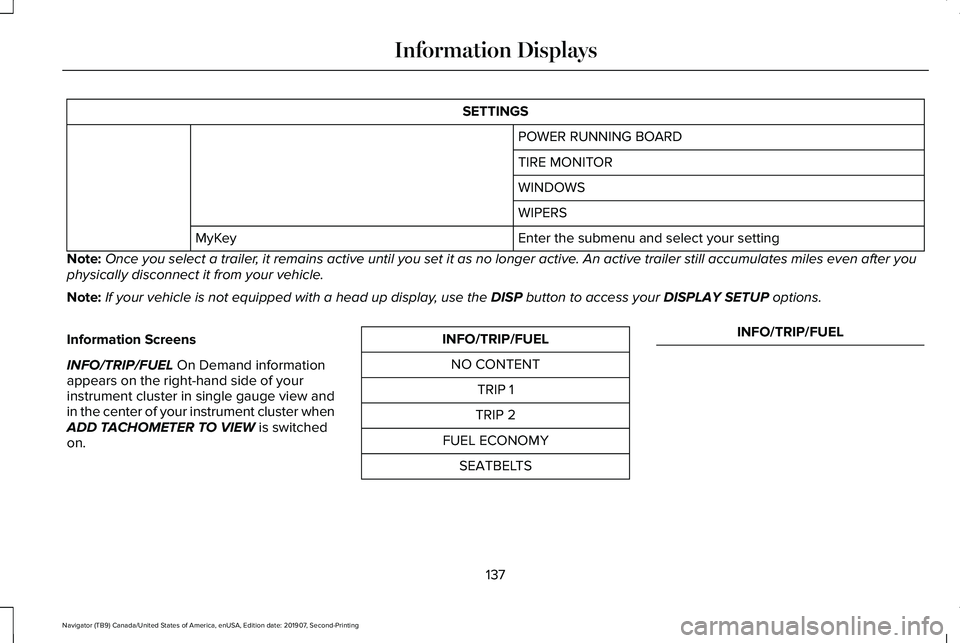
SETTINGS
POWER RUNNING BOARD
TIRE MONITOR
WINDOWS
WIPERS
Enter the submenu and select your setting
MyKey
Note: Once you select a trailer, it remains active until you set it as no longer active. An active trailer still accumulates miles even after you
physically disconnect it from your vehicle.
Note: If your vehicle is not equipped with a head up display, use the DISP button to access your DISPLAY SETUP options.
Information Screens
INFO/TRIP/FUEL
On Demand information
appears on the right-hand side of your
instrument cluster in single gauge view and
in the center of your instrument cluster when
ADD TACHOMETER TO VIEW
is switched
on. INFO/TRIP/FUEL
NO CONTENT TRIP 1
TRIP 2
FUEL ECONOMY SEATBELTS INFO/TRIP/FUEL
137
Navigator (TB9) Canada/United States of America, enUSA, Edition date: 201907, Second-Printing Information Displays
Page 167 of 622
Maintaining Your Head Up Display
•
Do not place objects onto the transparent
cover, as they may block you from seeing
portions of the image. These objects
could also damage the cover and affect
the quality of the projected image.
• The system uses a special windshield
designed to provide the optimum image
quality. You must replace the windshield
in a vehicle with this system with a
certified original equipment
manufactured (OEM) head up display
windshield. Replacing this system's
windshield with a non-head up display
windshield causes a double image or
distorted image. Have an authorized
dealer or authorized repair facility replace
the windshield.
• Light conditions such as oncoming
headlamps, sunrise, sunset or reflections
off of wet road surfaces can affect the
driver's ability to see the HUD image.
• Clean the windshield often for optimal
HUD performance. See Cleaning the
Windows and Wiper Blades (page 396).
164
Navigator (TB9) Canada/United States of America, enUSA, Edition date: 201907, Second-Printing Information Displays
Page 168 of 622
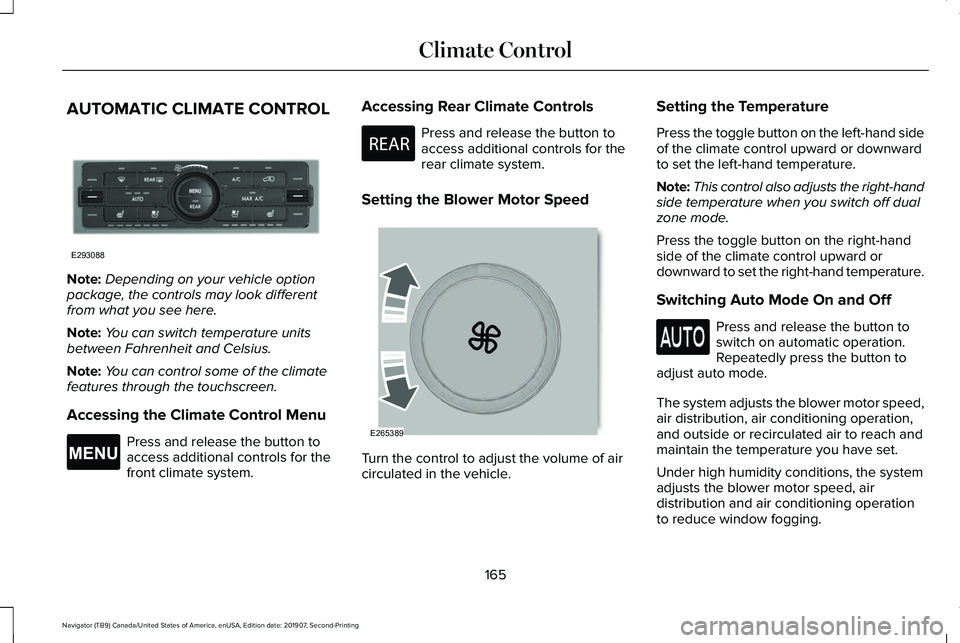
AUTOMATIC CLIMATE CONTROL
Note:
Depending on your vehicle option
package, the controls may look different
from what you see here.
Note: You can switch temperature units
between Fahrenheit and Celsius.
Note: You can control some of the climate
features through the touchscreen.
Accessing the Climate Control Menu Press and release the button to
access additional controls for the
front climate system. Accessing Rear Climate Controls Press and release the button to
access additional controls for the
rear climate system.
Setting the Blower Motor Speed Turn the control to adjust the volume of air
circulated in the vehicle.Setting the Temperature
Press the toggle button on the left-hand side
of the climate control upward or downward
to set the left-hand temperature.
Note:
This control also adjusts the right-hand
side temperature when you switch off dual
zone mode.
Press the toggle button on the right-hand
side of the climate control upward or
downward to set the right-hand temperature.
Switching Auto Mode On and Off Press and release the button to
switch on automatic operation.
Repeatedly press the button to
adjust auto mode.
The system adjusts the blower motor speed,
air distribution, air conditioning operation,
and outside or recirculated air to reach and
maintain the temperature you have set.
Under high humidity conditions, the system
adjusts the blower motor speed, air
distribution and air conditioning operation
to reduce window fogging.
165
Navigator (TB9) Canada/United States of America, enUSA, Edition date: 201907, Second-Printing Climate ControlE293088 E265038 E270447 E265389
Page 170 of 622
Note:
In certain conditions, such as
maximum defrost, the air conditioning
compressor may continue to operate even
though you switch off the air conditioning.
Switching Maximum Air Conditioning
On and Off Press and release the button for
maximum cooling.
The left-hand and right-hand settings set to
LO, recirculated air flows through the
instrument panel air vents, air conditioning
turns on and the blower motor adjusts to the
highest speed.
Switching Recirculated Air On and Off Press and release the button to
switch between outside air and
recirculated air.
The air currently in the passenger
compartment recirculates. This may reduce
the time needed to cool the interior, when
used with A/C, and reduce unwanted odors
from entering your vehicle. Note:
Recirculated air may turn off, or
prevent you from switching on, in all air flow
modes except MAX A/C to reduce the risk
of fogging. Recirculation may also turn on
and off in various air distribution control
combinations during hot weather to improve
cooling efficiency.
Switching the Heated Seats On and Off See
Heated Seats (page 191).
Switching the Ventilated Seats On and
Off See
Ventilated Seats (page 191).
HINTS ON CONTROLLING THE
INTERIOR CLIMATE
General Hints
Note: Prolonged use of recirculated air may
cause the windows to fog up. Note:
You may feel a small amount of air
from the footwell air vents regardless of the
air distribution setting.
Note: To reduce humidity build-up inside
your vehicle, do not drive with the system
switched off or with recirculated air always
switched on.
Note: Do not place objects under the front
seats as this may interfere with the airflow
to the rear seats.
Note: Remove any snow, ice or leaves from
the air intake area at the base of the
windshield.
Note: To improve the time to reach a
comfortable temperature in hot weather,
drive with the windows open until you feel
cold air through the air vents.
Automatic Climate Control
Note: Adjusting the settings when your
vehicle interior is extremely hot or cold is not
necessary. Automatic mode is best
recommended to maintain set temperature.
167
Navigator (TB9) Canada/United States of America, enUSA, Edition date: 201907, Second-Printing Climate Control E268558