brake sensor LINCOLN NAVIGATOR 2021 User Guide
[x] Cancel search | Manufacturer: LINCOLN, Model Year: 2021, Model line: NAVIGATOR, Model: LINCOLN NAVIGATOR 2021Pages: 639, PDF Size: 6.09 MB
Page 281 of 639
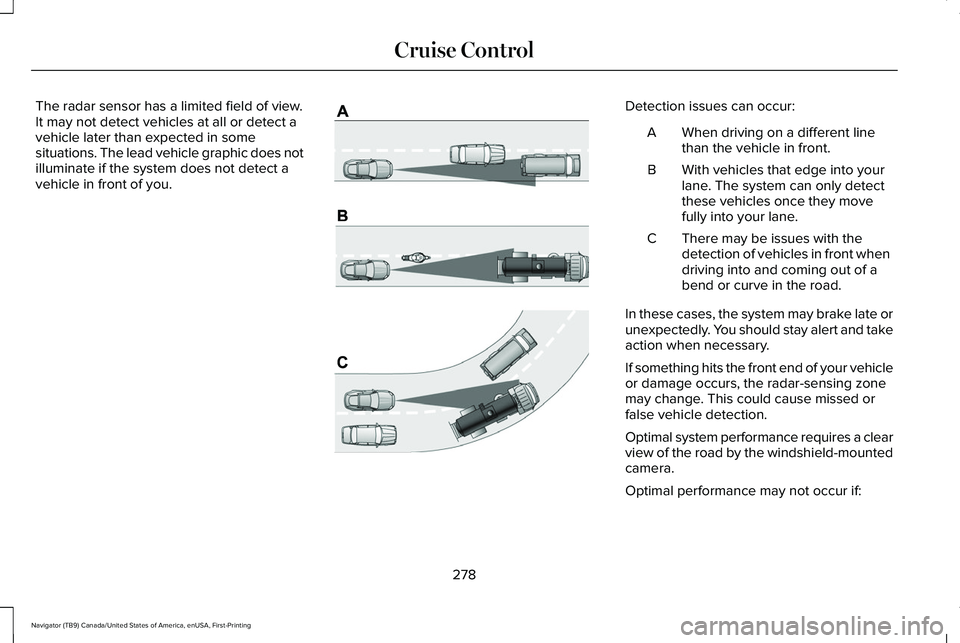
The radar sensor has a limited field of view.
It may not detect vehicles at all or detect a
vehicle later than expected in some
situations. The lead vehicle graphic does not
illuminate if the system does not detect a
vehicle in front of you. Detection issues can occur:
When driving on a different line
than the vehicle in front.
A
With vehicles that edge into your
lane. The system can only detect
these vehicles once they move
fully into your lane.
B
There may be issues with the
detection of vehicles in front when
driving into and coming out of a
bend or curve in the road.
C
In these cases, the system may brake late or
unexpectedly. You should stay alert and take
action when necessary.
If something hits the front end of your vehicle
or damage occurs, the radar-sensing zone
may change. This could cause missed or
false vehicle detection.
Optimal system performance requires a clear
view of the road by the windshield-mounted
camera.
Optimal performance may not occur if:
278
Navigator (TB9) Canada/United States of America, enUSA, First-Printing Cruise ControlE71621
Page 282 of 639
•
The camera is blocked.
• There is poor visibility or lighting
conditions.
• There are bad weather conditions.
System Not Available
Conditions that can cause the system to
deactivate or prevent the system from
activating when requested include:
• A blocked sensor.
• High brake temperature.
• A failure in the system or a related
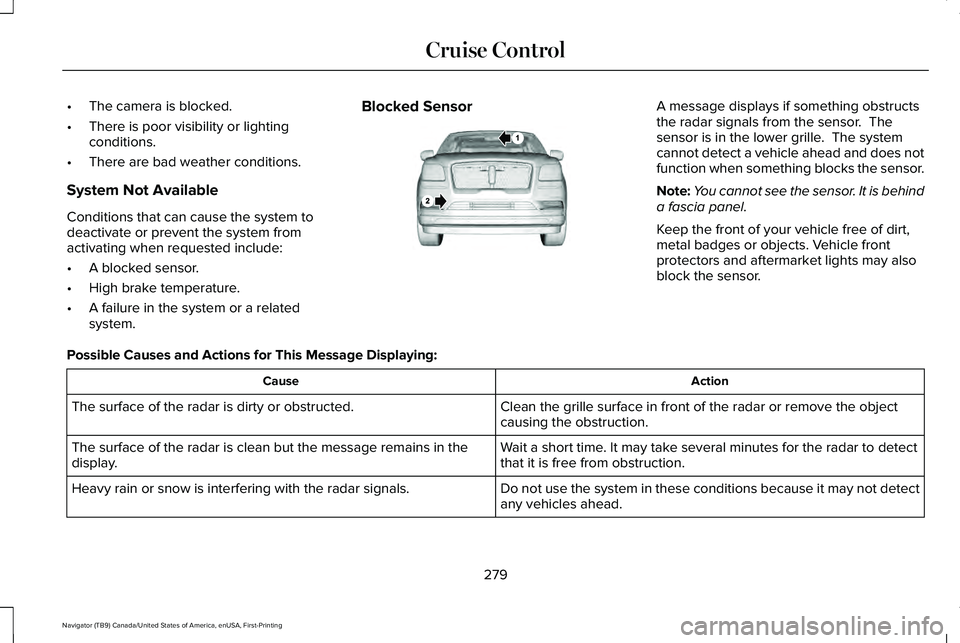
system. Blocked Sensor A message displays if something obstructs
the radar signals from the sensor. The
sensor is in the lower grille. The system
cannot detect a vehicle ahead and does not
function when something blocks the sensor.
Note:
You cannot see the sensor. It is behind
a fascia panel.
Keep the front of your vehicle free of dirt,
metal badges or objects. Vehicle front
protectors and aftermarket lights may also
block the sensor.
Possible Causes and Actions for This Message Displaying: Action
Cause
Clean the grille surface in front of the radar or remove the object
causing the obstruction.
The surface of the radar is dirty or obstructed.
Wait a short time. It may take several minutes for the radar to detect
that it is free from obstruction.
The surface of the radar is clean but the message remains in the
display.
Do not use the system in these conditions because it may not detect
any vehicles ahead.
Heavy rain or snow is interfering with the radar signals.
279
Navigator (TB9) Canada/United States of America, enUSA, First-Printing Cruise ControlE253503
Page 302 of 639
Brake Support: The system helps reduce
the impact speed by preparing the brakes
for rapid braking. Brake support does not
apply the brakes. If you press the brake
pedal, the system could apply additional
braking up to maximum braking force, even
if you lightly press the brake pedal.
Active Braking
: Active braking may activate
if the system determines that a collision is
imminent. The system may help the driver
reduce impact damage or avoid the crash
completely.
Note: Brake Support and Active Braking are
active at speeds up to 74.6 mph (120 km/h).
If the vehicle has a radar sensor or Adaptive
Cruise Control, then Brake Support and
Active Braking are active up to the maximum
speed of the vehicle.
Note: The system disables when you select
the Slow Climb or Deep Conditions drive
modes. Note:
If you perceive Pre-Collision Assist
alerts as being too frequent or disturbing,
then you can reduce the alert sensitivity,
though the manufacturer recommends using
the highest sensitivity setting where possible.
Setting lower sensitivity would lead to fewer
and later system warnings.
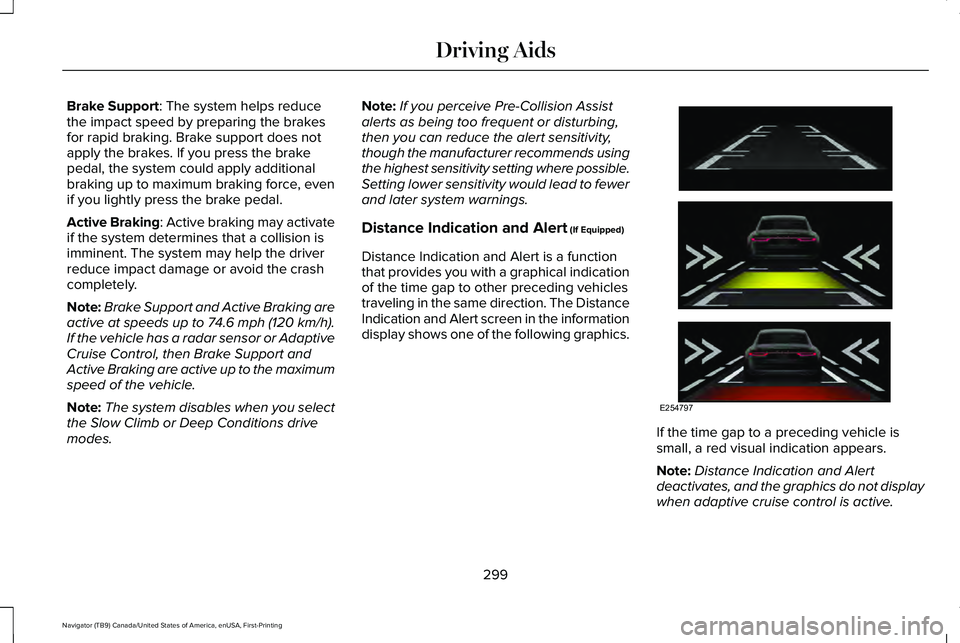
Distance Indication and Alert (If Equipped)
Distance Indication and Alert is a function
that provides you with a graphical indication
of the time gap to other preceding vehicles
traveling in the same direction. The Distance
Indication and Alert screen in the information
display shows one of the following graphics. If the time gap to a preceding vehicle is
small, a red visual indication appears.
Note:
Distance Indication and Alert
deactivates, and the graphics do not display
when adaptive cruise control is active.
299
Navigator (TB9) Canada/United States of America, enUSA, First-Printing Driving AidsE254797
Page 366 of 639
Protected Component
Fuse Rating
Fuse Number
Blindspot information system.
Cruise control module.
Tailgate applique.
Air quality sensor.
Image processing module B.
Powertrain control module run/start feed.
10 A
16
Anti-lock brake system run/start feed.
10 A
17
Electronic power assist steering run/start feed.
10 A
18
Not used.
—
19
Front blower.
40 A
20
Passenger seat motors.
40 A
21
Not used.
—
22
Alternator A-line.
10 A
23
Trailer brake control module.
30 A
24
Body control module power 1.
50 A
25
Electric fan 3.
50 A
26
Driver seat motors.
40 A
27
363
Navigator (TB9) Canada/United States of America, enUSA, First-Printing Fuses
Page 374 of 639
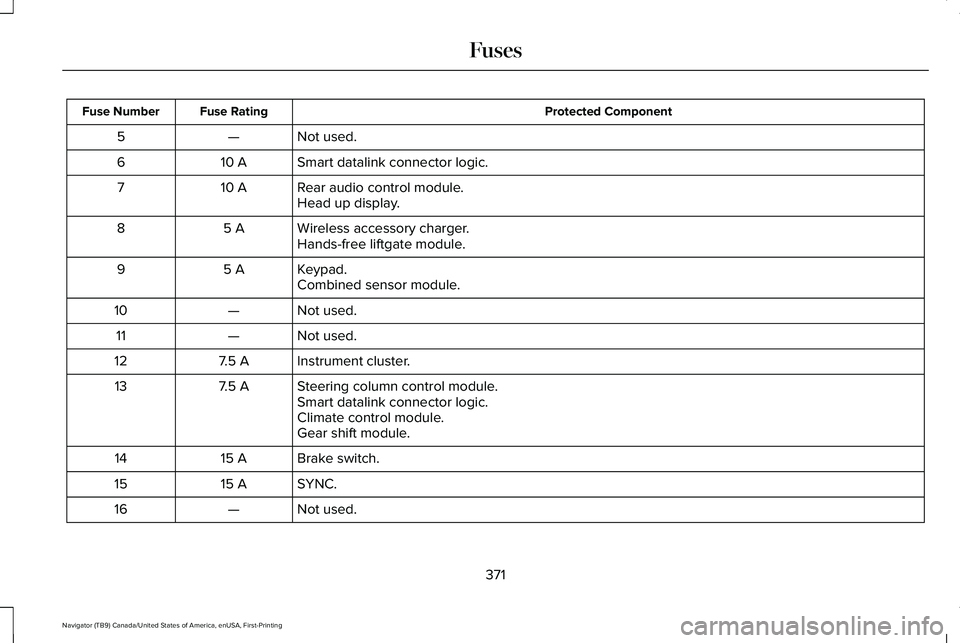
Protected Component
Fuse Rating
Fuse Number
Not used.
—
5
Smart datalink connector logic.
10 A
6
Rear audio control module.
10 A
7
Head up display.
Wireless accessory charger.
5 A
8
Hands-free liftgate module.
Keypad.
5 A
9
Combined sensor module.
Not used.
—
10
Not used.
—
11
Instrument cluster.
7.5 A
12
Steering column control module.
7.5 A
13
Smart datalink connector logic.
Climate control module.
Gear shift module.
Brake switch.
15 A
14
SYNC.
15 A
15
Not used.
—
16
371
Navigator (TB9) Canada/United States of America, enUSA, First-Printing Fuses
Page 427 of 639

Follow these guidelines when using snow
tires and chains:
•
If possible, avoid fully loading your
vehicle.
• Use only cable type chains or chains
offered by Ford/Lincoln as an accessory
or equivalent. Other conventional link
type chains may contact and cause
damage to the vehicle's wheel house
and/or body.
• Do not install chains on the front tires as
this may interfere with suspension
components.
• Only certain snow cables or chains have
been approved by Ford/Lincoln as safe
for use on your vehicle with the following
tires: 265/70R17 and 275/65R18.
• You should install snow cables or chains
that have been rated as SAE Class S.
• Install chains securely, verifying that the
chains do not touch any wiring, brake
lines, or fuel lines.
• Do not exceed 31 mph (50 km/h) or less
if recommended by the chain
manufacturer while using snow chains. •
Drive cautiously. If you hear the chains
rub or bang against your vehicle, stop
and retighten the chains. If this does not
work, remove the chains to prevent
damage to your vehicle.
• Remove the tire chains when they are no
longer needed. Do not use tire chains on
dry roads.
• Purchase chains or cables from a
manufacturer that clearly labels body to
tire dimension restrictions. The snow
chains or cables must be mounted in
pairs on the rear tires only.
If you have any questions regarding snow
chains or cables, please contact your
authorized dealer. TIRE PRESSURE MONITORING
SYSTEM WARNING:
The tire pressure
monitoring system is not a substitute for
manually checking tire pressures. You
should periodically check tire pressures
using a pressure gauge. Failure to correctly
maintain tire pressures could increase the
risk of tire failure, loss of control, vehicle
rollover and personal injury.
Note: You should only use tire sealants in
roadside emergencies as they could cause
damage to the tire pressure monitoring
system sensor.
Note: If the tire pressure monitoring system
sensor becomes damaged, it will not
function.
424
Navigator (TB9) Canada/United States of America, enUSA, First-Printing Wheels and Tires
Page 432 of 639
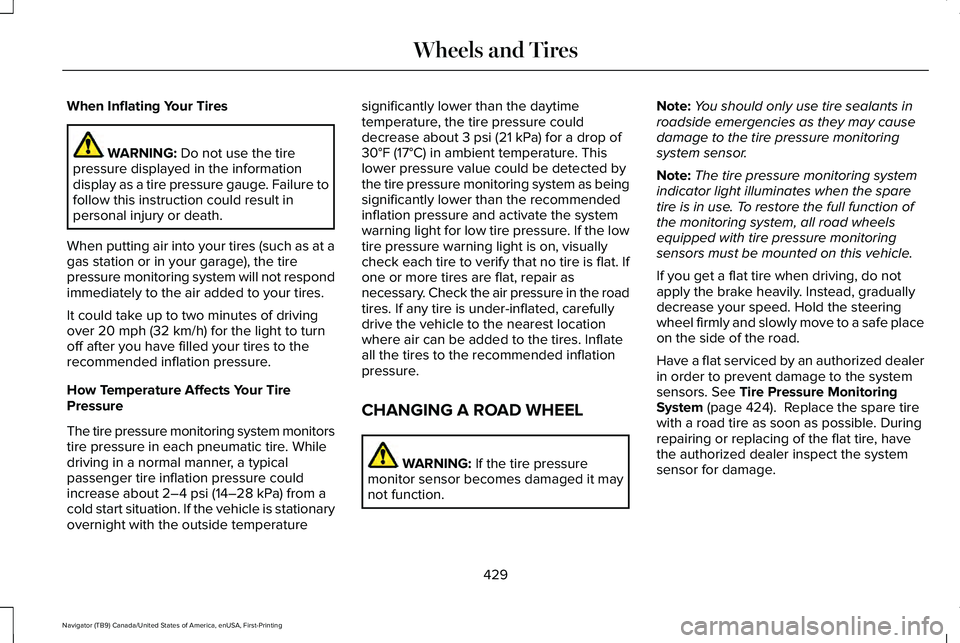
When Inflating Your Tires
WARNING: Do not use the tire
pressure displayed in the information
display as a tire pressure gauge. Failure to
follow this instruction could result in
personal injury or death.
When putting air into your tires (such as at a
gas station or in your garage), the tire
pressure monitoring system will not respond
immediately to the air added to your tires.
It could take up to two minutes of driving
over
20 mph (32 km/h) for the light to turn
off after you have filled your tires to the
recommended inflation pressure.
How Temperature Affects Your Tire
Pressure
The tire pressure monitoring system monitors
tire pressure in each pneumatic tire. While
driving in a normal manner, a typical
passenger tire inflation pressure could
increase about
2–4 psi (14–28 kPa) from a
cold start situation. If the vehicle is stationary
overnight with the outside temperature significantly lower than the daytime
temperature, the tire pressure could
decrease about
3 psi (21 kPa) for a drop of
30°F (17°C) in ambient temperature. This
lower pressure value could be detected by
the tire pressure monitoring system as being
significantly lower than the recommended
inflation pressure and activate the system
warning light for low tire pressure. If the low
tire pressure warning light is on, visually
check each tire to verify that no tire is flat. If
one or more tires are flat, repair as
necessary. Check the air pressure in the road
tires. If any tire is under-inflated, carefully
drive the vehicle to the nearest location
where air can be added to the tires. Inflate
all the tires to the recommended inflation
pressure.
CHANGING A ROAD WHEEL WARNING:
If the tire pressure
monitor sensor becomes damaged it may
not function. Note:
You should only use tire sealants in
roadside emergencies as they may cause
damage to the tire pressure monitoring
system sensor.
Note: The tire pressure monitoring system
indicator light illuminates when the spare
tire is in use. To restore the full function of
the monitoring system, all road wheels
equipped with tire pressure monitoring
sensors must be mounted on this vehicle.
If you get a flat tire when driving, do not
apply the brake heavily. Instead, gradually
decrease your speed. Hold the steering
wheel firmly and slowly move to a safe place
on the side of the road.
Have a flat serviced by an authorized dealer
in order to prevent damage to the system
sensors.
See Tire Pressure Monitoring
System (page 424). Replace the spare tire
with a road tire as soon as possible. During
repairing or replacing of the flat tire, have
the authorized dealer inspect the system
sensor for damage.
429
Navigator (TB9) Canada/United States of America, enUSA, First-Printing Wheels and Tires
Page 637 of 639
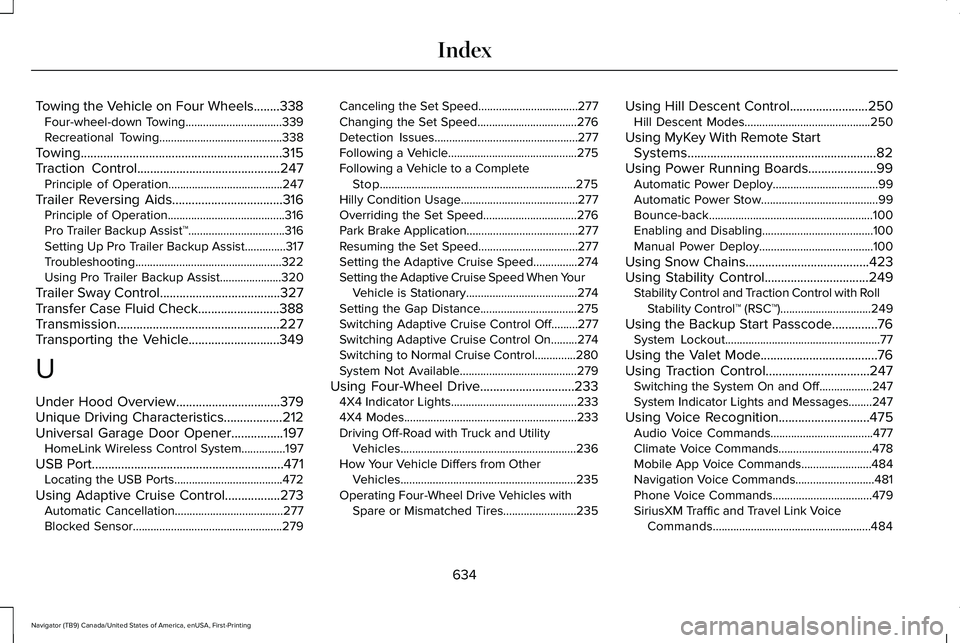
Towing the Vehicle on Four Wheels........338
Four-wheel-down Towing.................................339
Recreational Towing..........................................338
Towing..............................................................315
Traction Control............................................247 Principle of Operation.......................................247
Trailer Reversing Aids..................................316
Principle of Operation........................................316
Pro Trailer Backup Assist™.................................316
Setting Up Pro Trailer Backup Assist..............317
Troubleshooting ..................................................322
Using Pro Trailer Backup Assist.....................320
Trailer Sway Control
.....................................327
Transfer Case Fluid Check.........................388
Transmission..................................................227
Transporting the Vehicle
............................349
U
Under Hood Overview................................379
Unique Driving Characteristics
..................212
Universal Garage Door Opener................197 HomeLink Wireless Control System...............197
USB Port...........................................................471 Locating the USB Ports.....................................472
Using Adaptive Cruise Control
.................273
Automatic Cancellation.....................................277
Blocked Sensor...................................................279 Canceling the Set Speed..................................277
Changing the Set Speed..................................276
Detection Issues.................................................277
Following a Vehicle............................................275
Following a Vehicle to a Complete
Stop...................................................................275
Hilly Condition Usage........................................277
Overriding the Set Speed................................276
Park Brake Application......................................277
Resuming the Set Speed..................................277
Setting the Adaptive Cruise Speed...............274
Setting the Adaptive Cruise Speed When Your Vehicle is Stationary......................................274
Setting the Gap Distance.................................275
Switching Adaptive Cruise Control Off.........277
Switching Adaptive Cruise Control On.........274
Switching to Normal Cruise Control..............280
System Not Available........................................279
Using Four-Wheel Drive
.............................233
4X4 Indicator Lights...........................................233
4X4 Modes...........................................................233
Driving Off-Road with Truck and Utility
Vehicles............................................................236
How Your Vehicle Differs from Other Vehicles............................................................235
Operating Four-Wheel Drive Vehicles with Spare or Mismatched Tires.........................235 Using Hill Descent Control........................250
Hill Descent Modes...........................................250
Using MyKey With Remote Start Systems..........................................................82
Using Power Running Boards.....................99 Automatic Power Deploy....................................99
Automatic Power Stow........................................99
Bounce-back........................................................100
Enabling and Disabling......................................100
Manual Power Deploy.......................................100
Using Snow Chains
......................................423
Using Stability Control................................249 Stability Control and Traction Control with Roll
Stability Control™ (RSC™)...............................249
Using the Backup Start Passcode..............76 System Lockout.....................................................77
Using the Valet Mode....................................76
Using Traction Control................................247 Switching the System On and Off..................247
System Indicator Lights and Messages........247
Using Voice Recognition............................475 Audio Voice Commands...................................477
Climate Voice Commands................................
478
Mobile App Voice Commands........................484
Navigation Voice Commands...........................481
Phone Voice Commands..................................
479
SiriusXM Traffic and Travel Link Voice Commands......................................................484
634
Navigator (TB9) Canada/United States of America, enUSA, First-Printing Index