key LINCOLN NAVIGATOR 2021 Repair Manual
[x] Cancel search | Manufacturer: LINCOLN, Model Year: 2021, Model line: NAVIGATOR, Model: LINCOLN NAVIGATOR 2021Pages: 639, PDF Size: 6.09 MB
Page 322 of 639
Use the supplied measurement card, a tape
measure and pen to carefully mark the area
where to attach the sticker (supplied in the
back cover pocket of your quick start guide).
Make sure the whole sticker is within the
zone between the two arcs or distance
markers on the diagram, and is also visible
in the rear view camera display.
Step 4: Take Measurements
After you correctly place the sticker on the
trailer, you must take some key
measurements.
Note:
You must take accurate
measurements for the system to operate
properly.
Note: When rounding in inches, round
upward if the measured length is a quarter
inch or greater. Round downward if the
measured length is less than a quarter inch.
For example 12.25 in (31.11 cm) would be
rounded up to 12.50 in (31.75 cm). 12.13 in
(30.8 cm) would be rounded down to 12.00 in
(30.48 cm)
. Note:
When rounding in centimeters, round
to the nearest whole centimeter. If the
measurement is less than
0.2 in (0.5 cm)
round downward. If the measurement is
more than or equal to
0.2 in (0.5 cm) round
upward. For example, 11.9 in (30.3 cm) would
be rounded down to 11.8 in (30 cm). 12.0 in
(30.5 cm) would be rounded up to 12.2 in
(31 cm).
Note: Use consistent metric or imperial units
as required by your country or vehicle.
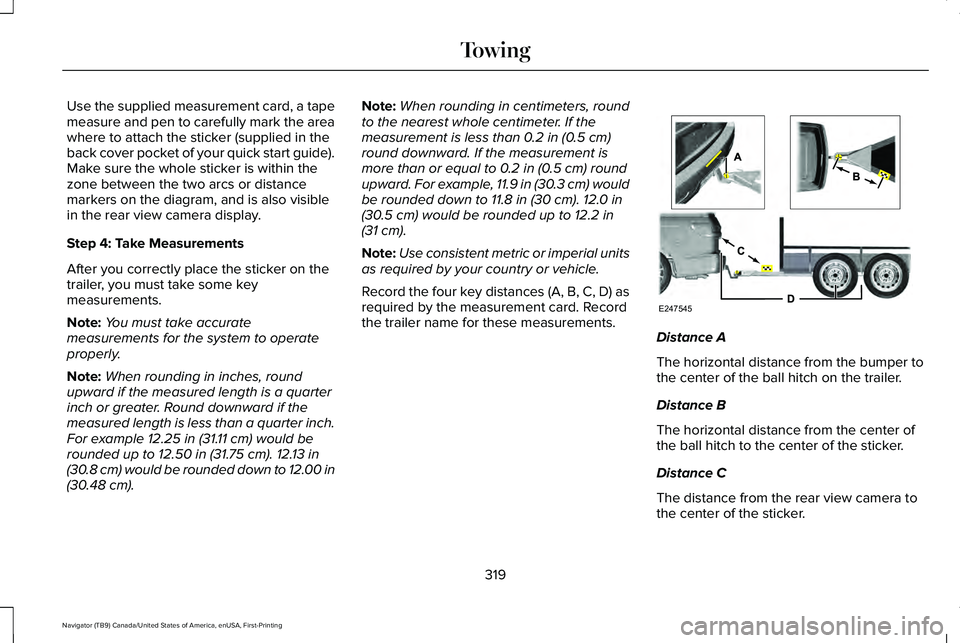
Record the four key distances (A, B, C, D) as
required by the measurement card. Record
the trailer name for these measurements. Distance A
The horizontal distance from the bumper to
the center of the ball hitch on the trailer.
Distance B
The horizontal distance from the center of
the ball hitch to the center of the sticker.
Distance C
The distance from the rear view camera to
the center of the sticker.
319
Navigator (TB9) Canada/United States of America, enUSA, First-Printing TowingE247545
Page 342 of 639
Four-wheel Drive Vehicles With SLOW
CLIMB Mode
You can only tow your vehicle with all wheels
on the ground by placing the transfer case
in its neutral position and engaging the four
wheel down towing feature. Perform the
steps outlined in the following section after
positioning your vehicle behind the tow
vehicle and properly securing them together.
Four-wheel-down Towing
Note: If completed successfully, the
information display shows
Neutral Tow
Enabled Leave Transmission in Neutral.
This indicates that your vehicle is safe to tow
with all wheels on the ground.
Note: If you do not see the message in the
information display, you must perform the
procedure again from the beginning.
Note: Make sure you properly secure your
vehicle to the tow vehicle.
1. Start your vehicle.
2. Confirm that your vehicle is in
NORMAL
mode. See Drive Mode Control (page
303). 3. Place your vehicle in stay in neutral
mode.
See Automatic Transmission
(page 227).
4. Switch your vehicle off by pressing the engine
START/STOP button once. A
Transmission Not in Park message
appears in the information display.
5. Place your vehicle in accessory mode by
pressing the start button once without
pressing the brake pedal.
6. Press and hold the brake pedal.
7. Enable neutral tow through the information display by selecting Settings
from the menu. See General Information
(page
134).
8. Then select
Advanced Settings.
9. Then select
Vehicle.
10. Then select
Neutral Tow.
11. Press and hold the
OK button until the
information display states Neutral Tow
Enabled Leave Transmission in
Neutral
. Note:
If completed successfully, the
information display shows
Neutral Tow
Enabled Leave Transmission in Neutral.
This indicates that your vehicle is safe to tow
with all wheels on the ground.
Note: If you do not see the message in the
information display, you must perform the
procedure again from the beginning.
Note: You may hear an audible noise as the
transfer case shifts into neutral, this is
normal.
12. Leave the transmission in neutral (N) and switch the ignition off by pressing
the engine
START/STOP button once
without pressing the brake pedal. You
do not need to leave your keys in the
vehicle. You can lock and unlock your
vehicle as you normally do. WARNING:
Do not disconnect the
battery during recreational towing. It
prevents the transfer case from shifting
properly and may cause the vehicle to roll,
even if the transmission is in park (P).
339
Navigator (TB9) Canada/United States of America, enUSA, First-Printing Towing
Page 347 of 639
ROADSIDE ASSISTANCE
Vehicles sold in the United States:
Getting Roadside Assistance
To fully assist you should you have a vehicle
concern, Lincoln Motor Company offers a
complimentary roadside assistance program.
This program is separate from the New
Vehicle Limited Warranty.
The service is available:
•
Throughout the life of the vehicle for
original owners.
• For six years or 70,000 mi (110,000 km)
(whichever comes first) for subsequent
owners.
Roadside Assistance covers:
• A flat tire change with a good spare
(except vehicles supplied with a tire
inflation kit).
• Battery jump start.
• Lock-out assistance (key replacement
cost is the client's responsibility). •
Fuel delivery — independent service
contractors, if not prohibited by state,
local or municipal law shall deliver up to
2 gal (8 L)
of gasoline fuel to a disabled
vehicle. Roadside Assistance limits fuel
delivery service to two no-charge
occurrences within a 12-month period.
• Winch out — available within 100 ft (30 m)
of a paved or county maintained road,
no recoveries. •
Towing — independent service
contractors, if not prohibited by state,
local or municipal law shall tow Lincoln
eligible vehicles to the client's selling or
preferred dealer within 100 mi (160 km)
of the disablement location or to the
nearest Lincoln dealer. If a client requests
a tow to a selling or preferred dealer that
is more than
100 mi (160 km) from the
disablement location, the client is
responsible for any mileage costs in
excess of
100 mi (160 km).
• Roadside Assistance includes up to $200
for a towed trailer if the disabled eligible
vehicle requires service at the nearest
authorized dealer. If the towing vehicle
is operational but the trailer is not, then
the trailer does not qualify for any
roadside services.
Vehicles Sold in the United States:
Using Roadside Assistance
United States clients who require roadside
assistance, call 1-800-521-4140 or contact
Roadside Assistance using the Lincoln Way
mobile app.
344
Navigator (TB9) Canada/United States of America, enUSA, First-Printing Roadside Emergencies
Page 348 of 639
If you need to arrange roadside assistance
for yourself, Lincoln Motor Company
reimburses a reasonable amount for towing
to the nearest Lincoln dealership within
100 mi (160 km). To obtain reimbursement
information, United States clients, call
1-800-521-4140. Clients need to submit their
original receipts.
Vehicles Sold in Canada: Getting
Roadside Assistance
To fully assist you should you have a vehicle
concern, Lincoln Motor Company offers a
complimentary roadside assistance program.
This program is eligible within Canada or the
continental United States.
The service is available 24 hours a day,
seven days a week.
This program is separate from the New
Vehicle Limited Warranty, beginning from
the original warranty start date and lasts the
life of the vehicle for the original owner.
Subsequent owners receive coverage that
is concurrent with the 6 years or
70,000 mi
(110,000 km) (whichever occurs first)
powertrain warranty coverage period. Note:
Canadian roadside coverage and
benefits may differ from the U.S. coverage.
For complete program coverage details,
review your warranty guide, contact your
dealer, call us in Canada at 1-800-387-9333,
or visit our website at
www.lincolncanada.com.
If you purchased your vehicle in Canada and
require roadside assistance, please call
1-800-387-9333 or contact Roadside
Assistance using the Lincoln Way mobile
app.
Note: For quick reference, complete the
roadside assistance identification card found
in the glove compartment of your vehicle
and place it in your wallet.
HAZARD FLASHERS
Note: The hazard flashers operate when the
ignition is in any position, or if the key is not
in the ignition. If used when the vehicle is not
running, the battery loses charge. As a result,
there may be insufficient power to restart
your vehicle. The flasher control is on the
instrument panel. Use your hazard
flashers when your vehicle is
creating a safety hazard for other motorists.
• Press the flasher control and all front and
rear direction indicators flash.
• Press the button again to switch them off.
FUEL SHUTOFF WARNING:
If your vehicle has been
involved in a crash, have the fuel system
checked. Failure to follow this instruction
could result in fire, personal injury or death.
Note: When you try to restart your vehicle
after a fuel shutoff, the vehicle makes sure
that various systems are safe to restart.
Once the vehicle determines the systems
are safe, then the vehicle allows you to
restart.
Note: In the event that your vehicle does not
restart after your third attempt, contact a
qualified technician.
345
Navigator (TB9) Canada/United States of America, enUSA, First-Printing Roadside Emergencies
Page 374 of 639
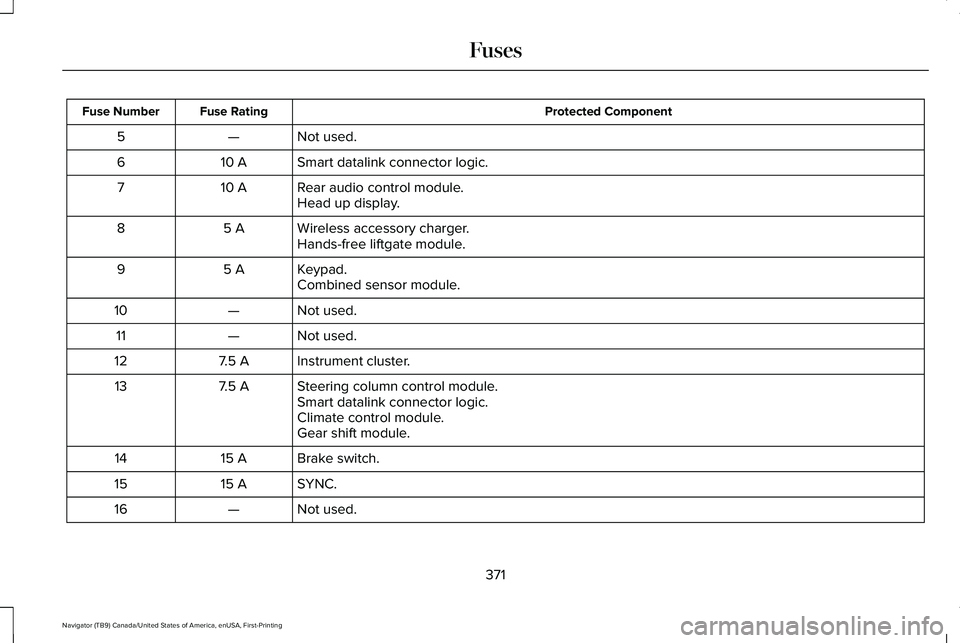
Protected Component
Fuse Rating
Fuse Number
Not used.
—
5
Smart datalink connector logic.
10 A
6
Rear audio control module.
10 A
7
Head up display.
Wireless accessory charger.
5 A
8
Hands-free liftgate module.
Keypad.
5 A
9
Combined sensor module.
Not used.
—
10
Not used.
—
11
Instrument cluster.
7.5 A
12
Steering column control module.
7.5 A
13
Smart datalink connector logic.
Climate control module.
Gear shift module.
Brake switch.
15 A
14
SYNC.
15 A
15
Not used.
—
16
371
Navigator (TB9) Canada/United States of America, enUSA, First-Printing Fuses
Page 473 of 639
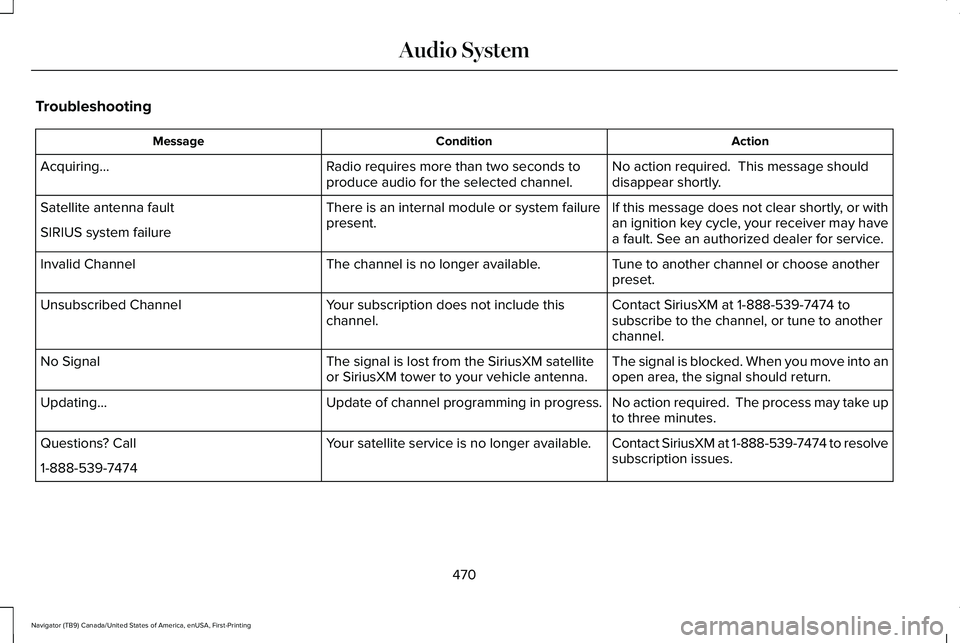
Troubleshooting
Action
Condition
Message
No action required. This message should
disappear shortly.
Radio requires more than two seconds to
produce audio for the selected channel.
Acquiring…
If this message does not clear shortly, or with
an ignition key cycle, your receiver may have
a fault. See an authorized dealer for service.
There is an internal module or system failure
present.
Satellite antenna fault
SIRIUS system failure
Tune to another channel or choose another
preset.
The channel is no longer available.
Invalid Channel
Contact SiriusXM at 1-888-539-7474 to
subscribe to the channel, or tune to another
channel.
Your subscription does not include this
channel.
Unsubscribed Channel
The signal is blocked. When you move into an
open area, the signal should return.
The signal is lost from the SiriusXM satellite
or SiriusXM tower to your vehicle antenna.
No Signal
No action required. The process may take up
to three minutes.
Update of channel programming in progress.
Updating…
Contact SiriusXM at 1-888-539-7474 to resolve
subscription issues.
Your satellite service is no longer available.
Questions? Call
1-888-539-7474
470
Navigator (TB9) Canada/United States of America, enUSA, First-Printing Audio System
Page 494 of 639
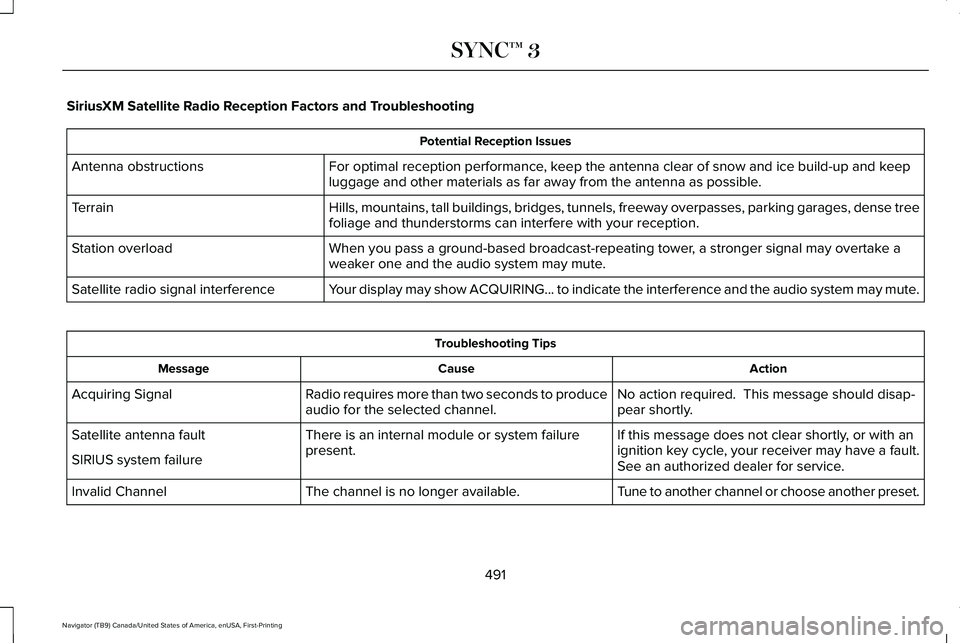
SiriusXM Satellite Radio Reception Factors and Troubleshooting
Potential Reception Issues
For optimal reception performance, keep the antenna clear of snow and ice build-up and keep
luggage and other materials as far away from the antenna as possible.
Antenna obstructions
Hills, mountains, tall buildings, bridges, tunnels, freeway overpasses, \
parking garages, dense tree
foliage and thunderstorms can interfere with your reception.
Terrain
When you pass a ground-based broadcast-repeating tower, a stronger signal may overtake a
weaker one and the audio system may mute.
Station overload
Your display may show ACQUIRING... to indicate the interference and the a\
udio system may mute.
Satellite radio signal interference Troubleshooting Tips
Action
Cause
Message
No action required. This message should disap-
pear shortly.
Radio requires more than two seconds to produce
audio for the selected channel.
Acquiring Signal
If this message does not clear shortly, or with an
ignition key cycle, your receiver may have a fault.
See an authorized dealer for service.
There is an internal module or system failure
present.
Satellite antenna fault
SIRIUS system failure
Tune to another channel or choose another preset.
The channel is no longer available.
Invalid Channel
491
Navigator (TB9) Canada/United States of America, enUSA, First-Printing SYNC™ 3
Page 506 of 639

1. Select Add Phone.
Note: A prompt alerts you to search for your
vehicle on your cell phone.
2. Select your vehicle on your cell phone.
Note: A number appears on your cell phone
and on the touchscreen.
3. Confirm that the number on your cell phone matches the number on the
touchscreen.
Note: The touchscreen indicates that you
have successfully paired your cell phone.
4. Download the phonebook from your cell
phone when you are prompted.
Note: If you pair more than one cell phone,
use the phone settings to specify the primary
phone. You can change this setting at any
time.
Using Your Cell Phone
Recent Call List
Display and select an entry from a list of
previous calls. Contacts
Display a smart search form to look up your
contacts. Use the List button to alphabetically
sort your contacts.
Change Phone
Display the list of paired or connected
devices that you can select.
Phone Settings
Change ring tones, alerts or pair another
phone.
Do Not Disturb
Reject incoming calls and switch ring tones
and alerts off.
Phone Keypad
Directly dial a number.
Mute
Mute the microphone when in a call or voice
recognition session.
Text Messaging
Setting Text Message Notification
iOS
1. Go to the settings menu on your cell
phone.
2. Select Bluetooth.
3. Select the information icon to the right of
your vehicle.
4. Switch text message notification on.
Android
1. Go to the settings menu on your cell phone.
2. Select Bluetooth.
3. Select the profiles option.
4. Select the phone profile.
5. Switch text message notification on.
503
Navigator (TB9) Canada/United States of America, enUSA, First-Printing SYNC™ 3
Page 510 of 639
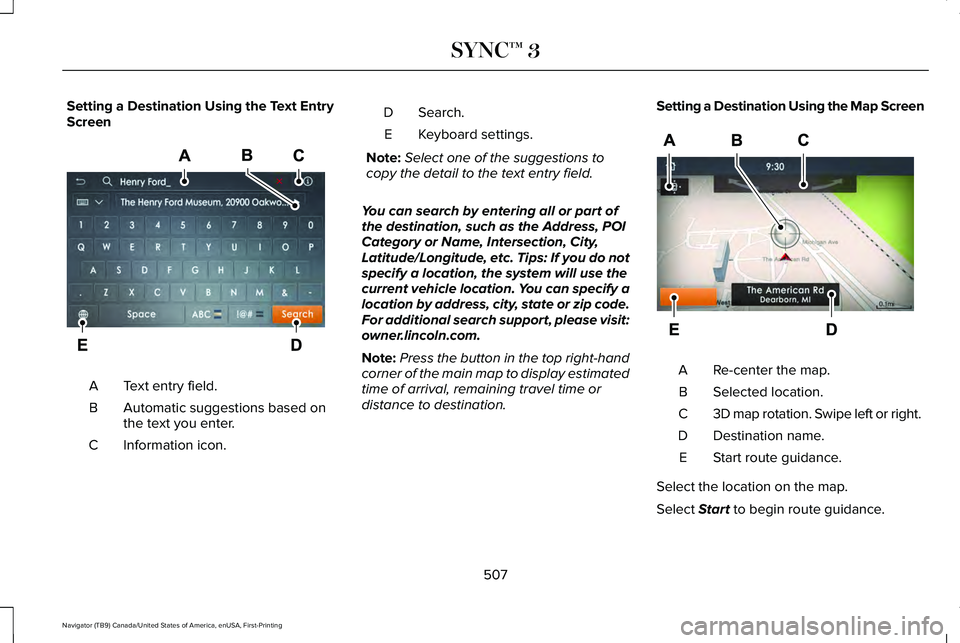
Setting a Destination Using the Text Entry
Screen
Text entry field.
A
Automatic suggestions based on
the text you enter.
B
Information icon.
C Search.
D
Keyboard settings.
E
Note: Select one of the suggestions to
copy the detail to the text entry field.
You can search by entering all or part of
the destination, such as the Address, POI
Category or Name, Intersection, City,
Latitude/Longitude, etc. Tips: If you do not
specify a location, the system will use the
current vehicle location. You can specify a
location by address, city, state or zip code.
For additional search support, please visit:
owner.lincoln.com.
Note: Press the button in the top right-hand
corner of the main map to display estimated
time of arrival, remaining travel time or
distance to destination. Setting a Destination Using the Map Screen
Re-center the map.
A
Selected location.
B
3D map rotation. Swipe left or right.
C
Destination name.
D
Start route guidance.
E
Select the location on the map.
Select Start to begin route guidance.
507
Navigator (TB9) Canada/United States of America, enUSA, First-Printing SYNC™ 3E297857 E297858
Page 518 of 639
SETTINGS
Press the button to enter the
settings menu.
Once you select a tile, press the
button next to a menu item to view
an explanation of the feature or
setting.
Sound
Select this tile to adjust the sound settings.
Clock
Select this tile to adjust the clock settings.
Bluetooth
Select this tile to switch Bluetooth on and off
and adjust settings.
Phone
Select this tile to connect, disconnect, and
manage the connected device settings. Audio
Select this tile to adjust the audio settings.
Driver Assist (If Equipped)
Select this tile to adjust Driver Assist features
like Parking Aids, Lane Keeping system,
Pedestrian Detection, and Auto-Start-Stop.
Vehicle
Select this tile to adjust vehicle settings like
windows, alarm, lighting, backup starting
passcode, and MyKey settings.
Lincoln Way
Select this tile to adjust the Lincoln Way
settings.
General
Select this tile to adjust settings like
language, measurement units, or to reset the
system.
911 Assist
(If Equipped)
Select this tile to switch 911 Assist on and off. Automatic Updates
Select this tile to adjust automatic update
settings.
Mobile Apps
Select this tile to adjust permissions, enable,
disable, and update mobile apps.
Display
Select this tile to adjust display settings like
brightness and auto dim.
Charge Settings
(If Equipped)
Select this tile to adjust the electric vehicle
charge setting.
Voice Control
Select this tile to adjust voice control settings
like command confirmations and displayed
lists.
Navigation
(If Equipped)
Select this tile to adjust navigation settings
like map preferences and route guidance.
515
Navigator (TB9) Canada/United States of America, enUSA, First-Printing SYNC™ 3E280315 E268570