buttons LINCOLN NAVIGATOR 2021 Owners Manual
[x] Cancel search | Manufacturer: LINCOLN, Model Year: 2021, Model line: NAVIGATOR, Model: LINCOLN NAVIGATOR 2021Pages: 639, PDF Size: 6.09 MB
Page 36 of 639

the child restraint. However, you can still use
the seatbelt to attach the child restraint if the
lower anchors are not used. For
forward-facing child restraints, you must also
attach the top tether strap to the proper top
tether anchor if a top tether strap has been
provided with your child restraint. We
recommend the use of a child safety seat
having a top tether strap. See Using Tether
Straps in this chapter.
Your vehicle has LATCH lower anchors for
child restraint installation at the seating
positions marked with the child restraint
symbol.
Second Row Bench Seat Second Row Bucket Seats
The LATCH anchors are at the rear section
of the rear seat between the cushion and
seatback, below the locator symbols on the
seatback. Follow the child restraint
manufacturer’
s instructions to properly install
a child restraint with LATCH attachments. The locator symbols are on round plastic
buttons for the center seat and on
rectangular tags for the outboard seats.
Follow the instructions on attaching child
safety seats with tether straps. See Using
Tether Straps in this chapter.
Attach LATCH lower attachments of the child
restraint only to the anchors shown.
33
Navigator (TB9) Canada/United States of America, enUSA, First-Printing Child SafetyE251314 E251315 E144054
Page 87 of 639
LOCKING AND UNLOCKING
You can use the power door lock control or
the remote control to lock and unlock your
vehicle.
Power Door Locks
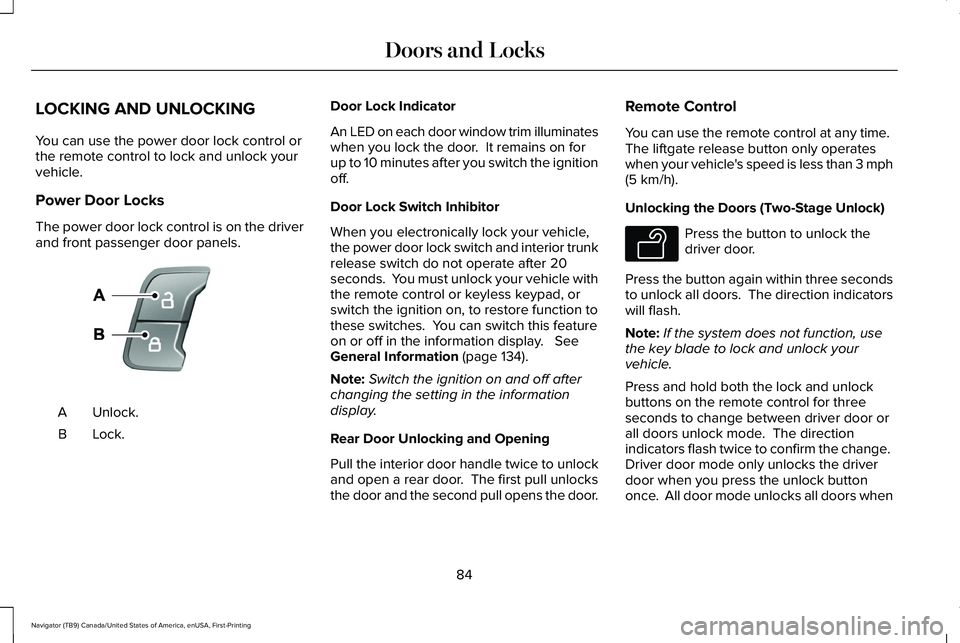
The power door lock control is on the driver
and front passenger door panels.
Unlock.
A
Lock.B Door Lock Indicator
An LED on each door window trim illuminates
when you lock the door. It remains on for
up to 10 minutes after you switch the ignition
off.
Door Lock Switch Inhibitor
When you electronically lock your vehicle,
the power door lock switch and interior trunk
release switch do not operate after 20
seconds. You must unlock your vehicle with
the remote control or keyless keypad, or
switch the ignition on, to restore function to
these switches. You can switch this feature
on or off in the information display. See
General Information (page 134).
Note: Switch the ignition on and off after
changing the setting in the information
display.
Rear Door Unlocking and Opening
Pull the interior door handle twice to unlock
and open a rear door. The first pull unlocks
the door and the second pull opens the door. Remote Control
You can use the remote control at any time.
The liftgate release button only operates
when your vehicle's speed is less than 3 mph
(5 km/h)
.
Unlocking the Doors (Two-Stage Unlock) Press the button to unlock the
driver door.
Press the button again within three seconds
to unlock all doors. The direction indicators
will flash.
Note: If the system does not function, use
the key blade to lock and unlock your
vehicle.
Press and hold both the lock and unlock
buttons on the remote control for three
seconds to change between driver door or
all doors unlock mode. The direction
indicators flash twice to confirm the change.
Driver door mode only unlocks the driver
door when you press the unlock button
once. All door mode unlocks all doors when
84
Navigator (TB9) Canada/United States of America, enUSA, First-Printing Doors and LocksE138628 E138629
Page 88 of 639
you press the unlock button once. The
unlocking mode applies to the remote
control, keyless entry keypad and intelligent
access. You can also change between the
unlocking modes using the information
display. See General Information (page 134).
Reprogramming the Unlocking Function
Note:
When you press the unlock button,
either all the doors are unlocked or only the
driver door is unlocked. Pressing the unlock
button again unlocks all the doors.
Press and hold the unlock and lock buttons
on the remote control simultaneously for at
least four seconds with the ignition off. The
direction indicators flash twice to confirm the
change.
To return to the original unlocking function,
repeat the process.
Locking the Doors Press the button to lock all doors.
The direction indicators will flash. Press the button again within three seconds
to confirm that all the doors are closed. The
door lock again, the horn sounds and the
direction indicators flash if all the doors and
the liftgate are closed.
Note:
If the system does not function, use
the key blade to lock and unlock your
vehicle.
Mislock
If any door or the liftgate is open, or if
the hood is open on vehicles with an
anti-theft alarm or remote start, the horn
sounds twice and the direction
indicators do not flash. You can switch
this feature on or off in the information
display. See General Information (page
134).
Opening the Liftgate Press twice within three seconds
to open the liftgate.Activating Intelligent Access
General Information
You can unlock and lock the vehicle without
taking the keys out of your pocket or purse
when your intelligent access key is within
3 ft (1 m)
of your vehicle. Intelligent access
uses a sensor on the back of the door handle
for unlocking and a separate sensor on the
face of each door handle for locking.
The system does not function if:
• Your vehicle battery has no charge.
• The key battery has no charge.
• The key frequencies are jammed.
Note: The system may not function if the key
is close to metal objects or electronic
devices, for example keys or a cell phone.
Note: If the system does not function, use
the key blade to lock and unlock your
vehicle.
See Remote Control (page 69).
85
Navigator (TB9) Canada/United States of America, enUSA, First-Printing Doors and LocksE138623 E267940
Page 93 of 639
To Unlock the Liftgate Glass
Enter the factory-set 5-digit code or your
personal code, then press 5·6 to unlock the
liftgate glass.
Displaying the Factory-Set Code
Note:
Two programmed intelligent access
keys are required for this procedure.
1. Open the floor console storage compartment lid.
2. With the buttons facing the rear of your vehicle and the key ring facing upward,
place the first intelligent access key into
the backup slot inside the center console.
3. Press the push button ignition switch once and wait for a few seconds.
4. Press the push button ignition switch again and remove the intelligent access
key from the center console.
5. Insert the second programmed key into the backup slot in the center console,
then press the push button ignition
switch. The factory-set code appears in the
information display for a few seconds.
Note:
The code may not display until after
any other warning messages first display.
90
Navigator (TB9) Canada/United States of America, enUSA, First-Printing Doors and Locks
Page 115 of 639
Note:
If you switch the autolamps and the
autowipers on, the headlamps turn on when
the windshield wipers continuously operate.
INSTRUMENT LIGHTING DIMMER
The instrument lighting dimmer buttons are
on the lighting control. Repeatedly press one of the
buttons to adjust the brightness.
HEADLAMP EXIT DELAY
After you switch the ignition off, you can
switch the headlamps on by pulling the
direction indicator lever toward you. You will
hear a short tone. The headlamps will switch
off automatically after three minutes with any
door open or 30 seconds after the last door
has been closed. You can cancel this feature
by pulling the direction indicator lever toward
you again or switching the ignition on. DAYTIME RUNNING LAMPS -
VEHICLES WITH: CONFIGURABLE
DAYTIME RUNNING LAMPS WARNING: The daytime running
lamps system does not activate the rear
lamps and may not provide adequate
lighting during low visibility driving
conditions. Make sure you switch the
headlamps on, as appropriate, during all
low visibility conditions. Failure to do so
may result in a crash.
Switch the daytime running lamps on or off
using the information display.
See General
Information (page 134).
The daytime running lamps turn on when:
1. The lamps are on in the information display.
2. You switch the ignition on.
3. The transmission is not in park (P) for vehicles with automatic transmissions or
you release the parking brake for
vehicles with manual transmissions. 4. The lighting control is in the autolamps
position.
5. The headlamps are off.
The other lighting control switch positions
do not turn on the daytime running lamps.
If the daytime running lamps are off in the
information display, the lamps stay off in all
switch positions.
DAYTIME RUNNING LAMPS -
VEHICLES WITH: DAYTIME
RUNNING LAMPS (DRL) WARNING: The daytime running
lamps system does not activate the rear
lamps and may not provide adequate
lighting during low visibility driving
conditions. Make sure you switch the
headlamps on, as appropriate, during all
low visibility conditions. Failure to do so
may result in a crash.
The system turns the lamps on in daylight
conditions.
112
Navigator (TB9) Canada/United States of America, enUSA, First-Printing LightingE291299 E291298
Page 128 of 639
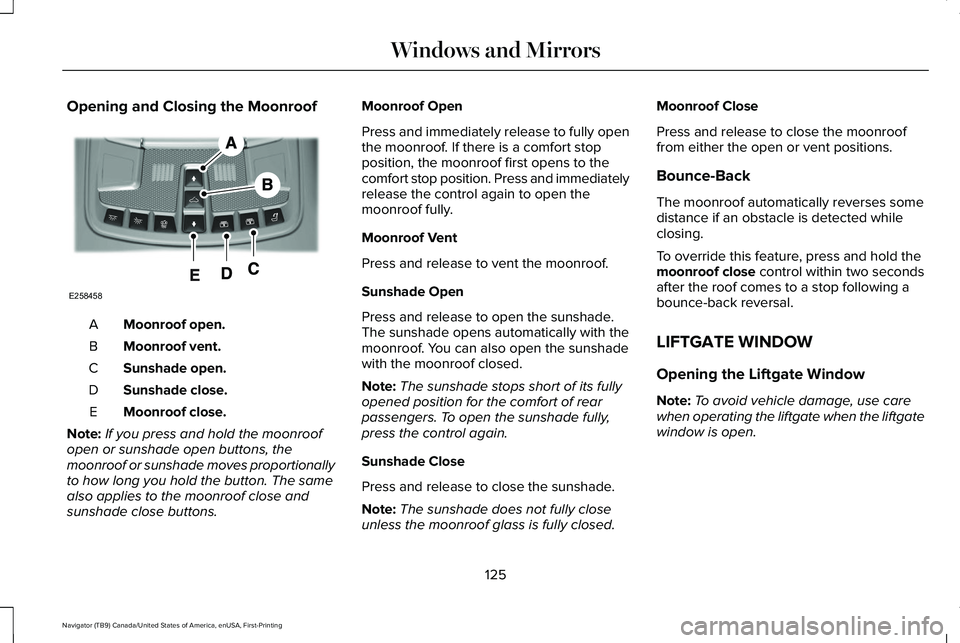
Opening and Closing the Moonroof
Moonroof open.
A
Moonroof vent.
B
Sunshade open.
C
Sunshade close.
D
Moonroof close.
E
Note: If you press and hold the moonroof
open or sunshade open buttons, the
moonroof or sunshade moves proportionally
to how long you hold the button. The same
also applies to the moonroof close and
sunshade close buttons. Moonroof Open
Press and immediately release to fully open
the moonroof. If there is a comfort stop
position, the moonroof first opens to the
comfort stop position. Press and immediately
release the control again to open the
moonroof fully.
Moonroof Vent
Press and release to vent the moonroof.
Sunshade Open
Press and release to open the sunshade.
The sunshade opens automatically with the
moonroof. You can also open the sunshade
with the moonroof closed.
Note:
The sunshade stops short of its fully
opened position for the comfort of rear
passengers. To open the sunshade fully,
press the control again.
Sunshade Close
Press and release to close the sunshade.
Note: The sunshade does not fully close
unless the moonroof glass is fully closed. Moonroof Close
Press and release to close the moonroof
from either the open or vent positions.
Bounce-Back
The moonroof automatically reverses some
distance if an obstacle is detected while
closing.
To override this feature, press and hold the
moonroof close control within two seconds
after the roof comes to a stop following a
bounce-back reversal.
LIFTGATE WINDOW
Opening the Liftgate Window
Note: To avoid vehicle damage, use care
when operating the liftgate when the liftgate
window is open.
125
Navigator (TB9) Canada/United States of America, enUSA, First-Printing Windows and MirrorsE258458
Page 129 of 639
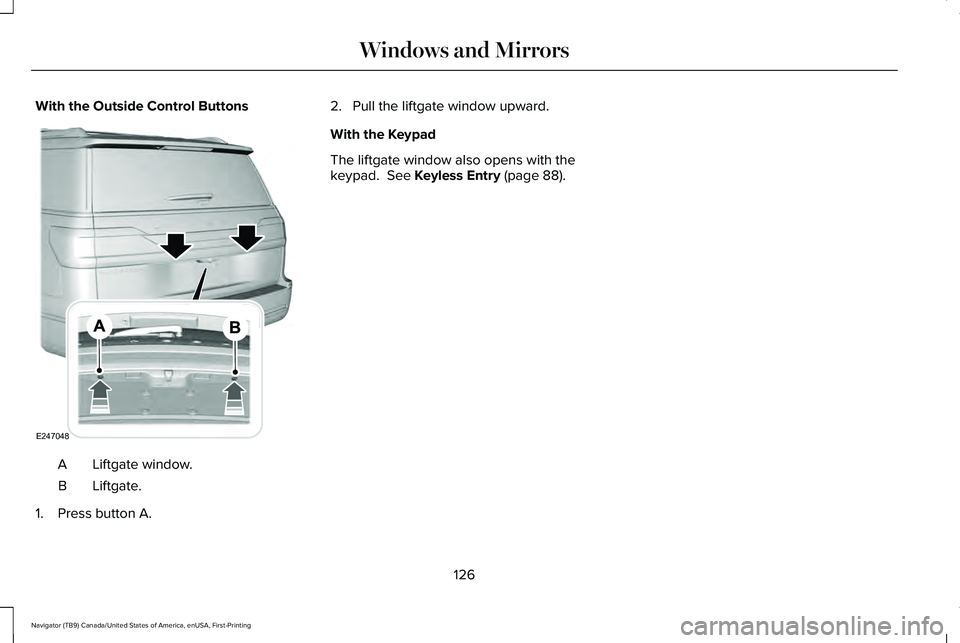
With the Outside Control Buttons
Liftgate window.
A
Liftgate.
B
1. Press button A. 2. Pull the liftgate window upward.
With the Keypad
The liftgate window also opens with the
keypad. See Keyless Entry (page 88).
126
Navigator (TB9) Canada/United States of America, enUSA, First-Printing Windows and MirrorsE247048
Page 137 of 639
GENERAL INFORMATION
WARNING: Driving while distracted
can result in loss of vehicle control, crash
and injury. We strongly recommend that
you use extreme caution when using any
device that may take your focus off the
road. Your primary responsibility is the safe
operation of your vehicle. We recommend
against the use of any hand-held device
while driving and encourage the use of
voice-operated systems when possible.
Make sure you are aware of all applicable
local laws that may affect the use of
electronic devices while driving.
You can control various systems on your
vehicle using the quick action menu (QAM)
buttons on the right-hand side of the steering
wheel. The information display provides the
corresponding information.
Note: Some options may appear slightly
different or not at all if the items are optional.
Note: Trailer options are not available if your
vehicle speed is greater than 3 mph (5 km/h). Note:
Some MyKey menu options only
appear if MyKey is enabled and at least one
MyKey is programmed. This icon gives you the ability to
switch a feature on or off. A check
in the box indicates the feature is
on, and unchecked indicates the feature is
off.
134
Navigator (TB9) Canada/United States of America, enUSA, First-Printing Information DisplaysE204495
Page 138 of 639
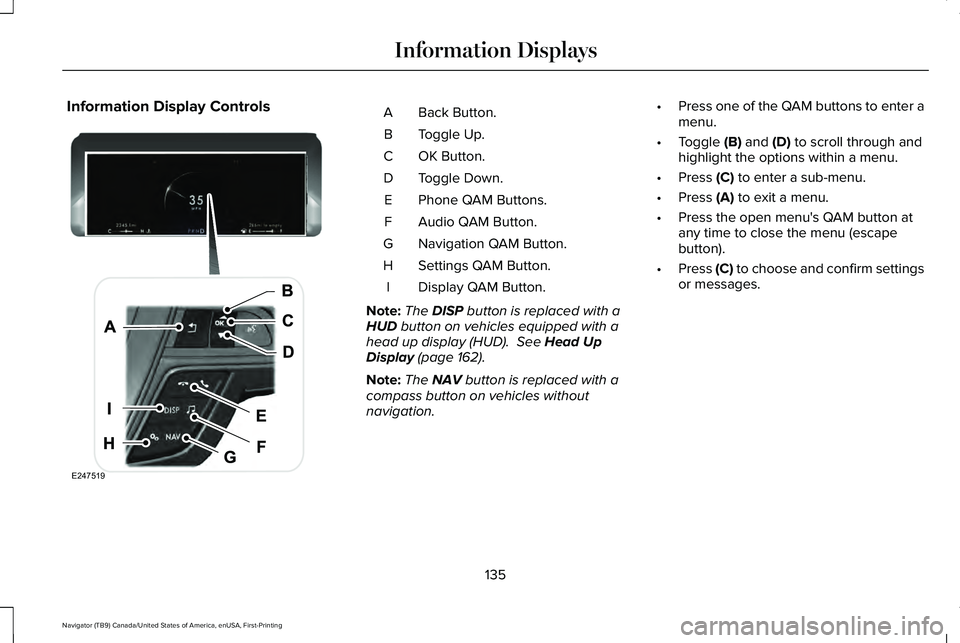
Information Display Controls
Back Button.
A
Toggle Up.
B
OK Button.
C
Toggle Down.
D
Phone QAM Buttons.
E
Audio QAM Button.
F
Navigation QAM Button.
G
Settings QAM Button.
H
Display QAM Button.
I
Note: The DISP button is replaced with a
HUD button on vehicles equipped with a
head up display (HUD). See Head Up
Display (page 162).
Note: The
NAV button is replaced with a
compass button on vehicles without
navigation. •
Press one of the QAM buttons to enter a
menu.
• Toggle
(B) and (D) to scroll through and
highlight the options within a menu.
• Press
(C) to enter a sub-menu.
• Press
(A) to exit a menu.
• Press the open menu's QAM button at
any time to close the menu (escape
button).
• Press
(C) to choose and confirm settings
or messages.
135
Navigator (TB9) Canada/United States of America, enUSA, First-Printing Information DisplaysE247519
Page 166 of 639
Navigation Display Area.
D
Status Bar.
E
Speedometer Display Area.
F
Signaling and Traffic Indication
Displays direction indicators, blind spot
information (if direction indicators are active)
and cross traffic alert.
Left Information Group
Displays incoming call information.
ADAS Display Area
Displays ACC and lane keeping system
status and warnings.
Navigation Display Area
Displays navigation next turn instructions. Status Bar
Displays distance to empty (DTE), time and
outside air temperature. Next to DTE, the
fuel gauge fill color changes to yellow in low
fuel conditions. You can switch off the status
bar in the HUD settings menu.
Speedometer Display Area
Displays current vehicle speed, speed limit
(if available in the map database) and your
transmission gear selection.
Configuring The Head Up Display
You can control the system's options through
the information display by using the HUD,
OK and arrow buttons on the right-hand side
of your steering wheel.
See General
Information (page 134). You can adjust the
display according to your height to make
viewing the content easier. You can also
adjust what content displays and the
brightness of the content. The system's
options appear in the instrument cluster
while the updates happen in the HUD. Note:
If HUD On is unchecked, other options
of the system are hidden.
Note: The HUD menu automatically closes
after a certain period of inactivity.
Note: The HUD image brightness
automatically adjusts to the brightness of
the ambient environment. You have the
ability to adjust the brightness further
according to your preference.
Note: In some instances, sunlight can cause
some reflections in and around the HUD
image.
163
Navigator (TB9) Canada/United States of America, enUSA, First-Printing Information Displays