coolant reservoir LINCOLN NAVIGATOR 2021 Owners Manual
[x] Cancel search | Manufacturer: LINCOLN, Model Year: 2021, Model line: NAVIGATOR, Model: LINCOLN NAVIGATOR 2021Pages: 639, PDF Size: 6.09 MB
Page 131 of 639

Status Bar.
A
Speedometer.
B
Right Information Group.
C
Fuel Gauge.
D
Coolant Gauge.
E
Left Information Group.
F
Status Bar
Displays information related to the current
audio source, compass direction and outside
air temperature.
Left and Right Information Group
Information that appears depends on current
gauge view and on-demand settings. See
General Information (page 134).
Fuel Gauge
The fuel gauge indicates about how much
fuel is in the fuel tank. The arrow adjacent to the fuel pump symbol
indicates on which side of your vehicle the
fuel filler door is located.
Note:
The fuel gauge may vary slightly when
your vehicle is moving or on a slope.
Low Fuel Reminder
A low fuel level reminder displays and
sounds when the distance to empty reaches
75 mi (120 km) to empty for MyKey, and at
50 mi (80 km), 25 mi (40 km), 10 mi (20 km)
and 0 mi (0 km) for all vehicle keys.
Note: The low fuel reminder can appear at
different fuel gauge positions depending on
fuel economy conditions. This variation is
normal. Engine Coolant Temperature Gauge WARNING:
Do not remove the
coolant reservoir cap when the engine is
on or the cooling system is hot. Wait 10
minutes for the cooling system to cool
down. Cover the coolant reservoir cap with
a thick cloth to prevent the possibility of
scalding and slowly remove the cap.
Failure to follow this instruction could result
in personal injury.
128
Navigator (TB9) Canada/United States of America, enUSA, First-Printing Instrument Cluster
Page 383 of 639
Brake fluid reservoir. See Brake Fluid Check (page 389).
F.
Air filter.
See Changing the Engine Air Filter (page 382).
G.
Engine coolant reservoir.
See Engine Coolant Check (page 383).
H.
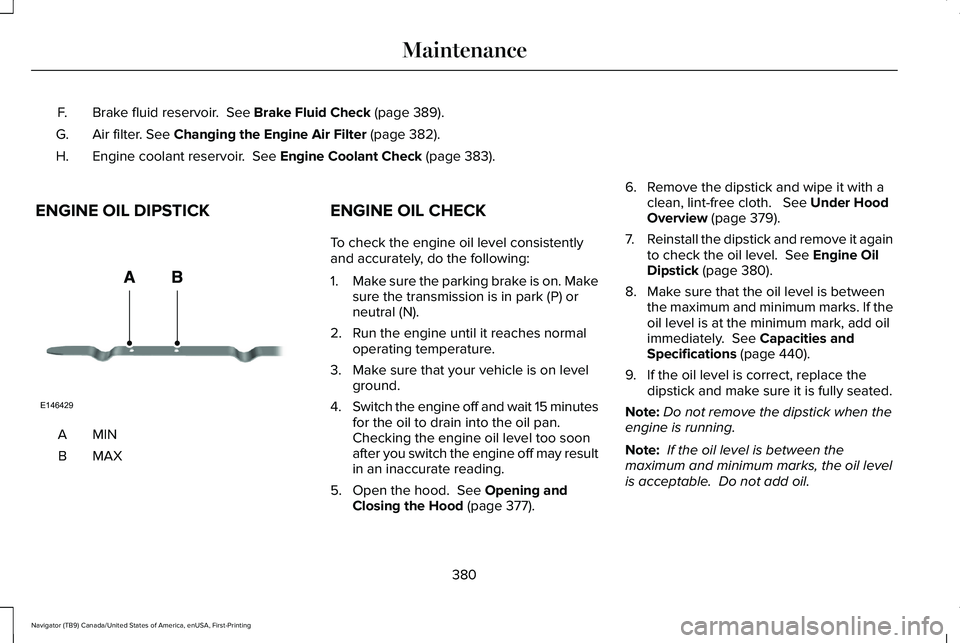
ENGINE OIL DIPSTICK MINA
MAXB ENGINE OIL CHECK
To check the engine oil level consistently
and accurately, do the following:
1.
Make sure the parking brake is on. Make
sure the transmission is in park (P) or
neutral (N).
2. Run the engine until it reaches normal operating temperature.
3. Make sure that your vehicle is on level ground.
4. Switch the engine off and wait 15 minutes
for the oil to drain into the oil pan.
Checking the engine oil level too soon
after you switch the engine off may result
in an inaccurate reading.
5. Open the hood.
See Opening and
Closing the Hood (page 377). 6. Remove the dipstick and wipe it with a
clean, lint-free cloth.
See Under Hood
Overview (page 379).
7. Reinstall the dipstick and remove it again
to check the oil level.
See Engine Oil
Dipstick (page 380).
8. Make sure that the oil level is between the maximum and minimum marks. If the
oil level is at the minimum mark, add oil
immediately.
See Capacities and
Specifications (page 440).
9. If the oil level is correct, replace the dipstick and make sure it is fully seated.
Note: Do not remove the dipstick when the
engine is running.
Note: If the oil level is between the
maximum and minimum marks, the oil level
is acceptable. Do not add oil.
380
Navigator (TB9) Canada/United States of America, enUSA, First-Printing MaintenanceE146429
Page 386 of 639
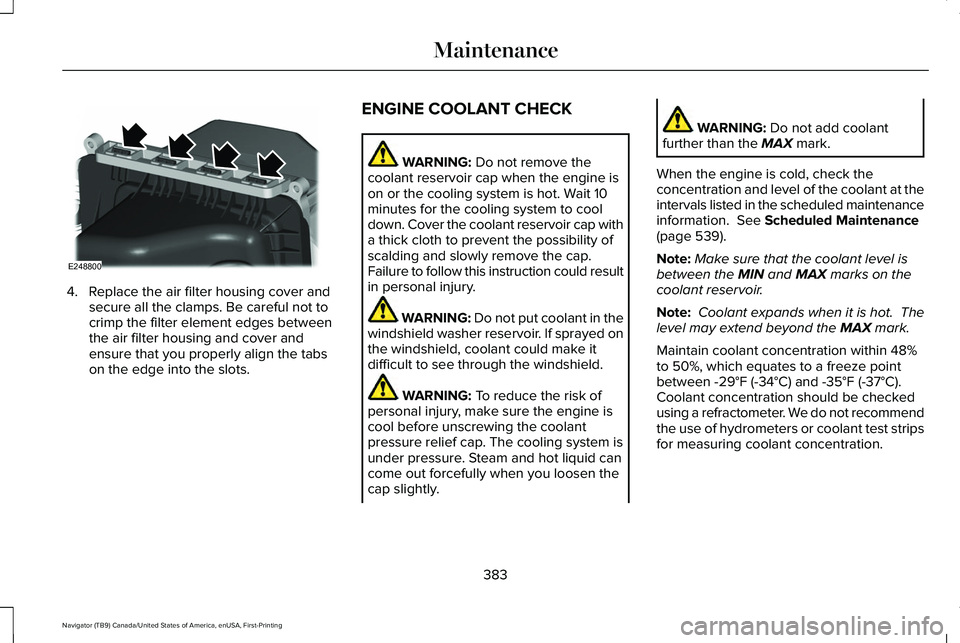
4. Replace the air filter housing cover and
secure all the clamps. Be careful not to
crimp the filter element edges between
the air filter housing and cover and
ensure that you properly align the tabs
on the edge into the slots. ENGINE COOLANT CHECK WARNING: Do not remove the
coolant reservoir cap when the engine is
on or the cooling system is hot. Wait 10
minutes for the cooling system to cool
down. Cover the coolant reservoir cap with
a thick cloth to prevent the possibility of
scalding and slowly remove the cap.
Failure to follow this instruction could result
in personal injury. WARNING: Do not put coolant in the
windshield washer reservoir. If sprayed on
the windshield, coolant could make it
difficult to see through the windshield. WARNING:
To reduce the risk of
personal injury, make sure the engine is
cool before unscrewing the coolant
pressure relief cap. The cooling system is
under pressure. Steam and hot liquid can
come out forcefully when you loosen the
cap slightly. WARNING:
Do not add coolant
further than the MAX mark.
When the engine is cold, check the
concentration and level of the coolant at the
intervals listed in the scheduled maintenance
information.
See Scheduled Maintenance
(page 539).
Note: Make sure that the coolant level is
between the
MIN and MAX marks on the
coolant reservoir.
Note: Coolant expands when it is hot. The
level may extend beyond the
MAX mark.
Maintain coolant concentration within 48%
to 50%, which equates to a freeze point
between
-29°F (-34°C) and -35°F (-37°C).
Coolant concentration should be checked
using a refractometer. We do not recommend
the use of hydrometers or coolant test strips
for measuring coolant concentration.
383
Navigator (TB9) Canada/United States of America, enUSA, First-Printing MaintenanceE248800
Page 387 of 639
Adding Coolant
WARNING: Do not remove the
coolant reservoir cap when the engine is
on or the cooling system is hot. Wait 10
minutes for the cooling system to cool
down. Cover the coolant reservoir cap with
a thick cloth to prevent the possibility of
scalding and slowly remove the cap.
Failure to follow this instruction could result
in personal injury. WARNING:
Do not add engine
coolant when the engine is on or the
cooling system is hot. Failure to follow this
instruction could result in personal injury.
Note: Automotive fluids are not
interchangeable. Take care not to put
engine coolant in the windshield washer fluid
reservoir or windshield washer fluid in the
engine coolant reservoir. Note:
Do not use stop leak pellets, cooling
system sealants, or non-specified additives
as they can cause damage to the engine
cooling or heating systems. Resulting
component damage may not be covered by
the vehicle Warranty.
It is very important to use prediluted coolant
approved to the correct specification in order
to avoid plugging the small passageways in
the engine cooling system.
See Capacities
and Specifications (page 440). Do not mix
different colors or types of coolant in your
vehicle. Mixing of engine coolants or using
an incorrect coolant may harm the engine or
cooling system components and may not be
covered by the vehicle Warranty.
Note: If prediluted coolant is not available,
use the approved concentrated coolant
diluting it to 50/50 with distilled water.
See
Capacities and Specifications (page 440).
Using water that has not been deionised
may contribute to deposit formation,
corrosion and plugging of the small cooling
system passageways. Note:
Coolants marketed for all makes and
models may not be approved to our
specifications and may cause damage to
the cooling system. Resulting component
damage may not be covered by the vehicle
Warranty.
If the coolant level is at or below the
minimum mark, add prediluted coolant
immediately.
To top up the coolant level do the following:
1. Unscrew the cap slowly. Any pressure escapes as you unscrew the cap.
2. Add prediluted coolant approved to the correct specification. See Capacities and
Specifications
(page 440).
3. Add enough prediluted coolant to reach
the correct level.
4. Replace the coolant reservoir cap. Turn the cap clockwise until it contacts the
hard stop.
5. Check the coolant level in the coolant reservoir the next few times you drive
your vehicle. If necessary, add enough
prediluted engine coolant to bring the
coolant level to the correct level.
384
Navigator (TB9) Canada/United States of America, enUSA, First-Printing Maintenance
Page 389 of 639
Coolant Change
At specific mileage intervals, as listed in the
scheduled maintenance information, the
coolant should be changed. Add prediluted
coolant approved to the correct specification.
See Capacities and Specifications (page
440).
Fail-Safe Cooling
Fail-safe cooling allows you to temporarily
drive your vehicle before any incremental
component damage occurs. The fail-safe
distance depends on ambient temperature,
vehicle load and terrain.
How Fail-Safe Cooling Works If the engine begins to overheat,
the coolant temperature gauge
moves toward the red zone:
A warning lamp illuminates and a
message may appear in the
information display. If the engine reaches a preset
over-temperature condition, the engine
automatically switches to alternating cylinder
operation. Each disabled cylinder acts as an
air pump and cools the engine.
When this occurs, your vehicle still operates,
however:
•
Engine power is limited.
• The air conditioning system turns off.
Continued operation increases the engine
temperature, causing the engine to
completely shut down. Your steering and
braking effort increases in this situation.
When the engine temperature cools, you can
re-start the engine. Have your vehicle
checked as soon as possible to minimize
engine damage. When Fail-Safe Mode Is Activated WARNING: Fail-safe mode is for use
during emergencies only. Operate your
vehicle in fail-safe mode only as long as
necessary to bring your vehicle to rest in
a safe location and seek immediate repairs.
When in fail-safe mode, your vehicle will
have limited power, will not be able to
maintain high-speed operation, and may
completely shut down without warning,
potentially losing engine power, power
steering assist, and power brake assist,
which may increase the possibility of a
crash resulting in serious injury. WARNING:
Do not remove the
coolant reservoir cap when the engine is
on or the cooling system is hot. Wait 10
minutes for the cooling system to cool
down. Cover the coolant reservoir cap with
a thick cloth to prevent the possibility of
scalding and slowly remove the cap.
Failure to follow this instruction could result
in personal injury.
386
Navigator (TB9) Canada/United States of America, enUSA, First-Printing Maintenance
Page 546 of 639
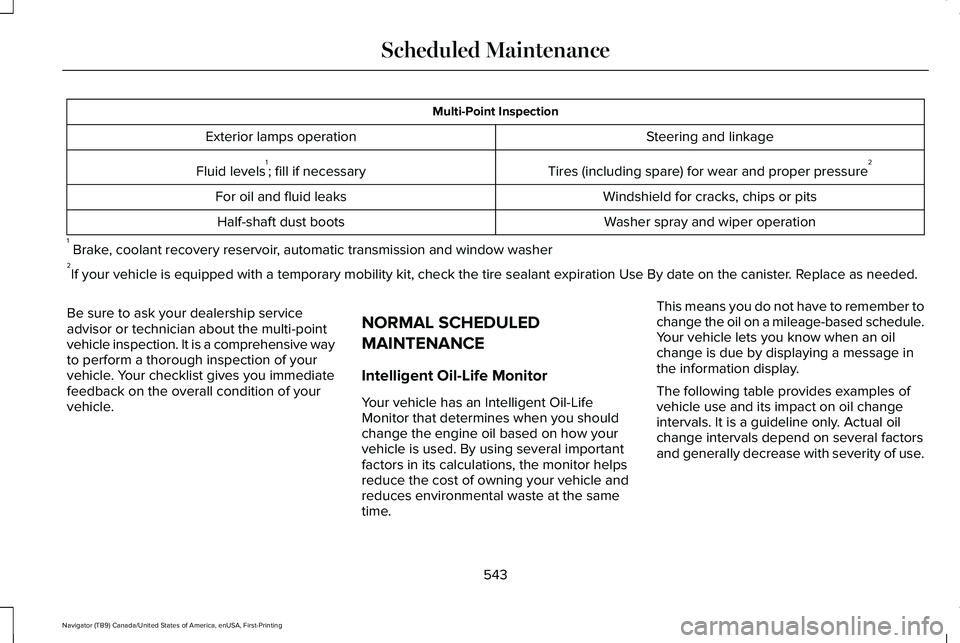
Multi-Point Inspection
Steering and linkage
Exterior lamps operation
Tires (including spare) for wear and proper pressure2
Fluid levels 1
; fill if necessary
Windshield for cracks, chips or pits
For oil and fluid leaks
Washer spray and wiper operation
Half-shaft dust boots
1 Brake, coolant recovery reservoir, automatic transmission and window washer
2 If your vehicle is equipped with a temporary mobility kit, check the tir\
e sealant expiration Use By date on the canister. Replace as needed.
Be sure to ask your dealership service
advisor or technician about the multi-point
vehicle inspection. It is a comprehensive way
to perform a thorough inspection of your
vehicle. Your checklist gives you immediate
feedback on the overall condition of your
vehicle. NORMAL SCHEDULED
MAINTENANCE
Intelligent Oil-Life Monitor
Your vehicle has an Intelligent Oil-Life
Monitor that determines when you should
change the engine oil based on how your
vehicle is used. By using several important
factors in its calculations, the monitor helps
reduce the cost of owning your vehicle and
reduces environmental waste at the same
time.This means you do not have to remember to
change the oil on a mileage-based schedule.
Your vehicle lets you know when an oil
change is due by displaying a message in
the information display.
The following table provides examples of
vehicle use and its impact on oil change
intervals. It is a guideline only. Actual oil
change intervals depend on several factors
and generally decrease with severity of use.
543
Navigator (TB9) Canada/United States of America, enUSA, First-Printing Scheduled Maintenance
Page 626 of 639
Engine Coolant...................................................442
Engine Oil.............................................................443
Front Axle.............................................................449
Fuel Tank..............................................................446
Grease...................................................................446
Hydraulic Brake System....................................447
Locks......................................................................447
Rear Axle..............................................................449
Transfer Case......................................................448
Washer Reservoir...............................................450
Cargo Nets.....................................................307
Car Wash See: Cleaning the Exterior...............................397
Catalytic Converter
......................................224
On-Board Diagnostics (OBD-II).......................225
Readiness for Inspection and Maintenance
(I/M) Testing.....................................................226
Center Console
............................................205
Changing a Bulb...........................................395
LED Lamps...........................................................395
Changing a Fuse...........................................374 Fuses......................................................................374
Changing a Road Wheel............................429 Dissimilar Spare Wheel and Tire Assembly
Information......................................................430
Location of the Spare Tire and Tools............430
Tire Change Procedure.....................................
431 Changing the 12V Battery..........................390
Battery Management System..........................392
Changing the Engine Air Filter.................382
Changing the Vehicle Wi-Fi Hotspot Name or Password................................................459
Changing the Wiper Blades......................394
Charging a Wireless Device......................204
Checking MyKey System Status
..................81
MyKey Distance......................................................81
Number of Admin Keys.......................................82
Number of MyKeys...............................................82
Checking the Wiper Blades.......................394
Childminder Mirror
........................................123
Child Restraint and Seatbelt Maintenance..................................................54
Child Restraint Positioning
...........................42
Child Safety......................................................24
General Information.............................................24
Child Safety Locks
..........................................44
Left-Hand Side.......................................................44
Right-Hand Side....................................................44
Cleaning Leather Seats..............................403
Cleaning Products.......................................396 Materials...............................................................396
Cleaning the Engine
....................................399
Cleaning the Exterior...................................397 Cleaning the Exterior Lamps...........................397
Cleaning the Exterior Precautions.................397 Exterior Chrome Parts.......................................398
Exterior Plastic Parts..........................................398
Stripes or Graphics............................................398
Underbody...........................................................398
Under Hood.........................................................398
Cleaning the Instrument Panel and Instrument Cluster Lens...........................402
Cleaning the Interior...................................400 Cleaning Black Label or Presidential
Interior..............................................................400
Cleaning the Wheels
...................................403
Cleaning the Windows and Wiper Blades...........................................................399
Clearing All MyKeys........................................81
Climate............................................................499 Accessing Rear Climate Controls..................502
Accessing the Climate Control Menu...........499
Directing the Airflow..........................................499
Rear Climate Control Lock Indicator.............502
Setting the Blower Motor Speed...................
500
Setting the Temperature..................................500
Switching Auto Mode On and Off.................500
Switching Dual Zone Mode On and Off.......500
Switching Maximum Air Conditioning On and Off.......................................................................501
Switching Maximum Defrost On and Off......501
Switching Rear Auto Mode On and Off........502
Switching Recirculated Air On and Off..........501
623
Navigator (TB9) Canada/United States of America, enUSA, First-Printing Index