flat tire LINCOLN NAVIGATOR 2021 Owners Manual
[x] Cancel search | Manufacturer: LINCOLN, Model Year: 2021, Model line: NAVIGATOR, Model: LINCOLN NAVIGATOR 2021Pages: 639, PDF Size: 6.09 MB
Page 52 of 639
length of webbing back toward the stowed
position. For rear seatbelts, recline the rear
seat backrest or push the seat backrest
cushion away from the seatbelt. Feed a small
length of webbing back toward the stowed
position.
Automatic Locking Mode
In this mode, the shoulder belt automatically
pre-locks. The belt still retracts to remove
any slack in the shoulder belt. The automatic
locking mode is not available on the driver
seatbelt.
When to Use the Automatic Locking Mode
Use this mode when you install a child safety
seat, except a booster, in the passenger front
or rear seating positions. Properly restrain
children 12 years old and under in a rear
seating position whenever possible. See
Seatbelts (page 45).
How to Use the Automatic Locking Mode
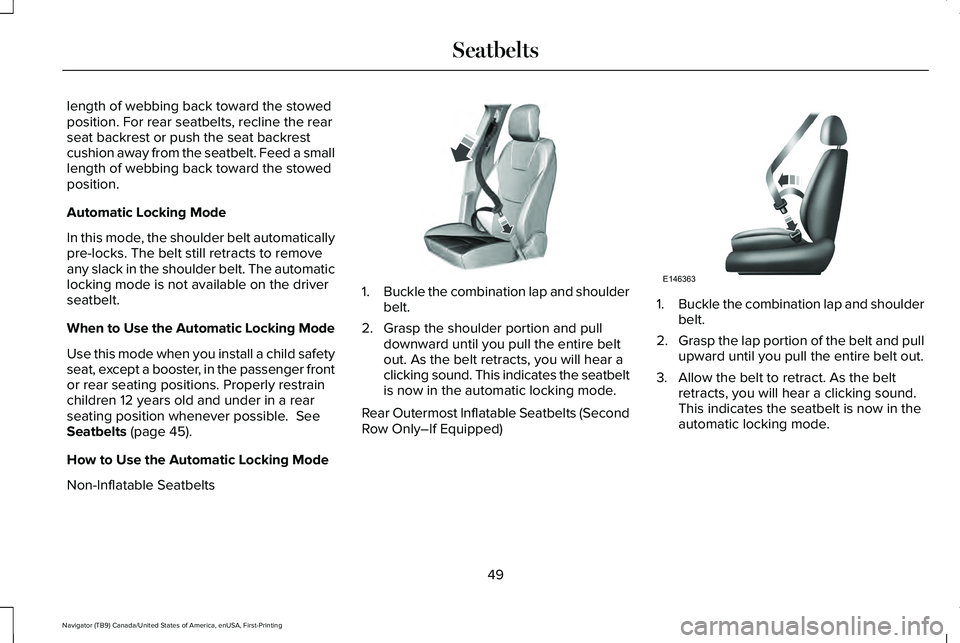
Non-Inflatable Seatbelts 1.
Buckle the combination lap and shoulder
belt.
2. Grasp the shoulder portion and pull downward until you pull the entire belt
out. As the belt retracts, you will hear a
clicking sound. This indicates the seatbelt
is now in the automatic locking mode.
Rear Outermost Inflatable Seatbelts (Second
Row Only–If Equipped) 1.
Buckle the combination lap and shoulder
belt.
2. Grasp the lap portion of the belt and pull
upward until you pull the entire belt out.
3. Allow the belt to retract. As the belt retracts, you will hear a clicking sound.
This indicates the seatbelt is now in the
automatic locking mode.
49
Navigator (TB9) Canada/United States of America, enUSA, First-Printing SeatbeltsE142591 E146363
Page 261 of 639
If the system is not available, the side
distance indicator blocks do not display.
ACTIVE PARK ASSIST
WARNING: You must remain in your
vehicle when the system turns on. At all
times, you are responsible for controlling
your vehicle, supervising the system and
intervening, if required. Failure to take care
may result in the loss of control of your
vehicle, serious personal injury or death. WARNING: The sensors may not
detect objects in heavy rain or other
conditions that cause interference. WARNING:
Active park assist does
not apply the brakes under any
circumstances. WARNING:
You are responsible for
controlling your vehicle at all times. The
system is designed to be an aid and does
not relieve you of your responsibility to
drive with due care and attention. Failure
to follow this instruction could result in the
loss of control of your vehicle, personal
injury or death.
Active park assist is a multi-step process and
may require you to shift the transmission
multiple times. Follow the onscreen
instructions until the parking maneuver is
complete.
If you are uncomfortable with the proximity
to any vehicle or object, you may choose to
override the system by grabbing the steering
wheel, or by taking full control of your vehicle
after pressing the active park assist button.
Keep your hands, hair, clothing and any
loose items clear of the steering wheel when
using active park assist.
The sensors are on the front and rear
bumpers. Note:
Keep the sensors free from snow, ice
and large accumulations of dirt.
Note: Do not cover up the sensors.
Note: Do not clean the sensors with sharp
objects.
Note: The sensors may not detect objects
with surfaces that absorb ultrasonic waves.
The sensors may falsely detect objects due
to ultrasonic interference caused by
motorcycle exhausts, truck air brakes or
horns, for example.
Note: If you change any tires, the system
must recalibrate and may not correctly
operate for a short time.
The system may not correctly operate in any
of the following conditions:
• You use a spare tire or a tire that is
significantly worn more than the other
tires.
• One or more tires are incorrectly inflated.
• You try to park on a tight curve.
• Something passes between the front
bumper and the parking space. For
example, a pedestrian or cyclist.
258
Navigator (TB9) Canada/United States of America, enUSA, First-Printing Parking Aids
Page 262 of 639
•
The edge of the neighboring parked
vehicle is high off the ground. For
example, a bus, tow truck or flatbed
truck.
• The weather conditions are poor. For
example, during heavy rain, snow, fog,
high humidity and high temperatures.
Do not use the system if:
• You have attached an add-on accessory
close to the sensors on the front or rear
of your vehicle. For example, a bike rack
or trailer.
• You have attached an overhanging
object to the roof. For example, a
surfboard.
• The front bumper, rear bumper or the
side sensors are damaged.
• The correct tire size is not in use on your
vehicle. For example, a mini-spare tire. Using Active Park Assist
Selecting an Active Park Assist Mode Press the button once to activate
parallel parking. Press the button
a second time to activate
perpendicular parking. If you press the
button again the system switches off.
If your vehicle is parked and after you switch
the ignition on, you can use the information
display to toggle through the modes. Press
the button to switch the system on and open
the system menu in the information display.
Note: If your vehicle is parked, the default
mode is parallel park out assist. However, if
you did not use active park assist to parallel
park your vehicle, use the information
display to select park out assist.
Note: You can repeatedly press the active
park assist button to toggle through the
modes only after moving your vehicle
approximately 33 ft (10 m). To toggle through the modes, use the
buttons on the information display to select
the following:
•
Parallel parking.
• Perpendicular parking.
• Parallel park out assist.
• Switch the system off.
Note: There is no time limit for toggling
through the modes.
Parallel Parking
The system detects available parallel parking
spaces and steers your vehicle into the
space. You control the accelerator, gearshift
and brakes. The system visually and audibly
guides you into a parallel parking space. Press the button once to search
for a parking space.
Note: You can also switch the system on
after you have already driven partially or
completely past a parking space. Press the
active park assist button and the system
informs you if you have recently passed a
suitable parking space.
259
Navigator (TB9) Canada/United States of America, enUSA, First-Printing Parking AidsE146186 E146186
Page 268 of 639
Possible Cause
Symptom
An irregular curb along the parking space prevents the system from corre\
ctly aligning
your vehicle.
Vehicles or objects bordering the space may not be correctly parked.
Your vehicle stopped too far past the parking space.
The tires may not be correctly installed or maintained. For example, not inflated correctly,
improper size, or of different sizes.
A repair or alteration changes the detection capabilities.
A parked vehicle has a high attachment. For example, a salt sprayer, snowplow or moving
truck bed.
The parking space length or position of parked objects changes after your vehicle passes
the space.
The temperature around your vehicle quickly changes. For example, driving from a
heated garage into the cold, or after leaving a car wash.
265
Navigator (TB9) Canada/United States of America, enUSA, First-Printing Parking Aids
Page 290 of 639
Why is the feature not available (line markings are gray) when I can s\
ee the lane markings on the road?
Lane width is too narrow or too wide.
The camera has not been calibrated after a windshield replacement.
Driving on tight roads or on uneven roads. Why does the vehicle not come back toward the middle of the lane, as expected, in the Aid or Aid + Alert mode?
High cross winds are present.
There is a large road crown.
Rough roads, grooves or shoulder drop-offs.
Heavy uneven loading of the vehicle or improper tire inflation pressure.
The tires have been changed, or the suspension has been modified.
287
Navigator (TB9) Canada/United States of America, enUSA, First-Printing Driving Aids
Page 328 of 639

•
Placing the sticker on a surface angled
away from the vehicle reduces
performance. Use a drawbar that
positions the trailer level to the ground
when attached to vehicle. This typically
provides a level surface to mount the
sticker. Place the sticker on a bracket or
other object when no level surface is
available.
• Make sure the entire sticker is on a flat
surface that is completely visible to the
camera. Do not fold the sticker over an
edge on the trailer frame. This can
degrade performance.
• Shadows on the sticker may effect
tracking performance under some
lighting conditions. Moving the sticker to
another location within the allowed
placement area may improve
performance. Use the change sticker
option in your Towing menu if you move
the sticker. •
You can change your sticker location by
going into the Towing menu, selecting
trailer options, selecting change trailer
settings and then selecting the change
sticker option. The previous sticker must
be removed. ONLY ONE STICKER
SHOULD BE PLACED ON THE TRAILER
FOR CORRECT SYSTEM FUNCTION.
• The camera system uses the entered
measurements to help locate the sticker.
Inaccurate measurements will reduce the
system ’s ability to locate the sticker.
Check the measurements entered into
the system are correct. Refer to the step
4 of Pro trailer backup Assist setup for
instructions on measurements.
• You can change your measurement by
going into the Towing menu, selecting
trailer options, selecting change trailer
setting and then selecting the change
sticker option. Disregard the prompt to
remove this sticker and continue to the
next step if you only plan to update the
measurements for the current sticker
location. System will not backup straight:
•
Factors such as the drawbar connection
to the hitch receiver, road camber, road
grade and compliance in the trailer
suspension can influence how straight
the system is able to back your trailer
when the knob is not turned. You can
compensate for the trailer drifting to the
right or left by slowly turning the Pro
Trailer Backup Assist knob until the trailer
is following your desired path and then
holding the knob in that position. If you
would like to recalibrate the system for
straight backing, you can do so with the
following procedure.
• Go into the Towing menu, select trailer
options, select change trailer setting and
then select the change sticker option.
Your saved measurements will be
displayed. Do not change them but
continue to confirm measurements. Once
you confirm the measurements, the
system will then prompt you to perform
the calibration procedure.
325
Navigator (TB9) Canada/United States of America, enUSA, First-Printing Towing
Page 344 of 639
REDUCED ENGINE PERFORMANCE
WARNING: If you continue to drive
your vehicle when the engine is
overheating, the engine could stop without
warning. Failure to follow this instruction
could result in the loss of control of your
vehicle.
If the engine coolant temperature gauge
needle moves to the upper limit position, the
engine is overheating.
See Gauges (page
127).
You must only drive your vehicle for a short
distance if the engine overheats. The
distance you can travel depends on ambient
temperature, vehicle load and terrain. The
engine continues to operate with limited
power for a short period of time.
If the engine temperature continues to rise,
the fuel supply to the engine reduces. The
air conditioning switches off and the engine
cooling fan operates continually. 1. Gradually reduce your speed and stop
your vehicle as soon as it is safe to do
so.
2. Immediately switch the engine off to prevent severe engine damage.
3. Wait for the engine to cool down.
4. Check the coolant level.
See Engine
Coolant Check (page 383).
5. Have your vehicle checked as soon as possible.
ECONOMICAL DRIVING
Fuel economy is affected by several things
such as how you drive, the conditions you
drive under and how you maintain your
vehicle.
There are some things to keep in mind that
may improve your fuel economy:
• Accelerate and slow down in a smooth,
moderate fashion.
• Drive at steady speeds.
• Anticipate stops; slowing down may
eliminate the need to stop. •
Combine errands and minimize
stop-and-go driving (When running
errands, go to the furthest destination
first and then work your way back home).
• Close the windows for high-speed
driving.
• Drive at reasonable speeds.
• Keep the tires properly inflated and use
only the recommended size.
• Use the recommended engine oil.
• Perform all regularly scheduled
maintenance.
There are also some things you may want to
avoid doing because they reduce your fuel
economy:
• Avoid sudden or hard accelerations.
• Avoid revving the engine before turning
off the car.
• Avoid long idle periods.
• Do not warm up your vehicle on cold
mornings.
• Reduce the use of air conditioning and
heat.
• Avoid using speed control in hilly terrain.
341
Navigator (TB9) Canada/United States of America, enUSA, First-Printing Driving Hints
Page 347 of 639
ROADSIDE ASSISTANCE
Vehicles sold in the United States:
Getting Roadside Assistance
To fully assist you should you have a vehicle
concern, Lincoln Motor Company offers a
complimentary roadside assistance program.
This program is separate from the New
Vehicle Limited Warranty.
The service is available:
•
Throughout the life of the vehicle for
original owners.
• For six years or 70,000 mi (110,000 km)
(whichever comes first) for subsequent
owners.
Roadside Assistance covers:
• A flat tire change with a good spare
(except vehicles supplied with a tire
inflation kit).
• Battery jump start.
• Lock-out assistance (key replacement
cost is the client's responsibility). •
Fuel delivery — independent service
contractors, if not prohibited by state,
local or municipal law shall deliver up to
2 gal (8 L)
of gasoline fuel to a disabled
vehicle. Roadside Assistance limits fuel
delivery service to two no-charge
occurrences within a 12-month period.
• Winch out — available within 100 ft (30 m)
of a paved or county maintained road,
no recoveries. •
Towing — independent service
contractors, if not prohibited by state,
local or municipal law shall tow Lincoln
eligible vehicles to the client's selling or
preferred dealer within 100 mi (160 km)
of the disablement location or to the
nearest Lincoln dealer. If a client requests
a tow to a selling or preferred dealer that
is more than
100 mi (160 km) from the
disablement location, the client is
responsible for any mileage costs in
excess of
100 mi (160 km).
• Roadside Assistance includes up to $200
for a towed trailer if the disabled eligible
vehicle requires service at the nearest
authorized dealer. If the towing vehicle
is operational but the trailer is not, then
the trailer does not qualify for any
roadside services.
Vehicles Sold in the United States:
Using Roadside Assistance
United States clients who require roadside
assistance, call 1-800-521-4140 or contact
Roadside Assistance using the Lincoln Way
mobile app.
344
Navigator (TB9) Canada/United States of America, enUSA, First-Printing Roadside Emergencies
Page 408 of 639
Fuel system
•
Fill the fuel tank with high-quality fuel
until the first automatic shutoff of the fuel
pump nozzle.
Cooling system
• Protect against freezing temperatures.
• When removing your vehicle from
storage, check coolant fluid level.
Confirm that there are no cooling system
leaks and that fluid is at the
recommended level.
Disconnecting Your 12 Volt Battery
• Check and recharge as necessary. Keep
connections clean.
• If storing your vehicle for more than 30
days without recharging the battery, we
recommend that you disconnect the
battery cables to maintain battery charge
for quick starting.
Note: It is necessary to reset memory
features if you disconnect the battery cables. Brakes
•
Make sure the brakes and parking brake
release fully.
Tires
• Maintain recommended air pressure.
Miscellaneous
• Make sure all linkages, cables, levers and
pins under your vehicle are covered with
grease to prevent rust.
• Move vehicles at least 25 ft (7.5 m) every
15 days to lubricate working parts and
prevent corrosion.
Removing Vehicle From Storage
When your vehicle is ready to come out of
storage, do the following:
• Wash your vehicle to remove any dirt or
grease film build-up on window surfaces.
• Check windshield wipers for any
deterioration. •
Check under the hood for any foreign
material that may have collected during
storage such as mice or squirrel nests.
• Check the exhaust for any foreign
material that may have collected during
storage.
• Check tire pressures and set tire inflation
per the Tire Label.
• Check brake pedal operation. Drive your
vehicle 15 ft (4.5 m) back and forth to
remove rust build-up.
• Check fluid levels (including coolant, oil
and gas) to make sure there are no leaks,
and fluids are at recommended levels.
• If you remove the battery, clean the
battery cable ends and check for
damage.
Contact an authorized dealer if you have any
concerns or issues.
405
Navigator (TB9) Canada/United States of America, enUSA, First-Printing Vehicle Care
Page 410 of 639
GENERAL INFORMATION
Use only approved wheel and tire sizes,
using other sizes could damage your vehicle.
If you change the diameter of the tires from
that fitted at the factory, the speedometer
may not display the correct speed. If you
intend to change the size of the wheels from
that fitted by the manufacturer, you can
check the suitability with an authorized
dealer.
Additional information related to the
functionality and maintenance of your tires
can be found later in this chapter. See Tire
Care (page 409).
You can find the recommended tire inflation
pressures can on the Tire Label, which is on
the B-pillar or the edge of the driver door.
You can also find this information on the
Safety Compliance Certification Label, affixed
to either the door hinge pillar, door-latch
post, or the door edge that meets the door
latch post; next to the driver seating position. We strongly recommend maintaining these
tire pressures at all times. Failure to follow
the tire pressure recommendations can
cause uneven treadwear patterns, reduced
fuel economy, and adversely affect the way
your vehicle handles.
Note:
Check and set the tire pressure at the
ambient temperature in which you are
intending to drive your vehicle and when the
tires are cold.
Note: Check your tire pressures at least once
per month.
If your vehicle has a spare tire, set the
pressure to the highest value given for your
vehicle and tire size combination.
Notice to utility vehicle and truck
owners WARNING:
Utility vehicles have a
significantly higher rollover rate than other
types of vehicles. WARNING:
Vehicles with a higher
center of gravity (utility and four-wheel
drive vehicles) handle differently than
vehicles with a lower center of gravity
(passenger cars). Avoid sharp turns,
excessive speed and abrupt steering in
these vehicles. Failure to drive cautiously
increases the risk of losing control of your
vehicle, vehicle rollover, personal injury
and death. WARNING:
In a rollover crash, an
unbelted person is significantly more likely
to die than a person wearing a seatbelt. WARNING:
Do not become
overconfident in the ability of four-wheel
drive vehicles. Although a four-wheel drive
vehicle may accelerate better than a
two-wheel drive vehicle in low traction
situations, it won't stop any faster than
two-wheel drive vehicles. Always drive at
a safe speed.
407
Navigator (TB9) Canada/United States of America, enUSA, First-Printing Wheels and Tires