sport mode LINCOLN NAVIGATOR 2021 Owners Manual
[x] Cancel search | Manufacturer: LINCOLN, Model Year: 2021, Model line: NAVIGATOR, Model: LINCOLN NAVIGATOR 2021Pages: 639, PDF Size: 6.09 MB
Page 8 of 639
Parking Aids
Principle of Operation
.................................251
Rear Parking Aid ..........................................
252
Front Parking Aid ........................................
254
Side Sensing System .................................
256
Active Park Assist .......................................
258
Rear View Camera ......................................
266
360 Degree Camera ..................................
269
Cruise Control
What Is Cruise Control ...............................
272
Switching Cruise Control On and Off ......
272
Setting the Cruise Control Speed ...........
272
Canceling the Set Speed ..........................
273
Resuming the Set Speed ...........................
273
Cruise Control Indicators ...........................
273
Using Adaptive Cruise Control ................
273
Driving Aids
Driver Alert .....................................................
281
Lane Keeping System ................................
282
Blind Spot Information System ................
288
Cross Traffic Alert ........................................
292Steering
.........................................................
297
Pre-Collision Assist .....................................
298
Drive Mode Control ....................................
303
Load Carrying
Rear Under Floor Storage .........................
305
Cargo Nets ....................................................
307
Roof Racks and Load Carriers .................
308
Load Limit ......................................................
309
Towing
Towing a Trailer .............................................
315
Trailer Reversing Aids .................................
316
Trailer Sway Control ....................................
327
Recommended Towing Weights ..............
327
Essential Towing Checks ..........................
330
Towing the Vehicle on Four Wheels ......
338
Driving Hints
Reduced Engine Performance ..................
341
Economical Driving ......................................
341
Breaking-In ....................................................
342
Driving Through Water ..............................
342Floor Mats
.....................................................
342
Roadside Emergencies
Roadside Assistance ..................................
344
Hazard Flashers ...........................................
345
Fuel Shutoff ..................................................
345
Jump Starting the Vehicle .........................
346
Post-Crash Alert System ............................
348
Transporting the Vehicle ...........................
349
Towing Points ...............................................
349
Customer Assistance
Getting the Services You Need ................
351
In California (U.S. Only) ..............................
352
The Better Business Bureau (BBB) Auto Line Program (U.S. Only) .......................
353
Utilizing the Mediation/Arbitration Program (Canada Only) ..........................................
354
Getting Assistance Outside the U.S. and Canada ......................................................
355
Ordering Additional Owner's Literature ......................................................................
357
Reporting Safety Defects (U.S. Only) ......
358
5
Navigator (TB9) Canada/United States of America, enUSA, First-Printing Table of Contents
Page 32 of 639
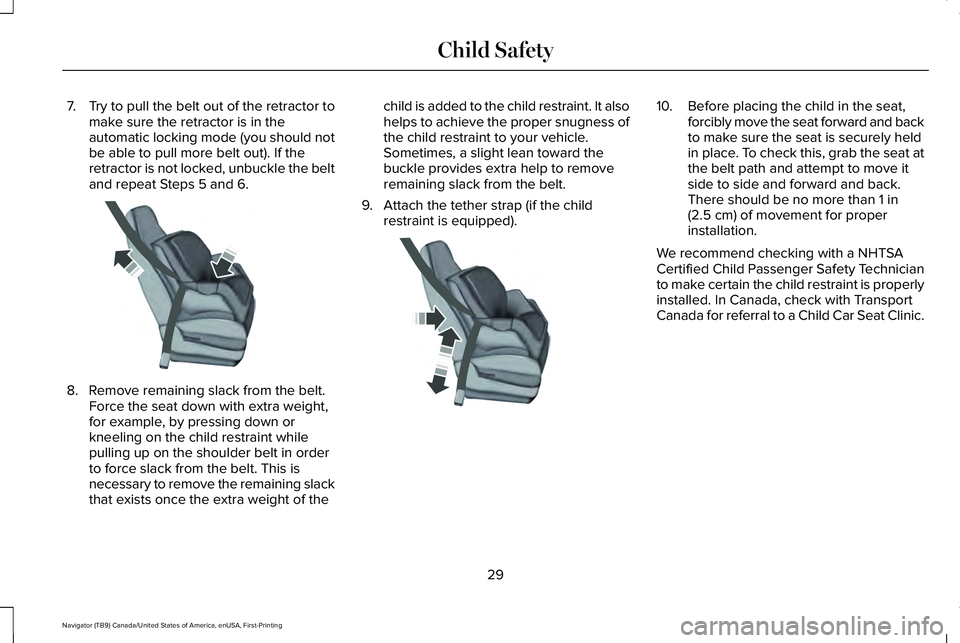
7.
Try to pull the belt out of the retractor to
make sure the retractor is in the
automatic locking mode (you should not
be able to pull more belt out). If the
retractor is not locked, unbuckle the belt
and repeat Steps 5 and 6. 8. Remove remaining slack from the belt.
Force the seat down with extra weight,
for example, by pressing down or
kneeling on the child restraint while
pulling up on the shoulder belt in order
to force slack from the belt. This is
necessary to remove the remaining slack
that exists once the extra weight of the child is added to the child restraint. It also
helps to achieve the proper snugness of
the child restraint to your vehicle.
Sometimes, a slight lean toward the
buckle provides extra help to remove
remaining slack from the belt.
9. Attach the tether strap (if the child restraint is equipped). 10. Before placing the child in the seat,
forcibly move the seat forward and back
to make sure the seat is securely held
in place. To check this, grab the seat at
the belt path and attempt to move it
side to side and forward and back.
There should be no more than 1 in
(2.5 cm) of movement for proper
installation.
We recommend checking with a NHTSA
Certified Child Passenger Safety Technician
to make certain the child restraint is properly
installed. In Canada, check with Transport
Canada for referral to a Child Car Seat Clinic.
29
Navigator (TB9) Canada/United States of America, enUSA, First-Printing Child SafetyE142533 E142534
Page 100 of 639
ANTI-THEFT ALARM
The active anti-theft system is designed to
warn you in the event of unauthorized
vehicle entry and is also designed to help
prevent unwanted towing of your vehicle.
You can choose what is monitored by arming
the system in different ways. See
Information Displays (page 134).
The direction indicators flash and the horn
sounds if the system triggers while the alarm
is armed.
Take all remote controls to an authorized
dealer if there is any potential alarm problem
with your vehicle.
Using the System
You can select two levels of alarm security.
You can change the level of security when
the ignition is switched off through the
information display with the two options
below: Perimeter Only (If Equipped)
Perimeter only monitors the following:
•
Doors.
• Hood.
• Liftgate.
All Sensors (If Equipped)
All sensors monitors the following:
• Doors.
• Hood.
• Liftgate.
• Movement inside your vehicle.
• Change in vehicle inclination, for
example, unwanted towing.
Note: Do not choose all sensors monitor
mode when the vehicle is in transport or if
movement within the vehicle is likely to
occur. Note:
For correct operation of the interior
motion detection system, make sure you
close all the windows prior to arming the
system. This helps prevent accidental alarm
activation due to external influences.
Additionally, the interior motion sensing
system does not arm if any door is ajar.
Arming the Alarm
The alarm is ready to arm when there is not
a key in the ignition. Lock your vehicle using
the remote control or keyless entry keypad.
You can also lock your vehicle using the lock
sensor on the exterior door handle if your
vehicle is equipped with intelligent access.
See
Locking and Unlocking (page 84).
The direction indicators flash once after you
lock your vehicle. This indicates the alarm is
in the pre-armed mode. It fully arms after 20
seconds.
97
Navigator (TB9) Canada/United States of America, enUSA, First-Printing Security
Page 153 of 639
Maintenance
Action
Message
Stop your vehicle as soon as safely possible, turn off the engine. Check the oil level. If the
message stays on or continues to come on with your engine running, have \
the system checked as soon as possible.
Low Engine Oil Pressure
The engine oil life is low and needs to be changed soon. See General Maintenance
Information (page 539).
Change Engine Oil Soon
The engine oil life is low and needs to be changed immediately. See General MaintenanceInformation
(page 539).
Oil Change Required
The brake fluid level is low and the brake system should be inspected immediately.
See
Brake Fluid Check (page 389).
Brake Fluid Level Low
The brake system needs servicing. Stop the vehicle in a safe place. Have the system checked as soon as possible.
Check Brake System
The engine coolant temperature is excessively high.
Engine Coolant Over Temperature
The washer fluid is low and needs to be refilled.
Washer Fluid Level Low
Indicates that your vehicle is still in Transport mode. This may not allow some features tooperate properly. Have the system checked as soon as possible.
Transport Mode Contact Dealer
Indicates that your vehicle is still in Factory mode. This may not allow some features to operateproperly. Have the system checked as soon as possible.
Factory Mode Contact Dealer
150
Navigator (TB9) Canada/United States of America, enUSA, First-Printing Information Displays
Page 307 of 639
•
NORMAL – For everyday driving. This
mode is a perfect balance of excitement,
comfort and convenience.
• EXCITE – For aggressive on-road driving.
This mode increases throttle response,
provides a sportier steering feel, along
with quicker shifting. The suspension
stiffens, with an emphasis on handling
and control. The transmission also holds
gears longer, helping your vehicle
accelerate faster when shifting gears.
• CONSERVE
– Enables efficient and
responsible driving. It helps deliver
maximum fuel efficiency and increases
driving range.
• NORMAL 4A
– For general on-road
driving. Use this mode on normal firm
surfaces such as dry or wet pavement
and hard packed dirt or gravel roads.
Delivers power to all four wheels, as
required. •
SLIPPERY
– For less than ideal road
conditions, such as snow or ice covered
roads. Slippery mode inspires confidence
without taking away from driving
pleasure. Slippery mode lowers throttle
response and optimizes shifting for
slippery surfaces.
• DEEP CONDITIONS
– Used for crossing
terrain that has deformable deep, rutted
surfaces such as mud, deep snow or
deep sand. Do not use on dry, hard
surfaced roads.
• SLOW CLIMB
– Used when you need
extra power, such as when climbing
steep grades, going through deep sand
or pulling a boat out of a launch ramp.
Do not use on dry, hard surfaced roads.
Slow Climb mode puts you in 4x4 Low
drive line settings.
Note: Slow Climb is only available on
vehicles with 4x4 and a two-speed transfer
case. Note:
The system has diagnostic checks that
continuously monitor the system for proper
operation. Certain drive modes are not
available based on gear shifter position. If
a mode is unavailable due to a system fault
or change in gear shifter position, the mode
defaults to
NORMAL.
304
Navigator (TB9) Canada/United States of America, enUSA, First-Printing Driving Aids
Page 340 of 639
Before Towing a Trailer
Practice turning, stopping and backing up to
get the feel of your vehicle-trailer
combination before starting on a trip. When
turning, make wider turns so the trailer
wheels clear curbs and other obstacles.
When Towing a Trailer
•
Do not drive faster than 70 mph
(113 km/h) during the first 500 mi
(800 km).
• Do not make full-throttle starts.
• Check your hitch, electrical connections
and trailer wheel lug nuts thoroughly after
you have traveled
50 mi (80 km).
• When stopped in congested or heavy
traffic during hot weather, place the
transmission in park (P) to aid engine and
transmission cooling and to help A/C
performance.
• Turn off the speed control when carrying
heavy loads or in hilly terrain. The speed
control may turn off automatically when
you are towing on long, steep grades. •
Shift to a lower gear when driving down
a long or steep hill. Do not apply the
brakes continuously, as they may
overheat and become less effective.
• If your transmission has a Grade Assist
or Tow/Haul feature, use this feature
when towing. This provides engine
braking and helps eliminate excessive
transmission shifting for optimum fuel
economy and transmission cooling.
• If your vehicle has AdvanceTrac with
RSC, this system may turn on during
typical cornering maneuvers with a
heavily loaded trailer. This is normal.
Turning the corner at a slower speed
while towing may reduce this tendency.
• If your vehicle has Adaptive suspension,
you can select NORMAL or SPORT drive
control modes for better experience
when towing a trailer.
See Information
Displays (page 134). •
If you are towing a trailer frequently in
hot weather, hilly conditions, at the gross
combined weight rating (or any
combination of these factors), consider
refilling your rear axle with synthetic gear
lubricant (if the axle is not already filled
with it).
See Capacities and
Specifications (page 438).
• Allow more distance for stopping with a
trailer attached. Anticipate stops and
brake gradually.
• Avoid parking on a grade. However, if
you must park on a grade:
1. Turn the steering wheel to point your vehicle tires away from traffic flow.
2. Set your vehicle parking brake.
3. Place the transmission in park (P).
4. Place wheel chocks in the front and back
of the trailer wheels.
Note: Chocks are not included with your
vehicle.
337
Navigator (TB9) Canada/United States of America, enUSA, First-Printing Towing
Page 411 of 639
Utility vehicles and trucks handle differently
than passenger cars in the various driving
conditions that are encountered on streets,
highways and off-road. Utility vehicles and
trucks are not designed for cornering at
speeds as high as passenger cars any more
than low-slung sports cars are designed to
perform satisfactorily under off-road
conditions.
Study your owner's manual and any
supplements for specific information about
equipment features, instructions for safe
driving and additional precautions to reduce
the risk of an accident or serious injury.
Four-wheel drive system (If Equipped)
WARNING:
Do not become
overconfident in the ability of four-wheel
drive vehicles. Although a four-wheel drive
vehicle may accelerate better than a
two-wheel drive vehicle in low traction
situations, it won't stop any faster than
two-wheel drive vehicles. Always drive at
a safe speed. A vehicle equipped with four-wheel drive,
when selected, has the ability to use all four
wheels to power itself. This increases traction
which may enable you to safely drive over
terrain and road conditions that a
conventional two-wheel drive vehicle cannot.
Power is supplied to all four wheels through
a transfer case or power transfer unit.
Four-wheel drive vehicles allow you to select
different modes as necessary. For
information on transfer case operation and
shifting procedures, See Four-Wheel Drive
(page 233). For information on transfer case
maintenance,
See Maintenance (page 377).
You should become thoroughly familiar with
this information before you operate your
vehicle.
On some four-wheel drive vehicles, the initial
shift from two-wheel to four-wheel drive
when the vehicle is moving can cause a
momentary clunk and ratcheting sound.
These sounds are normal and are not cause
for concern. In four-wheel drive vehicles, the size of the
spare tire relative to the remaining tires can
have an effect on the 4x4 system. If there is
a significant difference between the size of
a spare and the remaining tires, four-wheel
drive functionality may be limited. See Using
Four-Wheel Drive
(page 233).
How your vehicle differs from other
vehicles
Sport utility vehicles and trucks can differ
from some other vehicles in a few noticeable
ways. Your vehicle may be:
408
Navigator (TB9) Canada/United States of America, enUSA, First-Printing Wheels and Tires
Page 637 of 639
Towing the Vehicle on Four Wheels........338
Four-wheel-down Towing.................................339
Recreational Towing..........................................338
Towing..............................................................315
Traction Control............................................247 Principle of Operation.......................................247
Trailer Reversing Aids..................................316
Principle of Operation........................................316
Pro Trailer Backup Assist™.................................316
Setting Up Pro Trailer Backup Assist..............317
Troubleshooting ..................................................322
Using Pro Trailer Backup Assist.....................320
Trailer Sway Control
.....................................327
Transfer Case Fluid Check.........................388
Transmission..................................................227
Transporting the Vehicle
............................349
U
Under Hood Overview................................379
Unique Driving Characteristics
..................212
Universal Garage Door Opener................197 HomeLink Wireless Control System...............197
USB Port...........................................................471 Locating the USB Ports.....................................472
Using Adaptive Cruise Control
.................273
Automatic Cancellation.....................................277
Blocked Sensor...................................................279 Canceling the Set Speed..................................277
Changing the Set Speed..................................276
Detection Issues.................................................277
Following a Vehicle............................................275
Following a Vehicle to a Complete
Stop...................................................................275
Hilly Condition Usage........................................277
Overriding the Set Speed................................276
Park Brake Application......................................277
Resuming the Set Speed..................................277
Setting the Adaptive Cruise Speed...............274
Setting the Adaptive Cruise Speed When Your Vehicle is Stationary......................................274
Setting the Gap Distance.................................275
Switching Adaptive Cruise Control Off.........277
Switching Adaptive Cruise Control On.........274
Switching to Normal Cruise Control..............280
System Not Available........................................279
Using Four-Wheel Drive
.............................233
4X4 Indicator Lights...........................................233
4X4 Modes...........................................................233
Driving Off-Road with Truck and Utility
Vehicles............................................................236
How Your Vehicle Differs from Other Vehicles............................................................235
Operating Four-Wheel Drive Vehicles with Spare or Mismatched Tires.........................235 Using Hill Descent Control........................250
Hill Descent Modes...........................................250
Using MyKey With Remote Start Systems..........................................................82
Using Power Running Boards.....................99 Automatic Power Deploy....................................99
Automatic Power Stow........................................99
Bounce-back........................................................100
Enabling and Disabling......................................100
Manual Power Deploy.......................................100
Using Snow Chains
......................................423
Using Stability Control................................249 Stability Control and Traction Control with Roll
Stability Control™ (RSC™)...............................249
Using the Backup Start Passcode..............76 System Lockout.....................................................77
Using the Valet Mode....................................76
Using Traction Control................................247 Switching the System On and Off..................247
System Indicator Lights and Messages........247
Using Voice Recognition............................475 Audio Voice Commands...................................477
Climate Voice Commands................................
478
Mobile App Voice Commands........................484
Navigation Voice Commands...........................481
Phone Voice Commands..................................
479
SiriusXM Traffic and Travel Link Voice Commands......................................................484
634
Navigator (TB9) Canada/United States of America, enUSA, First-Printing Index