seats LINCOLN TOWN CAR 1997 Owners Manual
[x] Cancel search | Manufacturer: LINCOLN, Model Year: 1997, Model line: TOWN CAR, Model: LINCOLN TOWN CAR 1997Pages: 305, PDF Size: 2.68 MB
Page 69 of 305

65
NOTE:The outside temperature reading is most
accurate when the vehicle is moving. Higher
readings may be obtained when the vehicle is not
moving. The readings that you get may not agree
with temperatures given on the radio due to
differences in vehicle and station locations.Operating tipsThe following tips will help you to get the most
satisfaction from your Electronic Automatic
Temperature Control system.q
In humid weather, select DEFVbefore
starting your engine. This will help to prevent
windshield fogging. After a few minutes of
operation, switch to AUTOMATIC or an
override selection of your choice.
q
To prevent humidity buildup inside your
vehicle, always drive with the EATC System
turned on.
q
Do not put objects under the front seats that
interfere with the flow of air to the back seat
area.
q
Remove any snow, ice, or leaves from the air
intake area of your EATC System which could
block the air intake. The intake area is located
at the bottom of the windshield, under the
hood at the passenger side rear corner.
ServiceIf your EATC is not operating as described here,
take it to your dealer to have it checked. System
diagnostics are built in which will allow your dealer
to readily identify problems that might occur.
File:05fncft.ex
Update:Mon Jun 17 13:49:49 1996
Page 123 of 305
119
Seating and Safety RestraintsSeatsHead RestraintsIf you use them properly, head restraints will help
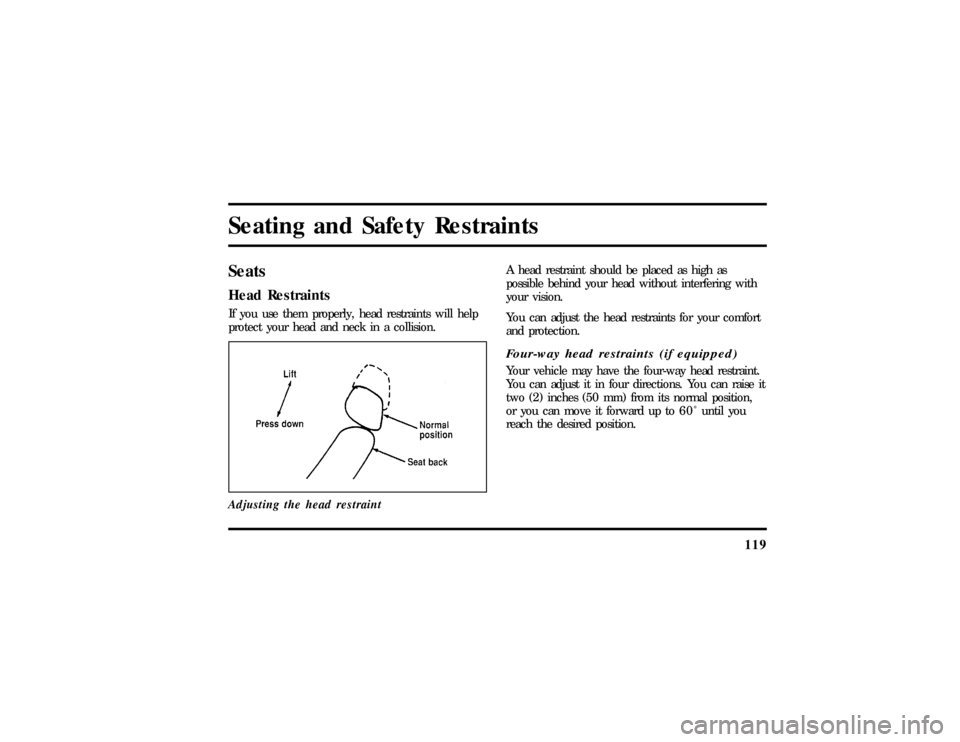
protect your head and neck in a collision.
Adjusting the head restraint
A head restraint should be placed as high as
possible behind your head without interfering with
your vision.
You can adjust the head restraints for your comfort
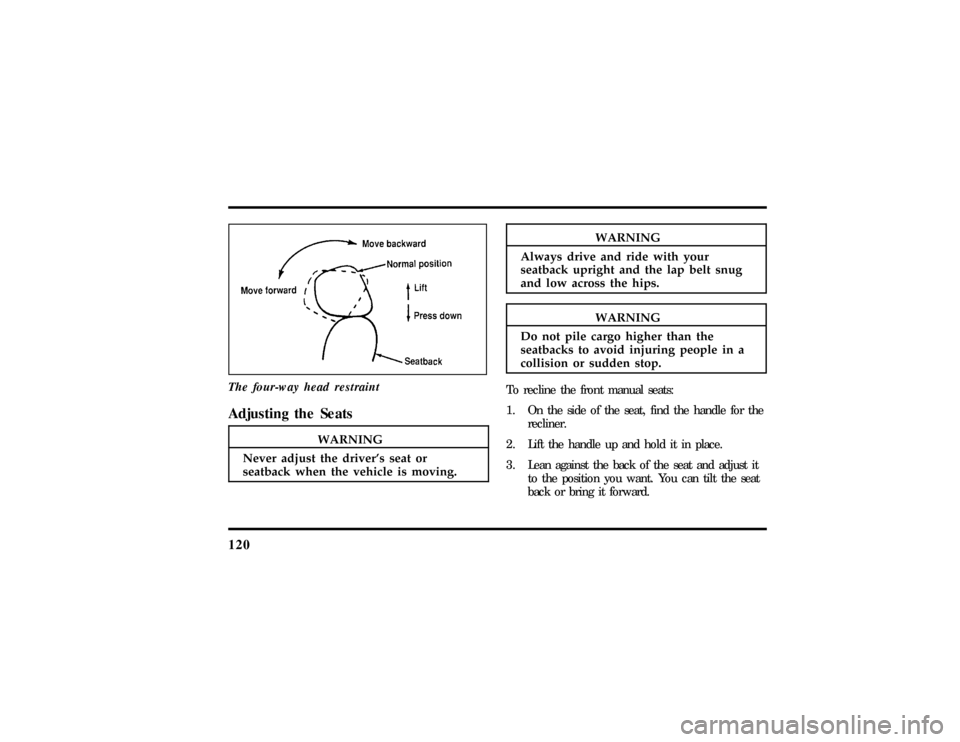
and protection.Four-way head restraints (if equipped)Your vehicle may have the four-way head restraint.
You can adjust it in four directions. You can raise it
two (2) inches (50 mm) from its normal position,
or you can move it forward up to 6 0 Ê until you
reach the desired position.
File:06fnsst.ex
Update:Fri Jun 21 08:57:53 1996
Page 124 of 305
120
Thefour-wa yhea drestraint
Adjustin gth e Seats
WARNING
Neve radjus tth edriver' ssea tor
WARNING
Alway sdriv ean drid ewit hyour
WARNING
Do no tpil ecarg ohighe rtha nthe
Page 125 of 305
121
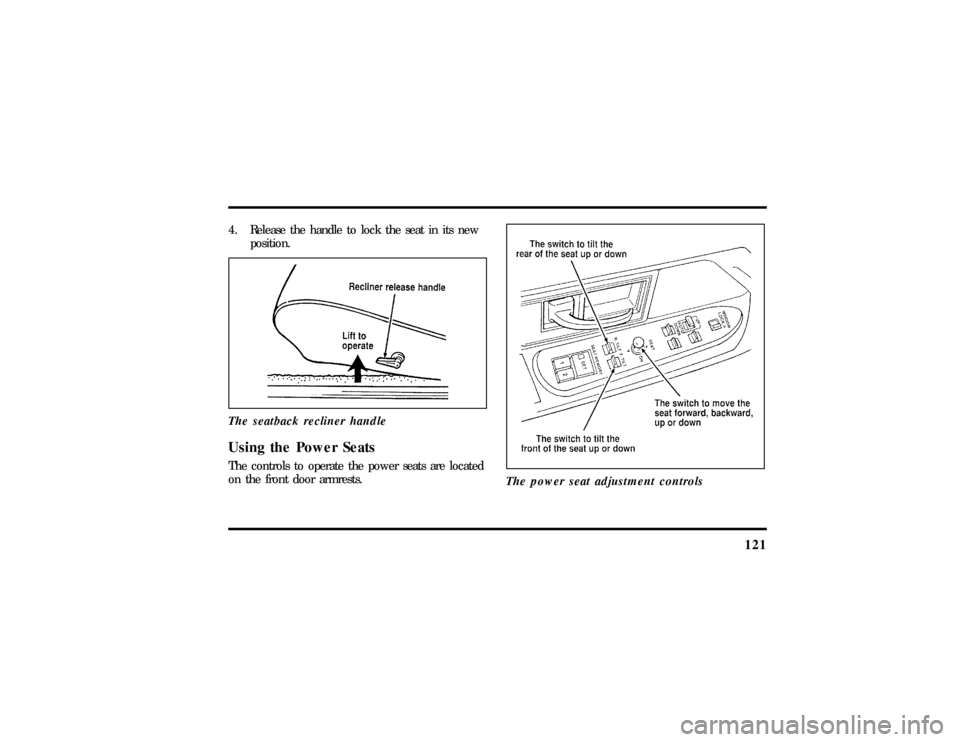
4. Release the handle to lock the seat in its new
position.
The seatback recliner handleUsing the Power SeatsThe controls to operate the power seats are located
on the front door armrests.
The power seat adjustment controls
File:06fnsst.ex
Update:Fri Jun 21 08:57:53 1996
Page 127 of 305
123
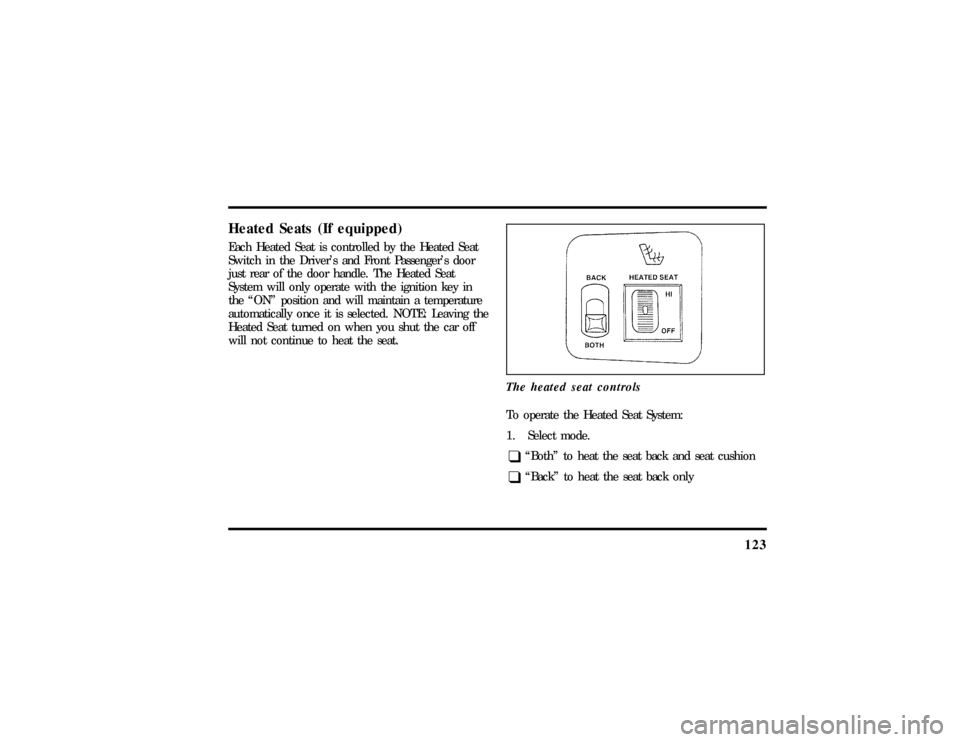
Heated Seats (If equipped)Each Heated Seat is controlled by the Heated Seat
Switch in the Driver's and Front Passenger's door
just rear of the door handle. The Heated Seat
System will only operate with the ignition key in
the ªONº position and will maintain a temperature
automatically once it is selected. NOTE: Leaving the
Heated Seat turned on when you shut the car off
will not continue to heat the seat.
The heated seat controls
To operate the Heated Seat System:
1. Select mode.q
ªBothº to heat the seat back and seat cushion
q
ªBackº to heat the seat back only
File:06fnsst.ex
Update:Fri Jun 21 08:57:53 1996
Page 138 of 305
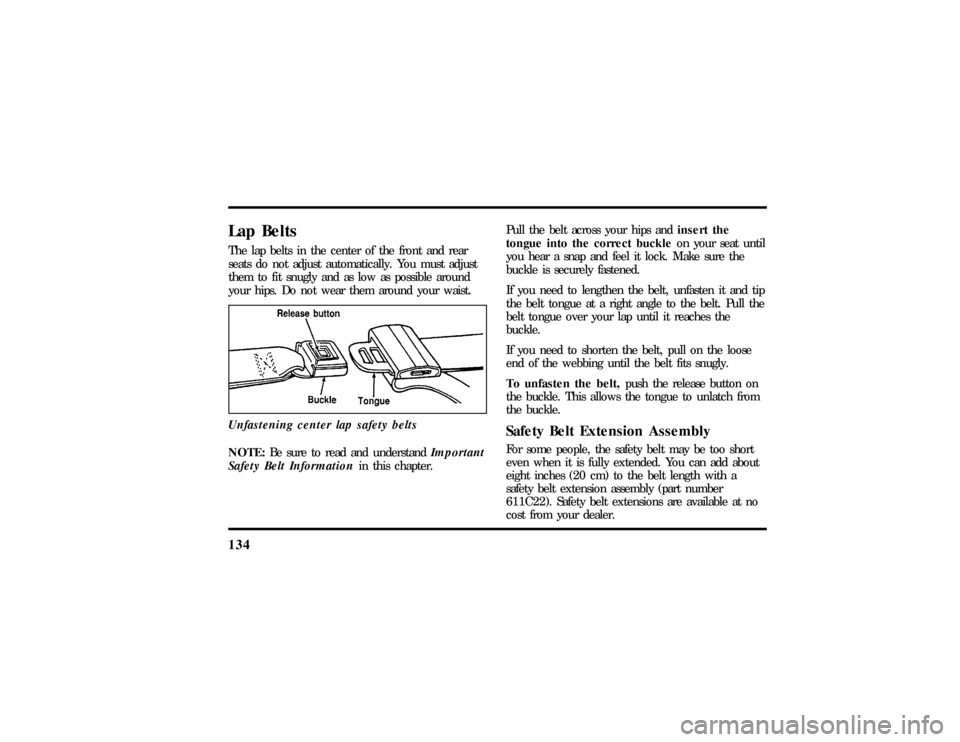
134Lap BeltsThe lap belts in the center of the front and rear
seats do not adjust automatically. You must adjust
them to fit snugly and as low as possible around
your hips. Do not wear them around your waist.
Unfastening center lap safety beltsNOTE:Be sure to read and understandImportant
Safety Belt Informationin this chapter.Pull the belt across your hips andinsert the
tongue into the correct buckleon your seat until
you hear a snap and feel it lock. Make sure the
buckle is securely fastened.
If you need to lengthen the belt, unfasten it and tip
the belt tongue at a right angle to the belt. Pull the
belt tongue over your lap until it reaches the
buckle.
If you need to shorten the belt, pull on the loose
end of the webbing until the belt fits snugly.
To unfasten the belt,push the release button on
the buckle. This allows the tongue to unlatch from
the buckle.
Safety Belt Extension AssemblyFor some people, the safety belt may be too short
even when it is fully extended. You can add about
eight inches (20 cm) to the belt length with a
safety belt extension assembly (part number
611C22). Safety belt extensions are available at no
cost from your dealer.
File:06fnsst.ex
Update:Fri Jun 21 08:57:53 1996
Page 146 of 305

142
WARNING
Rear-facingchil dseat sor infan tcarriers
WARNING
Whe nusin gforward-facin gchil dseats
WARNING
If yo udo no tproperl ysecur eth esafety
WARNING
Carefull yfollo wallof the
Page 155 of 305
151
9. Check to make sure that the child seat is
properly secured prior to each use. If the
retractor is not locked, repeat steps 6 through
8.
NOTE:To remove the retractor from automatic
lock mode, allow seat belt to retract fully to its
stowed position and the retractor will automatically
switch back to the vehicle sensitive locking mode
for normal adult usage.Installing Child Safety Seats in the Rear
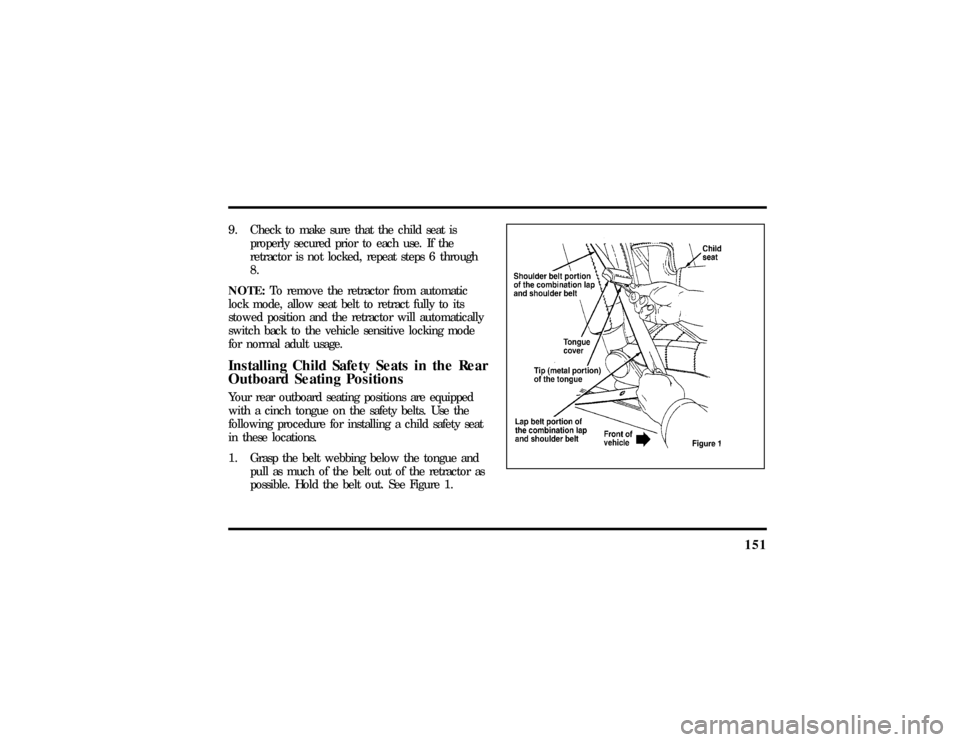
Outboard Seating PositionsYour rear outboard seating positions are equipped
with a cinch tongue on the safety belts. Use the
following procedure for installing a child safety seat
in these locations.
1. Grasp the belt webbing below the tongue and
pull as much of the belt out of the retractor as
possible. Hold the belt out. See Figure 1.
File:06fnsst.ex
Update:Fri Jun 21 08:57:53 1996
Page 257 of 305

255
Cleaning the SeatsLeatherFor routine cleaning, wipe the surface with a soft,
damp cloth. For more thorough cleaning, wipe the
surface with a leather and vinyl cleaner or a mild
soap.
Wipe the surface with a damp, soft cloth, then dry
and buff with a dry, soft cloth.FabricRemove dust and loose dirt with a whisk broom or
a vacuum cleaner. Remove fresh spots immediately.
Follow the directions that come with the cleaner.
NOTE:Before using any cleaner, test it on a small,
hidden area of fabric. If the fabric's color or texture
is adversely affected by a particular cleaner, do not
use it.
Cleaning the WheelsWash the wheels with the same detergent you use
to wash your vehicle's body. Do not use acid-based
wheel cleaners, steel wool, abrasives, fuel, or strong
detergents. These substances will damage protective
coatings. Use tar and road oil remover to remove
grease and tar.
NOTE:Before going to a car wash, find out if the
brushes are abrasive.
If you have whitewall tires that are difficult to clean
with regular detergent, use whitewall tire cleaner.
Follow the directions on the container and rinse the
tires with plenty of clean water.
File:11fnmct.ex
Update:Mon Jun 17 13:54:56 1996
Page 286 of 305

295
Index
A
ABS warning light (see Anti-lock
brake system)............ 11
Accessory position on the ignition.... 73
Accessory power source, power
point outlet............. 73
Accident damage............ 212
Air bag supplemental
restraint system........... 135
and child safety seats......137, 141
description............. 135
driver air bag............ 135
indicator light............ 14
operation.............. 137
passenger air bag........... 135
service and information labels..... 139
tone generator............ 139Air cleaner filter
location............... 216
specifications............ 257
Air conditioning, electronic automatic
temperature control system....... 55
Air suspension, description........ 170
Alarm, activating remote personal..... 112
Aluminum wheels........... 200
Antenna, radio (see Electronic
sound system)............ 40
Antifreeze (see Engine coolant)...... 224
Anti-lock brake system (ABS)
description............. 167
see also Brake............ 167
warning light............ 11
Anti-theft lug nuts and key........ 203
File:fnixt.ex
Update:Mon Jun 17 13:58:01 1996