lights LINCOLN TOWN CAR 1998 Owners Manual
[x] Cancel search | Manufacturer: LINCOLN, Model Year: 1998, Model line: TOWN CAR, Model: LINCOLN TOWN CAR 1998Pages: 188, PDF Size: 1.29 MB
Page 5 of 188
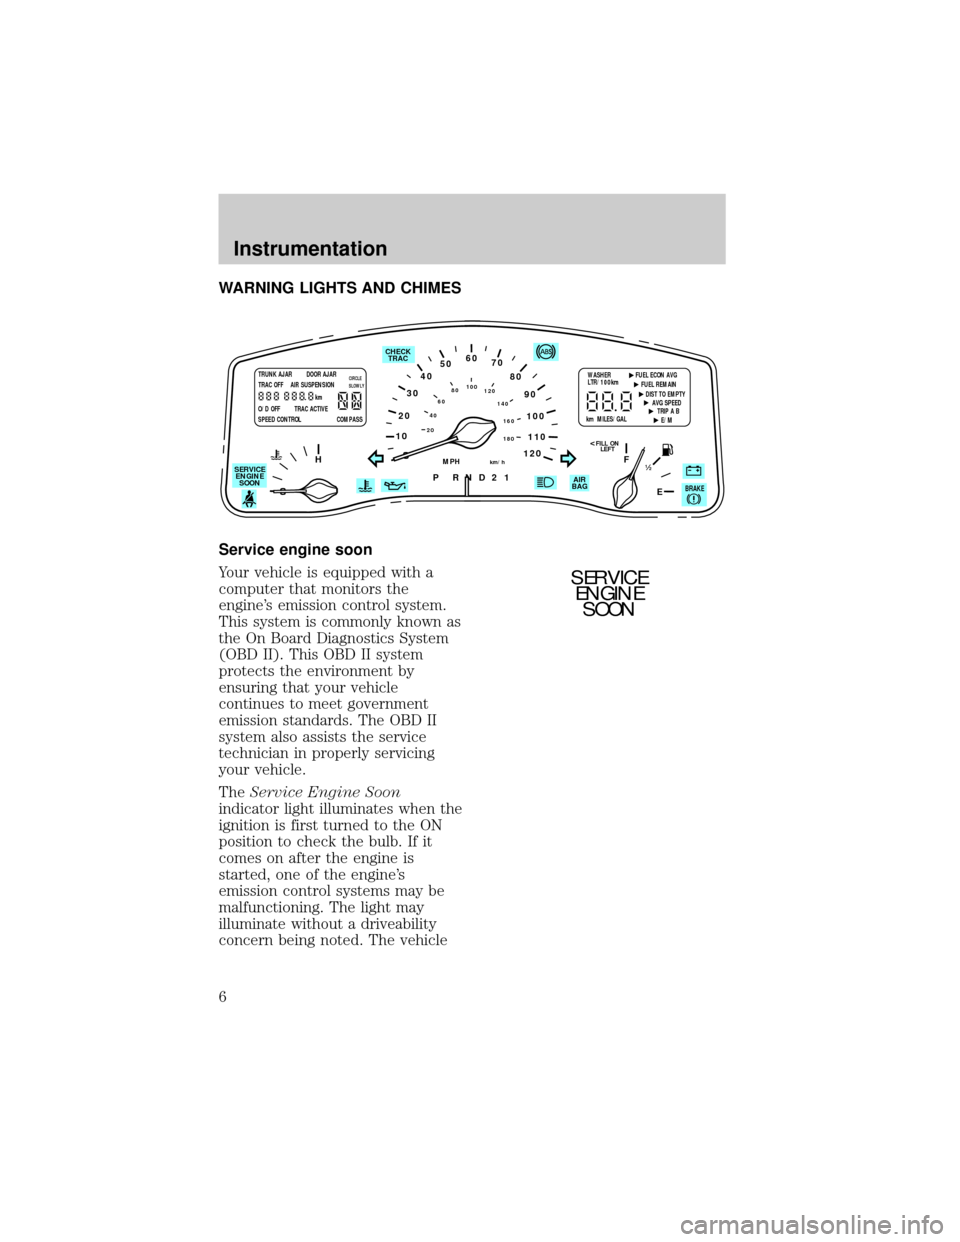
WARNING LIGHTS AND CHIMES
Service engine soon
Your vehicle is equipped with a
computer that monitors the
engine's emission control system.
This system is commonly known as
the On Board Diagnostics System
(OBD II). This OBD II system
protects the environment by
ensuring that your vehicle
continues to meet government
emission standards. The OBD II
system also assists the service
technician in properly servicing
your vehicle.
TheService Engine Soon
indicator light illuminates when the
ignition is first turned to the ON
position to check the bulb. If it
comes on after the engine is
started, one of the engine's
emission control systems may be
malfunctioning. The light may
illuminate without a driveability
concern being noted. The vehicle
10
2030405060
70
80
90
100
120206080
40100
120
160 140
180
P R N D 2 1
MPHkm/h
110
HF
E1
2
FILL ON
LEFT<
AIR
BAG CHECK
TRAC
SERVICE
ENGINE
SOON
TRUNK AJAR DOOR AJAR
TRAC OFF AIR SUSPENSION
O/D OFF TRAC ACTIVE
SPEED CONTROL COMPASSkmCIRCLE
SLOWLYWASHER FUEL ECON AVG
LTR/100km
FUEL REMAIN
DIST TO EMPTY
AVG SPEED
TRIP A B
E/M km MILES/GAL
BRAKE
SERVICE
ENGINE
SOON
Instrumentation
6
Page 8 of 188

parking brake indicates low brake
fluid level.
Anti-lock brake system (ABS)
Momentarily illuminates when the
ignition is turned on and the
engine is off. If the light remains
on, continues to flash or fails to
illuminate, have the system
serviced immediately.
Turn signal
Illuminates when the left or right
turn signal or the hazard lights are
turned on. If one or both of the
indicators stay on continuously or
flash faster, check for a burned-out
turn signal bulb. Refer toExterior
bulbsin theMaintenance and
carechapter.
High beams
Illuminates when the high beam
headlamps are turned on.
Charging system
Momentarily illuminates when the
ignition is turned ON and the
engine is off. The light also
illuminates when the battery is not
charging properly, requiring
electrical system service.
ABS
Instrumentation
9
Page 23 of 188
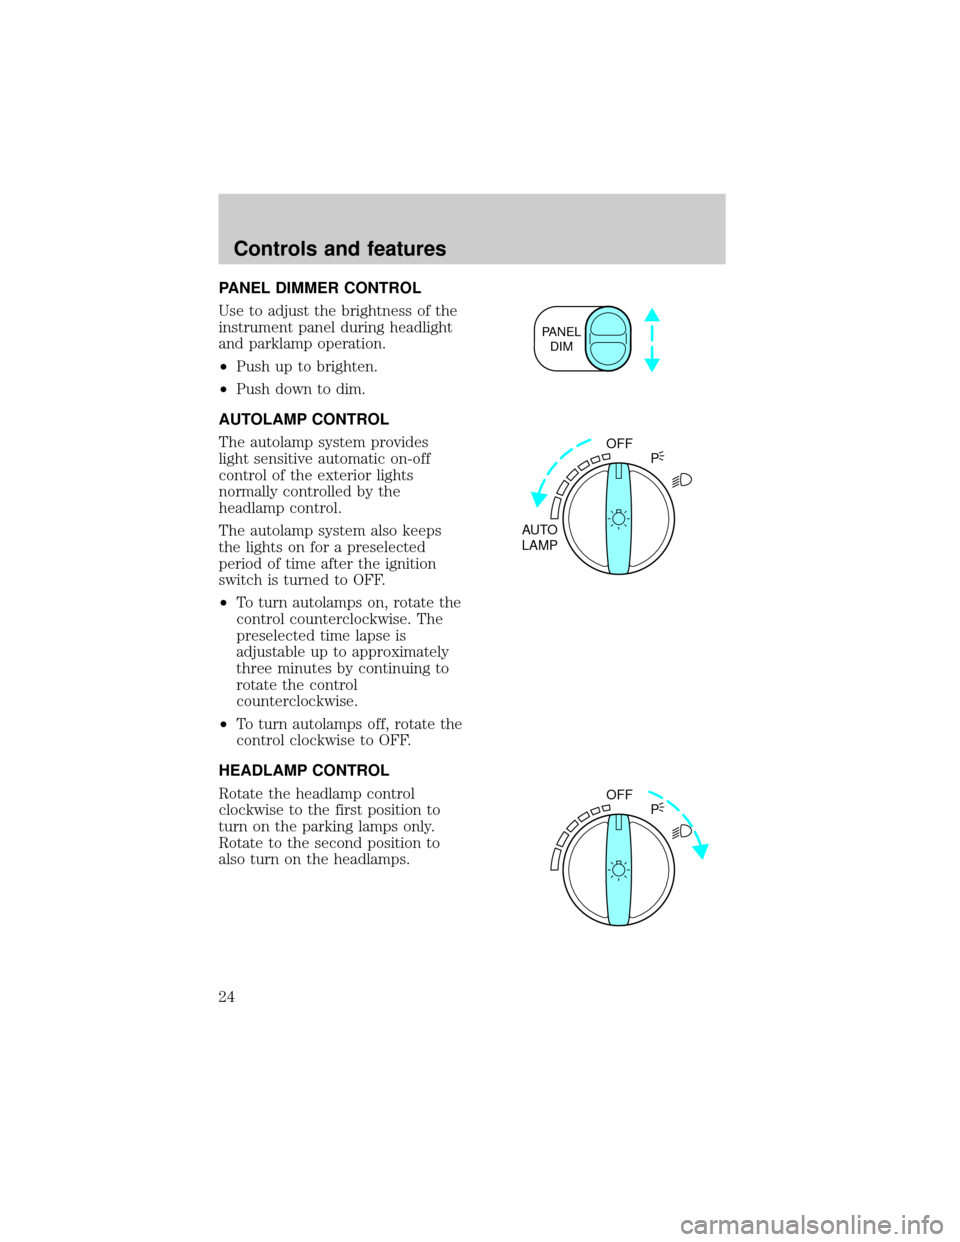
PANEL DIMMER CONTROL
Use to adjust the brightness of the
instrument panel during headlight
and parklamp operation.
²Push up to brighten.
²Push down to dim.
AUTOLAMP CONTROL
The autolamp system provides
light sensitive automatic on-off
control of the exterior lights
normally controlled by the
headlamp control.
The autolamp system also keeps
the lights on for a preselected
period of time after the ignition
switch is turned to OFF.
²To turn autolamps on, rotate the
control counterclockwise. The
preselected time lapse is
adjustable up to approximately
three minutes by continuing to
rotate the control
counterclockwise.
²To turn autolamps off, rotate the
control clockwise to OFF.
HEADLAMP CONTROL
Rotate the headlamp control
clockwise to the first position to
turn on the parking lamps only.
Rotate to the second position to
also turn on the headlamps.
PANEL
DIM
OFF
AUTO
LAMPP
OFF
P
Controls and features
24
Page 34 of 188
Press the left control to decrease
the time displayed.
AUDIO SYSTEM
Refer to the ªAudio Guideº in your
owner portfolio.
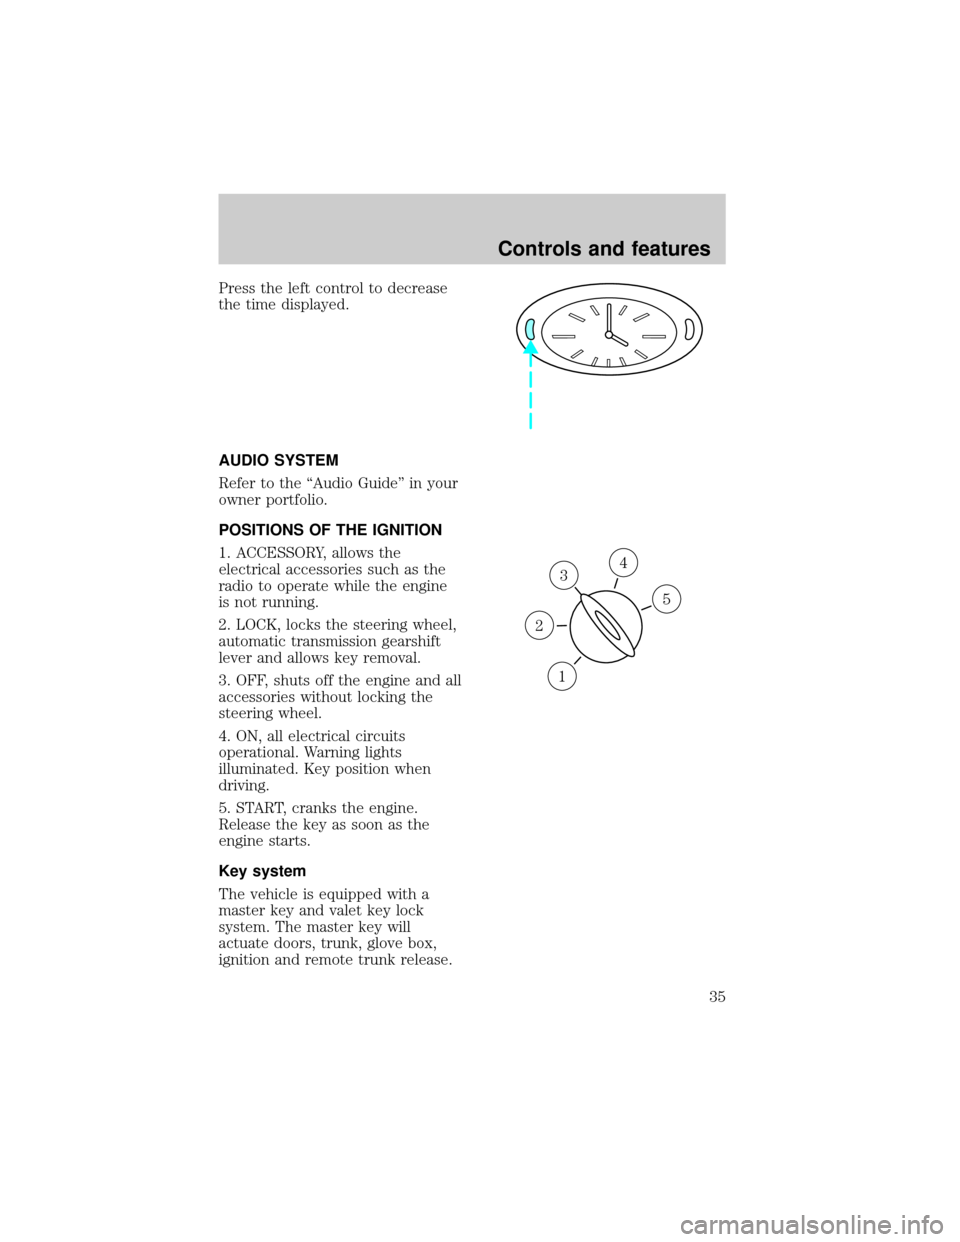
POSITIONS OF THE IGNITION
1. ACCESSORY, allows the
electrical accessories such as the
radio to operate while the engine
is not running.
2. LOCK, locks the steering wheel,
automatic transmission gearshift
lever and allows key removal.
3. OFF, shuts off the engine and all
accessories without locking the
steering wheel.
4. ON, all electrical circuits
operational. Warning lights
illuminated. Key position when
driving.
5. START, cranks the engine.
Release the key as soon as the
engine starts.
Key system
The vehicle is equipped with a
master key and valet key lock
system. The master key will
actuate doors, trunk, glove box,
ignition and remote trunk release.
3
1
2
5
4
Controls and features
35
Page 46 of 188

To close the moon roof:
²Press and hold the front portion
of the control.
²To close from the vent position,
press and hold the rear portion
of the control.
AUTOMATIC DIMMING INSIDE
REAR VIEW MIRROR
(IF EQUIPPED)
Your vehicle is equipped with an
inside rear view mirror which has
an auto-dimming function
(available as an option on the
outside driver's side mirror). The
electronic day/night mirror will
change from the normal state to
the non-glare state when bright
lights (glare) reach the mirror.
When the mirror detects bright
light from front or behind, it will
automatically adjust (darken) to
minimize glare.
Do not block the sensor on the
backside of the mirror since this
may impair proper mirror
performance.
Press the control to turn the
mirror on or off.
The mirror will automatically
return to the normal state
whenever the vehicle is placed in
R (Reverse)(when the mirror is
on) to ensure a bright clear view
when backing up.
Controls and features
47
Page 56 of 188

press any button on all
transmitters (up to four). When
completed, switch the ignition to
OFF.
All transmitters must be
programmed at the same time.
Illuminated entry
The interior lamps illuminate when
the remote entry system is used to
unlock the door(s) or sound the
personal alarm.
The system automatically turns off
after 25 seconds or when the
ignition is turned to the START or
ACC position. The dome lamp
switch (if equipped) mustnotbe
set to the OFF position for the
illuminated entry system to
operate.
The inside lights will not turn off
if:
²they have been turned on with
the dimmer control or
²any door is open.
Battery saver will shut off the
interior lamps 30 minutes after the
last door is closed.
Autolock
The autolock feature will lock all of
the doors when:
²all vehicle doors are fully closed
²the ignition key is turned to the
ON position
²the vehicle is in a forward gear
and
Controls and features
57
Page 92 of 188
Make sure the corresponding lights
illuminate briefly. If a light fails to
illuminate, have the vehicle
serviced.
²If the driver's safety belt is
fastened, the light (
) will not
illuminate.
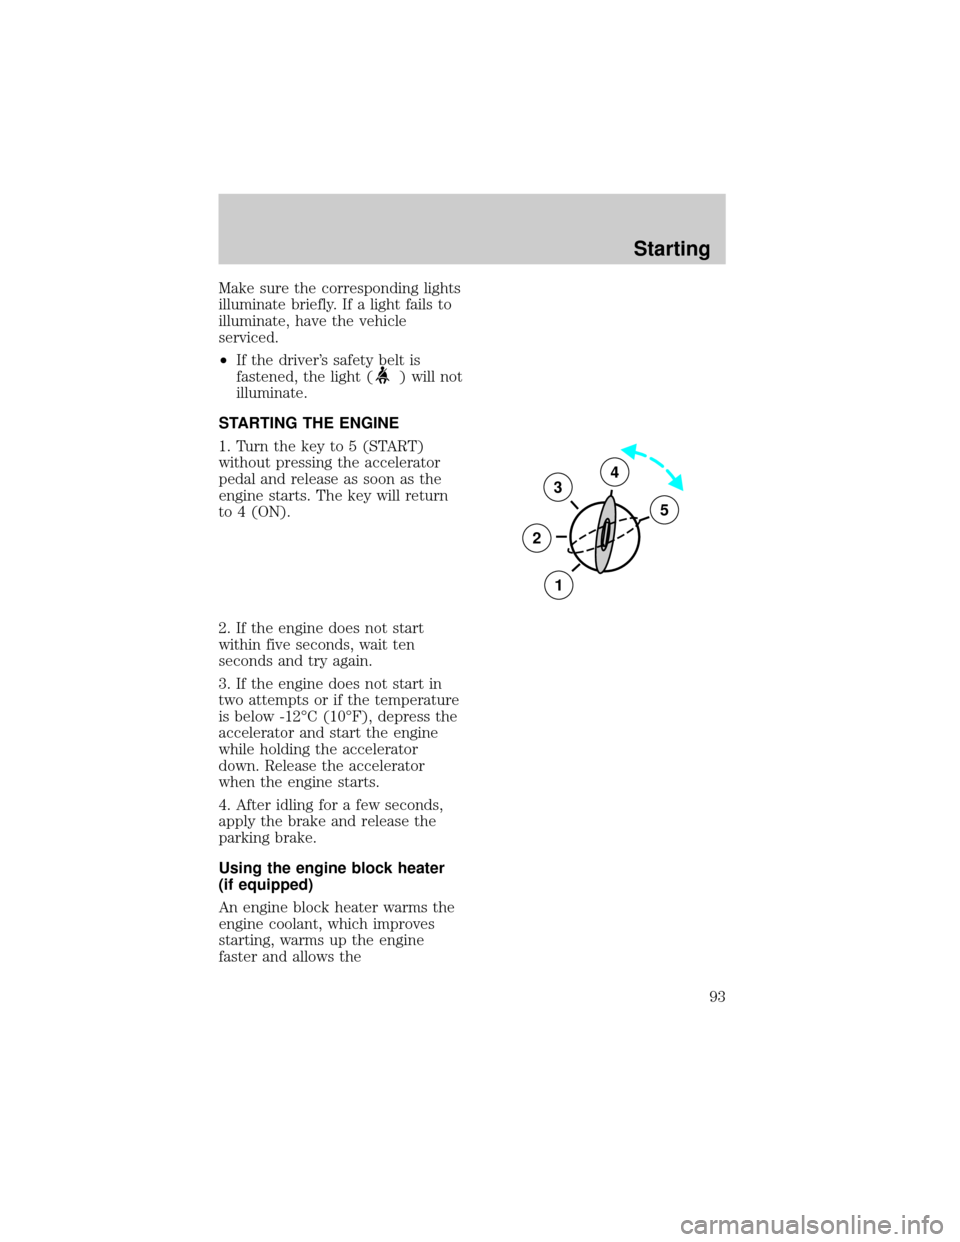
STARTING THE ENGINE
1. Turn the key to 5 (START)
without pressing the accelerator
pedal and release as soon as the
engine starts. The key will return
to 4 (ON).
2. If the engine does not start
within five seconds, wait ten
seconds and try again.
3. If the engine does not start in
two attempts or if the temperature
is below -12ÉC (10ÉF), depress the
accelerator and start the engine
while holding the accelerator
down. Release the accelerator
when the engine starts.
4. After idling for a few seconds,
apply the brake and release the
parking brake.
Using the engine block heater
(if equipped)
An engine block heater warms the
engine coolant, which improves
starting, warms up the engine
faster and allows the
3
2
1
5
4
Starting
93
Page 164 of 188
If you smell exhaust fumes
of any kind inside your
vehicle, have the dealer inspect
and fix your vehicle immediately.
Do not drive if you smell exhaust
fumes. These fumes are harmful
and could kill you.
Do not make any unauthorized
changes to your vehicle or engine.
By law, vehicle owners and anyone
who manufactures, repairs,
services, sells, leases, trades
vehicles, or supervises a fleet of
vehicles are not permitted to
intentionally remove an emission
control device or prevent it from
working. Information about your
vehicle's emission system is on the
Vehicle Emission Control
Information Decal located on or
near the engine. This decal
identifies engine displacement and
gives some tune up specifications.
Please consult your ªWarranty
Guideº for complete emission
warranty information.
Readiness for
inspection/maintenance
(I/M) testing
In some localities, it may be a legal
requirement to pass an I/M test of
the on-board diagnostic (OBD-II)
system. If your ªcheck
engine/service engine soonº light is
on, reference the applicable light
description in theWarning Lights
and Chimessection of your
owners guide. Your vehicle may
Maintenance and care
165
Page 170 of 188

2. With the hood open, locate the
bubble level vertical aim indicator.
It is visible when viewed from the
above rear of the headlamp.
3.Usea4mmwrench to turn the
vertical adjusting screw until the
reference mark on the reflector
extension aligns with the ª0º
reference mark on the vertical
indicator when viewed directly
from above.
4. Close the hood.
REPLACING THE INTERIOR
BULBS
Check the operation of the
following interior bulbs frequently:
²interior overhead lamp
²map lamp
USING THE RIGHT BULBS
Function Trade Number
Tail lamp, brakelamp, turn lamp 3157K
Backup lamp 3156K
Side marker lamp (front) 194
Park, turn lamp (front) 3157NAK
Headlamp 9007
Cornering lamp 3156K
License plate lamp 168
High-mount brakelamp 912
Luggage compartment lamp 212-2
Map lamp 578
Visor vanity lamp 168
Door courtesy lamp 904
Glove compartment 194
To replace all instrument panel lights - see your dealer.
Maintenance and care
171
Page 186 of 188

Headlamps ...................................24
autolamp system .......................24
flashing ......................................26
high beam .................................25
Heating ........................................26
High beams
indicator light .............................9
Hood
release lever ............................133
Ignition
positions of the ignition ...........35
Instrument panel
lighting up panel and interior .24
Jump-starting
your vehicle ........................126,128
attaching cables ......................127
disconnecting cables ..............128
Keyless entry system
autolock .....................................57
Keys
key in ignition chime ...............13
Lamps
interior lamps .........................171
Lights, warning and indicator
air bag ..........................................8
anti-lock brakes (ABS) ..............9
brake ............................................8
charging system ..........................9
low coolant ................................10
oil pressure ...............................10
safety belt ...................................8
service engine soon .................6,7
traction control system ............10
turn signal indicator ...................9
Lubricant specifications ...........181
Message center ...........................16
reset button ..............................17
select button .............................17
Mirrors
automatic dimming rearview
mirror ........................................47
cleaning ...................................178heated ........................................50
side view mirrors (power) .......50
Moon roof ....................................46
Odometer .....................................14
Panic alarm feature, remote
entry system ................................55
Parking brake ..............................98
Parts (see Motorcraft parts) ....179
Power door locks ........................49
Power steering
fluid, checking and adding ....145
Refill capacities for fluids ........180
Relays ........................................115
Remote entry system .................53
illuminated entry ......................57
locking/unlocking doors ......53,54
replacement/additional
transmitters ...............................56
replacing the batteries .............55
Reporting safety defects ..........185
Safety restraints
automatic locking mode
(retractor) ............................71,72
extension assembly ..................74
for children ...............................81
lap and shoulder belts .............70
maintenance ..............................75
proper use .................................68
warning light and chime .....13,75
Safety seats for children
attaching with tether straps ....89
automatic locking mode
(retractor) .................................85
in rear seat ................................88
tether anchorage hardware .....89
Seats ............................................64
adjusting the seat, manual .......67
adjusting the seat, power ...64,66
head restraints ..........................64
heated seats ..............................66
lumbar support .........................67
Servicing your vehicle ..............131
Index
187