bulb LINCOLN TOWN CAR 2001 Owners Manual
[x] Cancel search | Manufacturer: LINCOLN, Model Year: 2001, Model line: TOWN CAR, Model: LINCOLN TOWN CAR 2001Pages: 240, PDF Size: 1.92 MB
Page 8 of 240
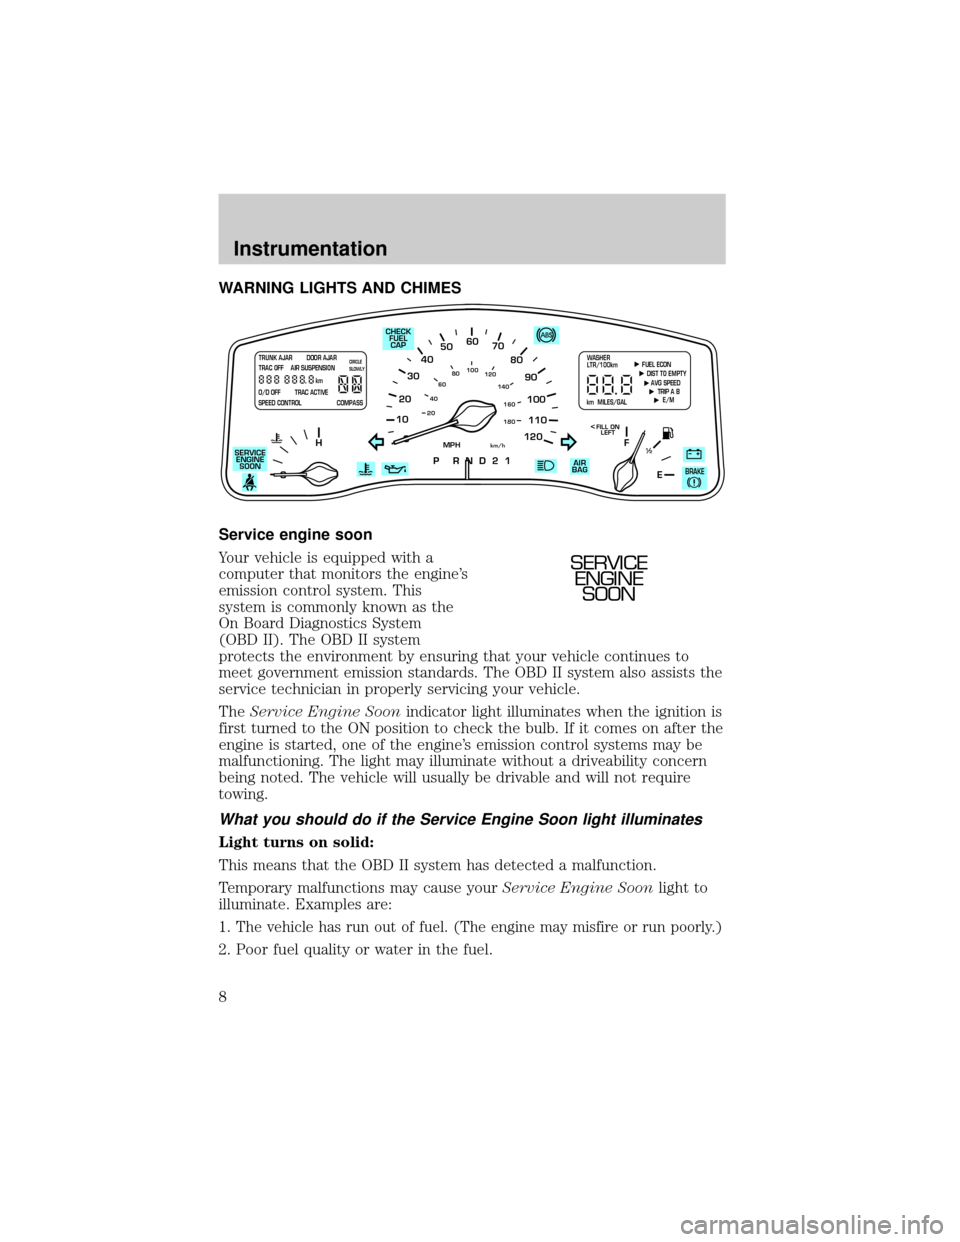
WARNING LIGHTS AND CHIMES
Service engine soon
Your vehicle is equipped with a
computer that monitors the engine's
emission control system. This
system is commonly known as the
On Board Diagnostics System
(OBD II). The OBD II system
protects the environment by ensuring that your vehicle continues to
meet government emission standards. The OBD II system also assists the
service technician in properly servicing your vehicle.
TheService Engine Soonindicator light illuminates when the ignition is
first turned to the ON position to check the bulb. If it comes on after the
engine is started, one of the engine's emission control systems may be
malfunctioning. The light may illuminate without a driveability concern
being noted. The vehicle will usually be drivable and will not require
towing.
What you should do if the Service Engine Soon light illuminates
Light turns on solid:
This means that the OBD II system has detected a malfunction.
Temporary malfunctions may cause yourService Engine Soonlight to
illuminate. Examples are:
1.
The vehicle has run out of fuel. (The engine may misfire or run poorly.)
2. Poor fuel quality or water in the fuel.
10
2030405060
70
80
90
100
120206080
40100
120
160 140
180
P R N D 2 1
MPHkm/h
110
HF
E1
2
FILL ON
LEFT<
AIR
BAG CHECK
FUEL
CAP
SERVICE
ENGINE
SOON
TRUNK AJAR DOOR AJAR
TRAC OFF AIR SUSPENSION
O/D OFF TRAC ACTIVE
SPEED CONTROL COMPASSkmCIRCLE
SLOWLY FUEL ECON
DIST TO EMPTY
AVG SPEED
TRIP A B
E/M
km MILES/GALWASHER
LTR/100km
BRAKE
SERVICE
ENGINE
SOON
Instrumentation
8
Page 10 of 240
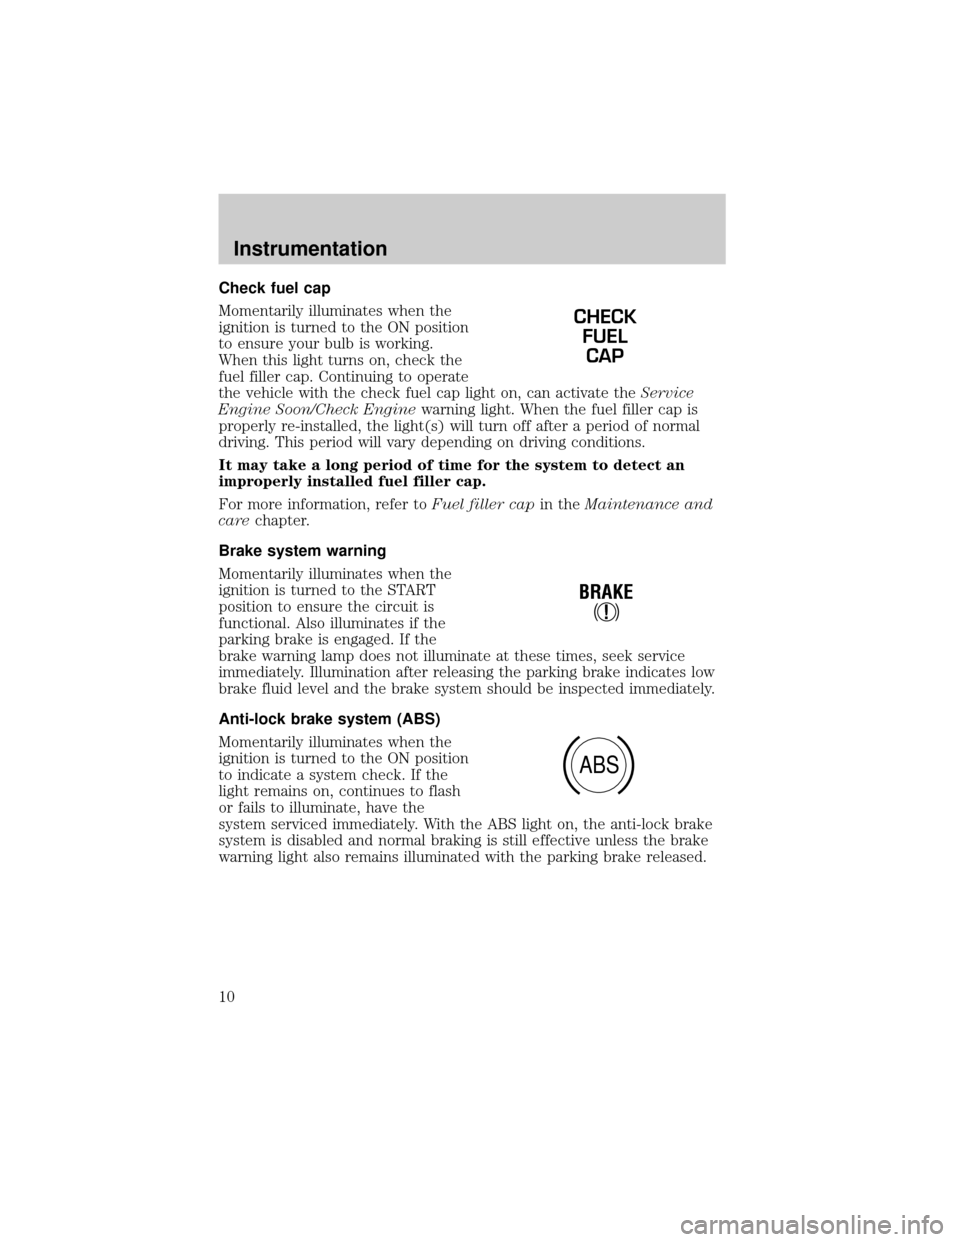
Check fuel cap
Momentarily illuminates when the
ignition is turned to the ON position
to ensure your bulb is working.
When this light turns on, check the
fuel filler cap. Continuing to operate
the vehicle with the check fuel cap light on, can activate theService
Engine Soon/Check Enginewarning light. When the fuel filler cap is
properly re-installed, the light(s) will turn off after a period of normal
driving. This period will vary depending on driving conditions.
It may take a long period of time for the system to detect an
improperly installed fuel filler cap.
For more information, refer toFuel filler capin theMaintenance and
carechapter.
Brake system warning
Momentarily illuminates when the
ignition is turned to the START
position to ensure the circuit is
functional. Also illuminates if the
parking brake is engaged. If the
brake warning lamp does not illuminate at these times, seek service
immediately. Illumination after releasing the parking brake indicates low
brake fluid level and the brake system should be inspected immediately.
Anti-lock brake system (ABS)
Momentarily illuminates when the
ignition is turned to the ON position
to indicate a system check. If the
light remains on, continues to flash
or fails to illuminate, have the
system serviced immediately. With the ABS light on, the anti-lock brake
system is disabled and normal braking is still effective unless the brake
warning light also remains illuminated with the parking brake released.
CHECK
FUEL
CAP
!
BRAKE
ABS
Instrumentation
10
Page 11 of 240
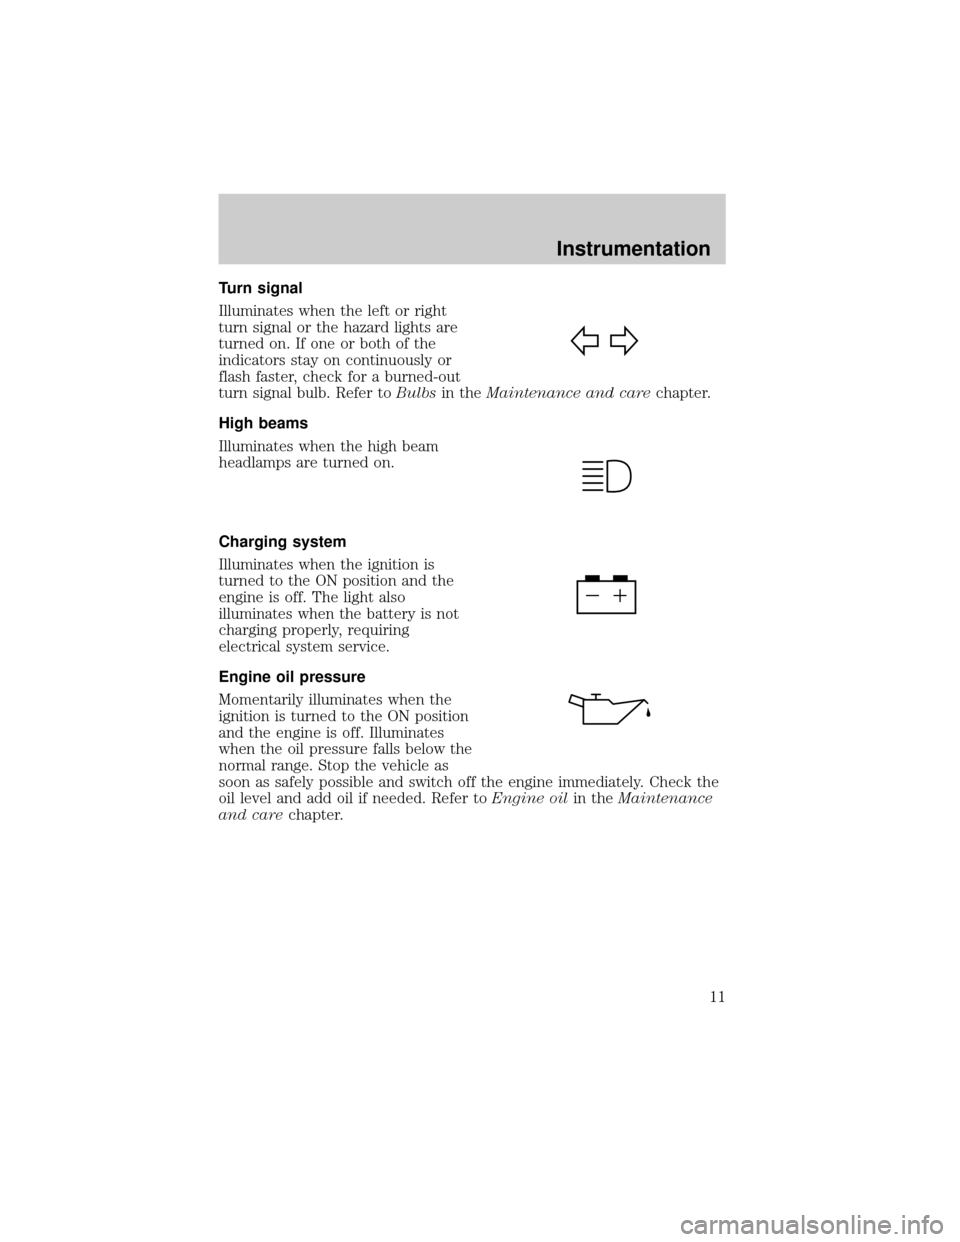
Turn signal
Illuminates when the left or right
turn signal or the hazard lights are
turned on. If one or both of the
indicators stay on continuously or
flash faster, check for a burned-out
turn signal bulb. Refer toBulbsin theMaintenance and carechapter.
High beams
Illuminates when the high beam
headlamps are turned on.
Charging system
Illuminates when the ignition is
turned to the ON position and the
engine is off. The light also
illuminates when the battery is not
charging properly, requiring
electrical system service.
Engine oil pressure
Momentarily illuminates when the
ignition is turned to the ON position
and the engine is off. Illuminates
when the oil pressure falls below the
normal range. Stop the vehicle as
soon as safely possible and switch off the engine immediately. Check the
oil level and add oil if needed. Refer toEngine oilin theMaintenance
and carechapter.
Instrumentation
11
Page 199 of 240
Allow the vehicle to sit for at least eight hours without starting the
engine. Then, start the engine and complete the above driving cycle. The
engine must warm up to its normal operating temperature. Once started,
do not turn off the engine until the above driving cycle is complete.
BULBS
Replacing exterior bulbs
Check the operation of the following lamps frequently:
²Headlamps
²Tail lamps
²Brakelamps
²High-mount brakelamp
²Turn signals
²Backup lamps
²License plate lamp
Do not remove lamp bulbs unless they will be replaced immediately. If a
bulb is removed for an extended period of time, contaminants may enter
the lamp housings and affect performance.
Replacing headlamp bulbs
To remove the headlamp bulb:
1. Make sure headlamp switch is in OFF position.
2. Open the hood.
Maintenance and care
199
Page 200 of 240
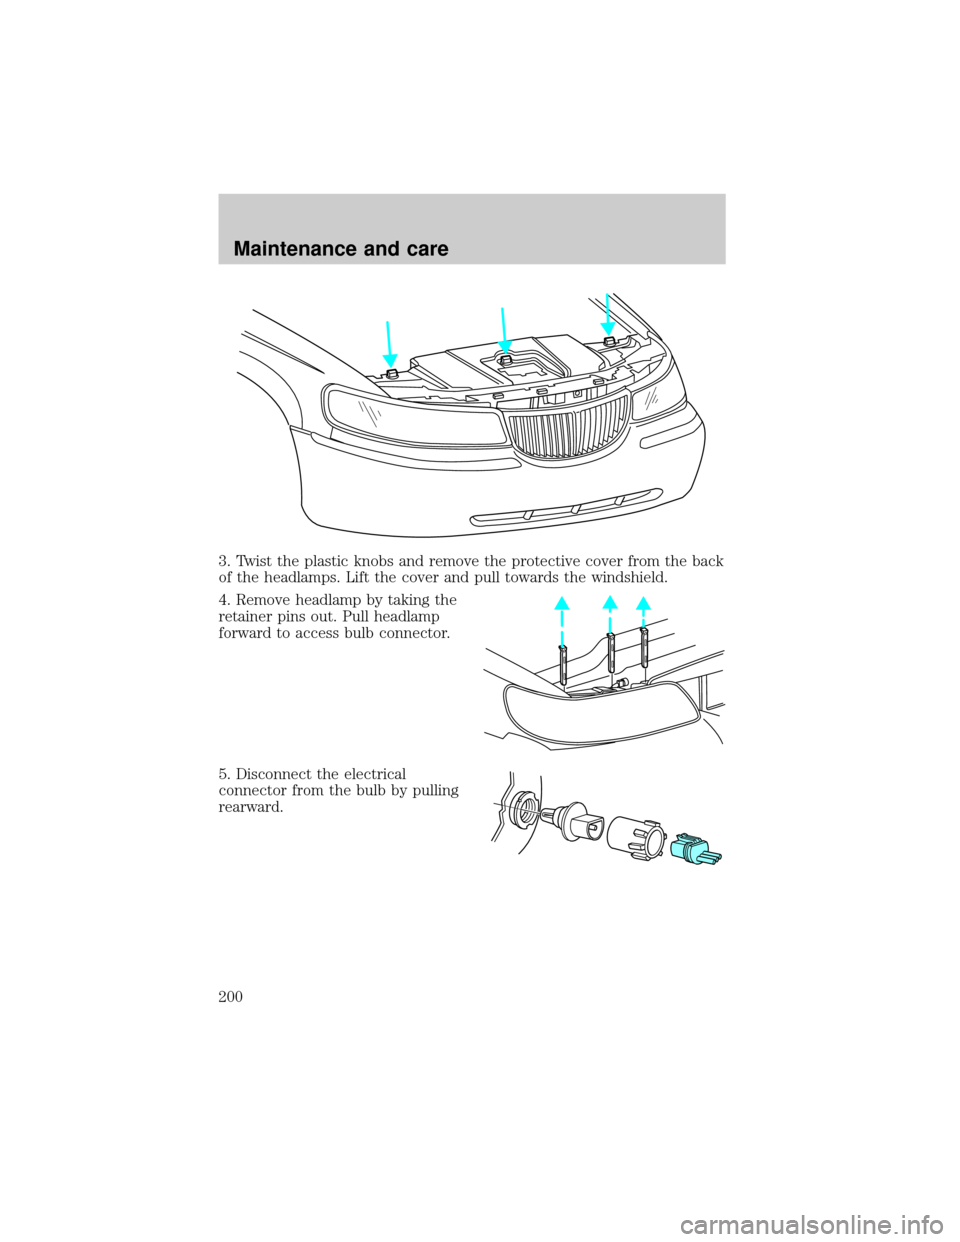
3. Twist the plastic knobs and remove the protective cover from the back
of the headlamps. Lift the cover and pull towards the windshield.
4. Remove headlamp by taking the
retainer pins out. Pull headlamp
forward to access bulb connector.
5. Disconnect the electrical
connector from the bulb by pulling
rearward.
Maintenance and care
200
Page 201 of 240
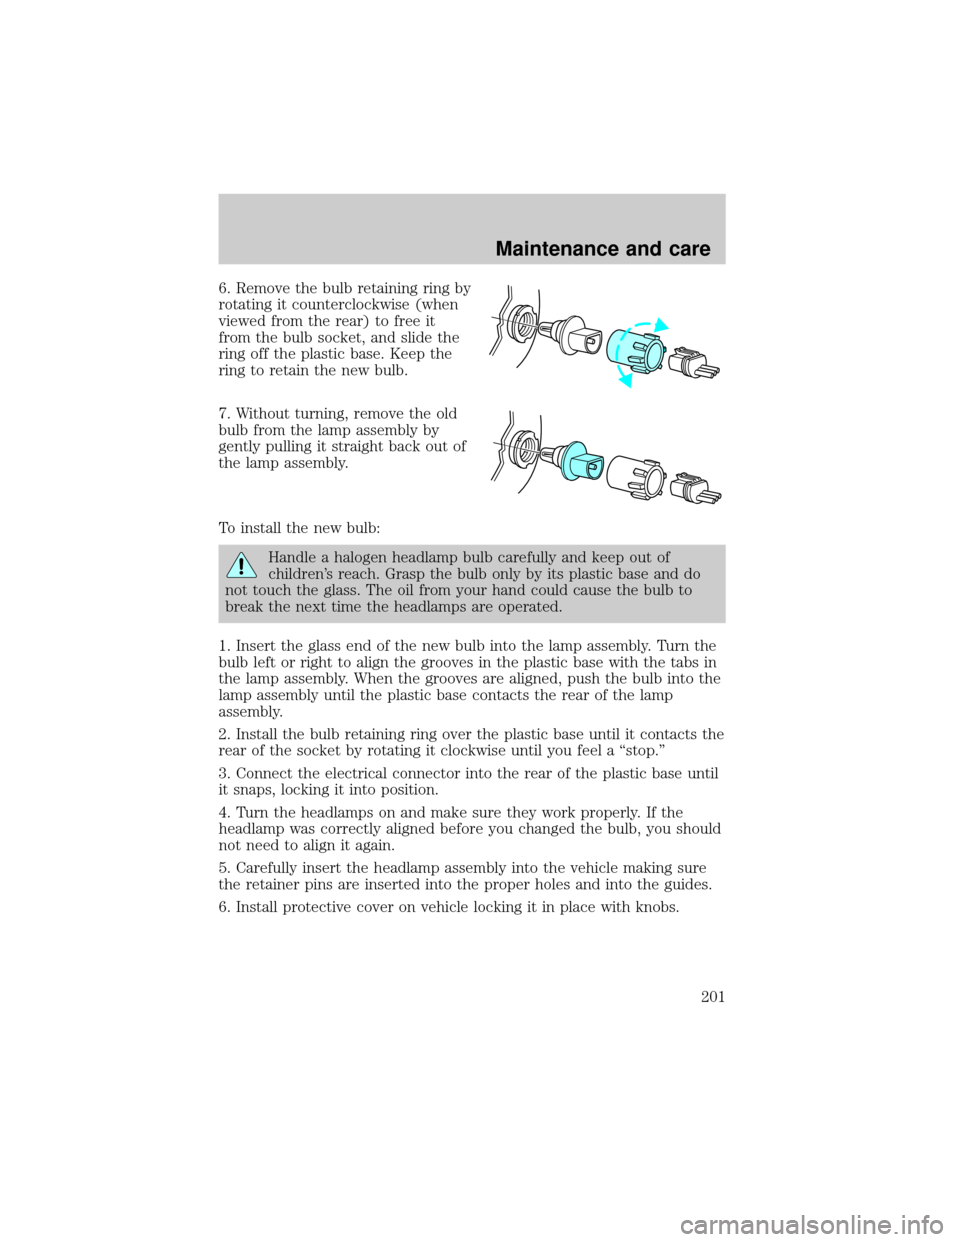
6. Remove the bulb retaining ring by
rotating it counterclockwise (when
viewed from the rear) to free it
from the bulb socket, and slide the
ring off the plastic base. Keep the
ring to retain the new bulb.
7. Without turning, remove the old
bulb from the lamp assembly by
gently pulling it straight back out of
the lamp assembly.
To install the new bulb:
Handle a halogen headlamp bulb carefully and keep out of
children's reach. Grasp the bulb only by its plastic base and do
not touch the glass. The oil from your hand could cause the bulb to
break the next time the headlamps are operated.
1. Insert the glass end of the new bulb into the lamp assembly. Turn the
bulb left or right to align the grooves in the plastic base with the tabs in
the lamp assembly. When the grooves are aligned, push the bulb into the
lamp assembly until the plastic base contacts the rear of the lamp
assembly.
2. Install the bulb retaining ring over the plastic base until it contacts the
rear of the socket by rotating it clockwise until you feel a ªstop.º
3. Connect the electrical connector into the rear of the plastic base until
it snaps, locking it into position.
4. Turn the headlamps on and make sure they work properly. If the
headlamp was correctly aligned before you changed the bulb, you should
not need to align it again.
5. Carefully insert the headlamp assembly into the vehicle making sure
the retainer pins are inserted into the proper holes and into the guides.
6. Install protective cover on vehicle locking it in place with knobs.
Maintenance and care
201
Page 202 of 240
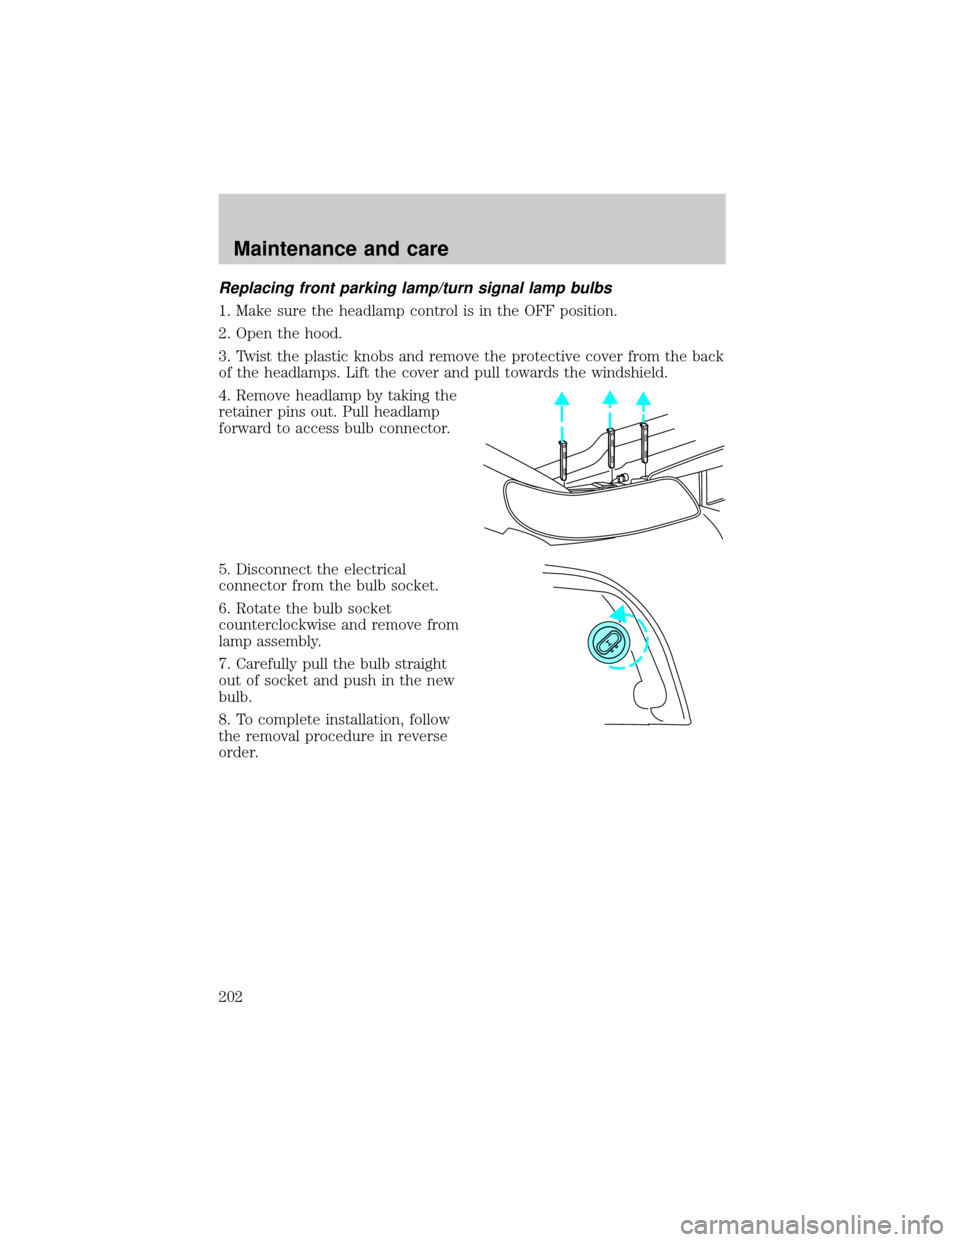
Replacing front parking lamp/turn signal lamp bulbs
1. Make sure the headlamp control is in the OFF position.
2. Open the hood.
3. Twist the plastic knobs and remove the protective cover from the back
of the headlamps. Lift the cover and pull towards the windshield.
4. Remove headlamp by taking the
retainer pins out. Pull headlamp
forward to access bulb connector.
5. Disconnect the electrical
connector from the bulb socket.
6. Rotate the bulb socket
counterclockwise and remove from
lamp assembly.
7. Carefully pull the bulb straight
out of socket and push in the new
bulb.
8. To complete installation, follow
the removal procedure in reverse
order.
Maintenance and care
202
Page 203 of 240
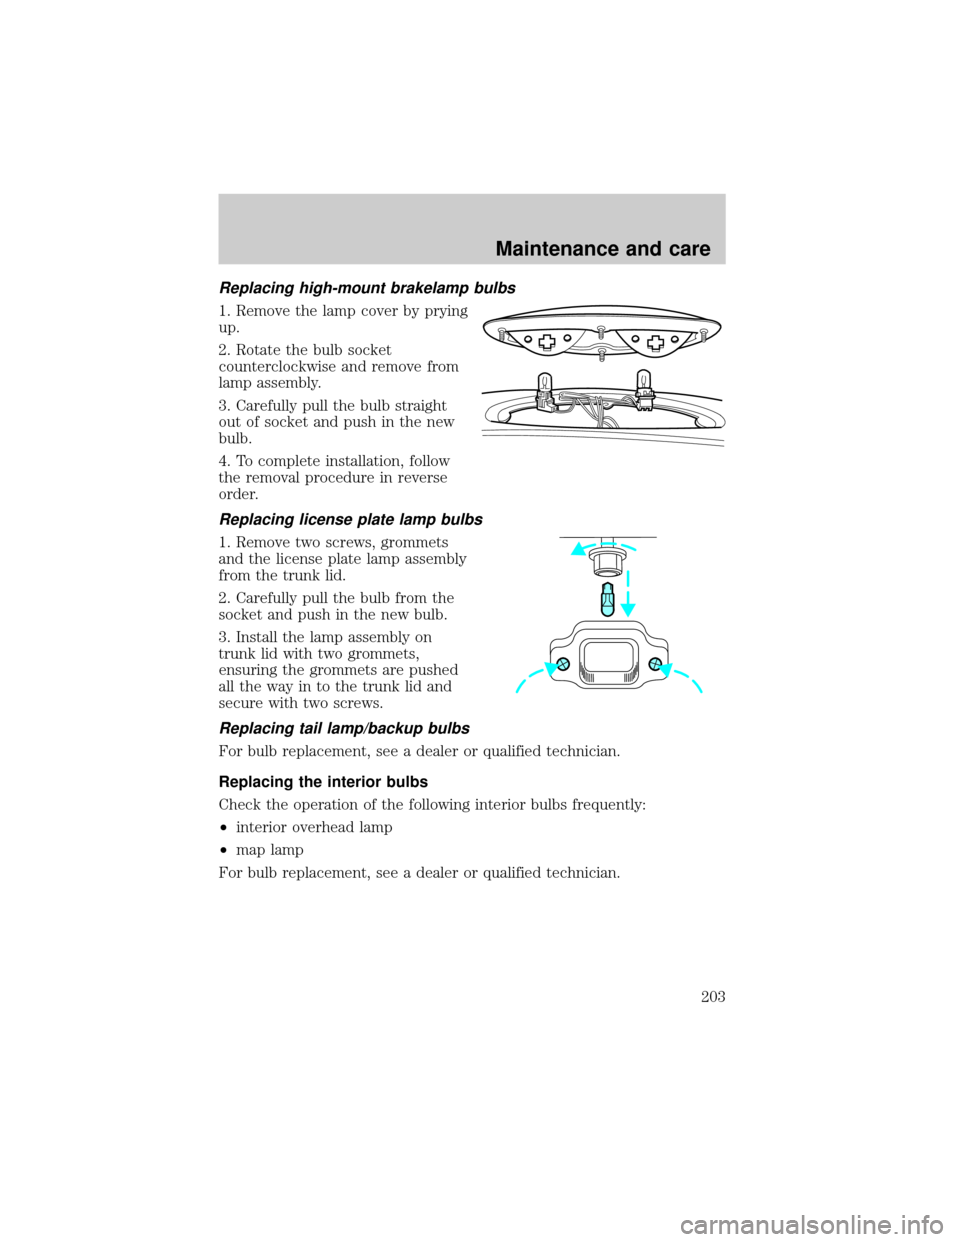
Replacing high-mount brakelamp bulbs
1. Remove the lamp cover by prying
up.
2. Rotate the bulb socket
counterclockwise and remove from
lamp assembly.
3. Carefully pull the bulb straight
out of socket and push in the new
bulb.
4. To complete installation, follow
the removal procedure in reverse
order.
Replacing license plate lamp bulbs
1. Remove two screws, grommets
and the license plate lamp assembly
from the trunk lid.
2. Carefully pull the bulb from the
socket and push in the new bulb.
3. Install the lamp assembly on
trunk lid with two grommets,
ensuring the grommets are pushed
all the way in to the trunk lid and
secure with two screws.
Replacing tail lamp/backup bulbs
For bulb replacement, see a dealer or qualified technician.
Replacing the interior bulbs
Check the operation of the following interior bulbs frequently:
²interior overhead lamp
²map lamp
For bulb replacement, see a dealer or qualified technician.
Maintenance and care
203
Page 204 of 240
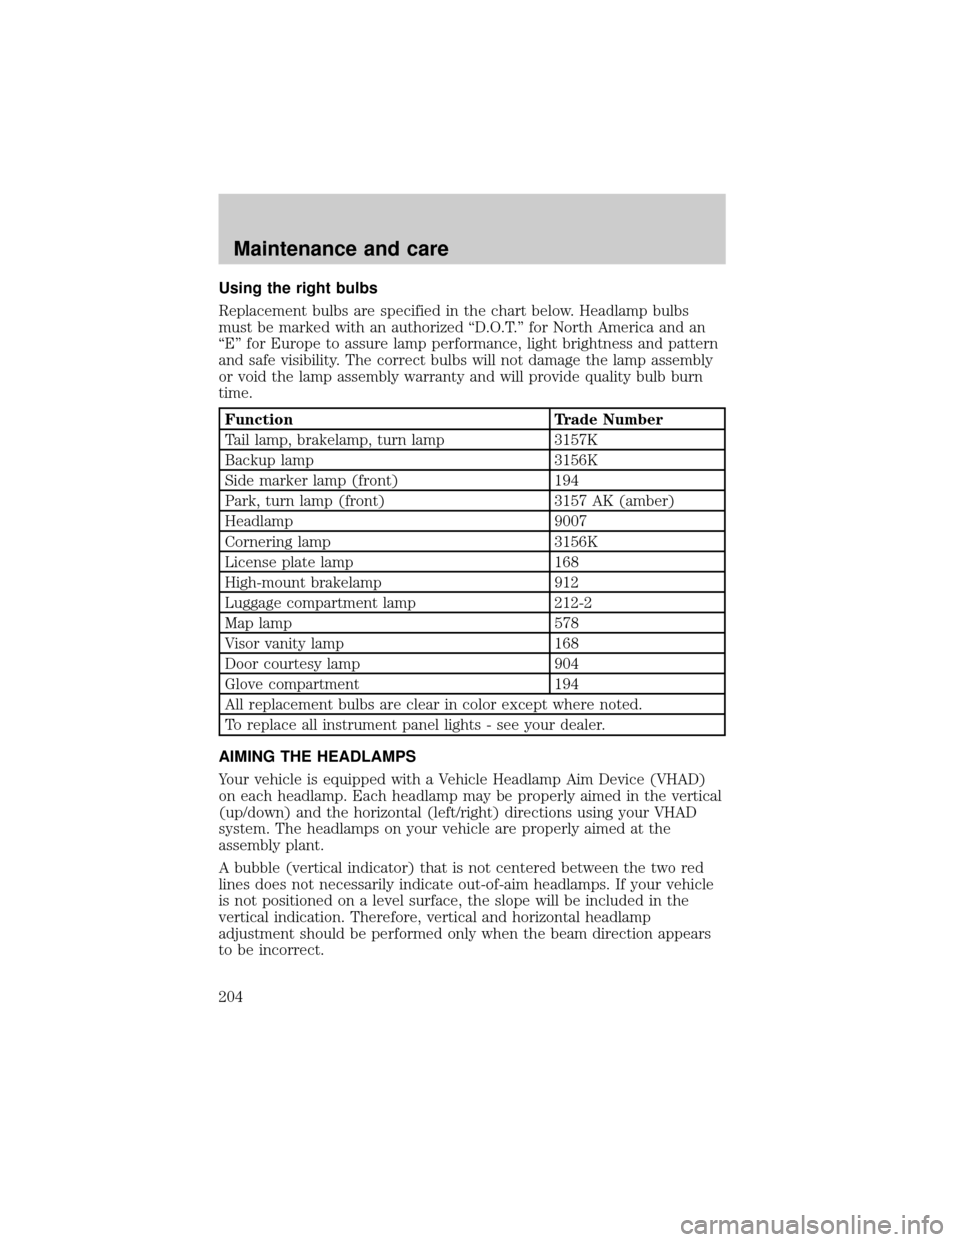
Using the right bulbs
Replacement bulbs are specified in the chart below. Headlamp bulbs
must be marked with an authorized ªD.O.T.º for North America and an
ªEº for Europe to assure lamp performance, light brightness and pattern
and safe visibility. The correct bulbs will not damage the lamp assembly
or void the lamp assembly warranty and will provide quality bulb burn
time.
Function Trade Number
Tail lamp, brakelamp, turn lamp 3157K
Backup lamp 3156K
Side marker lamp (front) 194
Park, turn lamp (front) 3157 AK (amber)
Headlamp 9007
Cornering lamp 3156K
License plate lamp 168
High-mount brakelamp 912
Luggage compartment lamp 212-2
Map lamp 578
Visor vanity lamp 168
Door courtesy lamp 904
Glove compartment 194
All replacement bulbs are clear in color except where noted.
To replace all instrument panel lights - see your dealer.
AIMING THE HEADLAMPS
Your vehicle is equipped with a Vehicle Headlamp Aim Device (VHAD)
on each headlamp. Each headlamp may be properly aimed in the vertical
(up/down) and the horizontal (left/right) directions using your VHAD
system. The headlamps on your vehicle are properly aimed at the
assembly plant.
A bubble (vertical indicator) that is not centered between the two red
lines does not necessarily indicate out-of-aim headlamps. If your vehicle
is not positioned on a level surface, the slope will be included in the
vertical indication. Therefore, vertical and horizontal headlamp
adjustment should be performed only when the beam direction appears
to be incorrect.
Maintenance and care
204
Page 234 of 240

aiming ..............................204±206
autolamp system .......................25
bulb specifications ..................204
daytime running lights .............26
flash to pass ..............................26
high beam ...........................11, 26
replacing bulbs .......................199
turning on and off ..............25±26
warning chime ..........................15
Heating ........................................27
HomeLink universal
transceiver (see Garage door
opener) ............................67, 69±70
Hood ..........................................165
I
Ignition .........................59, 215±216
Infant seats
(see Safety seats) .....................119
Inspection/maintenance (I/M)
testing ........................................198
Instrument panel
cleaning ...................................210
cluster ..................................8, 210
lighting up panel and
interior .......................................25
location of components ..............8
J
Jack ............................................154
positioning ...............................154
storage .....................................154
Jump-starting your vehicle ......158
K
Keyless entry system .................85autolock .....................................83
keypad .......................................85
programming entry code .........86
Keys .................................60, 88, 90
key in ignition chime ...............15
positions of the ignition ...........59
L
Lamps
autolamp system .......................25
bulb replacement
specifications chart ................204
cargo lamps ...............................25
daytime running light ...............26
headlamps ...........................25±26
headlamps, flash to pass ..........26
instrument panel, dimming .....25
interior lamps ...................71, 203
replacing bulbs .......199, 202±203
Lane change indicator (see
Turn signal) .................................60
Lights, warning and indicator ......8
air bag ..........................................9
air suspension ...........................13
anti-lock brakes (ABS) ....10, 131
brake ..........................................10
charging system ........................11
cruise indicator .........................14
door ajar ....................................12
fuel cap light .............................10
high beam .................................11
liftgate ajar ................................12
low coolant ................................12
low washer fluid .......................14
oil pressure ...............................11
safety belt ...................................9
service engine soon ....................8
speed control ............................65
traction control system ............13
Index
234