fuel pump LINCOLN TOWN CAR 2001 Owners Manual
[x] Cancel search | Manufacturer: LINCOLN, Model Year: 2001, Model line: TOWN CAR, Model: LINCOLN TOWN CAR 2001Pages: 240, PDF Size: 1.92 MB
Page 4 of 240
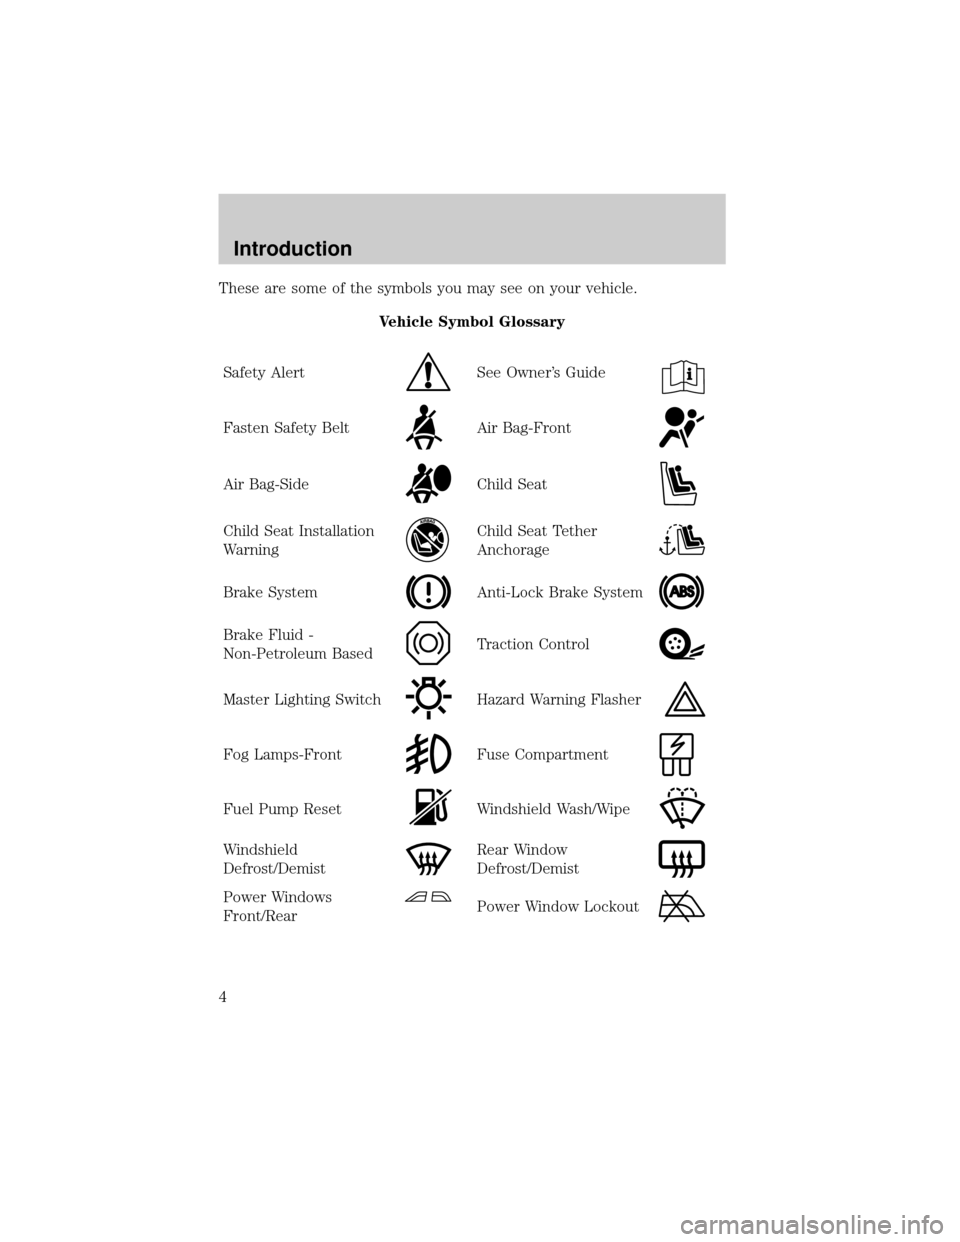
These are some of the symbols you may see on your vehicle.
Vehicle Symbol Glossary
Safety Alert
See Owner's Guide
Fasten Safety BeltAir Bag-Front
Air Bag-SideChild Seat
Child Seat Installation
WarningChild Seat Tether
Anchorage
Brake SystemAnti-Lock Brake System
Brake Fluid -
Non-Petroleum BasedTraction Control
Master Lighting SwitchHazard Warning Flasher
Fog Lamps-FrontFuse Compartment
Fuel Pump ResetWindshield Wash/Wipe
Windshield
Defrost/DemistRear Window
Defrost/Demist
Power Windows
Front/RearPower Window Lockout
Introduction
4
Page 21 of 240
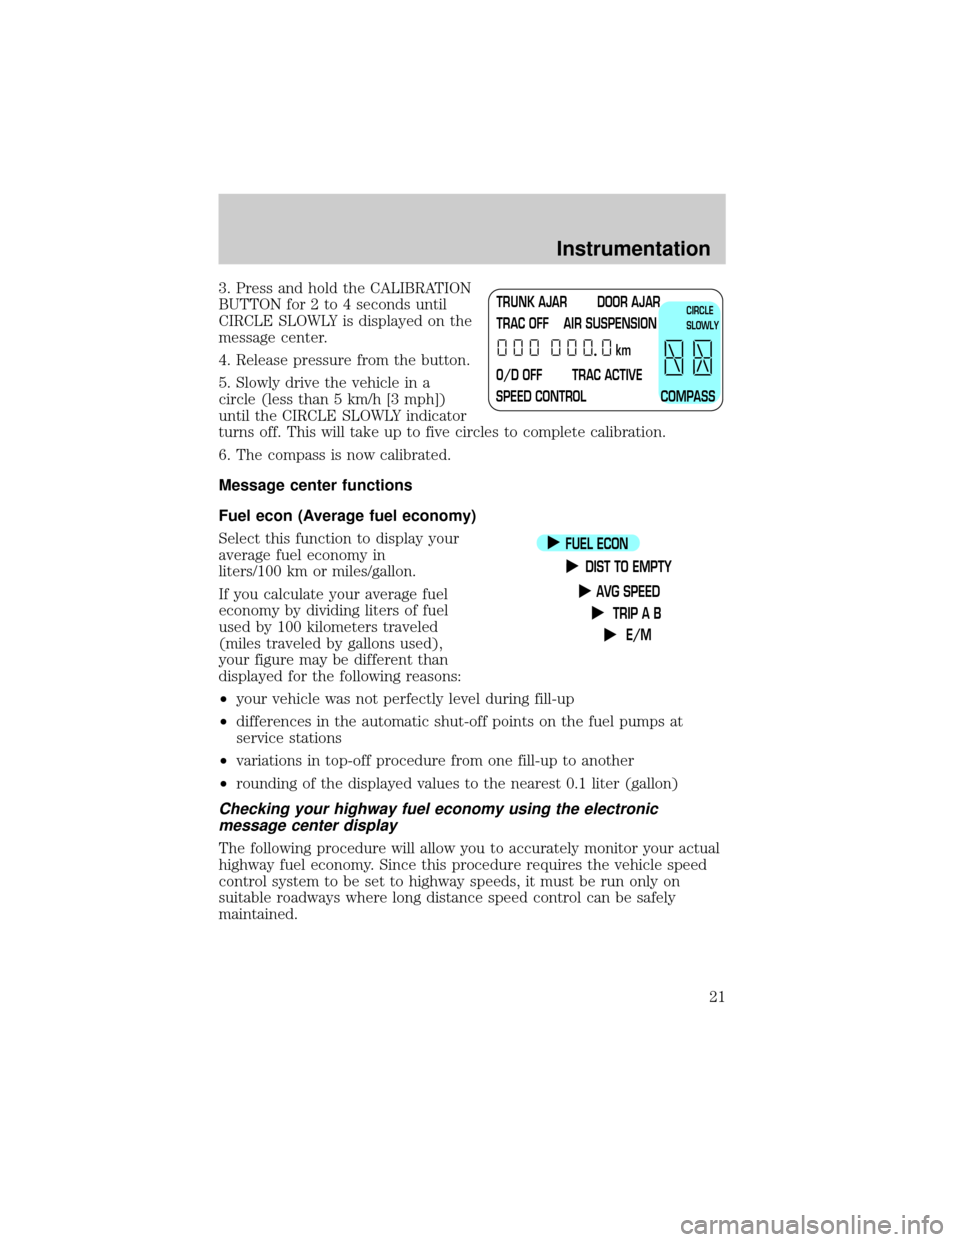
3. Press and hold the CALIBRATION
BUTTON for 2 to 4 seconds until
CIRCLE SLOWLY is displayed on the
message center.
4. Release pressure from the button.
5. Slowly drive the vehicle in a
circle (less than 5 km/h [3 mph])
until the CIRCLE SLOWLY indicator
turns off. This will take up to five circles to complete calibration.
6. The compass is now calibrated.
Message center functions
Fuel econ (Average fuel economy)
Select this function to display your
average fuel economy in
liters/100 km or miles/gallon.
If you calculate your average fuel
economy by dividing liters of fuel
used by 100 kilometers traveled
(miles traveled by gallons used),
your figure may be different than
displayed for the following reasons:
²your vehicle was not perfectly level during fill-up
²differences in the automatic shut-off points on the fuel pumps at
service stations
²variations in top-off procedure from one fill-up to another
²rounding of the displayed values to the nearest 0.1 liter (gallon)
Checking your highway fuel economy using the electronic
message center display
The following procedure will allow you to accurately monitor your actual
highway fuel economy. Since this procedure requires the vehicle speed
control system to be set to highway speeds, it must be run only on
suitable roadways where long distance speed control can be safely
maintained.
TRUNK AJAR DOOR AJAR
TRAC OFF AIR SUSPENSION
O/D OFF TRAC ACTIVE
SPEED CONTROL COMPASSkmCIRCLE
SLOWLY
FUEL ECON
DIST TO EMPTY
AVG SPEED
TRIP A B
E/M
Instrumentation
21
Page 146 of 240
Roadside coverage beyond basic warranty
In the United States, you may purchase additional roadside assistance
coverage beyond this period through the Ford Auto Club by contacting
your Ford or Lincoln Mercury dealer.
Similarly in Canada, for uninterrupted Roadside Assistance coverage, you
may purchase extended coverage prior to your Basic Warranty's Roadside
Assistance expiring. For more information and enrollment, contact
1±877±294±2582 or visit our website at www.ford.ca.
HAZARD FLASHER
Use only in an emergency to warn traffic of vehicle breakdown,
approaching danger, etc. The hazard flashers can be operated when the
ignition is off.
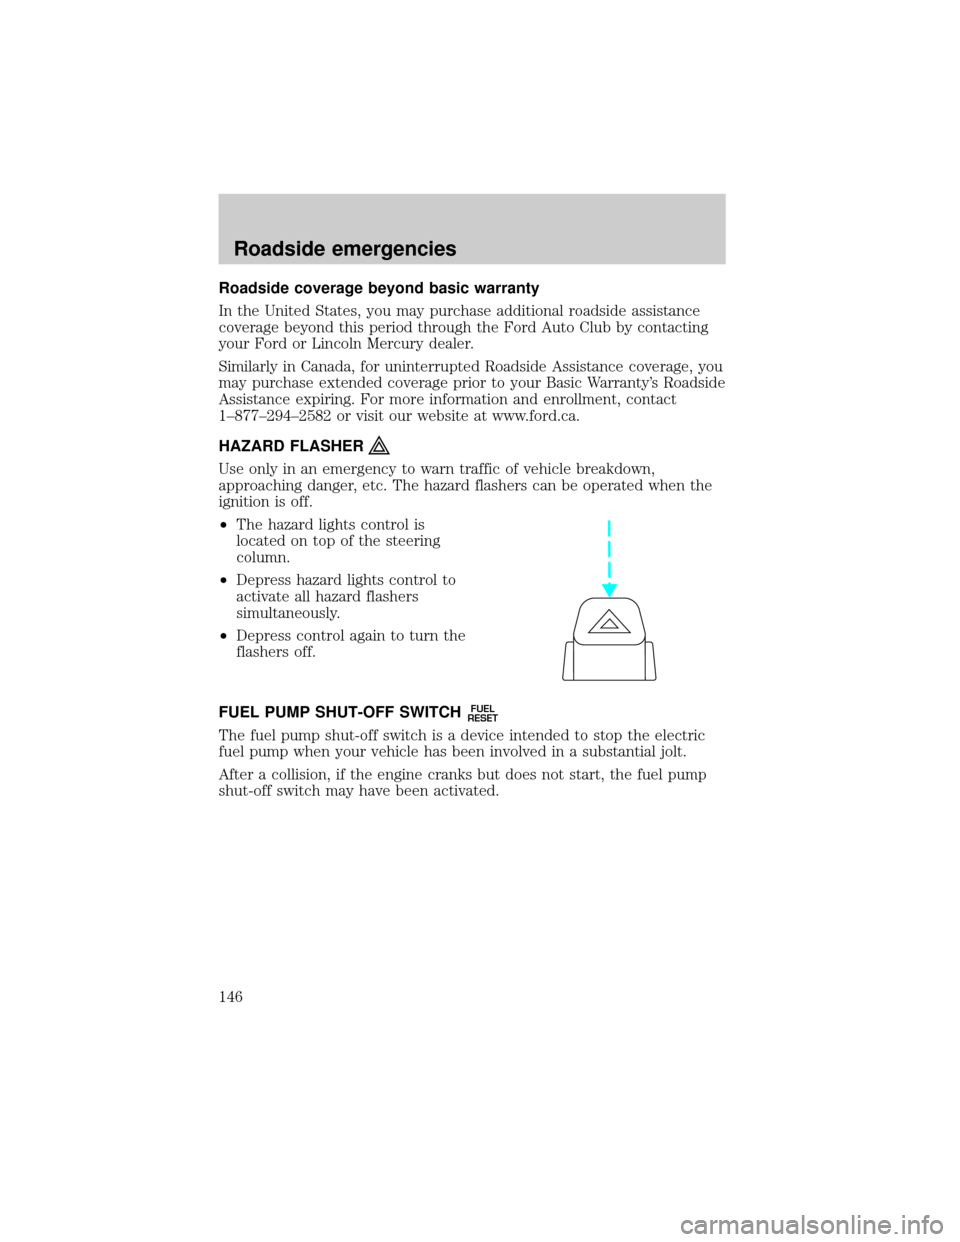
²The hazard lights control is
located on top of the steering
column.
²Depress hazard lights control to
activate all hazard flashers
simultaneously.
²Depress control again to turn the
flashers off.
FUEL PUMP SHUT-OFF SWITCH
FUEL
RESET
The fuel pump shut-off switch is a device intended to stop the electric
fuel pump when your vehicle has been involved in a substantial jolt.
After a collision, if the engine cranks but does not start, the fuel pump
shut-off switch may have been activated.
Roadside emergencies
146
Page 147 of 240
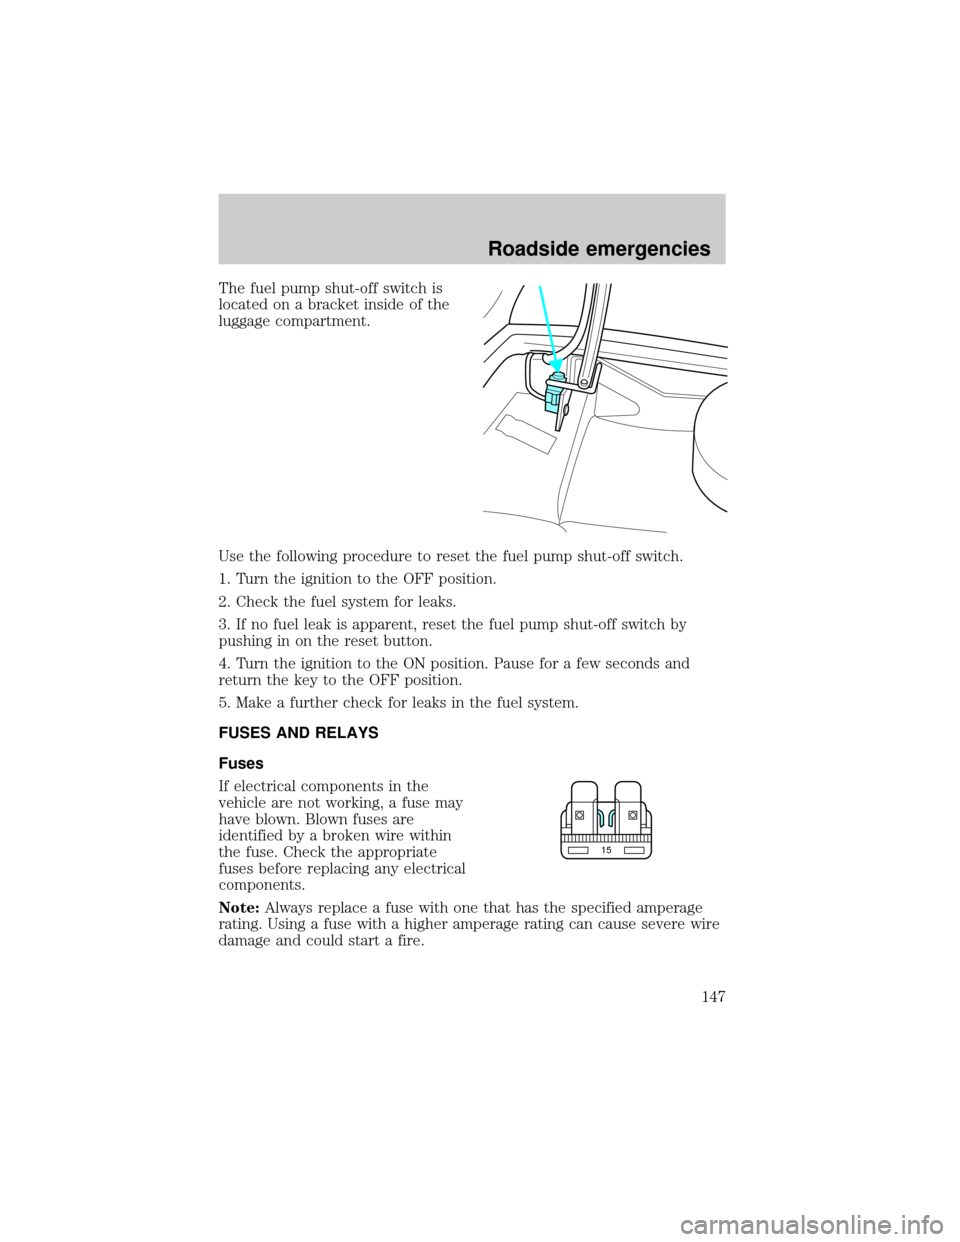
The fuel pump shut-off switch is
located on a bracket inside of the
luggage compartment.
Use the following procedure to reset the fuel pump shut-off switch.
1. Turn the ignition to the OFF position.
2. Check the fuel system for leaks.
3. If no fuel leak is apparent, reset the fuel pump shut-off switch by
pushing in on the reset button.
4. Turn the ignition to the ON position. Pause for a few seconds and
return the key to the OFF position.
5. Make a further check for leaks in the fuel system.
FUSES AND RELAYS
Fuses
If electrical components in the
vehicle are not working, a fuse may
have blown. Blown fuses are
identified by a broken wire within
the fuse. Check the appropriate
fuses before replacing any electrical
components.
Note:Always replace a fuse with one that has the specified amperage
rating. Using a fuse with a higher amperage rating can cause severe wire
damage and could start a fire.
15
Roadside emergencies
147
Page 153 of 240
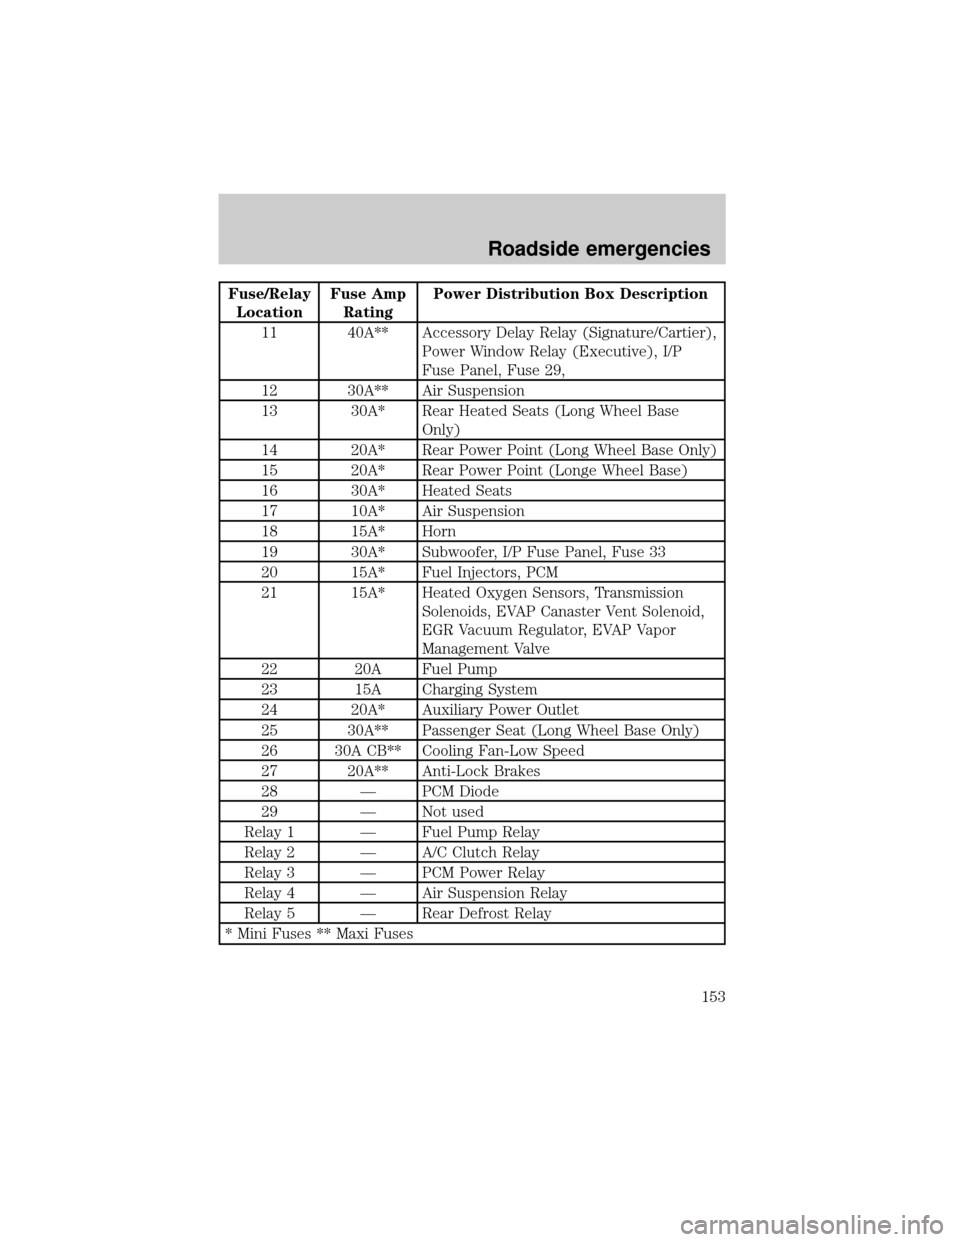
Fuse/Relay
LocationFuse Amp
RatingPower Distribution Box Description
11 40A** Accessory Delay Relay (Signature/Cartier),
Power Window Relay (Executive), I/P
Fuse Panel, Fuse 29,
12 30A** Air Suspension
13 30A* Rear Heated Seats (Long Wheel Base
Only)
14 20A* Rear Power Point (Long Wheel Base Only)
15 20A* Rear Power Point (Longe Wheel Base)
16 30A* Heated Seats
17 10A* Air Suspension
18 15A* Horn
19 30A* Subwoofer, I/P Fuse Panel, Fuse 33
20 15A* Fuel Injectors, PCM
21 15A* Heated Oxygen Sensors, Transmission
Solenoids, EVAP Canaster Vent Solenoid,
EGR Vacuum Regulator, EVAP Vapor
Management Valve
22 20A Fuel Pump
23 15A Charging System
24 20A* Auxiliary Power Outlet
25 30A** Passenger Seat (Long Wheel Base Only)
26 30A CB** Cooling Fan-Low Speed
27 20A** Anti-Lock Brakes
28 Ð PCM Diode
29 Ð Not used
Relay 1 Ð Fuel Pump Relay
Relay 2 Ð A/C Clutch Relay
Relay 3 Ð PCM Power Relay
Relay 4 Ð Air Suspension Relay
Relay 5 Ð Rear Defrost Relay
* Mini Fuses ** Maxi Fuses
Roadside emergencies
153
Page 191 of 240
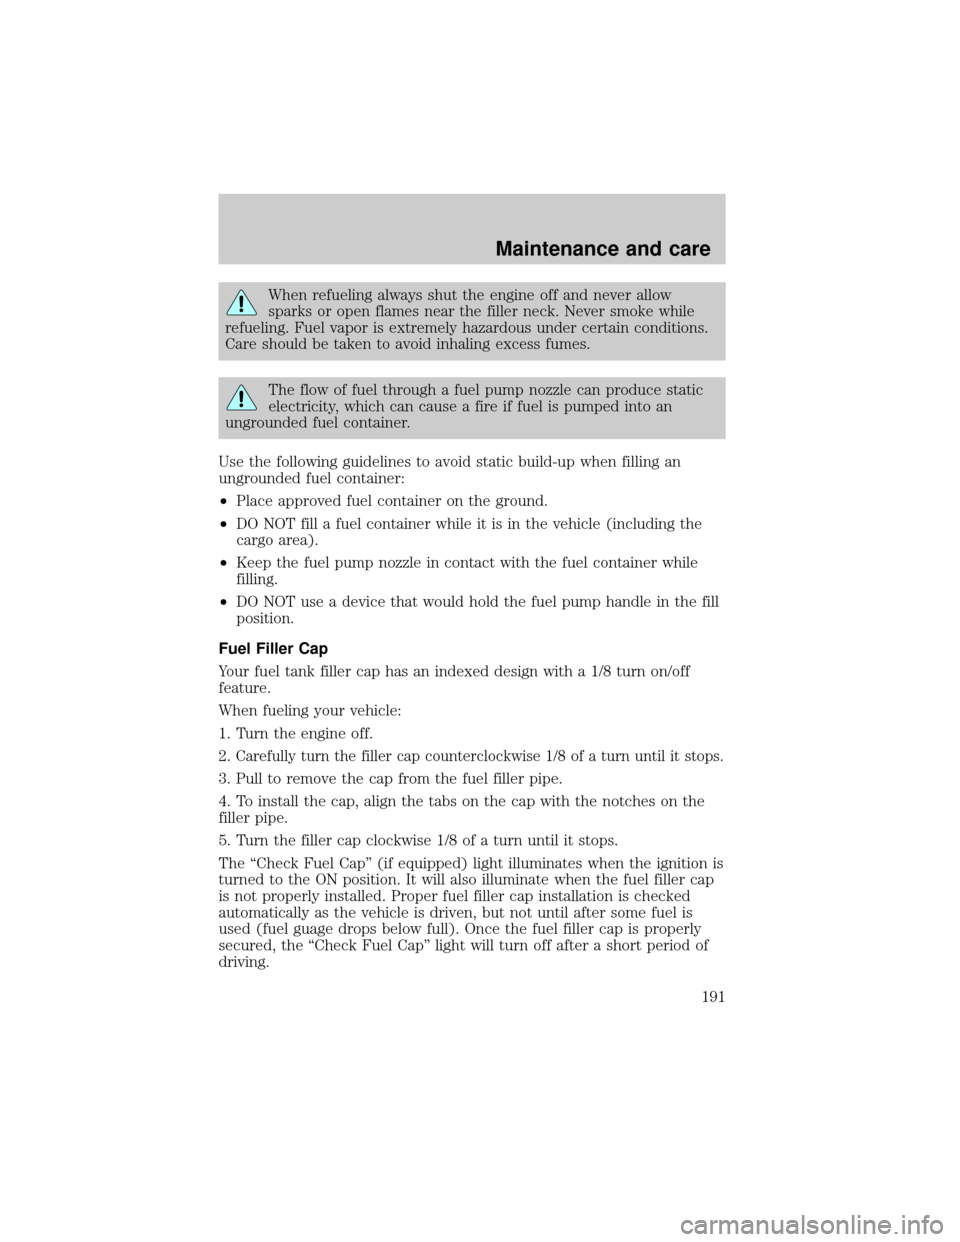
When refueling always shut the engine off and never allow
sparks or open flames near the filler neck. Never smoke while
refueling. Fuel vapor is extremely hazardous under certain conditions.
Care should be taken to avoid inhaling excess fumes.
The flow of fuel through a fuel pump nozzle can produce static
electricity, which can cause a fire if fuel is pumped into an
ungrounded fuel container.
Use the following guidelines to avoid static build-up when filling an
ungrounded fuel container:
²Place approved fuel container on the ground.
²DO NOT fill a fuel container while it is in the vehicle (including the
cargo area).
²Keep the fuel pump nozzle in contact with the fuel container while
filling.
²DO NOT use a device that would hold the fuel pump handle in the fill
position.
Fuel Filler Cap
Your fuel tank filler cap has an indexed design with a 1/8 turn on/off
feature.
When fueling your vehicle:
1. Turn the engine off.
2.
Carefully turn the filler cap counterclockwise 1/8 of a turn until it stops.
3. Pull to remove the cap from the fuel filler pipe.
4. To install the cap, align the tabs on the cap with the notches on the
filler pipe.
5. Turn the filler cap clockwise 1/8 of a turn until it stops.
The ªCheck Fuel Capº (if equipped) light illuminates when the ignition is
turned to the ON position. It will also illuminate when the fuel filler cap
is not properly installed. Proper fuel filler cap installation is checked
automatically as the vehicle is driven, but not until after some fuel is
used (fuel guage drops below full). Once the fuel filler cap is properly
secured, the ªCheck Fuel Capº light will turn off after a short period of
driving.
Maintenance and care
191
Page 192 of 240
If you must replace the fuel filler cap, replace it with a fuel filler
cap that is designed for your vehicle. The customer warranty may
be void for any damage to the fuel tank or fuel system if the
correct genuine Ford or Motorcraft fuel filler cap is not used.
The fuel system may be under pressure. If the fuel filler cap is
venting vapor or if you hear a hissing sound, wait until it stops
before completely removing the fuel filler cap. Otherwise, fuel may
spray out and injure you or others.
If you do not use the proper fuel filler cap, excessive pressure or
vacuum in the fuel tank may damage the fuel system or cause
the fuel cap to disengage in a collision, which may result in possible
personal injury.
Choosing the right fuel
Use only UNLEADED FUEL. The use of leaded fuel is prohibited by law
and could damage your vehicle.
Do not use fuel containing methanol. It can damage critical fuel system
components.
Your vehicle was not designed to use fuel or fuel additives with metallic
compounds, including manganese-based compounds containing MMT.
Repairs to correct the effects of using a fuel for which your vehicle was
not designed may not be covered by your warranty.
Octane recommendations
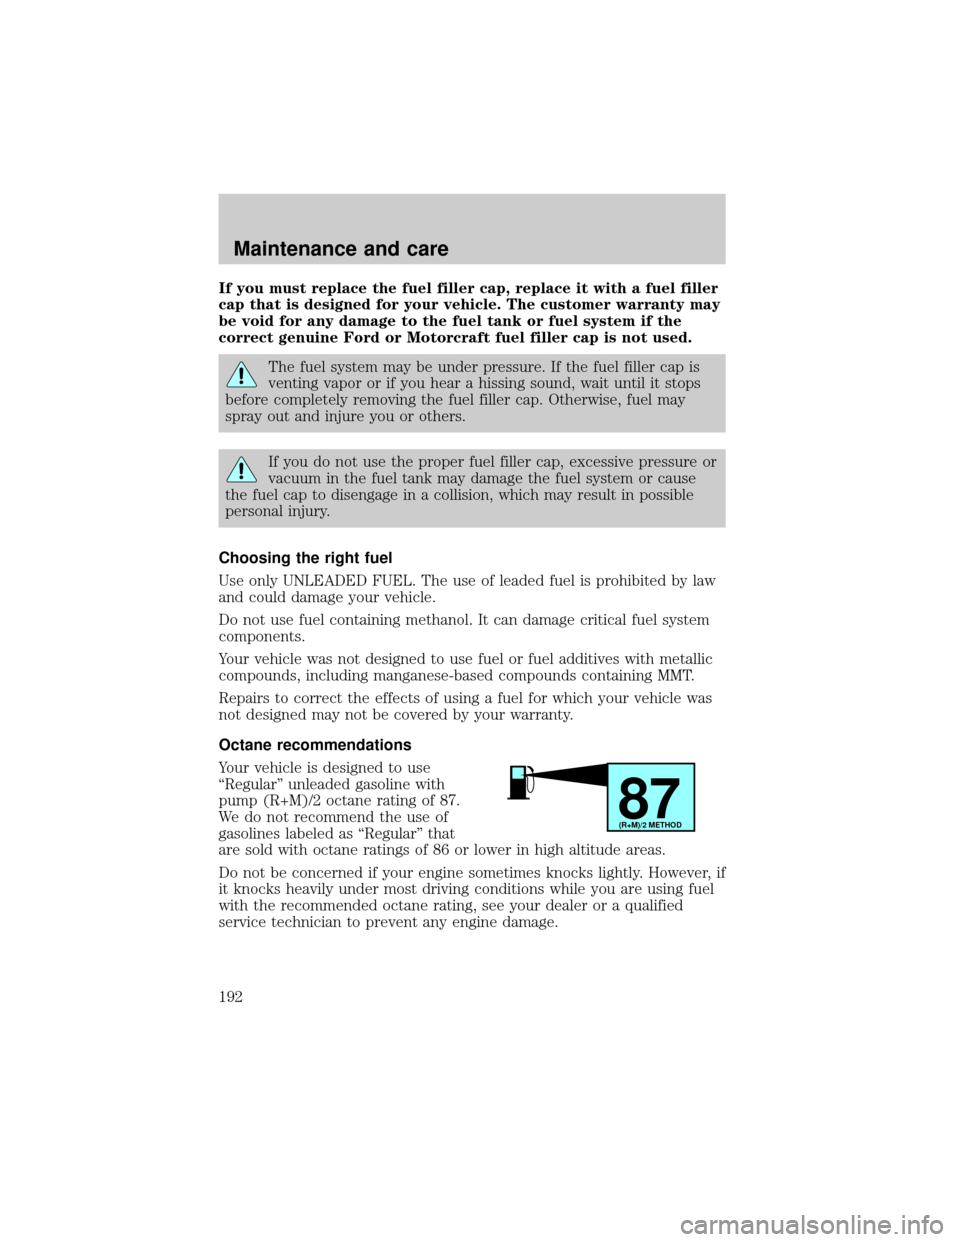
Your vehicle is designed to use
ªRegularº unleaded gasoline with
pump (R+M)/2 octane rating of 87.
We do not recommend the use of
gasolines labeled as ªRegularº that
are sold with octane ratings of 86 or lower in high altitude areas.
Do not be concerned if your engine sometimes knocks lightly. However, if
it knocks heavily under most driving conditions while you are using fuel
with the recommended octane rating, see your dealer or a qualified
service technician to prevent any engine damage.
87(R+M)/2 METHOD
Maintenance and care
192
Page 193 of 240
Fuel quality
If you are experiencing starting, rough idle or hesitation driveability
problems during a cold start, try a different brand of gasoline. ªPremiumº
unleaded gasoline should not be used (particularly in the United States)
if ªRegularº unleaded gasoline is recommended because it may cause
these problems to become more pronounced. If the problems persist, see
your dealer or a qualified service technician.
It should not be necessary to add any aftermarket products to your fuel
tank if you continue to use high quality fuel of the recommended octane
rating. Aftermarket products could cause damage to the fuel system.
Repairs to correct the effects of using an aftermarket product in your
fuel may not be covered by your warranty.
Many of the world's automakers
issued the World-wide Fuel Charter
that recommends gasoline
specifications to provide improved
performance and emission control
system protection for your vehicle.
Gasolines that meet the World-wide
Fuel Charter should be used when
available. Ask your fuel supplier
about gasolines that meet the
World-wide Fuel Charter. In Canada,
look for fuels that display theAuto Makers' Choiceylogo.
Cleaner air
Ford endorses the use of reformulated ªcleaner-burningº gasolines to
improve air quality.
Running out of fuel
Avoid running out of fuel because this situation may have an adverse
affect on powertrain components.
If you have run out of fuel:
²You may need to cycle the ignition from OFF to ON several times after
refueling, to allow the fuel system to pump the fuel from the tank to
the engine.
²Your ªService Engine Soonº indicator may come on. For more
information on the ªService Engine Soonº indicator, refer to the
Instrumentationchapter.
Maintenance and care
193
Page 195 of 240
²Allow no more than 2 automatic click-offs when filling.
²Always use fuel with the recommended octane rating.
²Use a known quality gasoline, preferably a national brand.
²Use the same side of the same pump and have the vehicle facing the
same direction each time you fill up.
²Have the vehicle loading and distribution the same every time.
Your results will be most accurate if your filling method is consistent.
Calculating fuel economy
1. Fill the fuel tank completely and record the initial odometer reading
(in kilometers or miles).
2. Each time you fill the tank, record the amount of fuel added (in liters
or gallons).
3. After at least three to five tank fill-ups, fill the fuel tank and record
the current odometer reading.
4. Subtract your initial odometer reading from the current odometer
reading.
5. Follow one of the simple calculations in order to determine fuel
economy:
Multiply liters used by 100, then divide by total kilometers
traveled.
Divide total miles traveled by total gallons used.
Keep a record for at least one month and record the type of driving (city
or highway). This will provide an accurate estimate of the vehicle's fuel
economy under current driving conditions. Additionally, keeping records
during summer and winter will show how temperature impacts fuel
economy. In general, lower temperatures give lower fuel economy.
Driving style Ð good driving and fuel economy habits
Give consideration to the lists that follow and you may be able to change
a number of variables and improve your fuel economy.
Habits
²Smooth, moderate operation can yield up to 10% savings in fuel.
²Steady speeds without stopping will usually give the best fuel
economy.
Maintenance and care
195
Page 233 of 240

coolant .....................................171
fail-safe coolant ......................176
idle speed control ...................181
lubrication
specifications ..................214±215
refill capacities ........................212
service points ..........................166
starting after a collision .........146
Engine block heater .................128
Engine oil ..................................167
change oil soon warning,
message center .......................167
checking and adding ..............167
dipstick ....................................167
filter, specifications ........169, 212
recommendations ...................169
refill capacities ........................212
specifications ..................214±215
Exhaust fumes ..........................129
F
Fail safe cooling ........................176
Floor mats ...................................79
Fluid capacities .........................212
Fuel ............................................189
calculating fuel
economy ............................21, 194
cap .....................................10, 191
capacity ...................................212
choosing the right fuel ...........192
comparisons with EPA fuel
economy estimates .................197
detergent in fuel .....................193
filling your vehicle
with fuel ..................189, 191, 194
filter, specifications ........194, 212
fuel filler door override ............73
fuel filler door release ..............72fuel pump shut-off switch .....146
gauge .........................................16
improving fuel economy ........194
octane rating ...........192, 215±216
quality ......................................193
running out of fuel .................193
safety information relating to
automotive fuels .....................189
Fuses ..................................147±148
G
Garage door opener ....................67
Gas cap (see Fuel cap) ......10, 191
Gas mileage (see Fuel
economy) ...................................194
Gauges .........................................15
engine coolant temperature
gauge .........................................17
fuel gauge ..................................16
odometer ...................................16
speedometer .............................16
GAWR (Gross Axle Weight
Rating) .......................................139
definition .................................139
driving with a heavy load ......139
location ....................................139
GVWR (Gross Vehicle Weight
Rating) .......................................139
calculating ...............................139
definition .................................139
driving with a heavy load ......139
location ....................................139
H
Hazard flashers .........................146
Head restraints ...........................92
Headlamps .............................25±26
Index
233