LINCOLN TOWN CAR 2002 Workshop Manual
Manufacturer: LINCOLN, Model Year: 2002, Model line: TOWN CAR, Model: LINCOLN TOWN CAR 2002Pages: 248, PDF Size: 1.9 MB
Page 51 of 248
AIMING THE HEADLAMPS
Your vehicle is equipped with a Vehicle Headlamp Aim Device (VHAD)
on each headlamp. Each headlamp may be properly aimed in the vertical
(up/down) and the horizontal (left/right) directions using your VHAD
system. The headlamps on your vehicle are properly aimed at the
assembly plant.
A bubble (vertical indicator) that is not centered between the two red
lines does not necessarily indicate out-of-aim headlamps. If your vehicle
is not positioned on a level surface, the slope will be included in the
vertical indication. Therefore, vertical and horizontal headlamp
adjustment should be performed only when the beam direction appears
to be incorrect.
You will need one 4 mm wrench or socket to make the adjustments.
If the vehicle has been in an accident, the vehicle's front structure
should be properly aligned before aiming the headlamps.
Horizontal aim adjustment
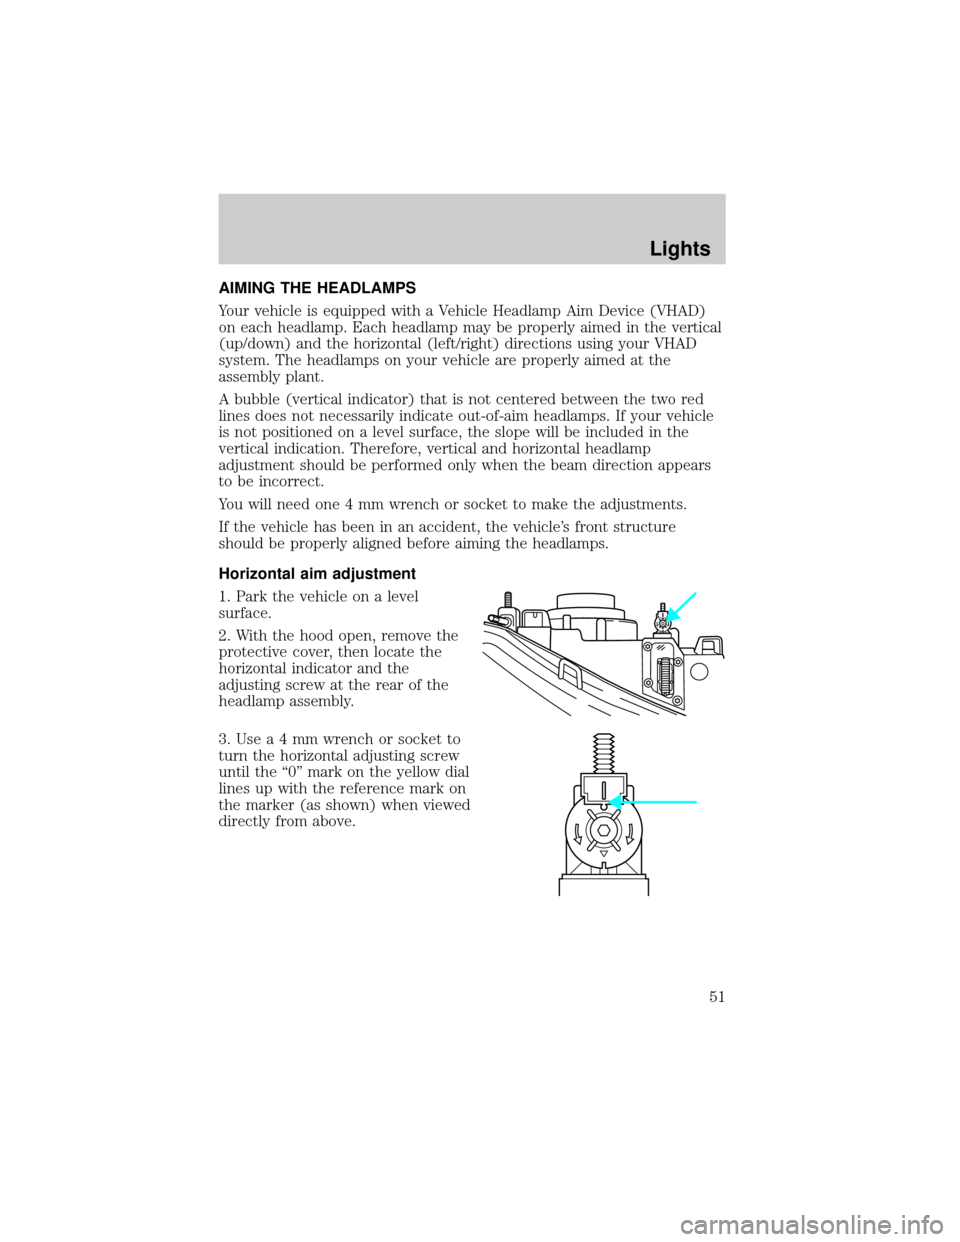
1. Park the vehicle on a level
surface.
2. With the hood open, remove the
protective cover, then locate the
horizontal indicator and the
adjusting screw at the rear of the
headlamp assembly.
3.Usea4mmwrench or socket to
turn the horizontal adjusting screw
until the ª0º mark on the yellow dial
lines up with the reference mark on
the marker (as shown) when viewed
directly from above.
Lights
51
Page 52 of 248
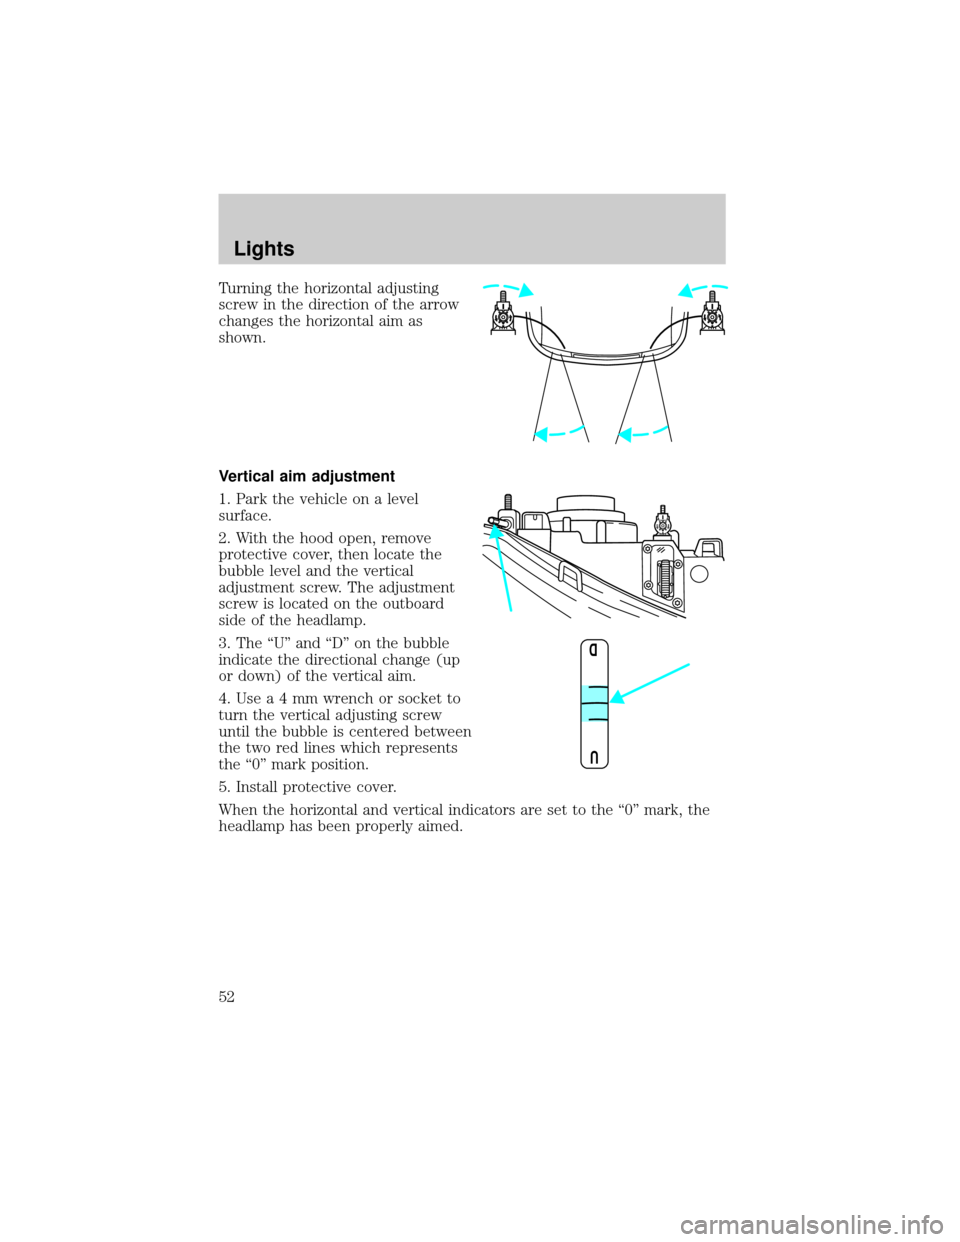
Turning the horizontal adjusting
screw in the direction of the arrow
changes the horizontal aim as
shown.
Vertical aim adjustment
1. Park the vehicle on a level
surface.
2. With the hood open, remove
protective cover, then locate the
bubble level and the vertical
adjustment screw. The adjustment
screw is located on the outboard
side of the headlamp.
3. The ªUº and ªDº on the bubble
indicate the directional change (up
or down) of the vertical aim.
4.Usea4mmwrench or socket to
turn the vertical adjusting screw
until the bubble is centered between
the two red lines which represents
the ª0º mark position.
5. Install protective cover.
When the horizontal and vertical indicators are set to the ª0º mark, the
headlamp has been properly aimed.
D U
Lights
52
Page 53 of 248
TURN SIGNAL CONTROL
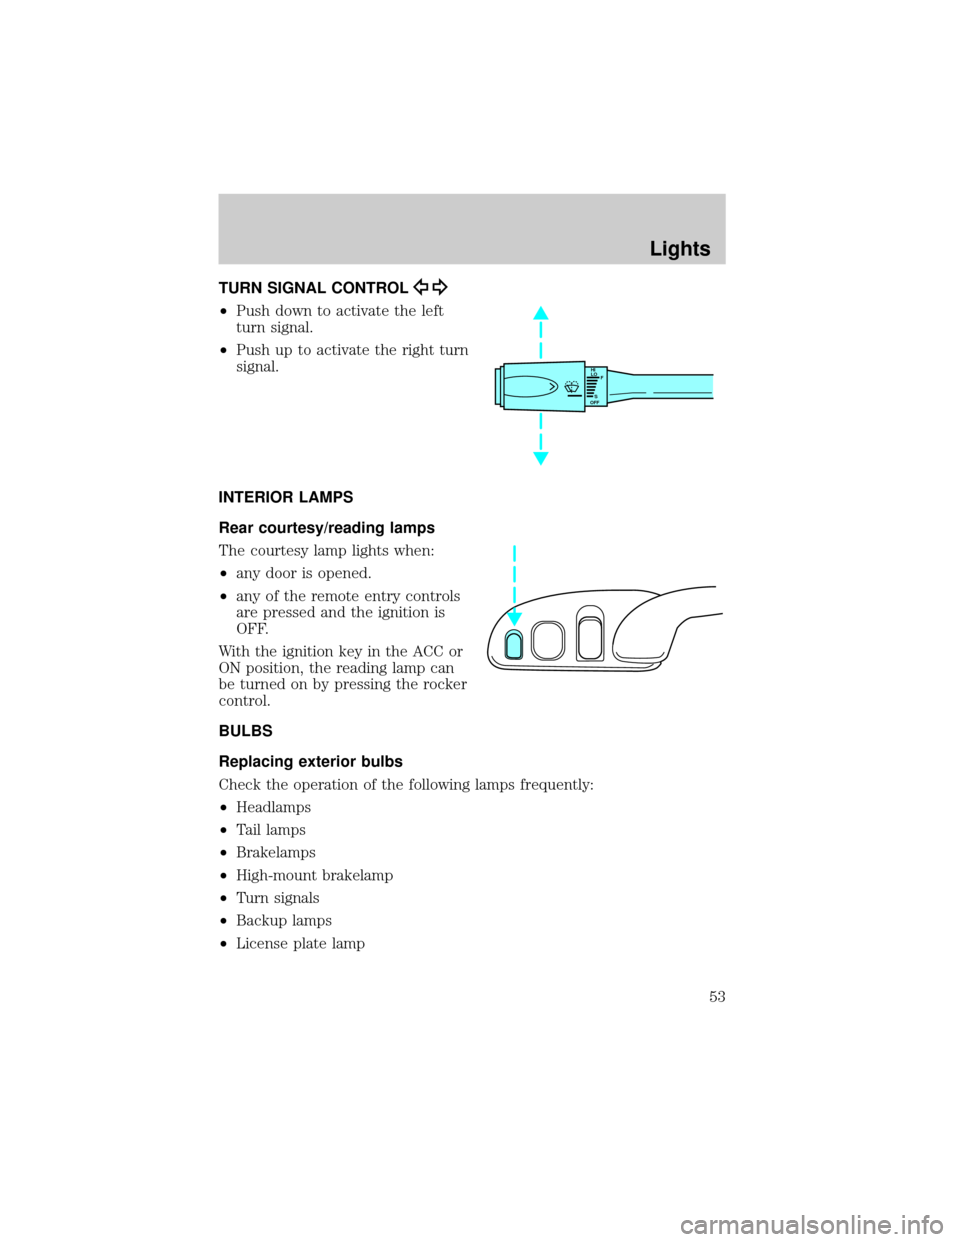
²Push down to activate the left
turn signal.
²Push up to activate the right turn
signal.
INTERIOR LAMPS
Rear courtesy/reading lamps
The courtesy lamp lights when:
²any door is opened.
²any of the remote entry controls
are pressed and the ignition is
OFF.
With the ignition key in the ACC or
ON position, the reading lamp can
be turned on by pressing the rocker
control.
BULBS
Replacing exterior bulbs
Check the operation of the following lamps frequently:
²Headlamps
²Tail lamps
²Brakelamps
²High-mount brakelamp
²Turn signals
²Backup lamps
²License plate lamp
HI
LO
F
S
OFF
Lights
53
Page 54 of 248
Do not remove lamp bulbs unless they will be replaced immediately. If a
bulb is removed for an extended period of time, contaminants may enter
the lamp housings and affect performance.
Using the right bulbs
Replacement bulbs are specified in the chart below. Headlamp bulbs
must be marked with an authorized ªD.O.T.º for North America and an
ªEº for Europe to assure lamp performance, light brightness and pattern
and safe visibility. The correct bulbs will not damage the lamp assembly
or void the lamp assembly warranty and will provide quality bulb burn
time.
Function Trade Number
Tail lamp, brakelamp, turn lamp 3157K
Backup lamp 3156K
Side marker lamp (front) 194
Park, turn lamp (front) 3157 AK (amber)
Headlamp 9007
Cornering lamp 3156K
License plate lamp 168
High-mount brakelamp 912
Luggage compartment lamp 212-2
Map lamp 578
Visor vanity lamp 168
Door courtesy lamp 904
Glove compartment 194
All replacement bulbs are clear in color except where noted.
To replace all instrument panel lights - see your dealer.
Replacing the interior bulbs
Check the operation of the following interior bulbs frequently:
²interior overhead lamp
²map lamp
For bulb replacement, see a dealer or qualified technician.
Lights
54
Page 55 of 248
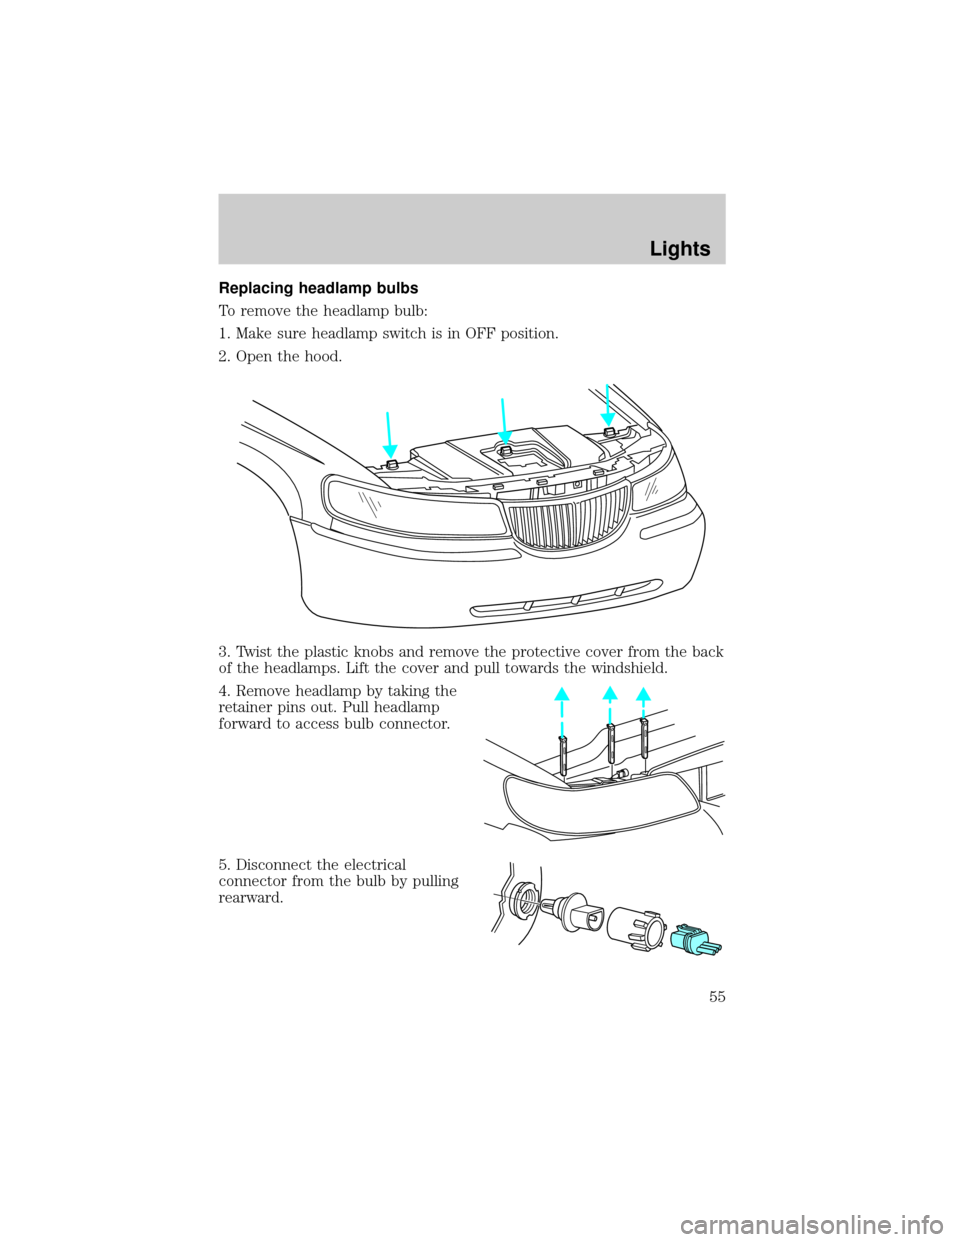
Replacing headlamp bulbs
To remove the headlamp bulb:
1. Make sure headlamp switch is in OFF position.
2. Open the hood.
3. Twist the plastic knobs and remove the protective cover from the back
of the headlamps. Lift the cover and pull towards the windshield.
4. Remove headlamp by taking the
retainer pins out. Pull headlamp
forward to access bulb connector.
5. Disconnect the electrical
connector from the bulb by pulling
rearward.
Lights
55
Page 56 of 248
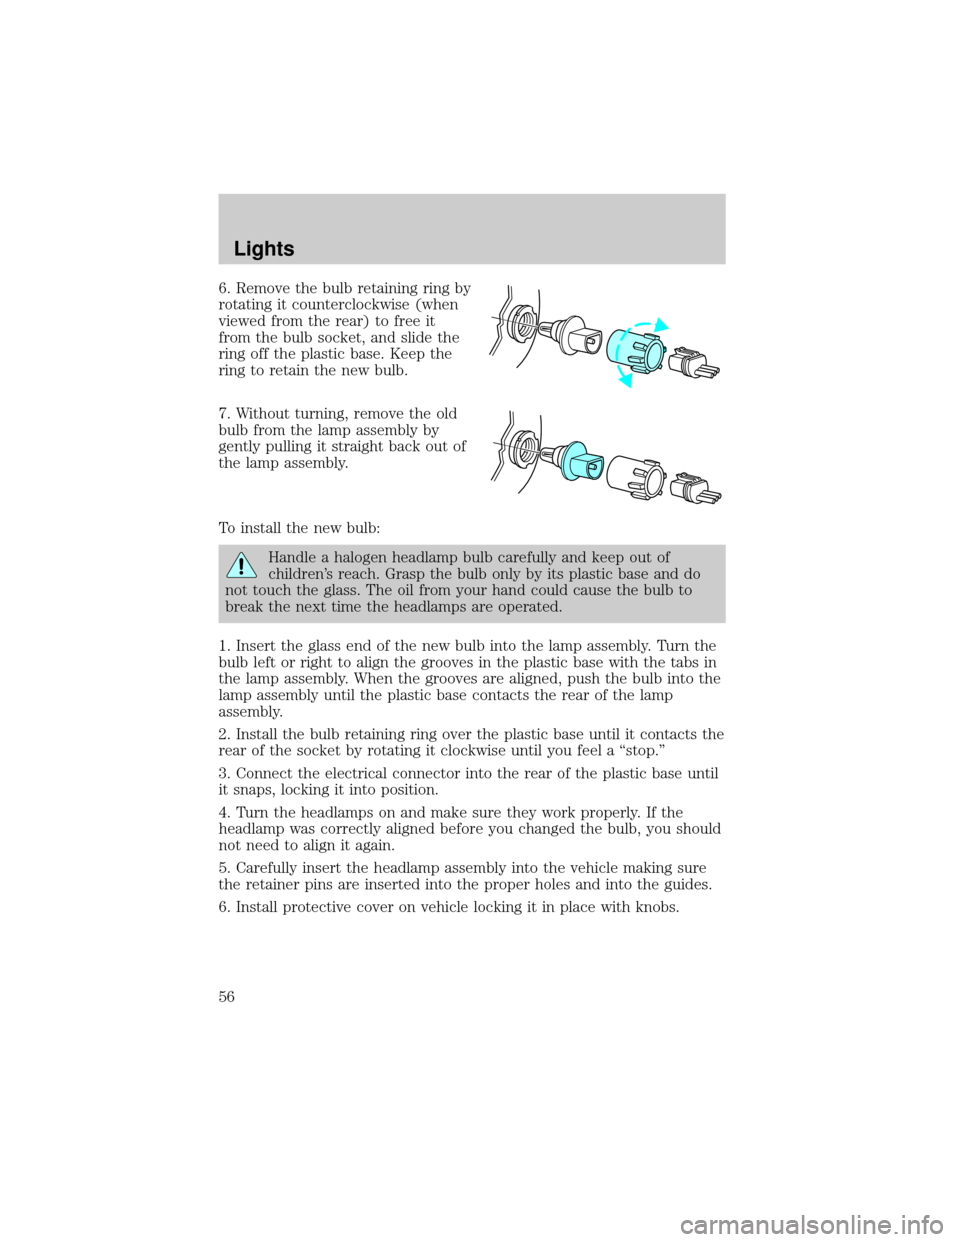
6. Remove the bulb retaining ring by
rotating it counterclockwise (when
viewed from the rear) to free it
from the bulb socket, and slide the
ring off the plastic base. Keep the
ring to retain the new bulb.
7. Without turning, remove the old
bulb from the lamp assembly by
gently pulling it straight back out of
the lamp assembly.
To install the new bulb:
Handle a halogen headlamp bulb carefully and keep out of
children's reach. Grasp the bulb only by its plastic base and do
not touch the glass. The oil from your hand could cause the bulb to
break the next time the headlamps are operated.
1. Insert the glass end of the new bulb into the lamp assembly. Turn the
bulb left or right to align the grooves in the plastic base with the tabs in
the lamp assembly. When the grooves are aligned, push the bulb into the
lamp assembly until the plastic base contacts the rear of the lamp
assembly.
2. Install the bulb retaining ring over the plastic base until it contacts the
rear of the socket by rotating it clockwise until you feel a ªstop.º
3. Connect the electrical connector into the rear of the plastic base until
it snaps, locking it into position.
4. Turn the headlamps on and make sure they work properly. If the
headlamp was correctly aligned before you changed the bulb, you should
not need to align it again.
5. Carefully insert the headlamp assembly into the vehicle making sure
the retainer pins are inserted into the proper holes and into the guides.
6. Install protective cover on vehicle locking it in place with knobs.
Lights
56
Page 57 of 248
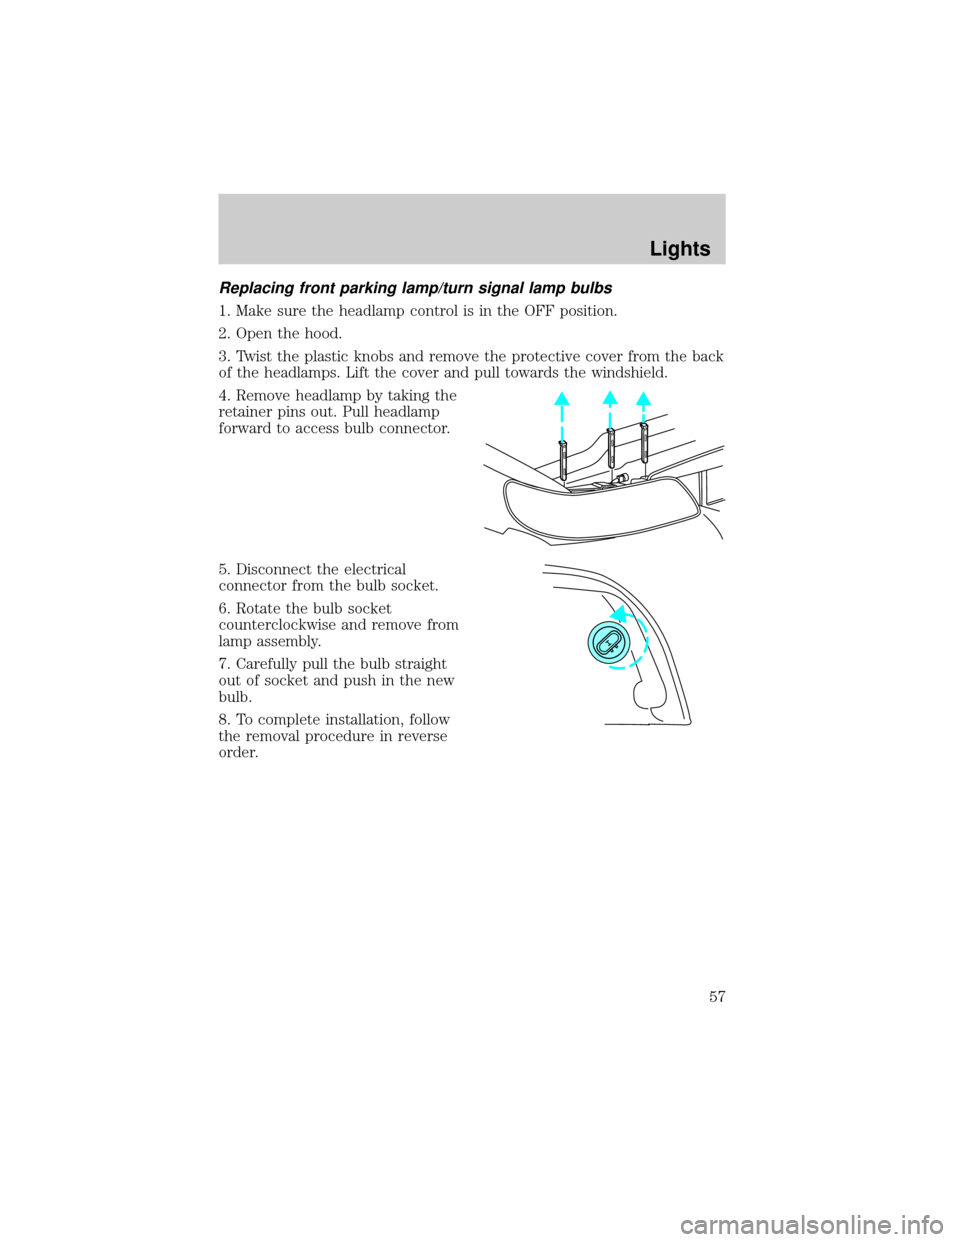
Replacing front parking lamp/turn signal lamp bulbs
1. Make sure the headlamp control is in the OFF position.
2. Open the hood.
3. Twist the plastic knobs and remove the protective cover from the back
of the headlamps. Lift the cover and pull towards the windshield.
4. Remove headlamp by taking the
retainer pins out. Pull headlamp
forward to access bulb connector.
5. Disconnect the electrical
connector from the bulb socket.
6. Rotate the bulb socket
counterclockwise and remove from
lamp assembly.
7. Carefully pull the bulb straight
out of socket and push in the new
bulb.
8. To complete installation, follow
the removal procedure in reverse
order.
Lights
57
Page 58 of 248
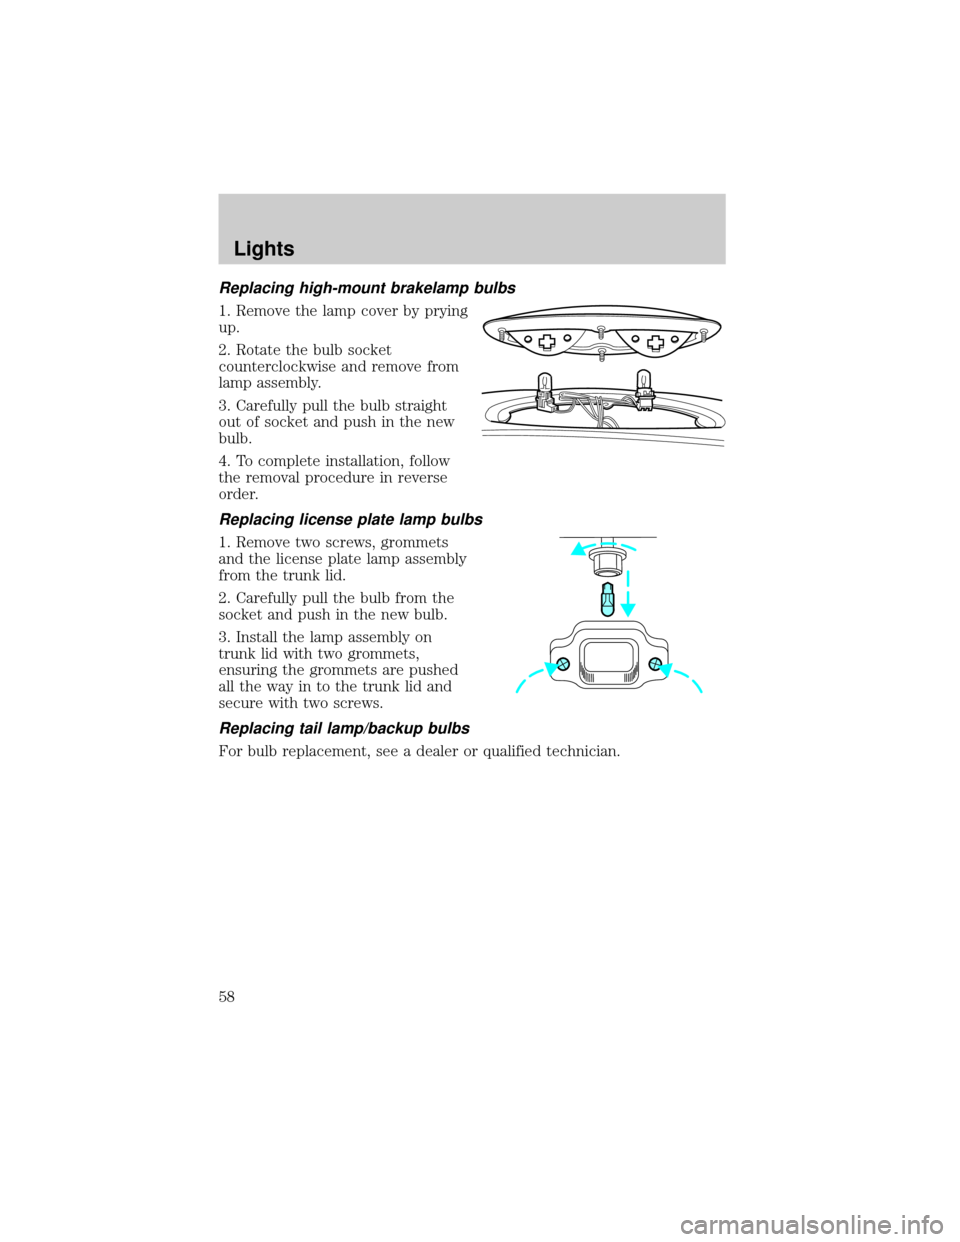
Replacing high-mount brakelamp bulbs
1. Remove the lamp cover by prying
up.
2. Rotate the bulb socket
counterclockwise and remove from
lamp assembly.
3. Carefully pull the bulb straight
out of socket and push in the new
bulb.
4. To complete installation, follow
the removal procedure in reverse
order.
Replacing license plate lamp bulbs
1. Remove two screws, grommets
and the license plate lamp assembly
from the trunk lid.
2. Carefully pull the bulb from the
socket and push in the new bulb.
3. Install the lamp assembly on
trunk lid with two grommets,
ensuring the grommets are pushed
all the way in to the trunk lid and
secure with two screws.
Replacing tail lamp/backup bulbs
For bulb replacement, see a dealer or qualified technician.
Lights
58
Page 59 of 248
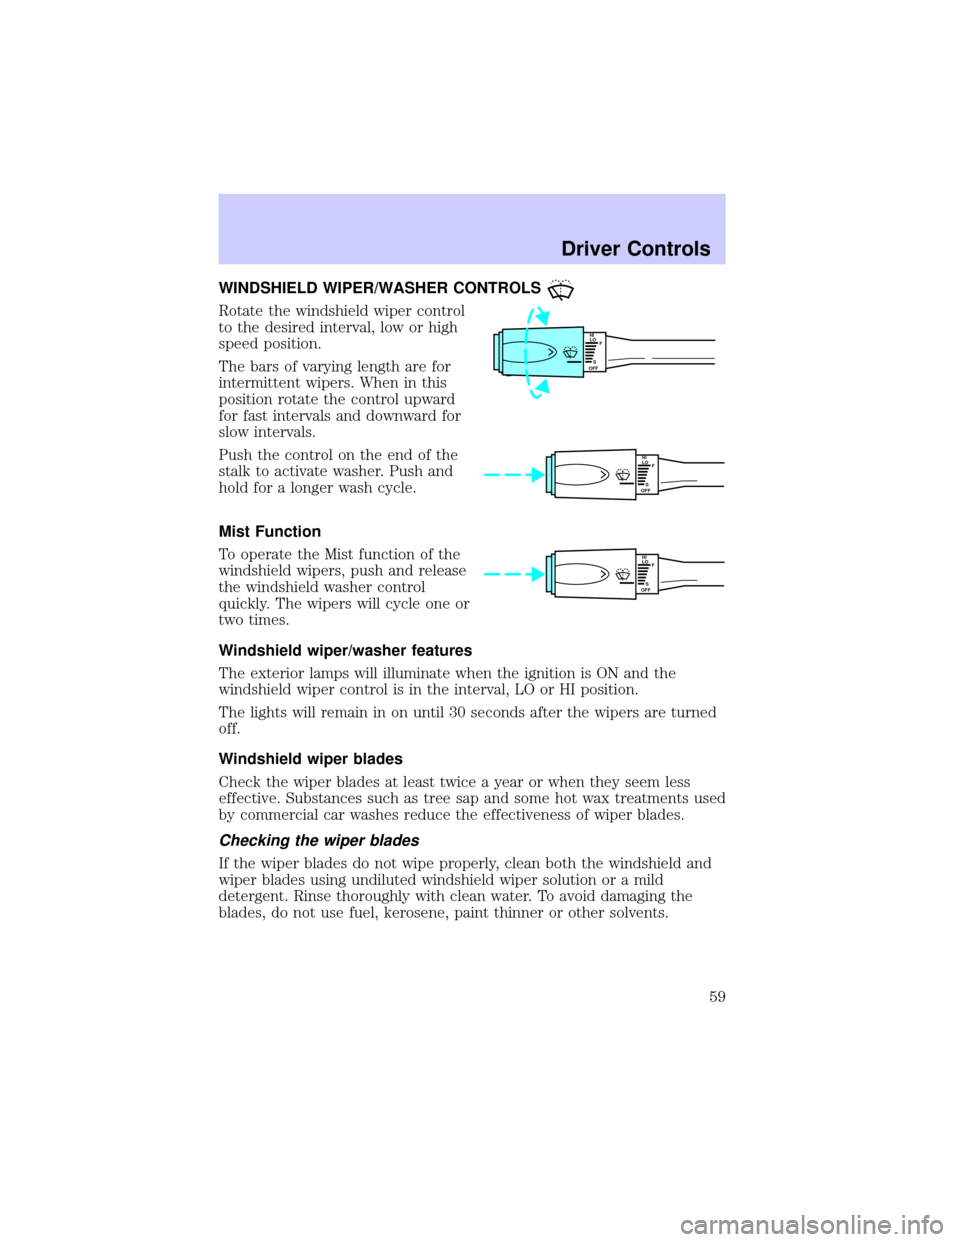
WINDSHIELD WIPER/WASHER CONTROLS
Rotate the windshield wiper control
to the desired interval, low or high
speed position.
The bars of varying length are for
intermittent wipers. When in this
position rotate the control upward
for fast intervals and downward for
slow intervals.
Push the control on the end of the
stalk to activate washer. Push and
hold for a longer wash cycle.
Mist Function
To operate the Mist function of the
windshield wipers, push and release
the windshield washer control
quickly. The wipers will cycle one or
two times.
Windshield wiper/washer features
The exterior lamps will illuminate when the ignition is ON and the
windshield wiper control is in the interval, LO or HI position.
The lights will remain in on until 30 seconds after the wipers are turned
off.
Windshield wiper blades
Check the wiper blades at least twice a year or when they seem less
effective. Substances such as tree sap and some hot wax treatments used
by commercial car washes reduce the effectiveness of wiper blades.
Checking the wiper blades
If the wiper blades do not wipe properly, clean both the windshield and
wiper blades using undiluted windshield wiper solution or a mild
detergent. Rinse thoroughly with clean water. To avoid damaging the
blades, do not use fuel, kerosene, paint thinner or other solvents.
HI
LO
F
S
OFF
HI
LO
F
S
OFF
HI
LO
F
S
OFF
Driver Controls
59
Page 60 of 248
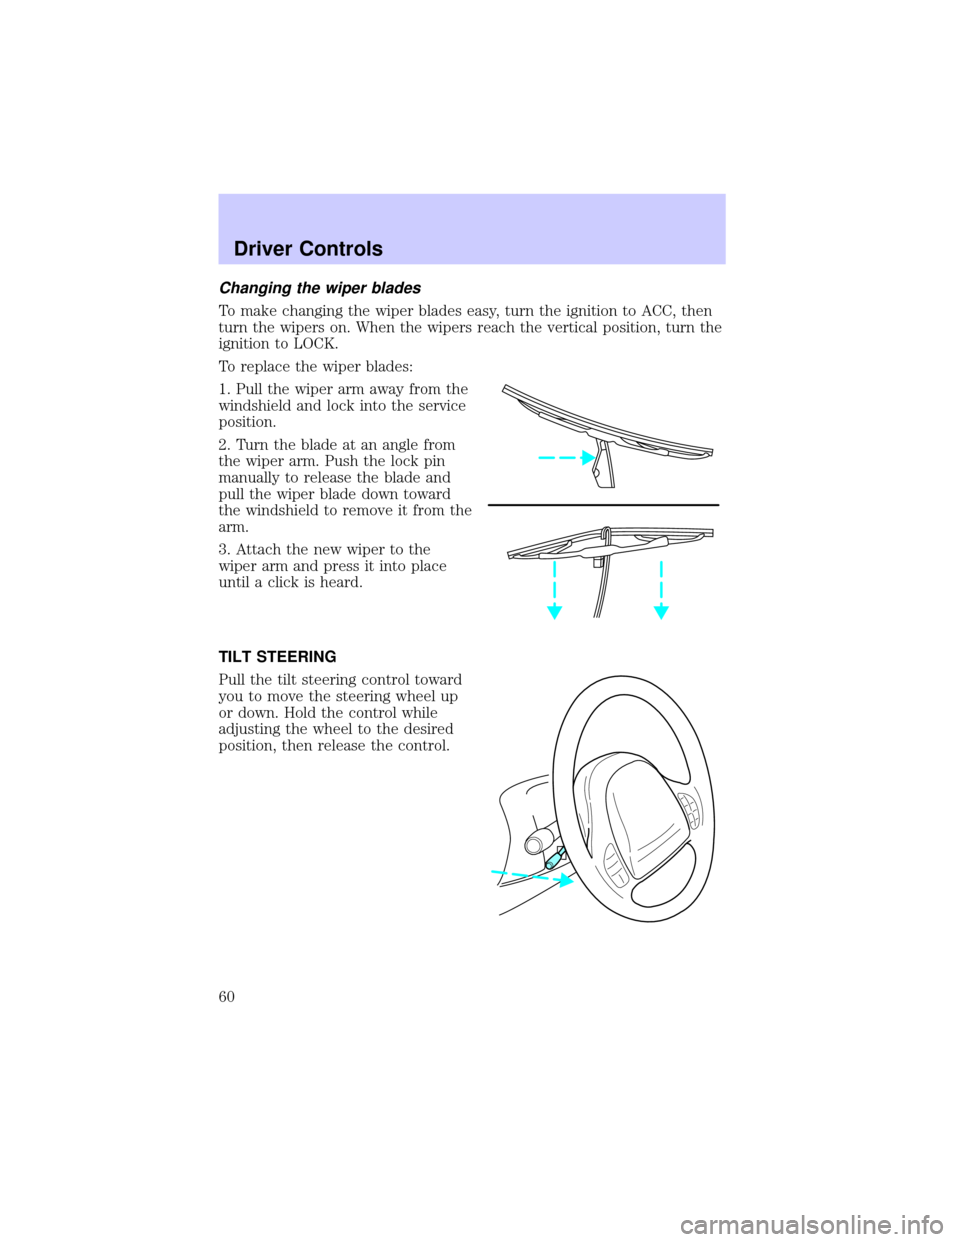
Changing the wiper blades
To make changing the wiper blades easy, turn the ignition to ACC, then
turn the wipers on. When the wipers reach the vertical position, turn the
ignition to LOCK.
To replace the wiper blades:
1. Pull the wiper arm away from the
windshield and lock into the service
position.
2. Turn the blade at an angle from
the wiper arm. Push the lock pin
manually to release the blade and
pull the wiper blade down toward
the windshield to remove it from the
arm.
3. Attach the new wiper to the
wiper arm and press it into place
until a click is heard.
TILT STEERING
Pull the tilt steering control toward
you to move the steering wheel up
or down. Hold the control while
adjusting the wheel to the desired
position, then release the control.
Driver Controls
60