driver controls LINCOLN TOWN CAR 2003 Owners Manual
[x] Cancel search | Manufacturer: LINCOLN, Model Year: 2003, Model line: TOWN CAR, Model: LINCOLN TOWN CAR 2003Pages: 272, PDF Size: 2.19 MB
Page 1 of 272
Introduction 4
Instrument Cluster 10
Warning and control lights 10
Gauges 15
Entertainment Systems 17
AM/FM stereo cassette with CD 17
CD changer 21
Navigation system 24
Climate Controls 70
Dual automatic temperature control 70
Lights 74
Headlamps 74
Turn signal control 78
Bulb replacement 79
Driver Controls 83
Windshield wiper/washer control 83
Steering wheel adjustment 85
Power windows 97
Mirrors 98
Speed control 99
Message center 104
Locks and Security 113
Locks 113
Anti-theft system 123
2003 Town Car(tow)
Owners Guide (post-2002-fmt)
USA English(fus)
Table of Contents
Table of Contents
1
Page 15 of 272
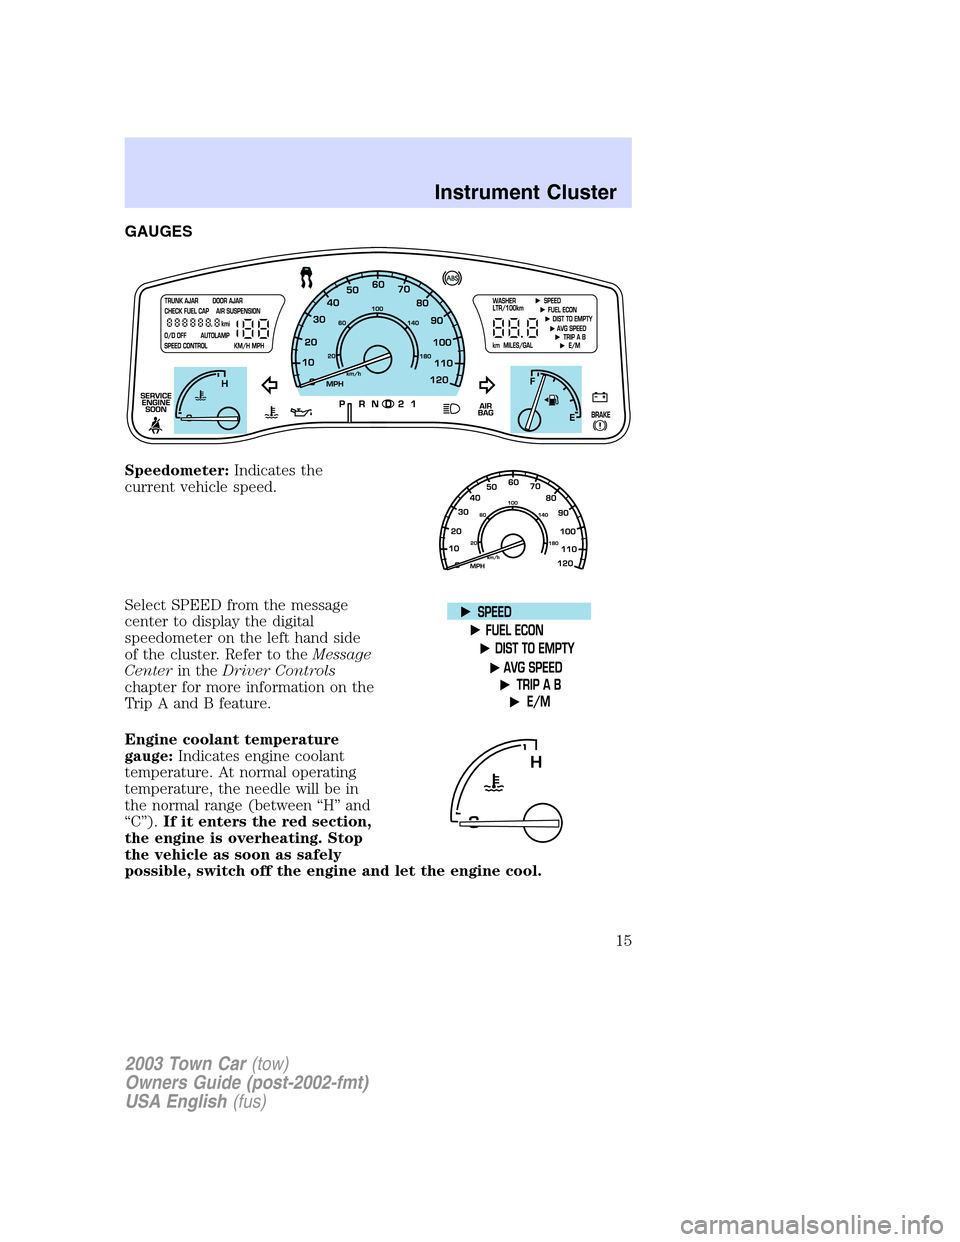
GAUGES
Speedometer:Indicates the
current vehicle speed.
Select SPEED from the message
center to display the digital
speedometer on the left hand side
of the cluster. Refer to theMessage
Centerin theDriver Controls
chapter for more information on the
Trip A and B feature.
Engine coolant temperature
gauge:Indicates engine coolant
temperature. At normal operating
temperature, the needle will be in
the normal range (between“H”and
“C”).If it enters the red section,
the engine is overheating. Stop
the vehicle as soon as safely
possible, switch off the engine and let the engine cool.
2003 Town Car(tow)
Owners Guide (post-2002-fmt)
USA English(fus)
Instrument Cluster
15
Page 37 of 272
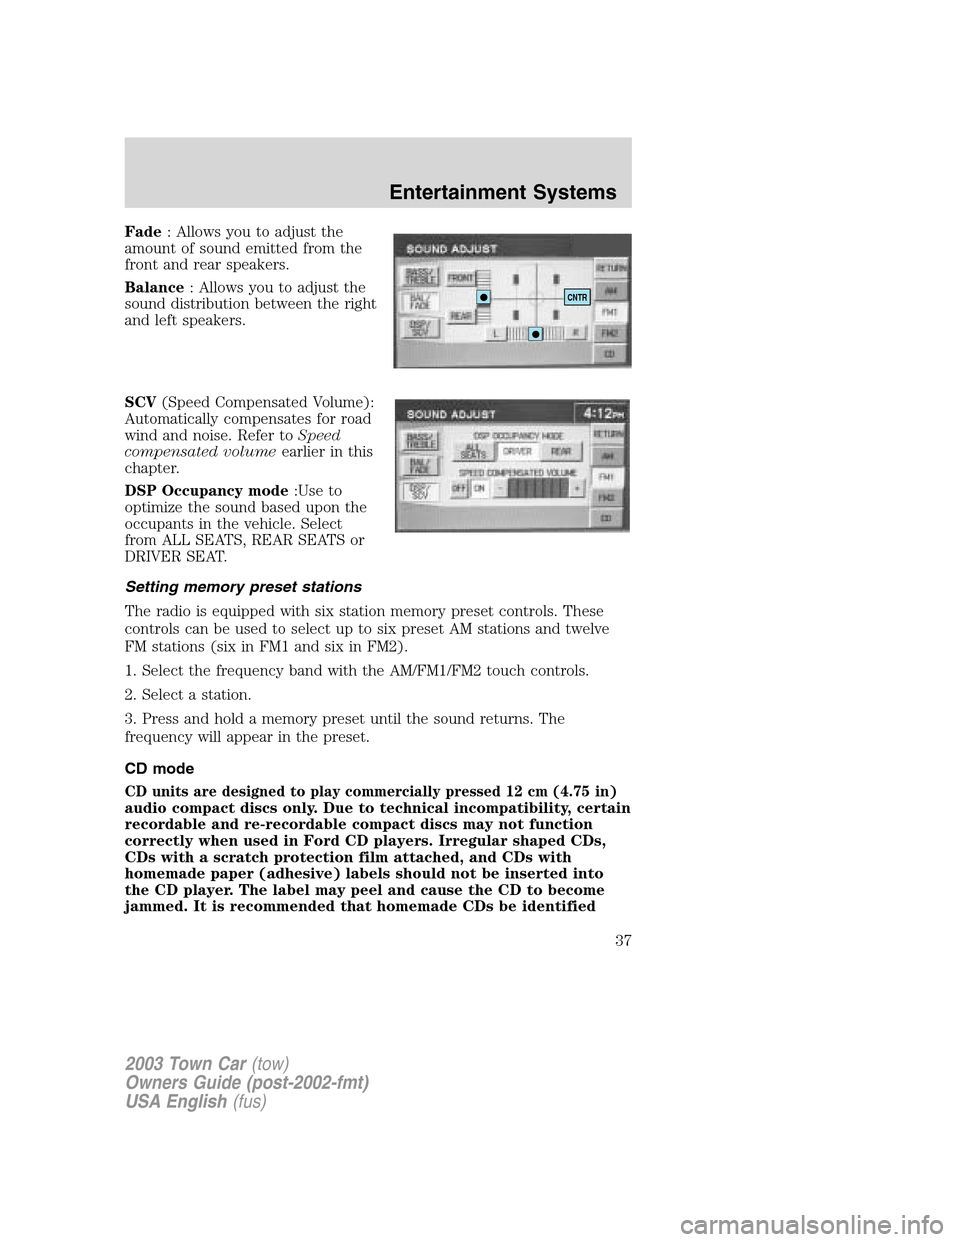
Fade: Allows you to adjust the
amount of sound emitted from the
front and rear speakers.
Balance: Allows you to adjust the
sound distribution between the right
and left speakers.
SCV(Speed Compensated Volume):
Automatically compensates for road
wind and noise. Refer toSpeed
compensated volumeearlier in this
chapter.
DSP Occupancy mode:Use to
optimize the sound based upon the
occupants in the vehicle. Select
from ALL SEATS, REAR SEATS or
DRIVER SEAT.
Setting memory preset stations
The radio is equipped with six station memory preset controls. These
controls can be used to select up to six preset AM stations and twelve
FM stations (six in FM1 and six in FM2).
1. Select the frequency band with the AM/FM1/FM2 touch controls.
2. Select a station.
3. Press and hold a memory preset until the sound returns. The
frequency will appear in the preset.
CD mode
CD units are designed to play commercially pressed 12 cm (4.75 in)
audio compact discs only. Due to technical incompatibility, certain
recordable and re-recordable compact discs may not function
correctly when used in Ford CD players. Irregular shaped CDs,
CDs with a scratch protection film attached, and CDs with
homemade paper (adhesive) labels should not be inserted into
the CD player. The label may peel and cause the CD to become
jammed. It is recommended that homemade CDs be identified
CNTR
2003 Town Car(tow)
Owners Guide (post-2002-fmt)
USA English(fus)
Entertainment Systems
37
Page 70 of 272
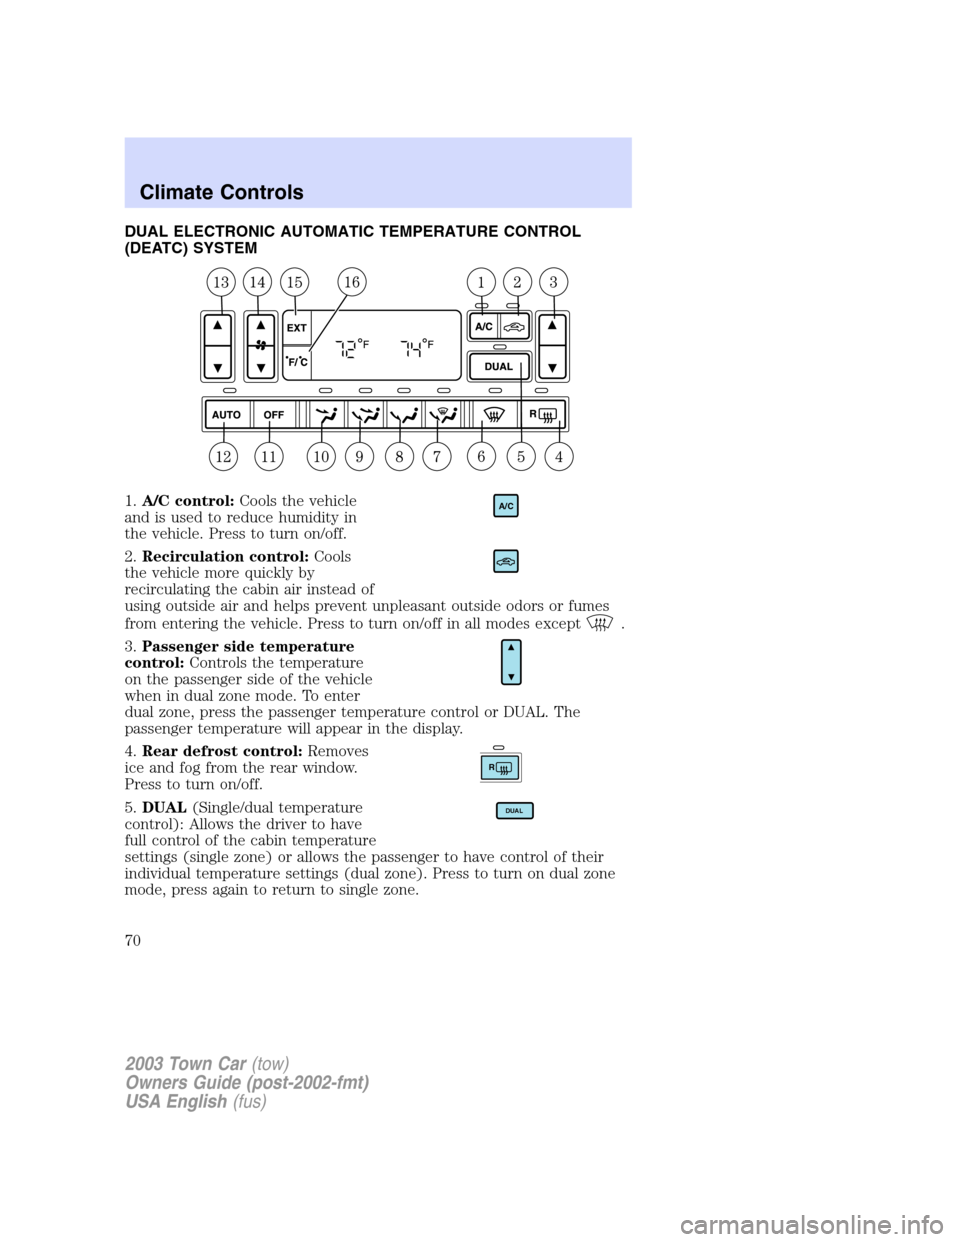
DUAL ELECTRONIC AUTOMATIC TEMPERATURE CONTROL
(DEATC) SYSTEM
1.A/C control:Cools the vehicle
and is used to reduce humidity in
the vehicle. Press to turn on/off.
2.Recirculation control:Cools
the vehicle more quickly by
recirculating the cabin air instead of
using outside air and helps prevent unpleasant outside odors or fumes
from entering the vehicle. Press to turn on/off in all modes except
.
3.Passenger side temperature
control:Controls the temperature
on the passenger side of the vehicle
when in dual zone mode. To enter
dual zone, press the passenger temperature control or DUAL. The
passenger temperature will appear in the display.
4.Rear defrost control:Removes
ice and fog from the rear window.
Press to turn on/off.
5.DUAL(Single/dual temperature
control): Allows the driver to have
full control of the cabin temperature
settings (single zone) or allows the passenger to have control of their
individual temperature settings (dual zone). Press to turn on dual zone
mode, press again to return to single zone.
A/C
R
DUAL
2003 Town Car(tow)
Owners Guide (post-2002-fmt)
USA English(fus)
Climate Controls
Climate Controls
70
Page 71 of 272
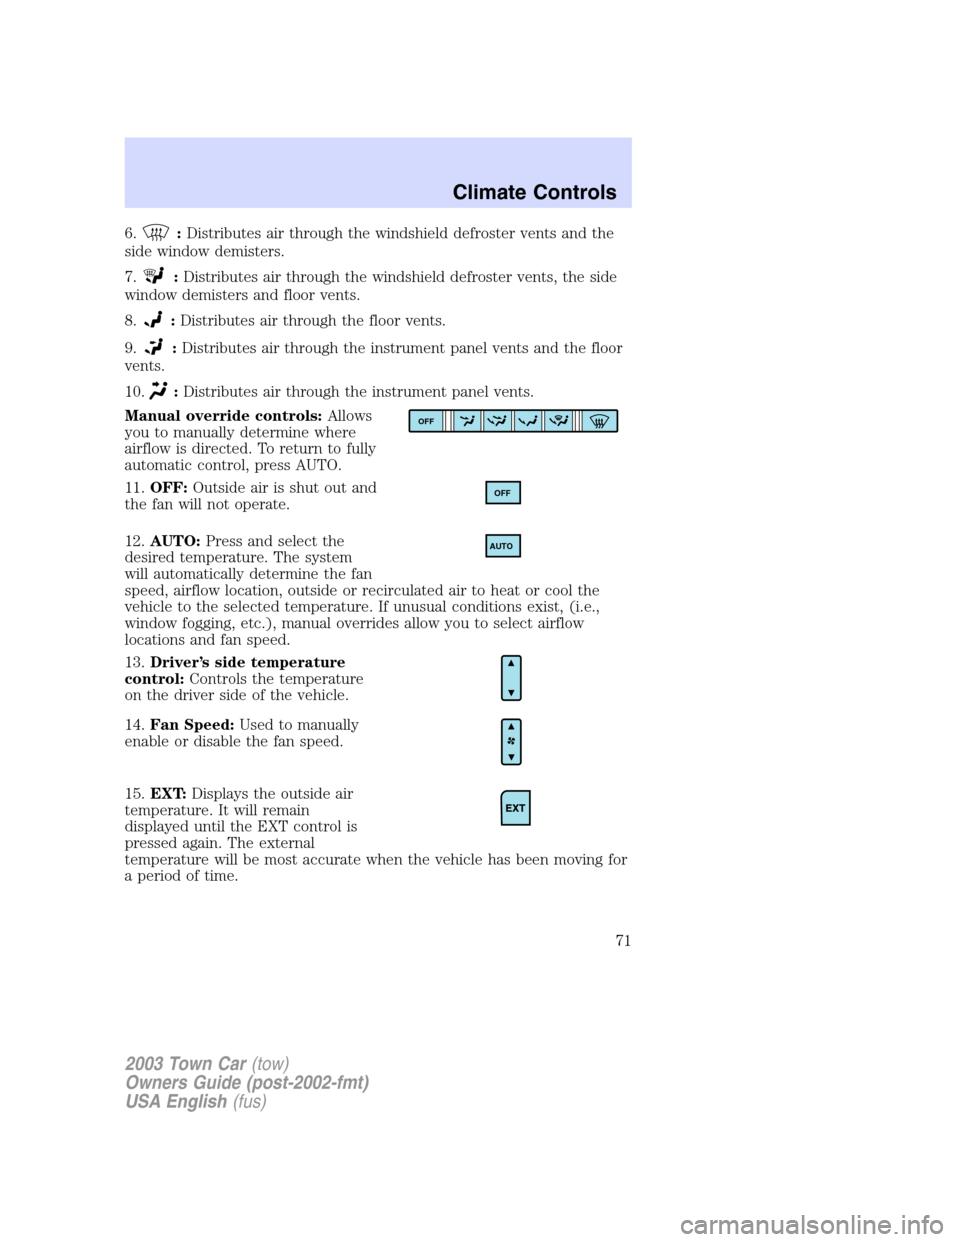
6.:Distributes air through the windshield defroster vents and the
side window demisters.
7.
:Distributes air through the windshield defroster vents, the side
window demisters and floor vents.
8.
:Distributes air through the floor vents.
9.
:Distributes air through the instrument panel vents and the floor
vents.
10.
:Distributes air through the instrument panel vents.
Manual override controls:Allows
you to manually determine where
airflow is directed. To return to fully
automatic control, press AUTO.
11.OFF:Outside air is shut out and
the fan will not operate.
12.AUTO:Press and select the
desired temperature. The system
will automatically determine the fan
speed, airflow location, outside or recirculated air to heat or cool the
vehicle to the selected temperature. If unusual conditions exist, (i.e.,
window fogging, etc.), manual overrides allow you to select airflow
locations and fan speed.
13.Driver’s side temperature
control:Controls the temperature
on the driver side of the vehicle.
14.Fan Speed:Used to manually
enable or disable the fan speed.
15.EXT:Displays the outside air
temperature. It will remain
displayed until the EXT control is
pressed again. The external
temperature will be most accurate when the vehicle has been moving for
a period of time.
OFF
OFF
AUTO
2003 Town Car(tow)
Owners Guide (post-2002-fmt)
USA English(fus)
Climate Controls
71
Page 83 of 272
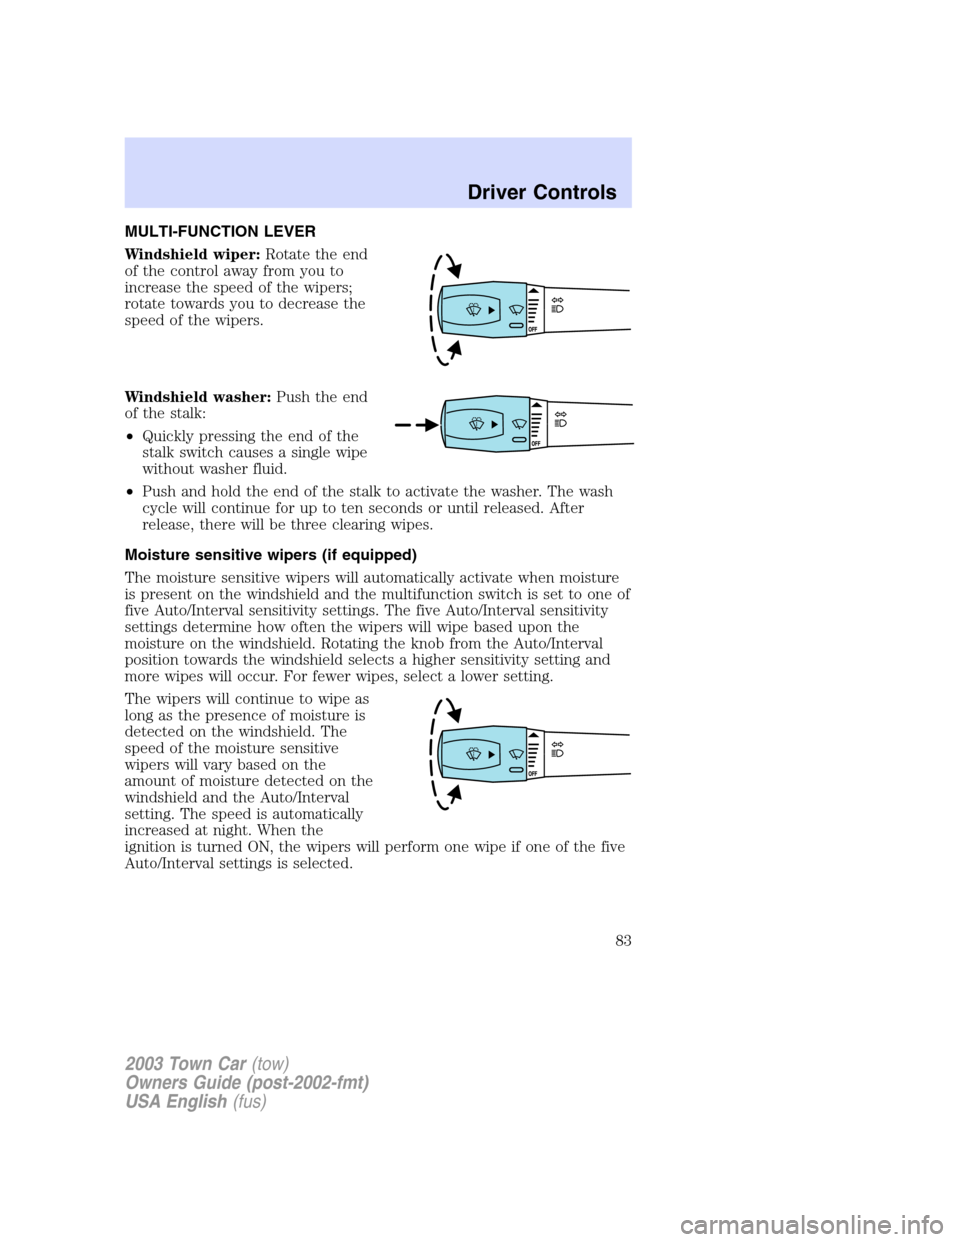
MULTI-FUNCTION LEVER
Windshield wiper:Rotate the end
of the control away from you to
increase the speed of the wipers;
rotate towards you to decrease the
speed of the wipers.
Windshield washer:Push the end
of the stalk:
•Quickly pressing the end of the
stalk switch causes a single wipe
without washer fluid.
•Push and hold the end of the stalk to activate the washer. The wash
cycle will continue for up to ten seconds or until released. After
release, there will be three clearing wipes.
Moisture sensitive wipers (if equipped)
The moisture sensitive wipers will automatically activate when moisture
is present on the windshield and the multifunction switch is set to one of
five Auto/Interval sensitivity settings. The five Auto/Interval sensitivity
settings determine how often the wipers will wipe based upon the
moisture on the windshield. Rotating the knob from the Auto/Interval
position towards the windshield selects a higher sensitivity setting and
more wipes will occur. For fewer wipes, select a lower setting.
The wipers will continue to wipe as
long as the presence of moisture is
detected on the windshield. The
speed of the moisture sensitive
wipers will vary based on the
amount of moisture detected on the
windshield and the Auto/Interval
setting. The speed is automatically
increased at night. When the
ignition is turned ON, the wipers will perform one wipe if one of the five
Auto/Interval settings is selected.
2003 Town Car(tow)
Owners Guide (post-2002-fmt)
USA English(fus)
Driver Controls
Driver Controls
83
Page 84 of 272
More or less wiping may occur under the following conditions:
•on cool mornings with high humidity
•in very light mist or rain
•salty water/mist
•hydrophobic coating applied to the windshield such as Rain-X or wax
(use of these types of coating is not recommended)
You can override the moisture sensitive wiper function by selecting
HIGH, LOW and OFF.
The moisture sensitive wiper feature should be turned OFF before
entering a car wash.
Windshield wiper/washer features
The exterior lamps will illuminate after 10–20 second delay when the
ignition is ON and the windshield wiper control is in the LO or HI
position.
The lights will remain on for 30 seconds after the wipers are turned off.
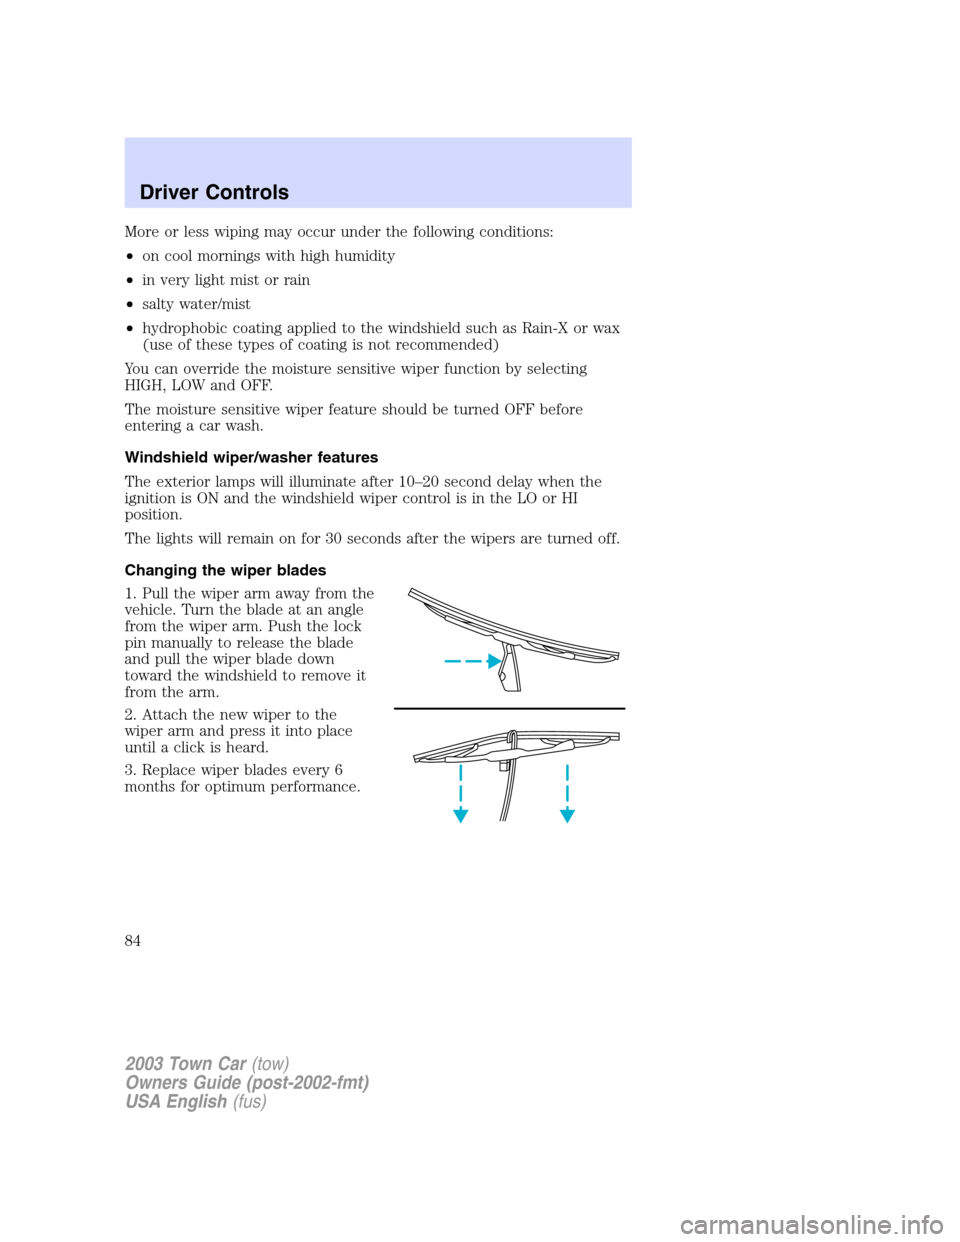
Changing the wiper blades
1. Pull the wiper arm away from the
vehicle. Turn the blade at an angle
from the wiper arm. Push the lock
pin manually to release the blade
and pull the wiper blade down
toward the windshield to remove it
from the arm.
2. Attach the new wiper to the
wiper arm and press it into place
until a click is heard.
3. Replace wiper blades every 6
months for optimum performance.
2003 Town Car(tow)
Owners Guide (post-2002-fmt)
USA English(fus)
Driver Controls
84
Page 85 of 272
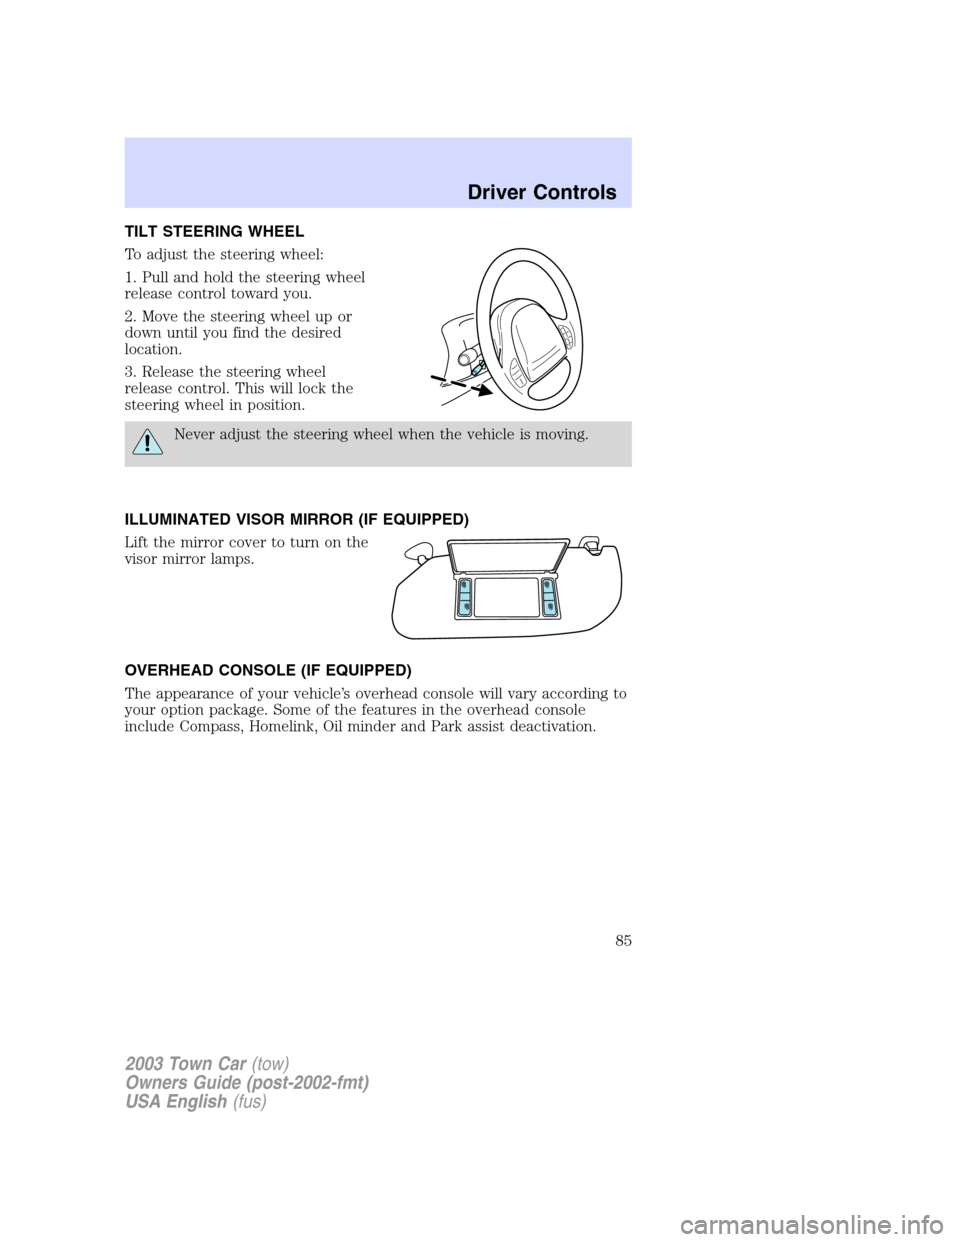
TILT STEERING WHEEL
To adjust the steering wheel:
1. Pull and hold the steering wheel
release control toward you.
2. Move the steering wheel up or
down until you find the desired
location.
3. Release the steering wheel
release control. This will lock the
steering wheel in position.
Never adjust the steering wheel when the vehicle is moving.
ILLUMINATED VISOR MIRROR (IF EQUIPPED)
Lift the mirror cover to turn on the
visor mirror lamps.
OVERHEAD CONSOLE (IF EQUIPPED)
The appearance of your vehicle’s overhead console will vary according to
your option package. Some of the features in the overhead console
include Compass, Homelink, Oil minder and Park assist deactivation.
2003 Town Car(tow)
Owners Guide (post-2002-fmt)
USA English(fus)
Driver Controls
85
Page 86 of 272
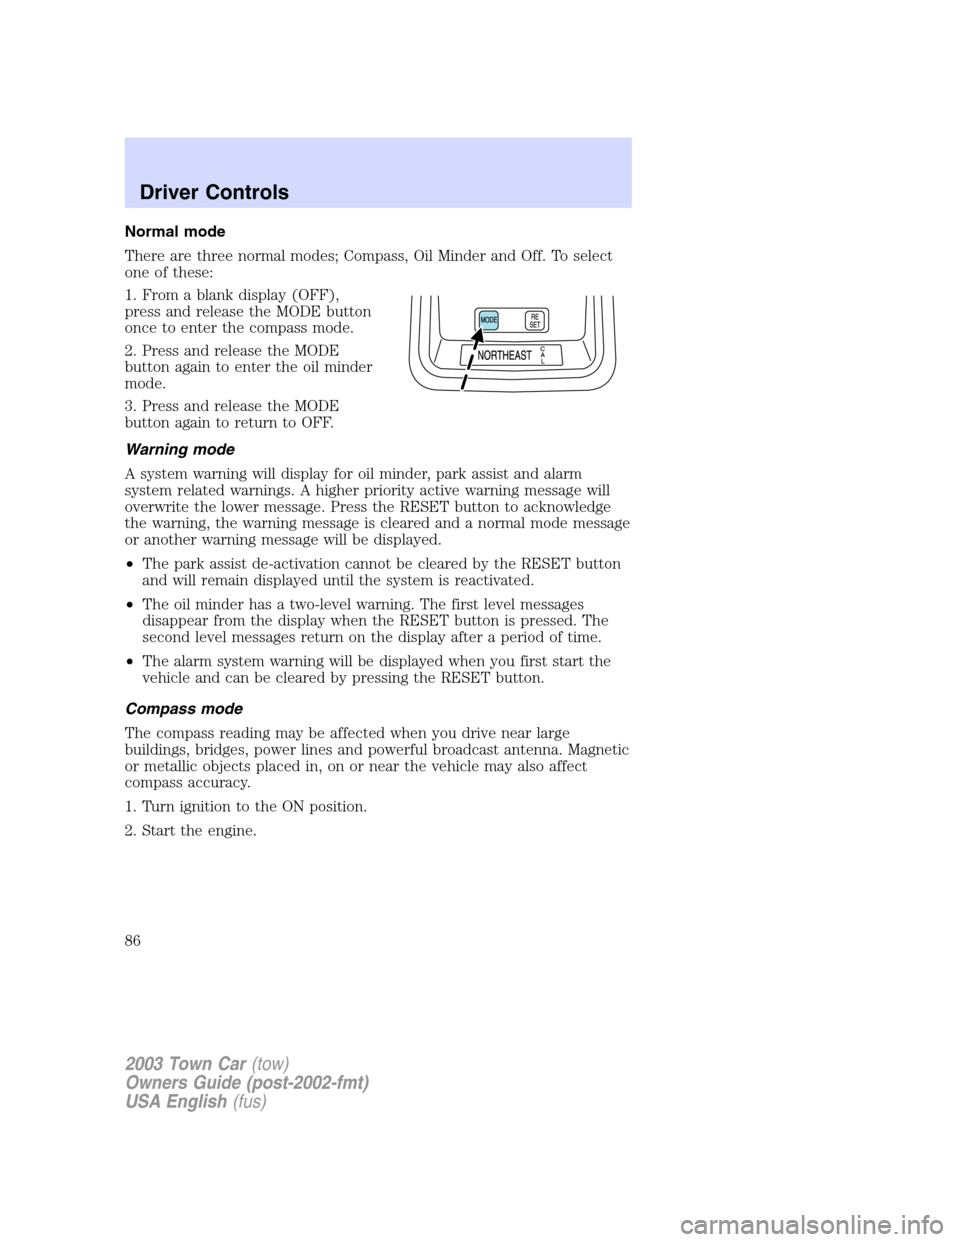
Normal mode
There are three normal modes; Compass, Oil Minder and Off. To select
one of these:
1. From a blank display (OFF),
press and release the MODE button
once to enter the compass mode.
2. Press and release the MODE
button again to enter the oil minder
mode.
3. Press and release the MODE
button again to return to OFF.
Warning mode
A system warning will display for oil minder, park assist and alarm
system related warnings. A higher priority active warning message will
overwrite the lower message. Press the RESET button to acknowledge
the warning, the warning message is cleared and a normal mode message
or another warning message will be displayed.
•The park assist de-activation cannot be cleared by the RESET button
and will remain displayed until the system is reactivated.
•The oil minder has a two-level warning. The first level messages
disappear from the display when the RESET button is pressed. The
second level messages return on the display after a period of time.
•The alarm system warning will be displayed when you first start the
vehicle and can be cleared by pressing the RESET button.
Compass mode
The compass reading may be affected when you drive near large
buildings, bridges, power lines and powerful broadcast antenna. Magnetic
or metallic objects placed in, on or near the vehicle may also affect
compass accuracy.
1. Turn ignition to the ON position.
2. Start the engine.
2003 Town Car(tow)
Owners Guide (post-2002-fmt)
USA English(fus)
Driver Controls
86
Page 87 of 272
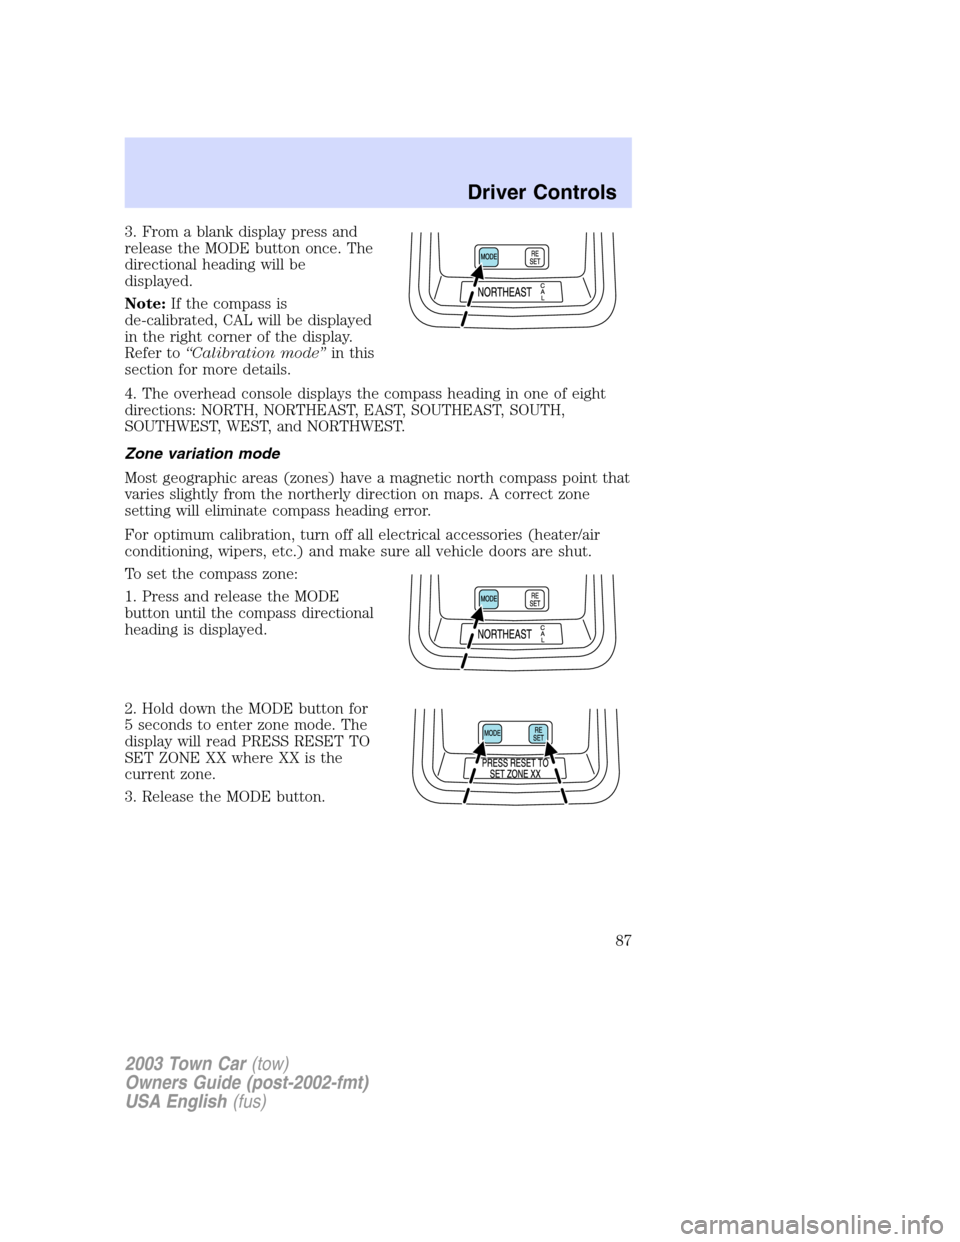
3. From a blank display press and
release the MODE button once. The
directional heading will be
displayed.
Note:If the compass is
de-calibrated, CAL will be displayed
in the right corner of the display.
Refer to“Calibration mode”in this
section for more details.
4. The overhead console displays the compass heading in one of eight
directions: NORTH, NORTHEAST, EAST, SOUTHEAST, SOUTH,
SOUTHWEST, WEST, and NORTHWEST.
Zone variation mode
Most geographic areas (zones) have a magnetic north compass point that
varies slightly from the northerly direction on maps. A correct zone
setting will eliminate compass heading error.
For optimum calibration, turn off all electrical accessories (heater/air
conditioning, wipers, etc.) and make sure all vehicle doors are shut.
To set the compass zone:
1. Press and release the MODE
button until the compass directional
heading is displayed.
2. Hold down the MODE button for
5 seconds to enter zone mode. The
display will read PRESS RESET TO
SET ZONE XX where XX is the
current zone.
3. Release the MODE button.
2003 Town Car(tow)
Owners Guide (post-2002-fmt)
USA English(fus)
Driver Controls
87