Hood LINCOLN TOWN CAR 2004 Owners Manual
[x] Cancel search | Manufacturer: LINCOLN, Model Year: 2004, Model line: TOWN CAR, Model: LINCOLN TOWN CAR 2004Pages: 304, PDF Size: 2.87 MB
Page 84 of 304
Do not use the navigation system to locate emergency services.
For road safety reasons, the driver should program the system only when
the vehicle is stationary. Certain functions will therefore not operate
while the vehicle is in motion.
The map database DVD does not reflect road detours, closures or
construction, road characteristics such as rough road surface, slope or
grade, weight or height restrictions, traffic congestion, weather or similar
conditions.
To use the system as effectively and safely as possible, obtain an
up-to-date map database DVD whenever they become available.
Set the volume level so that you can hear directions clearly.
Do not disassemble or modify the system as this may lead to damage and
void your warranty. If a problem occurs, stop using the system
immediately and contact your Ford or Lincoln Dealer.
Federal Communication Commission (FCC) Compliance
Changes or modifications not approved by Ford Lincoln Mercury could
void user’s authority to operate the equipment. This equipment has been
tested and found to comply with the limits for a Class B digital device,
pursuant to Part 15 of the FCC Rules. These limits are designed to
provide reasonable protection against harmful interference in a
residential installation. This equipment generates, uses and can radiate
radio frequency energy and, if not installed and used in accordance with
the instructions, may cause harmful interference to radio
communications.
However, there is no guarantee that interference will not occur in a
particular installation. If this equipment does cause harmful interference
to radio or television reception, which can be determined by turning the
equipment off and on, the user is encouraged to consult the dealer or an
experienced radio/TV technician for help.
The database reflects reality as existing before you received the
database and it comprises data and information from government
and other sources, which may contain errors and omissions.
Accordingly, the database may contain inaccurate or incomplete
information due to the passage of time, changing circumstances,
and due to the nature of the sources used. The database does not
include or reflect information on neighborhood safety, law
enforcement, emergency assistance, construction work, road or
lane closures, vehicle or speed restrictions, road slope or grade,
bridge height, weight or other limits, road or traffic conditions,
special events, traffic congestion, or travel time.
REVIEW COPY
2004 Town Car(tow), Owners Guide (post-2002-fmt)(own2002),
Market:USA_English(fus)
Entertainment Systems
84
Page 95 of 304
3. Turn on the low beam headlamps to illuminate the wall or screen and
open the hood.
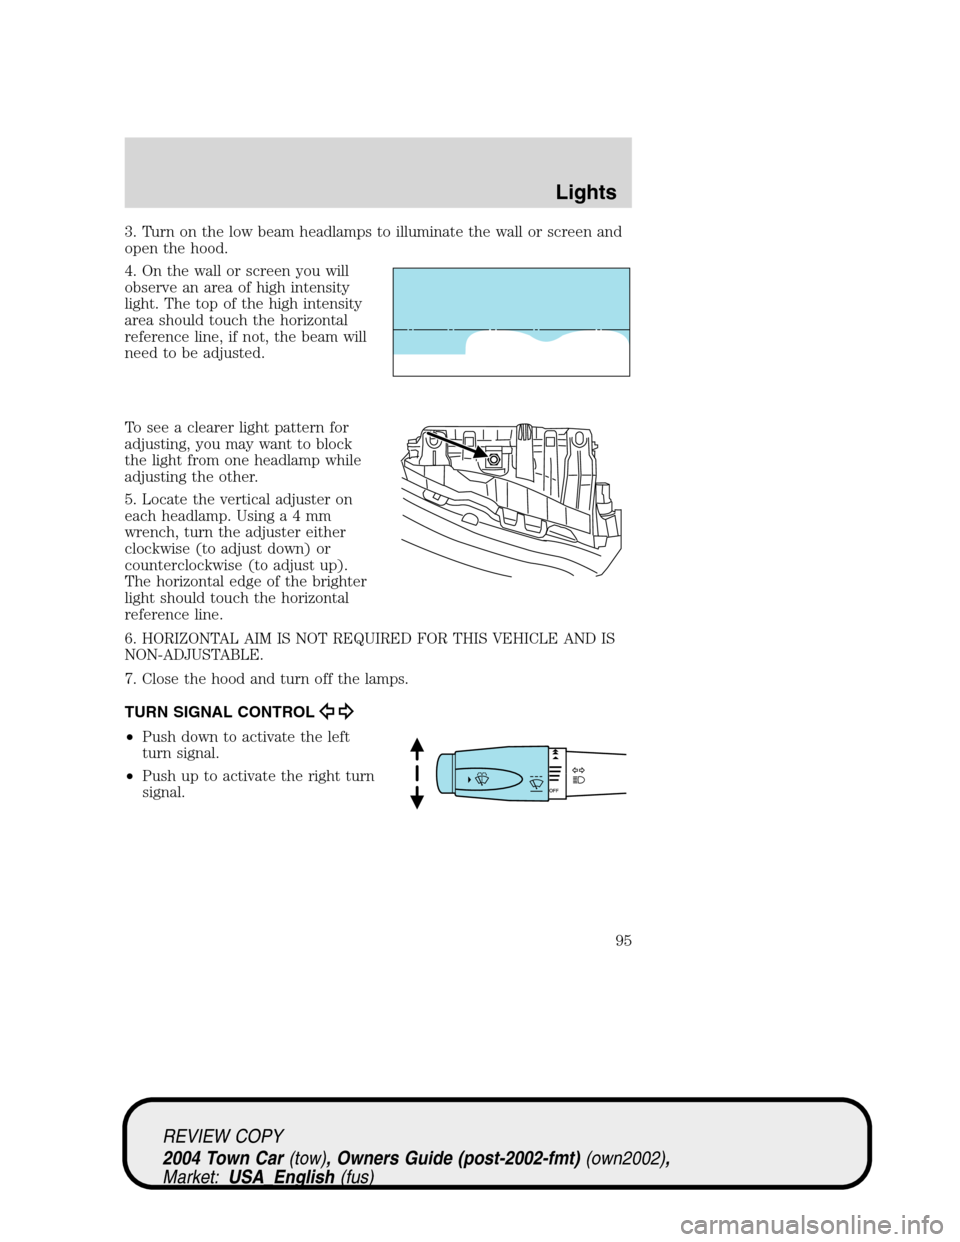
4. On the wall or screen you will
observe an area of high intensity
light. The top of the high intensity
area should touch the horizontal
reference line, if not, the beam will
need to be adjusted.
To see a clearer light pattern for
adjusting, you may want to block
the light from one headlamp while
adjusting the other.
5. Locate the vertical adjuster on
each headlamp. Usinga4mm
wrench, turn the adjuster either
clockwise (to adjust down) or
counterclockwise (to adjust up).
The horizontal edge of the brighter
light should touch the horizontal
reference line.
6. HORIZONTAL AIM IS NOT REQUIRED FOR THIS VEHICLE AND IS
NON-ADJUSTABLE.
7. Close the hood and turn off the lamps.
TURN SIGNAL CONTROL
•Push down to activate the left
turn signal.
•Push up to activate the right turn
signal.
REVIEW COPY
2004 Town Car(tow), Owners Guide (post-2002-fmt)(own2002),
Market:USA_English(fus)
Lights
95
Page 98 of 304
Replacing headlamp bulbs
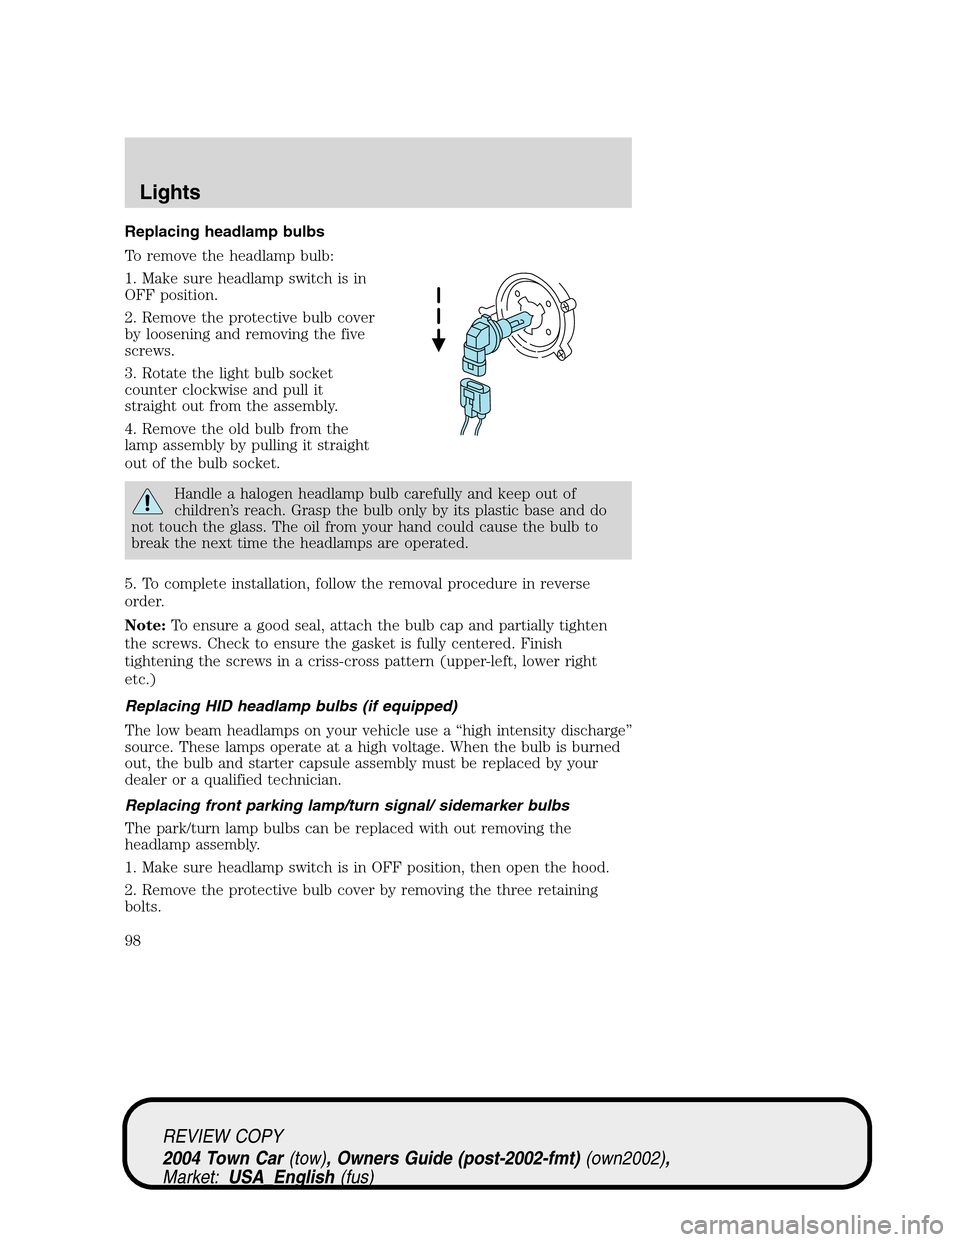
To remove the headlamp bulb:
1. Make sure headlamp switch is in
OFF position.
2. Remove the protective bulb cover
by loosening and removing the five
screws.
3. Rotate the light bulb socket
counter clockwise and pull it
straight out from the assembly.
4. Remove the old bulb from the
lamp assembly by pulling it straight
out of the bulb socket.
Handle a halogen headlamp bulb carefully and keep out of
children’s reach. Grasp the bulb only by its plastic base and do
not touch the glass. The oil from your hand could cause the bulb to
break the next time the headlamps are operated.
5. To complete installation, follow the removal procedure in reverse
order.
Note:To ensure a good seal, attach the bulb cap and partially tighten
the screws. Check to ensure the gasket is fully centered. Finish
tightening the screws in a criss-cross pattern (upper-left, lower right
etc.)
Replacing HID headlamp bulbs (if equipped)
The low beam headlamps on your vehicle use a“high intensity discharge”
source. These lamps operate at a high voltage. When the bulb is burned
out, the bulb and starter capsule assembly must be replaced by your
dealer or a qualified technician.
Replacing front parking lamp/turn signal/ sidemarker bulbs
The park/turn lamp bulbs can be replaced with out removing the
headlamp assembly.
1. Make sure headlamp switch is in OFF position, then open the hood.
2. Remove the protective bulb cover by removing the three retaining
bolts.
REVIEW COPY
2004 Town Car(tow), Owners Guide (post-2002-fmt)(own2002),
Market:USA_English(fus)
Lights
98
Page 134 of 304
•the headlamp control is in the autolamp position, and
•the unlock control is pressed on the remote entry transmitter.
The headlamps and parklamps remain illuminated:
•for 25 seconds, or
•until you turn the ignition from the 3 (OFF) position, or
•until the vehicle doors are locked using the remote entry transmitter
or the power door unlock control.
Locking the doors
Pressand release to lock all the doors.Note:The interior lamps will
turn off and the parklamps will flash, if all the closures (doors, trunk,
hood) are closed. If any closure is not closed, the parklamps willnot
flash.
Press
and release again within five seconds to confirm that all the
doors are closed.Note:The doors will lock again, the horn will chirp
once and the parklamps will flash, if all the closures are closed. If any
closure is not closed, the horn will chirp twice and the parklamps will
notflash.
Deactivating/activating the horn chirp feature
The horn chirp feature can be turned on/off through the following
procedure:
Complete Steps 1-7 within 30 seconds or you must repeat the procedure.
Wait 30 seconds before repeating the procedure.
1. Turn the ignition to the 4 (ON) position.
2. Press the power door unlock control on the door panel 3 times.
3. Cycle the ignition from the 4 (ON) to the 3 (OFF) position.
4. Press the power door unlock control 3 times.
5. Turn the ignition to the 4 (ON) position. The doors will lock and
unlock.
6. Press the unlock control twice within 5 seconds. The horn will chirp
twice to indicate a successful activation/deactivation of the horn chirp
feature.
7. Turn the ignition to the 3 (OFF) position.
Sounding a panic alarm
Press
on the remote transmitter to activate the alarm.Note:The
panic alarm only works with the ignition in the 3 (OFF) position.
REVIEW COPY
2004 Town Car(tow), Owners Guide (post-2002-fmt)(own2002),
Market:USA_English(fus)
Locks and Security
134
Page 144 of 304
7. Within twenty seconds of removing the previously programmed coded
key, insert the unprogrammed key (new/valet key) into the ignition.
8. Turn the ignition from the 3 (OFF) position to the 4 (ON) position.
Keep the ignition in the 4 (ON) position for at least one second.
9. Your new unprogrammed key is now programmed.
If the key has been successfully programmed it will start the vehicle’s
engine and the theft indicator light will illuminate for three seconds and
then go out. If the key was not successfully programmed, it will not start
your vehicle’s engine and the theft indicator light will flash on and off
rapidly. If failure repeats, bring your vehicle to your dealer to have the
new key(s) programmed.
To program additional new unprogrammed key(s), repeat this procedure
from Step 1 for each additional key.
PERIMETER ALARM SYSTEM (IF EQUIPPED)
The perimeter anti-theft system will warn you in the event of an
unauthorized entry to your vehicle.
If there is any potential perimeter anti-theft problem with your vehicle,
ensureALL remote entry transmittersare taken to the dealership to
aid in troubleshooting.
Arming the system
When armed, the perimeter alarm will notify you of an unauthorized
entry. When unauthorized entry occurs, the system will flash the park
lamps and will sound the horn.
The system is ready to arm whenever the key is out of the ignition. Any
of the following actions will arm the alarm system:
•Press the remote transmitter lock control one time to arm the system.
•Lock all doors using the keypad.
•Lock all doors using the interior power lock switch while the driver or
passenger door is open and then closed.
•Lock all doors with the key in the key lock cylinder.
If all the closures (doors, trunk, hood) are closed, the park lamps will
flash once and the horn will chirp once when the
on the remote entry
transmitter is pressed a second time within five seconds.
If any closure is not properly closed, the park lamps will not flash and
the horn will chirp twice.
REVIEW COPY
2004 Town Car(tow), Owners Guide (post-2002-fmt)(own2002),
Market:USA_English(fus)
Locks and Security
144
Page 175 of 304
never use a booster seat with a lap belt only. It is best to use a booster
seat with lap/shoulder belts in the back seat- the safest place for children
to ride.
Follow all instructions provided by the manufacturer of the
booster seat.
Never put the shoulder belt under a child’s arm or behind the
back because it eliminates the protection for the upper part of
the body and may increase the risk of injury or death in a collision.
Never use pillows, books, or towels to boost a child. They can
slide around and increase the likelihood of injury or death in a
collision.
SAFETY SEATS FOR CHILDREN
Child and infant or child safety seats
Use a safety seat that is recommended for the size and weight of the
child. Carefully follow all of the manufacturer’s instructions with the
safety seat you put in your vehicle. If you do not install and use the
safety seat properly, the child may be injured in a sudden stop or
collision.
When installing a child safety seat:
•Review and follow the information
presented in theAir Bag
Supplemental Restraint System
section in this chapter.
•Use the correct safety belt buckle
for that seating position.
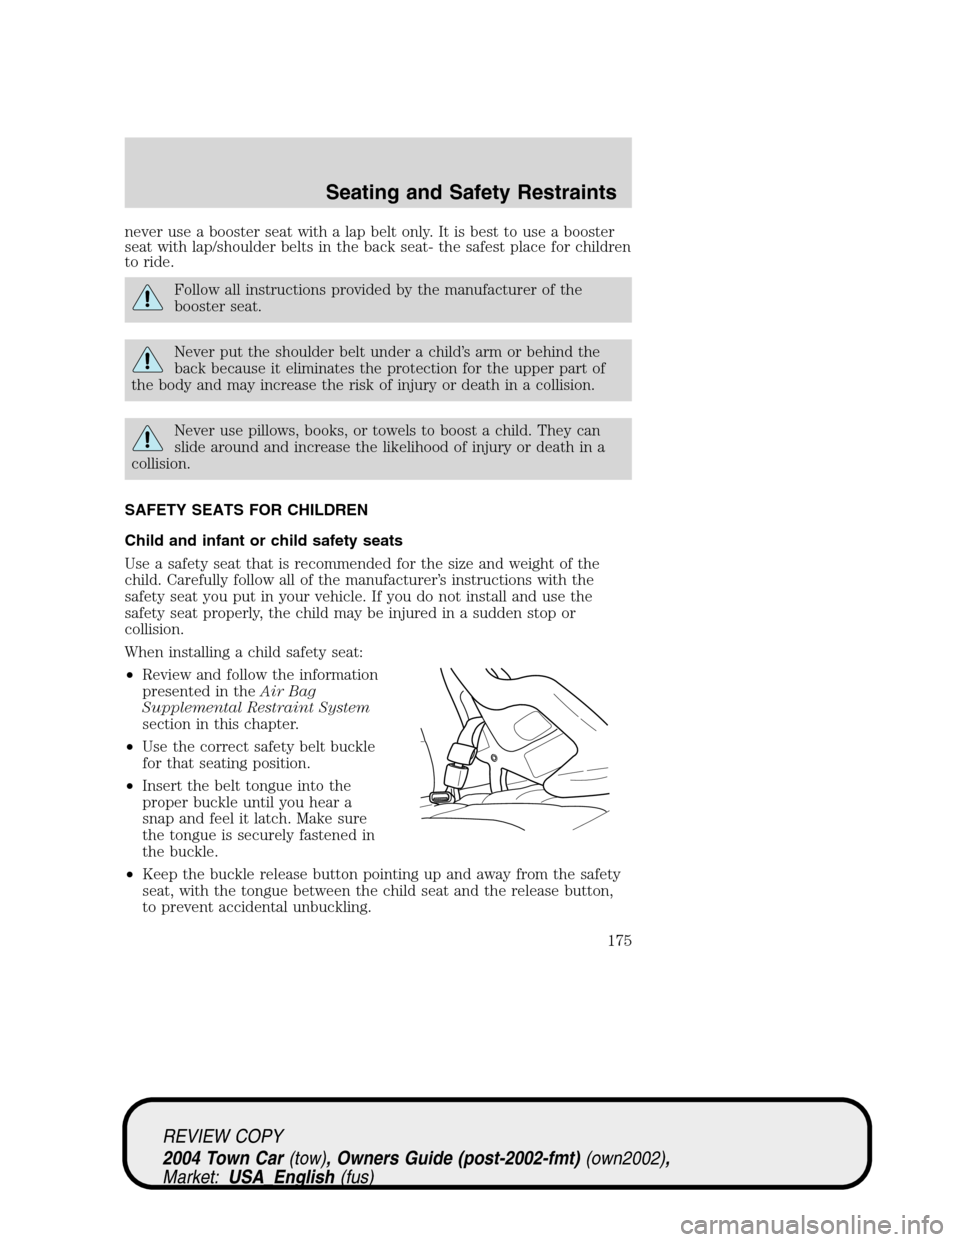
•Insert the belt tongue into the
proper buckle until you hear a
snap and feel it latch. Make sure
the tongue is securely fastened in
the buckle.
•Keep the buckle release button pointing up and away from the safety
seat, with the tongue between the child seat and the release button,
to prevent accidental unbuckling.
REVIEW COPY
2004 Town Car(tow), Owners Guide (post-2002-fmt)(own2002),
Market:USA_English(fus)
Seating and Safety Restraints
175
Page 186 of 304
4. Make sure the parking brake is
set.
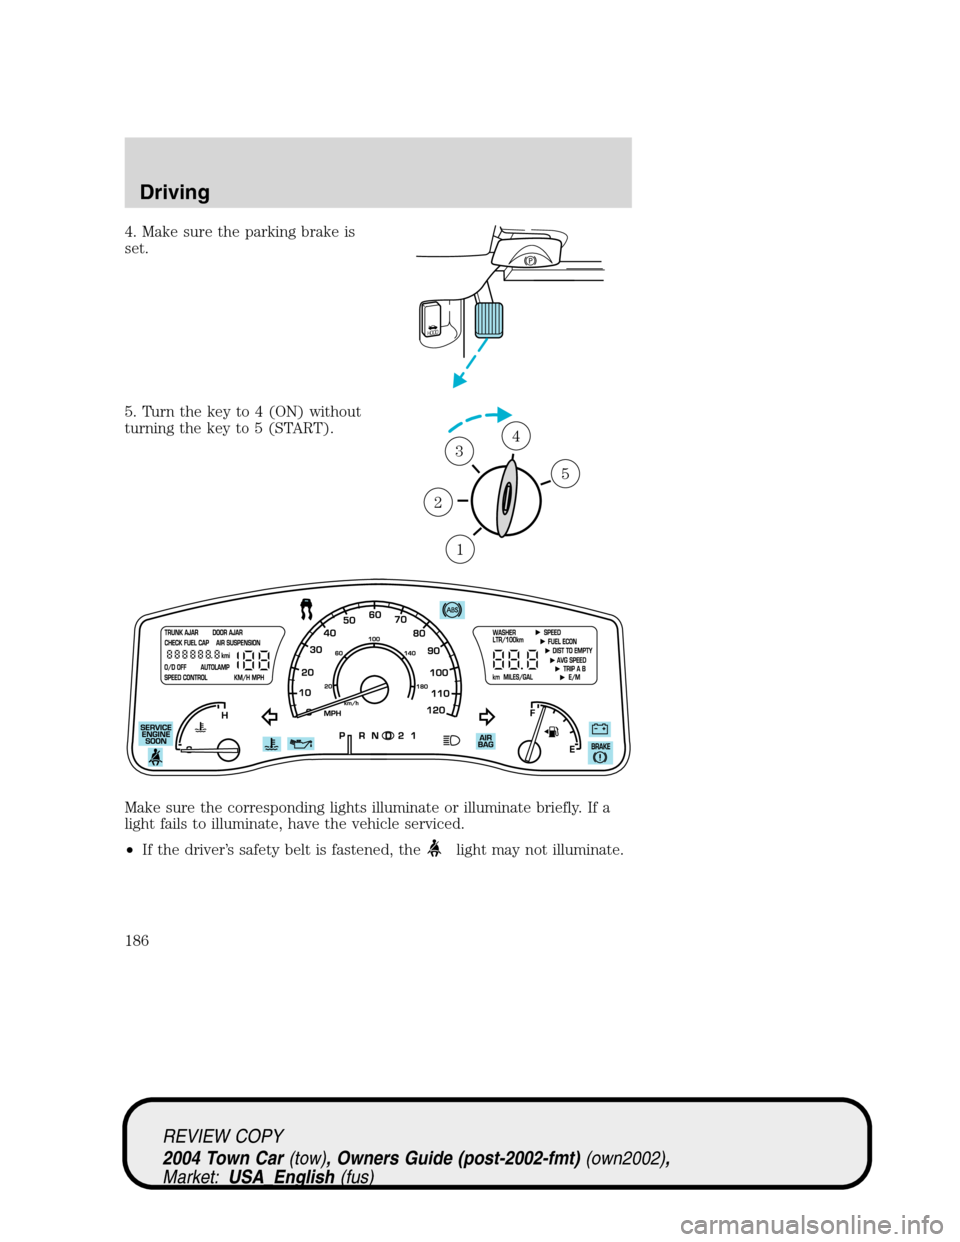
5. Turn the key to 4 (ON) without
turning the key to 5 (START).
Make sure the corresponding lights illuminate or illuminate briefly. If a
light fails to illuminate, have the vehicle serviced.
•If the driver’s safety belt is fastened, the
light may not illuminate.
HOOD
1
2
34
5
REVIEW COPY
2004 Town Car(tow), Owners Guide (post-2002-fmt)(own2002),
Market:USA_English(fus)
Driving
186
Page 189 of 304
Parking brake with auto-release
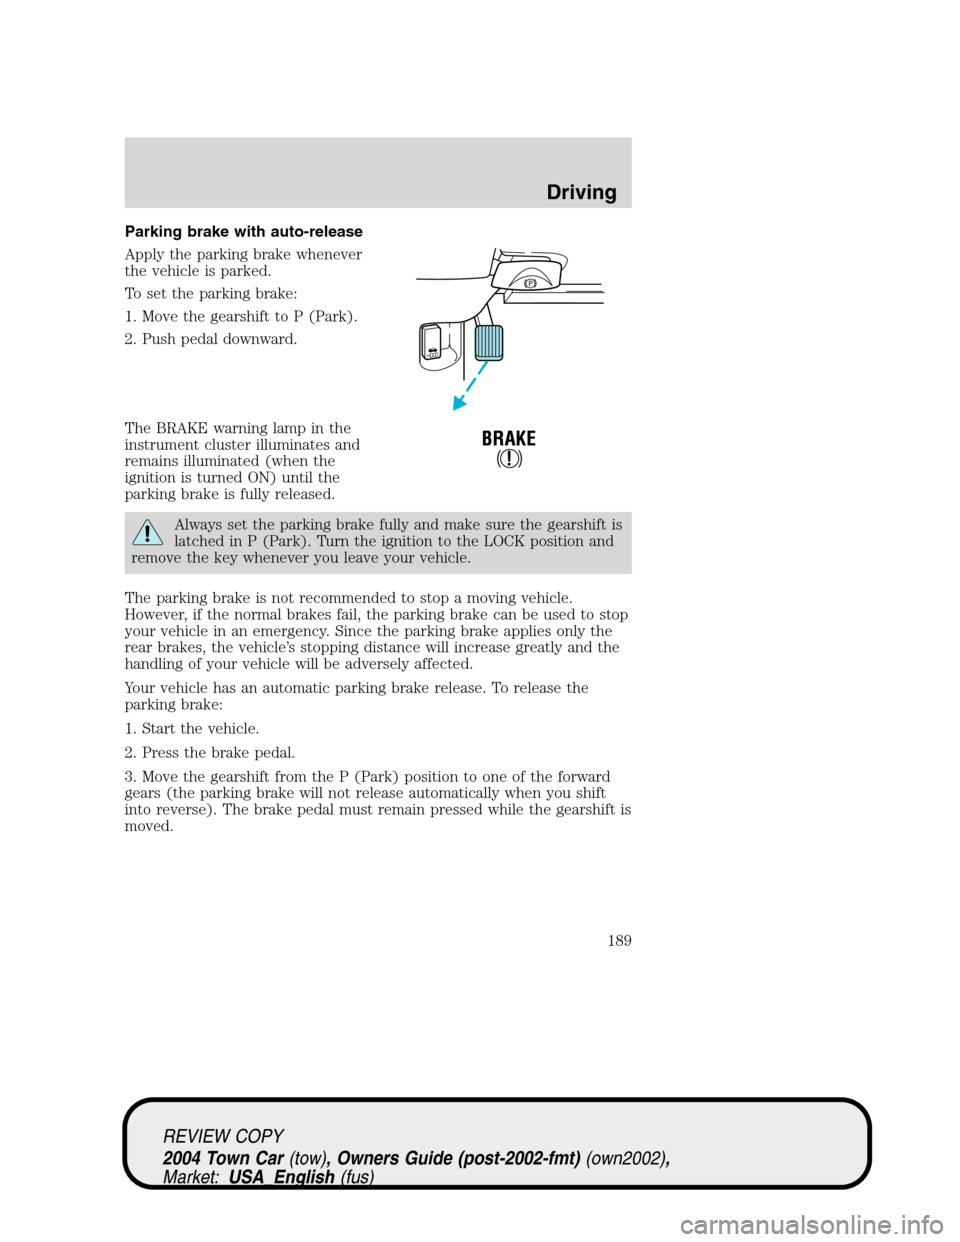
Apply the parking brake whenever
the vehicle is parked.
To set the parking brake:
1. Move the gearshift to P (Park).
2. Push pedal downward.
The BRAKE warning lamp in the
instrument cluster illuminates and
remains illuminated (when the
ignition is turned ON) until the
parking brake is fully released.
Always set the parking brake fully and make sure the gearshift is
latched in P (Park). Turn the ignition to the LOCK position and
remove the key whenever you leave your vehicle.
The parking brake is not recommended to stop a moving vehicle.
However, if the normal brakes fail, the parking brake can be used to stop
your vehicle in an emergency. Since the parking brake applies only the
rear brakes, the vehicle’s stopping distance will increase greatly and the
handling of your vehicle will be adversely affected.
Your vehicle has an automatic parking brake release. To release the
parking brake:
1. Start the vehicle.
2. Press the brake pedal.
3. Move the gearshift from the P (Park) position to one of the forward
gears (the parking brake will not release automatically when you shift
into reverse). The brake pedal must remain pressed while the gearshift is
moved.
HOOD
REVIEW COPY
2004 Town Car(tow), Owners Guide (post-2002-fmt)(own2002),
Market:USA_English(fus)
Driving
189
Page 218 of 304
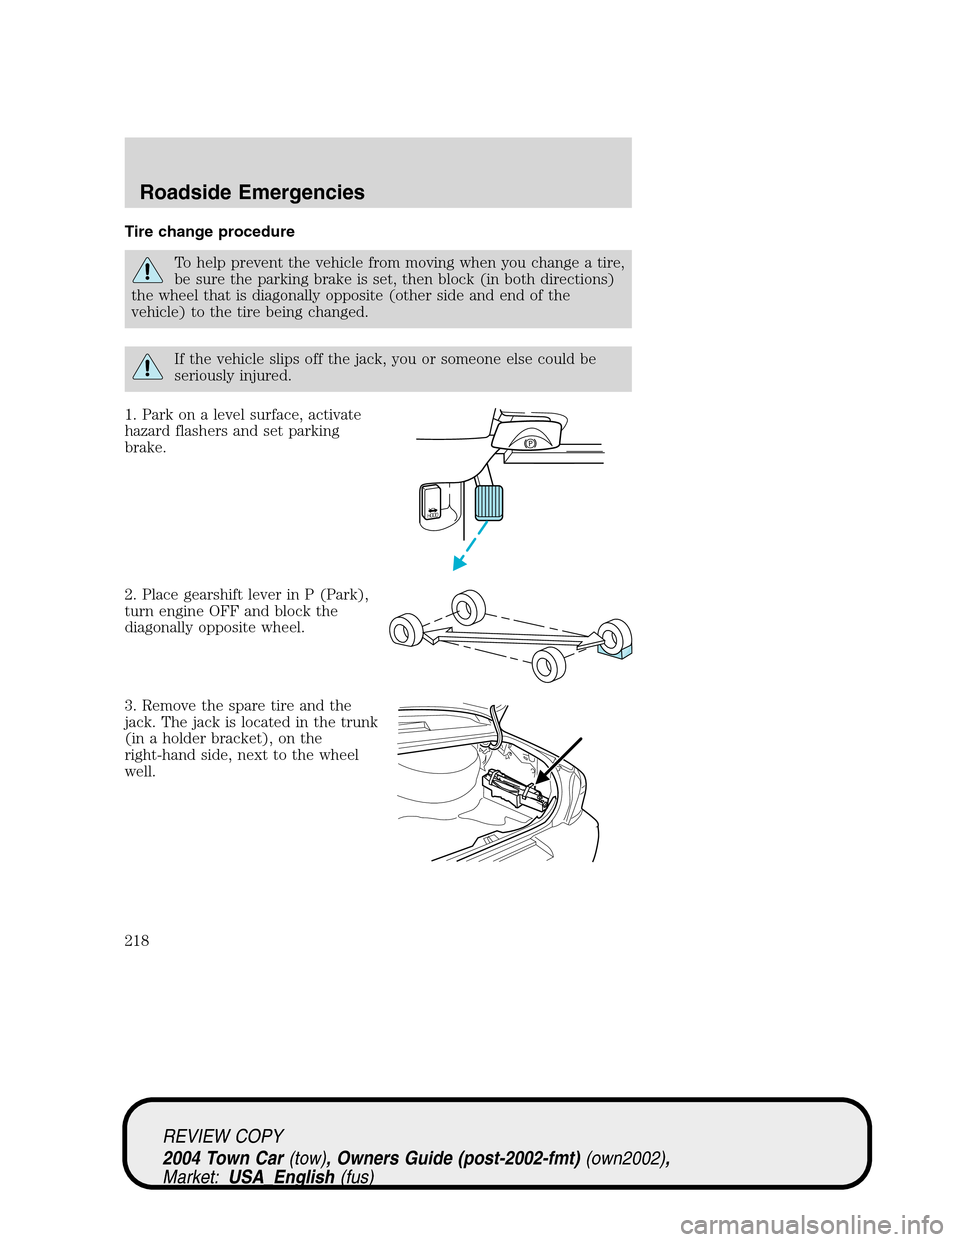
Tire change procedure
To help prevent the vehicle from moving when you change a tire,
be sure the parking brake is set, then block (in both directions)
the wheel that is diagonally opposite (other side and end of the
vehicle) to the tire being changed.
If the vehicle slips off the jack, you or someone else could be
seriously injured.
1. Park on a level surface, activate
hazard flashers and set parking
brake.
2. Place gearshift lever in P (Park),
turn engine OFF and block the
diagonally opposite wheel.
3. Remove the spare tire and the
jack. The jack is located in the trunk
(in a holder bracket), on the
right-hand side, next to the wheel
well.
HOOD
REVIEW COPY
2004 Town Car(tow), Owners Guide (post-2002-fmt)(own2002),
Market:USA_English(fus)
Roadside Emergencies
218
Page 223 of 304
3. Park the booster vehicle close to the hood of the disabled vehicle
making sure the two vehiclesdo nottouch. Set the parking brake on
both vehicles and stay clear of the engine cooling fan and other moving
parts.
4. Check all battery terminals and remove any excessive corrosion before
you attach the battery cables. Ensure that vent caps are tight and level.
5. Turn the heater fan on in both vehicles to protect any electrical
surges. Turn all other accessories off.
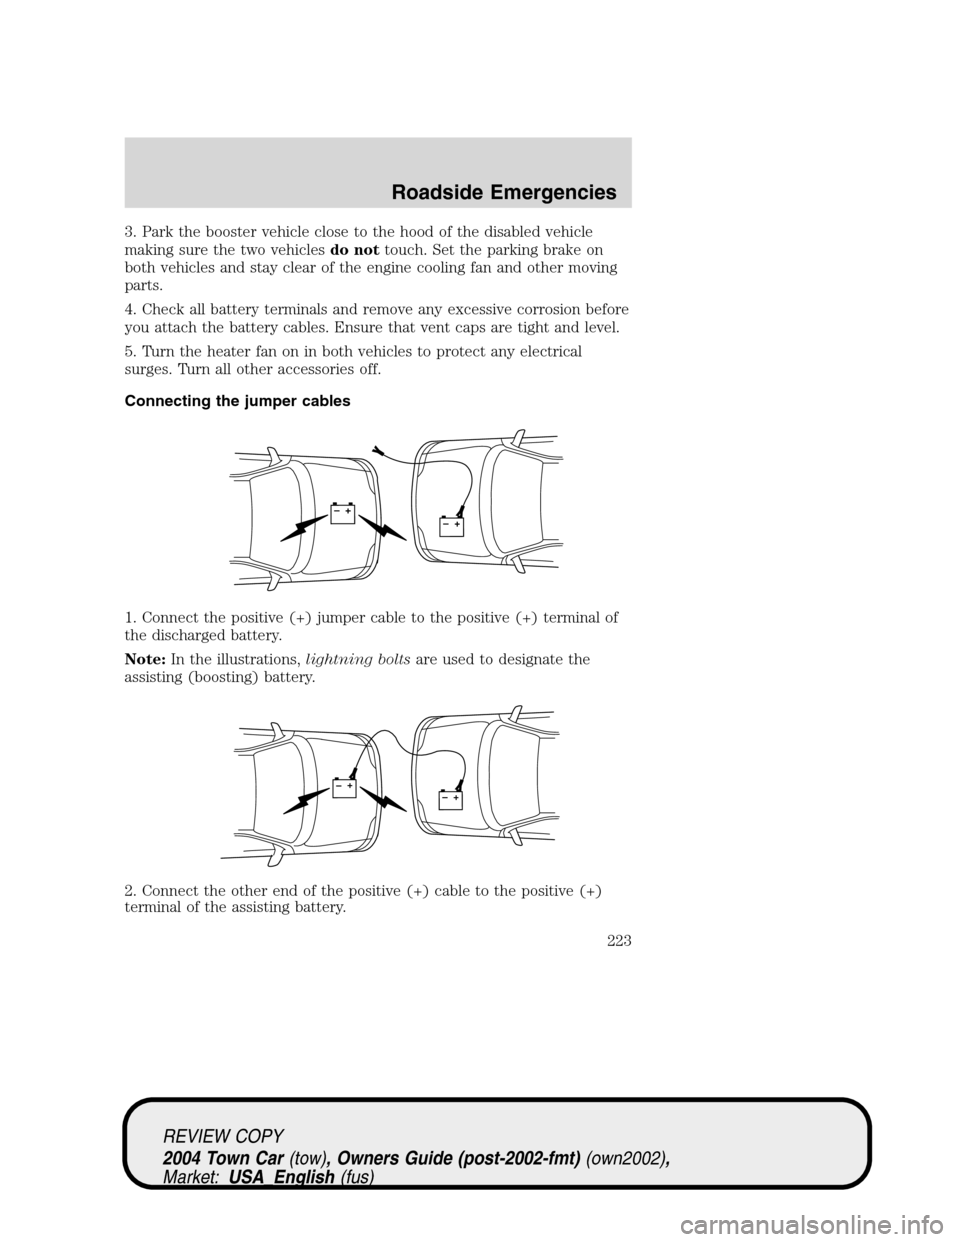
Connecting the jumper cables
1. Connect the positive (+) jumper cable to the positive (+) terminal of
the discharged battery.
Note:In the illustrations,lightning boltsare used to designate the
assisting (boosting) battery.
2. Connect the other end of the positive (+) cable to the positive (+)
terminal of the assisting battery.
+–+–
+–+–
REVIEW COPY
2004 Town Car(tow), Owners Guide (post-2002-fmt)(own2002),
Market:USA_English(fus)
Roadside Emergencies
223