air filter LINCOLN ZEPHYR 2006 Owners Manual
[x] Cancel search | Manufacturer: LINCOLN, Model Year: 2006, Model line: ZEPHYR, Model: LINCOLN ZEPHYR 2006Pages: 256, PDF Size: 3.74 MB
Page 3 of 256
Cleaning 203
Maintenance and Specifications 210Engine compartment 212
Engine oil 214
Battery 218
Engine coolant 220
Fuel information 226
Air filter(s) 239
Part numbers 240
Refill capacities 241
Lubricant specifications 242
Engine data 244
Accessories 249
Index 251
All rights reserved. Reproduction by any means, electronic or mechanical
including photocopying, recording or by any information storage and retrieval
system or translation in whole or part is not permitted without written
authorization from Ford Motor Company. Ford may change the contents without
notice and without incurring obligation.
Copyright © 2006 Ford Motor Company Table of Contents
3
2006 Zephyr (378)
Owners Guide (post-2002-fmt)
USA (fus)
Page 9 of 256
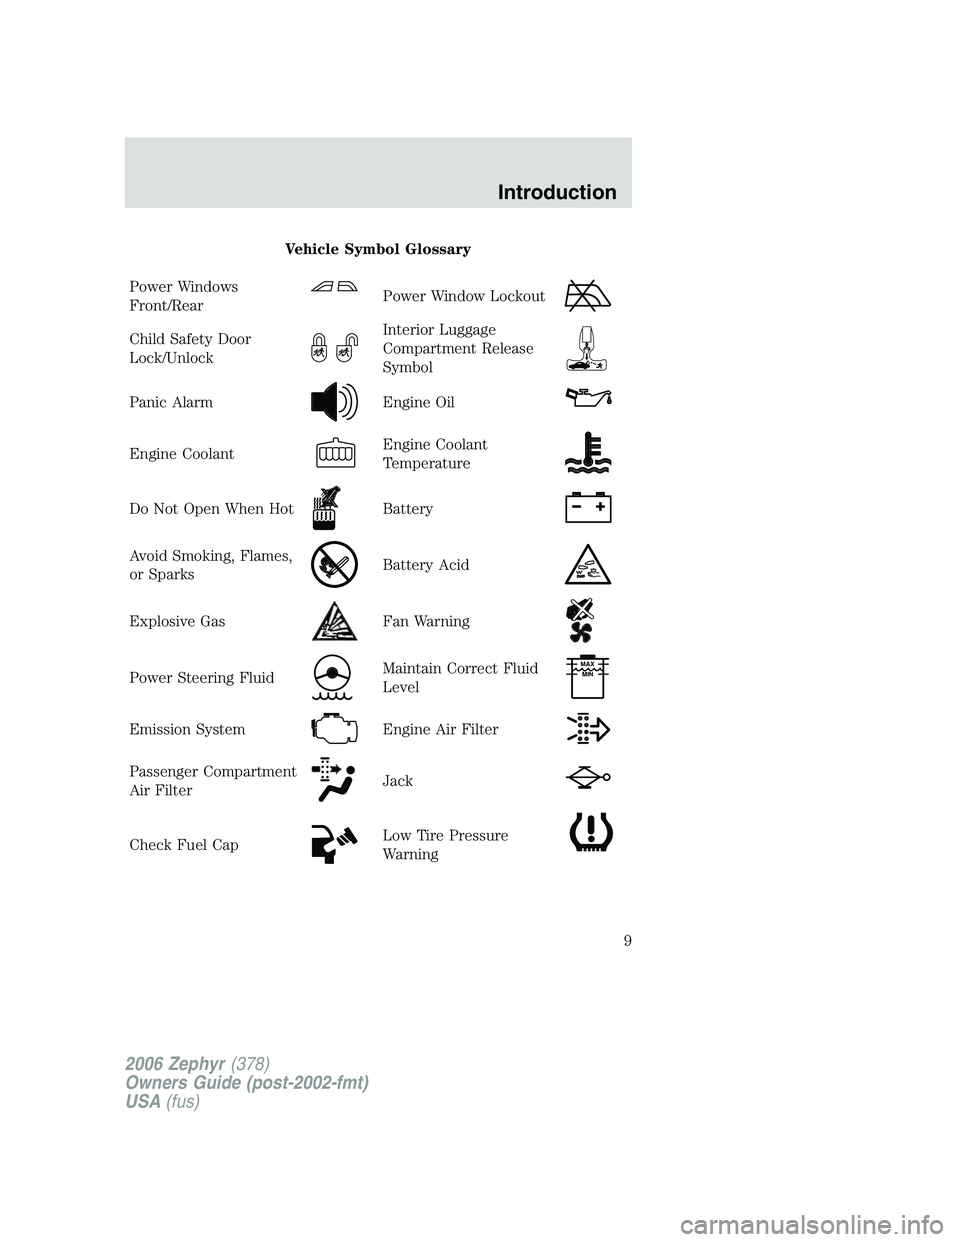
Vehicle Symbol Glossary
Power Windows
Front/Rear Power Window Lockout
Child Safety Door
Lock/Unlock Interior Luggage
Compartment Release
Symbol
Panic Alarm Engine Oil
Engine Coolant Engine Coolant
Temperature
Do Not Open When Hot Battery
Avoid Smoking, Flames,
or Sparks Battery Acid
Explosive Gas Fan Warning
Power Steering Fluid Maintain Correct Fluid
Level MAX
MIN
Emission System Engine Air Filter
Passenger Compartment
Air Filter Jack
Check Fuel Cap Low Tire Pressure
Warning
2006 Zephyr (378)
Owners Guide (post-2002-fmt)
USA (fus) Introduction
9
Page 36 of 256
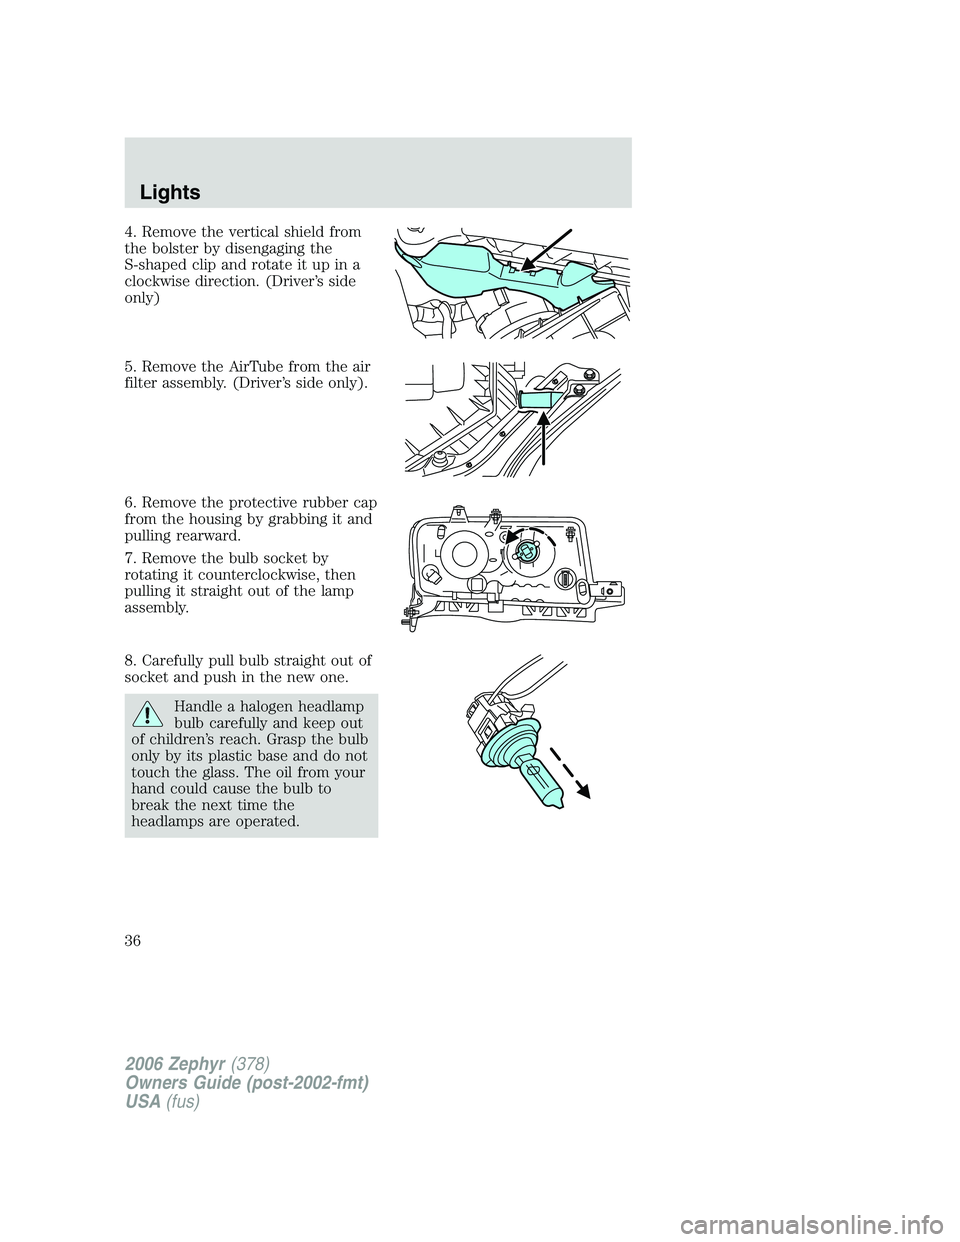
4. Remove the vertical shield from
the bolster by disengaging the
S-shaped clip and rotate it up in a
clockwise direction. (Driver’s side
only)
5. Remove the AirTube from the air
filter assembly. (Driver’s side only).
6. Remove the protective rubber cap
from the housing by grabbing it and
pulling rearward.
7. Remove the bulb socket by
rotating it counterclockwise, then
pulling it straight out of the lamp
assembly.
8. Carefully pull bulb straight out of
socket and push in the new one.
Handle a halogen headlamp
bulb carefully and keep out
of children’s reach. Grasp the bulb
only by its plastic base and do not
touch the glass. The oil from your
hand could cause the bulb to
break the next time the
headlamps are operated.
2006 Zephyr (378)
Owners Guide (post-2002-fmt)
USA (fus)Lights
36
Page 37 of 256
9. For ease of bulb socket installation into the lamp assembly, hold the
bulb socket at 15 degrees clockwise from a vertical position. Using the 2
lead wires oriented exactly up to represent the vertical reference
position.
10. From the 15 degree position rotate the bulb socket clockwise to a
locked position.
11. Tuck the 2 lead wires into the lamp housing to assure that they are
not pinched when installing the protective rubber cap.
12. Install the protective rubber cap to the housing circular ring by
pushing and pressing it forward.
13. Re-apply pressure around the complete circular ring on the housing
to make sure the protective rubber cap is completely seated.
14. Reconnect washer bottle filler neck snap strap by reversing step 3
(Passenger Side Only).
15. Reinstall the AirTube to the air filter assembly. (Driver’s side only).
16. Reinstall the vertical shield to the bolster. (Driver’s side only).
17. Turn the headlamps on and make sure they work properly. If the
headlamp was correctly aligned before you changed the bulb, you should
not need to align it again.
Lowbeam bulb replacement
1. Make sure headlamp switch is in OFF position, then open the hood.
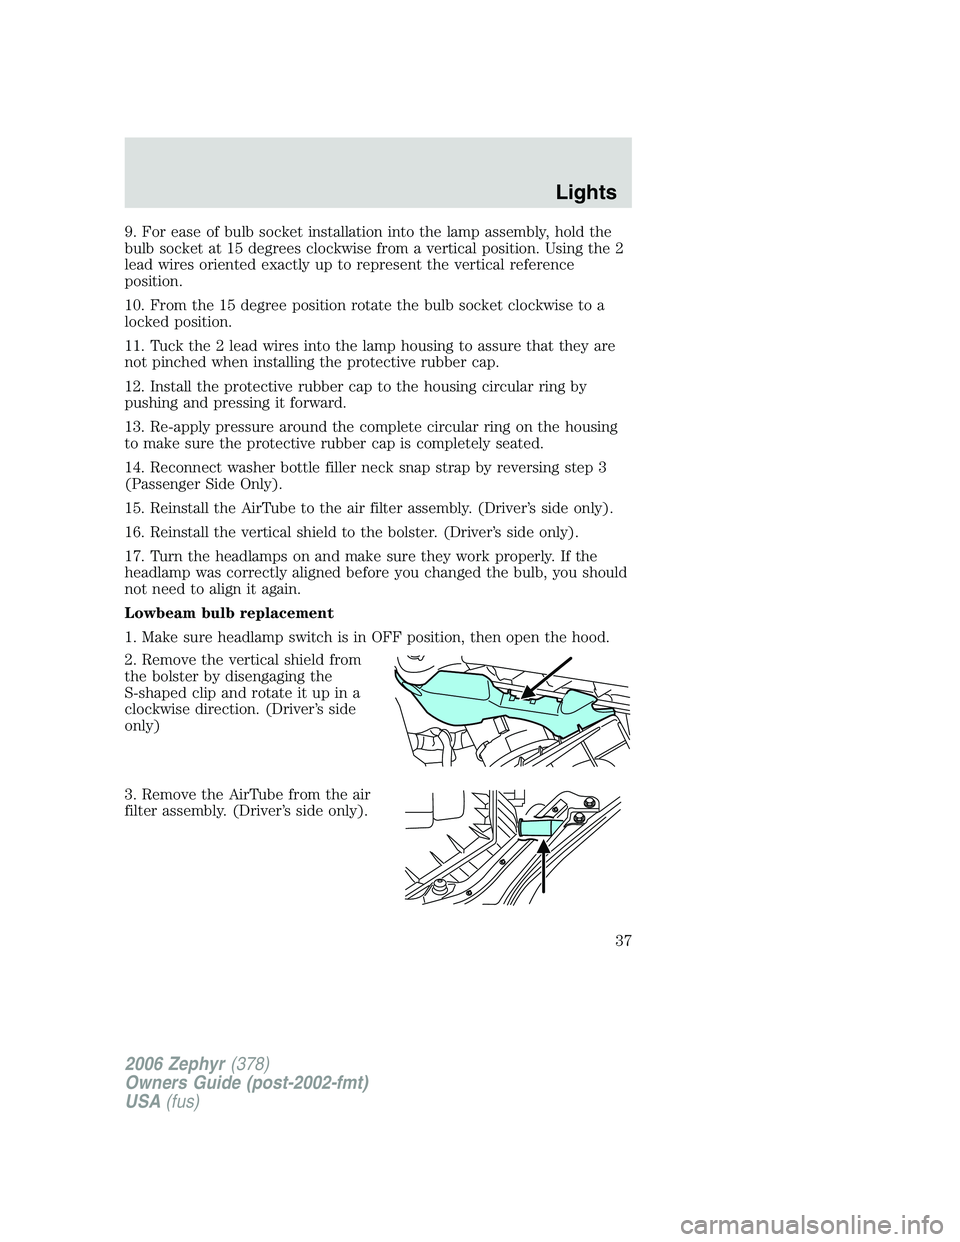
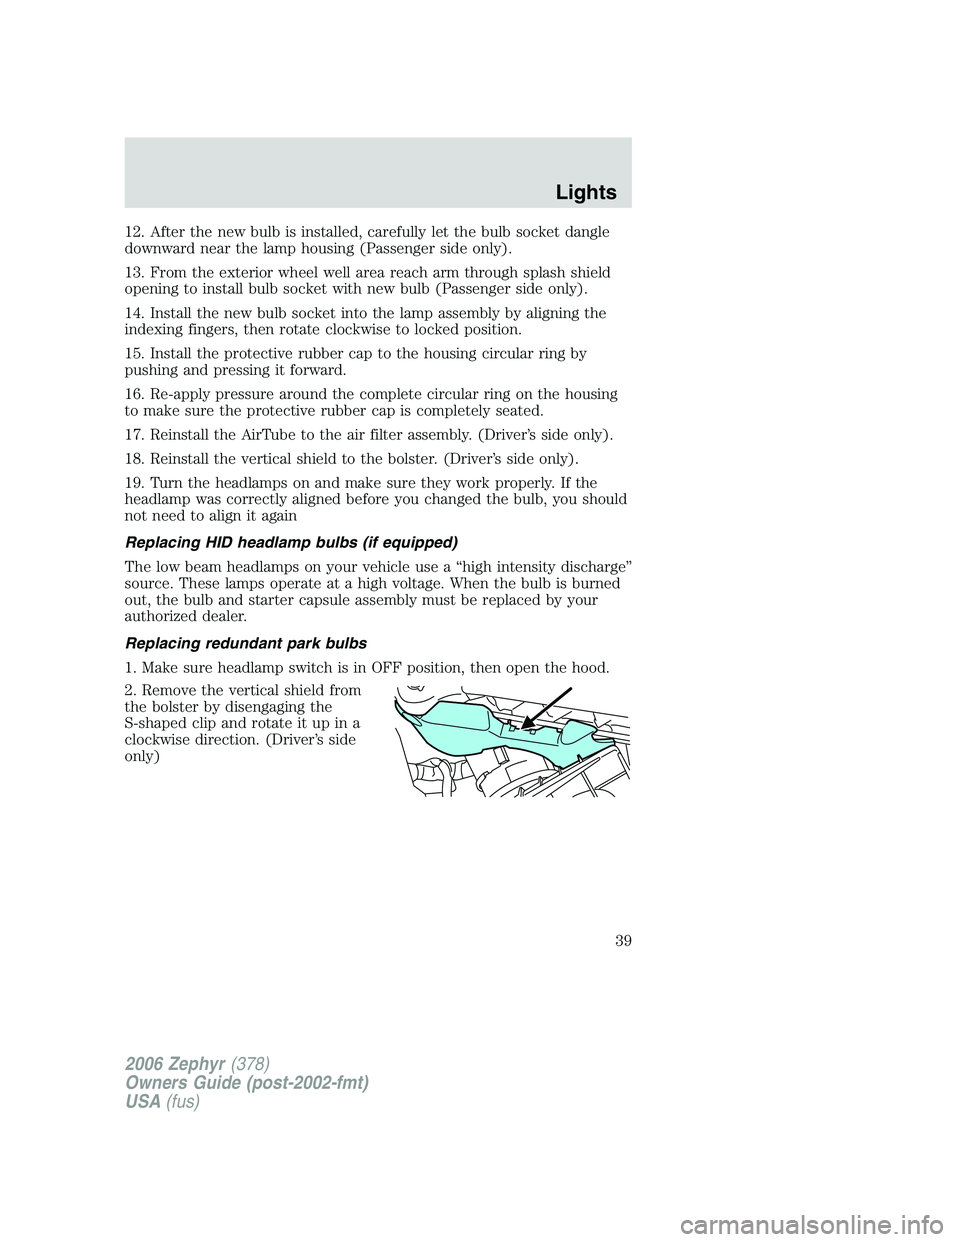
2. Remove the vertical shield from
the bolster by disengaging the
S-shaped clip and rotate it up in a
clockwise direction. (Driver’s side
only)
3. Remove the AirTube from the air
filter assembly. (Driver’s side only).
2006 Zephyr (378)
Owners Guide (post-2002-fmt)
USA (fus) Lights
37
Page 39 of 256
12. After the new bulb is installed, carefully let the bulb socket dangle
downward near the lamp housing (Passenger side only).
13. From the exterior wheel well area reach arm through splash shield
opening to install bulb socket with new bulb (Passenger side only).
14. Install the new bulb socket into the lamp assembly by aligning the
indexing fingers, then rotate clockwise to locked position.
15. Install the protective rubber cap to the housing circular ring by
pushing and pressing it forward.
16. Re-apply pressure around the complete circular ring on the housing
to make sure the protective rubber cap is completely seated.
17. Reinstall the AirTube to the air filter assembly. (Driver’s side only).
18. Reinstall the vertical shield to the bolster. (Driver’s side only).
19. Turn the headlamps on and make sure they work properly. If the
headlamp was correctly aligned before you changed the bulb, you should
not need to align it again
Replacing HID headlamp bulbs (if equipped)
The low beam headlamps on your vehicle use a “high intensity discharge”
source. These lamps operate at a high voltage. When the bulb is burned
out, the bulb and starter capsule assembly must be replaced by your
authorized dealer.
Replacing redundant park bulbs
1. Make sure headlamp switch is in OFF position, then open the hood.
2. Remove the vertical shield from
the bolster by disengaging the
S-shaped clip and rotate it up in a
clockwise direction. (Driver’s side
only)
2006 Zephyr (378)
Owners Guide (post-2002-fmt)
USA (fus) Lights
39
Page 40 of 256

3. Remove the AirTube from the air
filter assembly. (Driver’s side only).
4. Remove screw from oval splash
shield access panel from the
exterior wheel well area. Lift up and
rearward to release a hidden finger
attachment at the lower portion of
the panel.
5. From the exterior wheel well area
reach arm through splash shield
opening to access bulb socket.
6. Remove the bulb socket by
rotating it counterclockwise, then
pulling it out of the lamp assembly.
7. Let go of the bulb socket and
leave it dangling near the lamp
housing.
8. Reach over the front bolster in
the engine area, with a tool if
necessary, bring the bulb socket
upwards into an unobstructed area to replace the bulb.
9. Carefully pull bulb straight out of
socket and push in the new one.
10. After the new bulb is installed,
carefully let the bulb socket dangle
downward near the lamp housing.
11. From the exterior wheel well
area reach arm through splash
shield opening to install bulb socket
with new bulb.
2006 Zephyr (378)
Owners Guide (post-2002-fmt)
USA (fus)Lights
40
Page 41 of 256
12. Install the new bulb socket into the lamp assembly by aligning the
indexing fingers, then rotate clockwise to locked position.
13. Reinstall splash shield with screw.
14. Reinstall Air Tube to the air filter assembly (Driver’s Side Only).
Replacing primary park/turn signal bulbs
1. Make sure headlamp switch is in the OFF position, then open the
hood.
2. Reach over the front bolster.
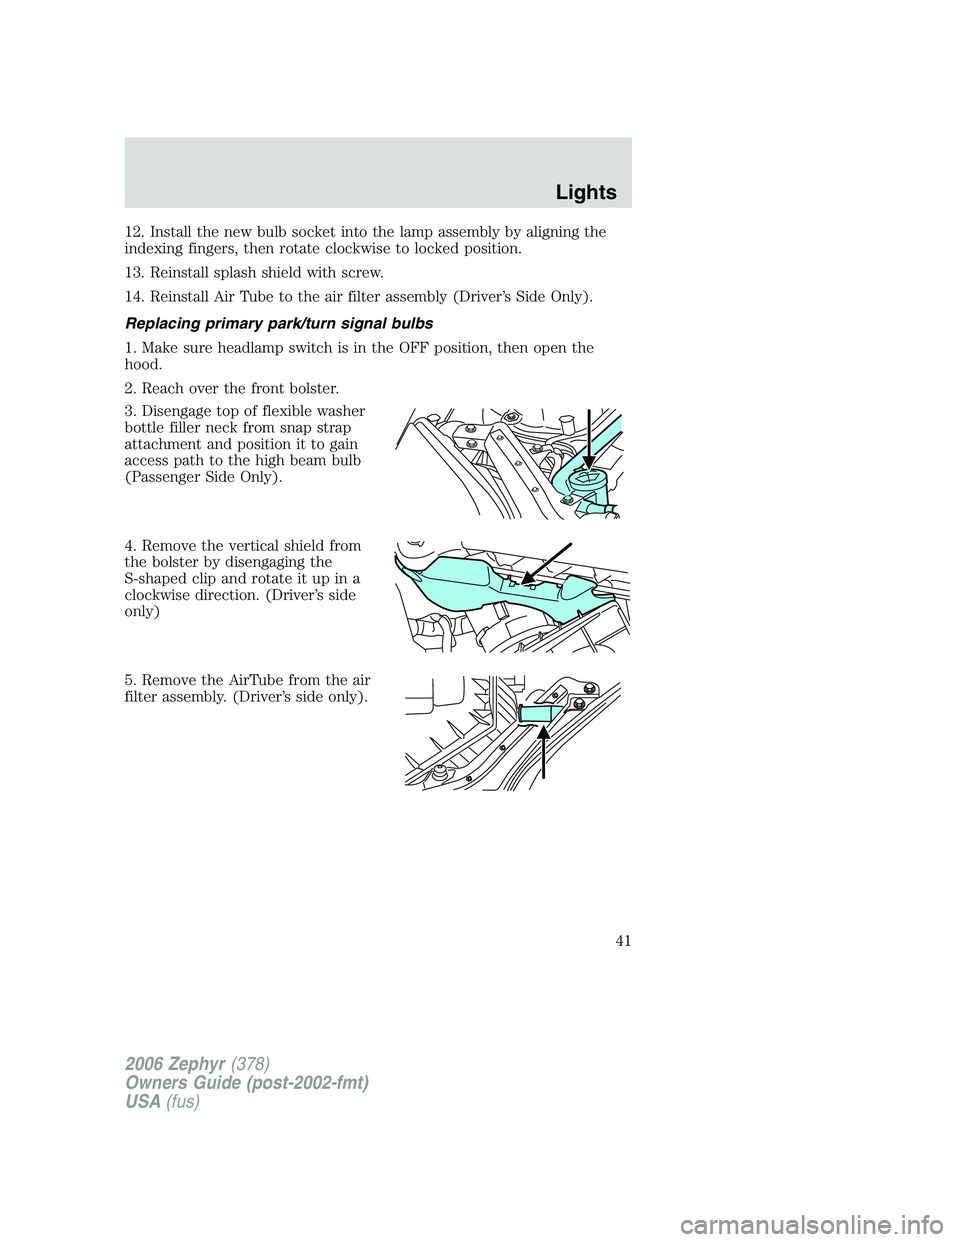
3. Disengage top of flexible washer
bottle filler neck from snap strap
attachment and position it to gain
access path to the high beam bulb
(Passenger Side Only).
4. Remove the vertical shield from
the bolster by disengaging the
S-shaped clip and rotate it up in a
clockwise direction. (Driver’s side
only)
5. Remove the AirTube from the air
filter assembly. (Driver’s side only).
2006 Zephyr (378)
Owners Guide (post-2002-fmt)
USA (fus) Lights
41
Page 42 of 256
6. Remove the bulb socket by
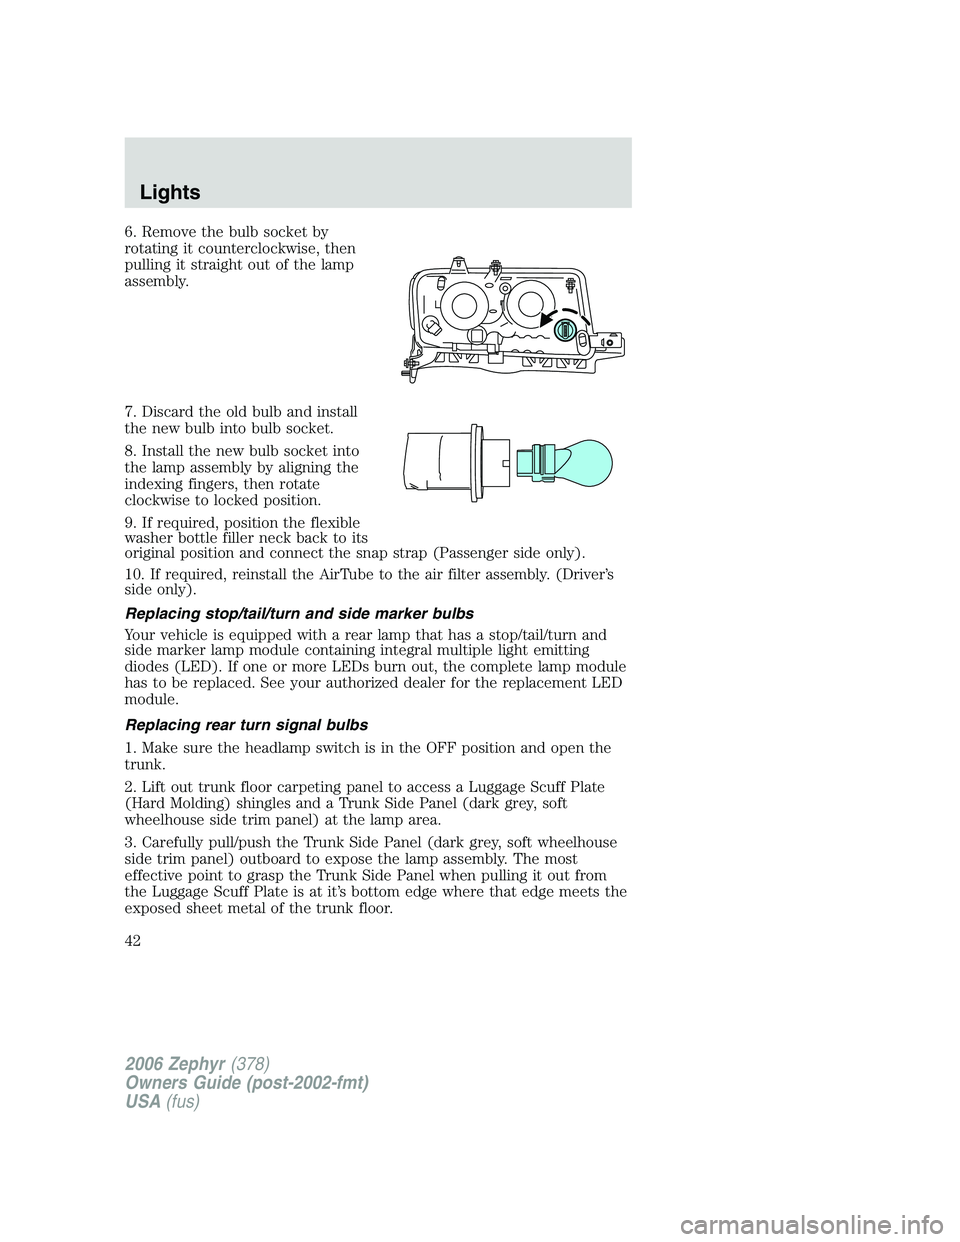
rotating it counterclockwise, then
pulling it straight out of the lamp
assembly.
7. Discard the old bulb and install
the new bulb into bulb socket.
8. Install the new bulb socket into
the lamp assembly by aligning the
indexing fingers, then rotate
clockwise to locked position.
9. If required, position the flexible
washer bottle filler neck back to its
original position and connect the snap strap (Passenger side only).
10. If required, reinstall the AirTube to the air filter assembly. (Driver’s
side only).
Replacing stop/tail/turn and side marker bulbs
Your vehicle is equipped with a rear lamp that has a stop/tail/turn and
side marker lamp module containing integral multiple light emitting
diodes (LED). If one or more LEDs burn out, the complete lamp module
has to be replaced. See your authorized dealer for the replacement LED
module.
Replacing rear turn signal bulbs
1. Make sure the headlamp switch is in the OFF position and open the
trunk.
2. Lift out trunk floor carpeting panel to access a Luggage Scuff Plate
(Hard Molding) shingles and a Trunk Side Panel (dark grey, soft
wheelhouse side trim panel) at the lamp area.
3. Carefully pull/push the Trunk Side Panel (dark grey, soft wheelhouse
side trim panel) outboard to expose the lamp assembly. The most
effective point to grasp the Trunk Side Panel when pulling it out from
the Luggage Scuff Plate is at it’s bottom edge where that edge meets the
exposed sheet metal of the trunk floor.
2006 Zephyr (378)
Owners Guide (post-2002-fmt)
USA (fus)Lights
42
Page 99 of 256
Climate controlled seats air filter replacement (if equipped)
The climate controlled seat system includes air filters that must be
replaced periodically. Refer to the Scheduled Maintenance Guide for
more information.
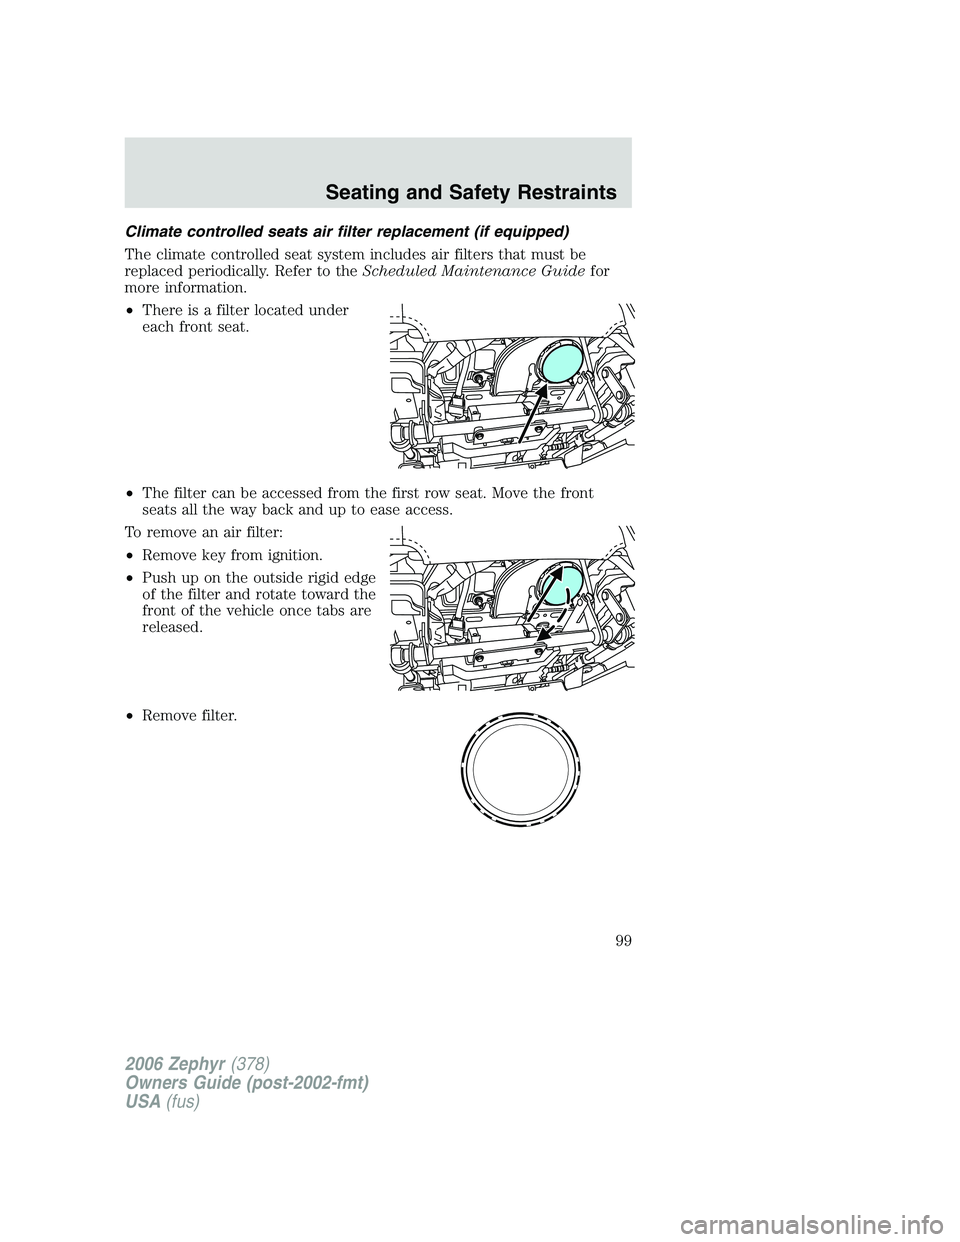
• There is a filter located under
each front seat.
• The filter can be accessed from the first row seat. Move the front
seats all the way back and up to ease access.
To remove an air filter:
• Remove key from ignition.
• Push up on the outside rigid edge
of the filter and rotate toward the
front of the vehicle once tabs are
released.
• Remove filter.
2006 Zephyr (378)
Owners Guide (post-2002-fmt)
USA (fus) Seating and Safety Restraints
99
Page 212 of 256
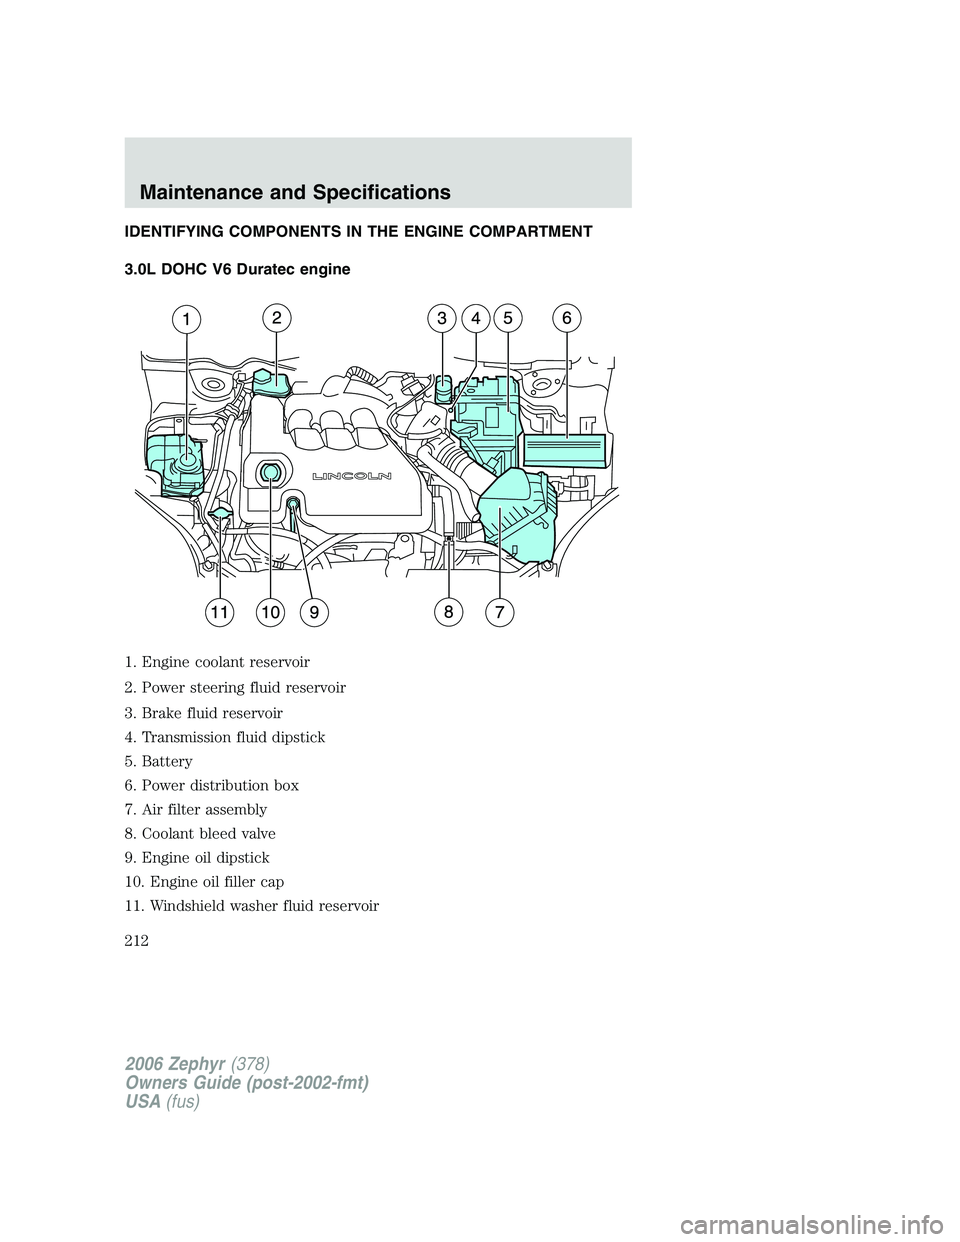
IDENTIFYING COMPONENTS IN THE ENGINE COMPARTMENT
3.0L DOHC V6 Duratec engine
1. Engine coolant reservoir
2. Power steering fluid reservoir
3. Brake fluid reservoir
4. Transmission fluid dipstick
5. Battery
6. Power distribution box
7. Air filter assembly
8. Coolant bleed valve
9. Engine oil dipstick
10. Engine oil filler cap
11. Windshield washer fluid reservoir
2006 Zephyr (378)
Owners Guide (post-2002-fmt)
USA (fus)Maintenance and Specifications
212