driver LOTUS ELISE 2005 User Guide
[x] Cancel search | Manufacturer: LOTUS, Model Year: 2005, Model line: ELISE, Model: LOTUS ELISE 2005Pages: 205, PDF Size: 4.51 MB
Page 25 of 205
belt, even with airbags. Sit as far back from the steering
wheel as is comfortable, whilst ensuring that full control can be maintained.
• Airbags plus lap-shoulder seat belts offer the best protection for adults, but not for young children and
infants. Neither the car ’s seat belt system nor its
airbag system is designed for them. Young children and
infants need the protection that a child restraint system can
provide. See later section on ‘Child Restraints’.
• If an object is between a person and an airbag, the bag
might not inflate properly or it might force the object into
that person causing death or serious injury. The path of an inflating airbag must be kept clear. Don’t put anything between an occupant and an airbag, and don’t attach or
put anything on the steering wheel hub or on or near any
passenger dashboard air bag covering.
• Do not lean against the inside of the doors; always hold the steering wheel by the outer rim; never rest your hands
on the airbag panel.
• Never transport heavy objects on or in front of the pas
-
senger seat.
• Give your passenger all of the information in this sec
-
tion.
• Do not attempt to de-activate the airbags, or make any other changes to the wiring or components of the airbag
system. Do not undertake any wiring for electrical ac
-
cessory equipment in the vicinity of the airbag wiring harnesses. Doing so may disable the airbag system, or
cause its unintended deployment.
• Adjust the driver’s seat to ensure that your chest is at
least 10 inches (250mm) from the steering wheel.
• If the airbag trim cover on the passenger side of the dash
-
board is accidently knocked off, the passenger airbag will
not operate correctly. Improper protection could result
in death or serious injury to a passenger in a crash. Do
not attempt to refit or repair the trim cover, but have the
fault rectified immediately by your dealer.
Airbag Tell Tale There is an airbag warning light (‘tell tale’) on the instrument
panel which shows the airbag symbol. The system checks the
following airbag electrical circuits for malfunction:
Seating & Safety Restraints
23
oh_croft_InD.indd 2320/05/2004 07:58:45ProCarManuals.com
Page 26 of 205
• Drivers airbag circuit;
• Passenger airbag circuit;
• Seatbelts pre-tensioner circuit;
• Internal componentry of the sensor and diagnostic module.
As a bulb and circuit check, the tell tale will light briefly when
the ignition is switched on, and then go out. If the lamp lights at any other time, a fault in the airbag system is indicated, which
should be rectified without delay by your Lotus dealer.
WARNING: If the airbag tell tale does not light up as the ignition is
turned on, or remains lit for more than a few seconds, have
the fault rectified immediately by your dealer. Ignoring the
tell tale can result in serious injury or death if the airbags do not inflate when needed.
Airbag Deployment If a crash or collision causes the airbags to inflate, you may
see what looks like smoke, but is actually powder from the airbag
surface used to aid smooth deployment. Although the powder is not harmful, people with respiratory problems may experience
some temporary discomfort. If this occurs, get out of the car if possible as soon as it is safe to do so. After airbag deployment, the airbags, seat belt tensioners
and electronic control unit must be replaced by a Lotus dealer
or other suitably qualified organisation. Component parts of the airbag system are located in various
sites around the car. Any technician working on the car should be advised that the car is fitted with airbags to allow suitable
precautions to be taken.
WARNING:
• For up to 20 seconds after the ignition has been turned off and the battery disconnected, an airbag can still
inflate if improper servicing occurs. You can be injured
if you are close to an airbag when it inflates.
• Airbag system components should be serviced only by an authorised Lotus dealer. Do not work on the airbag
system yourself.
• The disposal of used airbag units is subject to stringent
Seating & Safety Restraints
24
oh_croft_InD.indd 2420/05/2004 07:58:45ProCarManuals.com
Page 29 of 205
Behaviour: It is essential that the behaviour of any child trav-
elling in the car is such that they remain correctly seated and belted, and it is the responsibility of the driver to ensure that
this occurs.
The following wording has been included to comply with
National Highway Traffic Safety Authority requirements,
however;
WARNING: Lotus str ongly recommen ds that you do not fit any type
of child seat into the Elise due to the risk of death or seri
-
ous injury if the c hild is too close to the dashboard when
the airbag inflates.
Procedure for Proper Fitment of For ward- Facing Child
Seat
A utomatic Locking Retractor: The safety belt for the passen-
ger’s seat is equipped with an automatic locking retractor that
must be used for securing a forward-facing child restraint sy
s-
tem. When activated , this retractor allows you to securely fas
-
ten the child restraint system.
Activating the Automatic Retracto r:
1. Pull the passenger seat safety belt completely
out . At this
point, the locking mechanism is activated.
2.
P lace the forward-facing child seat in the passenger seat,
using the safety belt to secure the child seat,
fo llowing the
instructions that come with the child seat
.
3. Insert the safety tongu e into the buckle and make sure that
it is properl y latched.
4. Allow the safety belt to retract until it is tight on the child seat.
You may further tighten the belt by pulling on it to allow more of
it to retract. Check to make sure the child seat is secured, and
that the belt is snug and will not pull out.
Releasing the safety bel t and child seat:
1. Unbuckle the safety belt. 2. Remove the child seat.
3. Make sure that the belt has fully retracted. At this point the
automatic locking feature is disengaged.
Seating & Safety Restraints
27
oh_croft_InD.indd 2720/05/2004 07:58:46ProCarManuals.com
Page 33 of 205
car, enquire with the dealer immediately.
Engine Immobiliser In order to provide a measure of car security, independent
of any driver action, the system will ‘passively’ immobilise the
engine’s cranking and running circuits after the first occurring of the following:
i) Four minutes after switching off the ignition;
ii) Two minutes after a mobilising command (see below); or
iii) One minute after switching off the ignition and opening the driver’s door.
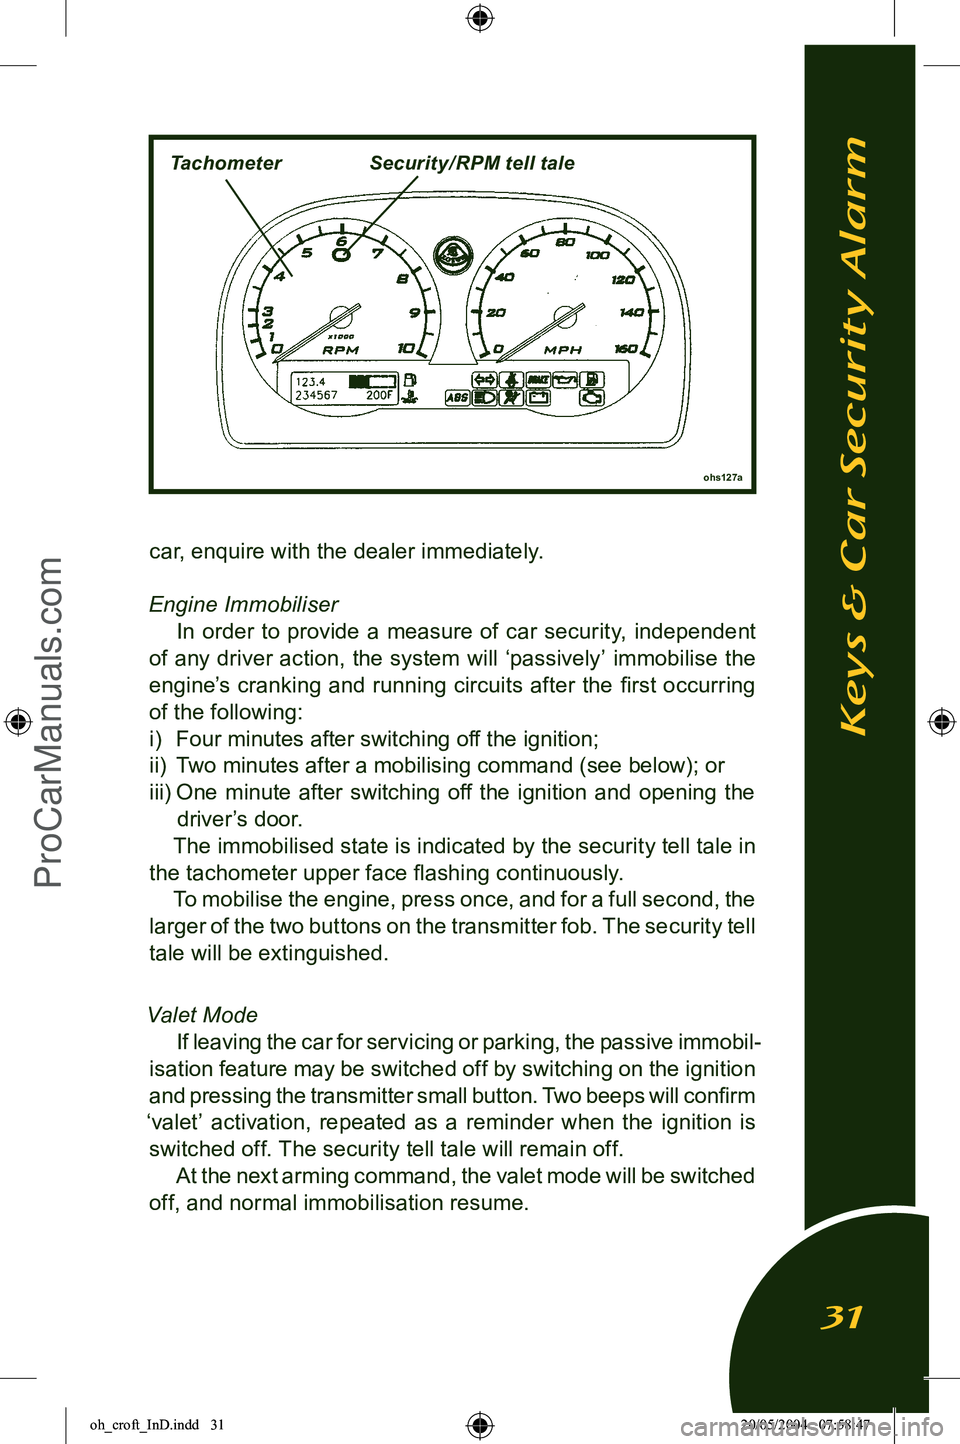
The immobilised state is indicated by the security tell tale in
the tachometer upper face flashing continuously. To mobilise the engine, press once, and for a full second, the
larger of the two buttons on the transmitter fob. The security tell
tale will be extinguished.
Valet Mode
If leaving the car for servicing or parking, the passive immobil
-
isation feature may be switched off by switching on the ignition
and pressing the transmitter small button. Two beeps will confirm
‘valet’ activation, repeated as a reminder when the ignition is switched off. The security tell tale will remain off. At the next arming command, the valet mode will be switched
off, and normal immobilisation resume.
ohs127a
Keys & Car Security Alarm
31
TachometerSecurity/ RPM tell tale
oh_croft_InD.indd 3120/05/2004 07:58:47ProCarManuals.com
Page 37 of 205
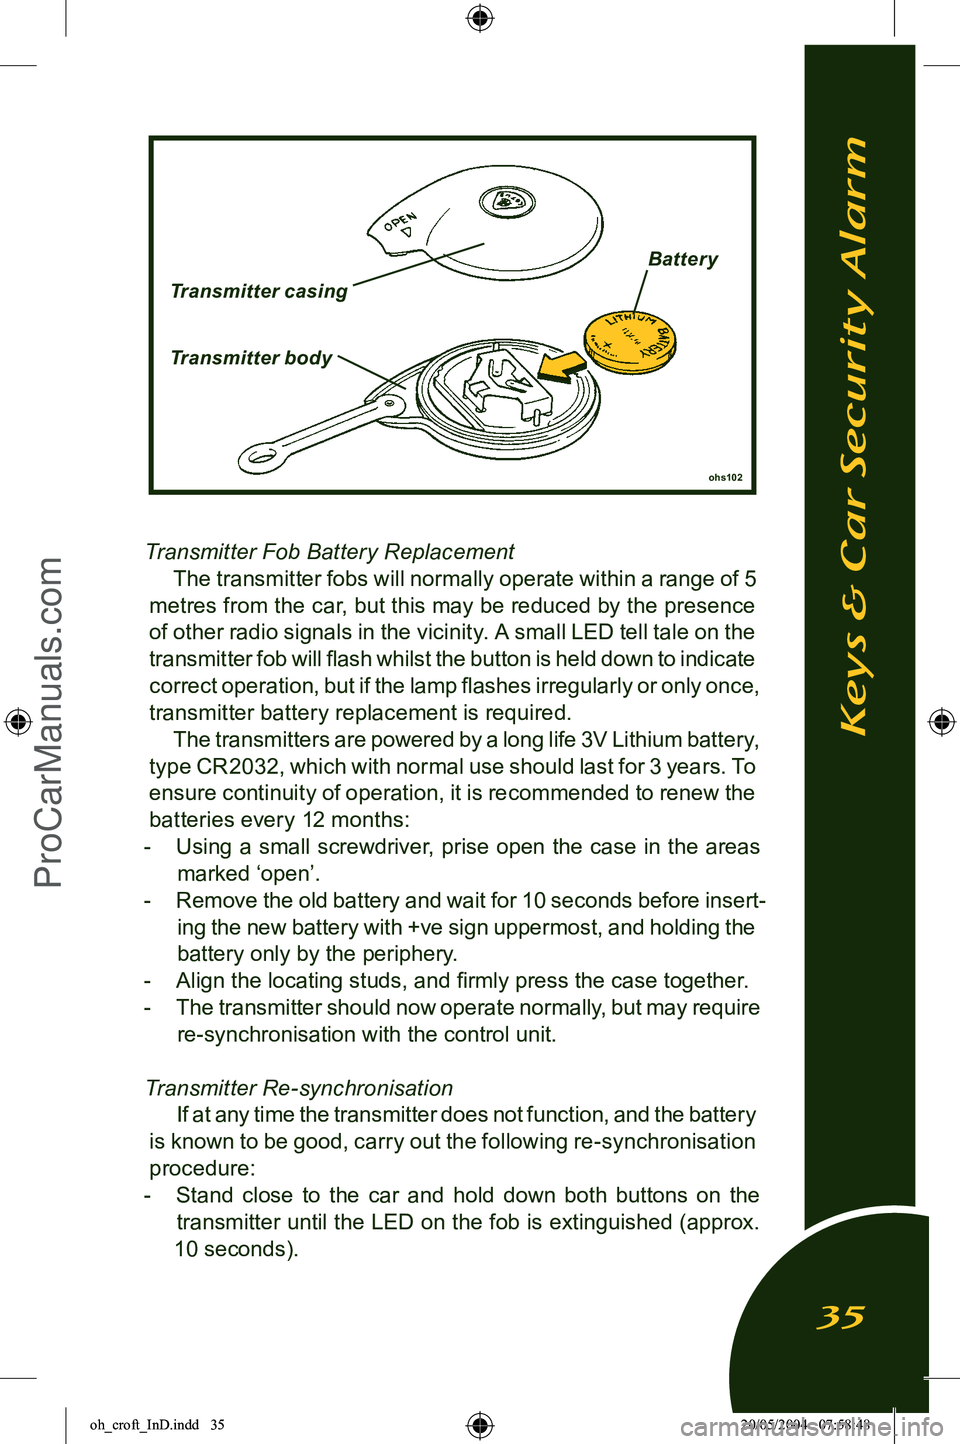
Transmitter Fob Battery ReplacementThe transmitter fobs will normally operate within a range of 5
metres from the car, but this may be reduced by the presence
of other radio signals in the vicinity. A small LED tell tale on the
transmitter fob will flash whilst the button is held down to indicate correct operation, but if the lamp flashes irregularly or only once,
transmitter battery replacement is required.
The transmitters are powered by a long life 3V Lithium battery,
type CR2032, which with normal use should last for 3 years. To ensure continuity of operation, it is recommended to renew the batteries every 12 months:
- Using a small screwdriver, prise open the case in the areas
marked ‘open’.
- Remove the old battery and wait for 10 seconds before insert
-
ing the new battery with +ve sign uppermost, and holding the battery only by the periphery.
- Align the locating studs, and firmly press the case together.
- The transmitter should now operate normally, but may require
re-synchronisation with the control unit.
Transmitter Re-synchronisation If at any time the transmitter does not function, and the battery
is known to be good, carry out the following re-synchronisation procedure:
- Stand close to the car and hold down both buttons on the
transmitter until the LED on the fob is extinguished (approx.
10 seconds).
ohs102
Keys & Car Security Alarm
35
Transmitter casing
Transmitter body
Batter y
oh_croft_InD.indd 3520/05/2004 07:58:48ProCarManuals.com
Page 39 of 205
ENTRY & COMFORT
WARNING:
• In very hot/cold territories, or under conditions of extreme solar heating, be aware of exposed metal surfaces in the
cabin. Take suitable precautions to guard against burn
injuries from hot or cold metal.
• Unlocked doors can be dangerous. Young children who get into unlocked cars may be unable to get out.
Always lock your car whenever you leave it.
Central Door Locking (CDL) The central door locking (CDL) operates on the driver’s and
passenger’s doors in conjunction with the security alarm system.
For full details of the alarm system, see page 30.
To unlock from outside: To unlock the doors from outside, press once, for a full second,
the larger button on the transmitter fob. The alarm will be dis
-
armed and both doors unlocked. Press the exterior lock button and pull open the door using the fingergrip below the button. If
the door is swung fully open, a spring detent mechanism on the hinge will aid restraint of the door for convenience whilst entering or exiting the car, but the door should be manually held in windy
conditions, or if the car is parked on a slope.
From inside the car, pull the door firmly shut using the recess
provided at the top of the door trim panel.
WARNING: Before closing a door take care to ensure that no persons
or objects will be trapped to avoid injury or damage.
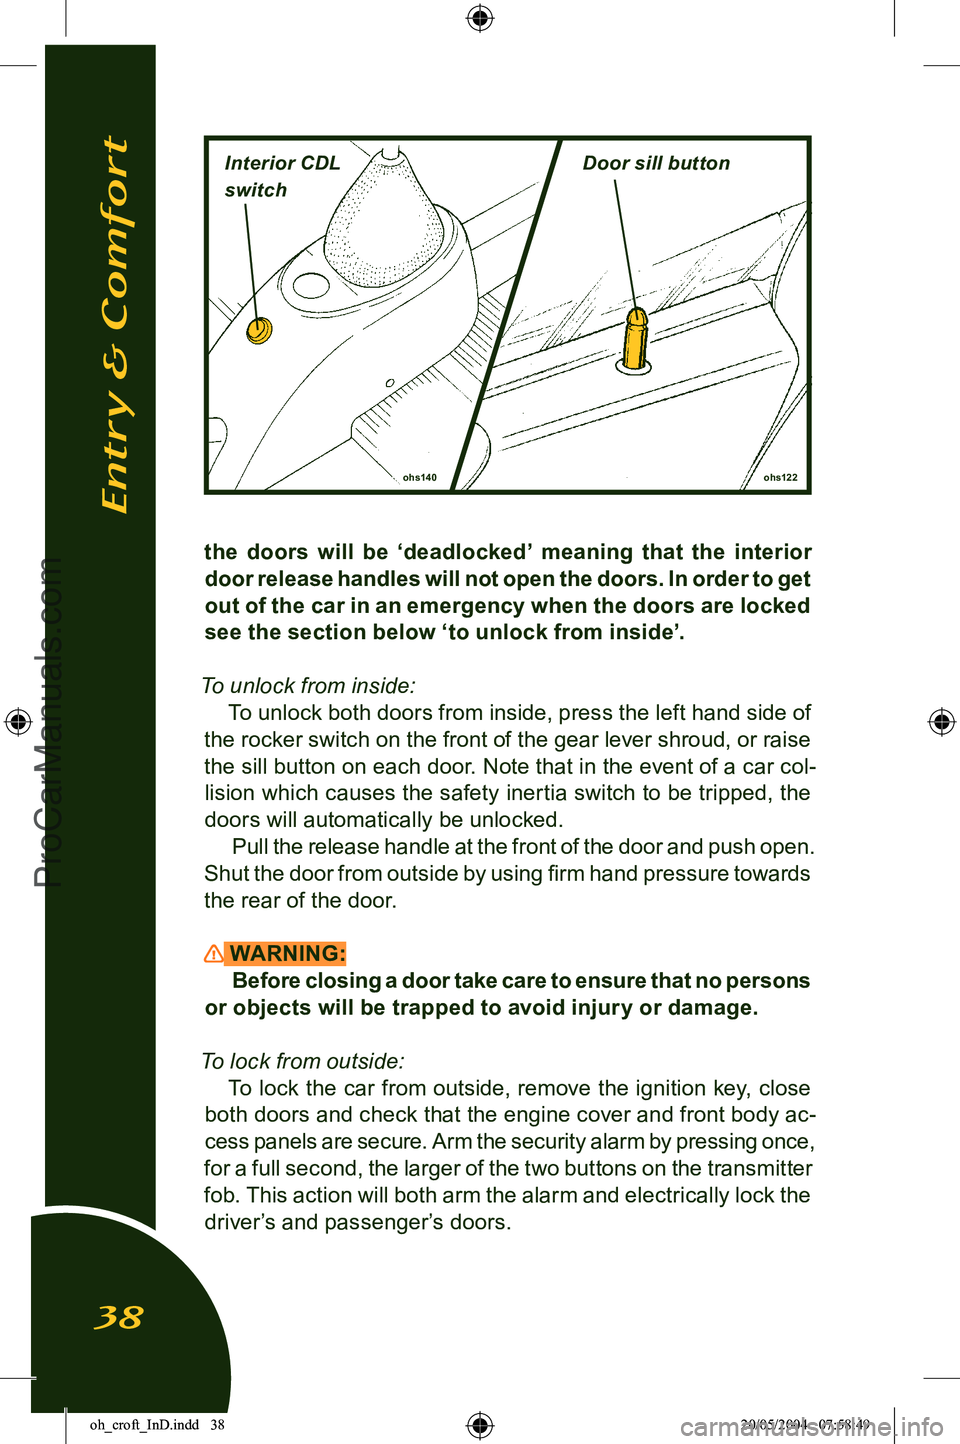
To lock from inside: If it is desired to lock the doors from inside the car, for example
to deter highjack attempts, press the right hand side of the CDL
rocker switch on the front of the gear lever shroud to lock both
doors with or without the ignition switched on. Alternatively, the
doors can be locked individually by depressing the button at the rear end of each door sill.
WARNING: Whether locked using the rocker switch or sill buttons,
Entry & Comfort
37
oh_croft_InD.indd 3720/05/2004 07:58:48ProCarManuals.com
Page 40 of 205
the doors will be ‘deadlocked’ meaning that the interior door release handles will not open the doors. In order to get
out of the car in an emergency when the doors are locked
see the section below ‘to unlock from inside’.
To unlock from inside: To unlock both doors from inside, press the left hand side of
the rocker switch on the front of the gear lever shroud, or raise
the sill button on each door. Note that in the event of a car col
-
lision which causes the safety inertia switch to be tripped, the doors will automatically be unlocked.
Pull the release handle at the front of the door and push open.
Shut the door from outside by using firm hand pressure towards the rear of the door.
WARNING: Before closing a door take care to ensure that no persons
or objects will be trapped to avoid injury or damage.
To lock from outside: To lock the car from outside, remove the ignition key, close
both doors and check that the engine cover and front body ac
-
cess panels are secure. Arm the security alarm by pressing once,
for a full second, the larger of the two buttons on the transmitter
fob. This action will both arm the alarm and electrically lock the driver’s and passenger’s doors.
ohs122
ohs140
Entry & Comfort
38
Interior CDL
switchDoor sill button
oh_croft_InD.indd 3820/05/2004 07:58:49ProCarManuals.com
Page 42 of 205
ohs149
NightDay
‘Lights On’ Buzzer
A ‘lights on’ reminder buzzer will sound if the lights are on, the
ignition is switched off, and the driver’s door is then opened.
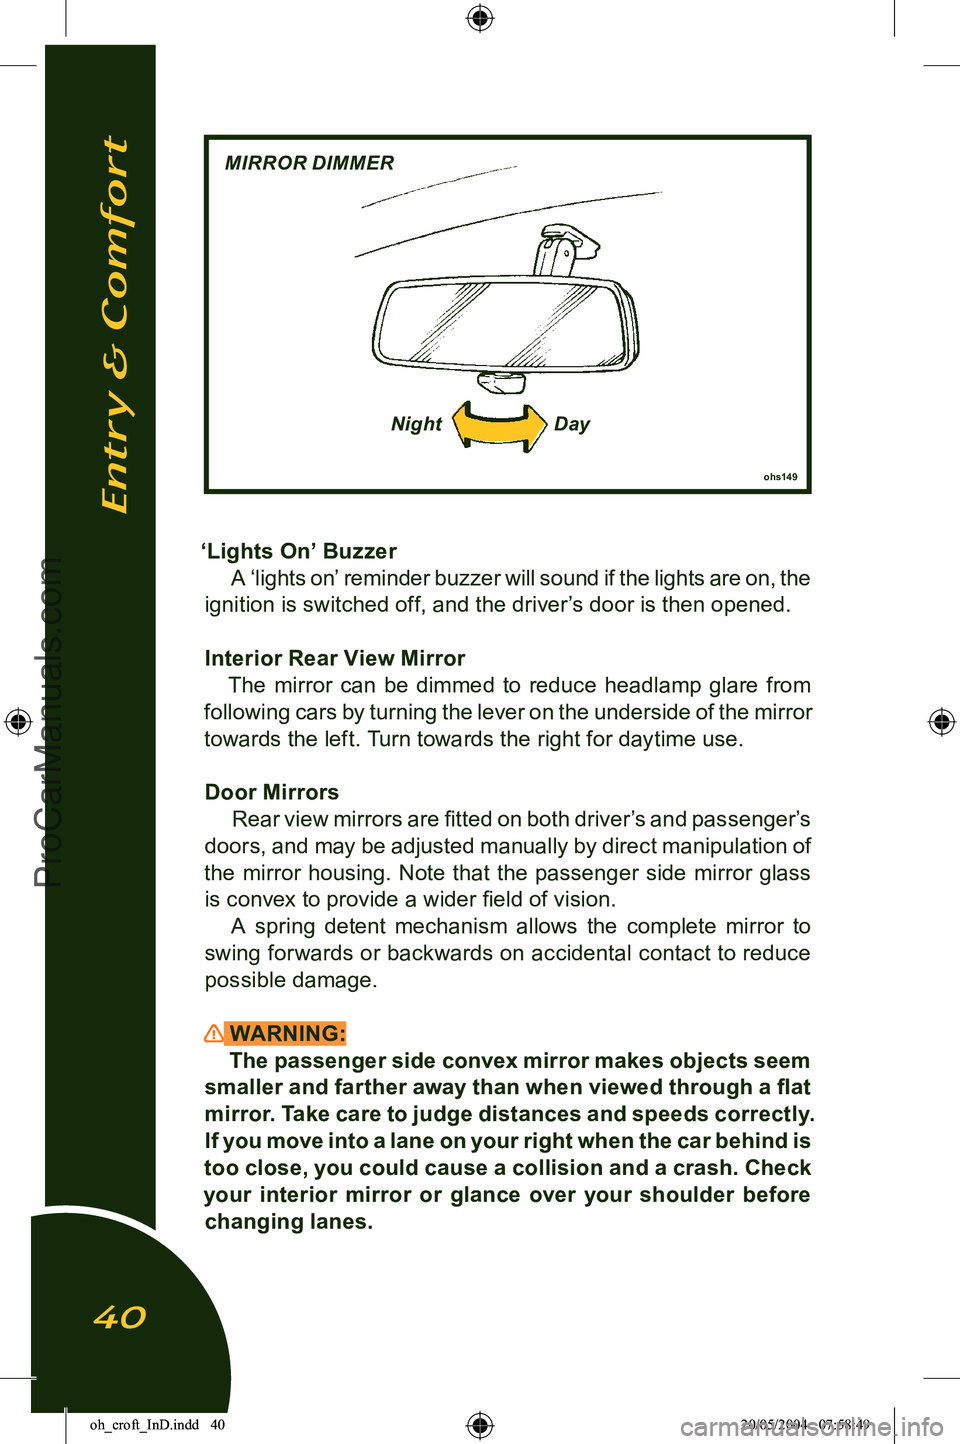
Interior Rear View Mirror The mirror can be dimmed to reduce headlamp glare from
following cars by turning the lever on the underside of the mirror
towards the left. Turn towards the right for daytime use.
Door Mirrors Rear view mirrors are fitted on both driver’s and passenger’s
doors, and may be adjusted manually by direct manipulation of
the mirror housing. Note that the passenger side mirror glass is convex to provide a wider field of vision. A spring detent mechanism allows the complete mirror to
swing forwards or backwards on accidental contact to reduce
possible damage.
WARNING: The passenger side convex mirror makes objects seem
smaller and farther away than when viewed through a flat
mirror. Take care to judge distances and speeds correctly.
If you move into a lane on your right when the car behind is
too close, you could cause a collision and a crash. Check
your interior mirror or glance over your shoulder before
changing lanes.
Entry & Comfort
40
MIRROR DIMMER
oh_croft_InD.indd 4020/05/2004 07:58:49ProCarManuals.com
Page 43 of 205
ohs99
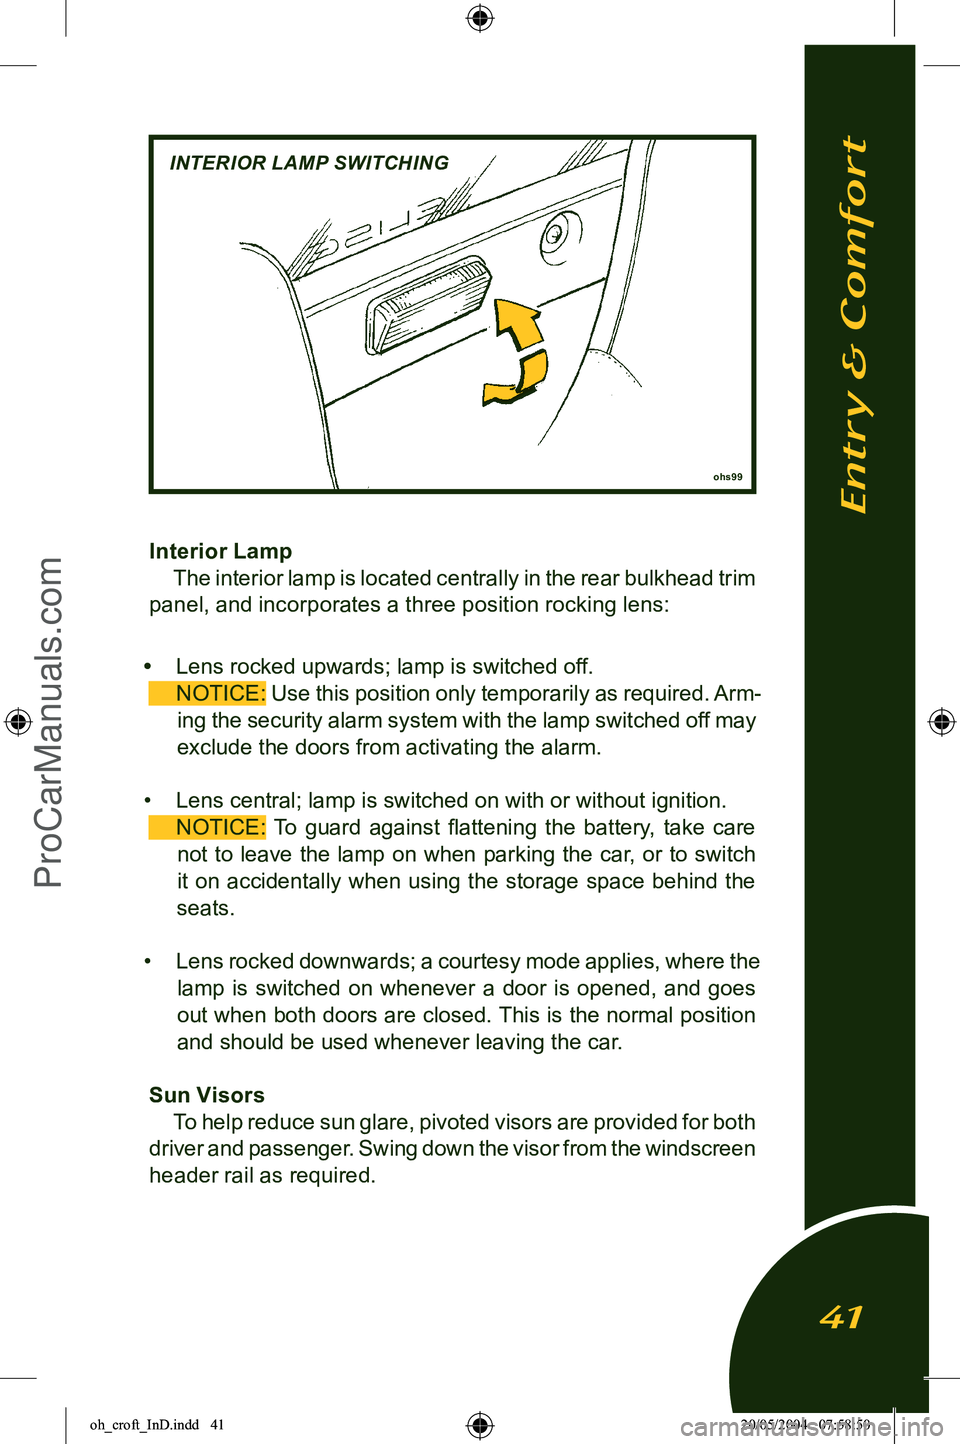
Interior LampThe interior lamp is located centrally in the rear bulkhead trim
panel, and incorporates a three position rocking lens:
• Lens rocked upwards; lamp is switched off.
NOTICE:
Use this position only temporarily as required. Arm-
ing the security alarm system with the lamp switched off may
exclude the doors from activating the alarm.
• Lens central; lamp is switched on with or without ignition.
NOTICE: To guard against flattening the battery, take care
not to leave the lamp on when parking the car, or to switch
it on accidentally when using the storage space behind the
seats.
• Lens rocked downwards; a courtesy mode applies, where the
lamp is switched on whenever a door is opened, and goes out when both doors are closed. This is the normal position
and should be used whenever leaving the car.
Sun Visors To help reduce sun glare, pivoted visors are provided for both
driver and passenger. Swing down the visor from the windscreen
header rail as required.
Entry & Comfort
41
INTERIOR LAMP SWITCHING
oh_croft_InD.indd 4120/05/2004 07:58:50ProCarManuals.com
Page 49 of 205
Seat Belt Tell Tale
The red seat belt tell tale is provided as a reminder that both
driver and passenger should always wear the seat belts, no
matter how short the journey. The lamp will flash until the driv
-
er’s seat belt is fastened, accompanied for the first 8 seconds by a buzzer.
Brake Tell Tale
This tell tale will glow red with the ignition switched on
whenever the parking brake is applied. Driving the car with the brake not fully released will cause overheat damage to the rear
brakes. Each time the parking brake is released, check that the
tell tale is extinguished. With the parking brake released, if the tell tale should light
at any time after the six second check period, stop the car im
-
mediately, as the circuit has detected a dangerously low level of brake fluid in the master cylinder reservoir, possibly caused
by a hydraulic leak in one of the separate front or rear brake
circuits. In the event of a leak there is a danger that air may enter the hydraulic system and cause spongy operation and
extended pedal travel. The divided brake circuit should ensure
that emergency braking remains, but the car should not be driven until the fault has been identified and rectified.
WARNING: If the tell tale remains lit when the parking brake has been
released, the footbrake may not be working properly. Stop
the car immediately it is safe to do so, and do not continue until the fault has been rectified. Continuing to drive could cause a crash and result in death or serious injury.
Oil Pressure Tell Tale
This red tell tale warns of low engine oil pressure. The lamp
will be lit whenever the ignition is on and the engine is stopped, but should go out as soon as the engine is started. If the lamp
fails to go out after engine start up, or comes on when the engine is running, stop the engine immediately and do not restart until
the cause has been investigated and rectified.
Instruments & Switches
47
oh_croft_InD.indd 4720/05/2004 07:58:52ProCarManuals.com