infotainment LUCID AIR 2022 Owners Manual
[x] Cancel search | Manufacturer: LUCID, Model Year: 2022, Model line: AIR, Model: LUCID AIR 2022Pages: 241, PDF Size: 5.15 MB
Page 7 of 241
Front Armrest and Storage Compartment 87
Center Console Storage Compartment 87
Rear Armrest and Storage Compartment 87
Cup Holders 87
Accessory Connections 89
USB Connections 89 Wireless Charging 89
12 Volt Power Socket 90DreamDriveAbout ADAS 92
ADAS Limitations 92
ADAS Features 93
ADAS Component Locations 94
Driving Experience 96
Steering Wheel DreamDrive Controls 96
DreamDrive Requirements 97
Adaptive Cruise Control 97
Highway Assist 99
Traffic Sign Recognition 101
Traffic Drive-Off Alert 102
Distracted Driver Alert 102 Drowsy Driver Alert 102High Beam Assist 103
Collision Detection and Protection 105
Collision Protection 105
Automatic Emergency Braking 105
Forward Collision Warning 106 Rear Pedestrian Collision Protection 107
Cross Traffic Protection 107
Lane Departure Protection 108
Blind Spot Warning 109
Blind Spot Display 109
Parking Experience 111
Automatic Park In 111
Automatic Park Out 112
Surround View Monitoring 114
Rear View Monitoring 115
Park Distance Warning 115InfotainmentUser Pro
Page 130 of 241

07Infotainment
Infotainment117
Page 134 of 241
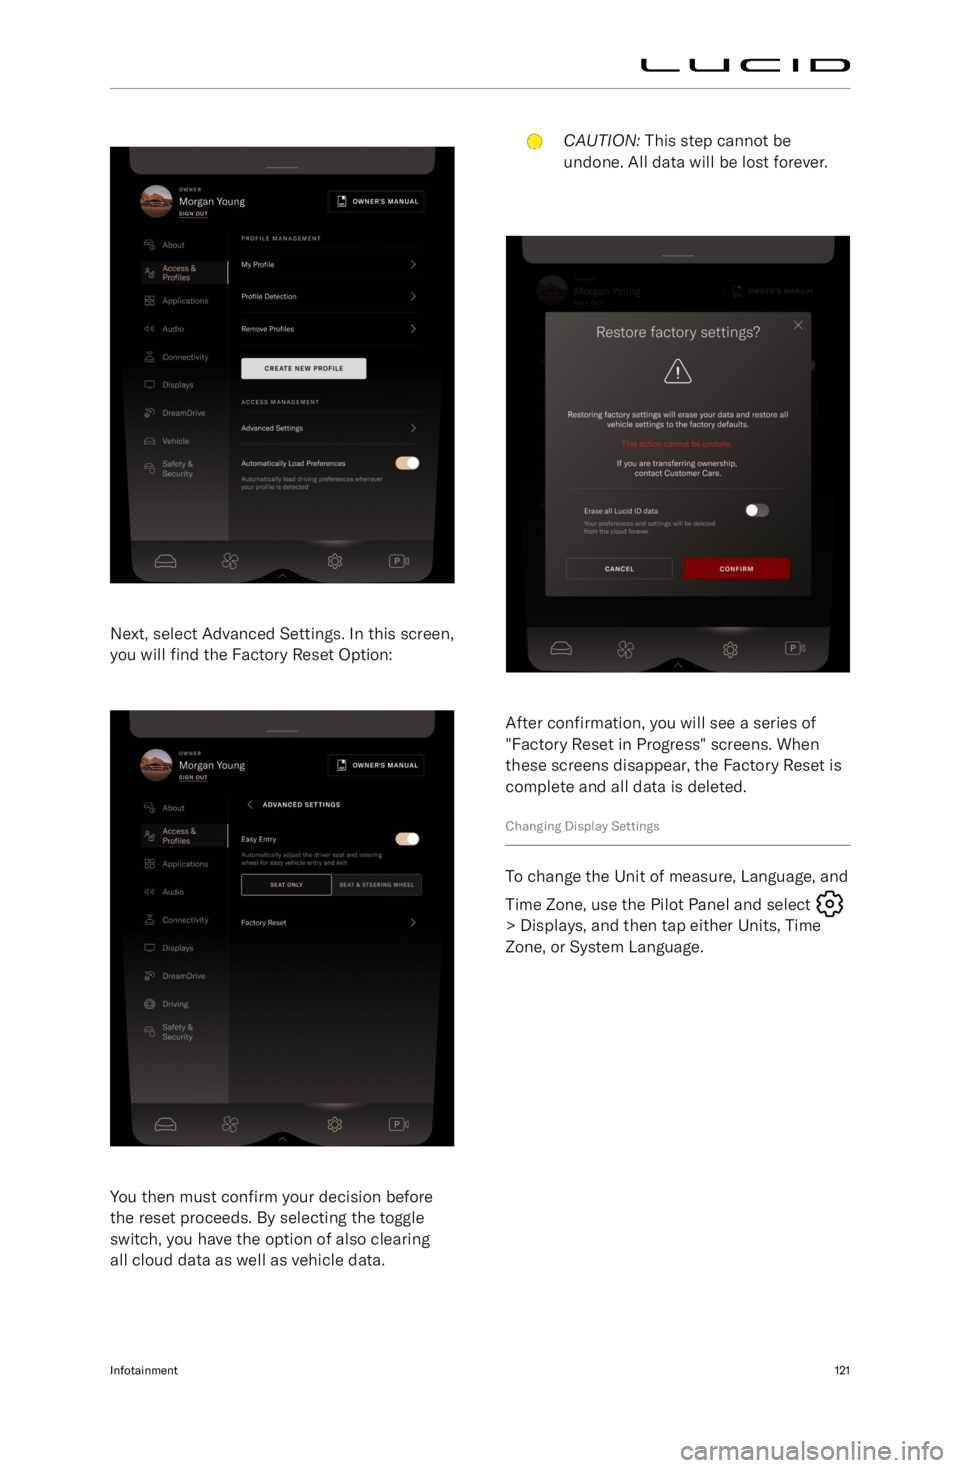
Next, select Advanced Settings. In this screen,you will find the Factory Reset Option:
You then must confirm your decision before
the reset proceeds. By selecting the toggle
switch, you have the option of also clearing all cloud data as well as vehicle data.
CAUTION: This step cannot be
undone. All data will be lost forever.
After confirmation, you will see a series of
"Factory Reset in Progress" screens. When
these screens disappear, the Factory Reset is
complete and all data is deleted.
Changing Display Settings
To change the Unit of measure, Language, and Time Zone, use the Pilot Panel and select
> Displays, and then tap either Units, Time
Zone, or System Language.
Infotainment121
Page 135 of 241
Media and Audio
Media Overview
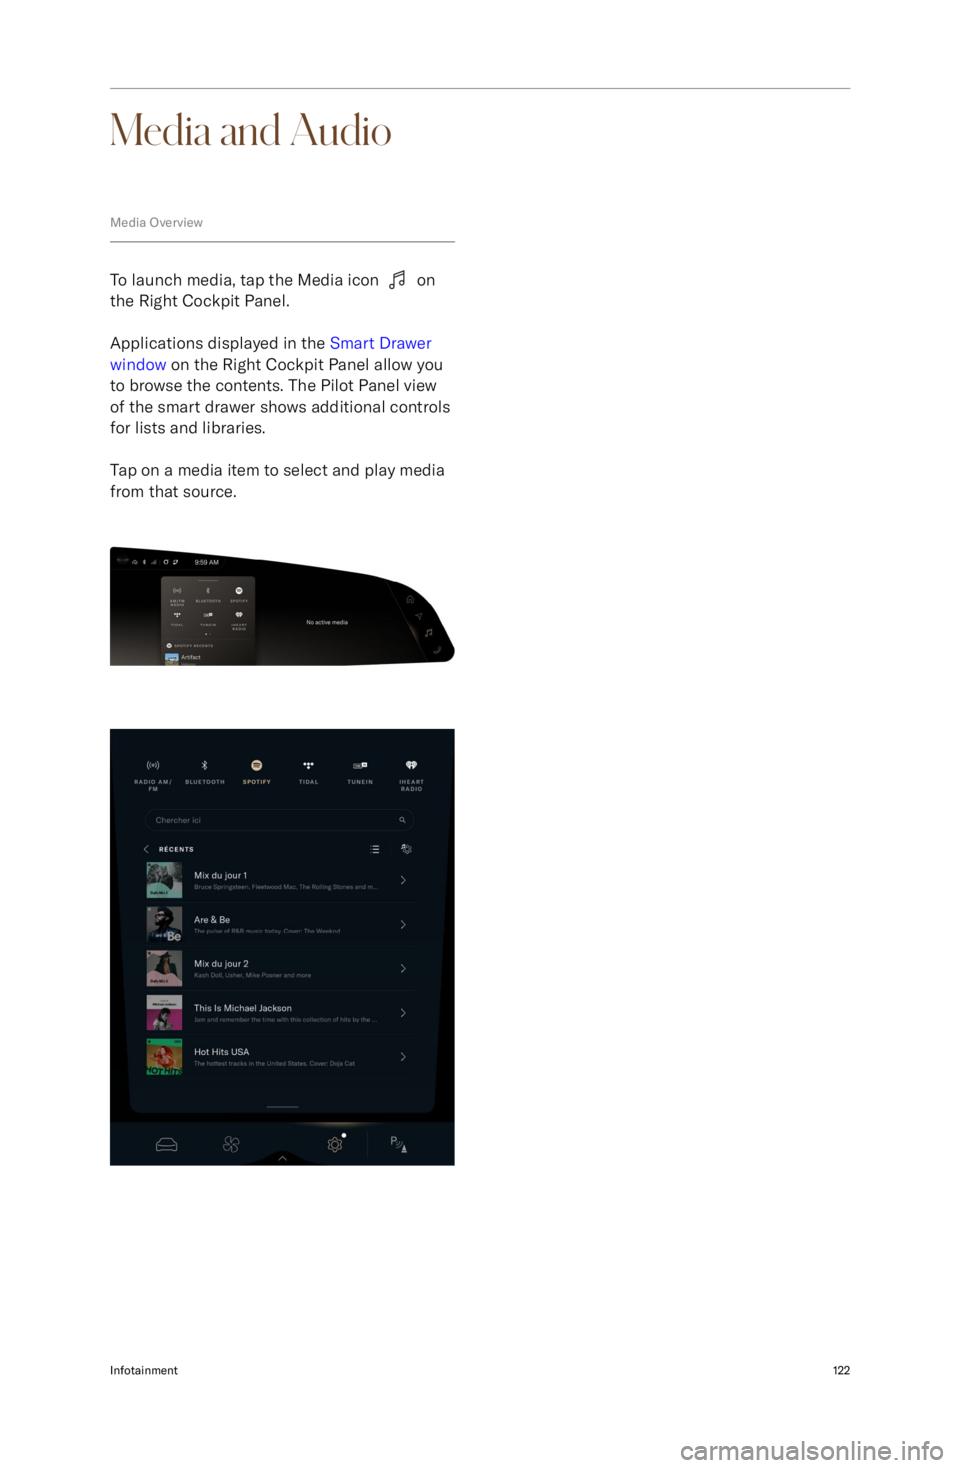
To launch media, tap the Media icon on
the Right Cockpit Panel.
Applications displayed in the Smart Drawer
window on the Right Cockpit Panel allow you
to browse the contents. The Pilot Panel view
of the smart drawer shows additional controls
for lists and libraries.
Tap on a media item to select and play media
from that source.
Infotainment122
Page 136 of 241
Physical Media Controls
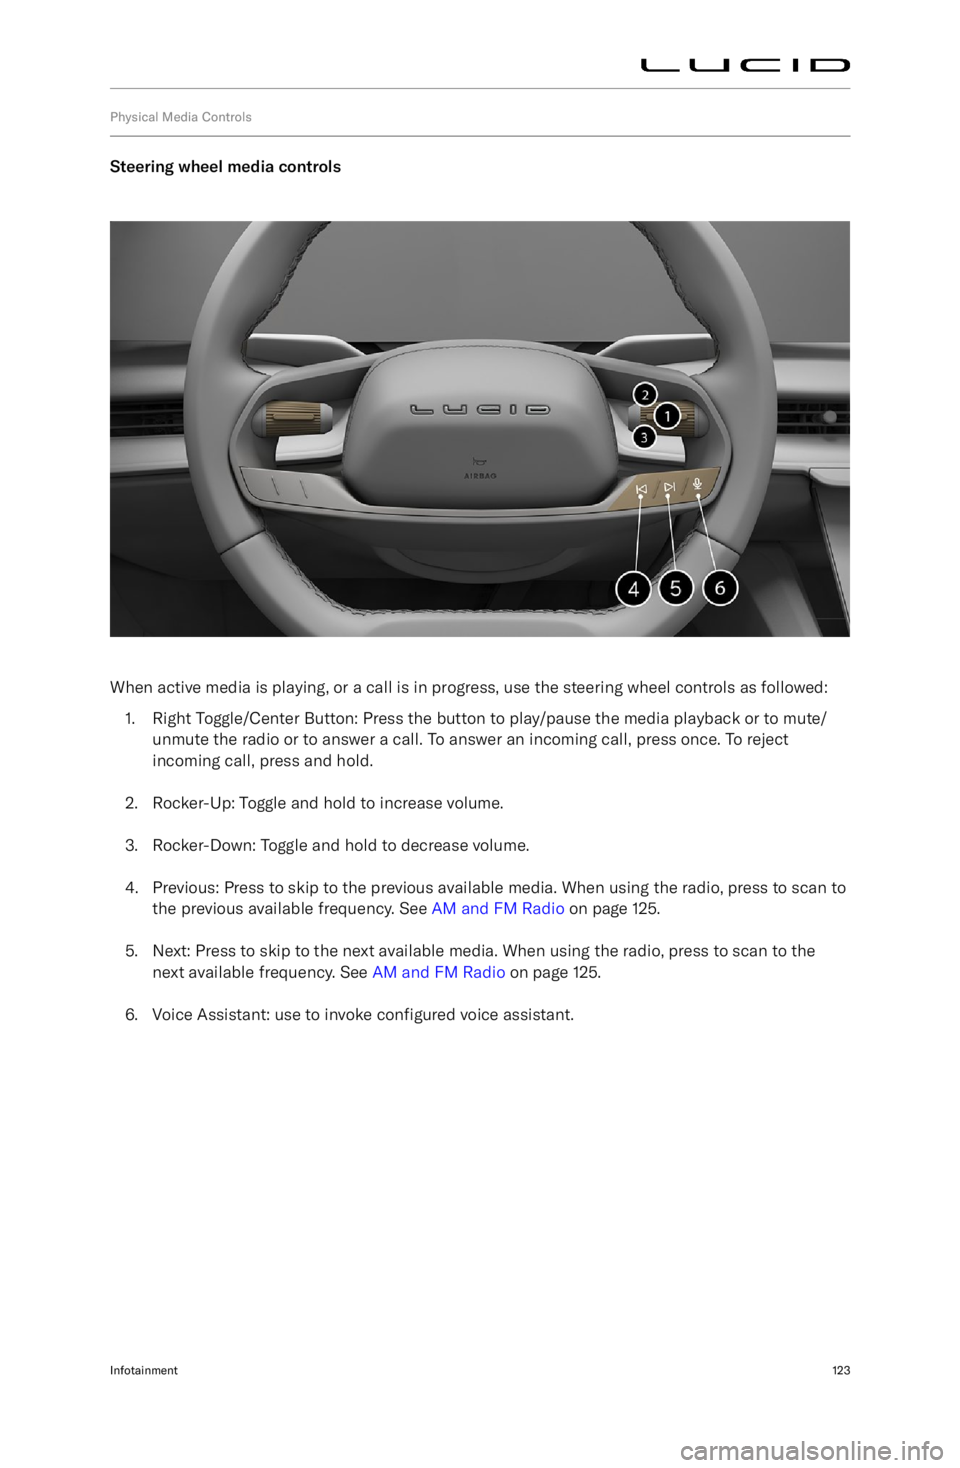
Steering wheel media controls
When active media is playing, or a call is in progress, use the steering wheel controls as followed:1. Right Toggle/Center Button: Press the button to play/pause the media playback or to mute/
unmute the radio or to answer a call. To answer an incoming call, press once. To reject
incoming call, press and hold.
2. Rocker-Up: Toggle and hold to increase volume.
3. Rocker-Down: Toggle and hold to decrease volume.
4. Previous: Press to skip to the previous available media. When using the radio, press to scan to the previous available frequency. See AM and FM Radio on page 125.
5. Next: Press to skip to the next available media. When using the radio, press to scan to the next available frequency. See AM and FM Radio on page 125.
6. Voice Assistant: use to invoke configured voice assistant.
Infotainment123
Page 137 of 241

Dashboard Volume Control
When media is playing, the toggle on the dashboard can be used adjust the volume. Scroll up to
increase or down to decrease.
Infotainment124
Page 140 of 241

Audio Settings
To access the audio settings on the Pilot
Panel, select
> Audio.
- Equalizer: Adjusts the bass, mid, and
treble
- Balance: Adjusts the sound level
between the speakers
- Volume: Adjusts the master volume,
as well as the volume levels for the
navigation system and phone
Infotainment127
Page 143 of 241
Navigating
To navigate to a location, open the smart
drawer on the right Cockpit Panel to select
a destination. Use Alexa voice commands
to navigate hands-free. Tap the search icon
of choose from one of the search category
shortcuts or recent destinations and search
terms.
Move the smart drawer into the Cockpit Panel
to access additional options:
-Use the Search bar to type in an address
via the on-screen keyboard.
- You can also select one of the six
categories. Swipe left or right to view
additional categories.
- You can also make your own shortcuts
for HOME and WORK: Select from your
saved home and work locations. See Setting Home and Work Destinations on
page 132.
- When you tap the search bar, by default
you will seeRECENTS: Select from a list
of recently-used destinations or search
terms. If you start typing something,
those will be replaced with search
matches.
- Search this Area (at another location on
the map if you pan the map)
When routing, you have 2 additional ways to
search:
-Along The Route
- Near Destination
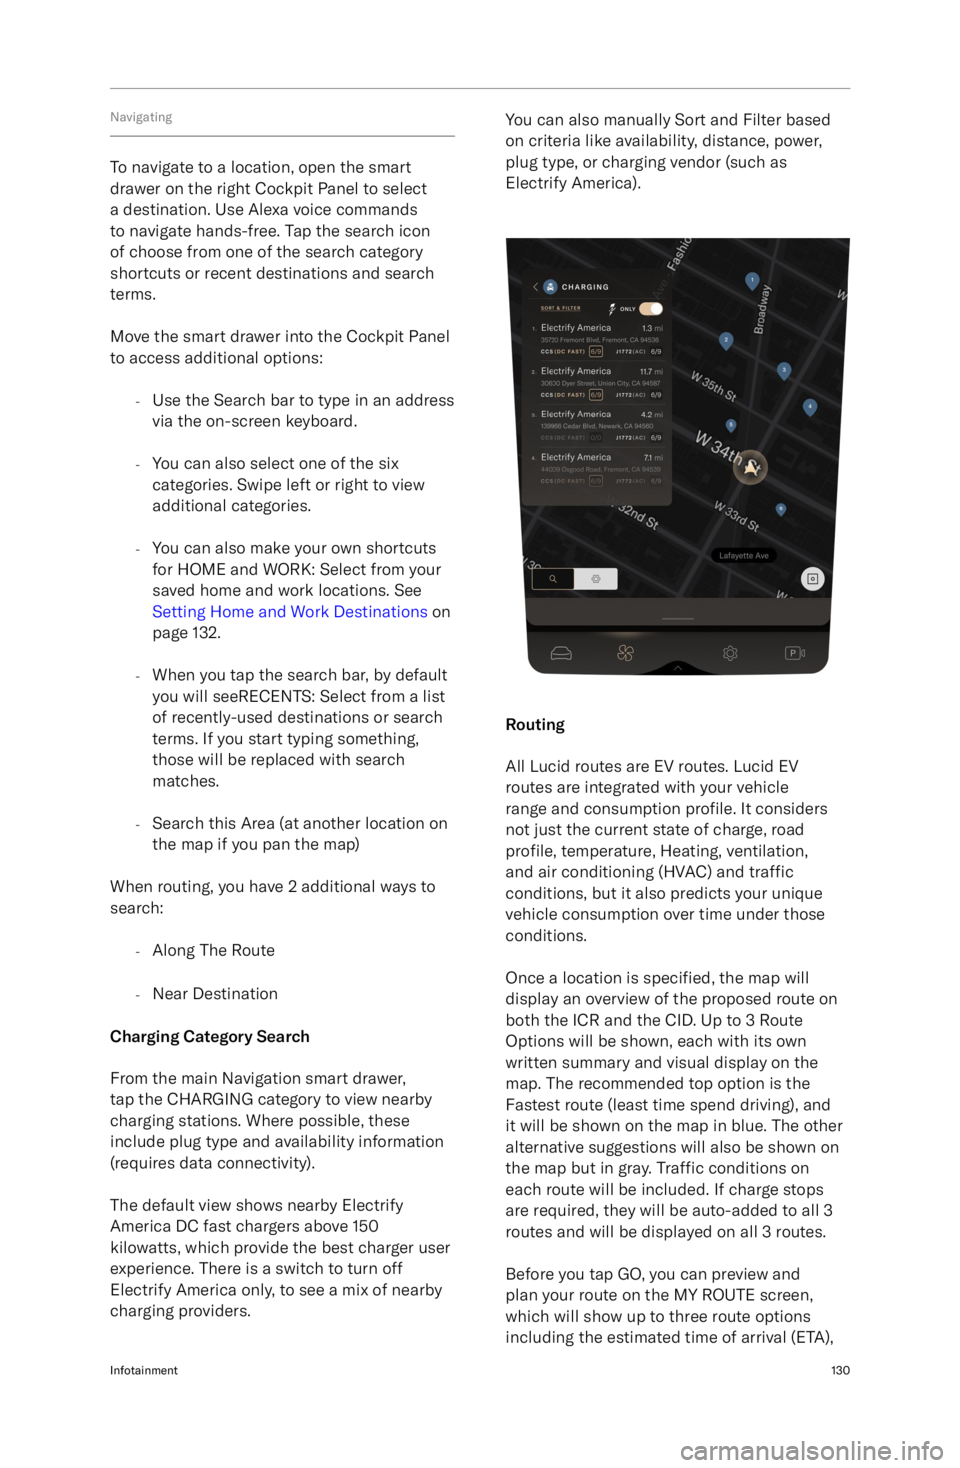
Charging Category Search
From the main Navigation smart drawer,
tap the CHARGING category to view nearby
charging stations. Where possible, these
include plug type and availability information
(requires data connectivity).
The default view shows nearby Electrify
America DC fast chargers above 150
kilowatts, which provide the best charger user
experience. There is a switch to turn off
Electrify America only, to see a mix of nearby
charging providers.
You can also manually Sort and Filter based
on criteria like availability, distance, power,
plug type, or charging vendor (such as
Electrify America).
Routing
All Lucid routes are EV routes. Lucid EV
routes are integrated with your vehicle
range and consumption profile. It considers
not just the current state of charge, road
profile, temperature, Heating, ventilation,
and air conditioning (HVAC) and traffic
conditions, but it also predicts your unique
vehicle consumption over time under those
conditions.
Once a location is specified, the map will
display an overview of the proposed route on
both the ICR and the CID. Up to 3 Route
Options will be shown, each with its own
written summary and visual display on the
map. The recommended top option is the
Fastest route (least time spend driving), and
it will be shown on the map in blue. The other
alternative suggestions will also be shown on
the map but in gray. Traffic conditions on
each route will be included. If charge stops
are required, they will be auto-added to all 3
routes and will be displayed on all 3 routes.
Before you tap GO, you can preview and
plan your route on the MY ROUTE screen,
which will show up to three route options
including the estimated time of arrival (ETA),
Infotainment130
Page 146 of 241

Map Updates and Offline Mode
When a data connection is present, the "self-
healing maps" are updated automatically over
the air with no user intervention as they
become available.
When your vehicle does not have an available
wireless internet connection, the navigation
system will pull from any existing map
data that was automatically downloaded
and stored by the vehicle based on
driving and search history. Any resulting
information displayed will be labeled as
OFFLINE RESULTS, and will not include live
traffic conditions, EV-style routing, charge
plug availability.
Infotainment133
Page 156 of 241

Schedule an update
On the software update screen, press
SCHEDULE TIME if you wish to start the
update later. Updates can be scheduled up to 48 hours later.
1. Read the cautionary statement and press CONFIRM to consent to the
update.
2. Select the time to start on the screen provided and press SET TIME to save.
3. Your scheduled date and time will be displayed on the main software update
screen, and can be edited by pressing
the
icon beside it. Ensure that all
update prerequisites will be met at the scheduled time.
30 minutes before a scheduled update, you
will receive a notification on the right Cockpit
Panel, with options to DELAY AN HOUR or CANCEL SCHEDULE.
Install an update now
On the software update screen, press
INSTALL NOW to proceed with the update.
1. Read the cautionary statement and press CONFIRM to consent to the
update.
2. The system will perform a series of checks to ensure all prerequisites havebeen met.
3. A 2-minute countdown will display. Exit and lock the doors at this time. See
Doors on page 20.
4. During the update, the Pilot Panel and left Cockpit Panel screens will be blank.
The Cockpit Panel indicates the update
is proceeding. The progress can be
viewed on the right Cockpit Panel and
within the Lucid mobile app.
5. When the update is complete, a notification will appear on the left Pilot
Panel and a push notification will be
sent to the Lucid mobile app.
Note: If an update fails to install, a notification
will display on the Infotainment screens and a
push notification is sent to the Lucid mobile
app.
- If a failure was due to a prerequisite
not being met (e.g., battery was at less
than 20% or vehicle was not put in Park),
resolve the issue and press TRY AGAIN.
- If a failure was due to another reason,
contact a Lucid Service Center for
assistance.
Viewing Release Notes
Lucid strongly recommends that all users read
the release notes for every software update.
They can contain important information about
your vehicle, including safety information or
new operating instructions.
Release notes can be viewed before and after
a software update:
-On the Pilot Panel, select
>
About Vehicle. The software
versions for the current installation and any available updates will be listed.
Press Learn More next to a version to
read the notes for it.
- When an update has installed
successfully, press Learn More on the
prompt that appears on the right
Cockpit Panel.
Infotainment143