tow LUCID AIR 2022 Owners Manual
[x] Cancel search | Manufacturer: LUCID, Model Year: 2022, Model line: AIR, Model: LUCID AIR 2022Pages: 241, PDF Size: 5.15 MB
Page 4 of 241
Type Approval 19
Doors 20
Opening Doors from the Outside 20 Opening Doors from the Inside 20Door Warnings 20Locking and Unlocking from Inside the Vehicle 21
Child Safety Locks 21
Automatic Locking and Unlocking 21
Opening Interior Doors with No Power 21
Windows 22
Window Safety 22
Opening and Closing Windows 22
Sunshades 22
Hood 24
Hood Opening and Closing 24
Accessing the Front Cargo Area 25
Hood Interior Emergency Release 25
Trunk 26
Trunk Opening and Closing 26 Accessing the Rear Cargo Area 27Trunk Interior Emergency Release 27
Safety & Security 28
Tow & Break-In Alert 28Seating & Safety RestraintsFront Seats 30 Adjusting the Front Seats 30
Correct Seating Position 30
Massage Feature 31
Seat Heating and Ventilation 31
Rear Seats 33
Rear Seat Folding 33
Rear Seat Pass-through 33 Rear Seat Heaters 33
Head Restraints 35
Correct Head Restraint Position 35
Adjusting the Head Restraints 35
Seat Belts 37
Seat Belt Warnings 37
Wearing Seat Belts 37
Fastening the Seat Belt 38 Seat belt reminders 38
Page 36 of 241

Side window sunshades
Window switches in the rear doors also
operate the side window sunshades.
Raise a sunshade by continuing to hold the
window UP button after the window is fully
raised.
Rear window sunshade
There are two way to operate the rear window
sunshade:
-On the Rear Center Console Display
home screen, select
SUNSHADE,
and touch EXTEND or STOW.
- From the Pilot Panel, select
>
OPENINGS, and touch the sunshade icon to raise or lower the
sunshade.
Opening and Closing23
Page 41 of 241
Safety & SecuritySafety & Security is a Settings menu item that
controls most safety & security features. To
access Safety & Security, tap the Settings icon
on the Pilot Panel and tap Safety & Security.
Tow & Break-In Alert
Vehicle sensors can detect significant
impacts, intrusions, or unauthorized towing while your vehicle is in P (Park) and can trigger
alarms and notifications.
To access Tow & Break-In Alert settings from the Pilot Panel, select
>
Safety and Security. Alternatively, use
Settings from the Lucid Mobile App. You can
then select a notification type (both an alarm
and push notification or a push notification
only) and disable the Tow & Break-In Alert.
By default, the Tow & Break-In Alert is
ON unless manually disabled (for example,
towing) and will notify you through the Alarm
and Push Notification.
Disable the Tow & Break-In Alert for towing
or servicing. If disabled, Tow & Break-In Alert
automatically re-enables when you eitherreenter the vehicle, or the next time the car
is in P (Park).
CAUTION: The sensor for the Tow
& Break-In Alert is located in the
center console of the vehicle and
could accidentally be triggered by a
large amount of force to that part of
the vehicle.
Disabling the alarm
If triggered, disable the Tow & Break-In Alert
sequence by holding a valid key close to
the vehicle or by double-clicking the key fob button.
Opening and Closing28
Page 87 of 241
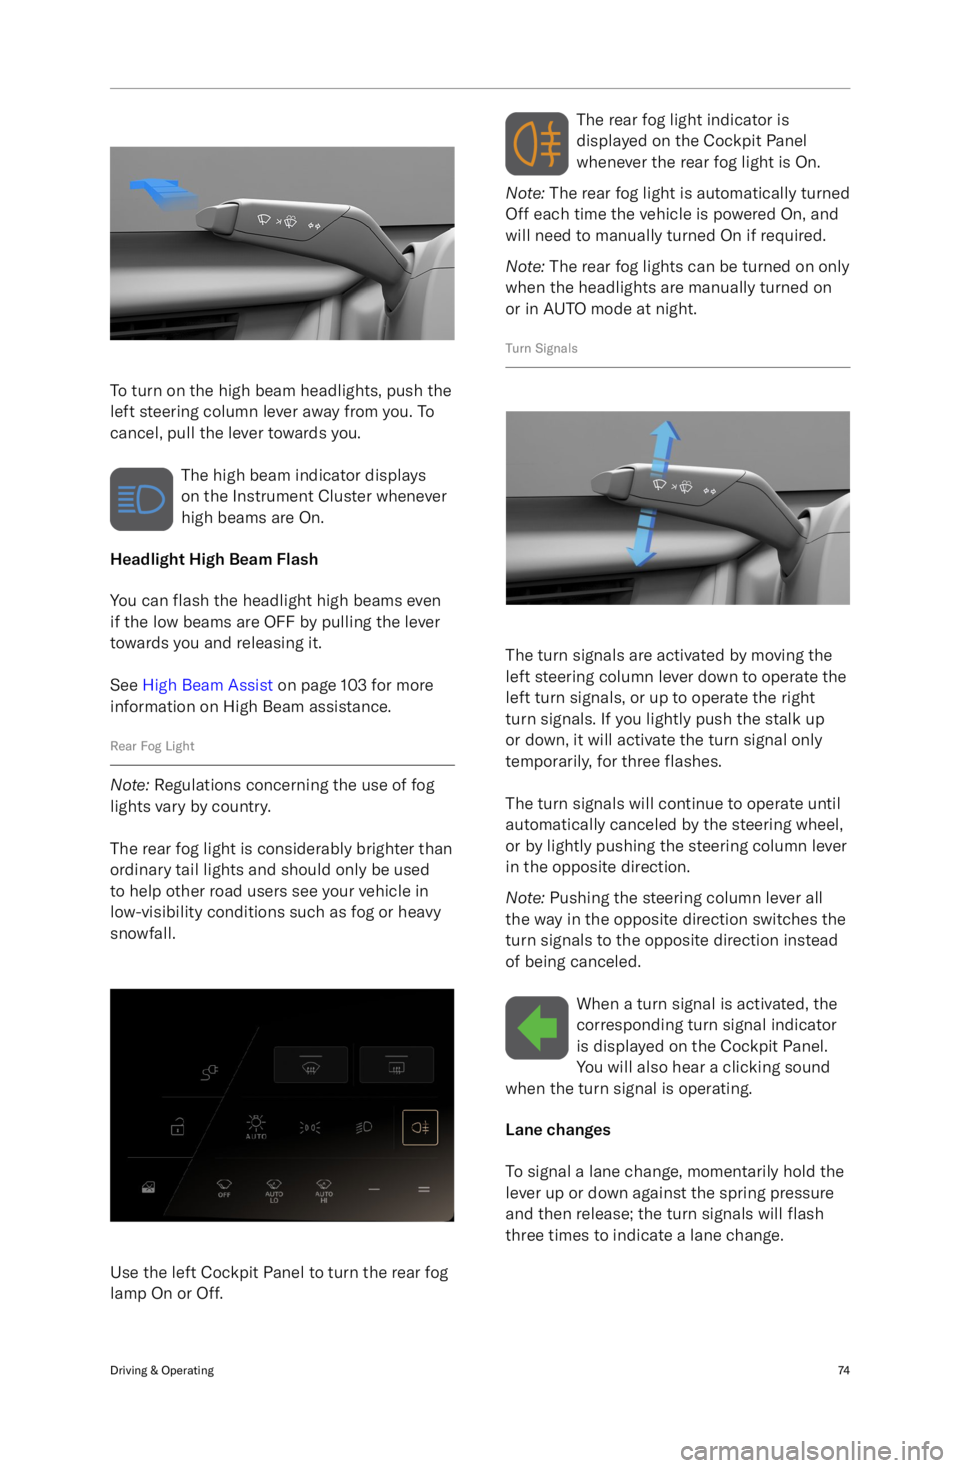
To turn on the high beam headlights, push the
left steering column lever away from you. To
cancel, pull the lever towards you.
The high beam indicator displays
on the Instrument Cluster whenever
high beams are On.
Headlight High Beam Flash
You can flash the headlight high beams even
if the low beams are OFF by pulling the lever
towards you and releasing it.
See High Beam Assist on page 103 for more
information on High Beam assistance.
Rear Fog Light
Note: Regulations concerning the use of fog
lights vary by country.
The rear fog light is considerably brighter than
ordinary tail lights and should only be used to help other road users see your vehicle in
low-visibility conditions such as fog or heavy
snowfall.
Use the left Cockpit Panel to turn the rear fog
lamp On or Off.
The rear fog light indicator is
displayed on the Cockpit Panel
whenever the rear fog light is On.
Note: The rear fog light is automatically turned
Off each time the vehicle is powered On, and
will need to manually turned On if required.
Note: The rear fog lights can be turned on only
when the headlights are manually turned on
or in AUTO mode at night.
Turn Signals
The turn signals are activated by moving the
left steering column lever down to operate the
left turn signals, or up to operate the right
turn signals. If you lightly push the stalk up
or down, it will activate the turn signal only
temporarily, for three flashes.
The turn signals will continue to operate until
automatically canceled by the steering wheel,
or by lightly pushing the steering column lever
in the opposite direction.
Note: Pushing the steering column lever all
the way in the opposite direction switches the
turn signals to the opposite direction instead
of being canceled.
When a turn signal is activated, thecorresponding turn signal indicator
is displayed on the Cockpit Panel.
You will also hear a clicking sound
when the turn signal is operating.
Lane changes
To signal a lane change, momentarily hold the
lever up or down against the spring pressure
and then release; the turn signals will flash
three times to indicate a lane change.
Driving & Operating74
Page 94 of 241

so the front wheels are pointing towards
the curb.
Brake Pad WearWARNING: Neglecting to replace worn
brake pads can damage the brake
rotors, reduce the vehicle
Page 99 of 241
Interior Equipment
Sun Visors
To use a sun visor, fold it down from its
stowed position. Sun visors can also pivot
towards the side window by releasing it from
the retaining clip.
Note: Make sure the sun visor is secured
by the retaining clip when returning it to its
stowed position.
Both sun visors have a covered mirror. Raise the cover to use the mirror; an integrated light
automatically turns On. The light turns Off
when the cover is closed.
Sun visor battery replacement
WARNING: Each sun visor contains
three coin/button type batteries.
These batteries contain toxic and
corrosive substances. Batteries are
a chemical burn hazard and should never be ingested. If a battery is
swallowed, it can cause serious
internal burns and may even lead to
death.
- Keep new and used batteries out of
the reach of children.
- If you think batteries may have
been swallowed or placed inside any part of the body, seek
immediate medical attention.
Due to the unique design of your vehicle, the
sun visors use batteries to power the mirror
lights.
Note: The batteries have an estimated life
of approximately two years based on typical
usage.
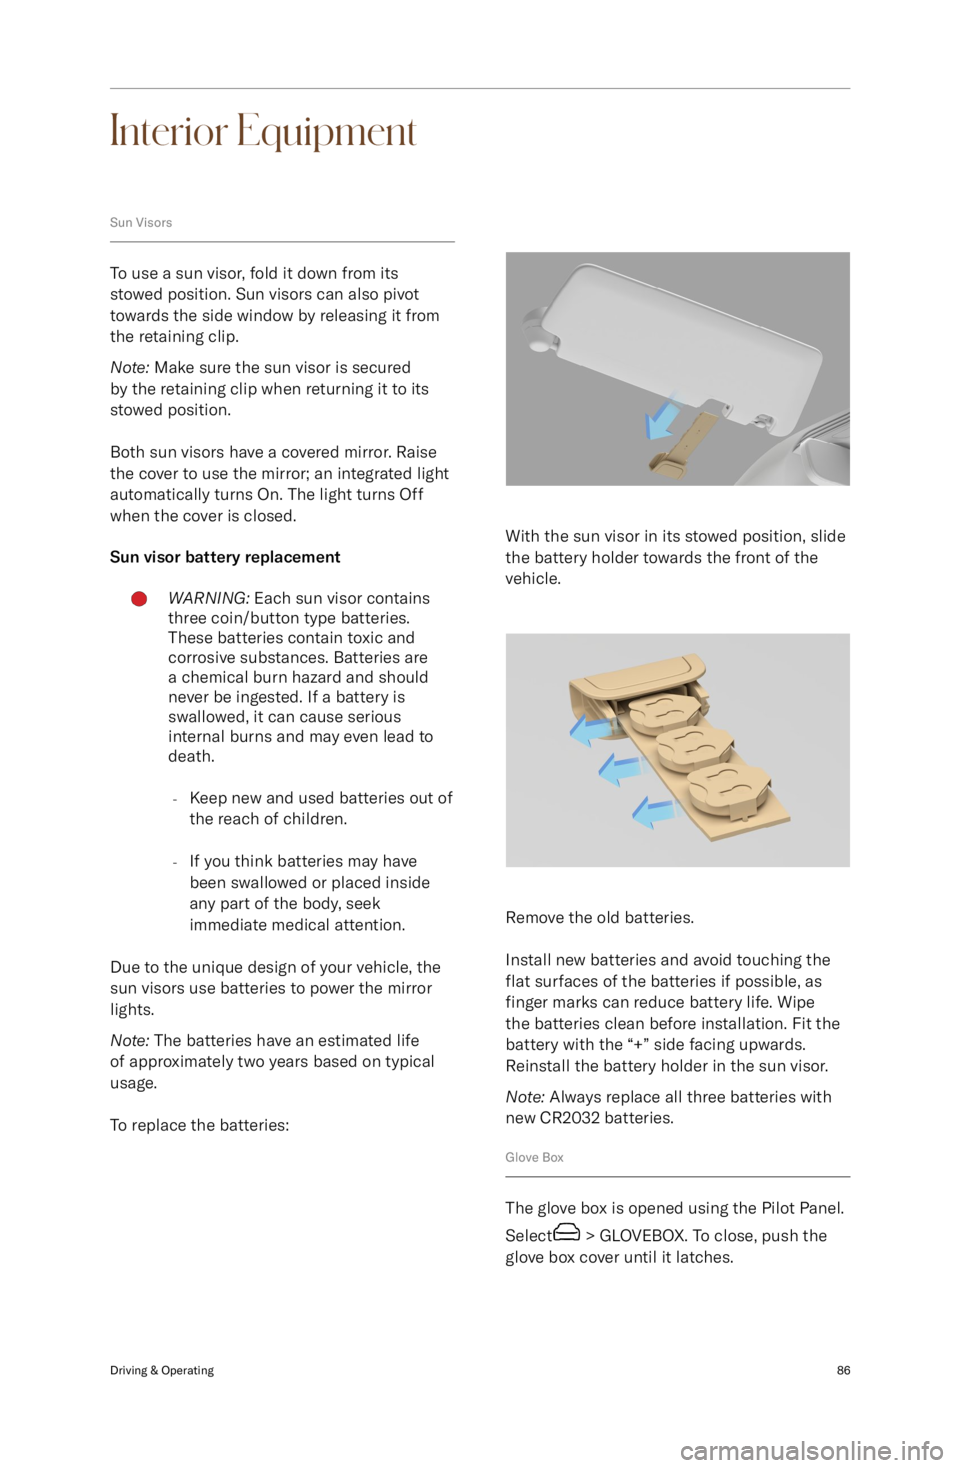
To replace the batteries:
With the sun visor in its stowed position, slide
the battery holder towards the front of the
vehicle.
Remove the old batteries.
Install new batteries and avoid touching the
flat surfaces of the batteries if possible, as
finger marks can reduce battery life. Wipe
the batteries clean before installation. Fit the
battery with the “+” side facing upwards.
Reinstall the battery holder in the sun visor.
Note: Always replace all three batteries with
new CR2032 batteries.
Glove Box
The glove box is opened using the Pilot Panel.
Select
> GLOVEBOX. To close, push the
glove box cover until it latches.
Driving & Operating86
Page 200 of 241
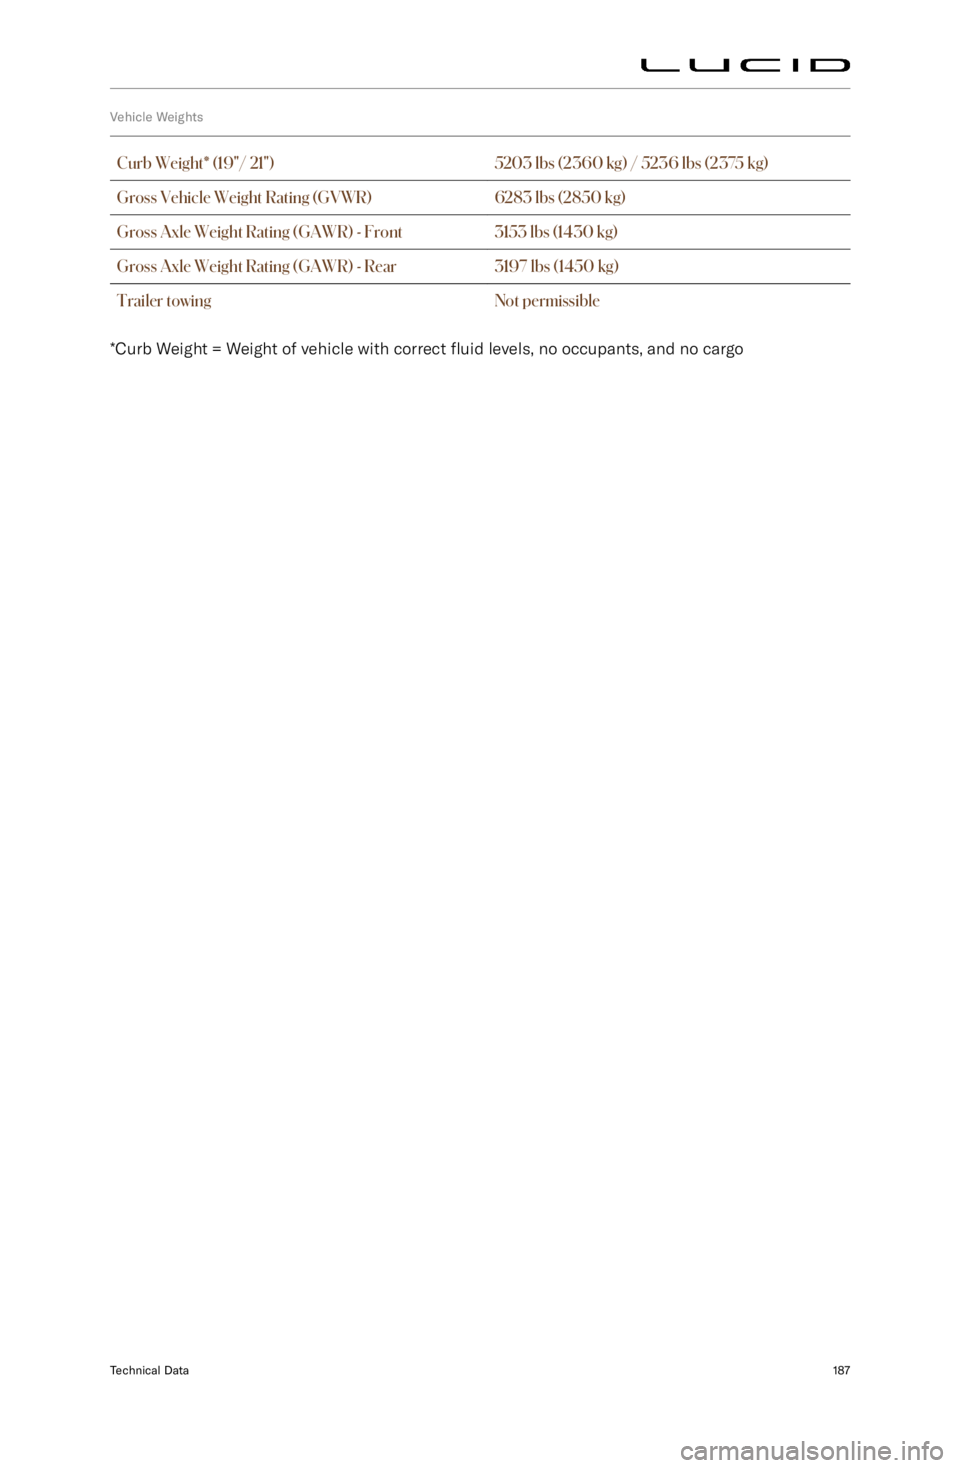
Vehicle WeightsCurb Weight* (19"/ 21")5203 lbs (2360 kg) / 5236 lbs (2375 kg)Gross Vehicle Weight Rating (GVWR)6283 lbs (2850 kg)Gross Axle Weight Rating (GAWR) - Front3153 lbs (1430 kg)Gross Axle Weight Rating (GAWR) - Rear3197 lbs (1450 kg)Trailer towingNot permissible
*Curb Weight = Weight of vehicle with correct fluid levels, no occupants, and no cargo
Technical Data187
Page 209 of 241
Roadside Assistance
Contacting Roadside Assistance
Lucid is committed to providing excellent
service. Our Roadside Assistance Program is
available 24 hours a day, 365 days a year. For
assistance call::
+1 888-995-8243 (888-99-LUCID)
Advise the representative of: -Vehicle identification number (VIN)
- Vehicle description
- License plate number
- Problem with the vehicle
- Your location
Lucid ensures appropriate transportation of its vehicles under the Lucid Roadside
Assistance Program. However, it is your
responsibility to provide the vehicle
transporter with instructions on how to
transport the vehicle. See Transporting the
Vehicle .
Services Covered
The following are covered at no charge for four
years or 50,000 miles, whichever comes first:
- Emergency Towing/Transport Service
for warranty repairs to the nearest
authorized Lucid Service Center
- Roadside service
- Flat Tire
- 12v Battery
Within the first year of ownership, Lucid
will also provide towing and transport to an
authorized Collison Repair facility in the event
of an accident.
Roadside Assistance & Emergency Information196
Page 210 of 241

Instructions for Transporters
Transporting the VehicleCAUTION: Towing the vehicle with
the wheels on the ground or on a
suspended lift may cause serious
damage to the vehicle as well as
generate high voltages in the vehicle
Page 211 of 241
Tow Truck Mode
When loading and unloading the vehicle onto
a flatbed tow truck, put the vehicle in Tow
Truck Mode. This can be done on the Pilot
Panel by navigating to Settings > Vehicle and
toggling Tow Truck Mode.
Tow Truck Mode disables the emergency
parking brake, disables the alarm, and shifts
the vehicle into neutral to allow for transport
on and off the flatbed truck.
Lucid recommends that Tow Truck Mode
remain active until after transportation has been completed.
Pulling the Vehicle onto a Trailer or TransporterCAUTION: Under no circumstances
should the vehicle be towed using
the vehicle recovery eye. Doing so
can cause significant damage to your
vehicle.CAUTION: Incorrect installation of the
recovery eye can cause it to become
detached while pulling the vehicle,
resulting in significant damage.WARNING: If the recovery eye mount
is not accessible and the vehicle
is recovered by attaching to a
frame, suspension, or other means,
the vehicle may sustain damage.
Inspect the vehicle and ensure it is
safe to operate.The Towing provider
MUST document the method of
vehicle recovery, whether using the
recovery eye, attachment to the body,
suspension, or other means.Failure to
do so could result in a hazardous
situation when operating the vehicle.
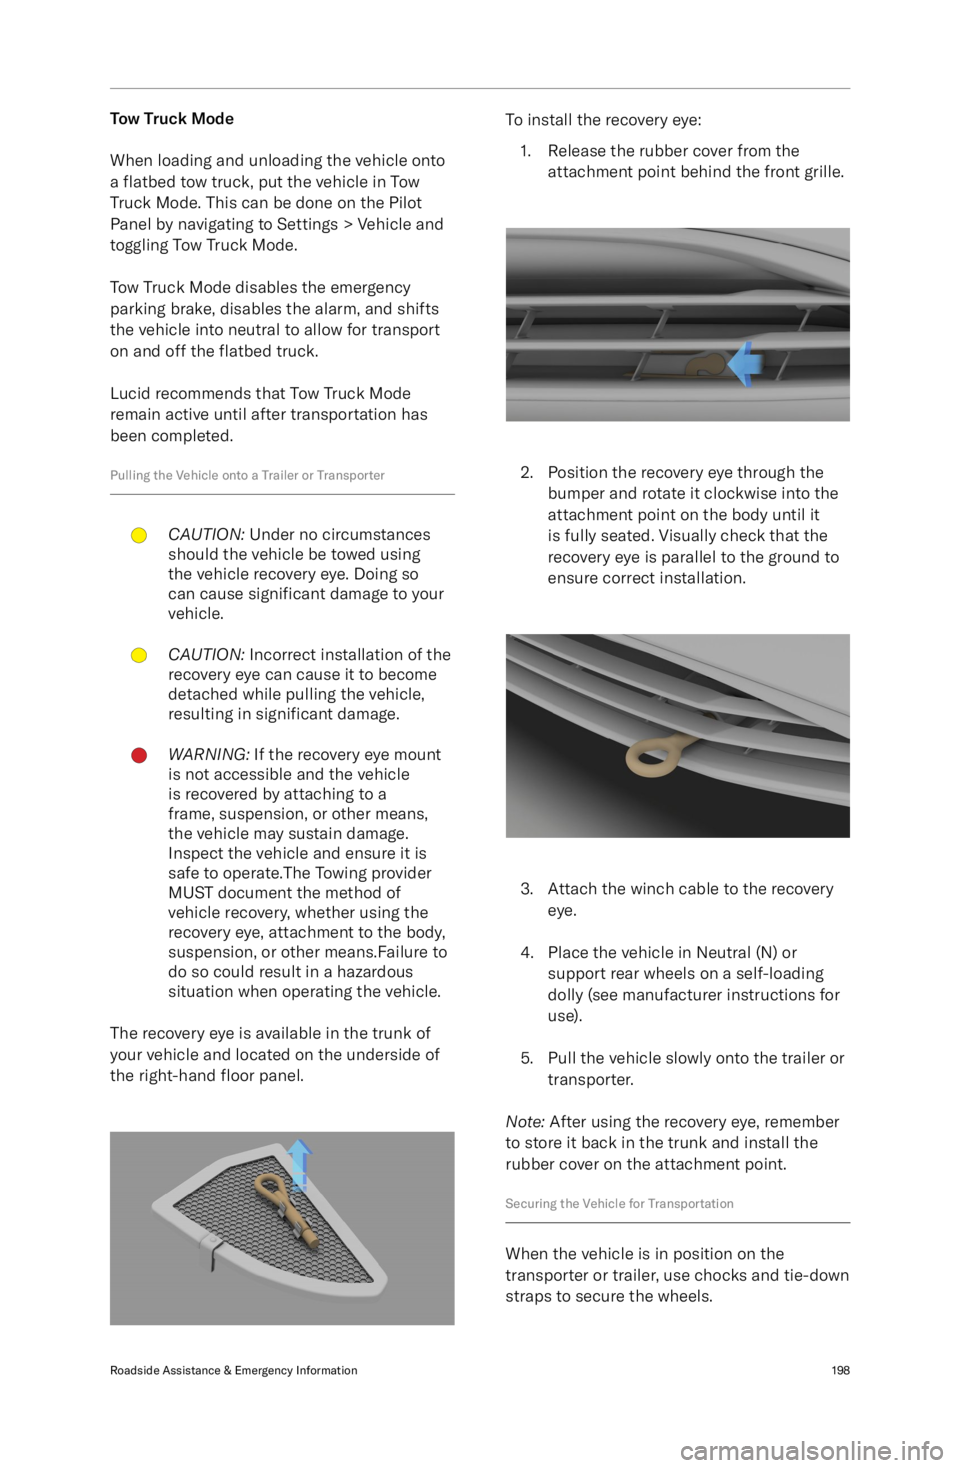
The recovery eye is available in the trunk of
your vehicle and located on the underside of
the right-hand floor panel.
To install the recovery eye:
1. Release the rubber cover from the attachment point behind the front grille.
2. Position the recovery eye through thebumper and rotate it clockwise into the
attachment point on the body until it
is fully seated. Visually check that the
recovery eye is parallel to the ground to
ensure correct installation.
3. Attach the winch cable to the recovery eye.
4. Place the vehicle in Neutral (N) or support rear wheels on a self-loading
dolly (see manufacturer instructions for use).
5. Pull the vehicle slowly onto the trailer or transporter.
Note: After using the recovery eye, remember
to store it back in the trunk and install the
rubber cover on the attachment point.
Securing the Vehicle for Transportation
When the vehicle is in position on the
transporter or trailer, use chocks and tie-down
straps to secure the wheels.
Roadside Assistance & Emergency Information198