mirror LUCID AIR 2023 Owners Manual
[x] Cancel search | Manufacturer: LUCID, Model Year: 2023, Model line: AIR, Model: LUCID AIR 2023Pages: 241, PDF Size: 5.15 MB
Page 6 of 241
Horn 68Drive Selector 69Using the Drive Selector 69
Vehicle Creep 69
Drive Modes 70
Using Neutral 70
Drive Modes 70
Limited Power Mode 70
Mirrors 72
Adjusting the Exterior Side Mirror Position 72
Interior Rear View Mirror 72
Exterior Lights 73
Exterior Lights Control 73
High Beam Headlights 73
Rear Fog Light 74 Turn Signals 74Hazard Warning Lights 75
Interior Lights 76
Interior Lights 76
Ambient Lighting 76
Wipers and Washers 77
Wipers 77
Washers 77
Brakes 78Braking Systems 78
Anti-Lock Braking System (ABS) 78
Regenerative Braking 79
Vehicle Hold 80
Parking Brake 80
Brake Pad Wear 81
Lucid Stability Control 82
Lucid Stability Control 82
Getting Maximum Range 83
Driving Tips to Maximize Range 83
Heating, Ventilation Air Conditioning 84
Temperature Control 84
Defrost 85
Interior Equipment 86
Sun Visors 86
Glove Box 86
Page 20 of 241
Exterior
Exterior Overview
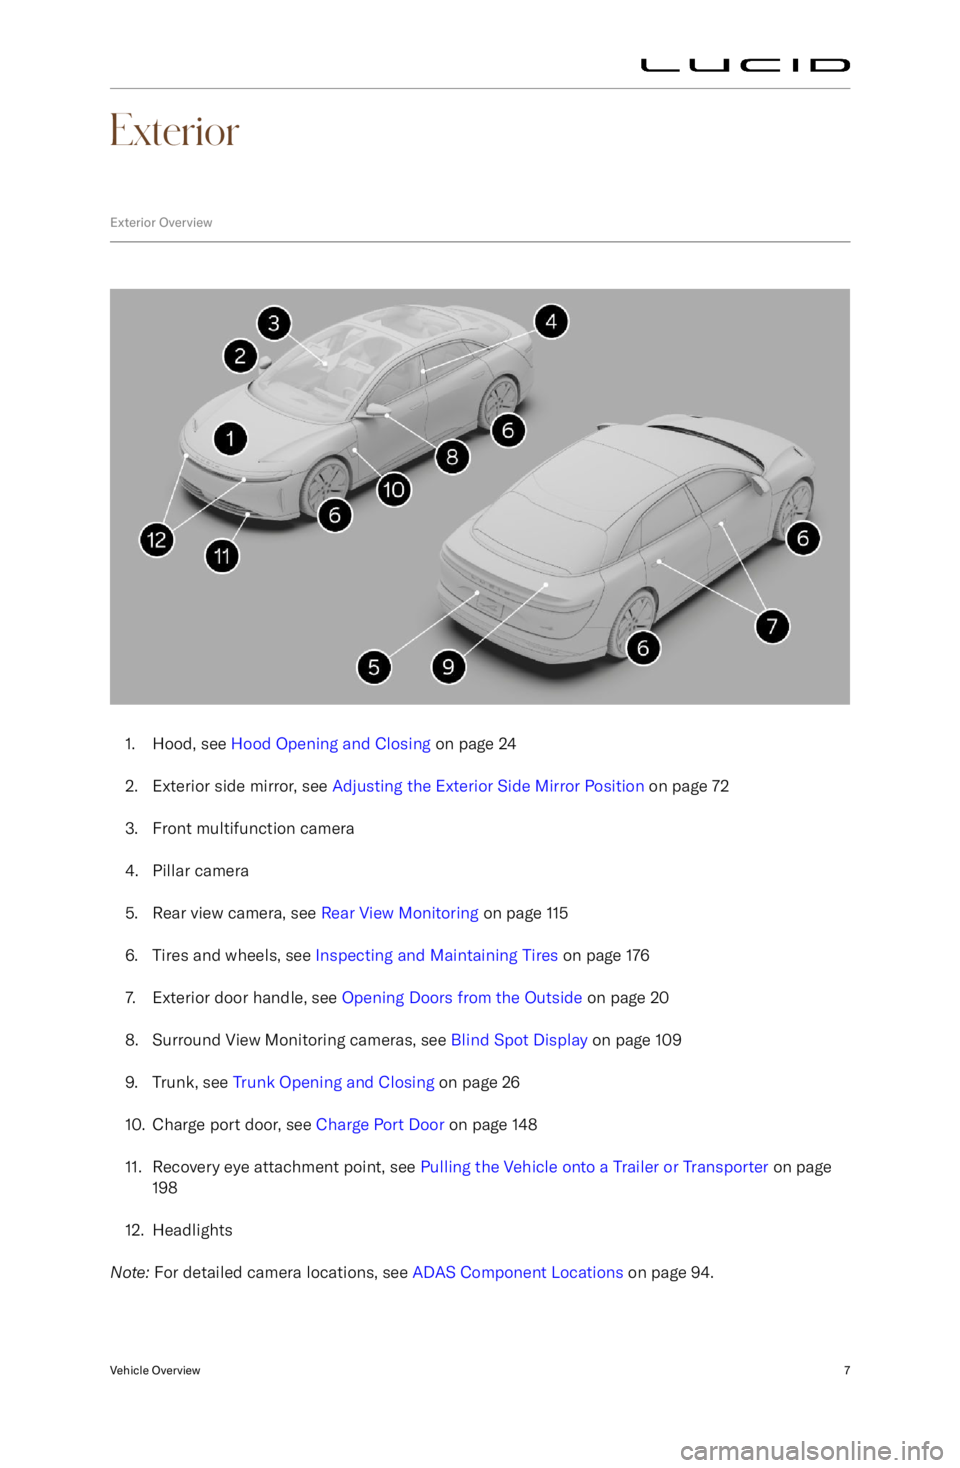
1. Hood, see Hood Opening and Closing on page 24
2. Exterior side mirror, see Adjusting the Exterior Side Mirror Position on page 72
3. Front multifunction camera
4. Pillar camera
5. Rear view camera, see Rear View Monitoring on page 115
6. Tires and wheels, see Inspecting and Maintaining Tires on page 176
7. Exterior door handle, see Opening Doors from the Outside on page 20
8. Surround View Monitoring cameras, see Blind Spot Display on page 109
9. Trunk, see Trunk Opening and Closing on page 26
10. Charge port door, see Charge Port Door on page 148
11. Recovery eye attachment point, see Pulling the Vehicle onto a Trailer or Transporter on page
198
12. Headlights
Note: For detailed camera locations, see ADAS Component Locations on page 94.
Vehicle Overview7
Page 85 of 241

Mirrors
Adjusting the Exterior Side Mirror PositionWARNING: Dependent upon the type
of mirror glass fitted to your vehicle,
distances may be difficult to judge
accurately. Objects viewed in the
mirror may be closer than they appear.
Use the Pilot Panel to adjust side mirror
position by touching
> .
1. Press the LEFT or RIGHT button to select the mirror.
2. Press the Up/Down/In/Out arrows to adjust.
Once adjusted, press RESTORE to return
to the previous position or press
SAVE TO PROFILE to save to the current User
Profile.
Press
to close.
Folding and unfolding
To manually fold/unfold the exterior side
mirrors via the Pilot Panel, press
> .
Heating and defrosting The exterior side mirror defrost feature
activates when the rear defrost button is
activated. See Defrost.
Interior Rear View Mirror
Manually adjust the position of the rear view
mirror for the desired view behind you.
The mirror will automatically dim in proportion
to the level of glare detected from a following
vehicle
Page 99 of 241
Interior Equipment
Sun Visors
To use a sun visor, fold it down from its
stowed position. Sun visors can also pivot
towards the side window by releasing it from
the retaining clip.
Note: Make sure the sun visor is secured
by the retaining clip when returning it to its
stowed position.
Both sun visors have a covered mirror. Raise the cover to use the mirror; an integrated light
automatically turns On. The light turns Off
when the cover is closed.
Sun visor battery replacement
WARNING: Each sun visor contains
three coin/button type batteries.
These batteries contain toxic and
corrosive substances. Batteries are
a chemical burn hazard and should never be ingested. If a battery is
swallowed, it can cause serious
internal burns and may even lead to
death.
- Keep new and used batteries out of
the reach of children.
- If you think batteries may have
been swallowed or placed inside any part of the body, seek
immediate medical attention.
Due to the unique design of your vehicle, the
sun visors use batteries to power the mirror
lights.
Note: The batteries have an estimated life
of approximately two years based on typical
usage.
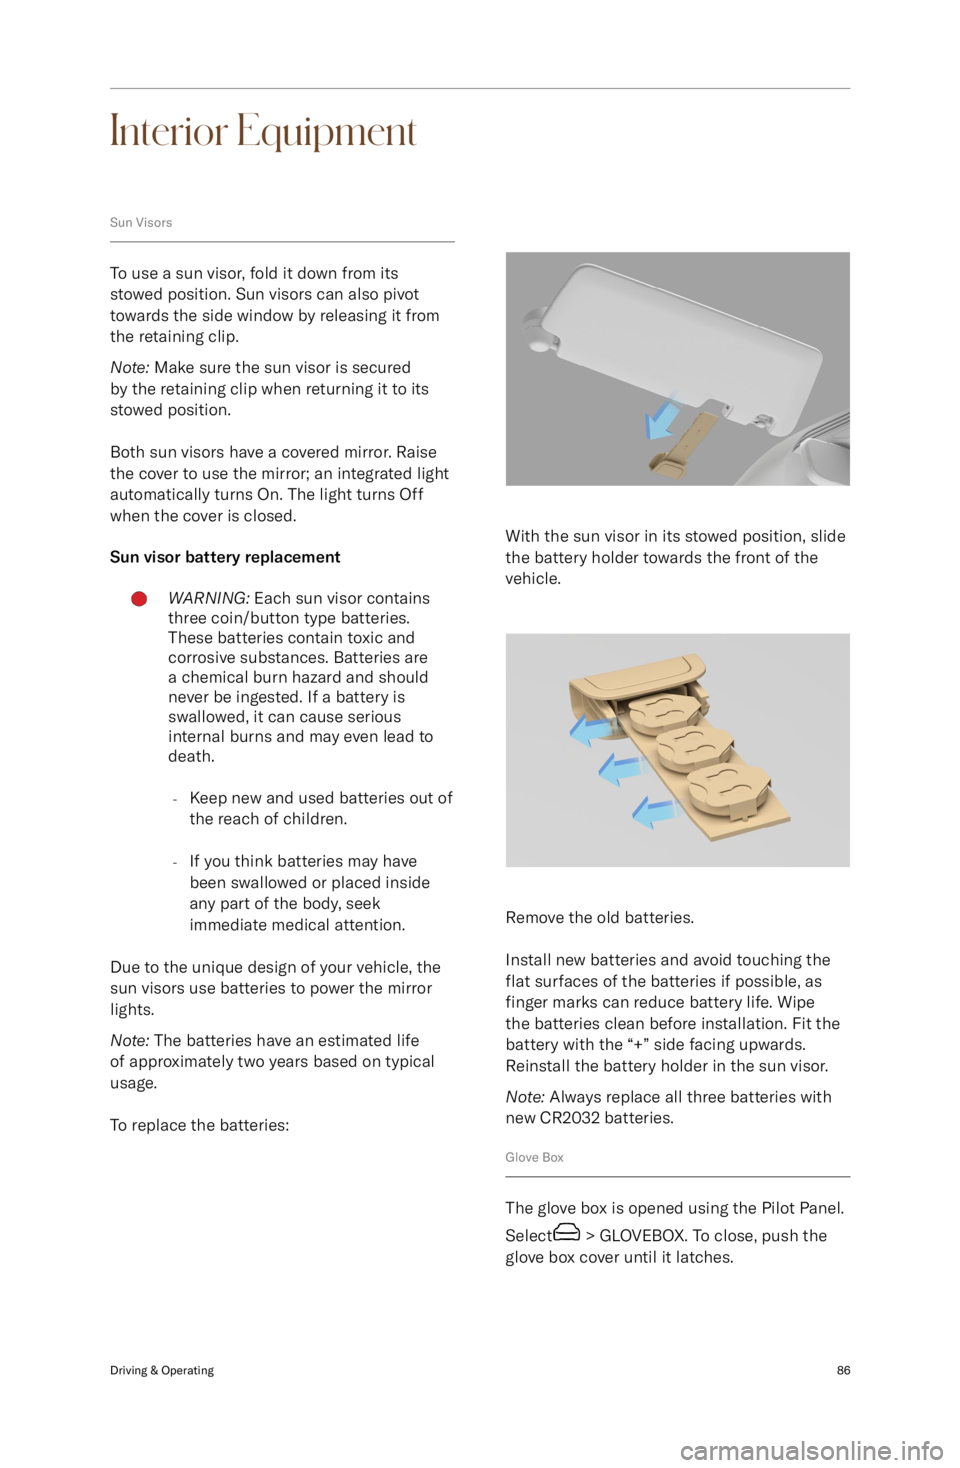
To replace the batteries:
With the sun visor in its stowed position, slide
the battery holder towards the front of the
vehicle.
Remove the old batteries.
Install new batteries and avoid touching the
flat surfaces of the batteries if possible, as
finger marks can reduce battery life. Wipe
the batteries clean before installation. Fit the
battery with the “+” side facing upwards.
Reinstall the battery holder in the sun visor.
Note: Always replace all three batteries with
new CR2032 batteries.
Glove Box
The glove box is opened using the Pilot Panel.
Select
> GLOVEBOX. To close, push the
glove box cover until it latches.
Driving & Operating86
Page 122 of 241
corrections, audible alerts will be longer induration.
Lane Departure Protection alerts will be
canceled immediately if any of the following
actions happen:
-A turn signal is activated
- Intentional steering
- Intentional acceleration
- Intentional braking
Lane Departure Protection settings
To configure Lane Departure Protection, from
the Pilot Panel touch
> DreamDrive,
then enable or disable Lane Departure Protection. Settings save to the current User
Profile.
When Lane Departure Protection is
disabled or unavailable, an indicator
will display on the Cockpit Panel.
When enabled, press INTERVENTION ONLY (default) or WARNING AND INTERVENTION if
you wish to receive haptic vibrations of the
steering wheel when a steering correction is recommended.
Warnings cancel automatically when the risk of an unintentional lane departure has beenreduced (such as when you steer the vehicle
back to the current lane).
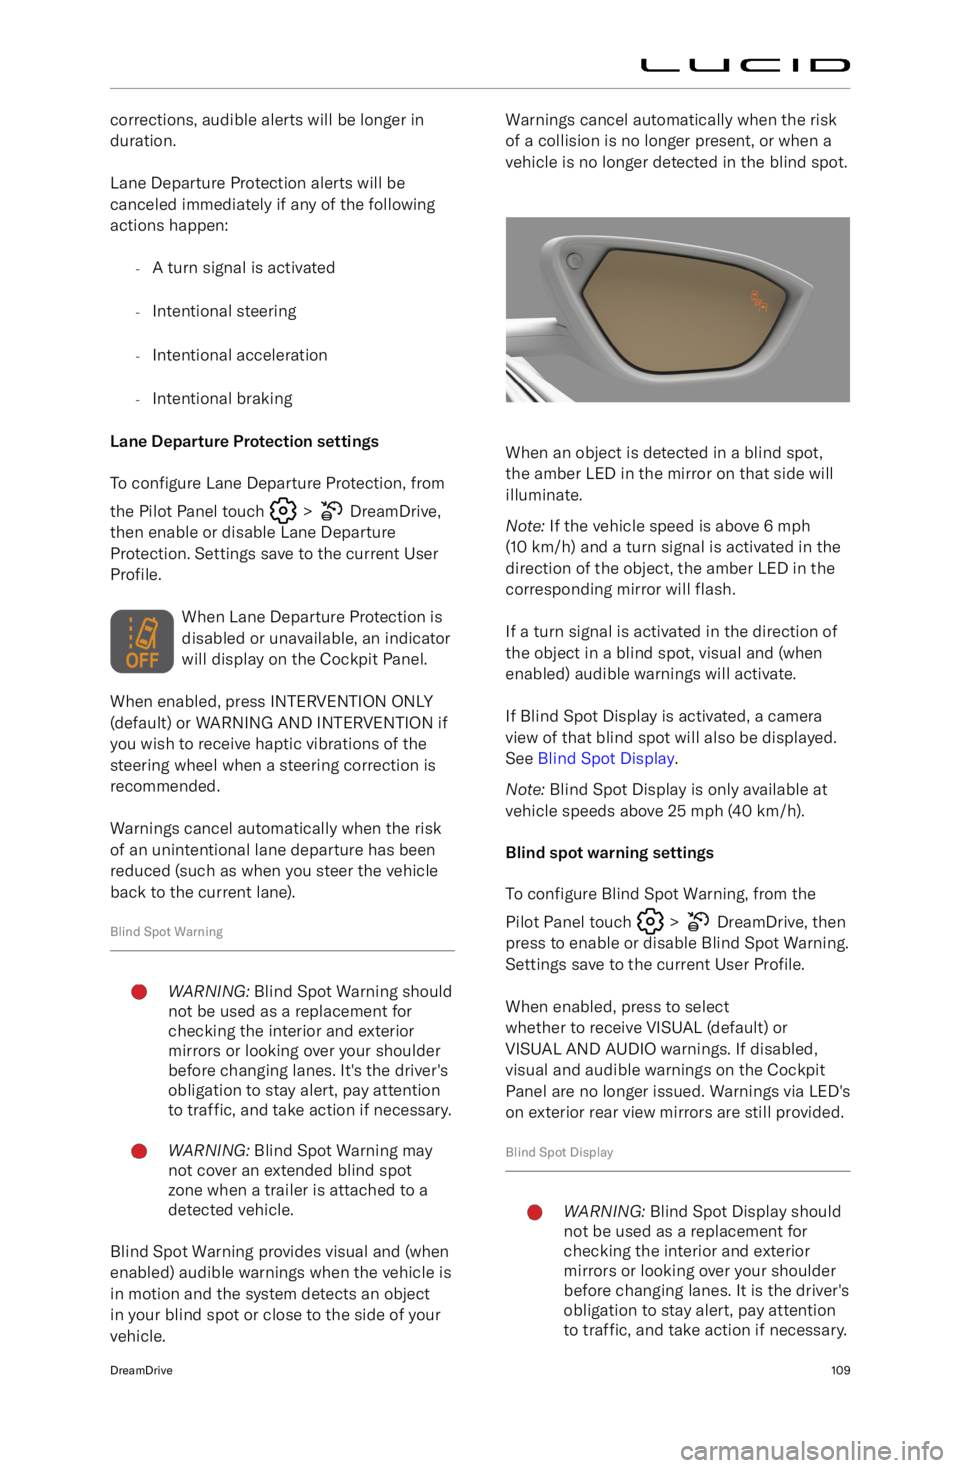
Blind Spot Warning
WARNING: Blind Spot Warning should
not be used as a replacement for
checking the interior and exterior
mirrors or looking over your shoulder
before changing lanes. It
Page 127 of 241
-A safety system activates (such
as Collision Protection or Automatic
Emergency Braking. See Collision
Detection and Protection on page 105)
When the system is canceled, the vehicle will
stop, emit an audible alert, and prompt the
driver to take control of the steering wheel
and brake pedal. If there is no response from
the driver after 20 seconds, the gear will
automatically shift into P (Park).
If Automatic Park Out cancels for any of the
aforementioned reasons and you wish to use
the system again, you must start over at the
beginning of the process.
Surround View MonitoringWARNING: The Surround View
Monitoring system should not be
used as a replacement for looking
into the interior and exterior mirrors
or looking over your shoulder when
operating and parking the vehicle.
Always inspect your surroundings with
your own eyes.
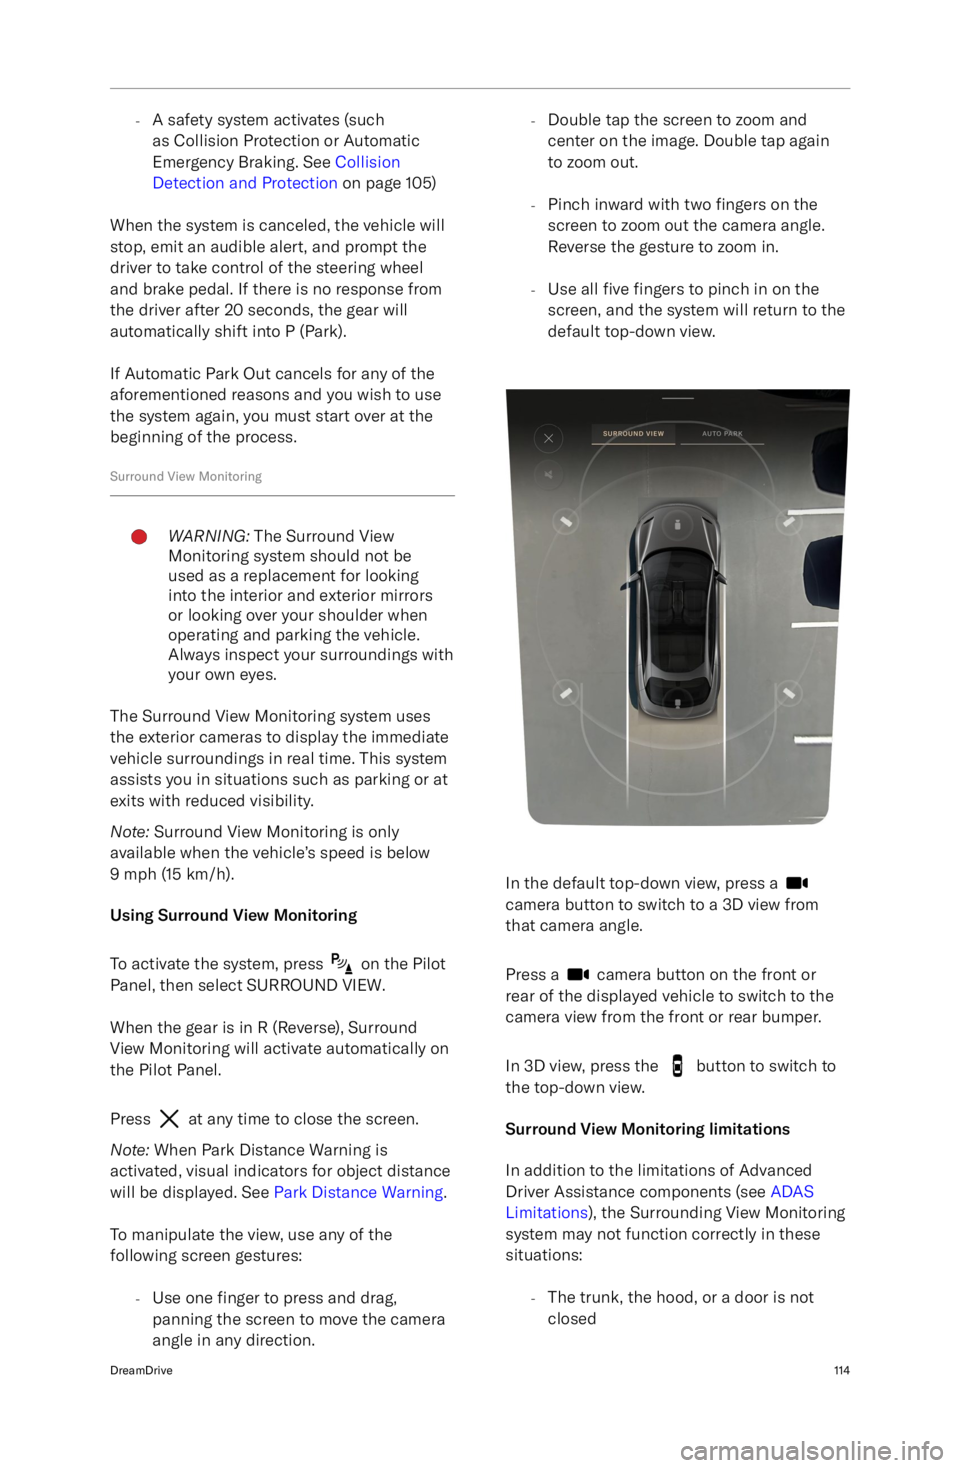
The Surround View Monitoring system uses
the exterior cameras to display the immediate vehicle surroundings in real time. This system
assists you in situations such as parking or at
exits with reduced visibility.
Note: Surround View Monitoring is only
available when the vehicle
Page 128 of 241
-The side mirrors are folded in
- The trunk or hood is open
Rear View MonitoringWARNING: The Rear View Monitoring
system should not be used as a
replacement for looking into the
interior and exterior mirrors or looking
over your shoulder when operating and parking the vehicle. Always
inspect your surroundings with your
own eyes.
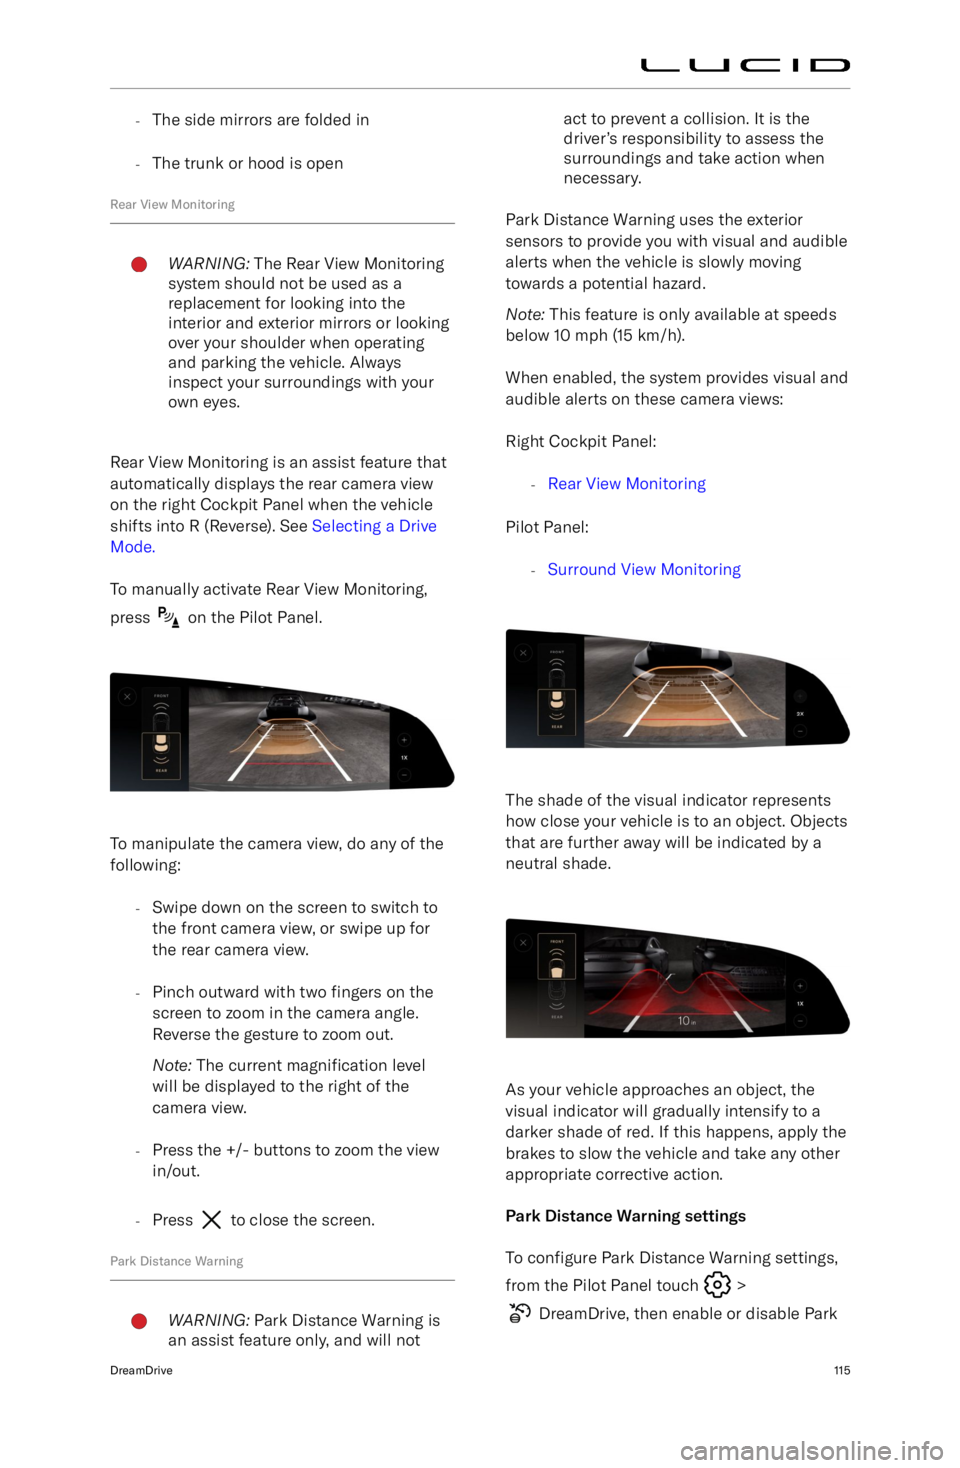
Rear View Monitoring is an assist feature that
automatically displays the rear camera view
on the right Cockpit Panel when the vehicle
shifts into R (Reverse). See Selecting a Drive
Mode.
To manually activate Rear View Monitoring,
press
on the Pilot Panel.
To manipulate the camera view, do any of the
following:
-Swipe down on the screen to switch to
the front camera view, or swipe up forthe rear camera view.
- Pinch outward with two fingers on the
screen to zoom in the camera angle.
Reverse the gesture to zoom out.
Note: The current magnification level
will be displayed to the right of the
camera view.
- Press the +/- buttons to zoom the view
in/out.
- Press
to close the screen.
Park Distance Warning
WARNING: Park Distance Warning is
an assist feature only, and will notact to prevent a collision. It is the
driver
Page 133 of 241
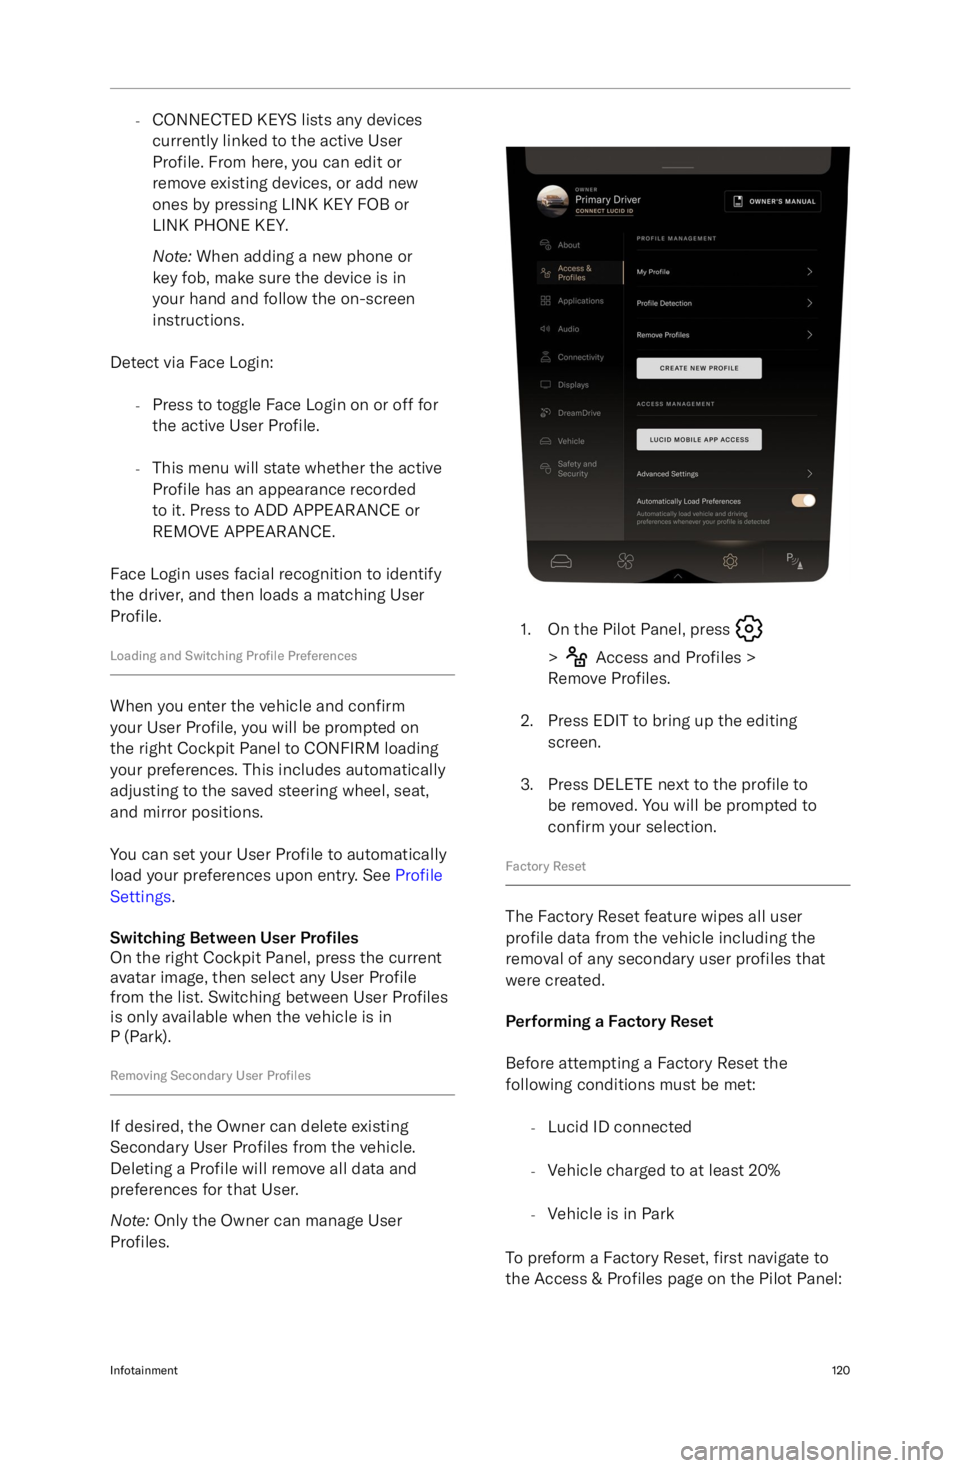
-CONNECTED KEYS lists any devices
currently linked to the active User
Profile. From here, you can edit or
remove existing devices, or add new ones by pressing LINK KEY FOB or
LINK PHONE KEY.
Note: When adding a new phone or
key fob, make sure the device is in
your hand and follow the on-screen
instructions.
Detect via Face Login: -Press to toggle Face Login on or off for
the active User Profile.
- This menu will state whether the active
Profile has an appearance recorded
to it. Press to ADD APPEARANCE or
REMOVE APPEARANCE.
Face Login uses facial recognition to identify the driver, and then loads a matching User
Profile.
Loading and Switching Profile Preferences
When you enter the vehicle and confirm
your User Profile, you will be prompted on
the right Cockpit Panel to CONFIRM loading
your preferences. This includes automatically
adjusting to the saved steering wheel, seat,
and mirror positions.
You can set your User Profile to automatically
load your preferences upon entry. See Profile
Settings .
Switching Between User Pro
Page 199 of 241
Vehicle Dimensions and Weights
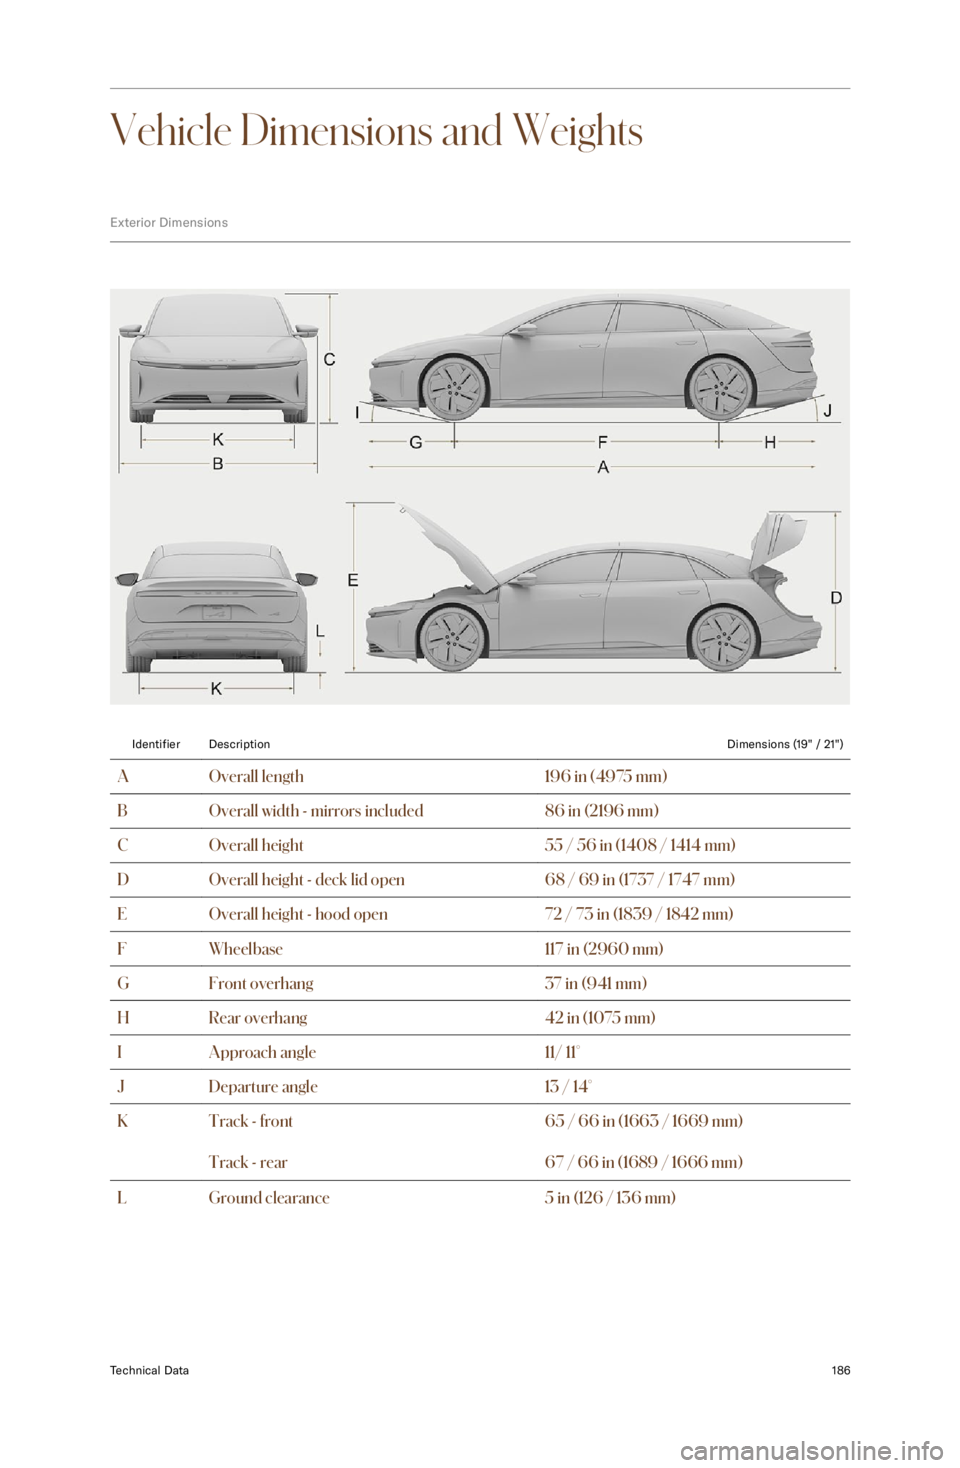
Exterior DimensionsIdentifierDescriptionDimensions (19" / 21")AOverall length196 in (4975 mm)BOverall width - mirrors included86 in (2196 mm)COverall height55 / 56 in (1408 / 1414 mm)DOverall height - deck lid open68 / 69 in (1737 / 1747 mm)EOverall height - hood open72 / 73 in (1839 / 1842 mm)FWheelbase117 in (2960 mm)GFront overhang37 in (941 mm)HRear overhang42 in (1075 mm)IApproach angle11/ 11