low beam MASERATI GHIBLI 2019 User Guide
[x] Cancel search | Manufacturer: MASERATI, Model Year: 2019, Model line: GHIBLI, Model: MASERATI GHIBLI 2019Pages: 384, PDF Size: 13.33 MB
Page 137 of 384
please contact Client Service at
1-800-977.2107 or write to:
[email protected].
CAUTION!
When selling the vehicle, you should
contact the above mentioned Client
Service to have your device removed
from the list of activated devices
registered in your name. Do not
simply give your control unit password
to a new owner. To avoid improper
internet access in your name and
allow new owner registration you
must de-register with the service
provider. A new owner will not be
able to register the device if it still
appears registered in the prior
owner's name. If you are a subsequent
owner, the unit could be improperly
monitored (usage and location), if it is
still registered to a prior owner. Cargo Area WARNING!
To help protect against personal
injury, passengers must not be seated
in the rear cargo area. The rear cargo
space is intended for load carrying
purposes only, not for passengers,
who should sit in seats and use seat
belts.
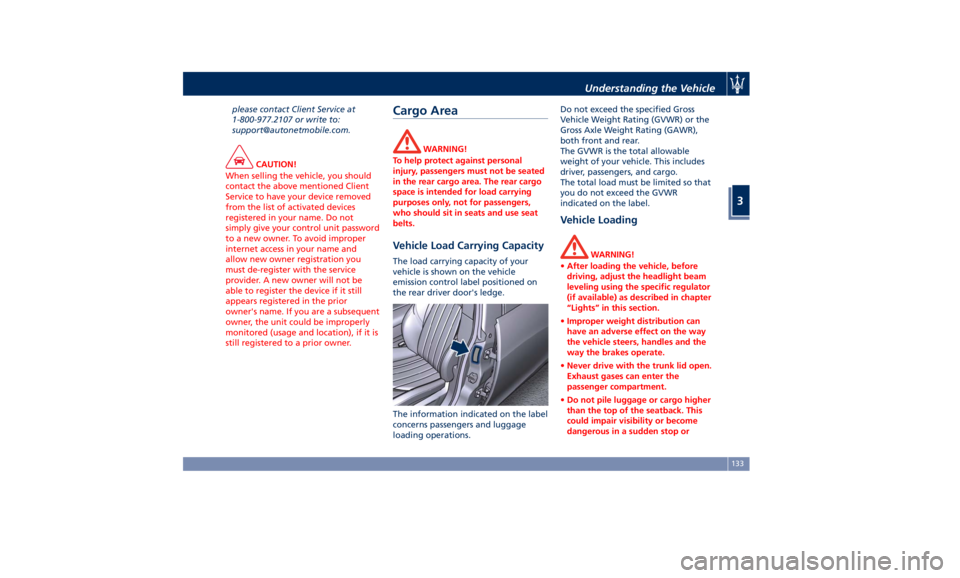
Vehicle Load Carrying Capacity The load carrying capacity of your
vehicle is shown on the vehicle
emission control label positioned on
the rear driver door's ledge.
The information indicated on the label
concerns passengers and luggage
loading operations. Do not exceed the specified Gross
Vehicle Weight Rating (GVWR) or the
Gross Axle Weight Rating (GAWR),
both front and rear.
The GVWR is the total allowable
weight of your vehicle. This includes
driver, passengers, and cargo.
The total load must be limited so that
you do not exceed the GVWR
indicated on the label.
Vehicle Loading WARNING!
• After loading the vehicle, before
driving, adjust the headlight beam
leveling using the specific regulator
(if available) as described in chapter
“Lights” in this section.
• Improper weight distribution can
have an adverse effect on the way
the vehicle steers, handles and the
way the brakes operate.
• Never drive with the trunk lid open.
Exhaust gases can enter the
passenger compartment.
• Do not pile luggage or cargo higher
than the top of the seatback. This
could impair visibility or become
dangerous in a sudden stop orUnderstanding the Vehicle
3
133
Page 153 of 384
When the engine starts again, the
telltale will switch off.
If the telltale during an automatic
engine shutdown (AutoStop) phase
starts flashing, it will be necessary to
restart the engine normally with the
ignition device while holding down
the brake pedal.
See chapter “Normal Starting of the
Engine” in section “Driving” for
further information.
Rear Fog Light Indicator
This indicator lights up when
the rear fog lights are
switched on.
High Beam Indicator
This indicator lights up when
the high beams are switched
on or when blinking.
Brake Indicator Light
This light monitors various
brake functions, including
brake fluid level, brake pads
wear and parking brake
engagement.
If the brake light illuminates the
parking brake may be engaged, the
brake pads have reached wear limit,
the brake fluid level may be low or a
problem with the anti-lock brake system (ABS) reservoir may have
occurred.
In all the above situations, a related
message will be displayed.
If the light still illuminates when the
parking brake has been disengaged,
and the fluid level is at the full mark
on the master cylinder reservoir, there
could be a brake hydraulic system
malfunction or a problem with the
brake booster detected by the
ABS/ESC system. If this occurs, the light
will remain lit until the problem has
been solved.
If the problem concerns the brake
booster, the ABS master cylinder will
run when engaging the brake and a
brake pedal pulsation may be felt
during each stop of the vehicle.
Inefficiency of one of the dual brake
system cycles is indicated by the brake
indicator light, which will turn on
when the brake fluid level in the
master cylinder has dropped below a
certain level.
The light will remain lit until the
problem has been solved.
If a brake failure occurs, visit an
Authorized Maserati Dealer as soon as
possible in order to check up the
brake system.
In the event of an Electronic Brake
Force Distribution (EBD) failure, both the brake indicator light and the ABS
light illuminate.
Immediate repair of the ABS system is
required.
Functioning of the brake indicator
light can be checked by turning the
ignition switch from OFF to RUN
position.
The light should illuminate for
approximately 2 seconds.
The light should switch off unless the
parking brake is engaged or a brake
fault is detected. If the light does not
illuminate, have the light system
repaired by an Authorized Maserati
Dealer .
The light will also switch on when the
parking brake is engaged with the
ignition switch in RUN position.
This light only indicates the brake is
engaged but not the clamping force
of the parking brake to the wheels.
WARNING!
Driving a vehicle with the red brake
light on can be very dangerous and is
not recommended. Part of the brake
system may have failed, resulting in
increased braking distances and the
risk of an accident. Have the vehicleDashboard Instruments and Controls
4
149
Page 155 of 384
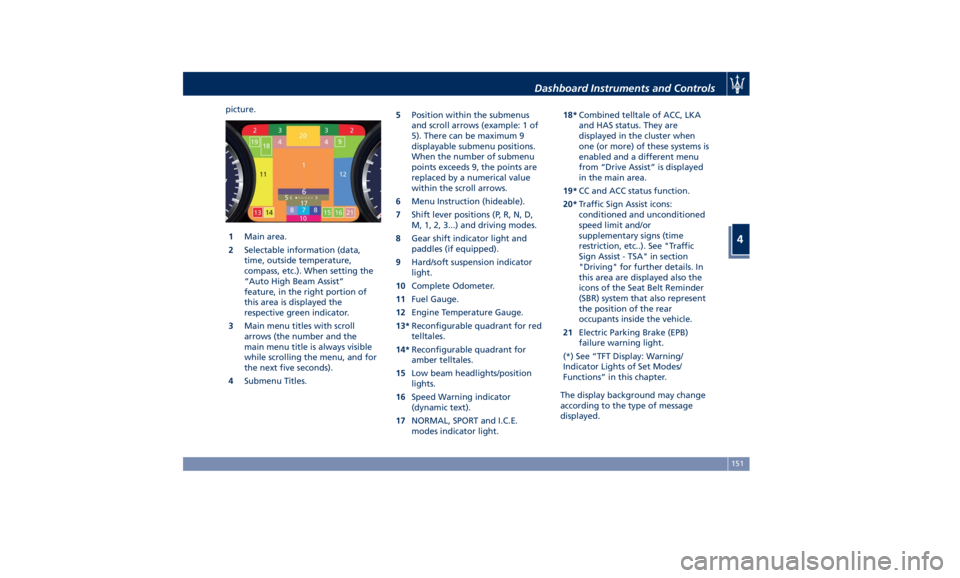
picture.
1 Main area.
2 Selectable information (data,
time, outside temperature,
compass, etc.). When setting the
“Auto High Beam Assist”
feature, in the right portion of
this area is displayed the
respective green indicator.
3 Main menu titles with scroll
arrows (the number and the
main menu title is always visible
while scrolling the menu, and for
the next five seconds).
4 Submenu Titles. 5 Position within the submenus
and scroll arrows (example: 1 of
5). There can be maximum 9
displayable submenu positions.
When the number of submenu
points exceeds 9, the points are
replaced by a numerical value
within the scroll arrows.
6 Menu Instruction (hideable).
7 Shift lever positions (P, R, N, D,
M, 1, 2, 3...) and driving modes.
8 Gear shift indicator light and
paddles (if equipped).
9 Hard/soft suspension indicator
light.
10 Complete Odometer.
11 Fuel Gauge.
12 Engine Temperature Gauge.
13* Reconfigurable quadrant for red
telltales.
14* Reconfigurable quadrant for
amber telltales.
15 Low beam headlights/position
lights.
16 Speed Warning indicator
(dynamic text).
17 NORMAL, SPORT and I.C.E.
modes indicator light. 18* Combined telltale of ACC, LKA
and HAS status. They are
displayed in the cluster when
one (or more) of these systems is
enabled and a different menu
from “Drive Assist” is displayed
in the main area.
19* CC and ACC status function.
20* Traffic Sign Assist icons:
conditioned and unconditioned
speed limit and/or
supplementary signs (time
restriction, etc..). See "Traffic
Sign Assist - TSA" in section
"Driving" for further details. In
this area are displayed also the
icons of the Seat Belt Reminder
(SBR) system that also represent
the position of the rear
occupants inside the vehicle.
21 Electric Parking Brake (EPB)
failure warning light.
(*) See “TFT Display: Warning/
Indicator Lights of Set Modes/
Functions” in this chapter.
The display background may change
according to the type of message
displayed.Dashboard Instruments and Controls
4
151
Page 170 of 384
Electronic Throttle Control (ETC)
Indicator
This indicator light indicates a
failure of the Electronic
Throttle Control (ETC) system.
If the indicator turns on while
driving (a torque decrease is possible),
have the system checked by an
Authorized Maserati Dealer .
When detecting a failure, the light
indicator will illuminate while the
engine is running.
If the indicator remains lit with the
engine running, you can still drive your
vehicle. However, contact an
Authorized Maserati Dealer as soon as
possible.
If the indicator is flashing while the
engine is running, immediate service is
required. You may experience reduced
performance, an elevated/rough idle
or engine stall and your vehicle may
require towing.
Trunk Lid and Hood Ajar Indicators
These light indicators will
illuminate to indicate that the
trunk lid and/or the hood are
ajar.
When the trunk lid or the
hood is open, a related
message will be displayed
besides the light if the vehicle is running at a speed of 5 mph (8 km/h)
or faster.
Low Fuel Indicator
When the fuel level reaches
approximately 4.2 Gallons (16
litres) this light under the fuel
gauge indicator will turn on,
and remain on until fuel is added
together with the related message. In
this condition the color indicating the
quantity of fuel in the tank, inside the
indicator on display, will go from
white to amber.
Refer to “Refueling” in section
“Driving” for fuel filling.
Windshield Washer Low Fluid
Indicator
This indicator will illuminate
for 5 seconds to indicate a low
level of the windshield washer
fluid. A related message will
be displayed.
See “Maintenance Procedures” in
section “Maintenance and Care” for
fluid filling.
Headlight Aiming System Failure
Warning Light
This warning light and the
related message indicate a
failure of the automatic
headlight aiming system. Please contact an Authorized Maserati
Dealer to check the system.
Automatic High Beam Failure Warning
Light
This warning light and the
related message illuminate to
report a failure of the
automatic high beam
headlights.
Contact an Authorized Maserati
Dealer as soon as possible.
Suspensions Failure Warning Light
This warning light and the
related message turn on while
driving if there is a failure of
the suspension system (only
with optional Skyhook active
suspension).
Please contact an Authorized Maserati
Dealer to check the system.
Ice Hazard Indicator
When the external
temperature falls below 38°F
(3°C), the temperature value
blinks for a few seconds, the
indicator light turns on, a message is
displayed and an acoustic signal is
triggered to warn the driver of the risk
of icy roadbed.
Under such conditions, we recommend
using the I.C.E. drive mode (seeDashboard Instruments and Controls
4
166
Page 184 of 384
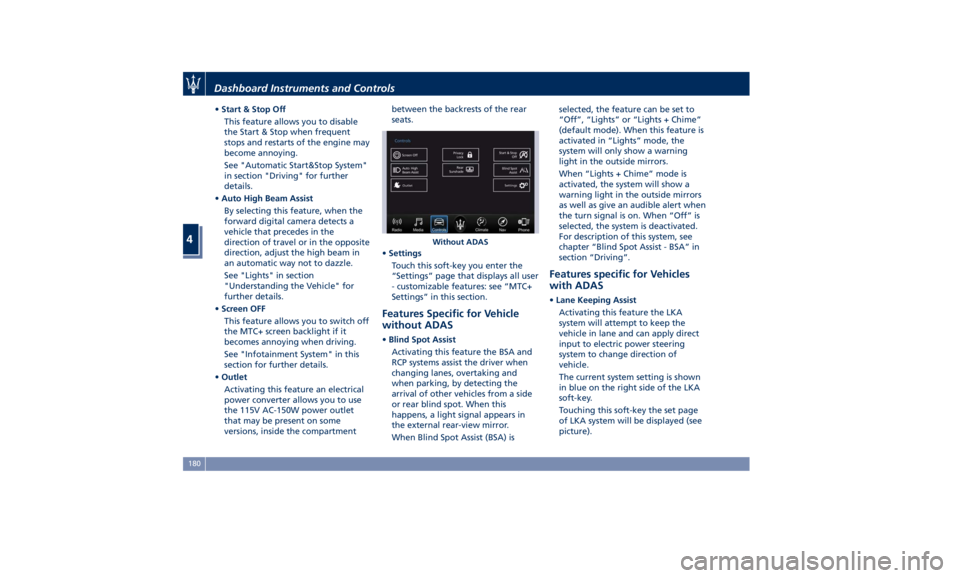
• Start & Stop Off
This feature allows you to disable
the Start & Stop when frequent
stops and restarts of the engine may
become annoying.
See "Automatic Start&Stop System"
in section "Driving" for further
details.
• Auto High Beam Assist
By selecting this feature, when the
forward digital camera detects a
vehicle that precedes in the
direction of travel or in the opposite
direction, adjust the high beam in
an automatic way not to dazzle.
See "Lights" in section
"Understanding the Vehicle" for
further details.
• Screen OFF
This feature allows you to switch off
the MTC+ screen backlight if it
becomes annoying when driving.
See "Infotainment System" in this
section for further details.
• Outlet
Activating this feature an electrical
power converter allows you to use
the 115V AC-150W power outlet
that may be present on some
versions, inside the compartment between the backrests of the rear
seats.
• Settings
Touch this soft-key you enter the
“Settings” page that displays all user
- customizable features: see “MTC+
Settings” in this section.
Features Specific for Vehicle
without ADAS • Blind Spot Assist
Activating this feature the BSA and
RCP systems assist the driver when
changing lanes, overtaking and
when parking, by detecting the
arrival of other vehicles from a side
or rear blind spot. When this
happens, a light signal appears in
the external rear-view mirror.
When Blind Spot Assist (BSA) is selected, the feature can be set to
“Off”, “Lights” or “Lights + Chime”
(default mode). When this feature is
activated in “Lights” mode, the
system will only show a warning
light in the outside mirrors.
When “Lights + Chime” mode is
activated, the system will show a
warning light in the outside mirrors
as well as give an audible alert when
the turn signal is on. When “Off” is
selected, the system is deactivated.
For description of this system, see
chapter “Blind Spot Assist - BSA” in
section “Driving”.
Features specific for Vehicles
with ADAS • Lane Keeping Assist
Activating this feature the LKA
system will attempt to keep the
vehicle in lane and can apply direct
input to electric power steering
system to change direction of
vehicle.
The current system setting is shown
in blue on the right side of the LKA
soft-key.
Touching this soft-key the set page
of LKA system will be displayed (see
picture).Without ADASDashboard Instruments and Controls
4
180
Page 192 of 384
• Rain Sensing Auto Wipers
By selecting this feature, the system
will automatically activate the
windshield wipers if it senses
moisture on the windshield. The
feature can be set to “On” or “Off”.
• Hill Start Assist
This feature allows you to disable
the HSA system. The feature can be
set to “On” or “Off”. See “Brake
and Stability Control System” in
section “Driving” for further details.
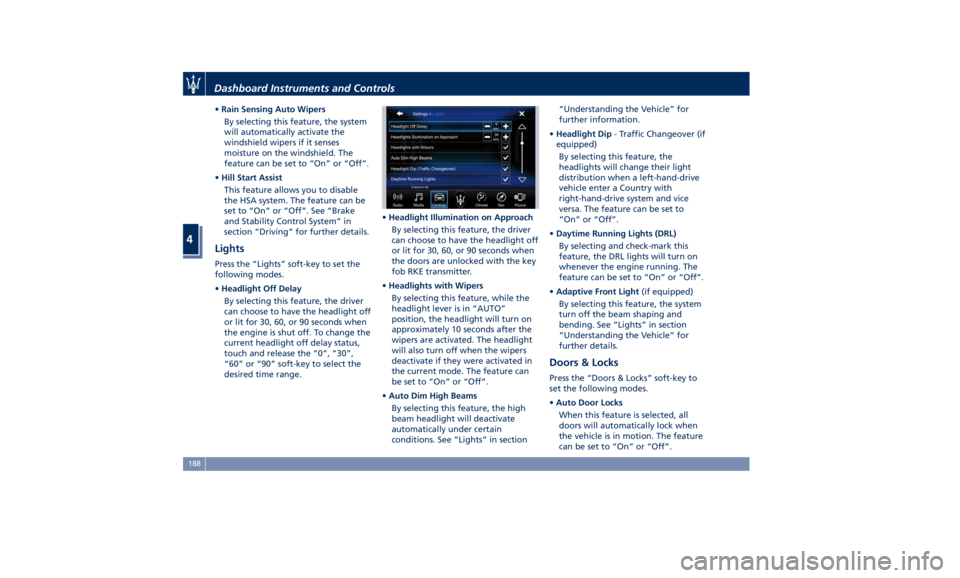
Lights Press the “Lights” soft-key to set the
following modes.
• Headlight Off Delay
By selecting this feature, the driver
can choose to have the headlight off
or lit for 30, 60, or 90 seconds when
the engine is shut off. To change the
current headlight off delay status,
touch and release the “0”, “30”,
“60” or “90” soft-key to select the
desired time range. • Headlight Illumination on Approach
By selecting this feature, the driver
can choose to have the headlight off
or lit for 30, 60, or 90 seconds when
the doors are unlocked with the key
fob RKE transmitter.
• Headlights with Wipers
By selecting this feature, while the
headlight lever is in “AUTO”
position, the headlight will turn on
approximately 10 seconds after the
wipers are activated. The headlight
will also turn off when the wipers
deactivate if they were activated in
the current mode. The feature can
be set to “On” or “Off”.
• Auto Dim High Beams
By selecting this feature, the high
beam headlight will deactivate
automatically under certain
conditions. See “Lights” in section “Understanding the Vehicle” for
further information.
• Headlight Dip - Traffic Changeover (if
equipped)
By selecting this feature, the
headlights will change their light
distribution when a left-hand-drive
vehicle enter a Country with
right-hand-drive system and vice
versa. The feature can be set to
“On” or “Off”.
• Daytime Running Lights (DRL)
By selecting and check-mark this
feature, the DRL lights will turn on
whenever the engine running. The
feature can be set to “On” or “Off”.
• Adaptive Front Light (if equipped)
By selecting this feature, the system
turn off the beam shaping and
bending. See “Lights” in section
“Understanding the Vehicle” for
further details.
Doors & Locks Press the “Doors & Locks” soft-key to
set the following modes.
• Auto Door Locks
When this feature is selected, all
doors will automatically lock when
the vehicle is in motion. The feature
can be set to “On” or “Off”.Dashboard Instruments and Controls
4
188
Page 303 of 384
• Reduce your speed, especially on
roads with no streetlights.
• Stop at early signs of drowsiness.
Continuing to drive would be a risk
for yourself and for others. Have a
rest before continuing your trip.
• Keep the vehicle at a greater
distance from vehicles in front of
you than you would during the day:
it is difficult to assess the speed of
other vehicles when you only see the
lights.
• Use the high beams only outside of
densely-populated areas and when
you are sure that they will not
disturb other drivers.
• When another vehicle is
approaching, switch from high
beams (if on) to low beams.
• Keep lights and headlights clean.
• Outside of densely-populated areas,
beware of animals crossing the road.
Driving in the Rain
Rain and wet roads are dangerous. On
a wet road all maneuvers are more
difficult since wheel grip on the road
is significantly reduced. This means
that braking distances increase
considerably and road grip decreases.
Some advices for driving in the rain
are listed below. • Reduce your speed and keep a
greater safety distance from the
vehicles in front of you. High speed
may result in a loss of vehicle
control.
• When driving on wet or slushy roads,
it is possible for a wedge of water to
build up between the tire and road
surface. This is known as
aquaplaning and may cause partial
or complete loss of vehicle control
and stopping ability. To reduce this
possibility: slow down if the road has
standing water or puddles.
• Heavy rain substantially reduces
visibility. In these circumstances, even
during the day, turn on the low
beams, to be more visible to other
drivers.
• Set the air conditioning and heating
system controls on the defogging
function, in order to avoid any
visibility problem.
• Periodically check the conditions of
the windshield wiper blades.
• In low grip conditions use “I.C.E.”
driving mode (see chapters “Drive
Mode” in this section).
• Avoid driving with ESC OFF as this
will likely cause a loss of control of
the vehicle. Driving in Fog
If the fog is dense, avoid traveling if
possible.
When driving in mist, blanket fog or
when there is the possibility of banks
of fog, please consider some advices
listed below.
• Keep a moderate speed.
• Even in daytime, turn on the low
beams and rear fog lights. Do not
use the high beams.
• Remember that fog creates
dampness on the asphalt and thus
any type of maneuver is more
difficult and braking distances are
extended.
• Keep a safe distance from the
vehicle in front of you.
• Avoid sudden changes in speed as
much as possible.
• Whenever possible, avoid
overtaking.
• If you are forced to stop the vehicle
(breakdowns, impossibility of
proceeding due to poor visibility,
etc.), first of all, try to stop off of the
travel lane. Then turn on the hazard
warning flashers and, if possible, the
low beams.Driving
5
299
Page 304 of 384
CAUTION!
Be aware that rear fog lights can
bother the drivers following your
vehicle: when visibility is back to
normal, turn off these lights.
Driving in the Mountains
Mountain
roads usually
have many
narrow turns and curves, tunnels and
steep uphill or downhill slopes: please
consider some advices listed below.
• Drive at a moderate speed, avoid
“cutting” corners.
• When driving inside a tunnel in
daylight turn on the low beams in
advance; avoid high beams and be
aware of the rapid brightness
change. Avoid abrupt maneuvers
that could be dangerous for the
following vehicle.
• Never coast downhill with the engine
off or in neutral.
• Remember that passing other
vehicles when driving uphill is slower
and thus requires more free distance
on the road. If you are being
overtaken on a hill, slow down and
allow the other vehicle to pass. Driving on Snow or Ice
Please consider some general advice
for driving in these conditions, listed
below.
• Maintain a very moderate speed.
• Fit snow chains or specific tires if the
road is covered with snow: see the
paragraphs “Tires – General
Information” in this section.
• We recommend you to activate the
“I.C.E.” mode (see chapters “Drive
Mode” in this section).
• During the winter season, even
apparently dry roads can have icy
sections. Be careful when crossing
bridges, viaducts and roads that have
little exposure to the sun and are
bordered by trees and rocks. They
may be icy.
• Keep an ample safe distance from
the vehicles in front of you.
WARNING!
• Rapid acceleration on slippery
surfaces is dangerous. Unequal
traction can cause sudden pulling of
the driving wheels. You could lose
control of the vehicle and possibly
have a collision. Accelerate slowly
and carefully whenever there is likely to be poor traction (ice, snow,
wet mud, loose sand, etc.).
• Do not drive on or across a road or
path where water is flowing and/or
rising (as in storm run-off). Flowing
water can wear away the road or
path surface and cause your vehicle
to sink into deeper water.
Furthermore, flowing and/or rising
water can carry your vehicle away
swiftly. Failure to follow this
warning may result in injuries that
are serious or fatal to you, your
passengers, and others around you.
Although your vehicle is capable of
driving
through shallow standing
water, consider the following Cautions
and Warnings before doing so.
CAUTION!
• Always check the depth of the
standing water before driving
through it. Never drive through
standing water that is deeper than
47 in (150 mm).
• Determine the condition of the road
or the path that is under water and if
there are any obstacles in the way
before driving through the standing
water.Driving
5
300
Page 343 of 384
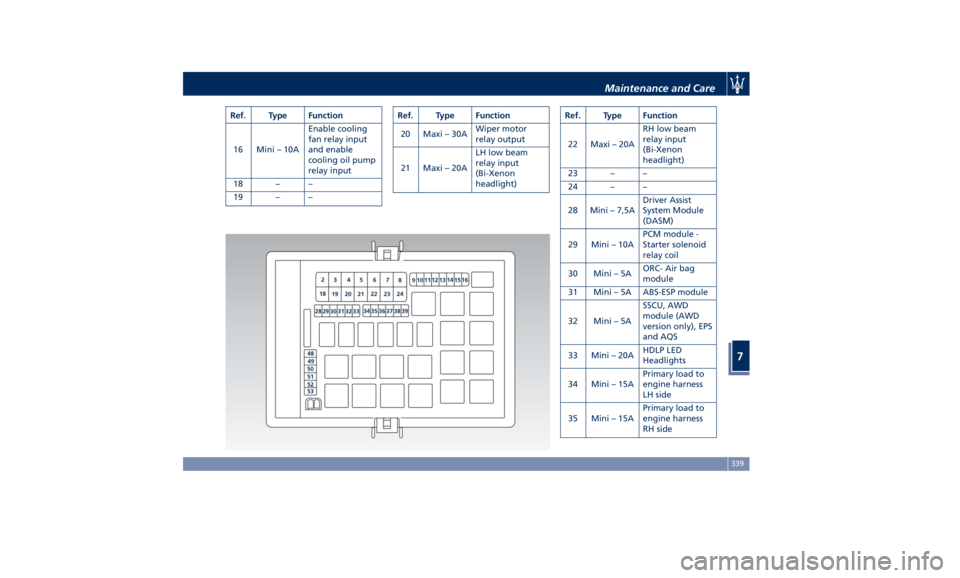
Ref. Type Function
16 Mini – 10A Enable cooling
fan relay input
and enable
cooling oil pump
relay input
18 – –
19 – – Ref. Type Function
20 Maxi – 30A Wiper motor
relay output
21 Maxi – 20A LH low beam
relay input
(Bi-Xenon
headlight) Ref. Type Function
22 Maxi – 20A RH low beam
relay input
(Bi-Xenon
headlight)
23 – –
24 – –
28 Mini – 7,5A Driver Assist
System Module
(DASM)
29 Mini – 10A PCM module -
Starter solenoid
relay coil
30 Mini – 5A ORC- Air bag
module
31 Mini – 5A ABS-ESP module
32 Mini – 5A SSCU, AWD
module (AWD
version only), EPS
and AQS
33 Mini – 20A HDLP LED
Headlights
34 Mini – 15A Primary load to
engine harness
LH side
35 Mini – 15A Primary load to
engine harness
RH sideMaintenance and Care
7
339
Page 348 of 384
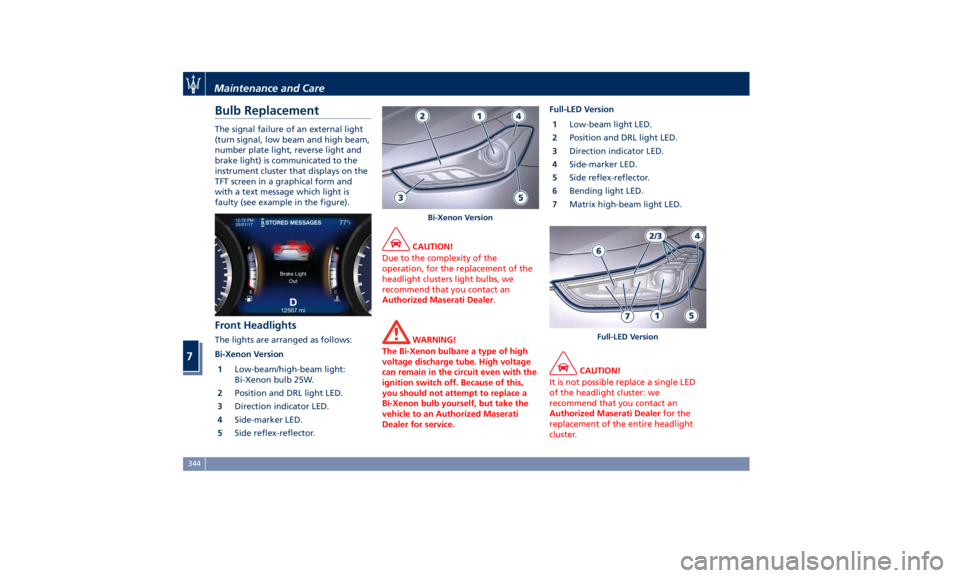
Bulb Replacement The signal failure of an external light
(turn signal, low beam and high beam,
number plate light, reverse light and
brake light) is communicated to the
instrument cluster that displays on the
TFT screen in a graphical form and
with a text message which light is
faulty (see example in the figure).
Front Headlights The lights are arranged as follows:
Bi-Xenon Version
1 Low-beam/high-beam light:
Bi-Xenon bulb 25W.
2 Position and DRL light LED.
3 Direction indicator LED.
4 Side-marker LED.
5 Side reflex-reflector. CAUTION!
Due to the complexity of the
operation, for the replacement of the
headlight clusters light bulbs, we
recommend that you contact an
Authorized Maserati Dealer .
WARNING!
The Bi-Xenon bulbare a type of high
voltage discharge tube. High voltage
can remain in the circuit even with the
ignition switch off. Because of this,
you should not attempt to replace a
Bi-Xenon bulb yourself, but take the
vehicle to an Authorized Maserati
Dealer for service. Full-LED Version
1 Low-beam
light LED.
2 Position and DRL light LED.
3 Direction indicator LED.
4 Side-marker LED.
5 Side reflex-reflector.
6 Bending light LED.
7 Matrix high-beam light LED.
CAUTION!
It is not possible replace a single LED
of the headlight cluster: we
recommend that you contact an
Authorized Maserati Dealer for the
replacement of the entire headlight
cluster.Bi-Xenon Version
Full-LED VersionMaintenance and Care
7
344