engine MASERATI GHIBLI 2019 Owner's Manual
[x] Cancel search | Manufacturer: MASERATI, Model Year: 2019, Model line: GHIBLI, Model: MASERATI GHIBLI 2019Pages: 384, PDF Size: 13.33 MB
Page 75 of 384
function properly if modifications
are made. Take your vehicle to an
Authorized Maserati Dealer for any
air bag system service. If your seat
including your trim cover and
cushion needs to be serviced in any
way (including removal or
loosening/tightening of seat
attachment bolts), take the vehicle
to an Authorized Maserati Dealer.
• Only Maserati manufacturer
approved seat accessories may be
used. If it is necessary to modify the
air bag system for persons with
disabilities, contact an Authorized
Maserati Dealer.
• If the speedometer, Rev Counter, or
any engine related gauges are not
working, the Occupant Restraint
Controller (ORC) may also be
disabled. The air bags may not be
ready to inflate for your protection.
Promptly check the fuse block for
blown fuses. To identify the air bag
fuse see “Fuse Replacement” in
section "Maintenance and Care". See
an Authorized Maserati Dealer if the
fuse does not fix the problem. Transport of persons with
disability If it is necessary to modify the
advanced air bag system of your
vehicle to accommodate a person with
disabilities, contact an Authorized
Maserati Dealer .
WARNING!
• The advanced air bag system of your
vehicle is not designed to protect
adults with disabilities that require
deactivation of the passenger or
driver air bag.
• If you or another occupant is an
adult with a medical condition that
requires air bag deactivation, please
contact an Authorized Maserati
Dealer. For further information on
disabled driver or passengers see
http://www.safercar.gov.
• As long as the air bag is activated,
persons with disabilities are advised
not to travel in the front seat in
order to avoid the risk of serious
injuries or death, even in minor
crashes. Event Data Recorder (EDR) This vehicle is equipped with an event
data recorder (EDR). The main purpose
of an EDR is to record, in certain crash
or near crash-like situations, such as an
air bag deployment or hitting a road
obstacle, data that will assist in
understanding how a vehicle’s systems
have performed.
The EDR is designed to record data
related to vehicle dynamics and safety
systems for a short period of time,
typically 30 seconds or less.
The EDR in this vehicle is designed to
record such data as:
• how various systems in your vehicle
were operating;
• whether or not the driver and
passenger safety belts were
buckled/fastened;
• how far (if at all) the driver was
depressing the accelerator and/or
brake pedal; and
• how fast the vehicle was traveling.
These data can help provide a better
understanding of the circumstances in
which crashes and injuries occur.Before Starting
2
71
Page 86 of 384
(Continued)
cameras are unable to view every
obstacle or object in your drive path.
• To avoid vehicle damage, the vehicle
must be driven slowly when using
the camera system with surround
view, to be able to stop in time when
an obstacle is seen. It is
recommended that the driver looks
frequently over his/her shoulder
when using this system.
NOTE:
If
snow , ice, mud, or any other
substance builds up on the camera
lens, clean the lens, rinse with water,
and dry with a soft cloth. Do not cover
the lens.
WARNING!
California Proposition 65
Operating, servicing and maintaining
a passenger vehicle or off-road vehicle
can expose you to chemicals including
such as, engine exhaust, carbon
monoxide, phthalates and lead, that
which are known to the State of
California to cause cancer and birth
defects or other reproductive harm. To
minimize exposure, avoid breathing
exhaust, do not idle the engine except as necessary, service your vehicle in a
well-ventilated area and wear gloves
or wash your hands frequently when
servicing your vehicle. For more
information go to:
www.P65Warnings.ca.gov/passenger-
vehicle
Safety Tips Transporting Passengers WARNING!
• Do not leave children or animals
inside parked vehicles in hot
weather. Interior heat build-up may
cause serious injury.
• Never ride in a cargo area, inside of
a vehicle.
• Do not allow people to ride in any
area of your vehicle that is not
equipped with seats and seat belts.
• Be sure everyone in your vehicle is in
a seat and using a seat belt properly.Before Starting
2
82
Page 87 of 384
Exhaust Gas WARNING!
Exhaust gases can injure. They contain
carbon monoxide (CO), which is
colorless and odorless. Breathing it
can make you unconscious and can
eventually poison you. To avoid
breathing (CO), follow these safety
tips:
• Do not run the engine in a closed
garage or in confined areas any
longer than needed to move your
vehicle in or out of the area.
• If it is necessary to sit in a parked
vehicle with the engine running,
adjust your heating or cooling
controls to force outside air into the
vehicle. Set the blower at high
speed.
• If you are required to drive with the
trunk open, make sure that all
windows are closed and the climate
control blowers switch is set at high
speed. DO NOT use the recirculation
mode.
The best protection against carbon
monoxide
entry into
the passenger
compartment is a properly maintained
engine exhaust system. Whenever detecting a change in the
sound of the exhaust system or
eventual exhaust fumes inside the
vehicle have the Authorized Maserati
Dealer inspect the complete exhaust
system and adjacent body areas for
broken, damaged, deteriorated, or
mispositioned parts.
Open seams or loose connections
could permit exhaust fumes to seep
into the passenger compartment.
WARNING!
California Proposition 65
Operating, servicing and maintaining
a passenger vehicle or off-road vehicle
can expose you to chemicals including
such as, engine exhaust, carbon
monoxide, phthalates and lead, that
which are known to the State of
California to cause cancer and birth
defects or other reproductive harm. To
minimize exposure, avoid breathing
exhaust, do not idle the engine except
as necessary, service your vehicle in a
well-ventilated area and wear gloves
or wash your hands frequently when
servicing your vehicle. For more
information go to:
www.P65Warnings.ca.gov/passenger-
vehicle Vehicle Safety Checks Seat Belts
• Inspect the belt system periodically,
checking for cuts, frays, and loose
parts. Damaged parts must be
replaced immediately.
• Do not disassemble or modify the
system.
• If the belt has been sharply pulled,
for example as the result of an
accident, the safety belt, together
with the anchoring devices, the
anchoring device mounting screws
and the pretensioner must be
completely replaced. Even if the belt
does not present any exterior signs
of wear or damage, it may have lost
its restraining properties.
Air Bag Warning Light
The
light should illuminate and
remain lit for a few seconds bulb
checking when the ignition switch is
pushed in RUN position (see
“Supplemental Restraint System (SRS)
— Air Bags” chapter in this section).
• If the light
does not illuminate
while starting, contact the
Authorized Maserati Dealer .
• If the light stays on, flickers, or
comes on while driving, have theBefore Starting
2
83
Page 89 of 384
• Check the tires (see “Tire Inflation
Pressure” chapter in section
“Features and Specifications”) for
proper cold inflation pressure.
Lights and Indicator Lights
• Have someone observe the
operation of exterior lights while
you operate the controls (see
“Lights” chapter in section
“Understanding the Vehicle”).
• Check turn signal and high beam
indicator lights on the instrument
cluster (see “Instrument Cluster”
chapter in section “Dashboard
Instruments and Controls”).
Door Latches
• Check for positive closing, latching,
and locking of doors and trunk lid
(see “Unlock the Vehicle with Key
fob” chapter in this section).
Fluid Leaks
• Check area under vehicle after
overnight parking for recent fluid
leaks (oil, fuel, etc.).
• If gasoline fumes are detected or
fluid leaks are suspected, contact the
Authorized Maserati Dealer . WARNING!
California Proposition 65
Operating, servicing and maintaining
a passenger vehicle or off-road vehicle
can expose you to chemicals including
such as, engine exhaust, carbon
monoxide, phthalates and lead, that
which are known to the State of
California to cause cancer and birth
defects or other reproductive harm. To
minimize exposure, avoid breathing
exhaust, do not idle the engine except
as necessary, service your vehicle in a
well-ventilated area and wear gloves
or wash your hands frequently when
servicing your vehicle. For more
information go to:
www.P65Warnings.ca.gov/passenger-
vehiclePark Assist (if equipped) The Park Assist (also called
“ParkSense”) system provides visual
and audible indications of the distance
between the rear and/or front bumper
and a detected obstacle when backing
up or moving forward, e.g. during a
parking maneuver.
Besides the use of the sensors
available on the bumpers and of the
rear parking camera, the vehicle may
be equipped with surround view
cameras (optional) to assist the driver
during maneuvers on dead-ends/roads
and on intersections. For more details
on this option, see chapter "Surround
View Camera System (optional)" in
this section.
Refer to “Park Assist System Usage
Precautions” for limitations of this
system and recommendations.
Park Assist system will retain the last
system state (enabled or disabled)
from the last ignition cycle when the
ignition is changed to the RUN
position.
Park Assist system can be active only
when the shift lever is in R (Reverse) or
D (Drive).
If Park Assist is enabled at one of
these shift lever positions, the system
will remain active until the vehicleBefore Starting
2
85
Page 97 of 384
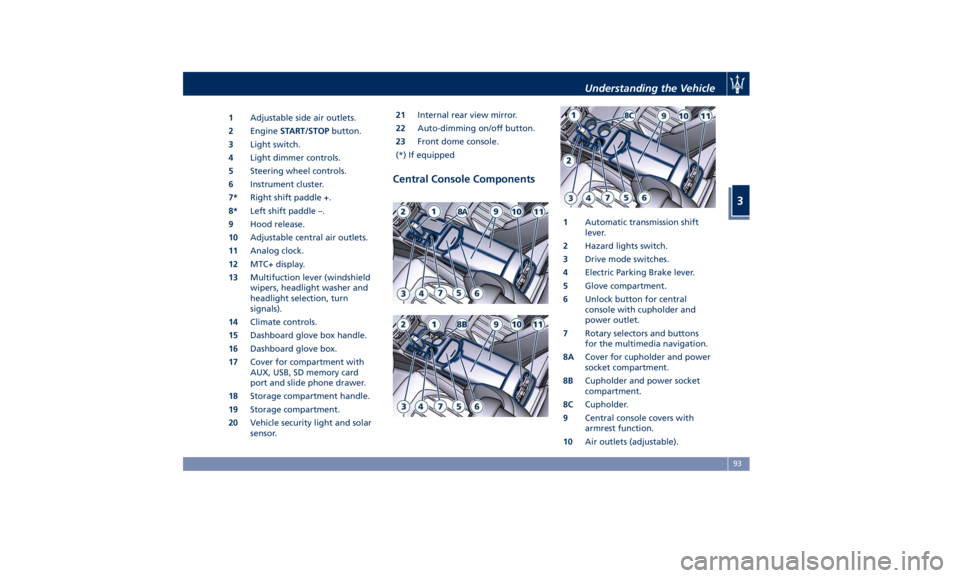
1 Adjustable side air outlets.
2 Engine START/STOP button.
3 Light switch.
4 Light dimmer controls.
5 Steering wheel controls.
6 Instrument cluster.
7* Right shift paddle +.
8* Left shift paddle –.
9 Hood release.
10 Adjustable central air outlets.
11 Analog clock.
12 MTC+ display.
13 Multifuction lever (windshield
wipers, headlight washer and
headlight selection, turn
signals).
14 Climate controls.
15 Dashboard glove box handle.
16 Dashboard glove box.
17 Cover for compartment with
AUX, USB, SD memory card
port and slide phone drawer.
18 Storage compartment handle.
19 Storage compartment.
20 Vehicle security light and solar
sensor. 21 Internal rear view mirror.
22 Auto-dimming on/off button.
23 Front dome console.
(*) If equipped
Central Console Components 1 Automatic transmission shift
lever.
2 Hazard lights switch.
3 Drive mode switches.
4 Electric Parking Brake lever.
5 Glove compartment.
6 Unlock button for central
console with cupholder and
power outlet.
7 Rotary selectors and buttons
for the multimedia navigation.
8A Cover for cupholder and power
socket compartment.
8B Cupholder and power socket
compartment.
8C Cupholder.
9 Central console covers with
armrest function.
10 Air outlets (adjustable).Understanding the Vehicle
3
93
Page 101 of 384
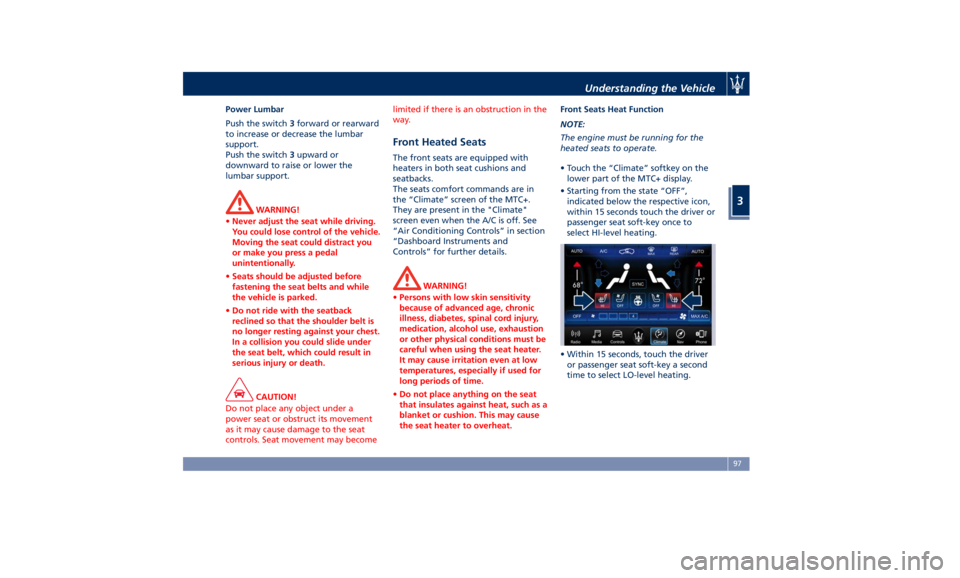
Power Lumbar
Push the switch 3 forward or rearward
to increase or decrease the lumbar
support.
Push the switch 3 upward or
downward to raise or lower the
lumbar support.
WARNING!
• Never adjust the seat while driving.
You could lose control of the vehicle.
Moving the seat could distract you
or make you press a pedal
unintentionally.
• Seats should be adjusted before
fastening the seat belts and while
the vehicle is parked.
• Do not ride with the seatback
reclined so that the shoulder belt is
no longer resting against your chest.
In a collision you could slide under
the seat belt, which could result in
serious injury or death.
CAUTION!
Do not place any object under a
power seat or obstruct its movement
as it may cause damage to the seat
controls. Seat movement may become limited if there is an obstruction in the
way.
Front Heated Seats The front seats are equipped with
heaters in both seat cushions and
seatbacks.
The seats comfort commands are in
the “Climate” screen of the MTC+.
They are present in the "Climate"
screen even when the A/C is off. See
“Air Conditioning Controls” in section
“Dashboard Instruments and
Controls” for further details.
WARNING!
• Persons with low skin sensitivity
because of advanced age, chronic
illness, diabetes, spinal cord injury,
medication, alcohol use, exhaustion
or other physical conditions must be
careful when using the seat heater.
It may cause irritation even at low
temperatures, especially if used for
long periods of time.
• Do not place anything on the seat
that insulates against heat, such as a
blanket or cushion. This may cause
the seat heater to overheat. Front Seats Heat Function
NOTE:
The
engine must
be running for the
heated seats to operate.
• Touch the “Climate” softkey on the
lower part of the MTC+ display.
• Starting from the state “OFF”,
indicated below the respective icon,
within 15 seconds touch the driver or
passenger seat soft-key once to
select HI-level heating.
• Within 15 seconds, touch the driver
or passenger seat soft-key a second
time to select LO-level heating.Understanding the Vehicle
3
97
Page 102 of 384
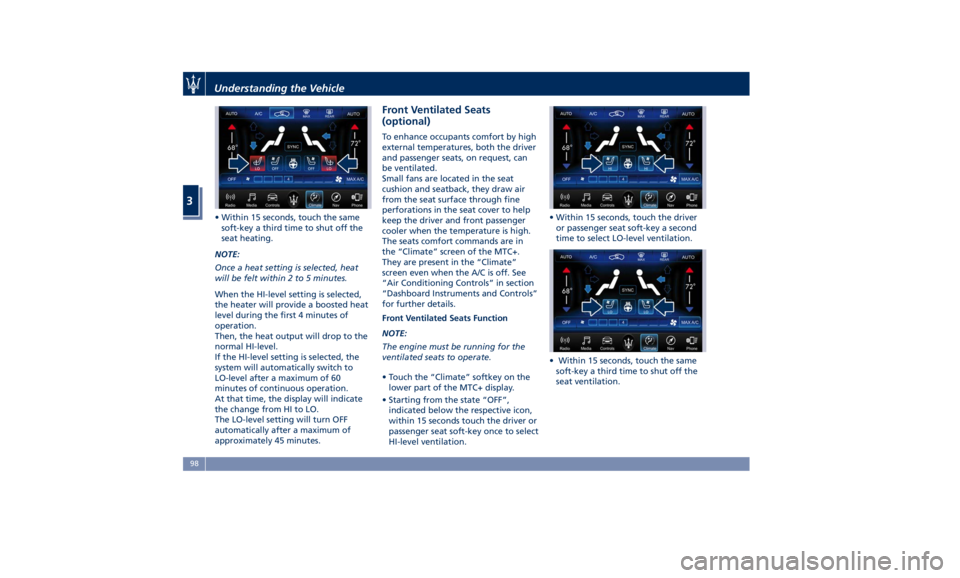
• Within 15 seconds, touch the same
soft-key a third time to shut off the
seat heating.
NOTE:
Once a heat setting is selected, heat
will be felt within 2 to 5 minutes.
When the HI-level setting is selected,
the heater will provide a boosted heat
level during the first 4 minutes of
operation.
Then, the heat output will drop to the
normal HI-level.
If the HI-level setting is selected, the
system will automatically switch to
LO-level after a maximum of 60
minutes of continuous operation.
At that time, the display will indicate
the change from HI to LO.
The LO-level setting will turn OFF
automatically after a maximum of
approximately 45 minutes. Front Ventilated Seats
(optional) To enhance occupants comfort by high
external temperatures, both the driver
and passenger seats, on request, can
be ventilated.
Small fans are located in the seat
cushion and seatback, they draw air
from the seat surface through fine
perforations in the seat cover to help
keep the driver and front passenger
cooler when the temperature is high.
The seats comfort commands are in
the “Climate” screen of the MTC+.
They are present in the “Climate”
screen even when the A/C is off. See
“Air Conditioning Controls” in section
“Dashboard Instruments and Controls”
for further details.
Front Ventilated Seats Function
NOTE:
The engine must be running for the
ventilated seats to operate.
• Touch the “Climate” softkey on the
lower part of the MTC+ display.
• Starting from the state “OFF”,
indicated below the respective icon,
within 15 seconds touch the driver or
passenger seat soft-key once to select
HI-level ventilation. • Within 15 seconds, touch the driver
or passenger seat soft-key a second
time to select LO-level ventilation.
• Within 15 seconds, touch the same
soft-key a third time to shut off the
seat ventilation.Understanding the Vehicle
3
98
Page 106 of 384
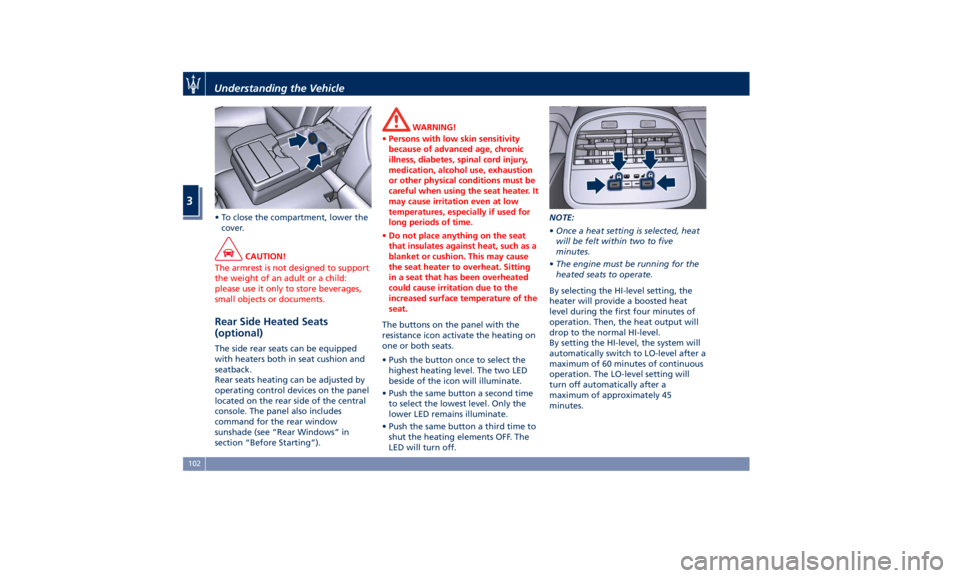
• To close the compartment, lower the
cover.
CAUTION!
The armrest is not designed to support
the weight of an adult or a child:
please use it only to store beverages,
small objects or documents.
Rear Side Heated Seats
(optional) The side rear seats can be equipped
with heaters both in seat cushion and
seatback.
Rear seats heating can be adjusted by
operating control devices on the panel
located on the rear side of the central
console. The panel also includes
command for the rear window
sunshade (see “Rear Windows” in
section “Before Starting”). WARNING!
• Persons with low skin sensitivity
because of advanced age, chronic
illness, diabetes, spinal cord injury,
medication, alcohol use, exhaustion
or other physical conditions must be
careful when using the seat heater. It
may cause irritation even at low
temperatures, especially if used for
long periods of time.
• Do not place anything on the seat
that insulates against heat, such as a
blanket or cushion. This may cause
the seat heater to overheat. Sitting
in a seat that has been overheated
could cause irritation due to the
increased surface temperature of the
seat.
The buttons on the panel with the
resistance
icon activate the heating on
one or both seats.
• Push the button once to select the
highest heating level. The two LED
beside of the icon will illuminate.
• Push the same button a second time
to select the lowest level. Only the
lower LED remains illuminate.
• Push the same button a third time to
shut the heating elements OFF. The
LED will turn off. NOTE:
• Once a heat setting is selected, heat
will be felt within two to five
minutes.
• The engine must be running for the
heated seats to operate.
By selecting the HI-level setting, the
heater will provide a boosted heat
level during the first four minutes of
operation. Then, the heat output will
drop to the normal HI-level.
By setting the HI-level, the system will
automatically switch to LO-level after a
maximum of 60 minutes of continuous
operation. The LO-level setting will
turn off automatically after a
maximum of approximately 45
minutes.Understanding the Vehicle
3
102
Page 110 of 384
NOTE:
You can use your key fob with RKE
transmitter or the memory buttons on
the driver's door trim panel to return
the tilt/telescopic steering
column/wheel to programmed
positions. See “Driver Memory Seat” in
this section.
WARNING!
Do not adjust the steering
column/wheel while driving.
Adjusting the steering column/wheel
while driving could cause the driver to
lose control of the vehicle. Be sure the
steering column/wheel is adjusted
before driving your vehicle. Failure to
follow this warning may result in
serious injury or death.
Heated Steering Wheel
(optional) The steering wheel contains a heating
element inside the rim that helps
warm driver’s hands by cold weather.
The heated steering wheel has only
one temperature setting. Once turned
on, this function will operate for
approximately 58 to 70 minutes before
automatically shutting off. The heated steering wheel can shut off
early or may not turn on when the
steering wheel is already warm.
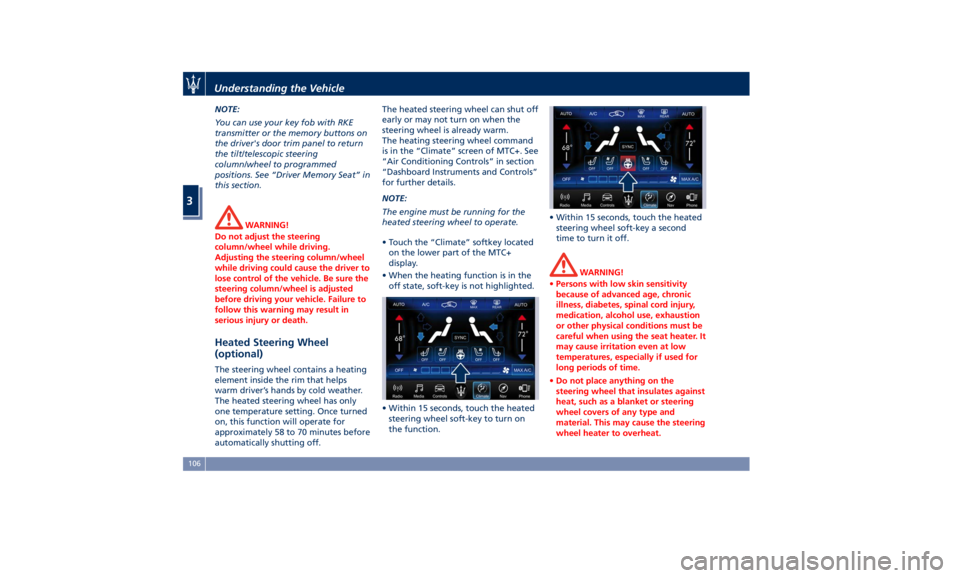
The heating steering wheel command
is in the “Climate” screen of MTC+. See
“Air Conditioning Controls” in section
“Dashboard Instruments and Controls”
for further details.
NOTE:
The engine must be running for the
heated steering wheel to operate.
• Touch the “Climate” softkey located
on the lower part of the MTC+
display.
• When the heating function is in the
off state, soft-key is not highlighted.
• Within 15 seconds, touch the heated
steering wheel soft-key to turn on
the function. • Within 15 seconds, touch the heated
steering wheel soft-key a second
time to turn it off.
WARNING!
• Persons with low skin sensitivity
because of advanced age, chronic
illness, diabetes, spinal cord injury,
medication, alcohol use, exhaustion
or other physical conditions must be
careful when using the seat heater. It
may cause irritation even at low
temperatures, especially if used for
long periods of time.
• Do not place anything on the
steering wheel that insulates against
heat, such as a blanket or steering
wheel covers of any type and
material. This may cause the steering
wheel heater to overheat.Understanding the Vehicle
3
106
Page 115 of 384

Lighting Up External Lights according to the Position of the Lights Switch and Ignition Device, and according to the
Engine Status and Twilight Sensor Mode
Ignition
Device
Position Engine
Status Twilight
Sensor
Mode Lights Switch Position
AUTO
0
OFF –– All lights off. All lights off. Position lights (1),
side marker and
license plate lights on
(3). Low beams, position
(1), side marker and
license plate lights
on.
ACC Off – All lights off. All lights off. Position lights (1),
side marker and
license plate lights on
(2). Low beams, position
(1), side marker and
license plate lights on
(2).
RUN Off – All lights off. All lights off. Position lights (1),
side marker and
license plate lights on
(2). Low beams, position
(1), side marker and
license plate lights on
(2).
RUN On DAY DRL (1) on. DRL (1) on. DRL (1), rear position
lights, side marker
and license plate
lights on. Low beams, position
(1), side marker and
license plate lights
on.
RUN On NIGHT Low beams, position
(1), side marker and
license plate lights
on. DRL (1) on. DRL (1), rear position
lights, side marker
and license plate
lights on. Low beams, position
(1), side marker and
license plate lights
on.
(1) The lighting system uses the same LED for DRL and front position lights with two different levels of intensity: high for
DRL and low for position lights.
(2) The lights are powered up for 30 minutes to preserve the charge of the battery.
(3) The lights are powered up for 8 minutes to preserve the charge of the battery. Understanding the Vehicle
3
111