inflation pressure MASERATI GHIBLI 2019 Owners Manual
[x] Cancel search | Manufacturer: MASERATI, Model Year: 2019, Model line: GHIBLI, Model: MASERATI GHIBLI 2019Pages: 384, PDF Size: 13.33 MB
Page 89 of 384
• Check the tires (see “Tire Inflation
Pressure” chapter in section
“Features and Specifications”) for
proper cold inflation pressure.
Lights and Indicator Lights
• Have someone observe the
operation of exterior lights while
you operate the controls (see
“Lights” chapter in section
“Understanding the Vehicle”).
• Check turn signal and high beam
indicator lights on the instrument
cluster (see “Instrument Cluster”
chapter in section “Dashboard
Instruments and Controls”).
Door Latches
• Check for positive closing, latching,
and locking of doors and trunk lid
(see “Unlock the Vehicle with Key
fob” chapter in this section).
Fluid Leaks
• Check area under vehicle after
overnight parking for recent fluid
leaks (oil, fuel, etc.).
• If gasoline fumes are detected or
fluid leaks are suspected, contact the
Authorized Maserati Dealer . WARNING!
California Proposition 65
Operating, servicing and maintaining
a passenger vehicle or off-road vehicle
can expose you to chemicals including
such as, engine exhaust, carbon
monoxide, phthalates and lead, that
which are known to the State of
California to cause cancer and birth
defects or other reproductive harm. To
minimize exposure, avoid breathing
exhaust, do not idle the engine except
as necessary, service your vehicle in a
well-ventilated area and wear gloves
or wash your hands frequently when
servicing your vehicle. For more
information go to:
www.P65Warnings.ca.gov/passenger-
vehiclePark Assist (if equipped) The Park Assist (also called
“ParkSense”) system provides visual
and audible indications of the distance
between the rear and/or front bumper
and a detected obstacle when backing
up or moving forward, e.g. during a
parking maneuver.
Besides the use of the sensors
available on the bumpers and of the
rear parking camera, the vehicle may
be equipped with surround view
cameras (optional) to assist the driver
during maneuvers on dead-ends/roads
and on intersections. For more details
on this option, see chapter "Surround
View Camera System (optional)" in
this section.
Refer to “Park Assist System Usage
Precautions” for limitations of this
system and recommendations.
Park Assist system will retain the last
system state (enabled or disabled)
from the last ignition cycle when the
ignition is changed to the RUN
position.
Park Assist system can be active only
when the shift lever is in R (Reverse) or
D (Drive).
If Park Assist is enabled at one of
these shift lever positions, the system
will remain active until the vehicleBefore Starting
2
85
Page 287 of 384
EXAMPLE: DOT MA L9 ABCD 0313
DOT = Department of Transportation
— This symbol certifies that the tire
is in compliance with the U.S.
Department of Transportation tire
safety standards and is approved for
highway use.
MA = Code representing the tire
manufacturing location (two digits).
L9 = Code representing the tire size
(two digits).
ABCD = Code used by the tire
manufacturer (one to four digits).
03 = Number representing the week
in which the tire was manufactured
(two digits). In this case, 03 means
the 3 rd
week.
13 = Number representing the year
in which the tire was manufactured
(two digits). In this case, 13 means
the year 2013. Tire Terminology and Definitions
Tire and Loading Information Label
The proper cold tire inflation pressure
and the loading information are listed
in two labels on the driver's side rear
door pillar. Term Definition
B-Pillar The vehicle B-Pillar is the structural member of the
body located behind the front door.
Cold Tire Inflation
Pressure Cold tire inflation pressure is defined as the tire
pressure after the vehicle has not been driven for
at least three hours, or driven less than 1 mile
(1.6 km) after sitting for a minimum of three
hours. Inflation pressure is measured in units of PSI
(pounds per square inch) or kPa (kilopascals).
Maximum Inflation
Pressure The maximum inflation pressure is the maximum
permissible cold tire inflation pressure for this tire.
The maximum inflation pressure is molded into
the sidewall.
Recommended Cold Tire
Inflation Pressure Vehicle manufacturer’s recommended cold tire
inflation pressure as shown on the tire placard.
Tire Placard A label permanently attached to the vehicle
describing the vehicle’s loading capacity, the
original equipment tire sizes and the
recommended cold tire inflation pressures. Driving
5
283
Page 288 of 384
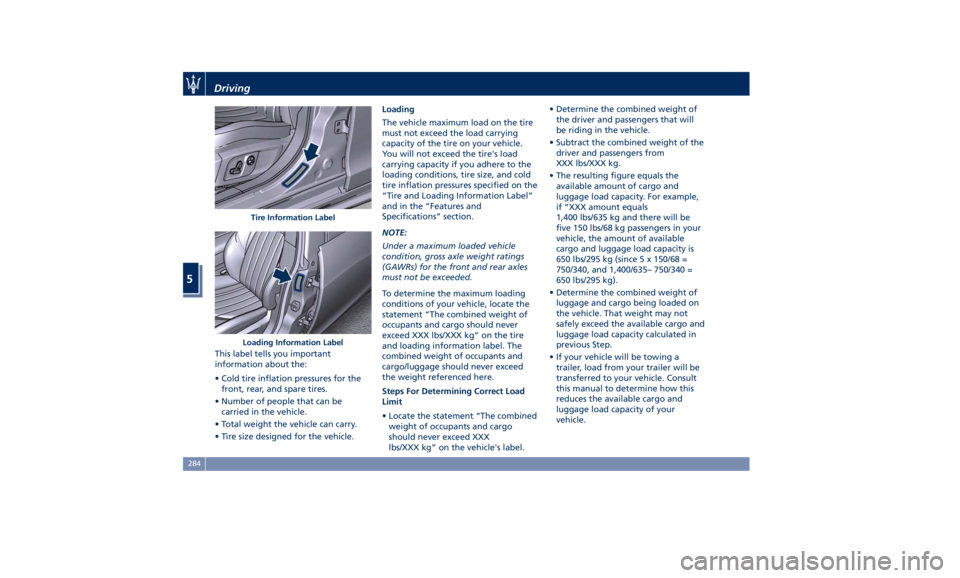
This label tells you important
information about the:
• Cold tire inflation pressures for the
front, rear, and spare tires.
• Number of people that can be
carried in the vehicle.
• Total weight the vehicle can carry.
• Tire size designed for the vehicle. Loading
The vehicle maximum load on the tire
must not exceed the load carrying
capacity of the tire on your vehicle.
You will not exceed the tire's load
carrying capacity if you adhere to the
loading conditions, tire size, and cold
tire inflation pressures specified on the
“Tire and Loading Information Label”
and in the “Features and
Specifications” section.
NOTE:
Under a maximum loaded vehicle
condition, gross axle weight ratings
(GAWRs) for the front and rear axles
must not be exceeded.
To determine the maximum loading
conditions of your vehicle, locate the
statement “The combined weight of
occupants and cargo should never
exceed XXX lbs/XXX kg” on the tire
and loading information label. The
combined weight of occupants and
cargo/luggage should never exceed
the weight referenced here.
Steps For Determining Correct Load
Limit
• Locate the statement “The combined
weight of occupants and cargo
should never exceed XXX
lbs/XXX kg” on the vehicle's label. • Determine the combined weight of
the driver and passengers that will
be riding in the vehicle.
• Subtract the combined weight of the
driver and passengers from
XXX lbs/XXX kg.
• The resulting figure equals the
available amount of cargo and
luggage load capacity. For example,
if “XXX amount equals
1,400 lbs/635 kg and there will be
five 150 lbs/68 kg passengers in your
vehicle, the amount of available
cargo and luggage load capacity is
650 lbs/295 kg (since 5 x 150/68 =
750/340, and 1,400/635– 750/340 =
650 lbs/295 kg).
• Determine the combined weight of
luggage and cargo being loaded on
the vehicle. That weight may not
safely exceed the available cargo and
luggage load capacity calculated in
previous Step.
• If your vehicle will be towing a
trailer, load from your trailer will be
transferred to your vehicle. Consult
this manual to determine how this
reduces the available cargo and
luggage load capacity of your
vehicle.Tire Information Label
Loading Information LabelDriving
5
284
Page 290 of 384
109. Grades B and A represent higher
levels of performance on the
laboratory test wheel, than the
minimum required by law.
WARNING!
The temperature grade for this tire is
established for a tire that is properly
inflated and not overloaded. Excessive
speed, under-inflation, or excessive
loading, either separately or in
combination, can cause heat buildup
and possible tire failure.
Tire Pressure Proper tire inflation pressure is
essential for safety and best
performance of your vehicle. The tire
pressure monitoring system “TPMS”
setup on the vehicle (see “Tire Pressure
Monitoring System” in this section)
may alert the driver about insufficient
tire pressure even though the driver is
responsible for regularly checking the
tire pressure.
Radial tires fitted on the vehicle may
look properly inflated even when they
actually are under inflated. Do not
make a visual judgment when
determining proper inflation. Three primary driving aspects are
affected by improper tire pressure:
Safety
WARNING!
• Improperly inflated tires can be
dangerous.
• Under-inflation increases tire flexing
and can result in tire overheating.
• Over-inflation reduces a tire's ability
to cushion shock. Objects on the
road and potholes can cause damage
that results in tire failure.
• Over-inflated or under-inflated tires
can affect vehicle handling and can
fail suddenly, resulting in loss of
vehicle control.
• Unequal tire pressures can cause
steering problems.
• Unequal tire pressures from one side
of the vehicle to the other can cause
the vehicle to drift to the right or
left.
• Always drive with each tire inflated
to the recommended cold tire
inflation pressure.
Economy
Improper
inflation pressures may cause
uneven wear patterns to develop across the tire tread. These abnormal
wear patterns will reduce tread life
resulting in a need for earlier tire
replacement. Under-inflation also
increases tire rolling resistance
resulting in higher fuel consumption.
Ride comfort and vehicle stability
Proper tire inflation contributes to a
comfortable ride. Over-inflation
produces a jarring and uncomfortable
ride.
Tire Pressure Checkup The proper cold tire inflation pressure
is indicated on the driver's side rear
door pillar and on the table “Tire
Inflation Pressure” in section “Features
and Specifications”.
Inflation pressure specified on the
table always refers to “cold tire
inflation pressure”. Cold tire inflation
pressure is defined as the tire pressure
after the vehicle has not been driven
for at least three hours, or driven less
than 1 mi (1.6 km) after a three hour
period.
Check tire pressures more often in case
of significant outside temperature
changes, as tire pressure varies
according to temperature changes.
The pressure should be checked and if
necessary adjusted; tire wear andDriving
5
286
Page 291 of 384

overall conditions should also be
checked monthly. Tire pressures
change by approximately 1 PSI (0.07
bar) per 12°F (7°C) of air temperature
change. Keep this in mind when
checking tire pressure inside a garage,
especially in winter.
Example: If garage temperature = 68°F
(20°C) and the outside temperature =
32°F (0°C) then the cold tire inflation
pressure should be increased by 3 PSI
(0.21 bar) for every 12°F (7°C) for this
outside temperature condition.
Tire pressure may increase from 2 to 6
PSI (0.13 to 0.4 bar) during operation.
DO NOT reduce this normal pressure
build-up or your tire pressure will be
too low. After inspecting or adjusting
the tire pressure, always reinstall the
valve stem cap. This will prevent
moisture and dirt from entering the
valve stem, which could damage the
valve stem and the TPMS sensor
connected to it.
Tread Wear Indicators Tread wear indicators are in the
original equipment tires to help you
determine when your tires should be
replaced.
These indicators are molded into the
bottom of the tread grooves. When the tread is worn to one of the
tread wear indicators, the tire should
be replaced.
WARNING!
The wet performance (aquaplaning
resistance) will decrease
proportionally to the thickness of the
tread.
Tires Durability The service life of a tire depends on
various factors including, but not
limited to:
• driving style;
• tire pressure;
• distance driven.
WARNING!
Tires and the spare tire (if equipped)
should be replaced after six years,
regardless of the remaining tread.
Failure to follow this warning could
result in tire failure. Replacement Tires NOTE:
In order to maintain high performance
and safety level under all driving
conditions, Maserati strongly
recommends to use tires equivalent to
the originals in size, quality and
performance when replacement is
needed.
For the size designation of your tire
see the label on the driver's side rear
door pillar or see table “Wheels” in
section “Features and Specifications”.
The “Load Index” and “Speed
Symbol” for your tire will be found on
the original equipment tire sidewall.
NOTE:
Maserati recommends Maserati
Genuine Tires marked with “MGT”
logo specifically designed for its
models.
It is recommended to replace the two
front tires or two rear tires as a pair.
Replacing just one tire can seriously
affect your vehicle’s handling.
If you ever replace a wheel assembly,
make sure that the wheel’s
specifications (valve, TPMS sensor and
tire) match those of the original
wheels. Failure to use equivalentDriving
5
287
Page 292 of 384
replacement tires may adversely affect
the safety, handling, and ride of your
vehicle.
Your Authorized Maserati Dealer is
available to provide suggestions as to
the types of tires most suited to the
use foreseen by the Customer.
WARNING!
• Do not use a tire, wheel size or
rating other than that specified for
your vehicle. Some combinations of
unapproved tires and wheels may
change suspension dimensions and
performance characteristics,
resulting in altered steering,
handling, and braking operations of
the vehicle. This can cause
unpredictable handling and stress to
steering and suspension
components. Use only the tire and
wheel sizes with load ratings
appointed for your vehicle.
• Never use a tire with a smaller load
index or capacity, other than what
was originally equipped on your
vehicle. Using a tire with a smaller
load index could result in tire
overloading and failure.
• Always check the maximum speed
rating on the tire sidewall on any tire on the vehicle.
• Never exceed the maximum speed
rating of the tires. Risk of accident
and serious personal injury due to
excessive speed.
• Failure to equip your vehicle with
tires having adequate speed
capability can result in tire failure.
CAUTION!
Replacing original tires with tires of a
different size may result in false
speedometer and odometer readings.
Winter Tires These tires are specially designed for
driving on snow and ice and are fitted
to replace the ones supplied with the
vehicle. Winter or all-season tires can
be identified by the M+S (Mud &
Snow) or 3PMSF (3 Peaks Mountain
Snow Flake) designation on the tire
sidewall.
Before mounting winter tires, contact
an Authorized Maserati Dealer to
receive the technical information
necessary to advise you on wheel and
tire compatibility.
As to the type of tires to use, inflation
pressures and winter tires specifications, carefully follow the
indications as reported in the
“Technical Data” and “Tire Inflation
Pressure” chapters in section “Features
and Specifications”.
WARNING!
The standard tires profile and rubber
mixture are optimized for wet and dry
driving conditions. Standard tires may
not prove favorable for snow
conditions.
NOTE:
Snow
tires should have the same load
capacity as original equipment tires
and should be mounted on all four
wheels.
Snow Chains Maserati approved traction devices (or
snow chains) may be used to improve
traction on compacted snow in heavy
snow conditions.
The use of snow chains is specified by
local regulations of each country.
Use snow chains of reduced
dimensions, with a maximum
projection of 0.23 in (6 mm) beyond
the tire tread.Driving
5
288
Page 293 of 384
The chains may be fitted only on 18”
and 19” rear wheel tires.
Please contact an Authorized Maserati
Dealer for further information.
Check the snow chain tension after
driving for a distance of about 55 yd
(50 m) with the chains fitted.
With the snow chains fitted, it is
advisable to deactivate the ESC system
(see chapter “Drive Mode” in this
section).
CAUTION!
• The use of non-recommended snow
chains may damage the vehicle.
• Broken snow chains can cause
serious damage. Stop the vehicle
immediately if noise occurs that
could indicate snow chain breakage.
Replace the damaged parts of the
snow chain before further use.
• Do not exceed 30 mph (50 km/h).
• Drive cautiously and avoid severe
turns and large bumps, especially
with a loaded vehicle.
• Avoid holes in the road, do not drive
over steps or sidewalks and do not
drive on long stretches without
snow. This will prevent damage to
the vehicle and the roadbed. NOTE:
The Authorized
Maserati Dealer can
provide you with all information
about the Maserati Snow Chains,
available in the "Genuine Accessories"
range.
Compact Spare Tire The limited-use spare tire, or compact
spare tire, is for temporary emergency
use only. This tire is identified by a
label indicating the driving speed
limitations to comply with when using
the spare tire.
Inflate the spare tire to the cold
inflation pressure listed on the table
“Tire Inflation Pressure” in section
“Features and Specifications”.
Mounting the spare tire affects vehicle
handling. Replace (or repair) as soon
as possible the original equipment tire
and reinstall it on the vehicle. Do not
install more than one compact spare
tire and wheel on the vehicle at a
time.
WARNING!
With these compact spare tires, do not
drive more than 50 mph (80 km/h).
Temporary use spares have limited
tread life.Tire Pressure Monitoring
System (TPMS) The Tire Pressure Monitoring System
(TPMS) will warn the driver of a low
tire pressure according to the vehicle
recommended cold pressure indicated
on the table “Tire Inflation Pressure”
in section “Features and
Specifications” and on the label
applied on the driver's side rear door
pillar.
Tire pressure should always be set
based on cold inflation tire pressure.
The cold tire inflation pressure must
not exceed the maximum inflation
pressure molded into the tire sidewall.
Check “Tires – General Information” in
section “Driving” for information on
how to properly inflate the tires.
The tire pressure will also increase as
the vehicle is driven - this is normal
and there is no adjustment required
when this occurs.
The TPMS will warn the driver of a low
tire pressure if the tire pressure falls
below the low-pressure warning limit
for any reason, including low
temperature effects and natural
pressure loss of the tire.
The TPMS will continue to warn the
driver of low tire pressure as long as
the condition persists and will not turnDriving
5
289
Page 294 of 384

off until the tire pressure is equal or
above the recommended cold inflation
pressure. Once the low tire pressure
warning light
illuminates, you must
increase the tire pressure to the
recommended cold inflation pressure
in order for the TPMS light
to turn
off. The system will automatically
update and the TPMS light
will turn
off once the system acquires the
correct tire pressure.
The vehicle may need to be driven for
up to 20 minutes above 15 mph
(24 km/h) in order for the TPMS to
acquire and process the updated
setting. WARNING!
The TPMS warns the driver that the
tire pressure has decreased. This
warning does not exempt the driver
from periodically checking the tires
and from complying with the
prescribed tire pressure levels.
CAUTION!
• The TPMS has been optimized for the
original equipment tires and wheels.
TPMS pressures and warning have
been established for the tire size
equipped on your vehicle.
Undesirable system operation or
sensor damage may occur when
using replacement equipment that is
not of the same size, type, and/or
style. Aftermarket wheels can cause
sensor damage. Do not use aftermarket tire sealants or balance
beads if your vehicle is equipped
with a TPMS, as damage to the
sensors may result.
• The system can temporarily
experience radio-electric
interference emitted by devices
using similar frequencies.
• After inspecting or adjusting the tire
pressure, always reinstall the valve
stem cap. This will prevent moisture
and dirt from entering the valve
stem and damage the TPMS internal
sensor.
NOTE:
• Driving
on a
significantly
underinflated tire causes the tire to
overheat and may lead to tire failure.
Under-inflation also reduces fuel
efficiency and tire tread life, and may
affect the vehicle’s handling and
stopping ability.
• The TPMS is not a substitute for
proper tire maintenance, and it is the
driver’s responsibility to maintain
correct tire pressure using an
accurate tire pressure gage, even if
under-inflation has not reached the
level to trigger illumination of the
TPMS light
.
• Seasonal temperature changes will
affect tire pressure, and the TPMSDriving
5
290
Page 295 of 384

will monitor the actual tire pressure
in the tire.
Premium System The TPMS system uses wireless
technology with wheel rim mounted
electronic sensors to monitor tire
pressure levels. Sensors mounted to
each wheel as part of the valve stem
transmit tire pressure readings to the
receiver module.
The TPMS consists of the following
components:
• receiver module;
• four TPMS sensors;
• various TPMS messages, which
display on the instrument cluster;
• warning light
.
Tire Pressure Low Warning
The TPMS light will illuminate in
the instrument cluster and an acoustic
signal will notify that tire pressure is
low in one or more of the four tires. The instrument cluster will also display
a screenshot reporting the pressure
values of each tire with flashing low
pressure value.
Should this occur, you should stop as
soon as possible and inflate the tire/s
with the low pressure (the one/s
flashing in the instrument cluster
graphic) to the recommended cold
pressure inflation value. Once the
system receives the updated tire
pressure value, the system will automatically update, the graphic
display in the instrument cluster will
stop flashing, and the TPMS light
will turn off. The vehicle may need
to be driven for up to 20 minutes
above 15 mph (24 km/h) in order for
the TPMS to acquire and process the
updated information.
Tire Pressure System Fault
If a system fault is detected, the TPMS
light
will flash for 75 seconds and
then remain lit followed by a beeping
sound. Therewith, the instrument
cluster will display a "Service Tire
Pressure System" message for a
minimum of five seconds and then
display dashes (--) in place of the
pressure value to indicate which
sensor is ineffective.
If the ignition switch is cycled, the
sequence will repeat, in case the
system fault still persists. If the system
fault no longer exists, the TPMS light
will no longer flash, and the
"Service Tire Pressure System"
message will no longer be displayed,
and a pressure value will be displayed
in place of the dashes.
A system fault can occur due to any of
the following:
• Signal interference due to electronic
devices or driving next to facilitiesDriving
5
291
Page 311 of 384
• If provided, the chock can be
installed in order to improve vehicle
stability.
WARNING!
The vehicle must be level and on the
firm ground during the vehicle lifting
operations. If forced to stop the
vehicle on a slope, call the Assistance
service and avoid any operation.
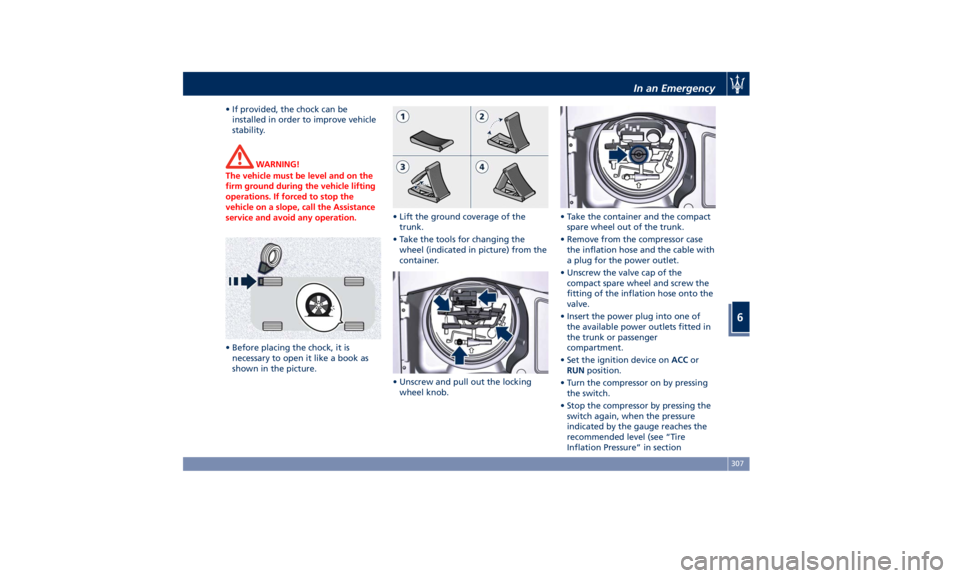
• Before placing the chock, it is
necessary
to open
it like a book as
shown in the picture. • Lift the ground coverage of the
trunk.
• Take the tools for changing the
wheel (indicated in picture) from the
container.
• Unscrew and pull out the locking
wheel knob. • Take the container and the compact
spare wheel out of the trunk.
• Remove from the compressor case
the inflation hose and the cable with
a plug for the power outlet.
• Unscrew the valve cap of the
compact spare wheel and screw the
fitting of the inflation hose onto the
valve.
• Insert the power plug into one of
the available power outlets fitted in
the trunk or passenger
compartment.
• Set the ignition device on ACC or
RUN position.
• Turn the compressor on by pressing
the switch.
• Stop the compressor by pressing the
switch again, when the pressure
indicated by the gauge reaches the
recommended level (see “Tire
Inflation Pressure” in sectionIn an Emergency
6
307