ad blue MASERATI GRANTURISMO 2019 Owners Manual
[x] Cancel search | Manufacturer: MASERATI, Model Year: 2019, Model line: GRANTURISMO, Model: MASERATI GRANTURISMO 2019Pages: 286, PDF Size: 8.08 MB
Page 91 of 286
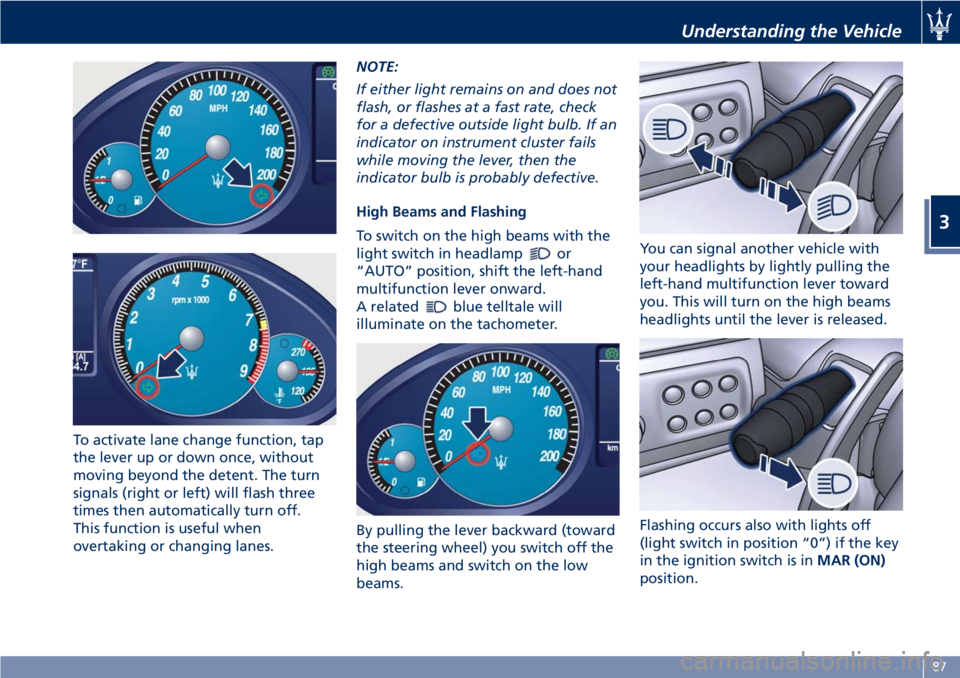
To activate lane change function, tap
the lever up or down once, without
moving beyond the detent. The turn
signals (right or left) will flash three
times then automatically turn off.
This function is useful when
overtaking or changing lanes. NOTE:
If either light remains on and does not
flash, or flashes at a fast rate, check
for a defective outside light bulb. If an
indicator on instrument cluster fails
while moving the lever, then the
indicator bulb is probably defective.
High Beams and Flashing
To switch on the high beams with the
light switch in headlamp
or
“AUTO” position, shift the left-hand
multifunction lever onward.
A related
blue telltale will
illuminate on the tachometer.
By pulling the lever backward (toward
the steering wheel) you switch off the
high beams and switch on the low
beams. You can signal another vehicle with
your headlights by lightly pulling the
left-hand multifunction lever toward
you. This will turn on the high beams
headlights until the lever is released.
Flashing occurs also with lights off
(light switch in position “0”) if the key
in the ignition switch is in MAR (ON)
position.Understanding the Vehicle
3
87
Page 127 of 286
for at least 2 seconds, it brings the
cursor back in the lower bar of the
main menus.
Enter Button
To confirm the function or setting
highlighted on MTC+ display. When in
"Radio" mode and the key in the
ignition switch in MAR (ON) position,
holding this button you can save your
preset stations.
With key not inserted in the ignition
switch or in STOP (OFF) position,
pressing and holding this button for
2-3 seconds will turn off the MTC+
system. If pressed again and held for
2-3 seconds, the MTC+ will turn back
on.
Main Menu Bar on MTC+
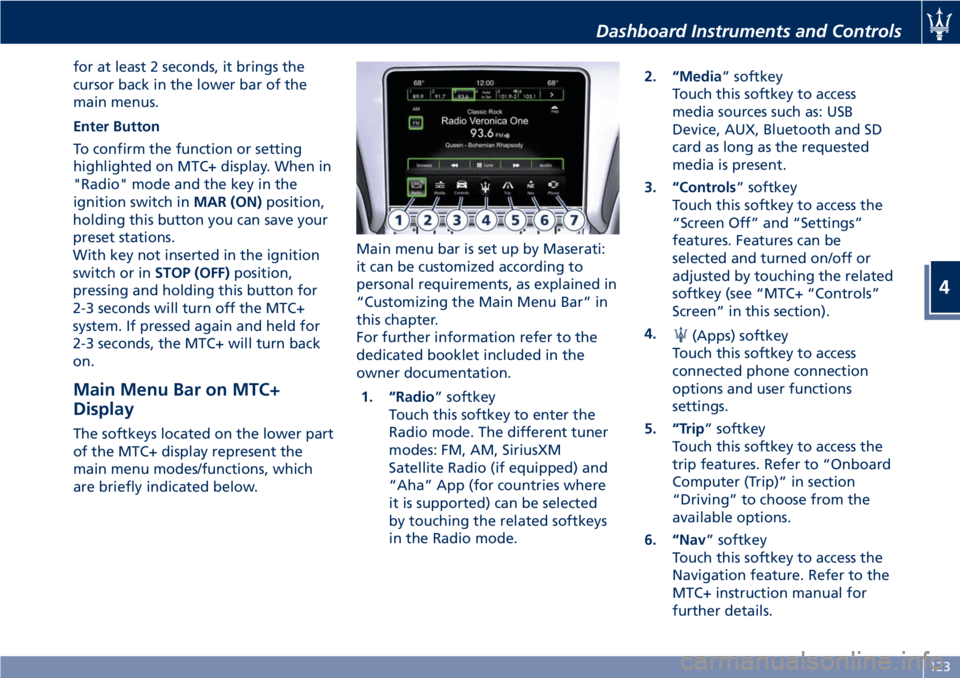
Display The softkeys located on the lower part
of the MTC+ display represent the
main menu modes/functions, which
are briefly indicated below. Main menu bar is set up by Maserati:
it can be customized according to
personal requirements, as explained in
“Customizing the Main Menu Bar” in
this chapter.
For further information refer to the
dedicated booklet included in the
owner documentation.
1. “Radio ” softkey
Touch this softkey to enter the
Radio mode. The different tuner
modes: FM, AM, SiriusXM
Satellite Radio (if equipped) and
“Aha” App (for countries where
it is supported) can be selected
by touching the related softkeys
in the Radio mode. 2. “Media ” softkey
Touch this softkey to access
media sources such as: USB
Device, AUX, Bluetooth and SD
card as long as the requested
media is present.
3. “Controls ” softkey
Touch this softkey to access the
“Screen Off” and “Settings”
features. Features can be
selected and turned on/off or
adjusted by touching the related
softkey (see “MTC+ “Controls”
Screen” in this section).
4.
(Apps) softkey
Touch this softkey to access
connected phone connection
options and user functions
settings.
5. “Trip ” softkey
Touch this softkey to access the
trip features. Refer to “Onboard
Computer (Trip)” in section
“Driving” to choose from the
available options.
6. “Nav ” softkey
Touch this softkey to access the
Navigation feature. Refer to the
MTC+ instruction manual for
further details.Dashboard Instruments and Controls
4
123
Page 136 of 286
NOTE:
• For further details refer to the
“Maserati Touch Control Plus
(MTC+)” guide.
• All settings must be edited with key
in the ignition switch in MAR (ON)
position.
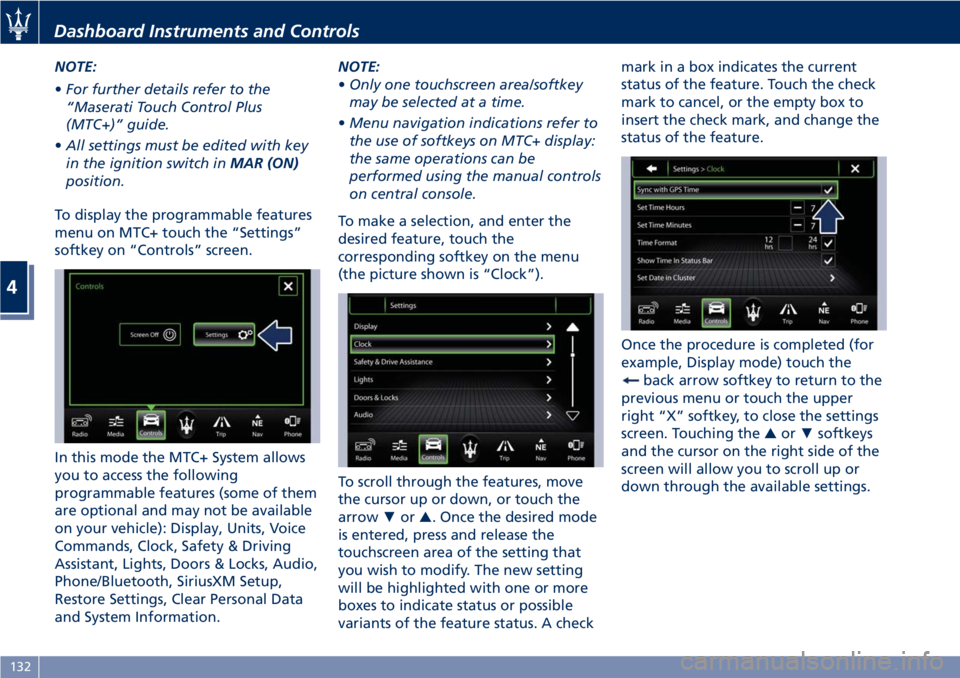
To display the programmable features
menu on MTC+ touch the “Settings”
softkey on “Controls” screen.
In this mode the MTC+ System allows
you to access the following
programmable features (some of them
are optional and may not be available
on your vehicle): Display, Units, Voice
Commands, Clock, Safety & Driving
Assistant, Lights, Doors & Locks, Audio,
Phone/Bluetooth, SiriusXM Setup,
Restore Settings, Clear Personal Data
and System Information. NOTE:
• Only one touchscreen area/softkey
may be selected at a time.
• Menu navigation indications refer to
the use of softkeys on MTC+ display:
the same operations can be
performed using the manual controls
on central console.
To make a selection, and enter the
desired feature, touch the
corresponding softkey on the menu
(the picture shown is “Clock”).
To scroll through the features, move
the cursor up or down, or touch the
arrow ▼ or ▲ . Once the desired mode
is entered, press and release the
touchscreen area of the setting that
you wish to modify. The new setting
will be highlighted with one or more
boxes to indicate status or possible
variants of the feature status. A check mark in a box indicates the current
status of the feature. Touch the check
mark to cancel, or the empty box to
insert the check mark, and change the
status of the feature.
Once the procedure is completed (for
example, Display mode) touch the
back arrow softkey to return to the
previous menu or touch the upper
right “X” softkey, to close the settings
screen. Touching the ▲ or ▼ softkeys
and the cursor on the right side of the
screen will allow you to scroll up or
down through the available settings.Dashboard Instruments and Controls
4
132
Page 141 of 286
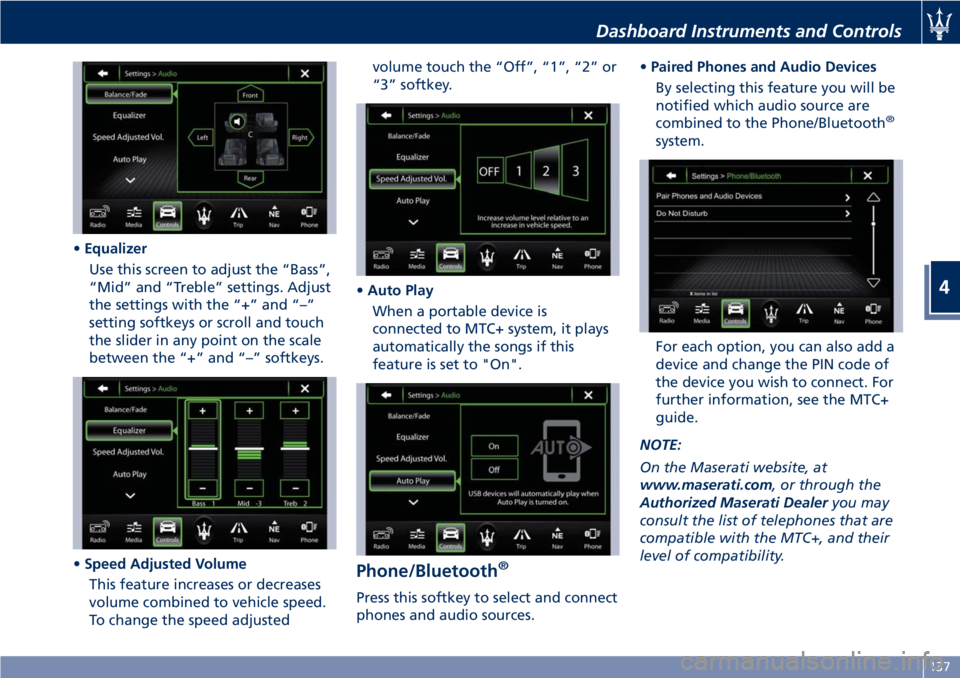
• Equalizer
Use this screen to adjust the “Bass”,
“Mid” and “Treble” settings. Adjust
the settings with the “+” and “–”
setting softkeys or scroll and touch
the slider in any point on the scale
between the “+” and “–” softkeys.
• Speed Adjusted Volume
This feature increases or decreases
volume combined to vehicle speed.
To change the speed adjusted volume touch the “Off”, “1”, “2” or
“3” softkey.
• Auto Play
When a portable device is
connected to MTC+ system, it plays
automatically the songs if this
feature is set to "On".
Phone/Bluetooth ®
Press this softkey to select and connect
phones and audio sources. • Paired Phones and Audio Devices
By selecting this feature you will be
notified which audio source are
combined to the Phone/Bluetooth ®
system.
For each option, you can also add a
device and change the PIN code of
the device you wish to connect. For
further information, see the MTC+
guide.
NOTE:
On the Maserati website, at
www.maserati.com , or through the
Authorized Maserati Dealer you may
consult the list of telephones that are
compatible with the MTC+, and their
level of compatibility.Dashboard Instruments and Controls
4
137
Page 143 of 286
settings and/or options that have been
modified compared to factory settings
and will also remove from system
memory Bluetooth ®
devices and
presets.
To remove personal information,
select this feature and a pop-up will
appear asking confirmation to delete
all personal data. Select “OK” to clear,
or “Cancel” to exit. Once the data
have been cleared, a pop up appears
confirming that personal data have
been cleared.
System Information When this feature is selected, the
display shows an information screen
with the software version installed on
MTC+. Glove Compartments The glove compartments may be used
to store devices, small items or
documents.
WARNING!
• Do not operate the vehicle with the
lid of glove compartment in the
open position.
• To help ensure passenger safety, the
glove compartment must always
remain closed while driving.
• Store objects or devices in glove
compartment to ensure they will not
move during the trip and prevent
them from hitting any person on
board.
CAUTION!
Do not place objects weighing over
22 lb (10 kg) in the glove
compartment.
Glove Box on Passenger Side
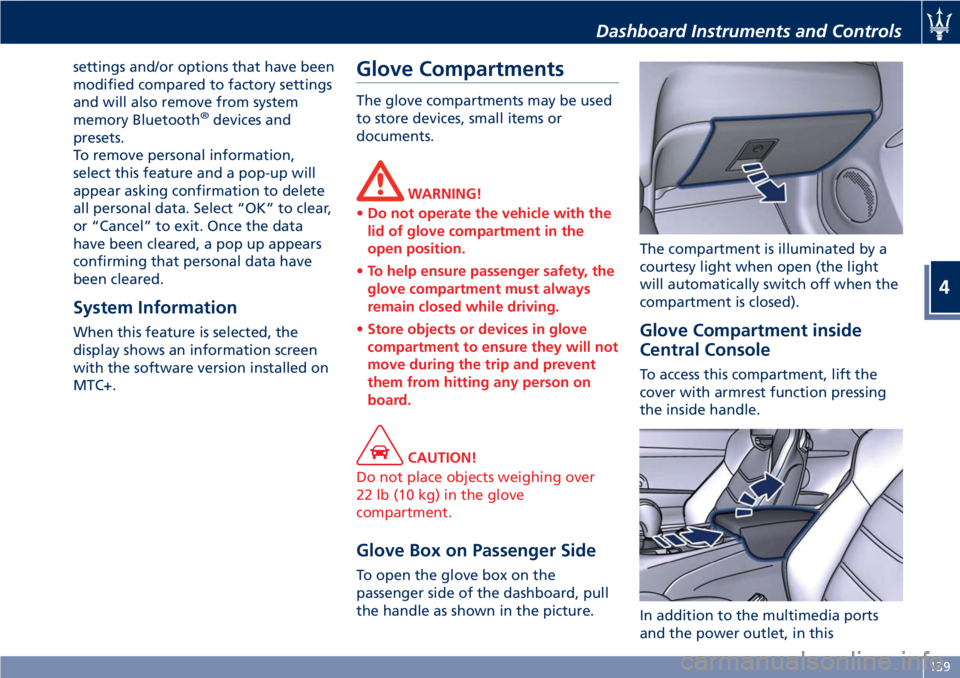
To open the glove box on the
passenger side of the dashboard, pull
the handle as shown in the picture. The compartment is illuminated by a
courtesy light when open (the light
will automatically switch off when the
compartment is closed).
Glove Compartment inside
Central Console To access this compartment, lift the
cover with armrest function pressing
the inside handle.
In addition to the multimedia ports
and the power outlet, in thisDashboard Instruments and Controls
4
139
Page 148 of 286
• compressor enabled (the LED on the
button is illuminated);
• defrosting/defogging function (MAX
DEF) deactivated (the LED on the
button is off);
• heated rear window deactivated (the
LED on the button is off);
• open recirculation (the LED on the
button is off);
• air ventilation and distribution are
set by the system;
• REAR disabled (the LED on the
button is off), the air flows to the
rear vents.
A/C Filter The climate control system filters
outside air containing dust, pollen and
some odors. Strong odors cannot be
totally removed by A/C filter at the
entrance of the air climate system. See
“Maintenance Procedures” in section
“Maintenance and Care” for filter
replacement instructions. Phone and Voice Controls
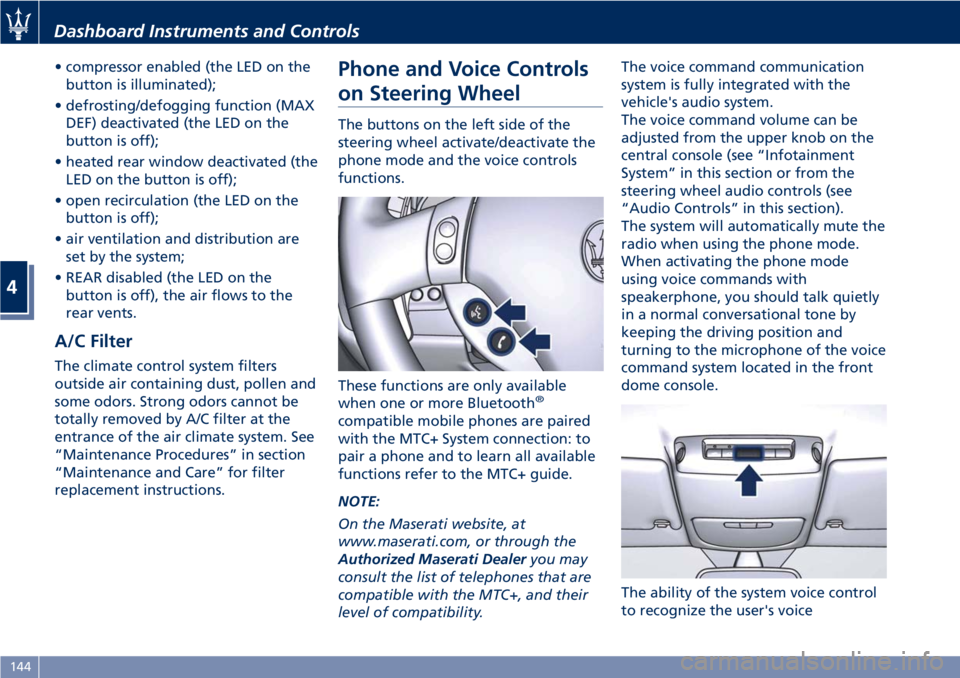
on Steering Wheel The buttons on the left side of the
steering wheel activate/deactivate the
phone mode and the voice controls
functions.
These functions are only available
when one or more Bluetooth ®
compatible mobile phones are paired
with the MTC+ System connection: to
pair a phone and to learn all available
functions refer to the MTC+ guide.
NOTE:
On the Maserati website, at
www.maserati.com, or through the
Authorized Maserati Dealer you may
consult the list of telephones that are
compatible with the MTC+, and their
level of compatibility. The voice command communication
system is fully integrated with the
vehicle's audio system.
The voice command volume can be
adjusted from the upper knob on the
central console (see “Infotainment
System” in this section or from the
steering wheel audio controls (see
“Audio Controls” in this section).
The system will automatically mute the
radio when using the phone mode.
When activating the phone mode
using voice commands with
speakerphone, you should talk quietly
in a normal conversational tone by
keeping the driving position and
turning to the microphone of the voice
command system located in the front
dome console.
The ability of the system voice control
to recognize the user's voiceDashboard Instruments and Controls
4
144
Page 245 of 286
Fuse Replacement Used Fuses Characteristics When an electrical device is not
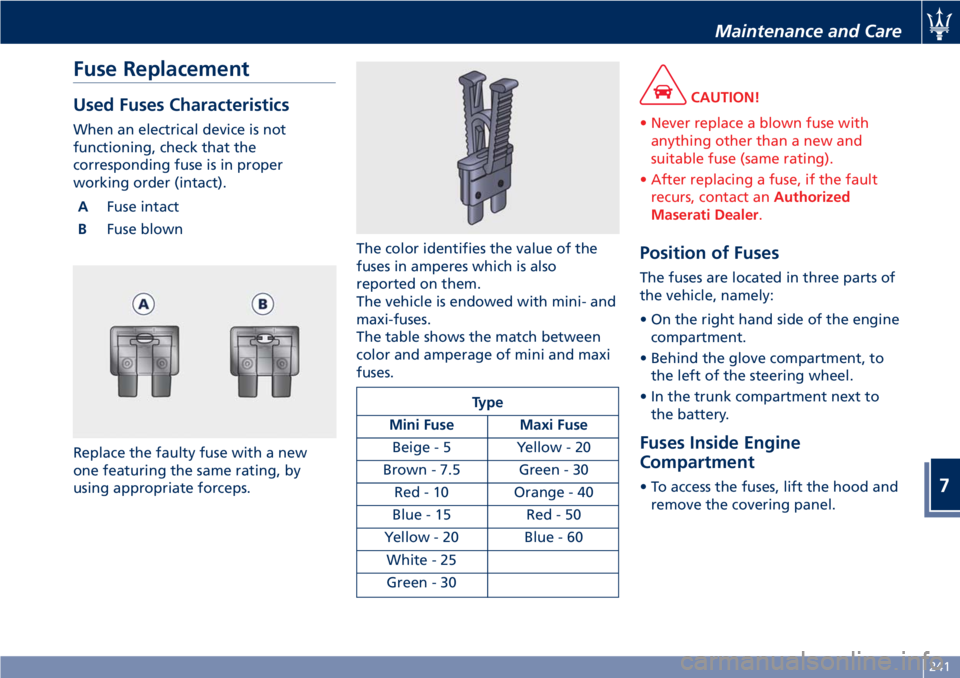
functioning, check that the
corresponding fuse is in proper
working order (intact).
A Fuse intact
B Fuse blown
Replace the faulty fuse with a new
one featuring the same rating, by
using appropriate forceps. The color identifies the value of the
fuses in amperes which is also
reported on them.
The vehicle is endowed with mini- and
maxi-fuses.
The table shows the match between
color and amperage of mini and maxi
fuses.
Type
Mini Fuse Maxi Fuse
Beige - 5 Yellow - 20
Brown - 7.5 Green - 30
Red - 10 Orange - 40
Blue - 15 Red - 50
Yellow - 20 Blue - 60
White - 25
Green - 30 CAUTION!
• Never replace a blown fuse with
anything other than a new and
suitable fuse (same rating).
• After replacing a fuse, if the fault
recurs, contact an Authorized
Maserati Dealer .
Position of Fuses The fuses are located in three parts of
the vehicle, namely:
• On the right hand side of the engine
compartment.
• Behind the glove compartment, to
the left of the steering wheel.
• In the trunk compartment next to
the battery.
Fuses Inside Engine
Compartment • To access the fuses, lift the hood and
remove the covering panel.Maintenance and Care
7
241
Page 246 of 286
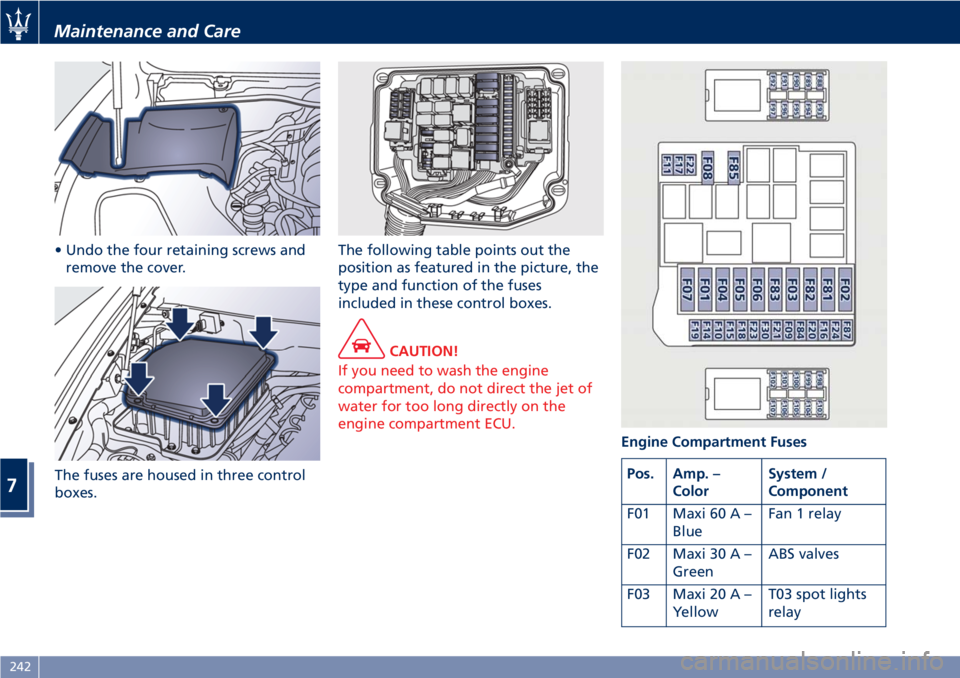
• Undo the four retaining screws and
remove the cover.
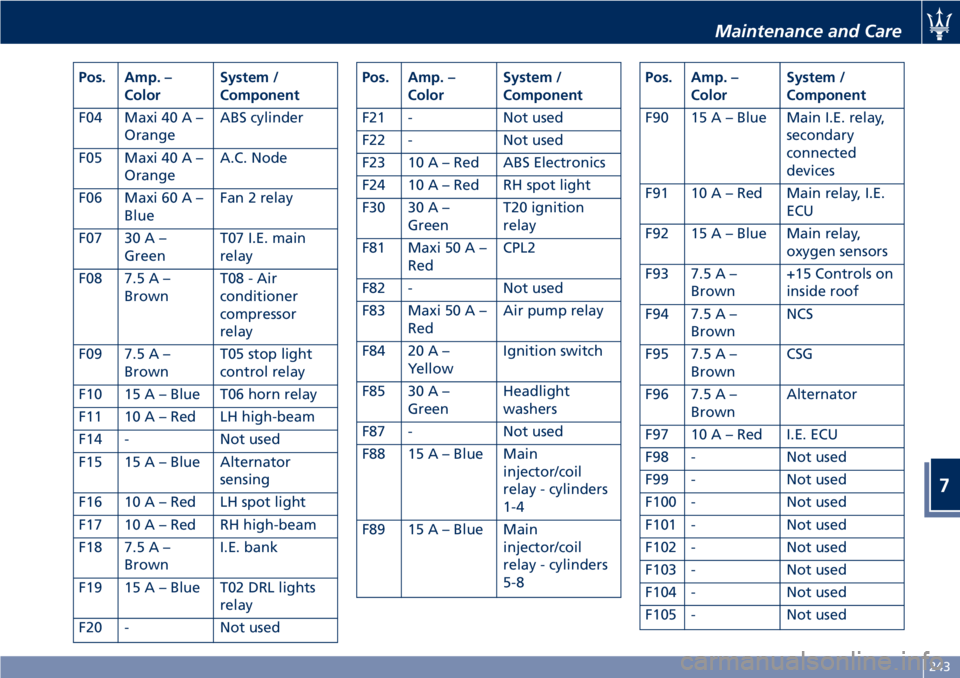
The fuses are housed in three control
boxes. The following table points out the
position as featured in the picture, the
type and function of the fuses
included in these control boxes.
CAUTION!
If you need to wash the engine
compartment, do not direct the jet of
water for too long directly on the
engine compartment ECU.
Engine Compartment Fuses
Pos. Amp. –
Color System /
Component
F01 Maxi 60 A –
Blue Fan 1 relay
F02 Maxi 30 A –
Green ABS valves
F03 Maxi 20 A –
Yellow T03 spot lights
relayMaintenance and Care
7
242
Page 247 of 286
Pos. Amp. –
Color System /
Component
F04 Maxi 40 A –
Orange ABS cylinder
F05 Maxi 40 A –
Orange A.C. Node
F06 Maxi 60 A –
Blue Fan 2 relay
F07 30 A –
Green T07 I.E. main
relay
F08 7.5 A –
Brown T08 - Air
conditioner
compressor
relay
F09 7.5 A –
Brown T05 stop light
control relay
F10 15 A – Blue T06 horn relay
F11 10 A – Red LH high-beam
F14 - Not used
F15 15 A – Blue Alternator
sensing
F16 10 A – Red LH spot light
F17 10 A – Red RH high-beam
F18 7.5 A –
Brown I.E. bank
F19 15 A – Blue T02 DRL lights
relay
F20 - Not used Pos. Amp. –
Color System /
Component
F21 - Not used
F22 - Not used
F23 10 A – Red ABS Electronics
F24 10 A – Red RH spot light
F30 30 A –
Green T20 ignition
relay
F81 Maxi 50 A –
Red CPL2
F82 - Not used
F83 Maxi 50 A –
Red Air pump relay
F84 20 A –
Yellow Ignition switch
F85 30 A –
Green Headlight
washers
F87 - Not used
F88 15 A – Blue Main
injector/coil
relay - cylinders
1-4
F89 15 A – Blue Main
injector/coil
relay - cylinders
5-8 Pos. Amp. –
Color System /
Component
F90 15 A – Blue Main I.E. relay,
secondary
connected
devices
F91 10 A – Red Main relay, I.E.
ECU
F92 15 A – Blue Main relay,
oxygen sensors
F93 7.5 A –
Brown +15 Controls on
inside roof
F94 7.5 A –
Brown NCS
F95 7.5 A –
Brown CSG
F96 7.5 A –
Brown Alternator
F97 10 A – Red I.E. ECU
F98 - Not used
F99 - Not used
F100 - Not used
F101 - Not used
F102 - Not used
F103 - Not used
F104 - Not used
F105 - Not usedMaintenance and Care
7
243
Page 249 of 286
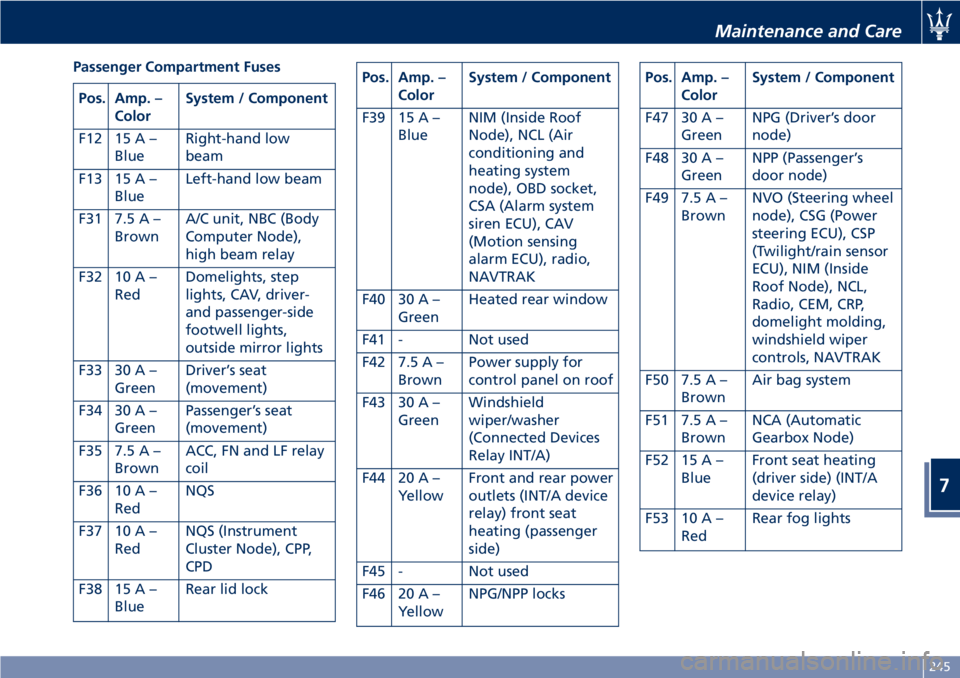
Passenger Compartment Fuses
Pos. Amp. –
Color System / Component
F12 15 A –
Blue Right-hand low
beam
F13 15 A –
Blue Left-hand low beam
F31 7.5 A –
Brown A/C unit, NBC (Body
Computer Node),
high beam relay
F32 10 A –
Red Domelights, step
lights, CAV, driver-
and passenger-side
footwell lights,
outside mirror lights
F33 30 A –
Green Driver’s seat
(movement)
F34 30 A –
Green Passenger’s seat
(movement)
F35 7.5 A –
Brown ACC, FN and LF relay
coil
F36 10 A –
Red NQS
F37 10 A –
Red NQS (Instrument
Cluster Node), CPP,
CPD
F38 15 A –
Blue Rear lid lock Pos. Amp. –
Color System / Component
F39 15 A –
Blue NIM (Inside Roof
Node), NCL (Air
conditioning and
heating system
node), OBD socket,
CSA (Alarm system
siren ECU), CAV
(Motion sensing
alarm ECU), radio,
NAVTRAK
F40 30 A –
Green Heated rear window
F41 - Not used
F42 7.5 A –
Brown Power supply for
control panel on roof
F43 30 A –
Green Windshield
wiper/washer
(Connected Devices
Relay INT/A)
F44 20 A –
Yellow Front and rear power
outlets (INT/A device
relay) front seat
heating (passenger
side)
F45 - Not used
F46 20 A –
Yellow NPG/NPP locks Pos. Amp. –
Color System / Component
F47 30 A –
Green NPG (Driver’s door
node)
F48 30 A –
Green NPP (Passenger’s
door node)
F49 7.5 A –
Brown NVO (Steering wheel
node), CSG (Power
steering ECU), CSP
(Twilight/rain sensor
ECU), NIM (Inside
Roof Node), NCL,
Radio, CEM, CRP,
domelight molding,
windshield wiper
controls, NAVTRAK
F50 7.5 A –
Brown Air bag system
F51 7.5 A –
Brown NCA (Automatic
Gearbox Node)
F52 15 A –
Blue Front seat heating
(driver side) (INT/A
device relay)
F53 10 A –
Red Rear fog lightsMaintenance and Care
7
245