navigation system MASERATI GRANTURISMO 2019 Owners Manual
[x] Cancel search | Manufacturer: MASERATI, Model Year: 2019, Model line: GRANTURISMO, Model: MASERATI GRANTURISMO 2019Pages: 286, PDF Size: 8.08 MB
Page 68 of 286
Rear Parking Camera Your vehicle is equipped with a rear
parking camera that allows you to see
an image on the MTC+ screen of the
rear surroundings of your vehicle
whenever the shift lever is put into R
(Reverse).
When “Parkview Backup Camera
Delay” mode is enabled on MTC+, the
rear view image shall be displayed for
up to 10 seconds after shifting out of R
(Reverse).
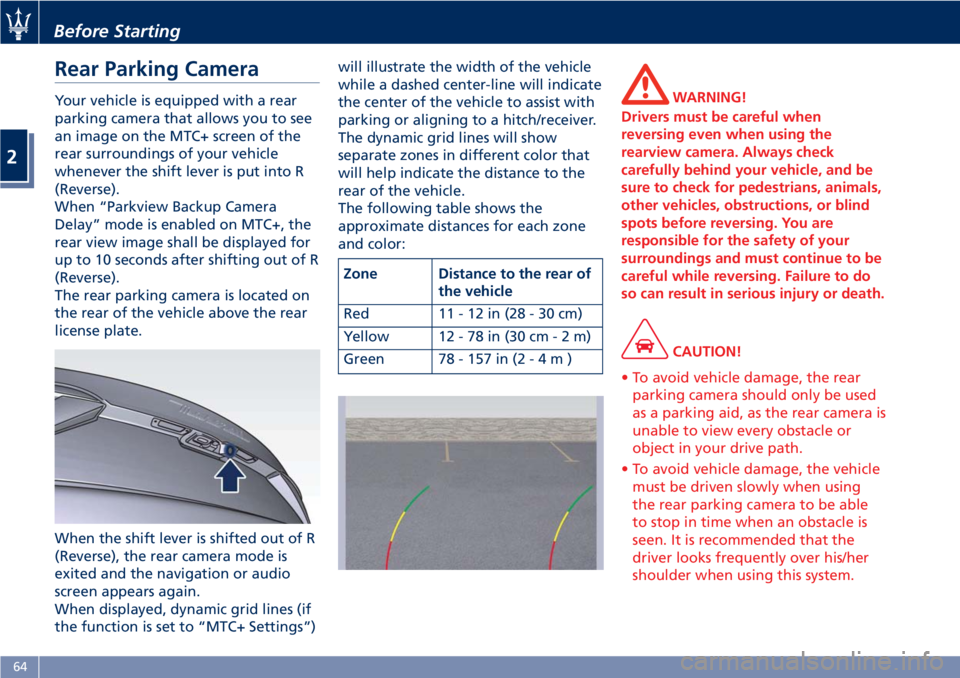
The rear parking camera is located on
the rear of the vehicle above the rear
license plate.
When the shift lever is shifted out of R
(Reverse), the rear camera mode is
exited and the navigation or audio
screen appears again.
When displayed, dynamic grid lines (if
the function is set to “MTC+ Settings”) will illustrate the width of the vehicle
while a dashed center-line will indicate
the center of the vehicle to assist with
parking or aligning to a hitch/receiver.
The dynamic grid lines will show
separate zones in different color that
will help indicate the distance to the
rear of the vehicle.
The following table shows the
approximate distances for each zone
and color:
Zone Distance to the rear of
the vehicle
Red 11-12in(28-30cm)
Yellow 12 - 78 in (30 c m-2m)
Green 78 - 157 in ( 2-4m) WARNING!
Drivers must be careful when
reversing even when using the
rearview camera. Always check
carefully behind your vehicle, and be
sure to check for pedestrians, animals,
other vehicles, obstructions, or blind
spots before reversing. You are
responsible for the safety of your
surroundings and must continue to be
careful while reversing. Failure to do
so can result in serious injury or death.
CAUTION!
• To avoid vehicle damage, the rear
parking camera should only be used
as a parking aid, as the rear camera is
unable to view every obstacle or
object in your drive path.
• To avoid vehicle damage, the vehicle
must be driven slowly when using
the rear parking camera to be able
to stop in time when an obstacle is
seen. It is recommended that the
driver looks frequently over his/her
shoulder when using this system.Before Starting
2
64
Page 77 of 286
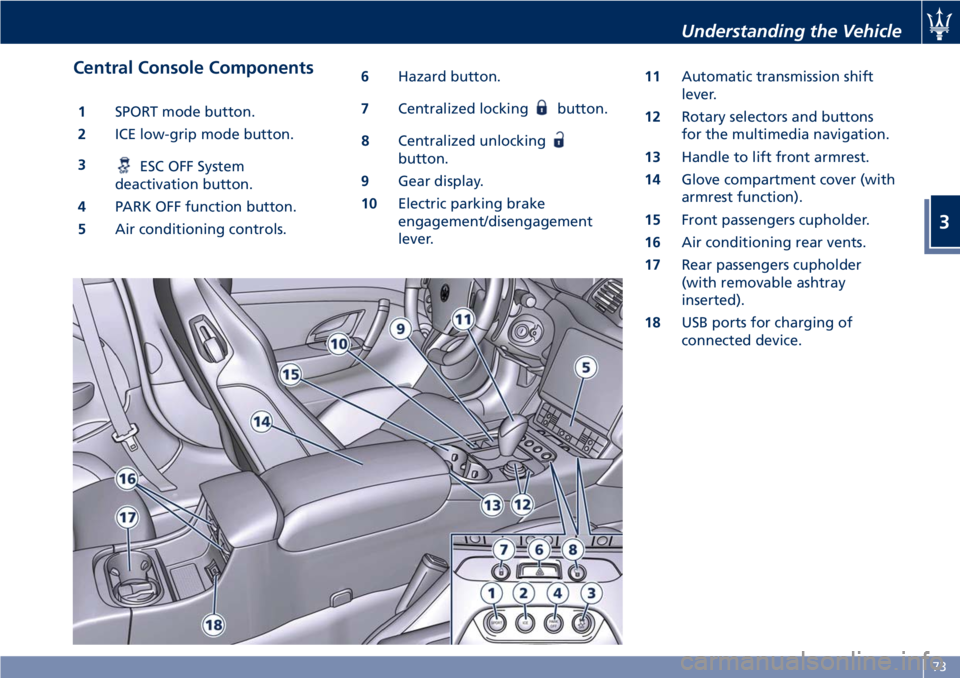
Central Console Components 1 SPORT mode button.
2 ICE low-grip mode button.
3
ESC OFF System
deactivation button.
4 PARK OFF function button.
5 Air conditioning controls. 6 Hazard button.
7 Centralized locking button.
8 Centralized unlocking
button.
9 Gear display.
10 Electric parking brake
engagement/disengagement
lever. 11 Automatic transmission shift
lever.
12 Rotary selectors and buttons
for the multimedia navigation.
13 Handle to lift front armrest.
14 Glove compartment cover (with
armrest function).
15 Front passengers cupholder.
16 Air conditioning rear vents.
17 Rear passengers cupholder
(with removable ashtray
inserted).
18 USB ports for charging of
connected device.Understanding the Vehicle
3
73
Page 99 of 286
must pass as close as possible to the
side walls of the containment
compartment, avoiding the hooking
area of the handle.
The AUX auxiliary port features:
• typical port impedance between
AUX-IN and AUX_REF: 13 Kohm;
• max. applicable voltage: 0.75 Vrms at
1 kHz;
• port compatible only with 3.5 mm
jack connectors (not included).
Any player with these characteristics
and analog audio output (headset
output type) can be served by the
MTC+ System. The system can
recognize the connection to a player
outlet autonomously, by enabling
access to the audio functions
connected to this source.
This
USB port can be used for
data exchange and charge of the
connected source (refer to the MTC+
guide for further details).
Through this USB input is possible to
recharge the connected device for
about an hour from when the key in
the ignition switch is turned in STOP
(OFF) position (“Active Charging”
feature). When this feature is enabled,
the USB port will be backlit.
In this compartment there is also an
SD memory card input. Once inserted into the slot, to extract it press lightly
on the card.
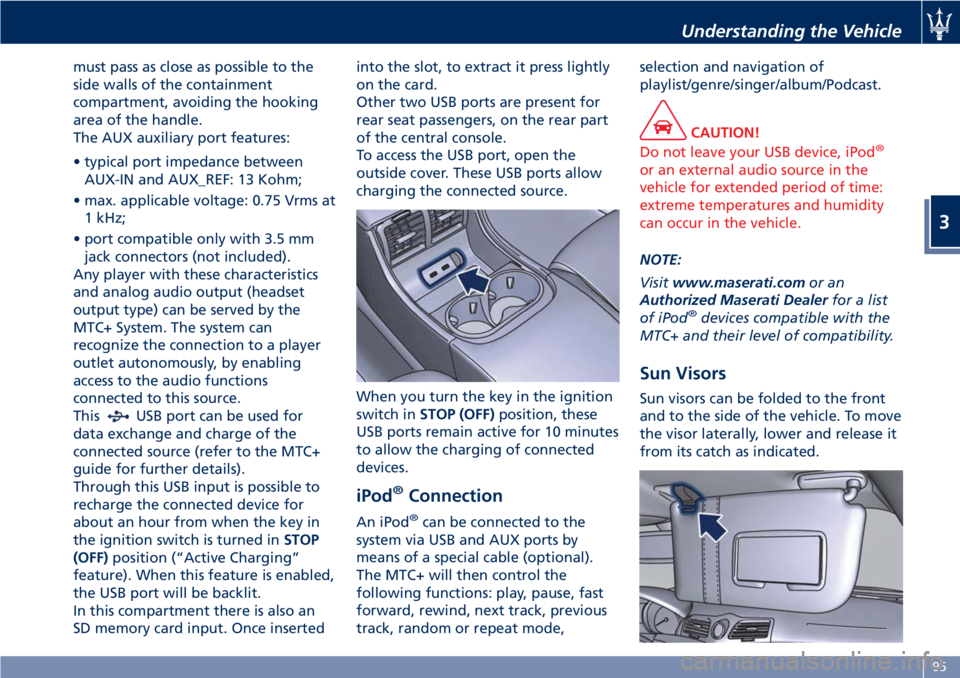
Other two USB ports are present for
rear seat passengers, on the rear part
of the central console.
To access the USB port, open the
outside cover. These USB ports allow
charging the connected source.
When you turn the key in the ignition
switch in STOP (OFF) position, these
USB ports remain active for 10 minutes
to allow the charging of connected
devices.
iPod ®
Connection An iPod ®
can be connected to the
system via USB and AUX ports by
means of a special cable (optional).
The MTC+ will then control the
following functions: play, pause, fast
forward, rewind, next track, previous
track, random or repeat mode, selection and navigation of
playlist/genre/singer/album/Podcast.
CAUTION!
Do not leave your USB device, iPod ®
or an external audio source in the
vehicle for extended period of time:
extreme temperatures and humidity
can occur in the vehicle.
NOTE:
V
isit www.maserati.com or an
Authorized Maserati Dealer for a list
of iPod ®
devices compatible with the
MTC+ and their level of compatibility.
Sun Visors Sun visors can be folded to the front
and to the side of the vehicle. To move
the visor laterally, lower and release it
from its catch as indicated.Understanding the Vehicle
3
95
Page 120 of 286
NOTE:
The TPMS calibration operation is
possible even with the engine running
but the vehicle must be stationary
(0 mph-km/h).
See "Tire Pressure Monitoring System
(TPMS)" in section "Driving" to
calibrate the system.
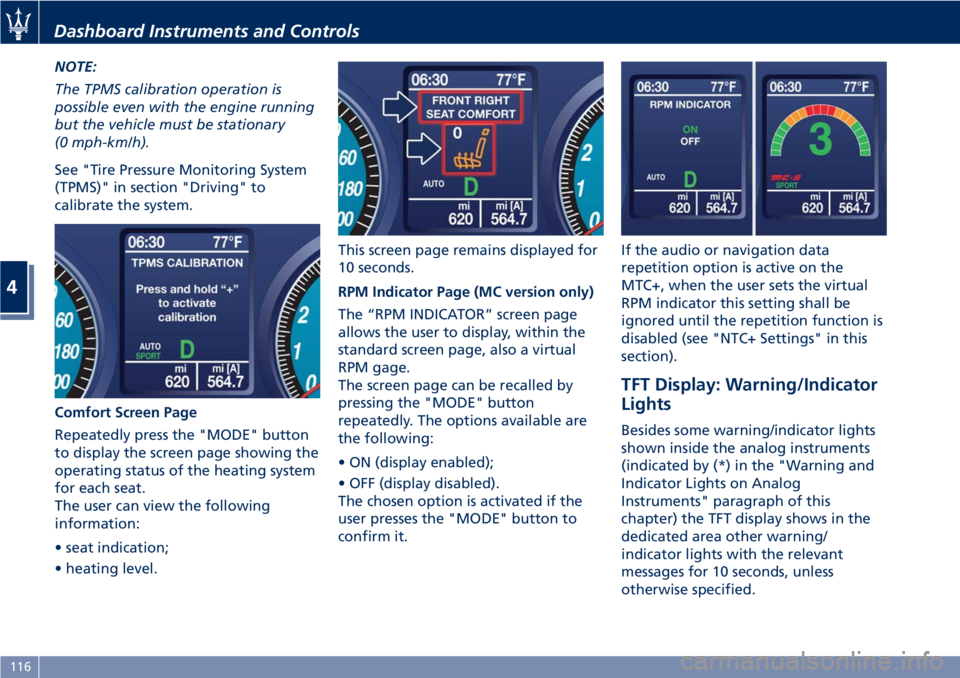
Comfort Screen Page
Repeatedly press the "MODE" button
to display the screen page showing the
operating status of the heating system
for each seat.
The user can view the following
information:
• seat indication;
• heating level. This screen page remains displayed for
10 seconds.
RPM Indicator Page (MC version only)
The “RPM INDICATOR” screen page
allows the user to display, within the
standard screen page, also a virtual
RPM gage.
The screen page can be recalled by
pressing the "MODE" button
repeatedly. The options available are
the following:
• ON (display enabled);
• OFF (display disabled).
The chosen option is activated if the
user presses the "MODE" button to
confirm it. If the audio or navigation data
repetition option is active on the
MTC+, when the user sets the virtual
RPM indicator this setting shall be
ignored until the repetition function is
disabled (see "NTC+ Settings" in this
section).
TFT Display: Warning/Indicator
Lights Besides some warning/indicator lights
shown inside the analog instruments
(indicated by (*) in the "Warning and
Indicator Lights on Analog
Instruments" paragraph of this
chapter) the TFT display shows in the
dedicated area other warning/
indicator lights with the relevant
messages for 10 seconds, unless
otherwise specified.Dashboard Instruments and Controls
4
116
Page 124 of 286
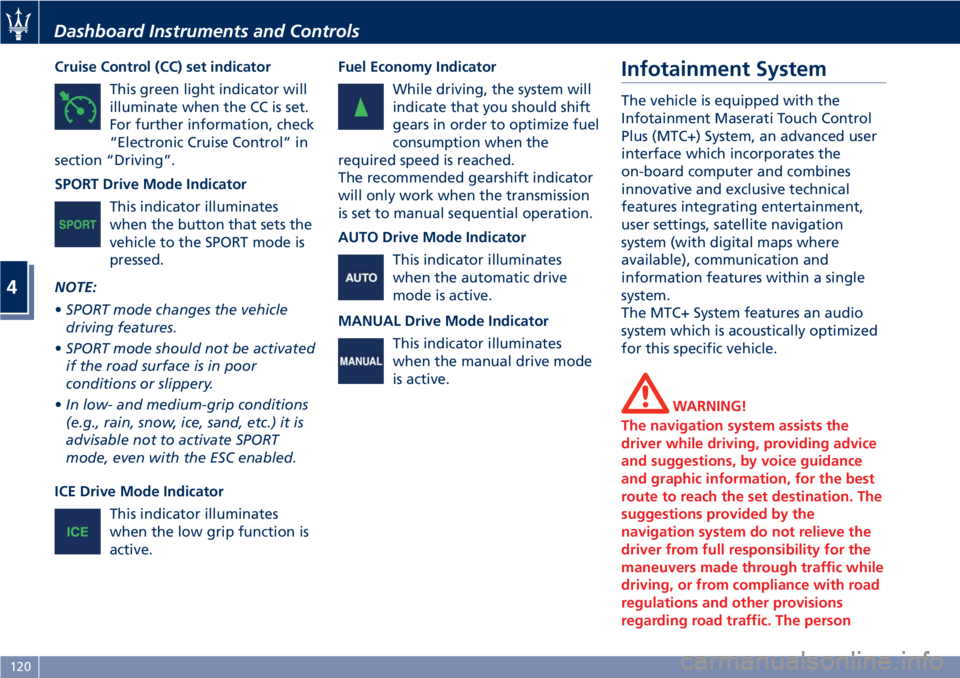
Cruise Control (CC) set indicator
This green light indicator will
illuminate when the CC is set.
For further information, check
“Electronic Cruise Control” in
section “Driving”.
SPORT Drive Mode Indicator
This indicator illuminates
when the button that sets the
vehicle to the SPORT mode is
pressed.
NOTE:
• SPORT mode changes the vehicle
driving features.
• SPORT mode should not be activated
if the road surface is in poor
conditions or slippery.
• In low- and medium-grip conditions
(e.g., rain, snow, ice, sand, etc.) it is
advisable not to activate SPORT
mode, even with the ESC enabled.
ICE Drive Mode Indicator
This indicator illuminates
when the low grip function is
active. Fuel Economy Indicator
While driving, the system will
indicate that you should shift
gears in order to optimize fuel
consumption when the
required speed is reached.
The recommended gearshift indicator
will only work when the transmission
is set to manual sequential operation.
AUTO Drive Mode Indicator
This indicator illuminates
when the automatic drive
mode is active.
MANUAL Drive Mode Indicator
This indicator illuminates
when the manual drive mode
is active. Infotainment System The vehicle is equipped with the
Infotainment Maserati Touch Control
Plus (MTC+) System, an advanced user
interface which incorporates the
on-board computer and combines
innovative and exclusive technical
features integrating entertainment,
user settings, satellite navigation
system (with digital maps where
available), communication and
information features within a single
system.
The MTC+ System features an audio
system which is acoustically optimized
for this specific vehicle.
WARNING!
The navigation system assists the
driver while driving, providing advice
and suggestions, by voice guidance
and graphic information, for the best
route to reach the set destination. The
suggestions provided by the
navigation system do not relieve the
driver from full responsibility for the
maneuvers made through traffic while
driving, or from compliance with road
regulations and other provisions
regarding road traffic. The personDashboard Instruments and Controls
4
120
Page 127 of 286
for at least 2 seconds, it brings the
cursor back in the lower bar of the
main menus.
Enter Button
To confirm the function or setting
highlighted on MTC+ display. When in
"Radio" mode and the key in the
ignition switch in MAR (ON) position,
holding this button you can save your
preset stations.
With key not inserted in the ignition
switch or in STOP (OFF) position,
pressing and holding this button for
2-3 seconds will turn off the MTC+
system. If pressed again and held for
2-3 seconds, the MTC+ will turn back
on.
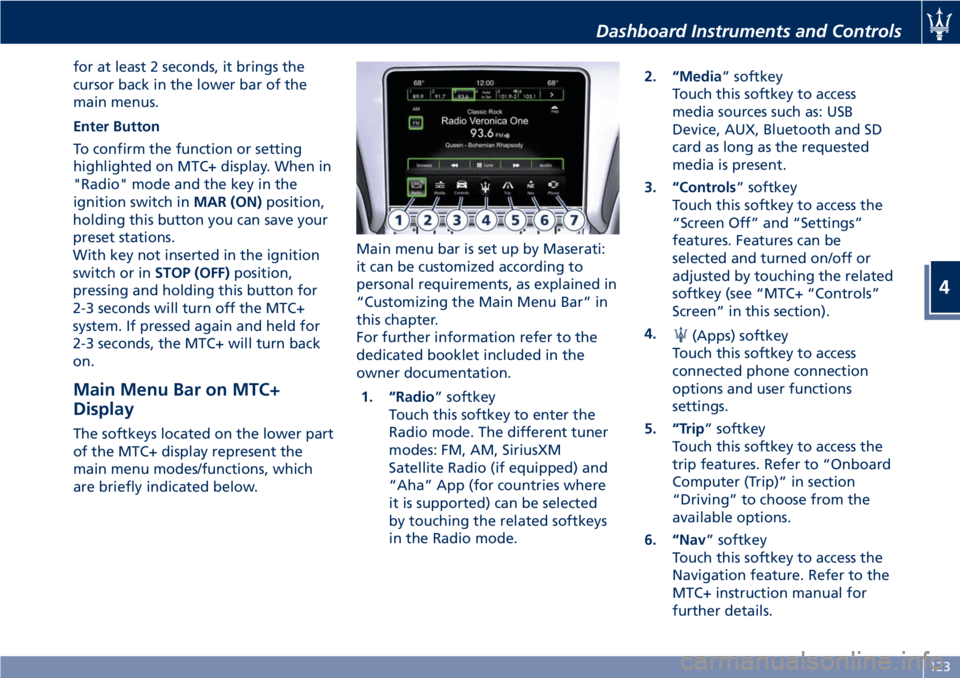
Main Menu Bar on MTC+
Display The softkeys located on the lower part
of the MTC+ display represent the
main menu modes/functions, which
are briefly indicated below. Main menu bar is set up by Maserati:
it can be customized according to
personal requirements, as explained in
“Customizing the Main Menu Bar” in
this chapter.
For further information refer to the
dedicated booklet included in the
owner documentation.
1. “Radio ” softkey
Touch this softkey to enter the
Radio mode. The different tuner
modes: FM, AM, SiriusXM
Satellite Radio (if equipped) and
“Aha” App (for countries where
it is supported) can be selected
by touching the related softkeys
in the Radio mode. 2. “Media ” softkey
Touch this softkey to access
media sources such as: USB
Device, AUX, Bluetooth and SD
card as long as the requested
media is present.
3. “Controls ” softkey
Touch this softkey to access the
“Screen Off” and “Settings”
features. Features can be
selected and turned on/off or
adjusted by touching the related
softkey (see “MTC+ “Controls”
Screen” in this section).
4.
(Apps) softkey
Touch this softkey to access
connected phone connection
options and user functions
settings.
5. “Trip ” softkey
Touch this softkey to access the
trip features. Refer to “Onboard
Computer (Trip)” in section
“Driving” to choose from the
available options.
6. “Nav ” softkey
Touch this softkey to access the
Navigation feature. Refer to the
MTC+ instruction manual for
further details.Dashboard Instruments and Controls
4
123
Page 129 of 286
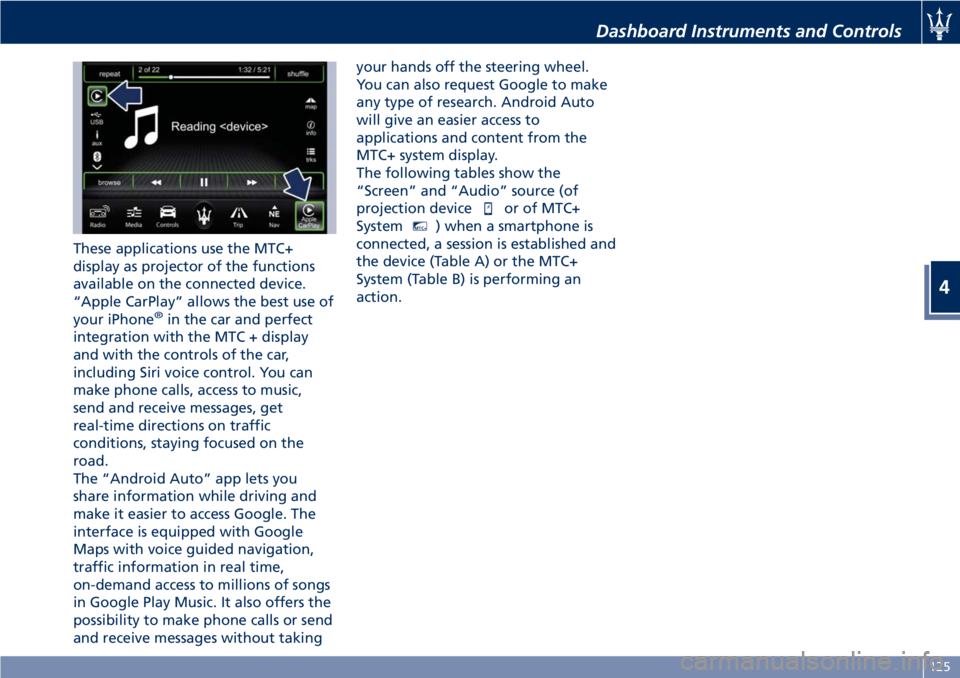
These applications use the MTC+
display as projector of the functions
available on the connected device.
“Apple CarPlay” allows the best use of
your iPhone ®
in the car and perfect
integration with the MTC + display
and with the controls of the car,
including Siri voice control. You can
make phone calls, access to music,
send and receive messages, get
real-time directions on traffic
conditions, staying focused on the
road.
The “Android Auto” app lets you
share information while driving and
make it easier to access Google. The
interface is equipped with Google
Maps with voice guided navigation,
traffic information in real time,
on-demand access to millions of songs
in Google Play Music. It also offers the
possibility to make phone calls or send
and receive messages without taking your hands off the steering wheel.
You can also request Google to make
any type of research. Android Auto
will give an easier access to
applications and content from the
MTC+ system display.
The following tables show the
“Screen” and “Audio” source (of
projection device
or of MTC+
System MTC+
) when a smartphone is
connected, a session is established and
the device (Table A) or the MTC+
System (Table B) is performing an
action. Dashboard Instruments and Controls
4
125
Page 130 of 286
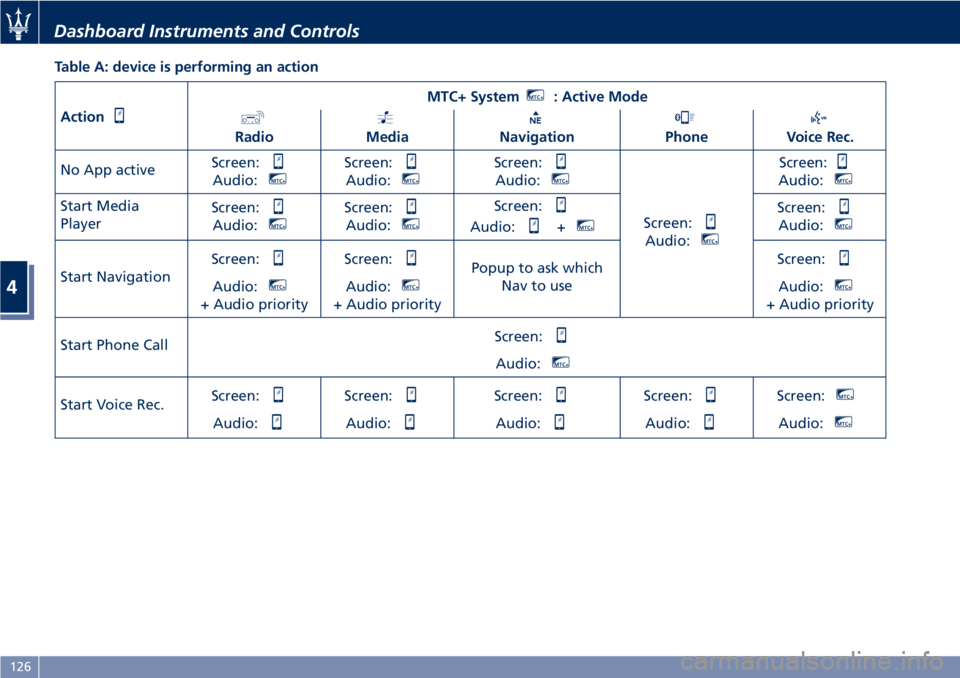
Table A: device is performing an action
Action MTC+ System MTC+
: Active Mode
Radio Media Navigation Phone Voice Rec.
No App active Screen:
Audio: MTC+
Screen:
Audio: MTC+
Screen:
Audio: MTC+
Screen:
Audio: MTC+
Screen:
Audio: MTC+
Start Media
Player Screen:
Audio: MTC+
Screen:
Audio: MTC+
Screen:
Audio: + MTC+
Screen:
Audio: MTC+
Start Navigation Screen:
Audio: MTC+
+ Audio priority Screen:
Audio: MTC+
+ Audio priority Popup to ask which
Nav to use Screen:
Audio: MTC+
+ Audio priority
Start Phone Call Screen:
Audio: MTC+
Start Voice Rec. Screen:
Audio: Screen:
Audio: Screen:
Audio: Screen:
Audio: Screen: MTC+
Audio: MTC+
Dashboard Instruments and Controls
4
126
Page 136 of 286
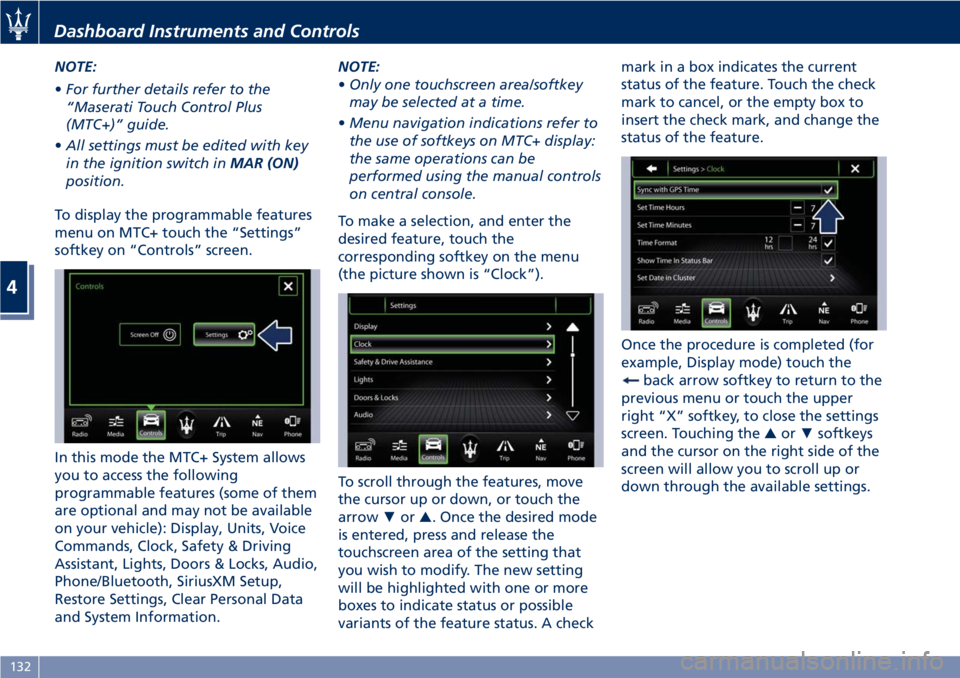
NOTE:
• For further details refer to the
“Maserati Touch Control Plus
(MTC+)” guide.
• All settings must be edited with key
in the ignition switch in MAR (ON)
position.
To display the programmable features
menu on MTC+ touch the “Settings”
softkey on “Controls” screen.
In this mode the MTC+ System allows
you to access the following
programmable features (some of them
are optional and may not be available
on your vehicle): Display, Units, Voice
Commands, Clock, Safety & Driving
Assistant, Lights, Doors & Locks, Audio,
Phone/Bluetooth, SiriusXM Setup,
Restore Settings, Clear Personal Data
and System Information. NOTE:
• Only one touchscreen area/softkey
may be selected at a time.
• Menu navigation indications refer to
the use of softkeys on MTC+ display:
the same operations can be
performed using the manual controls
on central console.
To make a selection, and enter the
desired feature, touch the
corresponding softkey on the menu
(the picture shown is “Clock”).
To scroll through the features, move
the cursor up or down, or touch the
arrow ▼ or ▲ . Once the desired mode
is entered, press and release the
touchscreen area of the setting that
you wish to modify. The new setting
will be highlighted with one or more
boxes to indicate status or possible
variants of the feature status. A check mark in a box indicates the current
status of the feature. Touch the check
mark to cancel, or the empty box to
insert the check mark, and change the
status of the feature.
Once the procedure is completed (for
example, Display mode) touch the
back arrow softkey to return to the
previous menu or touch the upper
right “X” softkey, to close the settings
screen. Touching the ▲ or ▼ softkeys
and the cursor on the right side of the
screen will allow you to scroll up or
down through the available settings.Dashboard Instruments and Controls
4
132
Page 137 of 286
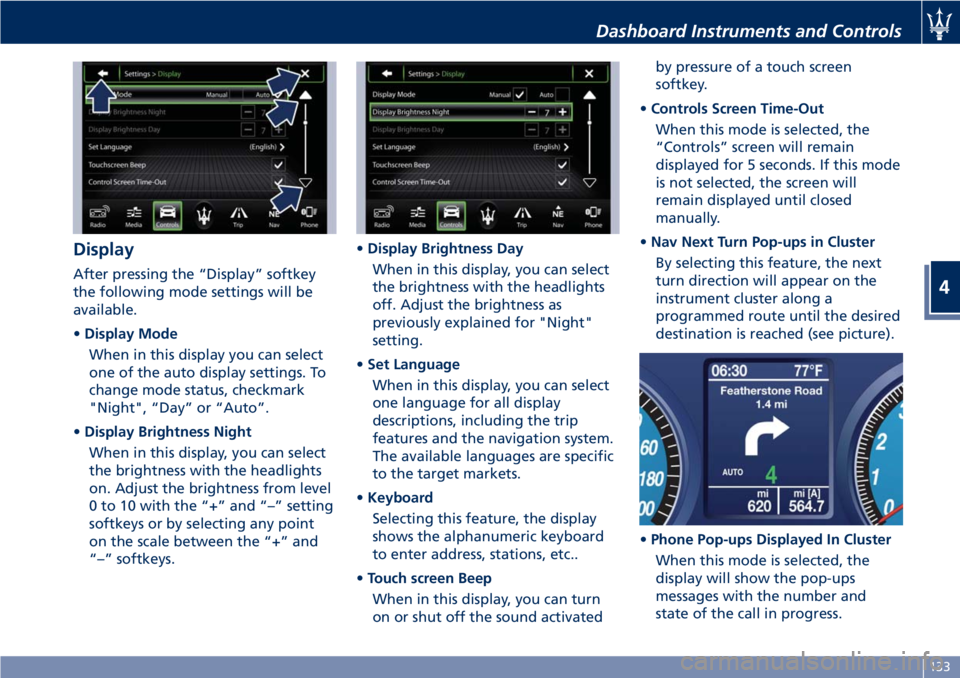
Display After pressing the “Display” softkey
the following mode settings will be
available.
• Display Mode
When in this display you can select
one of the auto display settings. To
change mode status, checkmark
"Night", “Day” or “Auto”.
• Display Brightness Night
When in this display, you can select
the brightness with the headlights
on. Adjust the brightness from level
0 to 10 with the “+” and “–” setting
softkeys or by selecting any point
on the scale between the “+” and
“–” softkeys. • Display Brightness Day
When in this display, you can select
the brightness with the headlights
off. Adjust the brightness as
previously explained for "Night"
setting.
• Set Language
When in this display, you can select
one language for all display
descriptions, including the trip
features and the navigation system.
The available languages are specific
to the target markets.
• Keyboard
Selecting this feature, the display
shows the alphanumeric keyboard
to enter address, stations, etc..
• Touch screen Beep
When in this display, you can turn
on or shut off the sound activated by pressure of a touch screen
softkey.
• Controls Screen Time-Out
When this mode is selected, the
“Controls” screen will remain
displayed for 5 seconds. If this mode
is not selected, the screen will
remain displayed until closed
manually.
• Nav Next Turn Pop-ups in Cluster
By selecting this feature, the next
turn direction will appear on the
instrument cluster along a
programmed route until the desired
destination is reached (see picture).
• Phone Pop-ups Displayed In Cluster
When this mode is selected, the
display will show the pop-ups
messages with the number and
state of the call in progress.Dashboard Instruments and Controls
4
133