reset MASERATI GRANTURISMO CONVERTIBLE 2020 Owners Manual
[x] Cancel search | Manufacturer: MASERATI, Model Year: 2020, Model line: GRANTURISMO CONVERTIBLE, Model: MASERATI GRANTURISMO CONVERTIBLE 2020Pages: 296, PDF Size: 8.23 MB
Page 31 of 296
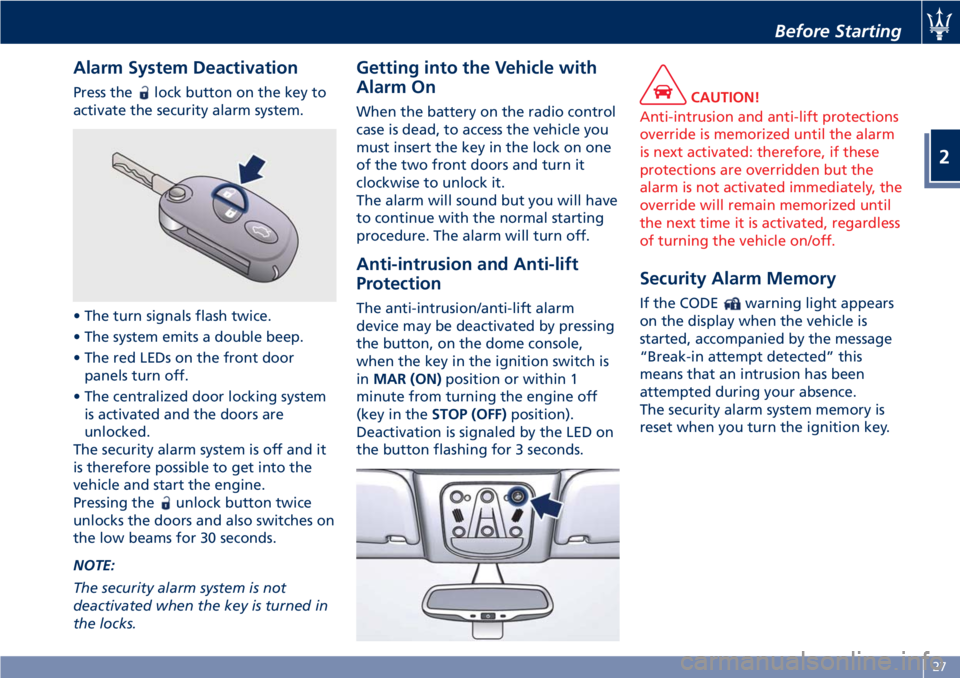
Alarm System Deactivation
Press thelock button on the key to
activate the security alarm system.
• The turn signals flash twice.
• The system emits a double beep.
• The red LEDs on the front door
panels turn off.
• The centralized door locking system
is activated and the doors are
unlocked.
The security alarm system is off and it
is therefore possible to get into the
vehicle and start the engine.
Pressing the
unlock button twice
unlocks the doors and also switches on
the low beams for 30 seconds.
NOTE:
The security alarm system is not
deactivated when the key is turned in
the locks.
Getting into the Vehicle with
Alarm On
When the battery on the radio control
case is dead, to access the vehicle you
must insert the key in the lock on one
of the two front doors and turn it
clockwise to unlock it.
The alarm will sound but you will have
to continue with the normal starting
procedure. The alarm will turn off.
Anti-intrusion and Anti-lift
Protection
The anti-intrusion/anti-lift alarm
device may be deactivated by pressing
the button, on the dome console,
when the key in the ignition switch is
inMAR (ON)position or within 1
minute from turning the engine off
(key in theSTOP (OFF)position).
Deactivation is signaled by the LED on
the button flashing for 3 seconds.
CAUTION!
Anti-intrusion and anti-lift protections
override is memorized until the alarm
is next activated: therefore, if these
protections are overridden but the
alarm is not activated immediately, the
override will remain memorized until
the next time it is activated, regardless
of turning the vehicle on/off.
Security Alarm Memory
If the CODEwarning light appears
on the display when the vehicle is
started, accompanied by the message
“Break-in attempt detected” this
means that an intrusion has been
attempted during your absence.
The security alarm system memory is
reset when you turn the ignition key.
Before Starting
2
27
Page 39 of 296
Reset Auto-Up/Down
Should the auto-up/down feature stop
working, the window probably needs
to be reset.
To reset auto-up/down, pull the
window switch up to close the
window completely and push the
window switch down to open the
window completely.
If You have to Disconnect the
Battery
Before disconnecting the battery,
lower the side windows by at least 1-2
in (4-5 cm) to avoid damaging the soft
top strip when opening and closing
the door.
When the battery is connected, this
operation is performed automatically
when the door is opened and closed.
The windows must remain lowered
until the charged battery is
reconnected. If the battery is
completely discharged when the
windows are fully raised, only open
the door if absolutely necessary, with
the utmost care; do not close the door
again until it is possible to lower the
window.
Open and Close the Trunk
Lid
Opening
The trunk compartment lid can be
opened from inside or outside the
vehicle.
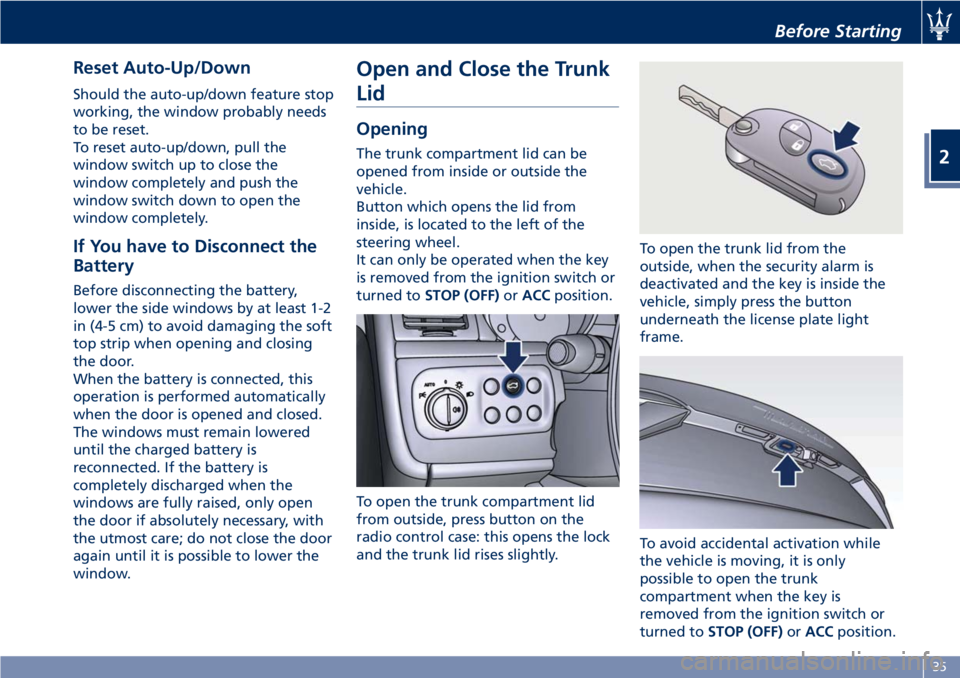
Button which opens the lid from
inside, is located to the left of the
steering wheel.
It can only be operated when the key
is removed from the ignition switch or
turned toSTOP (OFF)orACCposition.
To open the trunk compartment lid
from outside, press button on the
radio control case: this opens the lock
and the trunk lid rises slightly.To open the trunk lid from the
outside, when the security alarm is
deactivated and the key is inside the
vehicle, simply press the button
underneath the license plate light
frame.
To avoid accidental activation while
the vehicle is moving, it is only
possible to open the trunk
compartment when the key is
removed from the ignition switch or
turned toSTOP (OFF)orACCposition.
Before Starting
2
35
Page 119 of 296
Calibration Selection
The driver can select, in relation to
road surface conditions, vehicle speed,
driving style and comfort, one of the
two calibration levels provided by the
system: normal or sports-style.
•Normal calibration, active when
SPORT drive mode is disabled
("SPORT" button not pressed), favors
comfort and higher driving stability
with low and average grip
conditions.
•Sport-style calibration, active when
SPORT drive mode is enabled
("SPORT" button pressed) , favors
wheel drive and permits a
dynamic-style driving with optimal
road holding.
Whenever the engine is started, the
system automatically activates
NORMAL drive mode, even if SPORT
drive mode was selected before the
engine was last turned off.
The sport-style calibration can be
selected only with the key in the
ignition switch inMAR (ON)position
and it is enabled by pressing button
"SPORT", even while driving.
When SPORT drive mode is activated,
the word “SPORT” on the instrument
cluster display and the LED on the
button illuminate.WARNING!
SPORT drive mode should not be
activated if the road surface is rough
or slippery.
The electronic suspension control
system works in combination with the
ESC system.
When the suspension is set to normal
calibration, stability is increased under
medium and low grip conditions,
while when it is set to sport-style
calibration, the ESC system optimizes a
sportier driving.
WARNING!
In low- and medium-grip conditions
(e.g., rain, snow, ice, sand, etc.) it is
advisable not to use SPORT drive
mode, even with the ESC system
enabled.
Malfunction Indicators
If one or more electric components in
the system prove to be malfunctioning
while driving, the ECU illuminates the
amber warning light accompanied
by the message “Check suspensions”
on the display. In addition, the ECU
calibrates the shock absorbers to apreset value, thus ensuring a safe
vehicle set up.
Should the malfunction involve one
shock absorber only, this will no
longer be controlled by the ECU and
will therefore remain set as it was
when the fault occurred. It is
therefore possible for one of the four
shock absorbers to work with a fixed
calibration, different from that of the
other ones.
In any case, safe and secure vehicle
driving is always ensured at low
speeds.
CAUTION!
In the event of a malfunction in the
suspension control electronic system,
which will be indicated by the
illumination of the amber warning
light on the display while driving,
keep a moderate speed and have the
vehicle checked as soon as possible by
anAuthorized Maserati Dealer.
If a malfunction occurs while driving,
and this is signaled by the illumination
of the
amber warning light on the
display, it is advisable to stop the
vehicle as soon as possible, turn the
key in the ignition switch toSTOP
(OFF)position and then restart the
engine.
Understanding the Vehicle
3
115
Page 129 of 296
“+“ and “–” Buttons
By means of the “+ “ and “–” buttons,
the user can adjust the instrument
cluster brightness.
When a screen page is viewed, these
buttons can be used to select the
available options (see paragraph "TFT
Display: Screen Pages" in this chapter).
TFT Display: Screen Pages
Trip Screen Page
The Trip screen page is recalled by
pressing the “MODE” button. Each
Trip screen page “A” or “B” is timed,
i.e. it is displayed for a maximum of 10
seconds, after which the screen page
previously active is displayed once
again.
Before the 10 second timing has
elapsed, pressing the “MODE” button
briefly (less than 2 seconds) will reset
the trip information relating to the
flashing odometer “A” or “B”.
When the “Trip A” or “Trip B” feature
is active, the following information is
viewed on the display:
• traveled distance (shown in the
lower right area);
• average fuel consumption (Avg.
cons.)
• average traveling speed (Avg.
speed);• trip time;
• fuel range (Range);
The unit for this data can be adjusted
by the user from the MTC+ Settings
menu.
NOTE:
Trip and Service information can be
viewed by accessing the “Trip” menu
on the MTC+ screen (see “On Board
Computer Trip (Trip)” in section
“Driving”).
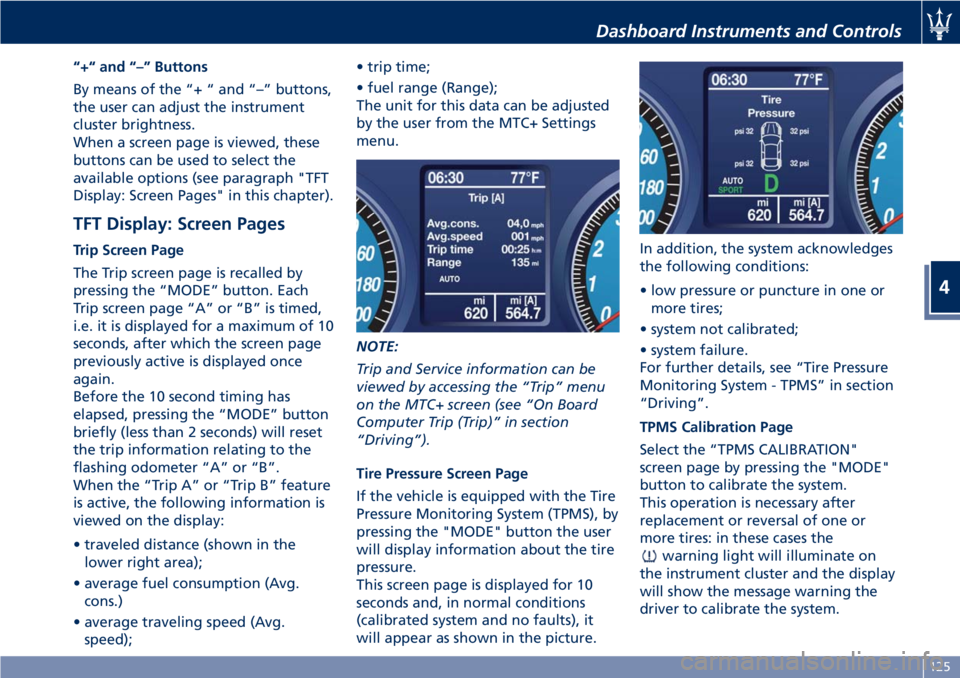
Tire Pressure Screen Page
If the vehicle is equipped with the Tire
Pressure Monitoring System (TPMS), by
pressing the "MODE" button the user
will display information about the tire
pressure.
This screen page is displayed for 10
seconds and, in normal conditions
(calibrated system and no faults), it
will appear as shown in the picture.In addition, the system acknowledges
the following conditions:
• low pressure or puncture in one or
more tires;
• system not calibrated;
• system failure.
For further details, see “Tire Pressure
Monitoring System - TPMS” in section
“Driving”.
TPMS Calibration Page
Select the “TPMS CALIBRATION"
screen page by pressing the "MODE"
button to calibrate the system.
This operation is necessary after
replacement or reversal of one or
more tires: in these cases the
warning light will illuminate on
the instrument cluster and the display
will show the message warning the
driver to calibrate the system.
Dashboard Instruments and Controls
4
125
Page 137 of 296
for at least 2 seconds, it brings the
cursor back in the lower bar of the
main menus.
Enter Button
To confirm the function or setting
highlighted on MTC+ display. When in
"Radio" mode and the key in the
ignition switch inMAR (ON)position,
holding this button you can save your
preset stations.
With key not inserted in the ignition
switch or inSTOP (OFF)position,
pressing and holding this button for
2-3 seconds will turn off the MTC+
system. If pressed again and held for
2-3 seconds, the MTC+ will turn back
on.
Main Menu Bar on MTC+
Display
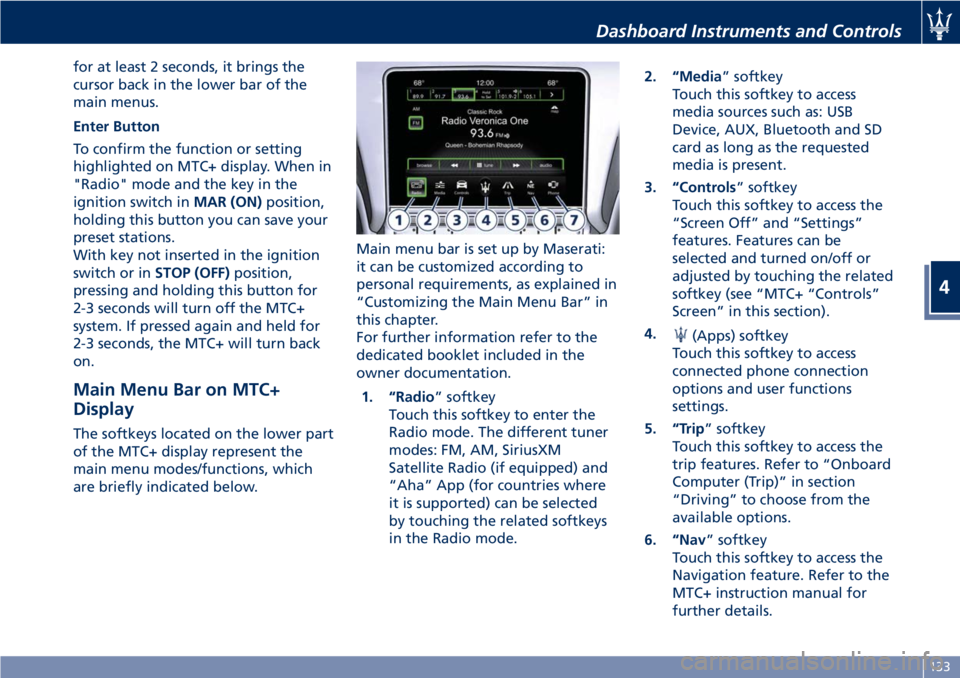
The softkeys located on the lower part
of the MTC+ display represent the
main menu modes/functions, which
are briefly indicated below.Main menu bar is set up by Maserati:
it can be customized according to
personal requirements, as explained in
“Customizing the Main Menu Bar” in
this chapter.
For further information refer to the
dedicated booklet included in the
owner documentation.
1. “Radio” softkey
Touch this softkey to enter the
Radio mode. The different tuner
modes: FM, AM, SiriusXM
Satellite Radio (if equipped) and
“Aha” App (for countries where
it is supported) can be selected
by touching the related softkeys
in the Radio mode.2. “Media” softkey
Touch this softkey to access
media sources such as: USB
Device, AUX, Bluetooth and SD
card as long as the requested
media is present.
3. “Controls” softkey
Touch this softkey to access the
“Screen Off” and “Settings”
features. Features can be
selected and turned on/off or
adjusted by touching the related
softkey (see “MTC+ “Controls”
Screen” in this section).
4.
(Apps) softkey
Touch this softkey to access
connected phone connection
options and user functions
settings.
5. “Trip” softkey
Touch this softkey to access the
trip features. Refer to “Onboard
Computer (Trip)” in section
“Driving” to choose from the
available options.
6. “Nav” softkey
Touch this softkey to access the
Navigation feature. Refer to the
MTC+ instruction manual for
further details.
Dashboard Instruments and Controls
4
133
Page 153 of 296
Restore Settings
When this feature is selected, it will
reset the “Display”, “Clock”, “Audio”,
and “SiriusXM Setup” to their default
settings.
Run this feature and a pop-up will
appear asking user to confirm default
settings resetting. Select “Yes” to
restore, or “Cancel” to exit. Once the
settings are restored, a pop-up
appears confirming that settings have
been reset to default.
Clear Personal Data
When this feature is selected, it will
remove personal data concerning
settings and/or options that have been
modified compared to factory settings
and will also remove from system
memory Bluetooth
®devices and
presets.
To remove personal information,
select this feature and a pop-up will
appear asking confirmation to delete
all personal data. Select “OK” to clear,
or “Cancel” to exit. Once the data
have been cleared, a pop up appears
confirming that personal data have
been cleared.
System Information
When this feature is selected, the
display shows an information screen
with the software version installed on
MTC+.
Glove Compartments
The glove compartments may be used
to store devices, small items or
documents.
WARNING!
•Do not operate the vehicle with the
lid of glove compartment in the
open position.
•To help ensure passenger safety, the
glove compartment must always
remain closed while driving.
•Store objects or devices in glove
compartment to ensure they will not
move during the trip and prevent
them from hitting any person on
board.
CAUTION!
Do not place objects weighing over
22 lb (10 kg) in the glove
compartment.
Glove Box on Passenger Side
To open the glove box on the
passenger side of the dashboard, pull
the handle as shown in the picture.
Dashboard Instruments and Controls
4
149
Page 157 of 296
• left-hand/right-hand vent air
distribution;
• fan speed (stepless change);
• compressor activation;
• air recirculation.
All the functions listed above can be
modified manually, i.e. the user can
select one or more of these functions
as desired, using the control panel.
The manual selections always have
priority over the automatic ones and
are memorized until the user chooses
the automatic control again.
When a function has been set
manually, the other automatic
functions will not be affected.
The following parameters/functions
can be set/modified manually:
• left-hand/right-hand side air
temperature;
• fan speed;
• air distribution on 7 positions
(left-hand/ right-hand);
• compressor activation;
• single/dual-zone distribution
priority;
• defrosting/defogging function (MAX
DEF);
• air recirculation;
• automatic/manual control of the
system;• heated rear window;
• system deactivation;
• opening/closing of air duct leading
to rear vents.
Activation
The system can be started up in a
number of ways. It is however
advisable to begin by pressing one of
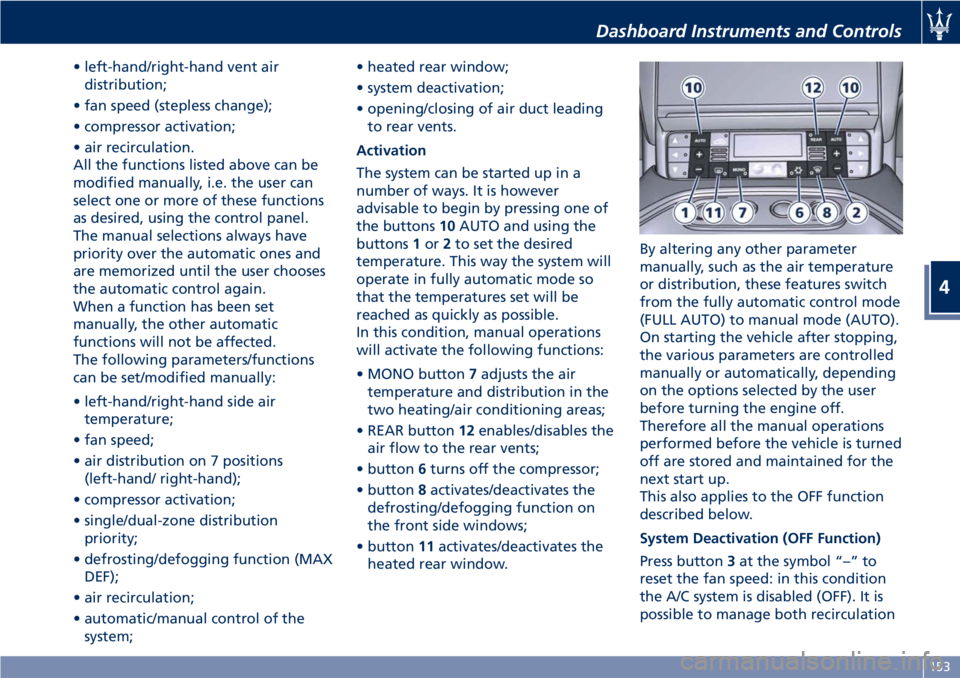
the buttons10AUTO and using the
buttons1or2to set the desired
temperature. This way the system will
operate in fully automatic mode so
that the temperatures set will be
reached as quickly as possible.
In this condition, manual operations
will activate the following functions:
• MONO button7adjusts the air
temperature and distribution in the
two heating/air conditioning areas;
• REAR button12enables/disables the
air flow to the rear vents;
• button6turns off the compressor;
• button8activates/deactivates the
defrosting/defogging function on
the front side windows;
• button11activates/deactivates the
heated rear window.By altering any other parameter
manually, such as the air temperature
or distribution, these features switch
from the fully automatic control mode
(FULL AUTO) to manual mode (AUTO).
On starting the vehicle after stopping,
the various parameters are controlled
manually or automatically, depending
on the options selected by the user
before turning the engine off.
Therefore all the manual operations
performed before the vehicle is turned
off are stored and maintained for the
next start up.
This also applies to the OFF function
described below.
System Deactivation (OFF Function)
Press button3at the symbol “–” to
reset the fan speed: in this condition
the A/C system is disabled (OFF). It is
possible to manage both recirculation
Dashboard Instruments and Controls
4
153
Page 172 of 296
TripA-TripB
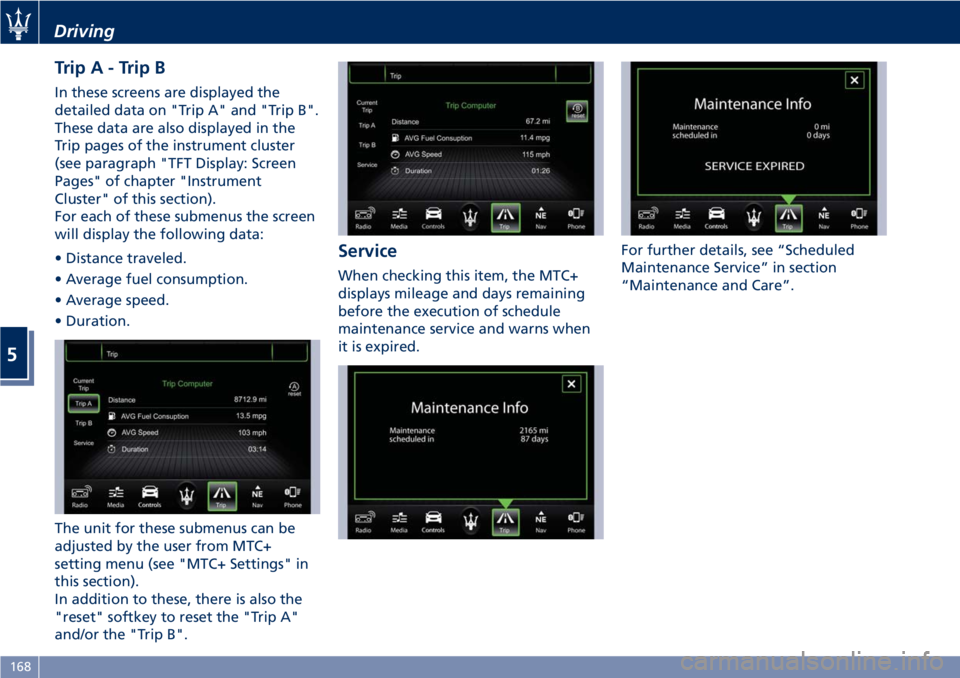
In these screens are displayed the
detailed data on "Trip A" and "Trip B".
These data are also displayed in the
Trip pages of the instrument cluster
(see paragraph "TFT Display: Screen
Pages" of chapter "Instrument
Cluster" of this section).
For each of these submenus the screen
will display the following data:
• Distance traveled.
• Average fuel consumption.
• Average speed.
• Duration.
The unit for these submenus can be
adjusted by the user from MTC+
setting menu (see "MTC+ Settings" in
this section).
In addition to these, there is also the
"reset" softkey to reset the "Trip A"
and/or the "Trip B".
Service
When checking this item, the MTC+
displays mileage and days remaining
before the execution of schedule
maintenance service and warns when
it is expired.For further details, see “Scheduled
Maintenance Service” in section
“Maintenance and Care”.
Driving
5
168
Page 190 of 296
the speed stored. Every time rotating
section is reset, the speed is increased
or decrease by approx. 0.6 mph (1
Km/h). Keep the rotating section
turned to vary the speed
continuously. When a new speed is
reached, it will automatically remain
constant.
• Button "RCL" at end of left
multifunction lever is used to resume
the speed stored.
NOTE:
•When the key in the ignition switch
is turned toSTOP (OFF)position or
ON/OFF switch is in the "OFF"
position, the speed stored is erased
and the system deactivated.
•The CC must be deactivated when
not in use.
WARNING!
Leaving the Cruise Control system on
when not in use is dangerous. You
could accidentally set the system or
cause it to go faster than you want.
Always leave the CC off when you are
not using it.
Storing a Speed
Turn the ON/OFF switch to "ON" and
reach the desired speed driving
normally. Turn the rotating section in
the middle of the left multifunction
lever to "+" for at least 3 seconds and
then release it.
The vehicle speed is stored and the
accelerator pedal can be released.
The vehicle will proceed at the
constant speed stored until the brake
pedal is pressed.
If necessary, (for example, to pass
another vehicle), you can accelerate by
simply pressing the accelerator pedal.
Afterward, when you release the
accelerator pedal, the vehicle will
return to the speed previously stored.
Resuming the Speed Stored
If the CC has been deactivated after
braking, the speed previously stored
can be resumed as follows:
• gradually accelerate until you reach a
speed close to that stored;
• engage the gear selected when the
speed was stored (4th, 5th or 6th
gear);
• press button "RCL".
Increasing the Speed Stored
The speed stored can be increased in
two ways:• by pressing the accelerator and then
storing the new speed reached (turn
the rotating section in the middle of
the left multifunction lever for more
than 3 seconds); or
• by turning the rotating section to
position "+": each impulse
transmitted by the rotating section
will cause a slight increase in speed
(about 0.6 mph/1 Km/h), whereas a
constant pressure on the same
rotating section will cause a
continuous increase in speed. When
the rotating section is released, the
new speed will be automatically
stored in the memory.
Decreasing the Speed Stored
The speed stored can be reduced in
two ways:
• by deactivating the CC, pressing the
brake pedal and then storing the
new speed (turning the rotating
section to position “+” for at least 3
seconds); or
• by keeping the rotating section
turned to position “-” until reaching
the new speed, which will be stored
automatically.
Resetting the Speed Stored
The speed stored is automatically
reset:
Driving
5
186
Page 232 of 296
Towing a Disabled Vehicle
Proper towing or lifting equipment is
required to prevent damage to your
vehicle. Use only towing bars and
other equipment designed for the
purpose, following equipment
manufacturer’s instructions.
Safety chains are mandatory.
Except for the front threaded seat to
fix the supplied hook (see “Tool Kit”
chapter in this section), the vehicle is
not equipped with other connection
points for towing operations with tow
truck.
CAUTION!
Any improper maneuver and use of
unsuitable equipment for recovering
vehicle in an emergency from off road
location could seriously damage the
vehicle. Contact theAuthorized
Maserati Dealeror anyone having
suitable equipment and the required
expertise to safely and properly carry
out any required operations.
Make sure you comply with local
towing regulations.
•If the vehicle's battery is discharged,
it is necessary to shift the automatic
transmission out of the P (Park)Position and release the parking
brake (see “ Transmission Manual
Release of P (Park) position” and
“Emergency Release of the Parking
Brake” in this section).
•If the vehicle battery is still charged,
turn off the engine and disengage
the parking brake manually (if
automatically engaged) by using the
command at the side of the
transmission shift lever (see “Parking
Brake” chapter in section “Driving”).
Shift then manually the transmission
out of P (Park) as described in
“Transmission Manual Release of P
(Park) Position” chapter of this
section. If you need to use the
accessories (wipers, defrosters, etc.)
while being towed, the key in the
ignition switch must be turned in
MAR (ON)position, do not use the
ACCposition.
Vehicle Towing Conditions
Maserati only allows vehicle towing
either on a flatbed or with all four
wheels off the ground.
If flatbed equipment is not available,
and the transmission is still operable,
the vehicle may be flat towed (with all
four wheels on the ground) under the
following conditions.• The shift lever must be in N (Neutral).
• The distance to be traveled must not
exceed 30 mi (50 km ).
• The towing speed must not exceed
30 mph (50 km/h).
If the transmission is not operable, or
the vehicle must be towed faster than
30 mph (50 km/h ) or farther than 30
mi (50 km) (for example on a
highway), tow with the rear driving
wheels off the ground and on a
platform of a rescue vehicle, or with
the rear wheels raised using a wheel
lift.
CAUTION!
If you have to tow the vehicle with 2
wheels raised, ensure that the key in
the ignition switch is in theSTOP (OFF)
position. If this is not observed, when
the ESC is active, the ECU will store a
malfunction and the relative indicator
light
will illuminate on the
instrument cluster display. This
requires the intervention of an
Authorized Maserati Dealerto reset
the system.
In an Emergency
6
228