heater MASERATI LEVANTE 2019 Owners Manual
[x] Cancel search | Manufacturer: MASERATI, Model Year: 2019, Model line: LEVANTE, Model: MASERATI LEVANTE 2019Pages: 436, PDF Size: 15.24 MB
Page 103 of 436
Seat movement may become limited if
there is an obstruction in the way.
Front Heated Seats The front seats are equipped with
heaters in both seat cushions and
seatbacks.
The seats comfort commands are in
the “Climate” screen of the MTC+.
They are present in the "Climate"
screen even when the A/C is off. See
“Air Conditioning Controls” in section
“Dashboard Instruments and
Controls” for further details.
When the MTC+ System is in any mode
other than “Climate” (Radio”,
“Media”, “Controls”, etc.) the icons of
the active front seats comfort
functions will be indicated on the
upper part of the display.
WARNING!
• Persons with low skin sensitivity
because of advanced age, chronic
illness, diabetes, spinal cord injury,
medication, alcohol use, exhaustion
or other physical conditions must be
careful when using the seat heater.
It may cause irritation even at low
temperatures, especially if used for
long periods of time. • Do not place anything on the seat
that insulates against heat, such as a
blanket or cushion. This may cause
the seat heater to overheat.
Front Seats Heat Function
NOTE:
The
engine must be
running for the
heated seats to operate.
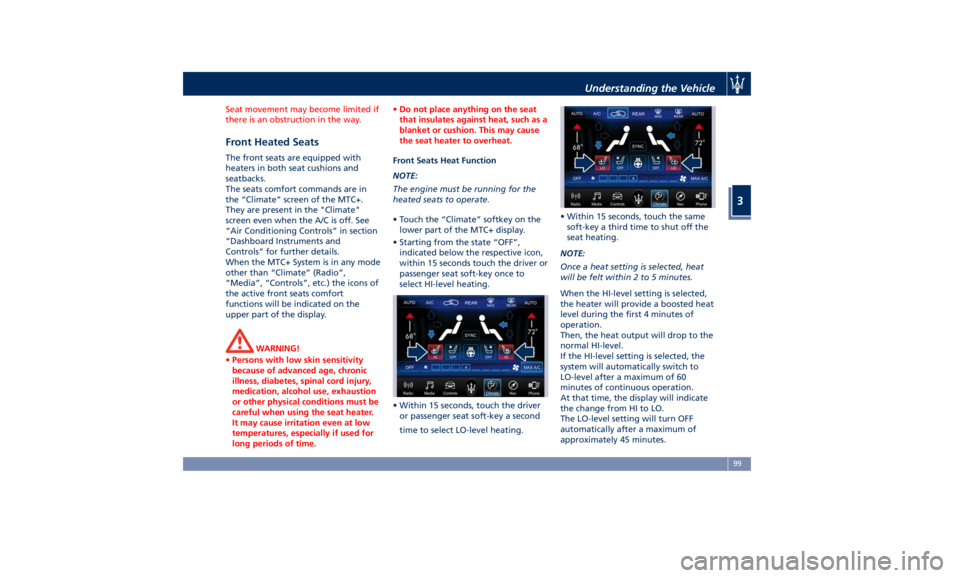
• Touch the “Climate” softkey on the
lower part of the MTC+ display.
• Starting from the state “OFF”,
indicated below the respective icon,
within 15 seconds touch the driver or
passenger seat soft-key once to
select HI-level heating.
• Within 15 seconds, touch the driver
or passenger seat soft-key a second
time to select LO-level heating. • Within 15 seconds, touch the same
soft-key a third time to shut off the
seat heating.
NOTE:
Once a heat setting is selected, heat
will be felt within 2 to 5 minutes.
When the HI-level setting is selected,
the heater will provide a boosted heat
level during the first 4 minutes of
operation.
Then, the heat output will drop to the
normal HI-level.
If the HI-level setting is selected, the
system will automatically switch to
LO-level after a maximum of 60
minutes of continuous operation.
At that time, the display will indicate
the change from HI to LO.
The LO-level setting will turn OFF
automatically after a maximum of
approximately 45 minutes.Understanding the Vehicle
3
99
Page 108 of 436
(Continued)
unlocked seatback cannot ensure the
necessary stability for passengers
and/or for child seats. An unlocked
seatback could cause severe injuries
in case of accident.
• When fastening a child seat on
external rear seats, ensure that the
corresponding seatback is in the full
upright position.
• Always check that the head restraint
of the rear seats that must be
occupied by a passenger is correctly
adjusted (see chapter “Head
Restraints” in this section).
NOTE:
Rear
seat backrest can
be fully folded
to increase luggage space. See “Cargo
Area” in this section for further
details.
Rear Armrest The rear armrest is mobile and can be
folded up into the seatback.
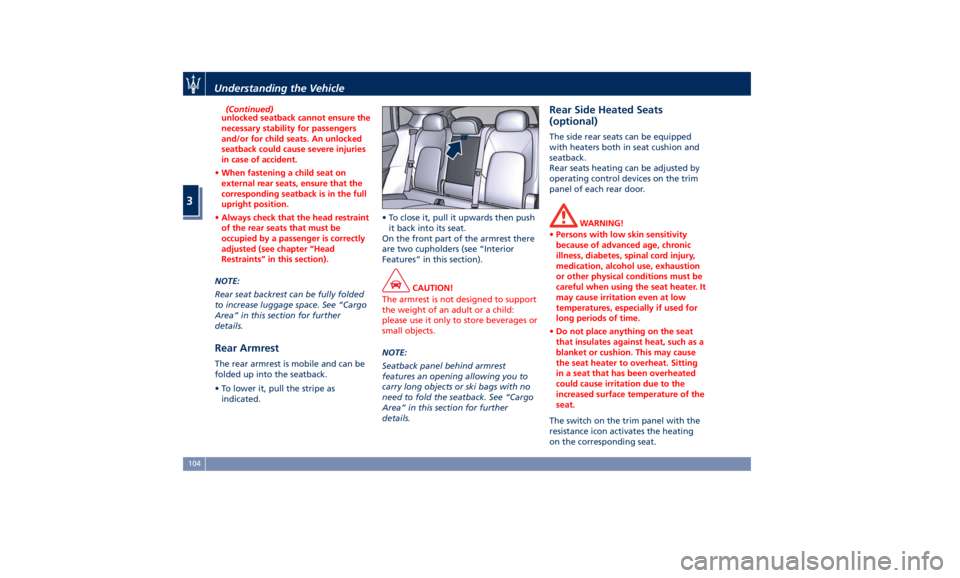
• To lower it, pull the stripe as
indicated. • To close it, pull it upwards then push
it back into its seat.
On the front part of the armrest there
are two cupholders (see “Interior
Features” in this section).
CAUTION!
The armrest is not designed to support
the weight of an adult or a child:
please use it only to store beverages or
small objects.
NOTE:
Seatback
panel behind armrest
features an opening allowing you to
carry long objects or ski bags with no
need to fold the seatback. See “Cargo
Area” in this section for further
details. Rear Side Heated Seats
(optional) The side rear seats can be equipped
with heaters both in seat cushion and
seatback.
Rear seats heating can be adjusted by
operating control devices on the trim
panel of each rear door.
WARNING!
• Persons with low skin sensitivity
because of advanced age, chronic
illness, diabetes, spinal cord injury,
medication, alcohol use, exhaustion
or other physical conditions must be
careful when using the seat heater. It
may cause irritation even at low
temperatures, especially if used for
long periods of time.
• Do not place anything on the seat
that insulates against heat, such as a
blanket or cushion. This may cause
the seat heater to overheat. Sitting
in a seat that has been overheated
could cause irritation due to the
increased surface temperature of the
seat.
The switch on the trim panel with the
resistance
icon activates the heating
on the corresponding seat.Understanding the Vehicle
3
104
Page 109 of 436
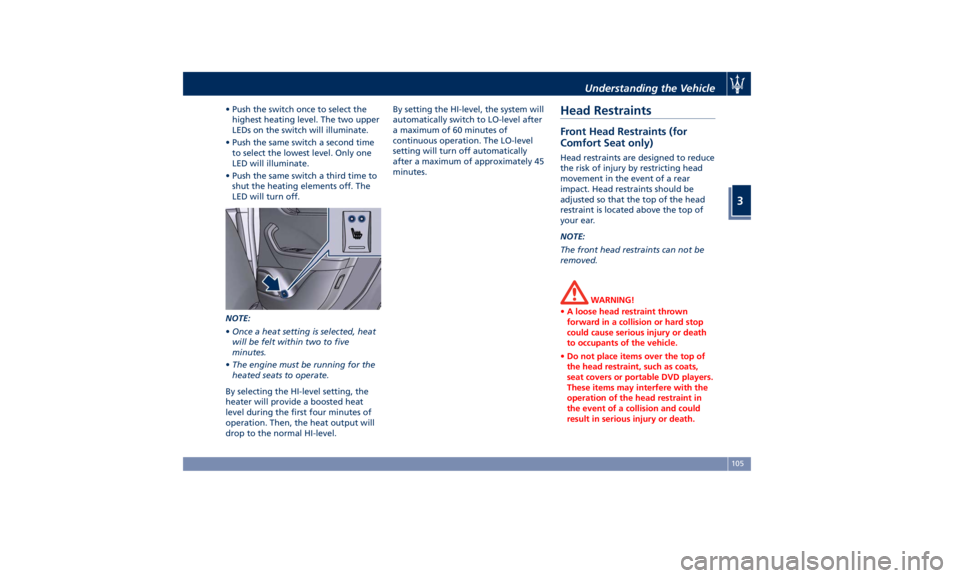
• Push the switch once to select the
highest heating level. The two upper
LEDs on the switch will illuminate.
• Push the same switch a second time
to select the lowest level. Only one
LED will illuminate.
• Push the same switch a third time to
shut the heating elements off. The
LED will turn off.
NOTE:
• Once a heat setting is selected, heat
will be felt within two to five
minutes.
• The engine must be running for the
heated seats to operate.
By selecting the HI-level setting, the
heater will provide a boosted heat
level during the first four minutes of
operation. Then, the heat output will
drop to the normal HI-level. By setting the HI-level, the system will
automatically switch to LO-level after
a maximum of 60 minutes of
continuous operation. The LO-level
setting will turn off automatically
after a maximum of approximately 45
minutes.
Head Restraints Front Head Restraints (for
Comfort Seat only) Head restraints are designed to reduce
the risk of injury by restricting head
movement in the event of a rear
impact. Head restraints should be
adjusted so that the top of the head
restraint is located above the top of
your ear.
NOTE:
The front head restraints can not be
removed.
WARNING!
• A loose head restraint thrown
forward in a collision or hard stop
could cause serious injury or death
to occupants of the vehicle.
• Do not place items over the top of
the head restraint, such as coats,
seat covers or portable DVD players.
These items may interfere with the
operation of the head restraint in
the event of a collision and could
result in serious injury or death.Understanding the Vehicle
3
105
Page 113 of 436
The heated steering wheel can shut
off early or may not turn on when the
steering wheel is already warm.
The heating steering wheel command
is in the “Climate” screen of MTC+. It
is present in the “Climate” screen even
when the A/C is off. See “Air
Conditioning Controls” in section
“Dashboard Instruments and
Controls” for further details.
When the MTC+ System is in any mode
other than “ Climate” (“Radio”,
“Media”, “Controls”, etc.) the icon of
the heated steering wheel will be
indicated on the upper part of the
display.
NOTE:
The engine must be running for the
heated steering wheel to operate.
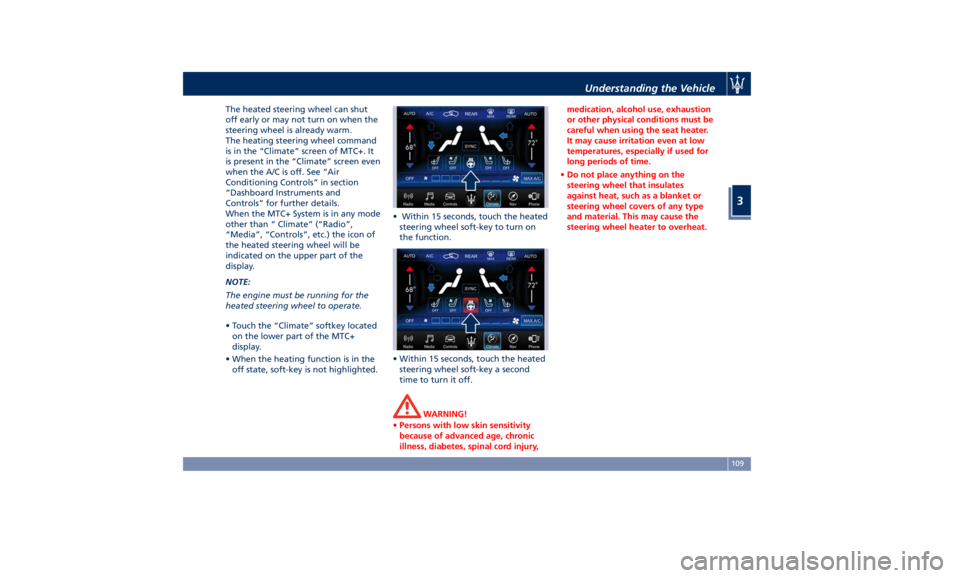
• Touch the “Climate” softkey located
on the lower part of the MTC+
display.
• When the heating function is in the
off state, soft-key is not highlighted. • Within 15 seconds, touch the heated
steering wheel soft-key to turn on
the function.
• Within 15 seconds, touch the heated
steering wheel soft-key a second
time to turn it off.
WARNING!
• Persons with low skin sensitivity
because of advanced age, chronic
illness, diabetes, spinal cord injury, medication, alcohol use, exhaustion
or other physical conditions must be
careful when using the seat heater.
It may cause irritation even at low
temperatures, especially if used for
long periods of time.
• Do not place anything on the
steering wheel that insulates
against heat, such as a blanket or
steering wheel covers of any type
and material. This may cause the
steering wheel heater to overheat.Understanding the Vehicle
3
109
Page 363 of 436
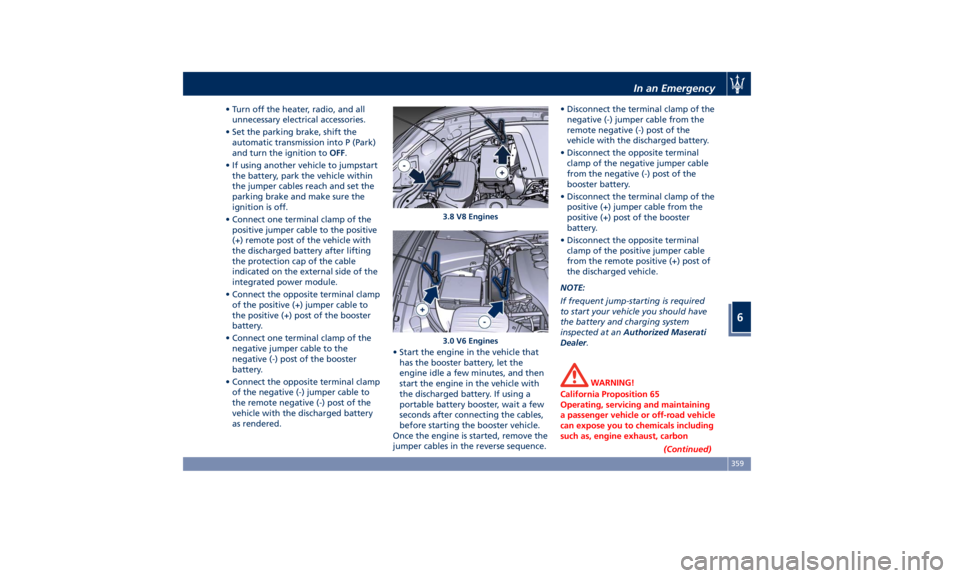
• Turn off the heater, radio, and all
unnecessary electrical accessories.
• Set the parking brake, shift the
automatic transmission into P (Park)
and turn the ignition to OFF .
• If using another vehicle to jumpstart
the battery, park the vehicle within
the jumper cables reach and set the
parking brake and make sure the
ignition is off.
• Connect one terminal clamp of the
positive jumper cable to the positive
(+) remote post of the vehicle with
the discharged battery after lifting
the protection cap of the cable
indicated on the external side of the
integrated power module.
• Connect the opposite terminal clamp
of the positive (+) jumper cable to
the positive (+) post of the booster
battery.
• Connect one terminal clamp of the
negative jumper cable to the
negative (-) post of the booster
battery.
• Connect the opposite terminal clamp
of the negative (-) jumper cable to
the remote negative (-) post of the
vehicle with the discharged battery
as rendered. • Start the engine in the vehicle that
has the booster battery, let the
engine idle a few minutes, and then
start the engine in the vehicle with
the discharged battery. If using a
portable battery booster, wait a few
seconds after connecting the cables,
before starting the booster vehicle.
Once the engine is started, remove the
jumper cables in the reverse sequence. • Disconnect the terminal clamp of the
negative (-) jumper cable from the
remote negative (-) post of the
vehicle with the discharged battery.
• Disconnect the opposite terminal
clamp of the negative jumper cable
from the negative (-) post of the
booster battery.
• Disconnect the terminal clamp of the
positive (+) jumper cable from the
positive (+) post of the booster
battery.
• Disconnect the opposite terminal
clamp of the positive jumper cable
from the remote positive (+) post of
the discharged vehicle.
NOTE:
If frequent jump-starting is required
to start your vehicle you should have
the battery and charging system
inspected at an Authorized Maserati
Dealer .
WARNING!
California Proposition 65
Operating, servicing and maintaining
a passenger vehicle or off-road vehicle
can expose you to chemicals including
such as, engine exhaust, carbon
(Continued)3.8 V8 Engines
3.0 V6 Engines In an Emergency
6
359
Page 395 of 436
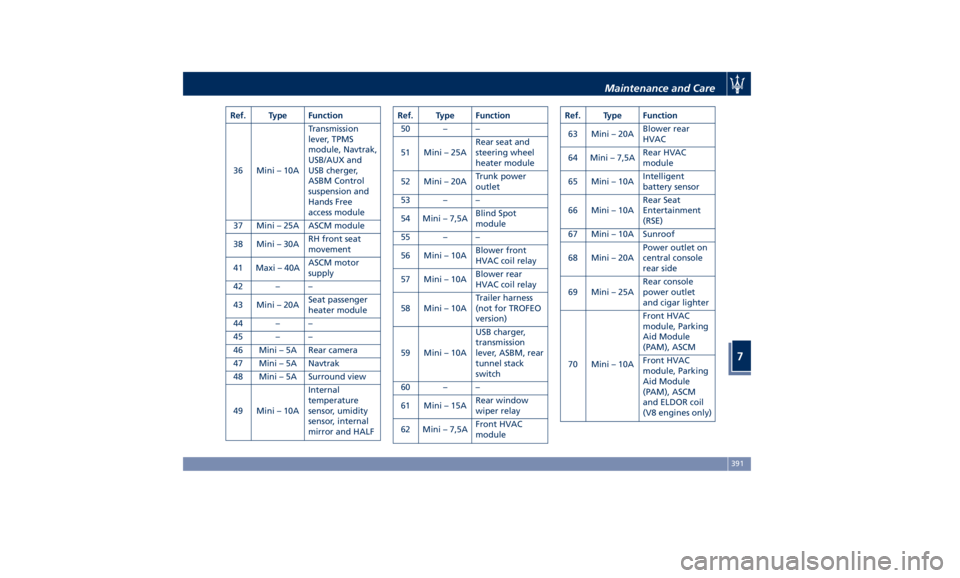
Ref. Type Function
36 Mini – 10A Transmission
lever, TPMS
module, Navtrak,
USB/AUX and
USB cherger,
ASBM Control
suspension and
Hands Free
access module
37 Mini – 25A ASCM module
38 Mini – 30A RH front seat
movement
41 Maxi – 40A ASCM motor
supply
42 – –
43 Mini – 20A Seat passenger
heater module
44 – –
45 – –
46 Mini – 5A Rear camera
47 Mini – 5A Navtrak
48 Mini – 5A Surround view
49 Mini – 10A Internal
temperature
sensor, umidity
sensor, internal
mirror and HALF Ref. Type Function
50 – –
51 Mini – 25A Rear seat and
steering wheel
heater module
52 Mini – 20A Trunk power
outlet
53 – –
54 Mini – 7,5A Blind Spot
module
55 – –
56 Mini – 10A Blower front
HVAC coil relay
57 Mini – 10A Blower rear
HVAC coil relay
58 Mini – 10A Trailer harness
(not for TROFEO
version)
59 Mini – 10A USB charger,
transmission
lever, ASBM, rear
tunnel stack
switch
60 – –
61 Mini – 15A Rear window
wiper relay
62 Mini – 7,5A Front HVAC
module Ref. Type Function
63 Mini – 20A Blower rear
HVAC
64 Mini – 7,5A Rear HVAC
module
65 Mini – 10A Intelligent
battery sensor
66 Mini – 10A Rear Seat
Entertainment
(RSE)
67 Mini – 10A Sunroof
68 Mini – 20A Power outlet on
central console
rear side
69 Mini – 25A Rear console
power outlet
and cigar lighter
70 Mini – 10A Front HVAC
module, Parking
Aid Module
(PAM), ASCM
Front HVAC
module, Parking
Aid Module
(PAM), ASCM
and ELDOR coil
(V8 engines only)Maintenance and Care
7
391