height MASERATI LEVANTE 2019 Owners Manual
[x] Cancel search | Manufacturer: MASERATI, Model Year: 2019, Model line: LEVANTE, Model: MASERATI LEVANTE 2019Pages: 436, PDF Size: 15.24 MB
Page 48 of 436
(Continued)
• there is a valid key fob RKE
transmitter outside the vehicle and
within 3.3 ft (1 m) of either “Passive
Entry” door handle;
• fifteen attempts are made to lock
the doors using the door panel
switch and/or the lower
button
(on the outer edge of the left trunk
compartment) and then close the
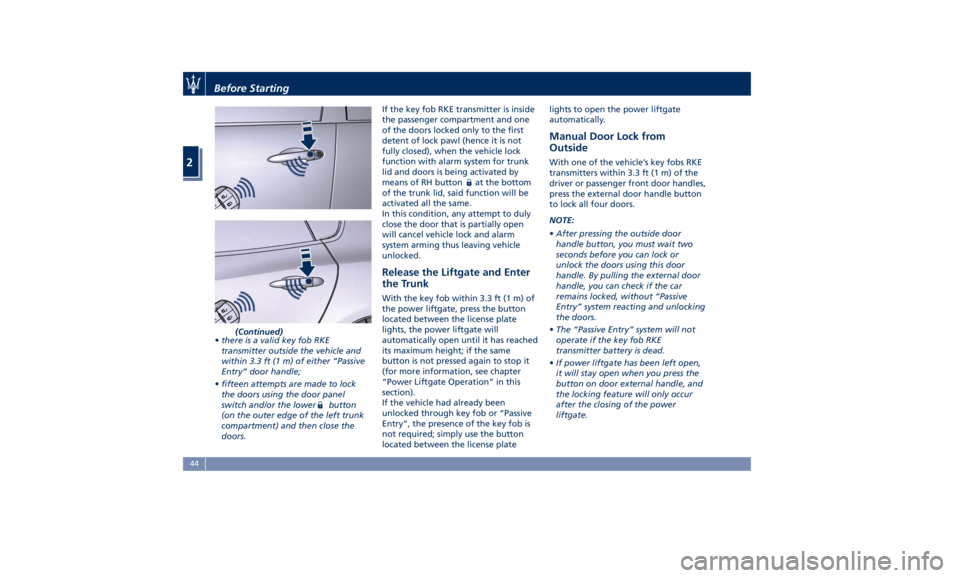
doors. If the key fob RKE transmitter is inside
the passenger compartment and one
of the doors locked only to the first
detent of lock pawl (hence it is not
fully closed), when the vehicle lock
function with alarm system for trunk
lid and doors is being activated by
means of RH button
at the bottom
of the trunk lid, said function will be
activated all the same.
In this condition, any attempt to duly
close the door that is partially open
will cancel vehicle lock and alarm
system arming thus leaving vehicle
unlocked.
Release the Liftgate and Enter
the Trunk With the key fob within 3.3 ft (1 m) of
the power liftgate, press the button
located between the license plate
lights, the power liftgate will
automatically open until it has reached
its maximum height; if the same
button is not pressed again to stop it
(for more information, see chapter
“Power Liftgate Operation” in this
section).
If the vehicle had already been
unlocked through key fob or “Passive
Entry”, the presence of the key fob is
not required; simply use the button
located between the license plate lights to open the power liftgate
automatically.
Manual Door Lock from
Outside With one of the vehicle’s key fobs RKE
transmitters within 3.3 ft (1 m) of the
driver or passenger front door handles,
press the external door handle button
to lock all four doors.
NOTE:
• After pressing the outside door
handle button, you must wait two
seconds before you can lock or
unlock the doors using this door
handle. By pulling the external door
handle, you can check if the car
remains locked, without “Passive
Entry” system reacting and unlocking
the doors.
• The “Passive Entry” system will not
operate if the key fob RKE
transmitter battery is dead.
• If power liftgate has been left open,
it will stay open when you press the
button on door external handle, and
the locking feature will only occur
after the closing of the power
liftgate.Before Starting
2
44
Page 54 of 436
C. Sunshade fully rolled down
(“DOWN” position) and Window
completely open (“DOWN” position)
• Pulling the control to 1 or 2 detent:
the window closes partially or
completely and the sunshade
remains rolled.
• Pressing the control to 1 or 2 detent:
no action (“NOP”).
Teaching Cycle
After battery disconnection, the
following teaching cycle is required to
store the limit positions the sunshades.
Use the controls on the rear doors to
move the sunshades.
• With glass closed, lift rear sunshade
control on driver side for a few
seconds. It is not necessary that the
sunshade reaches its upper limit.
• Reverse the sunshade movement by
pressing the control downwards.
Once the lower limit is reached, press
and hold the control for at least 10
seconds. This action allows setting
the control unit in initialisation
status.
• Release the movement command.
• Within maximum 15 seconds:
• Press once the control downwards
(first or second detent). In this way
the control unit stores the lower limit position. During this
operation a slight click of the
sunshade motor that switches to
mechanical lock condition can be
heard.
• Lift the control and hold it up until
the sunshade completes its
upstroke and reaches the car body
pillar, fully home. Once the upper
limit stop is reached, the sunshade
will move downwards for approx.
2-3 millimetres and the control unit
will store this height as the upper
limit. Now the teaching of the
driver side rear sunshade is
complete.
• Repeat the same operations for the
passenger side rear sunshade to
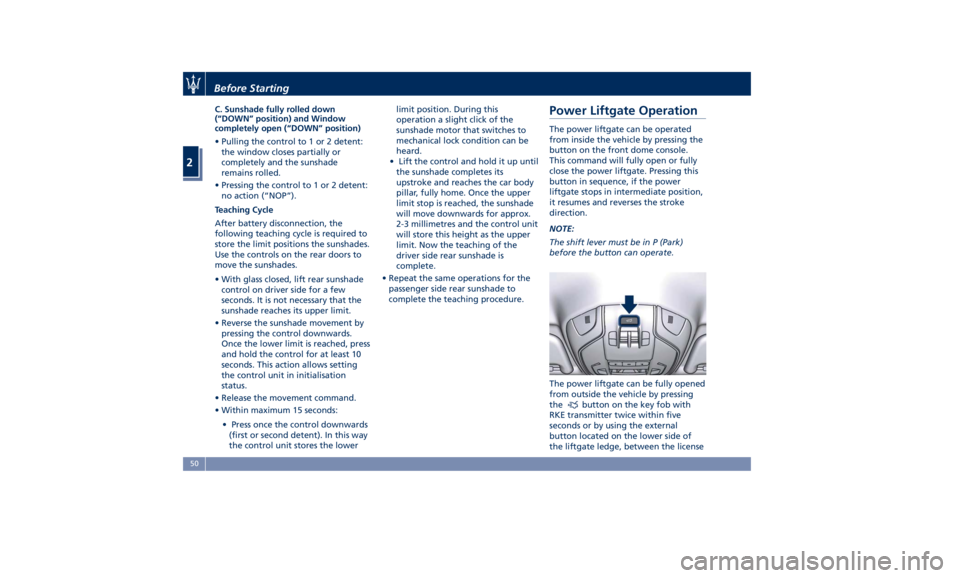
complete the teaching procedure.Power Liftgate Operation The power liftgate can be operated
from inside the vehicle by pressing the
button on the front dome console.
This command will fully open or fully
close the power liftgate. Pressing this
button in sequence, if the power
liftgate stops in intermediate position,
it resumes and reverses the stroke
direction.
NOTE:
The shift lever must be in P (Park)
before the button can operate.
The power liftgate can be fully opened
from outside the vehicle by pressing
the
button on the key fob with
RKE transmitter twice within five
seconds or by using the external
button located on the lower side of
the liftgate ledge, between the licenseBefore Starting
2
50
Page 63 of 436
Everyone in a motor vehicle should be
belted at all times.
Three-Point Seat Belts All seating positions in your vehicle
are equipped with combination lap
and shoulder belts.
The belt retractor is designed to lock
during very sudden stops or impacts.
This feature allows the shoulder part
of the belt to move freely with you
under normal conditions, conforming
to the body of the occupants.
However, in an accident, the belt will
lock and reduce your risk of striking
the inside of the vehicle or being
thrown out.
The driver is responsible for
respecting, and ensuring that all the
other occupants of the car also
observe the local regulations
concerning the use of seat belts.
Always fasten the seat belts before
starting the vehicle.
Seat belts are designed to be used by
persons whose physical characteristics
(age, height, weight) are provided for
by established legislation in each
country. Anyone who does comply
with these provisions may not travel in
the front passenger seat. This also
applies to children. Their heads are
proportionally heavier and larger than those of adults, while their bones and
muscles are relatively undeveloped. To
help protect them in case of a
collision, they must use special
restraint or safety systems, even in the
rear seat area.
WARNING!
• It is forbidden and dangerous to ride
in a cargo area. In an accident,
people riding in these areas are
more likely to be seriously injured or
killed.
• Do not allow any person to ride in
any area of your vehicle that is not
equipped with seats and seat belts.
• Be sure all passengers are in a seat
and using a seat belt properly.
• Wearing your belt improperly could
make your injuries in an accident
much worse. You might suffer
internal injuries, or you could even
slide out of part of the belt. Follow
these instructions to wear your seat
belt properly and to keep your
passengers safe, too.
• Two people should never be belted
into a single seat belt. People belted
together can crash into one another
in an accident, hurting one another severely. Never use a lap/shoulder
belt for more than one person.
• Remember that, in the event of an
accident, the rear seat passengers
not wearing the seat belts are not
only subject to personal injuries but
also represent a serious danger for
the front seat occupants.
Three-Point Seat Belts Use Instructions
•
Enter the vehicle
and close the door.
Sit back and adjust the seat.
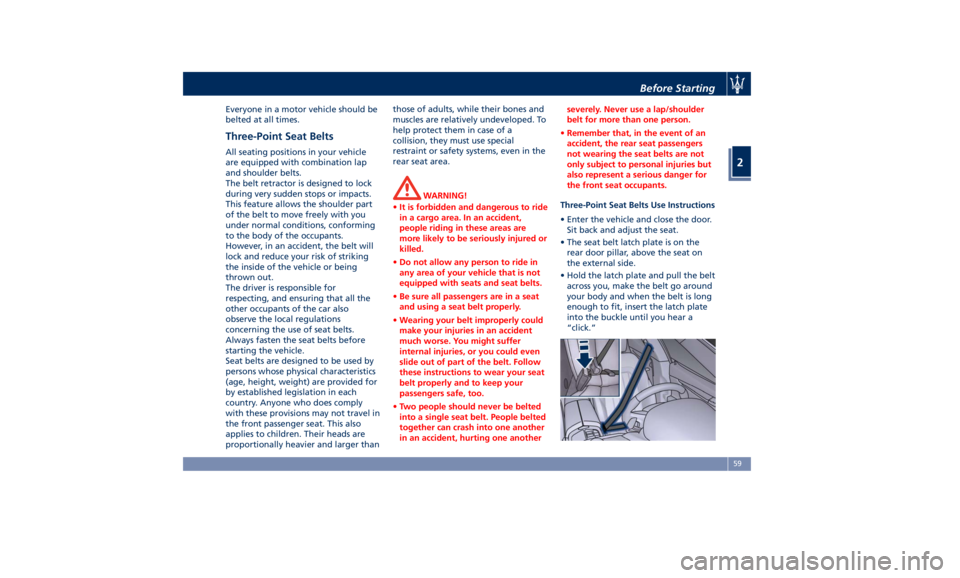
• The seat belt latch plate is on the
rear door pillar, above the seat on
the external side.
• Hold the latch plate and pull the belt
across you, make the belt go around
your body and when the belt is long
enough to fit, insert the latch plate
into the buckle until you hear a
“click.”Before Starting
2
59
Page 64 of 436
WARNING!
• The seat belts height must be
adjusted only with the vehicle
stationary.
• Do not bring sharp edges in contact
with a seat belt. This could reduce
their initial strength and cause them
to tear in the event of a crash.
• If a seat belt has been brought in
contact with a sharp edge, or has
been used to pin something to it,
have it immediately replaced by our
Authorized Maserati Dealer.
• A belt that is latched into the wrong
buckle will not protect you properly.
The lap portion of the belt could ride
too high on your body, possibly
causing internal injuries. Always
latch your belt into the
corresponding buckle.
• A seat belt that is too loose will not
protect you properly. In a sudden
stop, you could move too far
forward, increasing the possibility of
injury. Wear your seat belt snugly.
• A belt that is worn under your arm is
dangerous. Your body could strike
the inside surfaces of the vehicle in
an accident, increasing head and neck injury. A belt worn under the
arm can also cause internal injuries.
• Position the lap belt so that it is snug
and
lies low across
your hips, below
your abdomen. To fasten the lap belt
pull slightly up the diagonal portion
of the shoulder belt. To loosen the
lap belt if too tight, tilt the latch
plate and pull on the lap belt. A snug
belt reduces the risk of sliding under
the belt in an accident.
WARNING!
• A lap belt worn too high can
increase the risk of internal injury in
an accident. The belt forces won't
impact on the strong hip and pelvic
bones, but across your abdomen.
Always wear the lap belt as low as
possible and keep it comfortable.
• A twisted belt will not protect you
properly. In a collision, it could even
cut into you. Be sure the belt is
straight. If you can't straighten a
belt in your vehicle, take it to a
Service Center immediately.
• Do not use devices (clips, fastenings
etc.) that prevent the seat belts from
laying close to the occupants bodies. • Never carry children on a passenger’s
lap.
• Position the shoulder belt on your
chest
so that it
is comfortable and
not resting on your neck. The
retractor will withdraw any slack in
the belt.
• To release the belt, push the red
button on the buckle. The belt will
automatically retract to its stowed
position. If necessary, guide the seat
belt with your hand while it is
rewinding, to prevent it from
twisting.
WARNING!
A frayed or torn belt could break in an
accident and leave you with no
protection. Inspect the belt system
periodically, checking for cuts, frays, or
loose parts. Damaged parts must be
replaced immediately.
Do not disassemble or modify the
system. Seat belt/retractor assemblies
must be replaced by an Authorized
Maserati Dealer after an accident if
they have been damaged (bent
retractor, torn belt, etc.).Before Starting
2
60
Page 65 of 436
Three-Point Seat Belt Height
Adjustment
WARNING!
• Wearing your seat belt incorrectly
could make your injuries in a
collision much worse. You might
suffer internal injuries, or you could
even slide out of the seat belt.
Follow these instructions to wear
your seat belt safely and to keep
your passengers safe, too.
• Position the shoulder belt across the
shoulder and chest with minimal, if
any slack so that it is comfortable
and not resting on your neck. The
retractor will withdraw any slack in
the shoulder belt.
• Misadjustment of the seat belt could
reduce the effectiveness of the
safety belt in a crash.
• Always make all seat belt height
adjustments when the vehicle is
stationary.
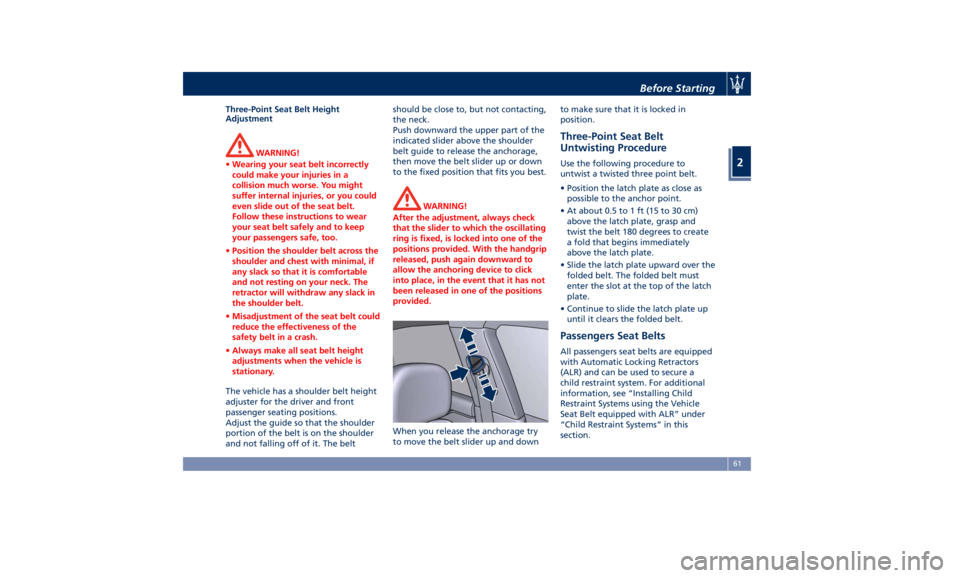
The vehicle has a shoulder belt height
adjuster
for the driver and front
passenger seating positions.
Adjust the guide so that the shoulder
portion of the belt is on the shoulder
and not falling off of it. The belt should be close to, but not contacting,
the neck.
Push downward the upper part of the
indicated slider above the shoulder
belt guide to release the anchorage,
then move the belt slider up or down
to the fixed position that fits you best.
WARNING!
After the adjustment, always check
that the slider to which the oscillating
ring is fixed, is locked into one of the
positions provided. With the handgrip
released, push again downward to
allow the anchoring device to click
into place, in the event that it has not
been released in one of the positions
provided.
When you release the anchorage try
to
move the belt
slider up and down to make sure that it is locked in
position.
Three-Point Seat Belt
Untwisting Procedure Use the following procedure to
untwist a twisted three point belt.
• Position the latch plate as close as
possible to the anchor point.
• At about 0.5 to 1 ft (15 to 30 cm)
above the latch plate, grasp and
twist the belt 180 degrees to create
a fold that begins immediately
above the latch plate.
• Slide the latch plate upward over the
folded belt. The folded belt must
enter the slot at the top of the latch
plate.
• Continue to slide the latch plate up
until it clears the folded belt.
Passengers Seat Belts All passengers seat belts are equipped
with Automatic Locking Retractors
(ALR) and can be used to secure a
child restraint system. For additional
information, see “Installing Child
Restraint Systems using the Vehicle
Seat Belt equipped with ALR” under
“Child Restraint Systems” in this
section.Before Starting
2
61
Page 67 of 436
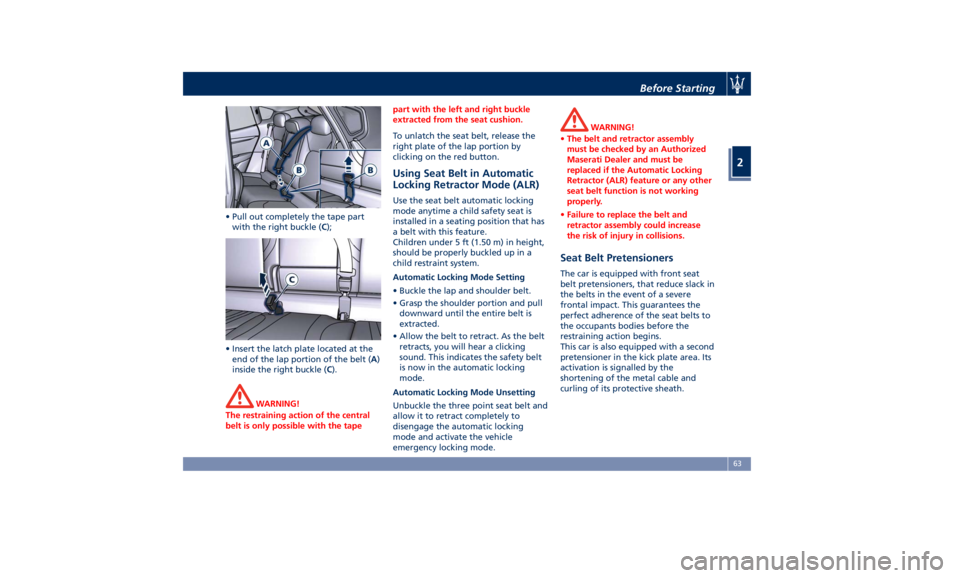
• Pull out completely the tape part
with the right buckle ( C );
• Insert the latch plate located at the
end of the lap portion of the belt ( A )
inside the right buckle ( C ).
WARNING!
The restraining action of the central
belt is only possible with the tape part with the left and right buckle
extracted from the seat cushion.
To unlatch the seat belt, release the
right
plate of the lap portion by
clicking on the red button.
Using Seat Belt in Automatic
Locking Retractor Mode (ALR) Use the seat belt automatic locking
mode anytime a child safety seat is
installed in a seating position that has
a belt with this feature.
Children under 5 ft (1.50 m) in height,
should be properly buckled up in a
child restraint system.
Automatic Locking Mode Setting
• Buckle the lap and shoulder belt.
• Grasp the shoulder portion and pull
downward until the entire belt is
extracted.
• Allow the belt to retract. As the belt
retracts, you will hear a clicking
sound. This indicates the safety belt
is now in the automatic locking
mode.
Automatic Locking Mode Unsetting
Unbuckle the three point seat belt and
allow it to retract completely to
disengage the automatic locking
mode and activate the vehicle
emergency locking mode. WARNING!
• The belt and retractor assembly
must be checked by an Authorized
Maserati Dealer and must be
replaced if the Automatic Locking
Retractor (ALR) feature or any other
seat belt function is not working
properly.
• Failure to replace the belt and
retractor assembly could increase
the risk of injury in collisions.
Seat Belt Pretensioners The car is equipped with front seat
belt pretensioners, that reduce slack in
the belts in the event of a severe
frontal impact. This guarantees the
perfect adherence of the seat belts to
the occupants bodies before the
restraining action begins.
This car is also equipped with a second
pretensioner in the kick plate area. Its
activation is signalled by the
shortening of the metal cable and
curling of its protective sheath.Before Starting
2
63
Page 78 of 436
Child Restraint Systems NOTE:
A child restraint system can help
protect a child in a vehicle so ensure
that the child restraint selected has a
certification label applicable to FMVSS
213 in the U.S., or CMVSS 213 in
Canada.
Everyone in your vehicle must be
buckled up all the time, including
babies and children. Every state in the
United States and all Canadian
provinces require that small children
ride in proper restraint systems. Please
be reminded that you can be
prosecuted for ignoring this law.
Children 12 years or younger should
ride properly buckled up in a rear seat,
if available. According to crash
statistics, children are safer when
properly restrained in the rear seats
rather than in the front.
WARNING!
In a collision, an unrestrained child,
even a baby, can become a projectile
inside the vehicle. The force required
to hold even an infant on your lap
could become so great that you could not hold the child, no matter how
strong you are. The child and others
could be badly injured or killed. Any
child riding in your vehicle should
always be in a proper restraint system
suitable for the child’s size.
There are different sizes and types of
restraint
systems for children from
newborn size to the child almost large
enough for an adult safety belt.
Always refer to the manual provided
with child seat to ensure it is the
proper type according the travelling
child. Use the restraint system that is
correct for your child.
Infants and Child Restraints Safety experts recommend that
children ride rearwardfacing in the
vehicle until they are two years old or
until they reach either the height or
weight limit of their rear facing child
seat.
Two types of child restraint systems
can be used rearward-facing: infant
carriers and convertible child seats.
The infant carrier is only used
rearward-facing in the vehicle. It is
recommended for children from birth
until they reach the weight or height
limit of the infant carrier. Convertible child seats can be used
either rearward-facing or
forward-facing in the rear seat of the
vehicle. Convertible child seats often
have a higher weight limit in the
rearward-facing direction than infant
carriers do, so they can be used
rearward-facing by children who have
outgrown their infant carrier but are
still younger than at least two years
old.
Children should remain rearward-
facing until they reach the highest
weight or height allowed by their child
seat. Both types of child restraint
systems are fixed to the car in the rear
seat area by the lap/shoulder belt or
the LATCH child restraint anchor
system. Refer to “Lower Anchors and
Tether for CHildren (LATCH)” in this
section.
WARNING!
• Never place a rear facing infant seat
in front of an air bag. A deploying
air bag can cause death or serious
injury to a child 12 years or younger,
including a child in a rearward facing
infant seat.
• Only use a rearward-facing childBefore Starting
2
74
Page 79 of 436
restraint in a vehicle with a rear
seat.
Older Children and Child
Restraints Children who are two years old or
who have outgrown their rear-facing
child seat can ride forward facing in
the rear seat of the vehicle in a proper
child restraint. Forward-facing child
seats and convertible child seats used
in the forward-facing direction are for
children who are over two years old or
who have outgrown the rear-facing
weight or height limit of their
rear-facing child seat.
Children should remain in a
forward-facing child seat with a
harness for as long as possible, up to
the highest weight or height allowed
by the child seat. These child seats are
also fixed to the car by the
lap/shoulder belt or the LATCH child
restraint anchorage system located in
the rear seat area. Refer to “Lower
Anchors and Tether for CHildren
(LATCH)” in this section.
All children whose weight or height is
above the forward-facing limit for the
child seat should use a belt-
positioning booster seat until the
vehicle’s seat belts fit properly. If the child cannot sit with knees bent over
the vehicle’s seat cushion while the
back is against the seatback, they
should use a belt-positioning booster
seat.
The child and belt-positioning booster
seat are fixed to the car by the
lap/shoulder belt.
Children Too Large for Booster
Seats Children who are large enough to
wear the shoulder belt comfortably
and whose legs are long enough to
bend over the front of the seat when
their back is against the seatback
should use the lap/shoulder belt in a
rear seat.
• Make sure that the child is upright in
the seat.
• The lap portion should be low on
the hips and as snug as possible.
• Check belt fit periodically. A child’s
squirming or slouching can move the
belt out of position.
• If the shoulder belt contacts the face
or neck, move the child closer to the
center of the vehicle. Never allow a
child to put the shoulder belt under
an arm or behind their back. NOTE:
For additional information, refer to
"http://www.safercar.gov/parents/
index.htm"
www.safercar.gov/parents/index.htm
or call 1-888-327-4236.
Canadian residents should refer to
Transport Canada’s website for
additional information:
http://www.tc.gc.ca/eng/motorvehicle
safety/safedrivers-childsafety-index-
53.htm
WARNING!
• Improper installation can lead to
failure of an infant or child restraint.
It could come loose in a collision.
The child could be badly injured or
killed. Follow the restraint
manufacturer’s directions exactly
when installing an infant or child
restraint.
• A rearward-facing child restraint
should only be used in a rear seat. A
rearward-facing child restraint in the
front seat may be struck by a
deploying passenger air bag, which
may cause severe or fatal injury to
the infant.Before Starting
2
75
Page 80 of 436
Here are some tips on getting
the most out of your child
restraint • Before buying any restraint system,
make sure that it has a label
certifying that it meets all applicable
Safety Standards. Maserati also
recommends that you make sure that
you can install the child restraint in
the vehicle where you will use it
before you buy it.
• The restraint system must be
appropriate for your child’s weight
and height.
• Check the label on the restraint
system for weight and height limits.
• Carefully follow the instructions that
come with the restraint system.
• If installed improperly, it may not
work when needed.
• Fit the child into the seat according
to the child restraint manufacturer’s
directions.
WARNING!
When your child restraint system is
not in use, secure it in the vehicle with
the seat belt or remove it from the
vehicle. Do not leave it loose in the
vehicle. In a sudden stop or accident, it could strike the occupants or
seatbacks and cause serious personal
injury.
Installing Child Restraint
Systems using the Vehicle Seat
Belt equipped with ALR Child restraint systems are designed to
be secured in vehicle seats by lap belts
or the lap belt portion of a
lap/shoulder belt.
All the passenger seat belts are
equipped with an Automatic Locking
Retractor (ALR) to secure child
protection through a Child Restraint
System (CRS). These types of seat belts
are designed to keep the lap portion
of the seat belt tight around the child
restraint seat avoiding to use a locking
clip.
The ALR will make a ratcheting noise if
the entire belt is pulled out of the
retractor in order to enable the belt to
retract subsequently. For additional
information on ALR, see “Using Seat
Belt in Automatic Locking Retractor
(ALR) Mode” in “Occupants Restraint
Systems” in this section.
To install a Child Restraint System with
ALR, pull enough of the belt out of the
retractor leading it through the belt
path of the protection device. Slide the latch into the buckle until it clicks,
then remove the entire safety belt
from the retractor in order to
rewound. While rewinding a click will
indicate the safety belt is now in
Automatic Locking mode.
Exert then a traction on the exceeded
lap section of the belt in order to
tighten it around the child restraint
seat. All seat belts will loosen over
time, it is therefore necessary to check
them periodically and set them
properly.
Lower Anchors and Tether for
Children (LATCH) Your vehicle's rear outboard seats are
all equipped with the child restraint
anchorage system called LATCH.
The LATCH system allows the child
restraint systems to be fixed without
using the vehicle's seat belts, instead
fixing the child restraint system to the
vehicle structure, using lower
anchorages A and upper tether strap
B .Before Starting
2
76
Page 99 of 436
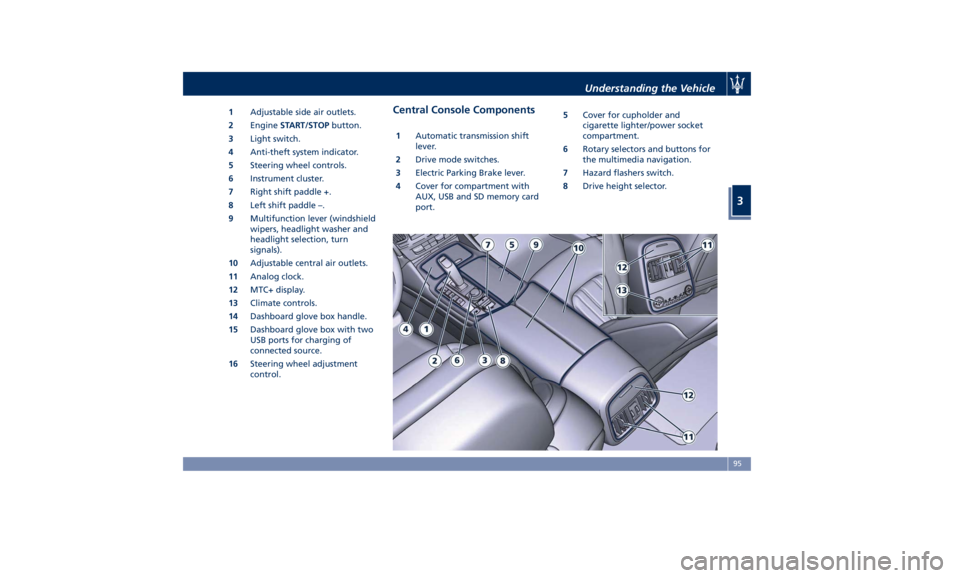
1 Adjustable side air outlets.
2 Engine START/STOP button.
3 Light switch.
4 Anti-theft system indicator.
5 Steering wheel controls.
6 Instrument cluster.
7 Right shift paddle +.
8 Left shift paddle –.
9 Multifunction lever (windshield
wipers, headlight washer and
headlight selection, turn
signals).
10 Adjustable central air outlets.
11 Analog clock.
12 MTC+ display.
13 Climate controls.
14 Dashboard glove box handle.
15 Dashboard glove box with two
USB ports for charging of
connected source.
16 Steering wheel adjustment
control. Central Console Components 1 Automatic transmission shift
lever.
2 Drive mode switches.
3 Electric Parking Brake lever.
4 Cover for compartment with
AUX, USB and SD memory card
port. 5 Cover for cupholder and
cigarette lighter/power socket
compartment.
6 Rotary selectors and buttons for
the multimedia navigation.
7 Hazard flashers switch.
8 Drive height selector.Understanding the Vehicle
3
95