battery replacement MAZDA 323 1989 Factory Repair Manual
[x] Cancel search | Manufacturer: MAZDA, Model Year: 1989, Model line: 323, Model: MAZDA 323 1989Pages: 1164, PDF Size: 81.9 MB
Page 17 of 1164
CAUTION GI
9MUGIX-032
9MUGIX-029
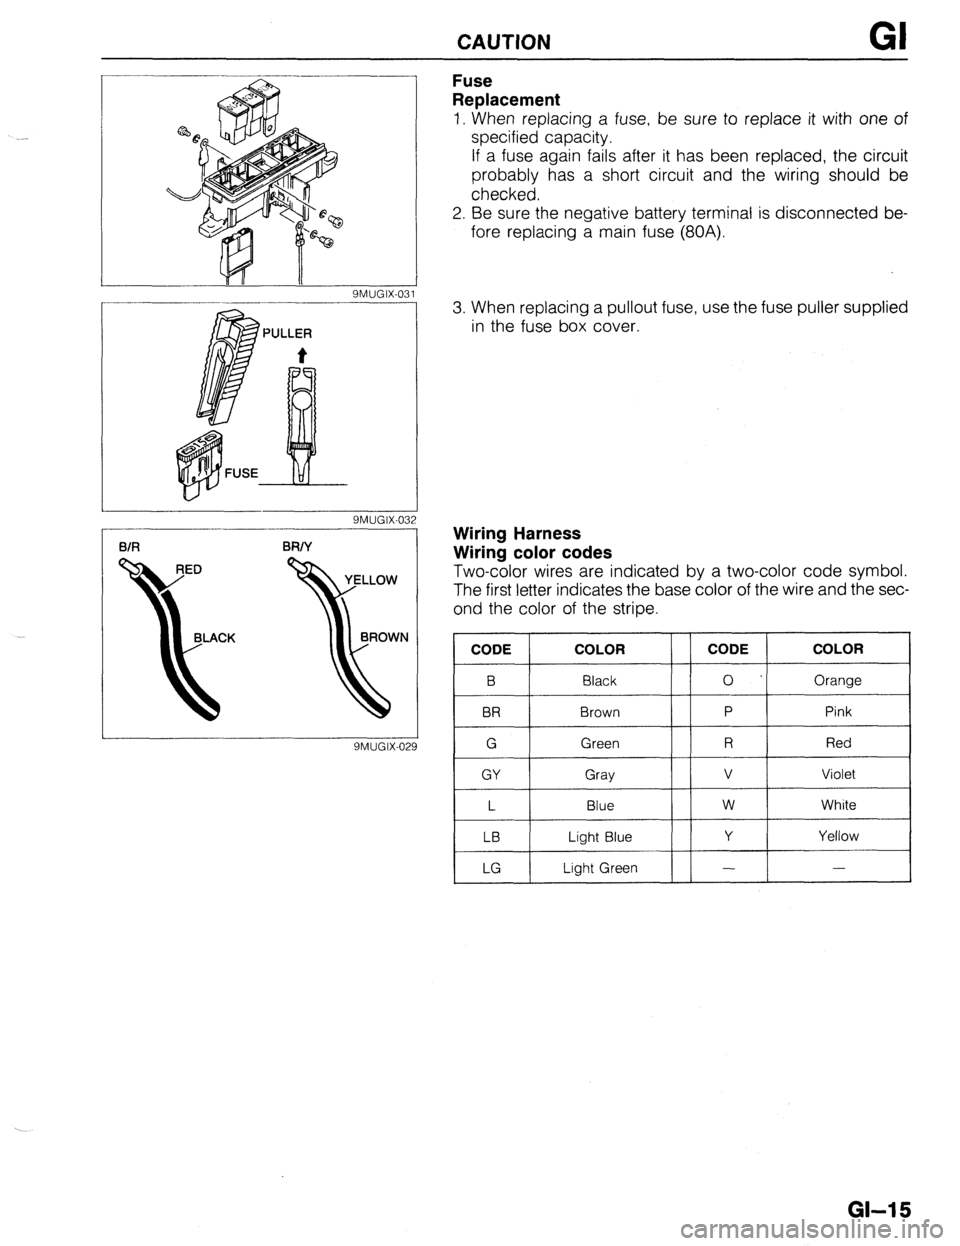
Fuse
Replacement
1. When replacing a fuse, be sure to replace it with one of
specified capacity.
If a fuse again fails after it has been replaced, the circuit
probably has a short circuit and the wiring should be
checked.
2. Be sure the negative battery terminal is disconnected be-
fore replacing a main fuse (80A).
3. When replacing a pullout fuse, use the fuse puller supplied
in the fuse box cover.
Wiring Harness
Wiring color codes
Two-color wires are indicated by a two-color code symbol.
The first letter indicates the base color of the wire and the sec-
ond the color of the stripe.
CODE COLOR
B Black
BR Brown
G Green
GY Gray
L Blue
LB Light Blue
LG Light Green CODE COLOR
0 Orange
P Pink
R Red
v Violet
w White
Y Yellow
- -
GI-15
Page 46 of 1164
Bl ON-VEHICLE MAINTENANCE
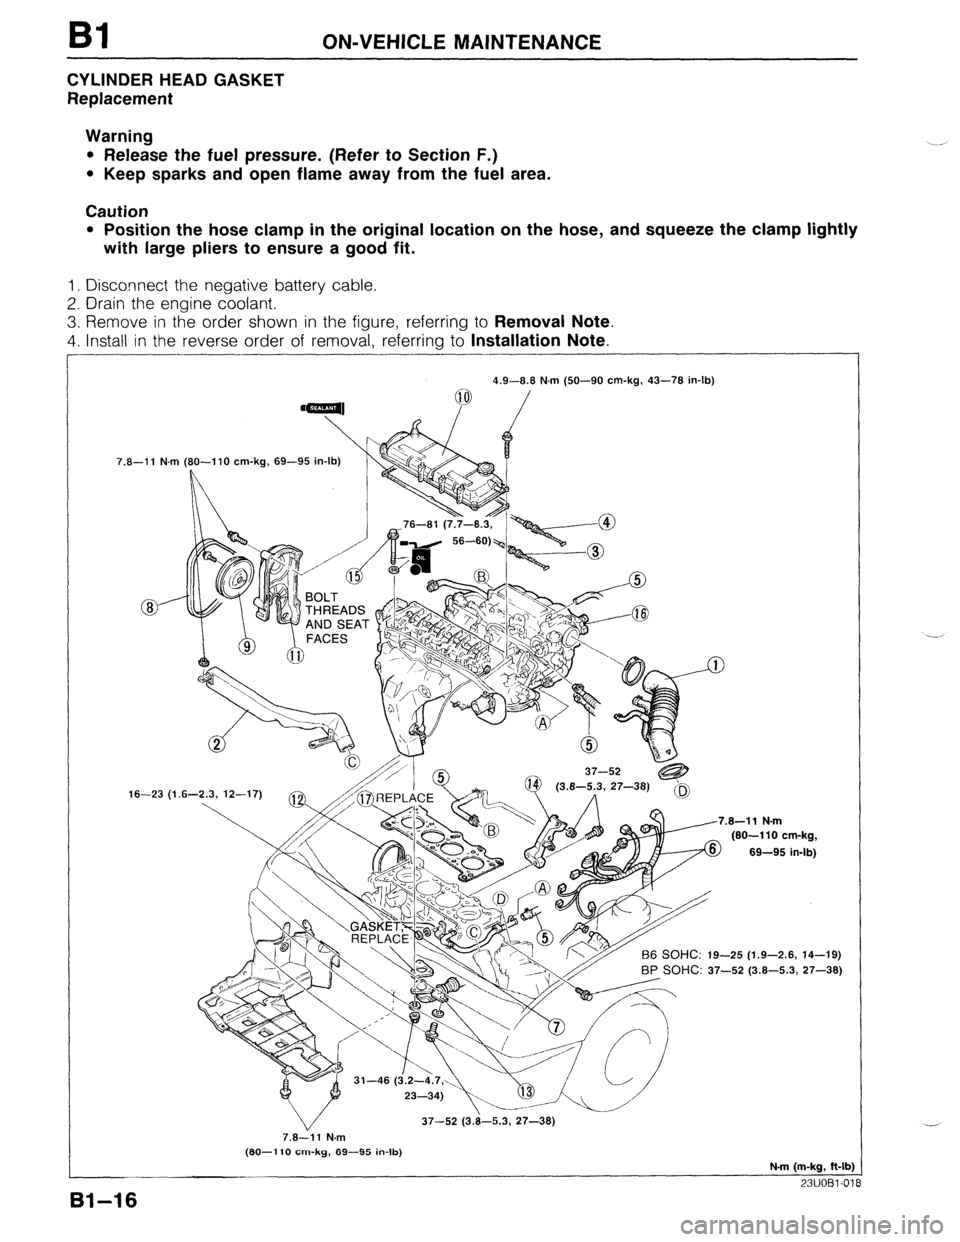
CYLINDER HEAD GASKET
Replacement
Warning
l Release the fuel pressure. (Refer to Section F.)
l Keep sparks and open flame away from the fuel area.
Caution
l Position the hose clamp in the original location on the hose, and squeeze the clamp lightly
with large pliers to ensure a good fit.
1. Disconnect the negative battery cable.
2. Drain the engine coolant.
3. Remove in the order shown in the figure, referring to Removal Note.
4. Install in the reverse order of removal, referring to Installation Note.
7.8-11 N.m
16-23 (1 4.9-8.8 N.m (50-90 cm-kg, 43-78 in-lb)
(80-l 10 cm-kg, 69-95 in-lb)
L
.8-11 N.m
(80-110 cm-kg,
69-95 in-lb)
-25 (1.9-2.6, 14-19)
BP SOHC: 37-52 (3.8-5.3, 27-38)
37-52 (3.8-5.3, 27-38)
7.8-11 N.m
(80-l 10 cm-kg, 89-95 in-lb)
N-m (m-kg, ft-lb)
23UOBl-01
81-16
Page 53 of 1164
ON-VEHICLE MAINTENANCE
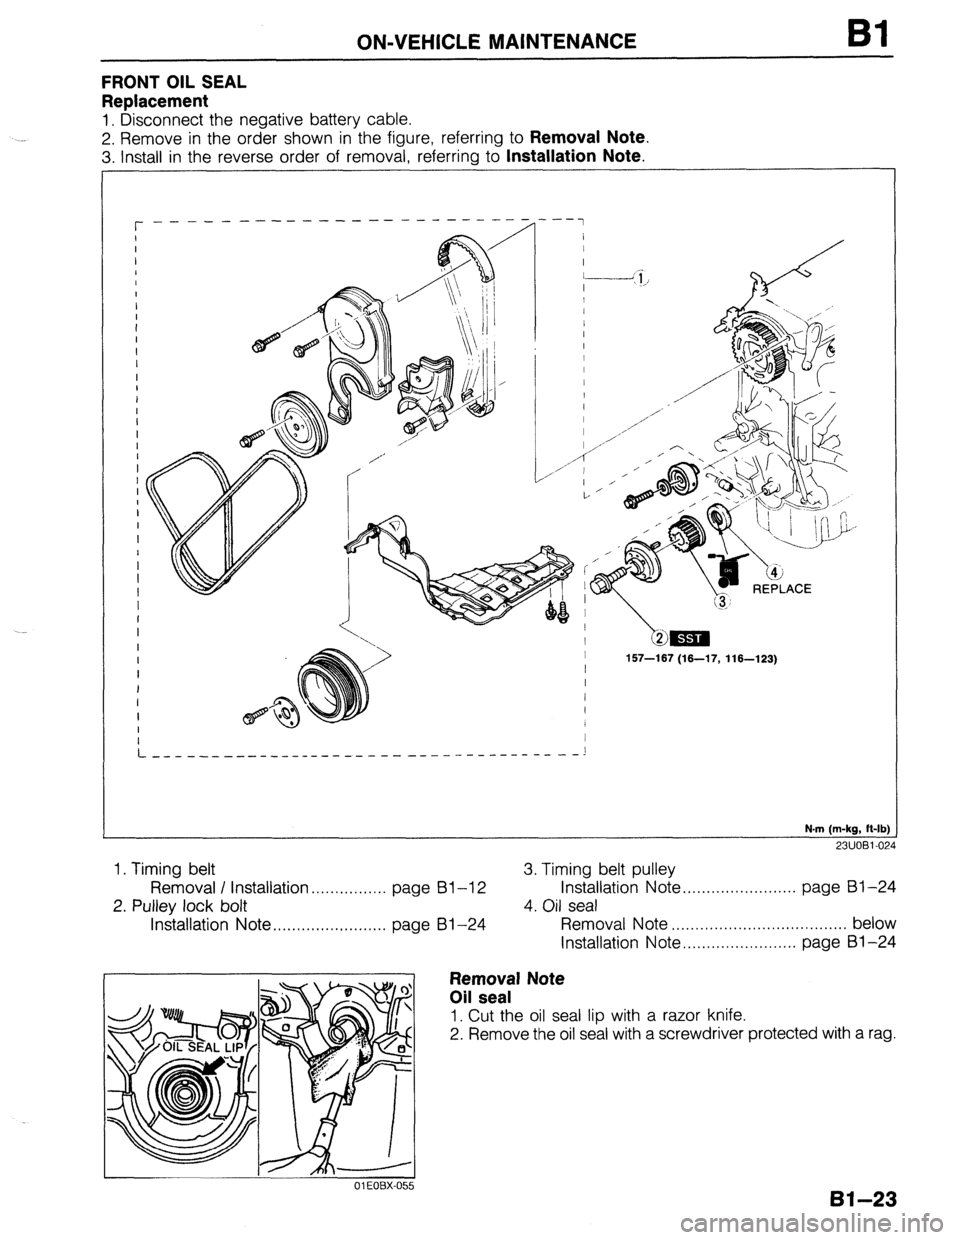
FRONT OIL SEAL
Replacement
1. Disconnect the negative battery cable.
2. Remove in the order shown in the figure, referring to
Removal Note.
3. Install in the reverse order of removal, referring to Installation Note.
I- I
I
I
I
157-167 (16-17, 116-123)
I
t
I
I
/
L---- -____ - _......_____________ -----------!
N.m (m-kg, It-lb)
^ ^ ^ -
_ _
1. Timing belt
- 3. Timing belt pulley
Removal I Installation..
.............. page
61-12 Installation
Note.. ......................
page Bl-24
2. Pulley lock bolt
4. Oil seal
Installation Note ........................
page Bl-24
Removal Note
..................................... below
Installation
Note.. ......................
page Bl-24
01 EOBX-055
Removal Note
Oil seal
1. Cut the oil seal lip with a razor knife.
2. Remove the oil seal with a screwdriver protected with a rag.
61-23
Page 55 of 1164
-.
ON-VEHICLE MAINTENANCE Bl
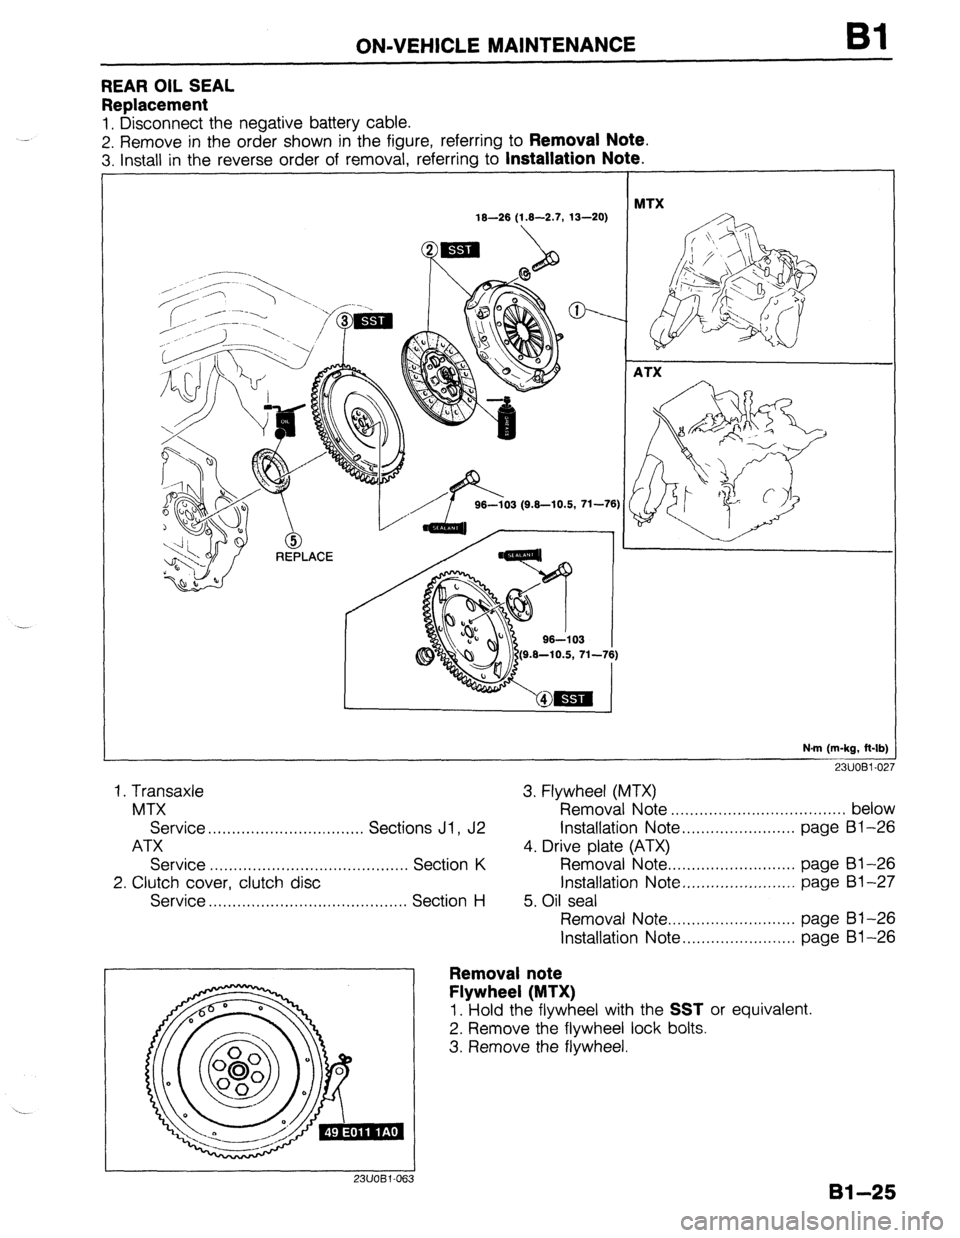
REAR OIL SEAL
Replacement
1. Disconnect the negative battery cable.
2. Remove in the order shown in the figure, referring to
Removal Note.
3. install in the reverse order of removal, referring to Installation Note !.
I
16-26 (1.6-2.7, 13-20) I HTX
ATX
N.m (m-kg, R-lb)
23UOBl-027
1. Transaxle
MTX
Service.. ............................... Sections Jl , J2
ATX
Service .......................................... Section K
2. Clutch cover, clutch disc
Service .......................................... Section H 3. Flywheel (MTX)
Removal Note ..................................... below
Installation Note ........................ page 81-26
4. Drive plate (ATX)
Removal Note.. ......................... page Bl-26
Installation Note.. ...................... page Bl-27
5. Oil seal
Removal Note.. ......................... page 81-26
Installation Note ........................ page 81-26
Removal note
Flywheel (MTX)
1. Hold the flywheel with the SST or equivalent.
2. Remove the flywheel lock bolts.
3. Remove the flywheel.
Bl-25
Page 148 of 1164
82 ON-VEHICLE MAINTENANCE
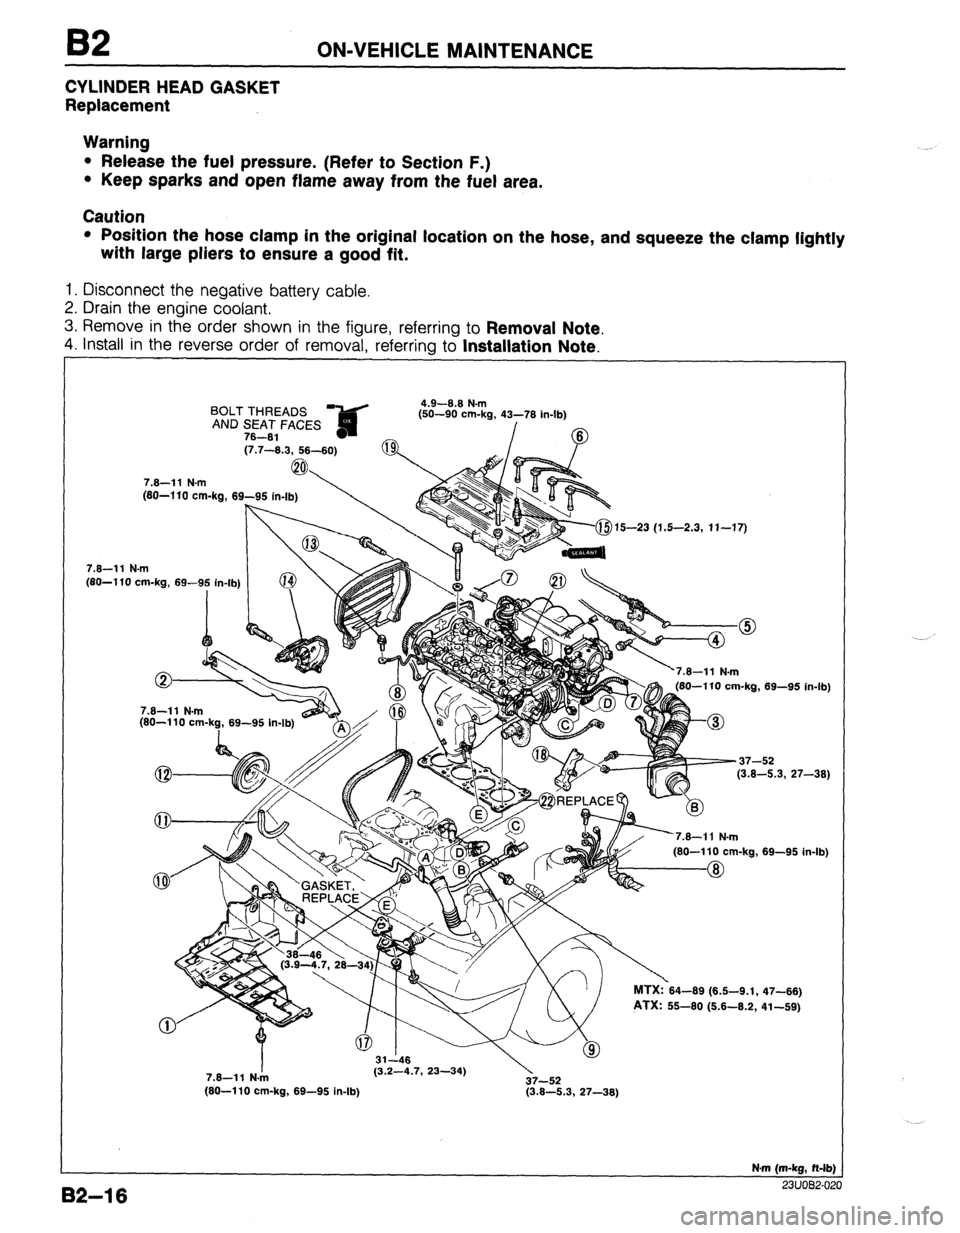
CYLINDER HEAD GASKET
Replacement
Warning
l Release the fuel pressure. (Refer to Section F.)
l Keep sparks and open flame away from the fuel area.
Caution
l Position the hose clamp in the original location on the hose, and squeeze the clamp lightly
with large pliers to ensure a good fit.
1. Disconnect the negative battery cable.
2. Drain the engine coolant.
3. Remove in the order shown in the figure, referring to
Removal Note.
4. install in the reverse order of removal, referrina to Installation Note.
BOLT THREADS ?&d 4.9-8.8 N.m
fsn-an om.h 41-‘71( ir
AND SEAT FACES ,-- -- -... ..=, _” . _ ..I-lb)
78-81 - /
(7.7-8.3, 58-60)
7.8-11 N.m
(80-l 10 cm-ka, 69-95
, . . . . . . (80-l 10 cm-kg, 69-9: in-lb) (j-$15-23 (1.5-2.3, 11-17)
82-l 6
7.8-11 N.m
(80-110 cm-k?, 69-95 In-lb) 180-110 cm-ka. 69-95 in-lb
-37-52
(3.8-5.3, 27-38)
’
nl MTX:?64-69 (6.6-9.1,
PTX: 55-60 (6.6-8.2, 69-95 in. .Ib)
47-86)
41-69)
7.8-11 N./n (3.2-4.7, 23-34)
37-52
(80-110 cm-kg, 69-95 in-lb) (3.8-5.3, 27-38)
N-m (m-kg, N-lb)
^^. .^_^ __
Page 158 of 1164
B2 ON-VEHICLE MAINTENANCE
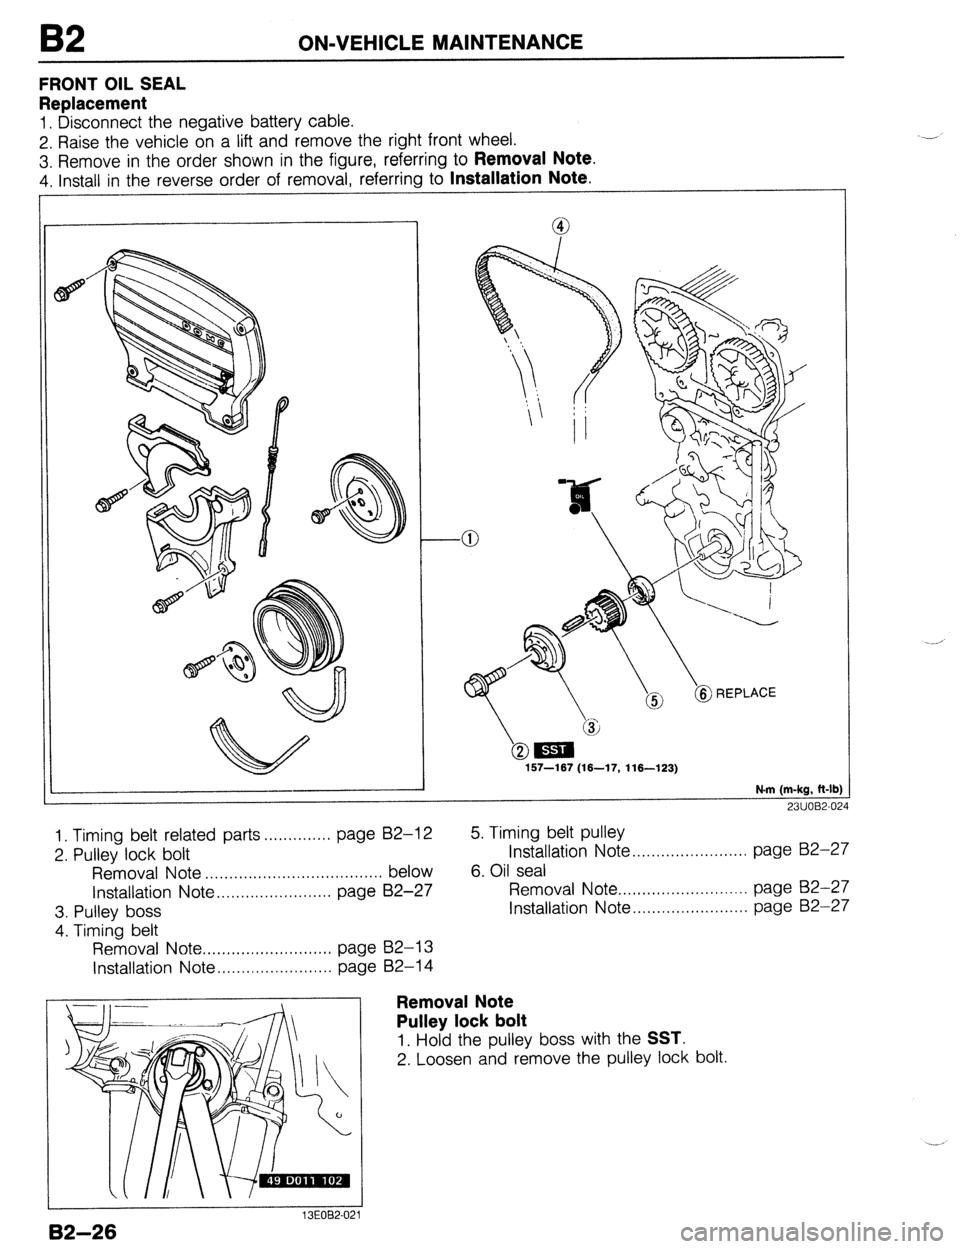
FRONT OIL SEAL
Replacement
1. Disconnect the negative battery cable.
2. Raise the vehicle on a lift and remove the right front wheel.
3. Remove in the order shown in the figure, referring to
Removal Note.
4. Install in the reverse order of removal, referring to Installation Note.
I
@Em
157-167 (16-17, 116-123)
N.m (m-kg, ft-lb
1. Timing belt related parts.. ............ page B2-12
2. Pulley lock bolt
Removal Note ..................................... below
Installation Note.. page B2-27 ......................
3. Pulley boss
4. Timing belt
Removal Note.. ......................... page B2-13
Installation Note ........................ page B2-14 5. Timing belt pulley
Installation Note..
...................... page B2-27
6. Oil seal
Removal Note.. ......................... page B2-27
Installation Note.. ...................... page B2-27
Removal Note
Pulley lock bolt
1. Hold the pulley boss with the SST.
2. Loosen and remove the pulley lock bolt.
Page 160 of 1164
B2 ON-VEHICLE MAINTENANCE
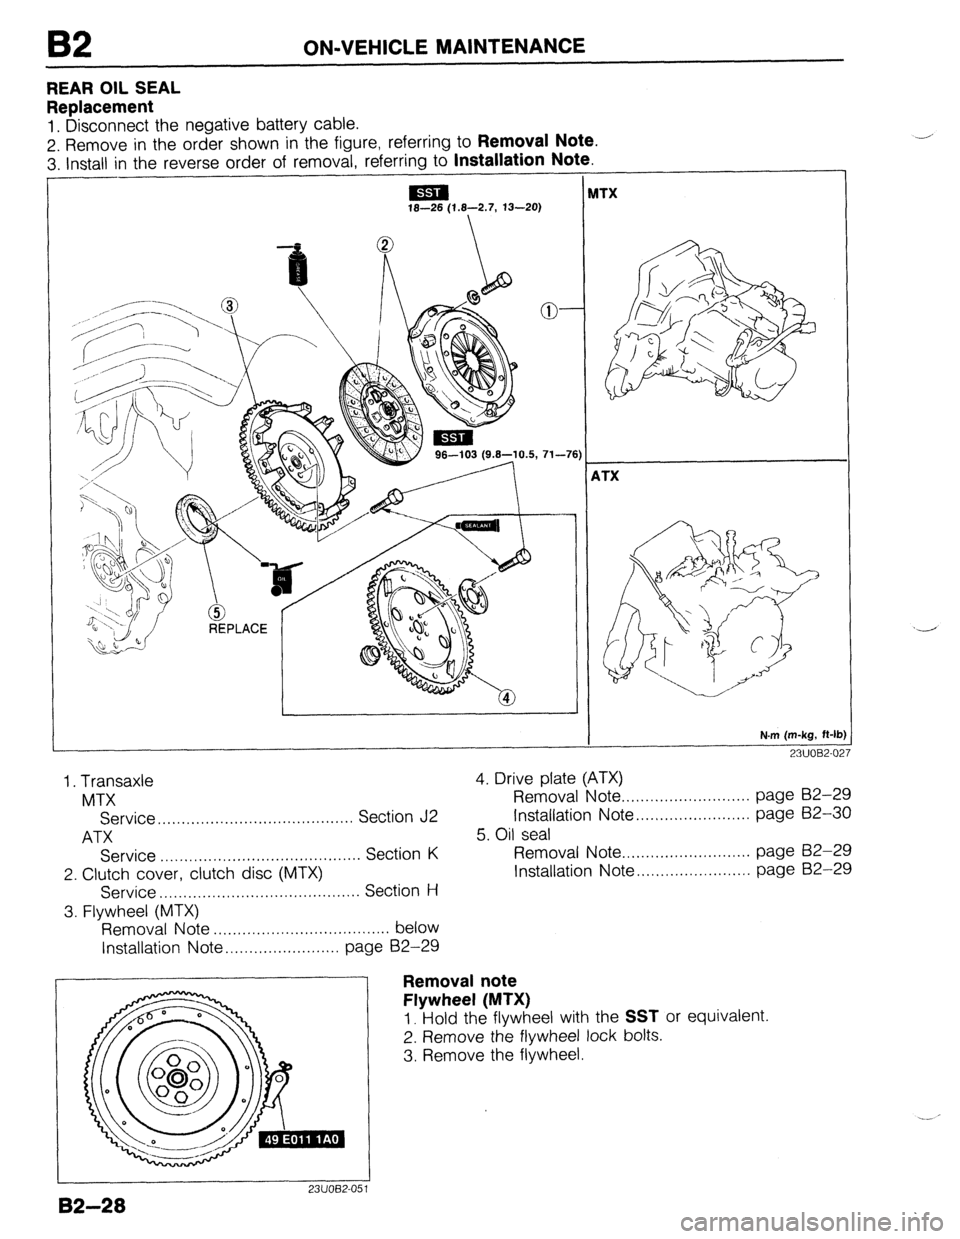
REAR OIL SEAL
Replacement
1. Disconnect the negative battery cable.
2. Remove in the order shown in the figure, referring to
Removal Note.
3. install in the reverse order of removal, referring to Installation Note.
t
I 1
ITX 16-26 (1.6-2.7, 13-20)
L
\TX
N.m (m-kg, ft-It 0
23UOBZ-027
1. Transaxle
MTX
Service . . . . . . . . . . . . . . . . . . . . . . . . . . . . . . . . . . . . . . . . . Section J2
ATX
Service . . . , . . . . ,.......................... Section K
2. Clutch cover, clutch disc (MTX)
Service . . . . . . . . . . . . . . . . . . . . . . . . . . . . . . . . . . . . . . . . . . Section H
3. Flywheel (MTX)
Removal Note . . . . . . . . . . . . . . . . . . . . . . . . . . . . . . . . . . . . . below
Installation Note .,.....,..,............. page 82-29 4. Drive plate (ATX)
Removal Note ..,........................ page B2-29
Installation Note . . . . . . . . . . . . . . . . . . . . . . . . page 62-30
5. Oil seal
Removal Note .,......................... page 52-29
Installation Note . . . . . . . . . . . . . . . . . . . . . . . . page B2-29
23UOB2-05
82-28
il
Removal note
Flywheel (MTX)
1. Hold the flywheel with the SST or equivalent.
2. Remove the flywheel lock bolts.
3. Remove the flywheel.
Page 263 of 1164
FAN MOTOR E
I-
i.- 5. Connect the battery, an ammeter, and switch to the fan mo-
tor connectors for high-speed inspection.
6. Verify that the fan motor operates smoothly at the standard
current or less with the switch ON.
Current (A): 13.3 + 10% MAX
7. If the fan motor is faulty, replace it.
---“-. --
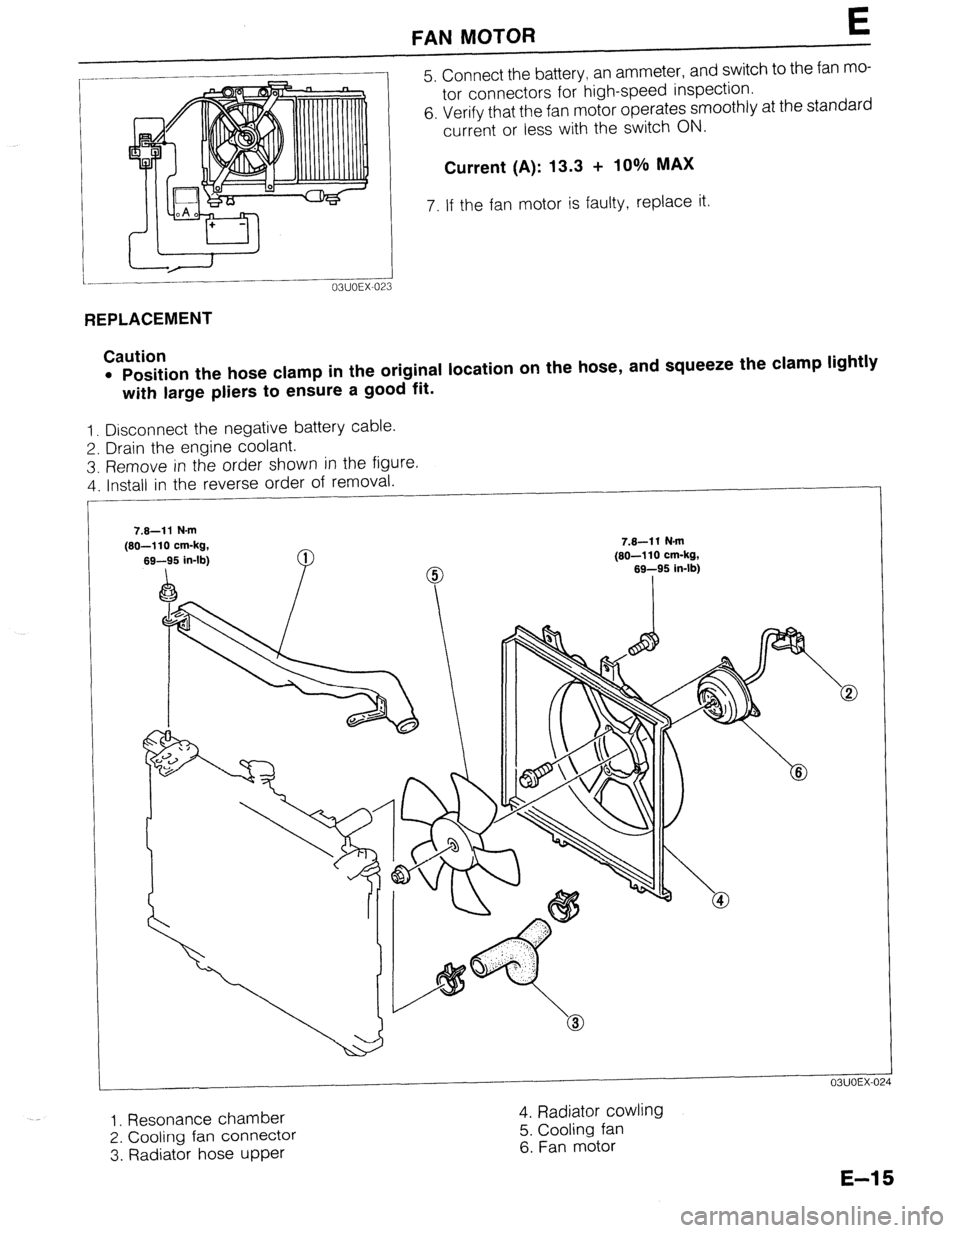
REPLACEMENT
Caution
l Position the hose clamp in the original location on the hose, and squeeze the clamp lightly
with large pliers to ensure a good fit.
1. Disconnect the negative battery cable.
2. Drain the engine coolant.
3. Remove in the order shown in the figure.
4. Install in the reverse order of removal.
7.8-11 N.m
7.8-11 N.m
(80-110 cm-kg,
1. Resonance chamber
4. Radiator cowling
2. Cooling fan connector
5.
Cooling fan
3. Radiator hose upper
6. Fan motor
E-l 5
Page 395 of 1164
FUEL SYSTEM F
STA
OBUOFX- 15
03UOFX-15
DISCONNECT CONNECTOR
TO RELEASE FUfL PRESSURE
REAR SEAT C
23UOFX-11
INSTALL CLAMPS
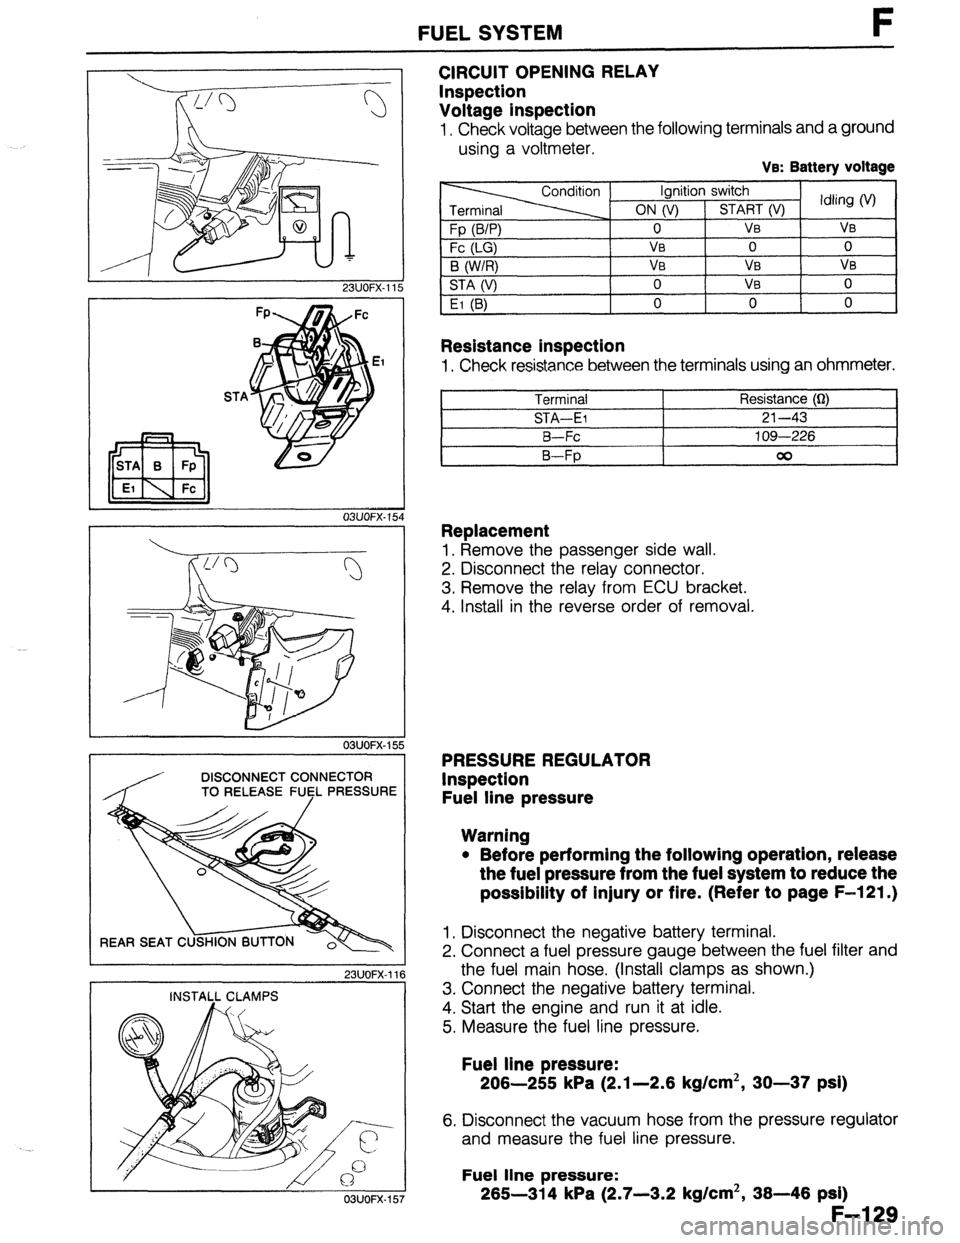
CIRCUIT OPENING RELAY
Inspection
Voltage inspection
I, Check voltage between the following terminals and a ground
using a voltmeter.
Ve: Battery voltage
Resistance inspection
1, Check resistance between the terminals using an ohmmeter.
Terminal Resistance (Q)
STA-El 21-43
B-Fc 109-226
B-Fp 00
Replacement
1, Remove the passenger side wall.
2. Disconnect the relay connector.
3. Remove the relay from ECU bracket.
4. Install in the reverse order of removal.
PRESSURE REGULATOR
Inspection
Fuel line pressure
Warning
l Before performing the following operation, release
the fuel pressure from the fuel system to reduce the
possibility of injury or fire. (Refer to page F-121.)
1, Disconnect the negative battery terminal.
2. Connect a fuel pressure gauge between the fuel filter and
the fuel main hose. (Install clamps as shown.)
3. Connect the negative battery terminal.
4. Start the engine and run it at idle.
5. Measure the fuel line pressure.
Fuel line pressure:
206-255 kPa (2.1-2.6 kg/cm2, 30-37 psi)
6. Disconnect the vacuum hose from the pressure regulator
and measure the fuel line pressure.
Fuel line pressure:
265-314 kPa (2.7-3.2 kg/cm2, 36-46 psi)
F-l 29
03UOFX-157
Page 396 of 1164
F FUELSYSTEM
DISCONNECT CONNECTOR
TO RELEASE FlJ$L PRESSURE
REAR SEAT C
23UOFX-11
INSTALL CLAMPS 7
03UOFX.I 59
F-l 30
DIAGNOSl&OJNECTOR
/ K
1 SUOFX-10
DISCONNECT CONNECTOR
TO RELEASE
FlJl$L PRESSURE
23UOFX-11
I
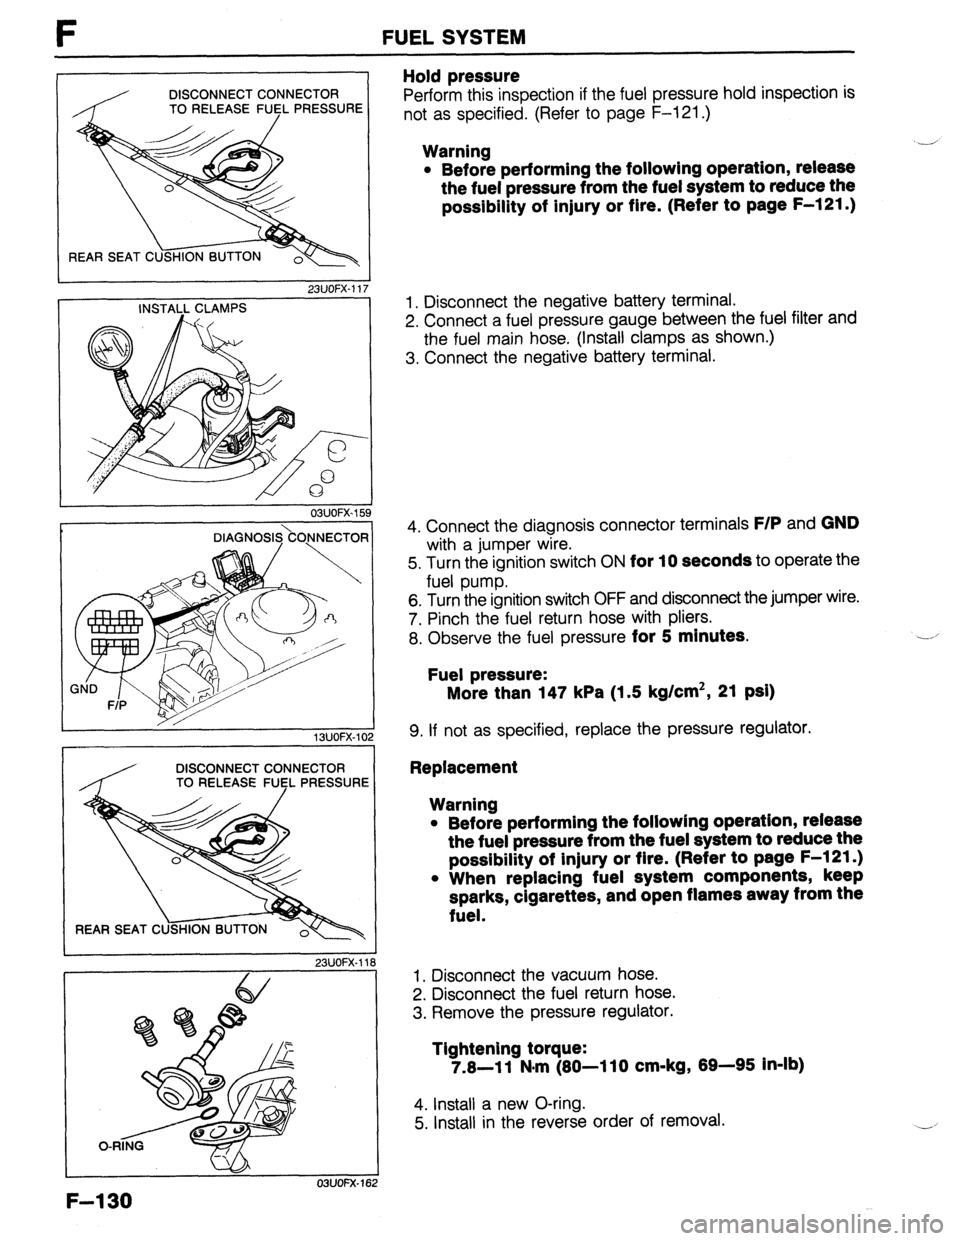
Hold pressure
Perform this inspection if the fuel pressure hold inspection is
not as specified. (Refer to page F-121 .)
Warning
l Before performing the following operation, release
the fuel pressure from the fuel system to reduce the
possibility of injury or fire. (Refer to page F-121 .) ,-
1. Disconnect the negative battery terminal.
2. Connect a fuel pressure gauge between the fuel filter and
the fuel main hose. (Install clamps as shown.)
3. Connect the negative battery terminal.
4. Connect the diagnosis connector terminals
F/P and GND
with a jumper wire.
5. Turn the ignition switch ON
for 10 seconds to operate the
fuel pump.
6. Turn the ignition switch OFF and disconnect the jumper wire.
7. Pinch the fuel return hose with pliers.
8. Observe the fuel pressure
for 5 minutes.
Fuel pressure:
More than 147 kPa (1.5 kg/cm2, 21 psi)
9. If not as specified, replace the pressure regulator.
Replacement
Warning
l Before performing the followlng operation, release
the fuel pressure from the fuel system to reduce the
possibility of injury or flre. (Refer to page F-l 21.)
l When replacing fuel system components, keep
sparks, cigarettes, and open flames away from the
fuel.
1. Disconnect the vacuum hose.
2. Disconnect the fuel return hose.
3. Remove the pressure regulator.
Tightening torque:
7.8-11 N#m (80-110 cm-kg, 89-95 In-lb)
4. Install a new O-ring.
5. Install in the reverse order of removal.