roof MAZDA 323 1989 Factory Repair Manual
[x] Cancel search | Manufacturer: MAZDA, Model Year: 1989, Model line: 323, Model: MAZDA 323 1989Pages: 1164, PDF Size: 81.9 MB
Page 16 of 1164
GI CAUTION
/
_____--__.. -I
OWGIX-028
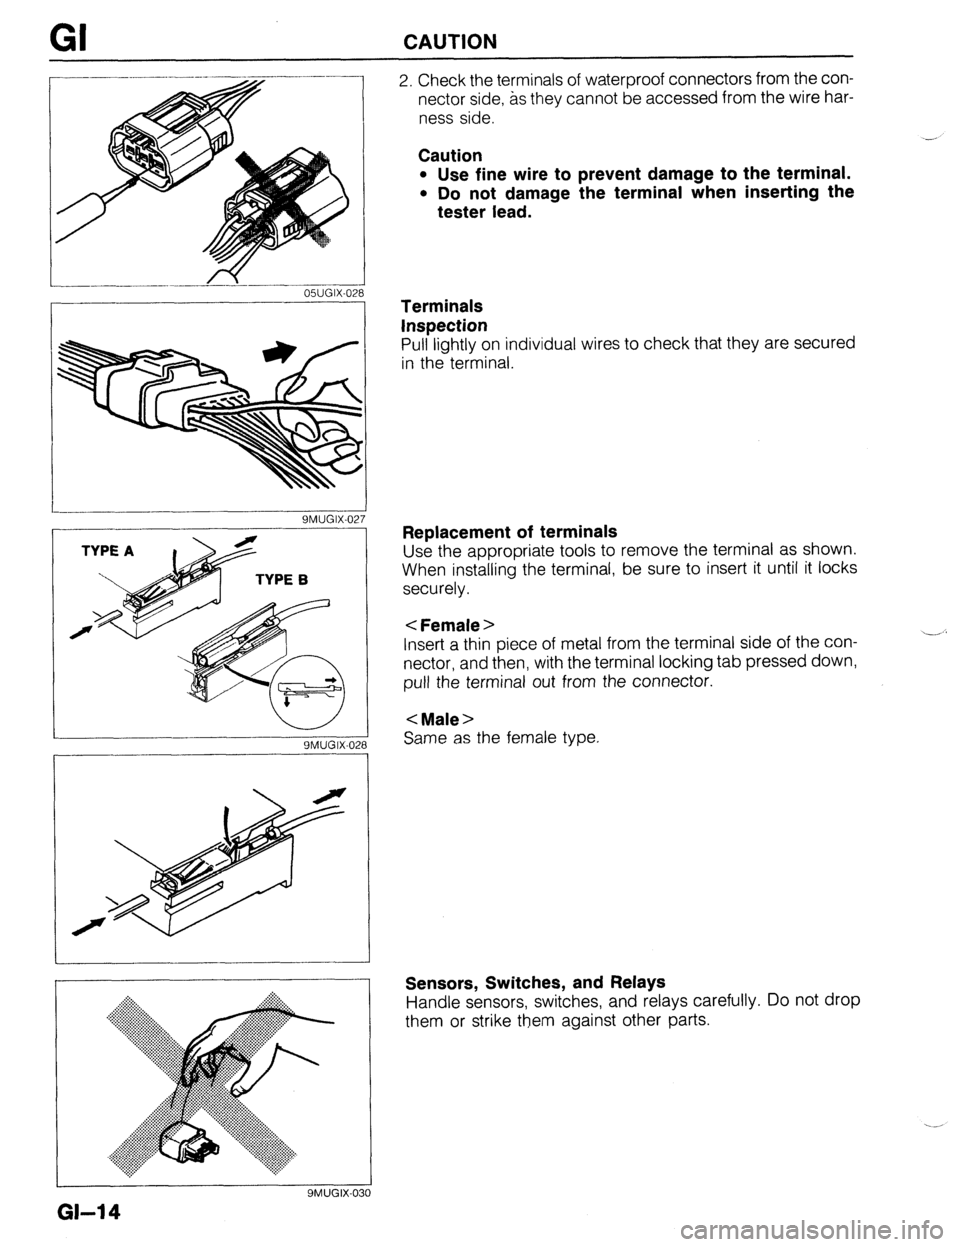
2. Check the terminals of waterproof connectors from the con-
nector side, as they cannot be accessed from the wire har-
ness side.
Caution
l Use fine wire to prevent damage to the terminal.
l Do not damage the terminal when inserting the
tester lead.
.- - 9MUGIX-027
9MUGIX-028
Same as the female type.
I
9MUGK031
Terminals
Inspection
Pull lightly on individual wires to check that they are secured
in the terminal.
Replacement of terminals
Use the appropriate tools to remove the terminal as shown.
When installing the terminal, be sure to insert it until it locks
securely.
< Female >
Insert a thin piece of metal from the terminal side of the con-
nectar, and then, with the terminal locking tab pressed down,
pull the terminal out from the connector.
< Male >
Sensors, Switches, and Relays
Handle sensors, switches, and relays carefully. Do not drop
them or strike them against other parts.
GI-14
Page 20 of 1164
PRE-DELIVERY INSPECTION
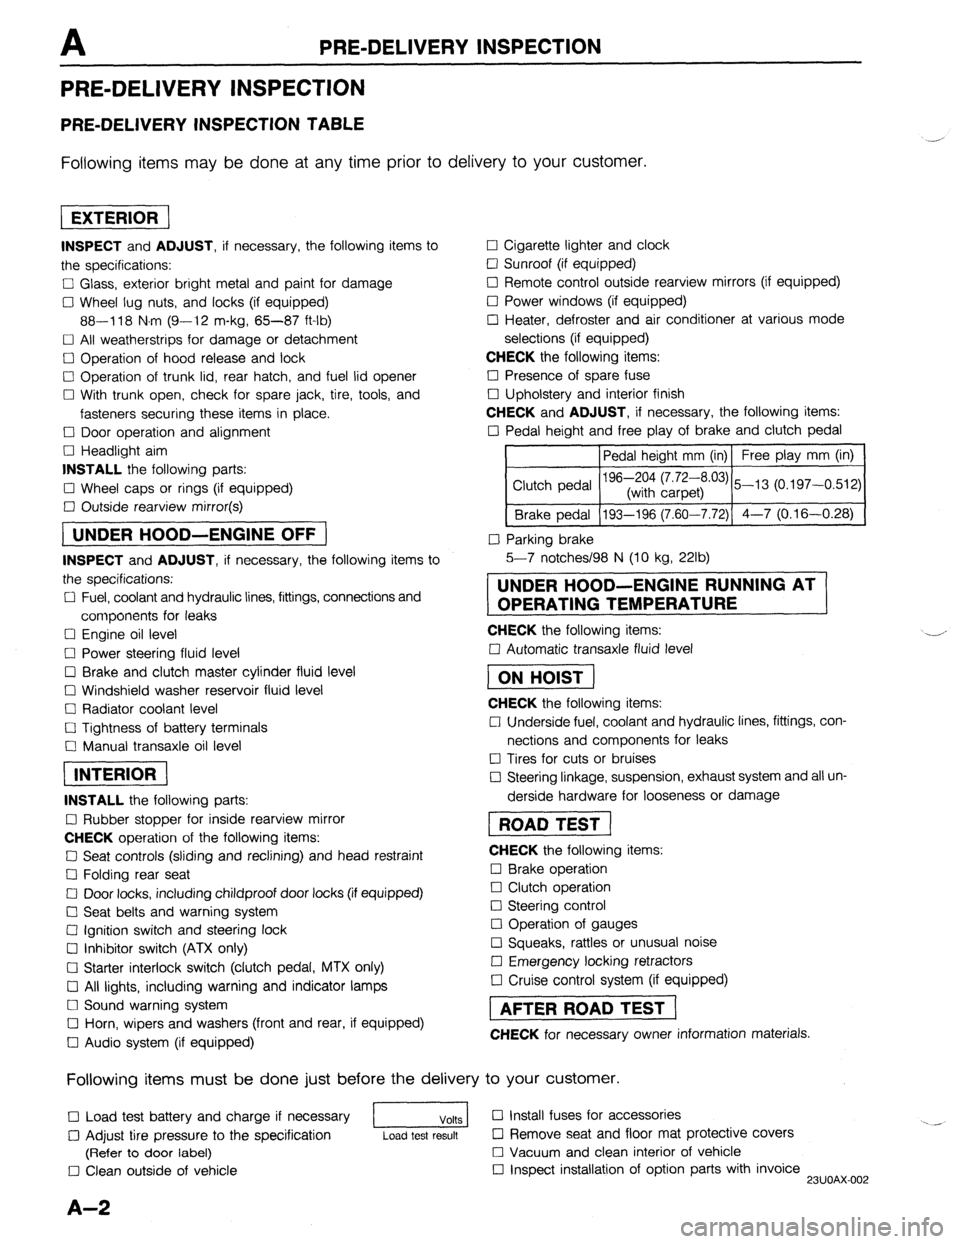
PRE-DELIVERY INSPECTION
PRE-DELIVERY INSPECTION TABLE
Following items may be done at any time prior to delivery to your customer.
INSPECT and ADJUST, if necessary, the following items to
the specifications:
0 Glass, exterior bright metal and paint for damage
Cl Wheel lug nuts, and locks (if equipped)
88-118 N.m (9-12 m-kg, 65-87 ft-lb)
q All weatherstrips for damage or detachment
0 Operation of hood release and lock
0 Operation of trunk lid, rear hatch, and fuel lid opener
Cl With trunk open, check for spare jack, tire, tools, and
fasteners securing these items in place.
Cl Door operation and alignment
Cl Headlight aim
INSTALL the following parts:
Cl Wheel caps or rings (if equipped)
q Outside rearview mirror(s)
1 UNDER HOOD-ENGINE OFF )
INSPECT and ADJUST, if necessary, the following items to
the specifications:
0 Fuel, coolant and hydraulic lines, fittings, connections and
components for leaks
Cl Engine oil level
0 Power steering fluid level
0 Brake and clutch master cylinder fluid level
El Windshield washer reservoir fluid level
Cl Radiator coolant level
Cl Tightness of battery terminals
Cl Manual transaxle oil level
riizmiq
INSTALL the following parts:
Cl Rubber stopper for inside rearview mirror
CHECK operation of the following items:
0 Seat controls (sliding and reclining) and head restraint
Cl Folding rear seat
0 Door locks, including childproof door locks (if equipped)
Seat belts and warning system
Cl Ignition switch and steering lock
0 Inhibitor switch (ATX only)
U Starter interlock switch (clutch pedal, MTX only)
Cl All lights, including warning and indicator lamps
Cl Sound warning system
Cl Horn, wipers and washers (front and rear, if equipped)
0 Audio system (if equipped) 0 Cigarette lighter and clock
0 Sunroof (if equipped)
II Remote control outside rearview mirrors (if equipped)
Cl Power windows (if equipped)
q Heater, defroster and air conditioner at various mode
selections (if equipped)
CHECK the following items:
Cl Presence of spare fuse
0 Upholstery and interior finish
CHECK and ADJUST, if necessary, the following items:
0 Pedal height and free play of brake and clutch pedal
Pedal height mm (in) Free play mm (in)
0 Parking brake
5-7 notches/98 N (10 kg, 22lb)
UNDER HOOD-ENGINE RUNNING AT
OPERATING TEMPERATURE
CHECK the following items:
q Automatic transaxle fluid level
[I
CHECK the following items:
Cl Underside fuel, coolant and hydraulic lines, fittings, con-
nections and components for leaks
0 Tires for cuts or bruises
0 Steering linkage, suspension, exhaust system and all un-
derside hardware for looseness or damage
[I
CHECK the following items:
0 Brake operation
0 Clutch operation
Cl Steering control
Cl Operation of gauges
q Squeaks, rattles or unusual noise
Cl Emergency locking retractors
0 Cruise control system (if equipped)
1 AFTER ROAD TEST (
CHECK for necessary owner information materials.
Following items must be done just before the delivery to your customer.
q Load test battery and charge if necessary
1 Volts 1 0 Install fuses for accessories
i.. _
0 Adjust tire pressure to the specification
Load test result cl Remove seat and floor mat protective covers
(Refer to door label) 0 Vacuum and clean interior of vehicle
0 Clean outside of vehicle q Inspect installation of option parts with invoice
23UOAX-002
A-2
Page 33 of 1164
OUTLINE, TROUBLESHOOTING GUIDE Bl
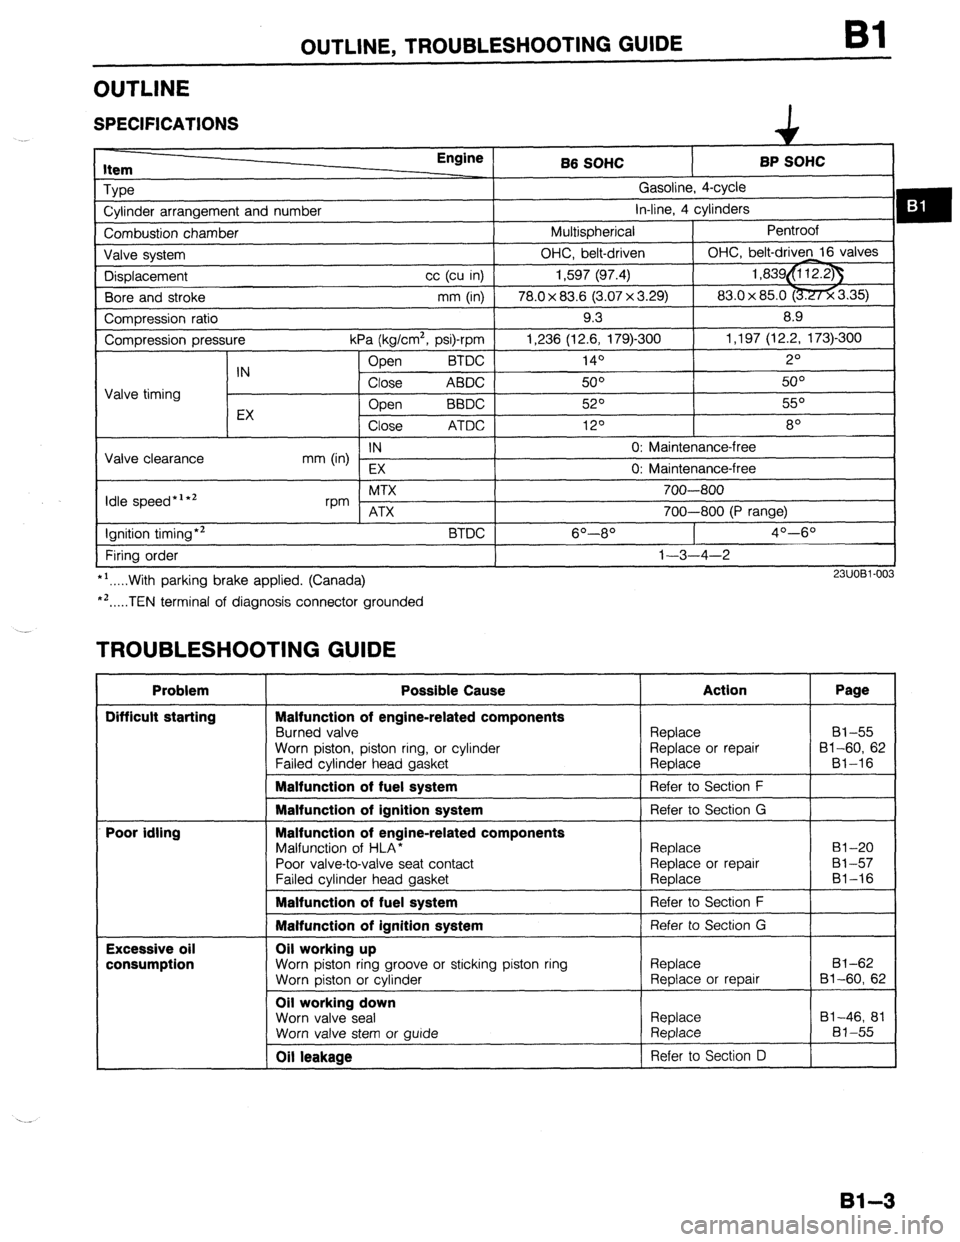
OUTLINE
SPECIFICATIONS
item Engine
Type
Cylinder arrangement and number
Combustion chamber
Valve system
Displacement cc (cu in)
Bore and stroke mm (in)
Compression ratio
Compression pressure
kPa (kg/cm2, psi)-rpm
Open BTDC
IN
Close ABDC
Valve timing
EX Open
BBDC
Close ATDC
IN
Valve clearance
mm (in)
EX
Idle speed*‘*’ MTX
rpm ATX
Ignition timing*2
BTDC
Firing order
*‘.....With parking brake applied. (Canada)
*‘.....TEN terminal of diagnosis connector grounded B6 SOHC BP SOHC
Gasoline, 4-cycle
in-line, 4 cylinders
Multispherical Pentroof
OHC, belt-driven OHC, belt-driven 16 valves
1,597 (97.4) 1,839&i 12.23
78.0 x 83.6 (3.07 x 3.29) 83.0x 85.0 -3.35)
9.3 8.9
1,236 (12.6, 179)300 1,197 (12.2, 173)-300
140 2O
50° 5o”
52O 55O
120 8
0: Maintenance-free
0: Maintenance-free
700-800
700-800 (P range)
6O----8O 4O--6O
1-3-4-2
23UOBl-003
TROUBLESHOOTING GUIDE
Problem
Difficult starting
Poor idling
Excessive oil
consumption Possible Cause
Malfunction of engine-related components
Burned valve
Worn piston, piston ring, or cylinder
Failed cvlinder head aasket Action Page
Replace 81-55
Replace or repair 81-60, 62
Reolace Bl-16
Malfunction of fuel system
1 Refer to Section F
I
Malfunction of ignition system
Malfunction of engine-related components
Malfunction of HLA*
Poor valve-to-valve seat contact
Failed cvlinder head aasket Refer to Section G
Replace
Replace or repair
Reolace 81-20
81-57
81-16
Malfunction of fuel system 1 Refer to Section F
I
Malfunction of ignition system Refer to Section G
Oil working up
Worn piston ring groove or sticking piston ring
Worn piston or cylinder
Oil working down
Worn valve seal
Worn valve stem or wide Replace
Replace or repair
Replace
Replace 81-62
Bl-60, 62
81-46, 81
81-55
Oil leakage Refer to Section D
81-3
Page 135 of 1164
OUTLINE, TROUBLESHOOTING GUIDE
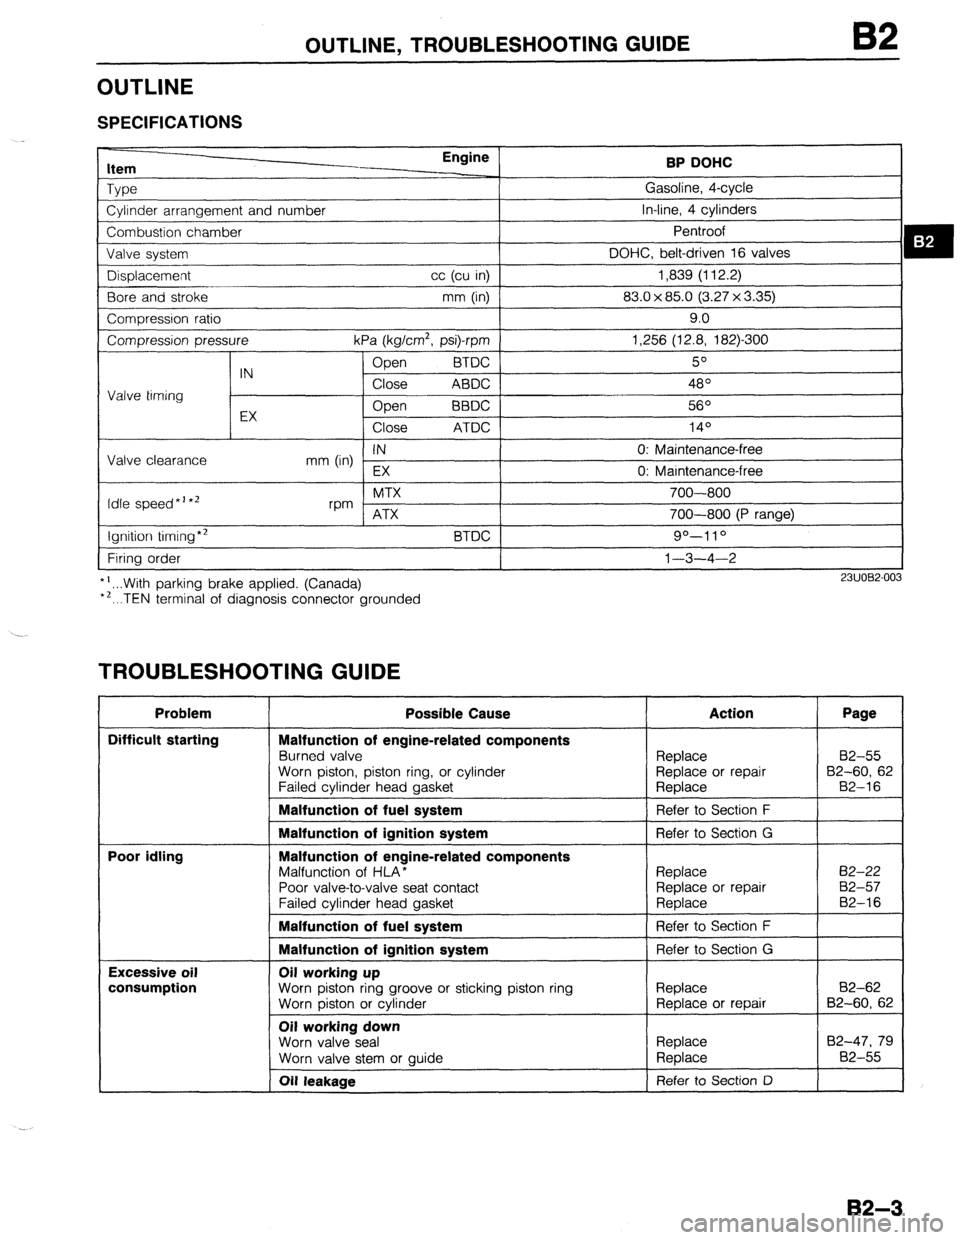
OUTLINE
SPECIFICATIONS
ItC- Engine
BP DOHC
Type Gasoline, 4-cycle
Cylinder arrangement and number In-line, 4 cylinders
Combustion chamber Pentroof
Valve svstem DOHC, belt-driven 16 valves
Displacement
Bore and stroke cc (cu in) 1,839 (112.2)
mm (in) I 83.0 x 85.0 (3.27 x 3.35)
Compression ratio
Compression pressure
IN
Valve timing
EX kPa (kg/cm*, psi)-rpm
BTDC Open
Close ABDC
Open BBDC
Close ATDC 9.0
1,256 (12.8, 182)300
!zJ”
48O
56O
140
Valve clearance IN 0: Maintenance-free
mm (in)
EX 0: Marntenance-free
Idle speed *’ *’ MTX
rpm
ATX
Ignition timing*2
Firing order
::...With parking brake applied. (Canada)
. ..TEN terminal of diagnosis connector grounded BTDC 700-800
700-800 (P range)
90-l 1 O
l-3-4-2
P3UOBZ003
TROUBLESHOOTING GUIDE
Problem
Difficult starting
Poor idling
Excessive oil
consumption Possible Cause
Malfunction of engine-related components
Burned valve
Worn piston, piston ring, or cylinder
Failed cylinder head gasket
Malfunction of fuel system
Malfunction of ignition system
Malfunction of engine-related components
Malfunction of HLA*
Poor valve-to-valve seat contact
Failed cylinder head gasket
Malfunction of fuel system
Malfunction of ignition system
Oil working up
Worn piston ring groove or sticking piston ring
Worn oiston or cvlinder
Oil working down
Worn valve seal
Worn valve stem or auide
Oil leakaae i
Replace 82-55
Replace or repair 92-60, 62
Reolace B2-16
Refer to Section F
I
Replace 82-47, 79
Replace 82-55
Refer to Section 0 I
82-3
Page 711 of 1164
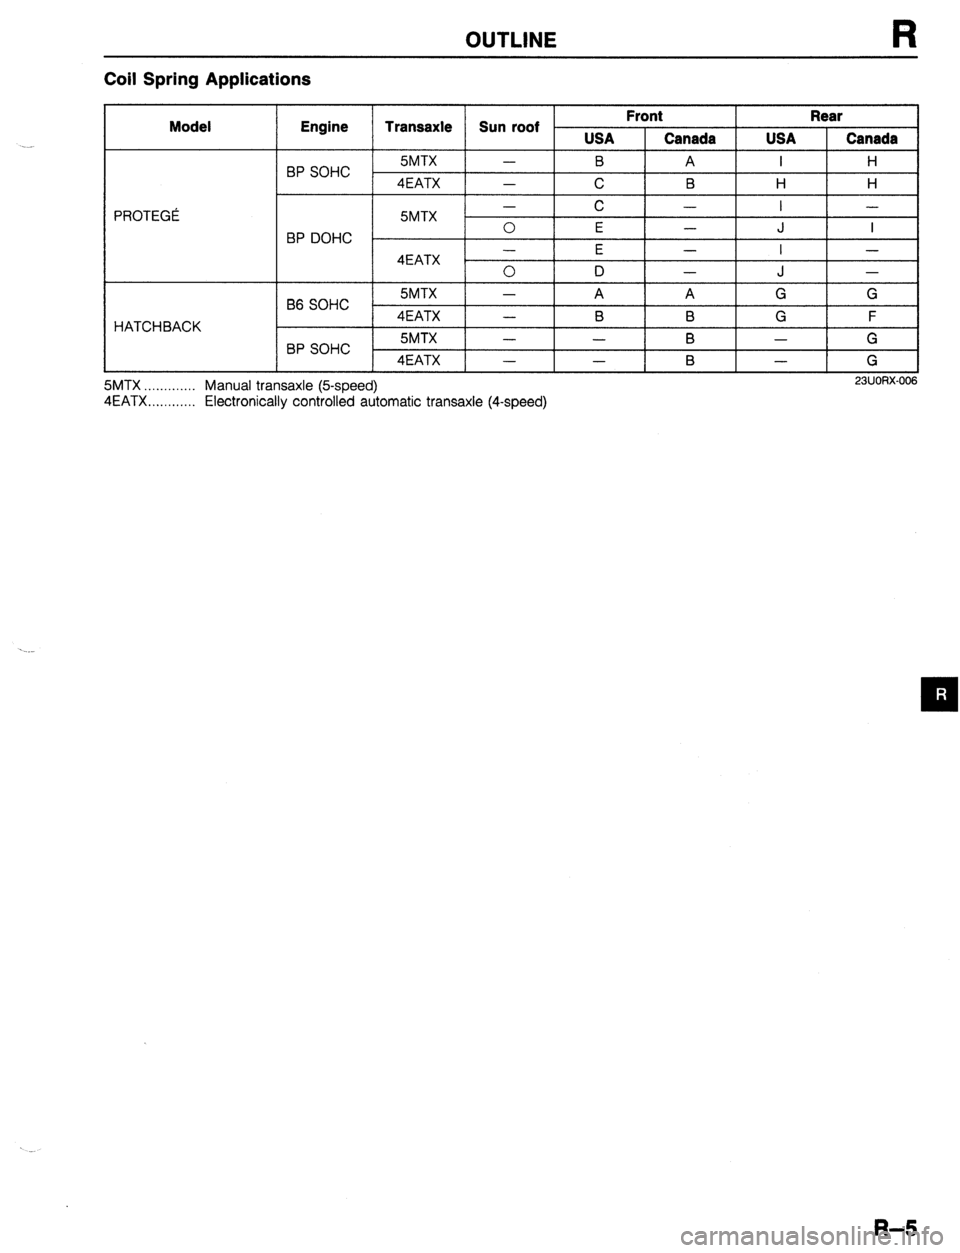
OUTLINE R
Coil Spring Applications
Model
PROTEGi
HATCHBACK Engine
Transaxle Sun roof ’ Front
I Rear
I
I
5MTX -
B 1 USA Canada USA Canada BP SOHC I I A I H
4EATX 1 -
C B H H
BP -
B6 DOHC
SOHC
BP SOHC 5MTX
4EATX
5MTX Manual transaxle @speed)
23UORX-006 .............
4EATX ............ Electronically controlled automatic transaxle (4-speed)
I- I c I- II I- I 0
E -
J I -
E -
I -
0 D -
J
I - -
A A G G
-
B B
G F
- -
B -
G
- -
B -
G
R-5
Page 737 of 1164
S
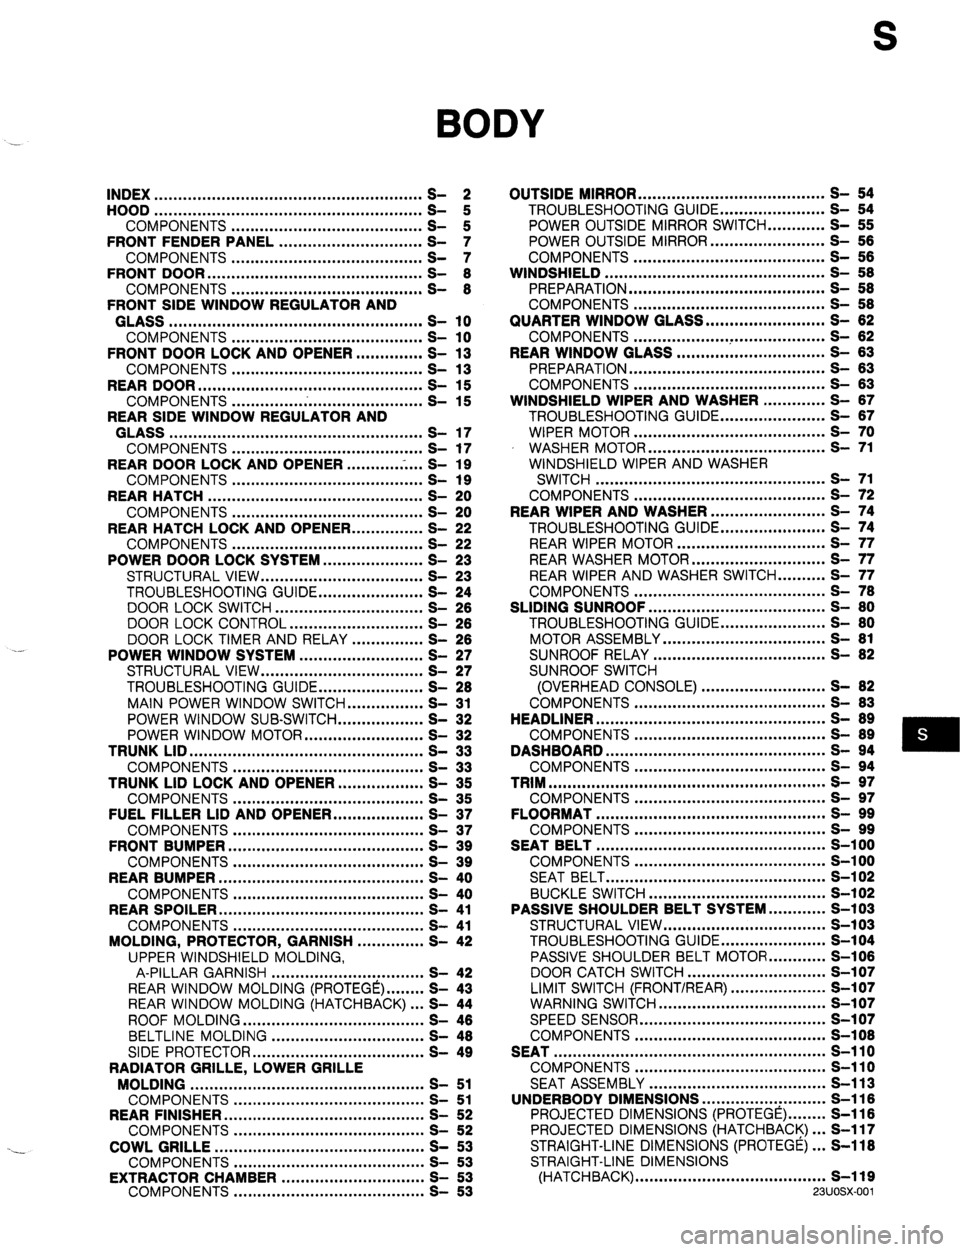
BODY
INDEX ........................................................ 2
HOOD ........................................................
COMPONENTS ........................................ t
FRONT FENDER PANEL .............................. ;I
COMPONENTS ........................................ S- ::
FRONT DOOR ............................................. S- 8
COMPONENTS ........................................ S- 8
FRONT SIDE WINDOW REGULATOR AND
GLASS ..................................................... s- 10
COMPONENTS ........................................ s- 10
FRONT DOOR LOCK AND OPENER .............. S- 13
COMPONENTS ........................................ s- 13
REAR DOOR ............................................... s- 15
COMPONENTS ........................................ s- 15
REAR SIDE WINDOW REGULATOR AND
GLASS ..................................................... s- 17
COMPONENTS ........................................ s- 17
REAR DOOR LOCK AND OPENER ...........
.-. ...
S- 19
COMPONENTS ........................................ s- 19
REAR HATCH ............................................. s- 20
COMPONENTS ........................................ s- 20
REAR HATCH LOCK AND OPENER.. .............
S- 22
COMPONENTS ........................................ s- 22
POWER DOOR LOCK SYSTEM.. ................... S- 23
STRUCTURAL VIEW .................................. S- 23
TROUBLESHOOTING GUIDE ...................... S- 24
DOOR LOCK SWITCH ............................... S- 28
DOOR LOCK CONTROL ............................ S- 26
DOOR LOCK TIMER AND RELAY ............... S- 26
POWER WINDOW SYSTEM .......................... S- 27
STRUCTURAL VIEW .................................. S- 27
TROUBLESHOOTING GUIDE.. .................... S- 28
MAIN POWER WINDOW SWITCH.. .............. S- 31
POWER WINDOW SUB-SWITCH.. ................ S- 32
POWER WINDOW MOTOR ......................... S- 32
TRUNK LID .................................................
s- 33
COMPONENTS ........................................ s- 33
TRUNK LID LOCK AND OPENER.. ................ S- 35
COMPONENTS ........................................ s- 35
FUEL FILLER LID AND OPENER ................... S- 37
COMPONENTS ........................................ s- 37
FRONT BUMPER ......................................... s- 39
COMPONENTS ........................................ s- 39
REAR BUMPER ........................................... s- 40
COMPONENTS ........................................ s- 40
REAR SPOILER ........................................... s- 41
COMPONENTS ........................................ s- 41
MOLDING, PROTECTOR, GARNISH .............. S- 42
UPPER WINDSHIELD MOLDING,
A-PILLAR GARNISH ................................ S- 42
REAR WINDOW MOLDING (PROTEGE) ........ S- 43
REAR WINDOW MOLDING (HATCHBACK) ... S- 44
ROOF MOLDING ...................................... S- 46
BELTLINE MOLDING ................................ S- 48
SIDE PROTECTOR.. .................................. S- 49
RADIATOR GRILLE, LOWER GRILLE
MOLDING ................................................. s- 51
COMPONENTS ........................................ S- 51
REAR FINISHER.. ........................................
S- 52
COMPONENTS ........................................ S- 52
COWL GRILLE ............................................ s- 53
COMPONENTS ........................................ s- 53
EXTRACTOR CHAMBER ..............................
COMPONENTS ........................................ g-
- ;; OUTSIDE MIRROR ....................................... s- 54
TROUBLESHOOTING GUIDE.. .................... S- 54
POWER OUTSIDE MIRROR SWITCH ............ S- 55
POWER OUTSIDE MIRROR.. ...................... S- 56
COMPONENTS ........................................ s- 66
WINDSHIELD .............................................. S- 58
PREPARATION ......................................... S- 58
COMPONENTS ........................................ S- 58
QUARTER WINDOW GLASS ......................... S- 62
COMPONENTS .................. ..T ................... S- 82
REAR WINDOW GLASS ............................... S- 63
PREPARATION ......................................... S- 63
COMPONENTS ........................................ S- 63
WINDSHIELD WIPER AND WASHER ............. S- 87
TROUBLESHOOTING GUIDE.. .................... S- 67
WIPER MOTOR ........................................ s- 70
WASHER MOTOR ..................................... s- 71
WINDSHIELD WIPER AND WASHER
SWITCH ................................................ s- 71
COMPONENTS ........................................ S- 72
REAR WIPER AND WASHER ........................ S- 74
TROUBLESHOOTING GUIDE.. .................... S- 74
REAR WIPER MOTOR ............................... s- 77
REAR WASHER MOTOR ............................ s- 77
REAR WIPER AND WASHER SWITCH.. ........ S- 77
COMPONENTS ........................................ S- 78
SLIDING SUNROOF ..................................... S- 80
TROUBLESHOOTING GUIDE.. .................... S- 80
MOTOR ASSEMBLY .................................. S- 81
SUNROOF RELAY .................................... S- 82
SUNROOF SWITCH
(OVERHEAD CONSOLE) .......................... S- 82
COMPONENTS ........................................ S- 83
HEADLINER ................................................ S- 89
COMPONENTS ........................................ S- 89
DASHBOARD .............................................. s- 94
COMPONENTS ........................................ s- 94
TRIM .......................................................... s- 97
COMPONENTS ........................................ s- 97
FLOORMAT ................................................ s- 99
COMPONENTS ........................................ s- 99
SEAT BELT ................................................ S-l 00
COMPONENTS ........................................ S-l 00
SEAT BELT .............................................. S-l 02
BUCKLE SWITCH ..................................... s-102
PASSIVE SHOULDER BELT SYSTEM.. .......... S-103
STRUCTURAL VIEW .................................. s-103
TROUBLESHOOTING GUIDE.. .................... S-104
PASSIVE SHOULDER BELT MOTOR.. .......... S-106
DOOR CATCH SWITCH ............................. S-l 07
LIMIT SWITCH (FRONT/REAR)
WARNING SWITCH ....................................................... z-:X;
-
SPEED SENSOR ....................................... s-i 07
COMPONENTS ........................................ S-l 08
SEAT ......................................................... s-110
COMPONENTS ........................................ s-110
SEAT ASSEMBLY ..................................... S-l 13
UNDERBODY DIMENSIONS .............. ..: ......... S-116
PROJECTED DIMENSIONS (PROTEGE) ........ S-116
PROJECTED DIMENSIONS (HATCHBACK). .. S-117
STRAIGHT-LINE DIMENSIONS (PROTEGE). .. S-118
STRAIGHT-LINE DIMENSIONS
(HATCHBACK) ........................................ s-119
23UOSX.001
Page 738 of 1164
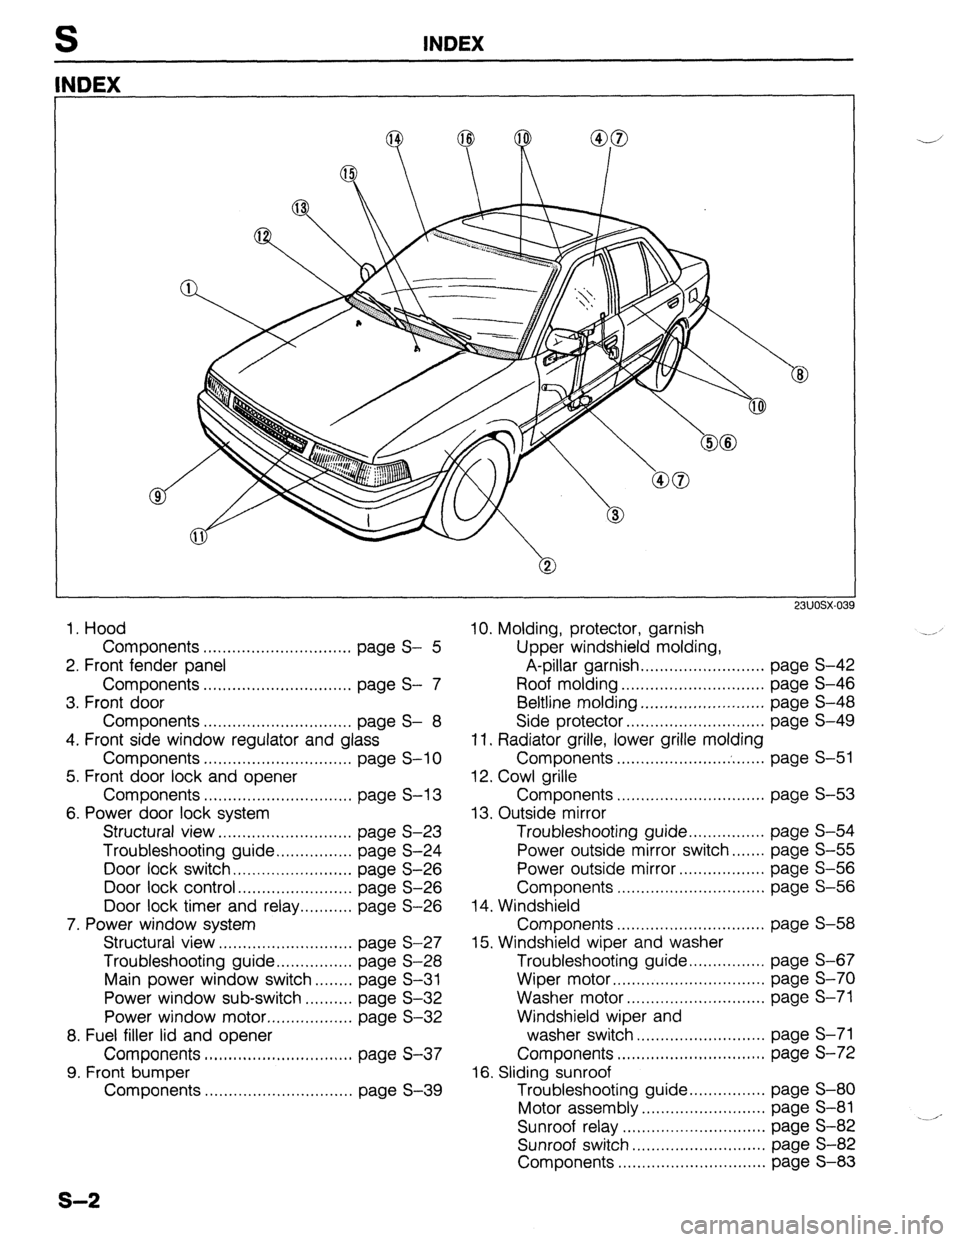
INDEX
NDEX
1. Hood
Components ............................... page S- 5
2. Front fender panel
Components ............................... page S- 7
3. Front door
Components ............................... page S- 8
4. Front side window regulator and glass
Components ............................... page S-l 0
5. Front door lock and opener
Components ............................... page S-l 3
6. Power door lock system
Structural view.. .......................... page S-23
Troubleshooting guide.. .............. page S-24
Door lock switch.. ....................... page S-26
Door lock control.. ...................... page S-26
Door lock timer and relay ........... page S-26
7. Power window system
Structural view ............................ page S-27
Troubleshooting guide.. .............. page S-28
Main power window switch.. ...... page S-31
Power window sub-switch .......... page S-32
Power window motor .................. page S-32
8. Fuel filler lid and opener
Components ............................... page S-37
9. Front bumper
Components ............................... page S-39
23UOSX-03
10. Molding, protector, garnish
Upper windshield molding,
A-pillar garnish.. ........................ page S-42
Roof molding .............................. page S-46
Beltline molding.. ........................ page S-48
Side protector.. ...........................
page S-49
11. Radiator grille, lower grille molding
Components ....................... . ....... page S-51
12. Cowl grille
Components ............................... page S-53
13. Outside mirror
Troubleshooting guide ................ page S-54
Power outside mirror switch.. ..... page S-55
Power outside mirror.. ................ page S-56
Components ............................... page S-56
14. Windshield
Components ...............................
page S-58
15. Windshield wiper and washer
Troubleshooting guide.. .............. page S-67
Wiper motor ................................ page S-70
Washer motor.. ........................... page S-71
Windshield wiper and
washer switch ........................... page S-71
Components ............................... page S-72
16. Sliding sunroof
Troubleshooting guide ................ page S-80
Motor assembly.. ........................ page S-81
Sunroof relay ..............................
page S-82 .--‘-
Sunroof switch ............................ page S-82
Components ............................... page S-83
s-2
Page 782 of 1164
MOLDING, PROTECTOR, GARNISH
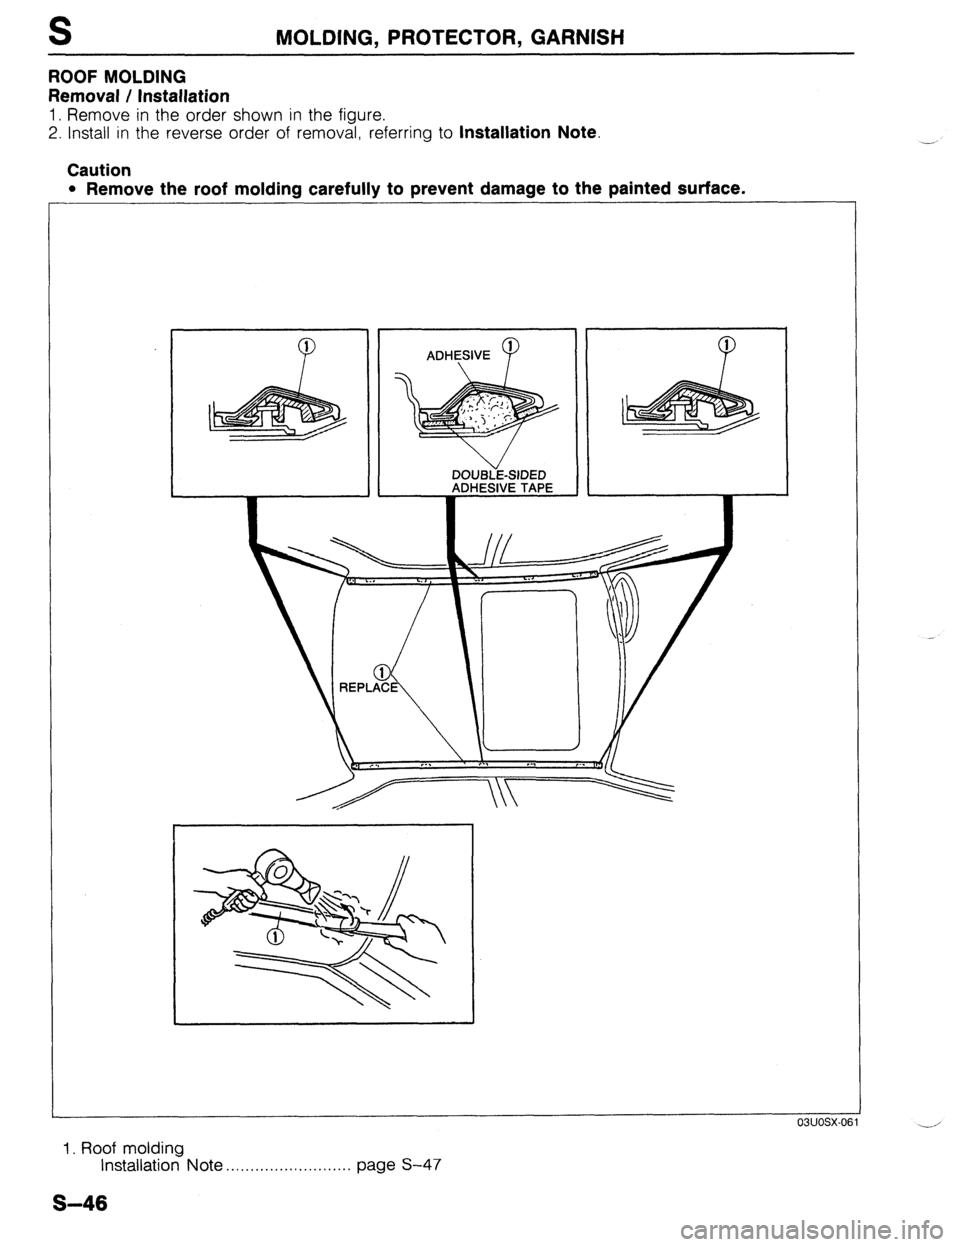
ROOF MOLDING
Removal / Installation
1. Remove in the order shown in the figure.
2. Install in the reverse order of removal, referring to
Installation Note.
Caution
l Remove the roof molding carefully to prevent damage to the painted surface.
03UOSX-OE
1. Roof molding
Installation Note . . . . . . . . . . . . . . . . . . . . . . . . . . page S-47 --,
S-46
Page 783 of 1164
MOLDING, PROTECTOR, GARNISH S
ADHESIVE
-------
03UOSX-06
--.-
03UOSX-OE
ADHESIVE
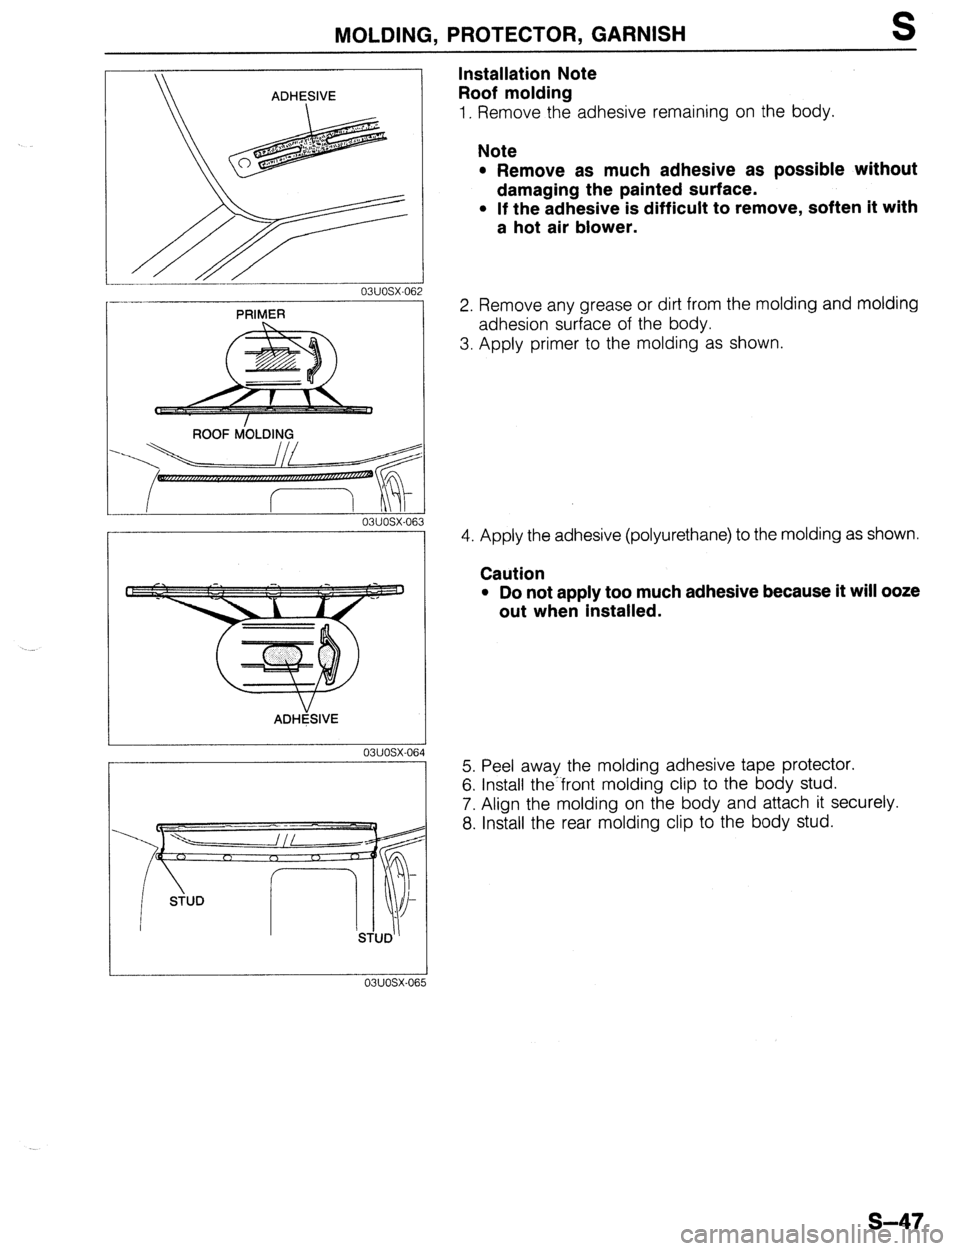
Installation Note
Roof molding
1. Remove the adhesive remaining on the body.
Note
l Remove as much adhesive as possible without
damaging the painted surface.
l If the adhesive is difficult to remove, soften it with
a hot air blower.
2. Remove any grease or dirt from the molding and molding
adhesion surface of the body.
3. Apply primer to the molding as shown.
4. Apply the adhesive (polyurethane) to the molding as shown.
Caution
l Do not apply too much adhesive because it will ooze
out when installed.
5. Peel away the molding adhesive tape protector.
6. Install the’front molding clip to the body stud.
7. Align the molding on the body and attach it securely.
8. Install the rear molding clip to the body stud.
I
03UOSX-065
S-47
Page 795 of 1164
WINDSHIELD S
1. Sun visor and adaptor 7. Glass stopper
2. Inside rearview mirror, overhead console 8. A-pillar garnish (Hatchback)
(With sliding sunroof) Removal / Installation . . . . . . . . . . . . . . . . . . page S-42
3. A-pillar trim 9. Upper windshield molding
Removal / Installation ..,.,..... pages S-97, 98 Removal / Installation . . . . . . . . . . . . . . . . . . page S-42
4. Upper garnish 10. Windshield
5. Wiper arm and blade Removal Note .,.....*.........*........... page S-59
Removal / Installation . . . . . . . . . . . . page S-72 Installation Note ..,......*................ page S-60
6. Cowl arille 11. Spacer
Removal I Installation . . . . . . . . . . . . page S-53 12. Protector
1 HEADLINER
Gsi?i==
SiX.A-A
03uosx-08
PROTECTIVE TAPE -I
9 03UOSX-088
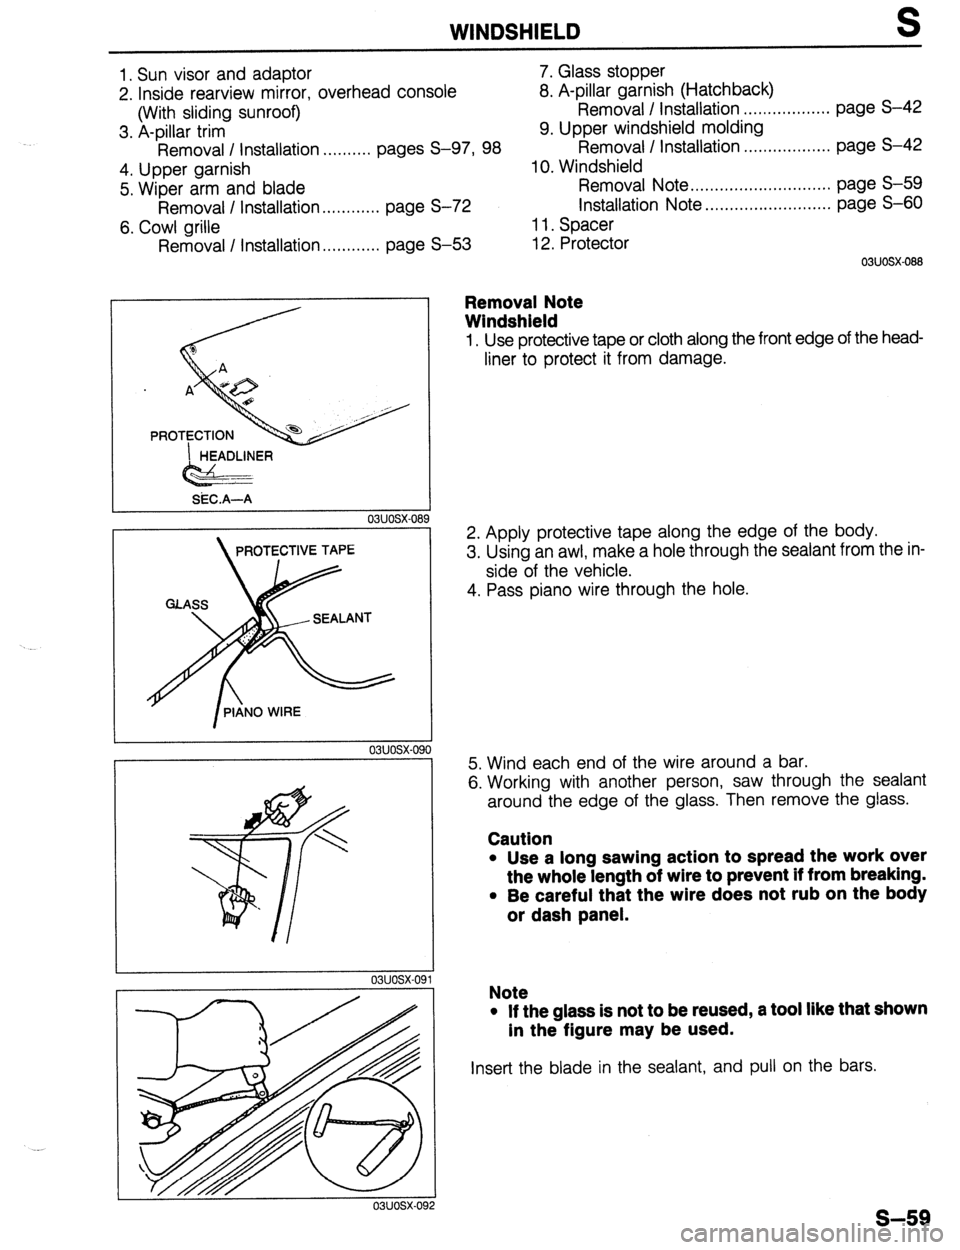
Removal Note
Windshield
1, Use protective tape or cloth along the front edge of the head-
liner to protect it from damage.
2. Apply protective tape along the edge of the body.
3. Using an awl, make a hole through the sealant from the in-
side of the vehicle.
4. Pass piano wire through the hole.
5. Wind each end of the wire around a bar.
6. Working with another person, saw through the sealant
around the edge of the glass. Then remove the glass.
Caution
l Use a long sawing action to spread the work over
the whole length of wire to prevent if from breaking.
l Be careful that the wire does not rub on the body
or dash panel.
Note
l If the glass is not to be reused, a tool like that shown
in the figure may be used.
Insert the blade in the sealant, and pull on the bars.
s-59