wheel bolts MAZDA 323 1992 Workshop Manual Suplement
[x] Cancel search | Manufacturer: MAZDA, Model Year: 1992, Model line: 323, Model: MAZDA 323 1992Pages: 279, PDF Size: 24.15 MB
Page 98 of 279

M FRONT AXLE
WHEEL HUB, STEERING KNUCKLE
RemovaI / Inspection I Installation
1. Remove in the order shown in the figure, referring to Removal Note.
2. Inspect all parts and repair or replace as necessary.
3. InstaH in the reverse order of removal, referring to Installation Note.
Caution
l Loosely tighten the shock absorber bolts. Lower the vehicle and tighten the bolts to the specified
torque with the vehicle unladen.
4. Adjust the front wheel alianment.
16-22 ]1.6-2.3, 12-161 I
19.0-l 2.0, 65-86.7 I
1. Wheel hub nut
2. Wheel and tire
3. Locknut
Removal Note . . . . . . .._.. . . . . . . . . . . . . . . . . . . . page M-7
installation Note .I.........,..,............ page M-7
4. Brake caliper assembly
Service . _. . . . . . . . . ,__. . . , , . ._. _. , , . . . , . ._ ._. . . . . . Section P
5. Disc plate
lnspectioti .~~*.......*~...,......,,,.....*~...~. Section P
6. ABS wheel speed sensor (if equipped)
7. Tie rod end
Removal Note . . . . . . .._.......... I . .._.....= page M-7
lnstallatiofi Note . . .._... _.__......,....... page M-7
M-6
8. Lower ball joint
9. Steering knuckle, wheel hub, and dust cover
Inspect-wheel hub for cracks and damage
Inspect knuckle spindle for cracks and
damage
Inspect dust cuver for damage and dis-
tortion
Disassembly I Inspection I
Assembly . ..C1..............~...,.....,.....
page M-8
Page 101 of 279

FRONT AXLE M
13EOMX-317
I
I 13EOMX-311 3
3. Press out the bearing race by using the SST.
Wheel bearing
Caution
l Do not reuse the wheel bearing.
Remove the wheel bearing by using the SST.
Dust cover
Caution
l Do not remove the dust cover if not necessary.
1
l Do not reuse the dust cover If removed. ’
I. Mark the dust cover and steering knuckle for proper reas-
sembly.
2. Remove the dust cover by using a chisel.
Hub boft
caution
l Do not remove the hub bolts if not necessary.
l Do not reuse the hub bolts if removed.
Remove the hub bolts by using a press.
Assembly note
Hub bolt
Press in new hub bolts.
M-9. /,
I
Page 104 of 279

REAR AXLE
WHEEL HUB, KNUCKLE
Removal I Inspection / installation
1. Remove in the order shown in the figure, referring to
Removal Note. 2. Inspect all parts and repair or replace as necessary.
3. Install in the reverse order of removal, referring to Installation Note.
Caution
l Loosely tighten the shock absorber bolts. Lower the vehicle and tighten the bolts to the specified
torque with the vehicle unladen.
4. Adiust the rear wheel alianment.
16-22 1?.6-2.3, 12-16 I
7
IO.o-13.0,
66-66.7 1 1. Wheel and tire
2. Locknut
Removal Note..; . . . . . . . . , . . . . ,.......- -.. page M-f 3
Installation Note .._...,.,...._.__........ page M-13
I$ Brake caliper assembly
Service . . . . . . . . . . . ..e......._......... ,.,...,....
Section P
4. Disc plate
‘Service ..I....................__....... . . . . . . . . . Section P 5. Af3S wheel speed sensor (if equipped)
6. Wheel hub, knuckle
Disassembly I Inspect& /
Assem bty . . . . . . . ..I..........*..*.*...-... page M-14
Inspect wheel hub and knuckle for damage
or cracks
Inspect dust cover for damage or defor-
mation
M-12
Page 107 of 279

REAR AXLE
13EOMX-330
13EOMX-331
I
t3EOMX.318
. _.
-.
3. Press out the bearing race by using the SST.
Wheel bearing
Remove the wheel bearing by using the SST.
Dust cover
Caution
l Do not remove the dust cover if not necessary.
l Do not reuse-the dust cover if removed.
1. Mark the dust cover and steering knuckle for proper reas- *
sembly.
2. Remove the dust cover by using a chisel.
Ice scraper
Caution
l Do not remove the ice scraper if not necessary.
. If it is removed, use a new bolt applied specified
thread locking compound.
Hub bolt
caution
l Do not remove the hub bolts if not necessary.
i Do not reuse the hub bolts if removed.
Remove the hub bolts by using a press.
.
M-q.5
Page 108 of 279

M REAR AXLE
.
I
I
13EOMX-319
I
1 SEOMX -3;
13EOMX-33
1
M-16 f3EOMX-32:
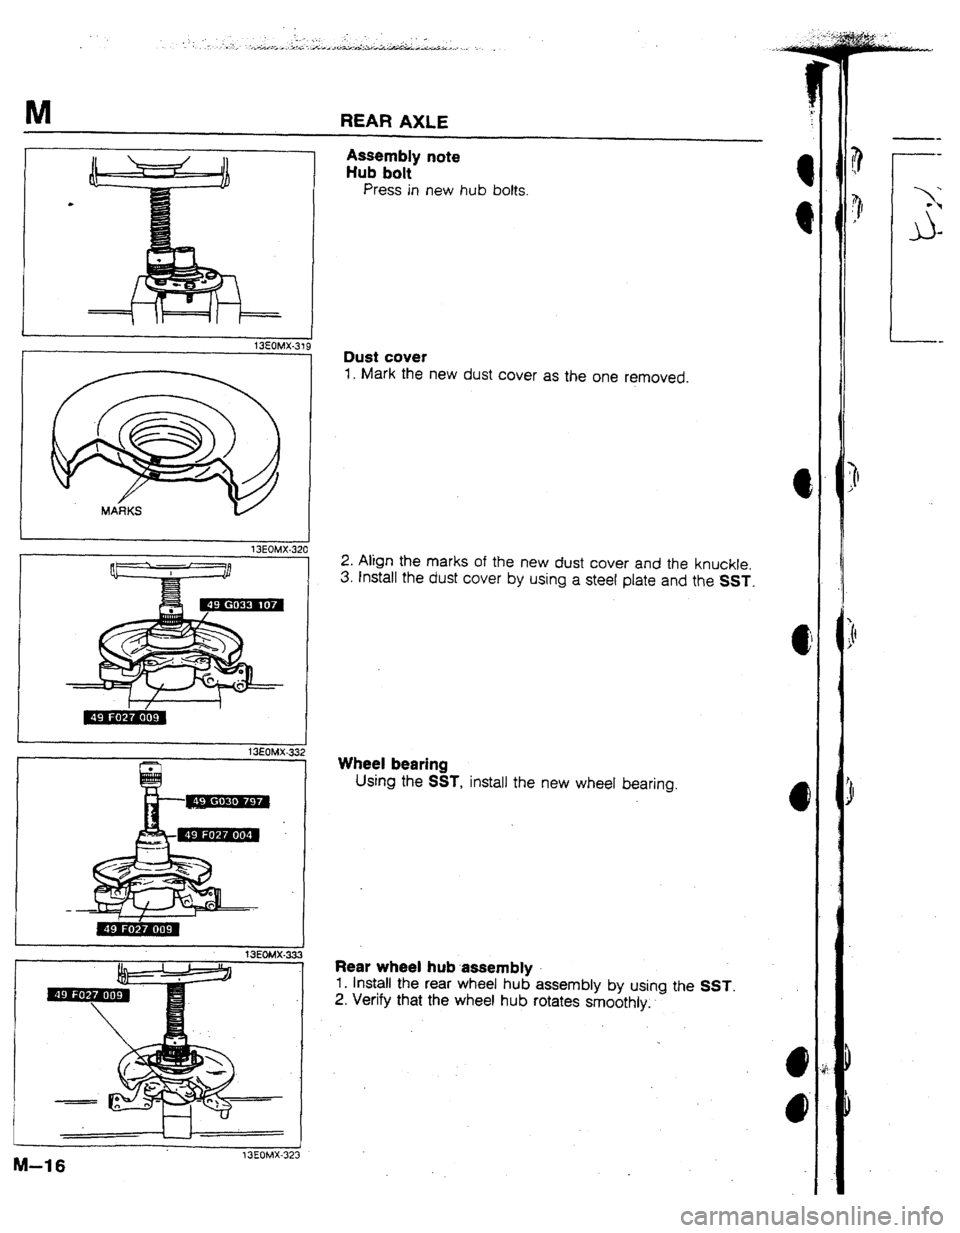
Assembly note
Hub bolt
Press in new hub bolts.
Dust cover
1. Mark the new dust cover as the one removed.
2. Align the marks of the new dust cover and the knuckle.
3. Install the dust cover by using a steel plate and the SST.
Wheel bearing
Using the SST, install the new wheel bearing.
Rear wheel hub assembly
1. Install the rear wheel hub assembly by using the SST.
2. Verify that the wheel hub rotates smoothly..