automatic MAZDA CX30 2023 Owners Manual
[x] Cancel search | Manufacturer: MAZDA, Model Year: 2023, Model line: CX30, Model: MAZDA CX30 2023Pages: 595, PDF Size: 21.06 MB
Page 28 of 595

NOTE
If you do not perform the operation
correctly, a sound indicating that the
programming has failed is activated.
If the angle of the outer mirrors only
changes a little, the angle of the
outer mirrors may not have been
programmed correctly.
If the angle of the outer mirrors is
adjusted close to the limits of its
range of motion, the driving position
can be successfully programmed, but
it may fail when calling up the
programmed driving position.
Calling up the programmed driving
position
CAUTION
Do not place fingers or hands around
the bottom of the seat while the seat
memory function is operating. The seat
moves automatically while the seat
memory function is operating and
fingers or hands could get pinched and
injured.
Using the position memory button
1. Make sure the parking brake is on.
2. Make sure the selector lever is in
the P position.
3. Switch the ignition ON.
4. Press the programming button for
the driving position you want to call
up (button 1 or 2).
5. A sound is activated when the adjustment to the programmed
driving position is completed.
NOTE
When adjustment of the driving
position is not necessary, a sound is
not activated.
The driving position adjustment is
canceled in the following cases:
The seat adjustment switch on the
driver's seat is operated.
The angle of the outer mirrors is
adjusted.
The SET button is pressed.Programming button 1 or 2 is
pressed.
The lock button or unlock button
on the transmitter is pressed.
The vehicle starts moving.The active driving display is
adjusted.
The selector lever is shifted to a
position other than P.
Using the transmitter
1. Unlock the driver's door using one of the following methods.
Touch the sensing area of the
door release touch sensor.
Press the unlock button on the
transmitter.
2. When you open the driver's door within 90 seconds after unlocking
the doors, the adjustment of the
following parts starts.
Driver's seatActive driving display (When the
ignition is switched ON, the
adjusted active driving display is
activated.)
Outside mirrors
A sound is activated when the
adjustment is completed.
NOTE
When adjustment of the driving
position is not necessary, a sound is
not activated.
The driving position adjustment is
canceled in the following cases:
The seat adjustment switch on the
driver's seat is operated.
Essential Safety Equipment
Seats
2-11
CX-30_8LD3-EA-22J_Edition1_new 2022-6-7 13:06:59
Page 35 of 595

Seat Warmer*
▼Seat Warmer
The front seats can be warmed up
while the engine is running.
While the seat warmer is operating,
the indicator light in the seat warmer
switch turns on according to the set
temperature.
Manual mode
When the seat warmer switch is
pressed, the seat warmer operates in
manual mode.
The set temperature changes as shown
in the figure each time the seat warmer
switch is pressed.
1. OFF
2. High
3. Mid
4. Low
NOTE
If the engine is turned
off while the
seat warmer is operating in manual
mode, the seat warmer does not turn
on automatically the next time the
engine is turned on. To turn the seat
warmer on, press the switch again.
Auto mode
The driver and front passenger's seat
warmer can be operated in auto mode
using the following procedure.
1. If “Occupant Comfort” has been disabled, enable it using the
following procedure.
a) Select “Settings” from the MazdaConnect home screen.
b) Select “Vehicle Settings”.
c) Enable “Occupant Comfort”.
2. Press the AUTO switch.
While in auto mode, the seat
temperature is automatically controlled
in 4 levels (High, Mid, Low, and OFF)
according to the conditions in the
cabin.
NOTE
If the front passenger’s seat belt is
unfastened, the front passenger’s
seat warmer turns off.
If the seat warmer switch is pressed
during auto mode, the seat warmer
on the side where the switch was
pressed switches to manual mode.
To return to auto mode, press the
AUTO switch.
If the engine is turned off while the
seat warmer is operating in auto
mode, the seat warmer operates in
auto mode again the next time the
engine is turned on.
Essential Safety Equipment
Seat Warmer/Heated Steering Wheel
2-18*Some models.
CX-30_8LD3-EA-22J_Edition1_new 2022-6-7 13:06:59
Page 36 of 595

WARNING
Be careful when using the seat
warmer:
The heat from the seat warmer may be
too hot for the following people and
could cause a low-temperature burn.
Infants, small children, elderly
people, and physically challenged
people
People with delicate skin
People who are excessively fatigued
People who are intoxicated
People who have taken
sleep-inducing medicine such as
sleeping pills or cold medicine
Do not use the seat warmer with
anything having high
moisture-retention ability such as a
blanket or cushion on the seat:
The seat may be heated excessively
and cause a low-temperature burn.
Do not use the seat warmer even
when taking a short nap in the
vehicle:
The seat may be heated excessively
and cause a low-temperature burn.
Do not place heavy objects with sharp
projections on the seat, or insert
needles or pins into it:
This could cause the seat to become
excessively heated and result in injury
from a minor burn.
CAUTION
Do not use organic solvents to clean
the seat. It may damage the seat
surface and the heater.
Heated Steering Wheel*
▼ Heated Steering Wheel
The grips on the left and right of the
steering wheel can be warmed up
when the ignition is switched ON.
While the heated steering wheel is
operating, the indicator light in the
heated steering wheel switch turns on.
1. Heated steering wheel switch
2. Heating area
Manual mode
The heated steering wheel operates for
about 30 minutes when the heated
steering wheel switch is pressed, and
then automatically turns off.
To turn the heated steering wheel off
manually, press the switch again.
Essential Safety Equipment
Seat Warmer/Heated Steering Wheel
*Some models.2-19
CX-30_8LD3-EA-22J_Edition1_new
2022-6-7 13:06:59
Page 37 of 595

Auto mode
The heated steering wheel can be
operated in auto mode using the
following procedure.
1. If “Occupant Comfort” has beendisabled, enable it using the
following procedure.
a) Select “Settings” from the MazdaConnect home screen.
b) Select “Vehicle Settings”.
c) Enable “Occupant Comfort”.
2. Press the AUTO switch.
While in auto mode, the heated
steering wheel automatically operates/
turns off according to the conditions in
the cabin.
NOTE
If the heated steering wheel switch is
pressed during auto mode, the
heated steering wheel switches to
manual mode. To return to auto
mode, press the AUTO switch.
If the ignition is switched OFF while
the heated steering wheel is
operating in auto mode, the heated
steering wheel operates in auto
mode again the next time the
ignition is switched ON.
CAUTION
The following types of persons should
be careful not to touch the steering
wheel. Otherwise, it could cause a
low-temperature burn.
Infants, small children, elderly
people, and physically challenged
people
People with delicate skin
People who are excessively fatigued
People who are intoxicated
People who have taken
sleep-inducing medicine such as
sleeping pills or cold medicine
Essential Safety Equipment
Seat Warmer/Heated Steering Wheel
2-20
CX-30_8LD3-EA-22J_Edition1_new 2022-6-7 13:06:59
Page 38 of 595

Seat Belt Precautions
▼Seat Belt Precautions
Seat belts help to decrease the
possibility of severe injury during
accidents and sudden stops. Mazda
recommends that the driver and all
passengers always wear seat belts.
(Mexico)
All the seats have lap/shoulder belts.
These belts have retractors with inertia
locks that keep them out of the way
when not in use. The locks allow the
belts to remain comfortable on users,
but they will lock in position during a
collision.
(Except Mexico)
All of the seat belt retractors are
designed to keep the lap/shoulder
belts out of the way when not in use.
The driver's seat belt has no provisions
for child-restraint systems and has only
an emergency locking mode. The
driver may wear it comfortably, and it
will lock during a collision.
However, the front passenger's seat
and all rear lap/shoulder belt
retractors operate in two modes:
emergency locking mode, and for
child-restraint systems, automatic
locking mode. While we recommend
you put all children in the rear seats, if
you must use the front passenger seat
for a child, slide the front passenger
seat as far back as possible and make
sure any child-restraint system is
secured properly.
WARNING
Always wear your seat belt and make
sure all occupants are properly
restrained:
Not wearing a seat belt is extremely
dangerous. During a collision,
occupants not wearing seat belts could
hit someone or things inside the
vehicle or even be thrown out of the
vehicle. They could be seriously injured
or even killed. In the same collision,
occupants wearing seat belts would be
much safer.
In a rollover crash, an unbelted person
is significantly more likely to die than a
person wearing a seat belt.
Do not wear twisted seat belts:
Twisted seat belts are dangerous. In a
collision, the full width of the belt is
not available to absorb the impact.
This puts more force on the bones
beneath the belt, which could cause
serious injury or death. So, if your seat
belt is twisted, you must straighten the
seat belt to remove any twists and to
allow the full width of the belt to be
used.
Never use one seat belt on more than
one person at a time:
Using one seat belt for more than one
person at a time is dangerous. A seat
belt used in this way cannot spread the
impact forces properly and the two
passengers could be crushed together
and seriously injured or even killed.
Never use one belt for more than one
person at a time and always operate
the vehicle with each occupant
properly restrained.
Essential Safety Equipment
Seat Belt Systems
2-21
CX-30_8LD3-EA-22J_Edition1_new
2022-6-7 13:06:59
Page 40 of 595

▼Pregnant Women and Persons with
Serious Medical Conditions
Pregnant women should always wear
seat belts. Ask your doctor for
specific
recommendations.
The lap belt should be worn SNUGLY
AND AS LOW AS POSSIBLE OVER THE
HIPS.
The shoulder belt should be worn
across your shoulder properly, but
never across the stomach area.
Persons with serious medical
conditions also should wear seat belts.
Check with your doctor for any special
instructions regarding specific medical
conditions.
▼ Emergency Locking Mode
When the seat belt is fastened, it will
always be in the emergency locking
mode.
In the emergency locking mode, the
belt remains comfortable on the
occupant and the retractor will lock in
position during a collision.
If the belt is locked and cannot be
pulled out, retract the belt once, and
then try pulling it out slowly. If this
fails, pull the belt strongly 1 time and
loosen, then pull it out again slowly.
(Seat Belt with Automatic Locking
Mode)
When the seat belt is fastened, it will
always be in the emergency locking
mode until it is switched to automatic
locking mode by pulling it all the way
out to its full length. If the belt feels
tight and hinders comfortable
movement while the vehicle is stopped
or in motion, it may be in the
automatic locking mode because the
belt has been pulled too far out. To
return the belt to the more
comfortable emergency locking mode,
wait until the vehicle has stopped in a
safe, level area, retract the belt fully to
convert it back to emergency locking
mode and then extend it around you
again.
▼Automatic Locking Mode (Except
Mexico)
Always use the automatic locking
mode to keep the child-restraint
system from shifting to an unsafe
position in the event of an accident. To
enable seat belt automatic locking
mode, pull it all the way out and
connect it as instructed on the
child-restraint system. It will retract
down to the child-restraint system and
stay locked on it. See the section on
child restraint (page 2-41).
Essential Safety Equipment
Seat Belt Systems
2-23
CX-30_8LD3-EA-22J_Edition1_new
2022-6-7 13:06:59
Page 43 of 595

Seat Belt Pretensionerand Load Limiting Systems
▼Seat Belt Pretensioner and Load
Limiting Systems
For optimum protection, the front seat
belts and rear outboard seat belts* are
equipped with pretensioner and load
limiting systems. For both these
systems to work properly you must
wear the seat belt properly.
Pretensioners:
When a collision is detected, the
pretensioners deploy simultaneously
with the air bags.
For vehicles with the front passenger
occupant classification system, the
pretensioners deploy simultaneously
with the air bags when a roll-over is
also detected.
For deployment details, refer to the
SRS Air Bag Deployment Criteria (page
2-63).
The seat belt retractors remove slack
quickly as the air bags are expanding.
Any time the air bags and seat belt
pretensioners have fired they must be
replaced.
A system malfunction or operation
conditions are indicated by a warning.
Refer to Air Bag/Seat Belt Pretensioner
System Warning Indication/Warning
Light on page 7-28.
(With Front Passenger Occupant
Classification System)
In addition, the pretensioner system
for the front passenger, like the front
and side passenger air bag , is designed
to only deploy in accordance with the
total seated weight on the front
passenger seat.
For details, refer to the front passenger
seat weight sensors (page 2-67).
Load limiter:
The load limiting system releases belt
webbing in a controlled manner to
reduce belt force on the occupant's
chest. While the most severe load on a
seat belt occurs in frontal collisions,
the load limiter has an automatic
mechanical function and can activate
in any accident mode with sufficient
occupant movement.
Even if the pretensioners have not
fired, the load limiting function must
be checked by an Authorized Mazda
Dealer.
WARNING
Wear seat belts only as recommended
in this owner's manual:
Incorrect positioning of the seat belts is
dangerous. Without proper
positioning, the pretensioner and load
limiting systems cannot provide
adequate protection in an accident
and this could result in serious injury.
For more details about wearing seat
belts, refer to "Fastening the Seat Belt"
(page 2-24).
Essential Safety Equipment
Seat Belt Systems
2-26*Some models.
CX-30_8LD3-EA-22J_Edition1_new 2022-6-7 13:06:59
Page 57 of 595

Installing Child-RestraintSystems
▼Installing Child-Restraint Systems
Accident statistics reveal that a child is
safer in the rear seat. The front
passenger's seat is clearly the worst
choice for any child under 12, and
with rear-facing child-restraint systems
it is clearly unsafe due to air bags.
NOTE
Even if your vehicle is equipped with
front passenger occupant classification
sensor (page 2-67), which
automatically deactivates the front
passenger air bag , a rear seat is the
safest place for a child of any age or
size.
Some child-restraint systems now
come with tethers and therefore must
be installed on the seats that take
tethers to be effective. In your Mazda,
tethered child-restraint systems can
only be accommodated in the three
positions on the rear seat.
Some child-restraint systems also
employ specially designed ISOFIX/
LATCH
*1 attachments; refer to "Using
ISOFIX Lower Anchor (Mexico)/Using
LATCH Lower Anchor (Except
Mexico)" (page 2-47).
*1 ISOFIX (Mexico)/LATCH (Except Mexico)
WARNING
Tethered Child-Restraint Systems
Work Only on Tether-Equipped Rear
Seats:
Installation of a tether equipped
child-restraint system in the front
passenger's seat defeats the safety
design of the system and will result in
an increased chance of serious injury if
the child-restraint system goes forward
without benefit of being tethered.
Place tether equipped child-restraint
systems where there are tether
anchors.
▼Anchor Bracket
Anchor brackets for securing
child-restraint systems are equipped in
the vehicle. Locate each anchor
position using the illustration.
To install a child-restraint system,
remove the head restraint. Always
follow the instruction manual
accompanying the child-restraint
system.
Anchor bracket location
Use the indicated anchor bracket
locations when installing a
child-restraint system equipped with a
tether.
1. For right
2. For center (Except Mexico)
3. For left
Essential Safety Equipment
Child Restraint
2-40
CX-30_8LD3-EA-22J_Edition1_new
2022-6-7 13:06:59
Page 58 of 595

WARNING
Always attach the tether strap to the
correct tether anchor position:
Attaching the tether strap to the
incorrect tether anchor position is
dangerous. In a collision, the tether
strap could come off and loosen the
child-restraint system. If the
child-restraint system moves it could
result in death or injury to the child.
Always remove the head restraint and
install child-restraint system:
Installing a child-restraint system
without removing the head restraint is
dangerous. The child-restraint system
cannot be installed correctly which
may result in death or injury to the
child in a collision.
(Mexico)
If the top tether strap does not reach
the anchor bracket, purchase and use
an extension strap provided by the CRS
manufacturer.
(Except Mexico)
1. Tether strap
2. Anchor bracket
3. Forward
Always install the head restraint and
adjust it to the appropriate position
after removing the child-restraint
system:
Driving with the head restraint
removed is dangerous as impact to the
occupant's head cannot be prevented
during emergency braking or in a
collision, which could result in a
serious accident, injury or death.
Refer to Head Restraints on page 2-16.
▼Using Automatic Locking Mode
(Except Mexico)
Follow these instructions when using a
child-restraint system, unless you are
attaching a
LATCH-equipped
child-restraint system to the rear
LATCH lower anchors. Refer to “Using
LATCH Lower Anchor” (page 2-47).
NOTE
Follow the child-restraint system
manufacturer's instructions carefully. If
you are not sure whether you have a
LATCH system or tether, check in the
child-restraint system manufacturer's
instructions and follow them
accordingly. Depending on the type of
child-restraint system, it may use
LATCH system instead of seat belts or if
the belt goes across the child's chest,
may recommend against using
automatic locking mode.
1. Make sure the seatback is securely latched by pushing it back until it is
fully locked.
2. Remove the head restraint. However, when installing a backless
booster seat, always install the
vehicle head restraint to the seat
Essential Safety Equipment
Child Restraint
2-41
CX-30_8LD3-EA-22J_Edition1_new 2022-6-7 13:06:59
Page 59 of 595
where the backless booster seat is
installed.
Refer to Head Restraints on page
2-16.
3. Secure the child-restraint system with the lap portion of the lap/
shoulder belt. See the
manufacturer's instructions on the
child-restraint system for belt
routing instructions.
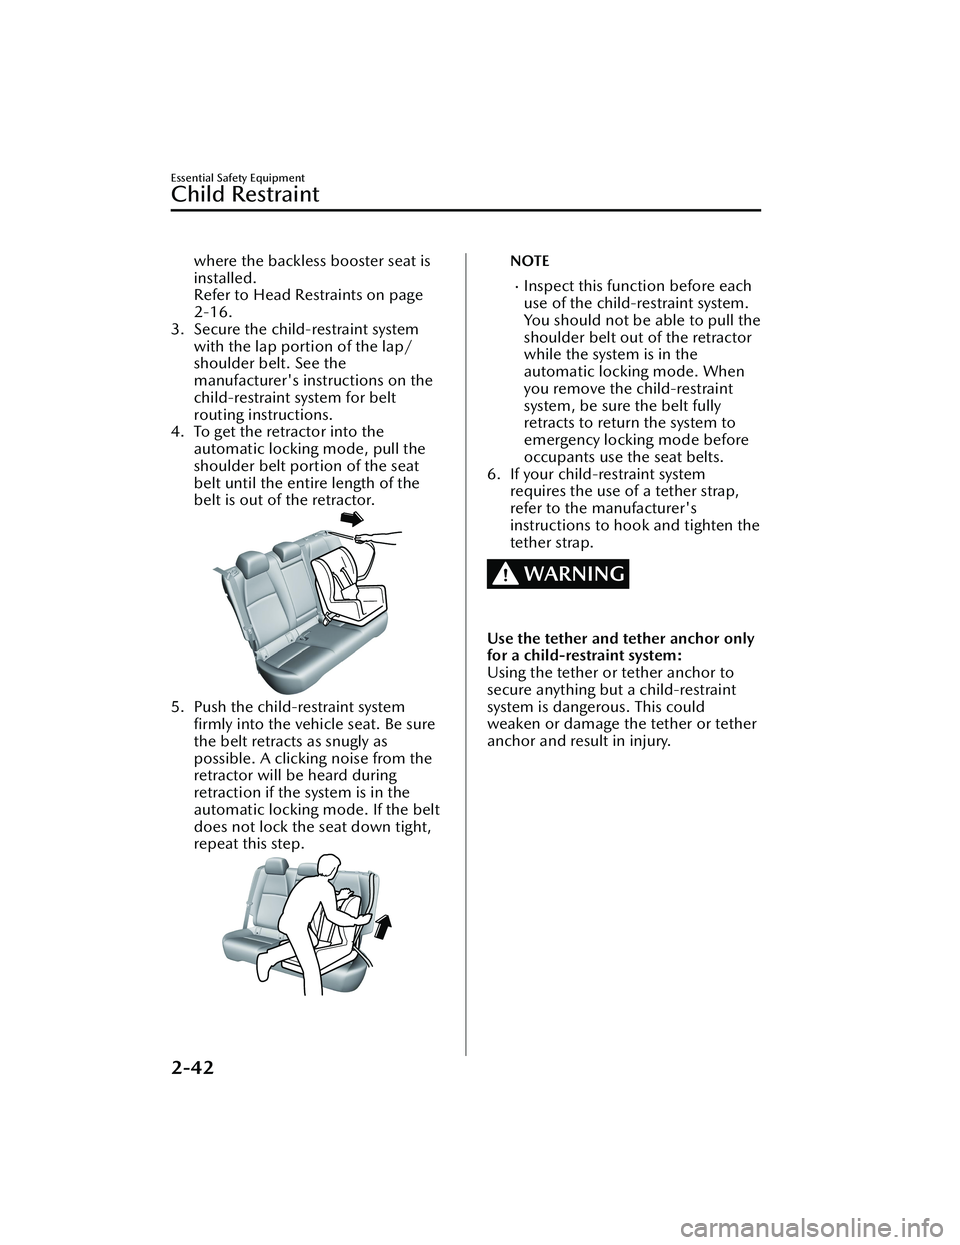
4. To get the retractor into the automatic locking mode, pull the
shoulder belt portion of the seat
belt until the entire length of the
belt is out of the retractor.
5. Push the child-restraint system
firmly into the vehicle seat. Be sure
the belt retracts as snugly as
possible. A clicking noise from the
retractor will be heard during
retraction if the system is in the
automatic locking mode. If the belt
does not lock the seat down tight,
repeat this step.
NOTE
Inspect this function before each
use of the child-restraint system.
You should not be able to pull the
shoulder belt out of the retractor
while the system is in the
automatic locking mode. When
you remove the child-restraint
system, be sure the belt fully
retracts to return the system to
emergency locking mode before
occupants use the seat belts.
6. If your child-restraint system requires the use of a tether strap,
refer to the manufacturer's
instructions to hook and tighten the
tether strap.
WARNING
Use the tether and tether anchor only
for a child-restraint system:
Using the tether or tether anchor to
secure anything but a child-restraint
system is dangerous. This could
weaken or damage the tether or tether
anchor and result in injury.
Essential Safety Equipment
Child Restraint
2-42
CX-30_8LD3-EA-22J_Edition1_new 2022-6-7 13:06:59