parking brake MAZDA MIATA 1991 Factory User Guide
[x] Cancel search | Manufacturer: MAZDA, Model Year: 1991, Model line: MIATA, Model: MAZDA MIATA 1991Pages: 392, PDF Size: 29.45 MB
Page 235 of 392
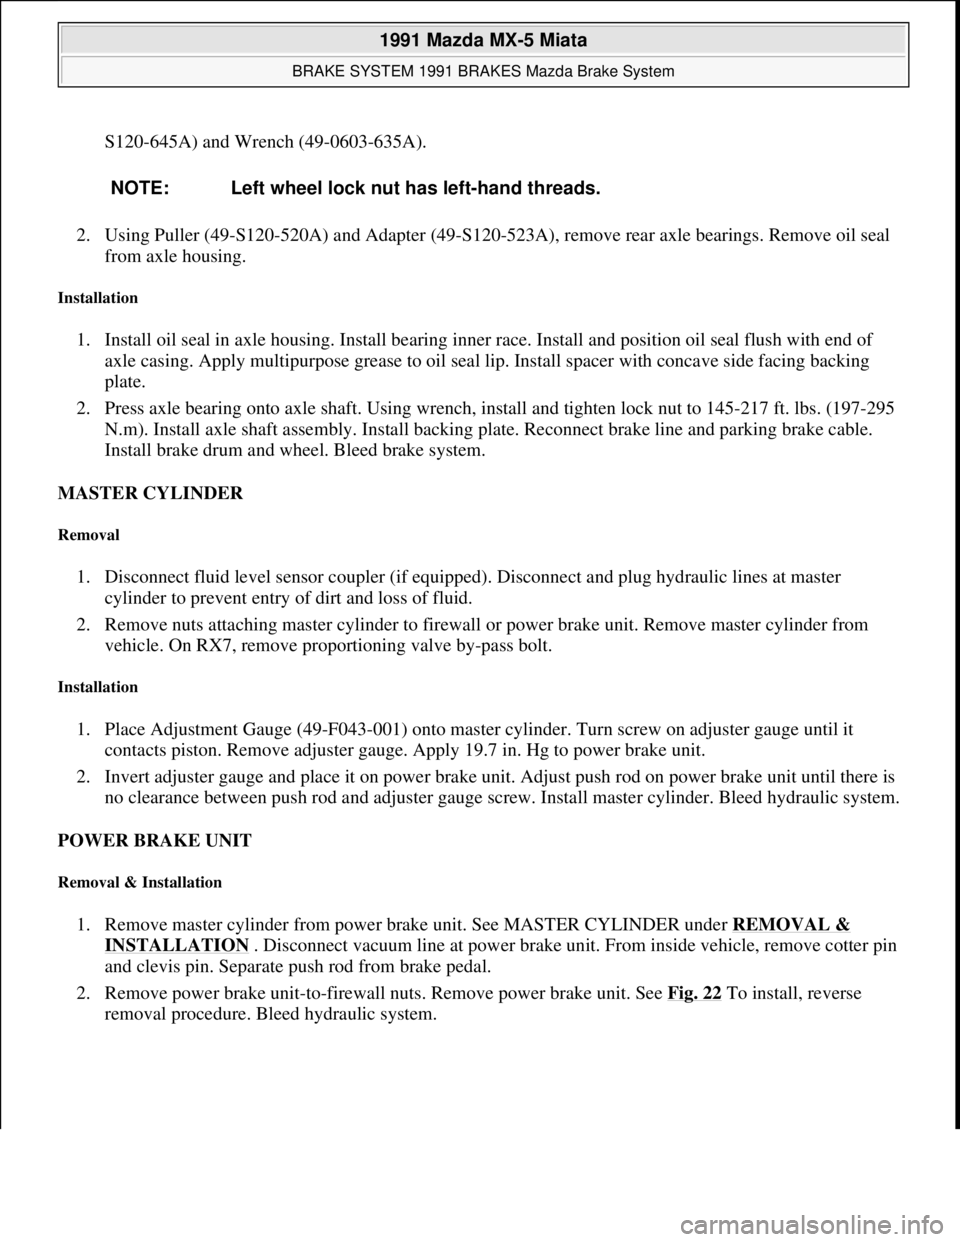
S120-645A) and Wrench (49-0603-635A).
2. Using Puller (49-S120-520A) and Adapter (49-S120-523A), remove rear axle bearings. Remove oil seal
from axle housing.
Installation
1. Install oil seal in axle housing. Install bearing inner race. Install and position oil seal flush with end of
axle casing. Apply multipurpose grease to oil seal lip. Install spacer with concave side facing backing
plate.
2. Press axle bearing onto axle shaft. Using wrench, install and tighten lock nut to 145-217 ft. lbs. (197-295
N.m). Install axle shaft assembly. Install backing plate. Reconnect brake line and parking brake cable.
Install brake drum and wheel. Bleed brake system.
MASTER CYLINDER
Removal
1. Disconnect fluid level sensor coupler (if equipped). Disconnect and plug hydraulic lines at master
cylinder to prevent entry of dirt and loss of fluid.
2. Remove nuts attaching master cylinder to firewall or power brake unit. Remove master cylinder from
vehicle. On RX7, remove proportioning valve by-pass bolt.
Installation
1. Place Adjustment Gauge (49-F043-001) onto master cylinder. Turn screw on adjuster gauge until it
contacts piston. Remove adjuster gauge. Apply 19.7 in. Hg to power brake unit.
2. Invert adjuster gauge and place it on power brake unit. Adjust push rod on power brake unit until there is
no clearance between push rod and adjuster gauge screw. Install master cylinder. Bleed hydraulic system.
POWER BRAKE UNIT
Removal & Installation
1. Remove master cylinder from power brake unit. See MASTER CYLINDER under REMOVAL &
INSTALLATION . Disconnect vacuum line at power brake unit. From inside vehicle, remove cotter pin
and clevis pin. Separate push rod from brake pedal.
2. Remove power brake unit-to-firewall nuts. Remove power brake unit. See Fig. 22
To install, reverse
removal procedure. Bleed hydraulic system. NOTE: Left wheel lock nut has left-hand threads.
1991 Mazda MX-5 Miata
BRAKE SYSTEM 1991 BRAKES Mazda Brake System
Microsoft
Sunday, July 05, 2009 2:18:08 PMPage 32 © 2005 Mitchell Repair Information Company, LLC.
Page 242 of 392
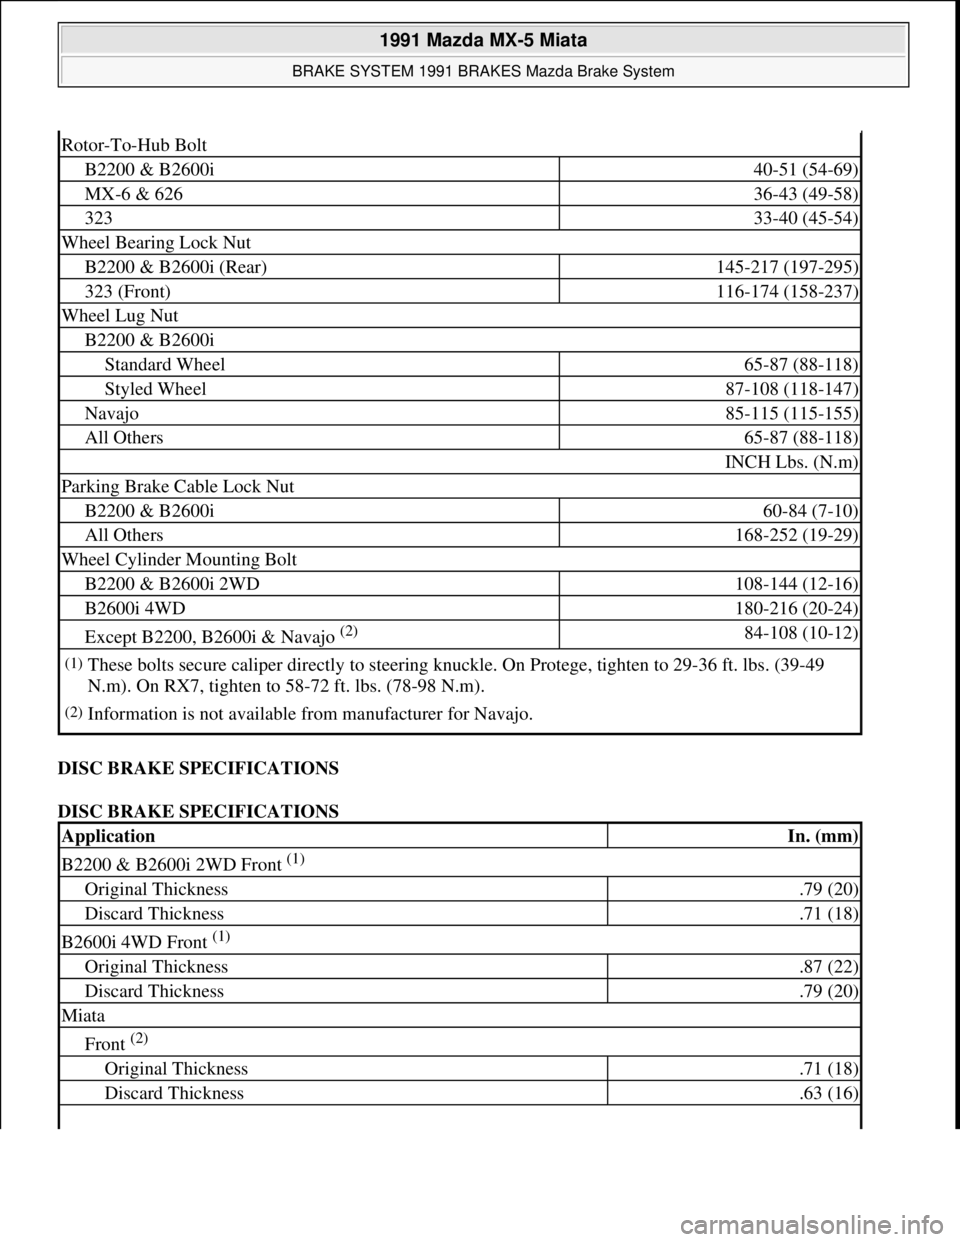
DISC BRAKE SPECIFICATIONS
DISC BRAKE SPECIFICATIONS
Rotor-To-Hub Bolt
B2200 & B2600i40-51 (54-69)
MX-6 & 62636-43 (49-58)
32333-40 (45-54)
Wheel Bearing Lock Nut
B2200 & B2600i (Rear)145-217 (197-295)
323 (Front)116-174 (158-237)
Wheel Lug Nut
B2200 & B2600i
Standard Wheel65-87 (88-118)
Styled Wheel87-108 (118-147)
Navajo85-115 (115-155)
All Others65-87 (88-118)
INCH Lbs. (N.m)
Parking Brake Cable Lock Nut
B2200 & B2600i60-84 (7-10)
All Others168-252 (19-29)
Wheel Cylinder Mounting Bolt
B2200 & B2600i 2WD108-144 (12-16)
B2600i 4WD180-216 (20-24)
Except B2200, B2600i & Navajo (2) 84-108 (10-12)
(1)These bolts secure caliper directly to steering knuckle. On Protege, tighten to 29-36 ft. lbs. (39-49
N.m). On RX7, tighten to 58-72 ft. lbs. (78-98 N.m).
(2)Information is not available from manufacturer for Navajo.
ApplicationIn. (mm)
B2200 & B2600i 2WD Front (1)
Original Thickness.79 (20)
Discard Thickness.71 (18)
B2600i 4WD Front (1)
Original Thickness.87 (22)
Discard Thickness.79 (20)
Miata
Front (2)
Original Thickness.71 (18)
Discard Thickness.63 (16)
1991 Mazda MX-5 Miata
BRAKE SYSTEM 1991 BRAKES Mazda Brake System
Microsoft
Sunday, July 05, 2009 2:18:09 PMPage 39 © 2005 Mitchell Repair Information Company, LLC.
Page 260 of 392
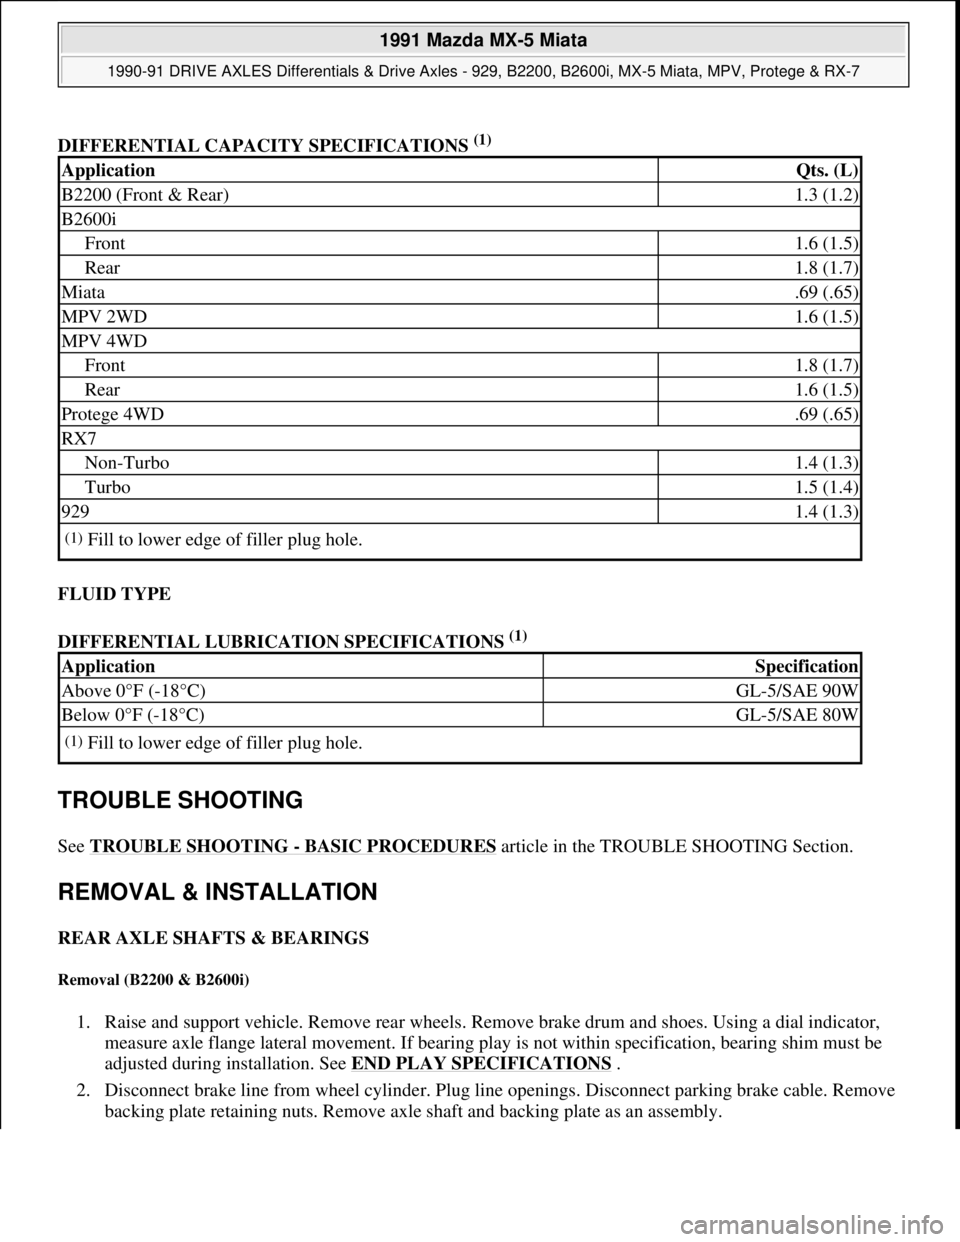
DIFFERENTIAL CAPACITY SPECIFICATIONS (1)
FLUID TYPE
DIFFERENTIAL LUBRICATION SPECIFICATIONS
(1)
TROUBLE SHOOTING
See TROUBLE SHOOTING - BASIC PROCEDURES article in the TROUBLE SHOOTING Section.
REMOVAL & INSTALLATION
REAR AXLE SHAFTS & BEARINGS
Removal (B2200 & B2600i)
1. Raise and support vehicle. Remove rear wheels. Remove brake drum and shoes. Using a dial indicator,
measure axle flange lateral movement. If bearing play is not within specification, bearing shim must be
adjusted during installation. See END PLAY SPECIFICATIONS
.
2. Disconnect brake line from wheel cylinder. Plug line openings. Disconnect parking brake cable. Remove
backing plate retaining nuts. Remove axle shaft and backing plate as an assembly.
ApplicationQts. (L)
B2200 (Front & Rear)1.3 (1.2)
B2600i
Front1.6 (1.5)
Rear1.8 (1.7)
Miata.69 (.65)
MPV 2WD1.6 (1.5)
MPV 4WD
Front1.8 (1.7)
Rear1.6 (1.5)
Protege 4WD.69 (.65)
RX7
Non-Turbo1.4 (1.3)
Turbo1.5 (1.4)
9291.4 (1.3)
(1)Fill to lower edge of filler plug hole.
ApplicationSpecification
Above 0°F (-18°C)GL-5/SAE 90W
Below 0°F (-18°C)GL-5/SAE 80W
(1)Fill to lower edge of filler plug hole.
1991 Mazda MX-5 Miata
1990-91 DRIVE AXLES Differentials & Drive Axles - 929, B2200, B2600i, MX-5 Miata, MPV, Protege & RX-7
Microsoft
Sunday, July 05, 2009 2:17:01 PMPage 2 © 2005 Mitchell Repair Information Company, LLC.
Page 261 of 392
3. Using Bearing Nut Wrench (49 0603 635A ) and Shaft Holder (49 S120 645A ), remove bearing lock nut
from axle shaft. Remove bearing and bearing retainer from axle using Puller (49 S120 520A ). Remove
outer race from hub.
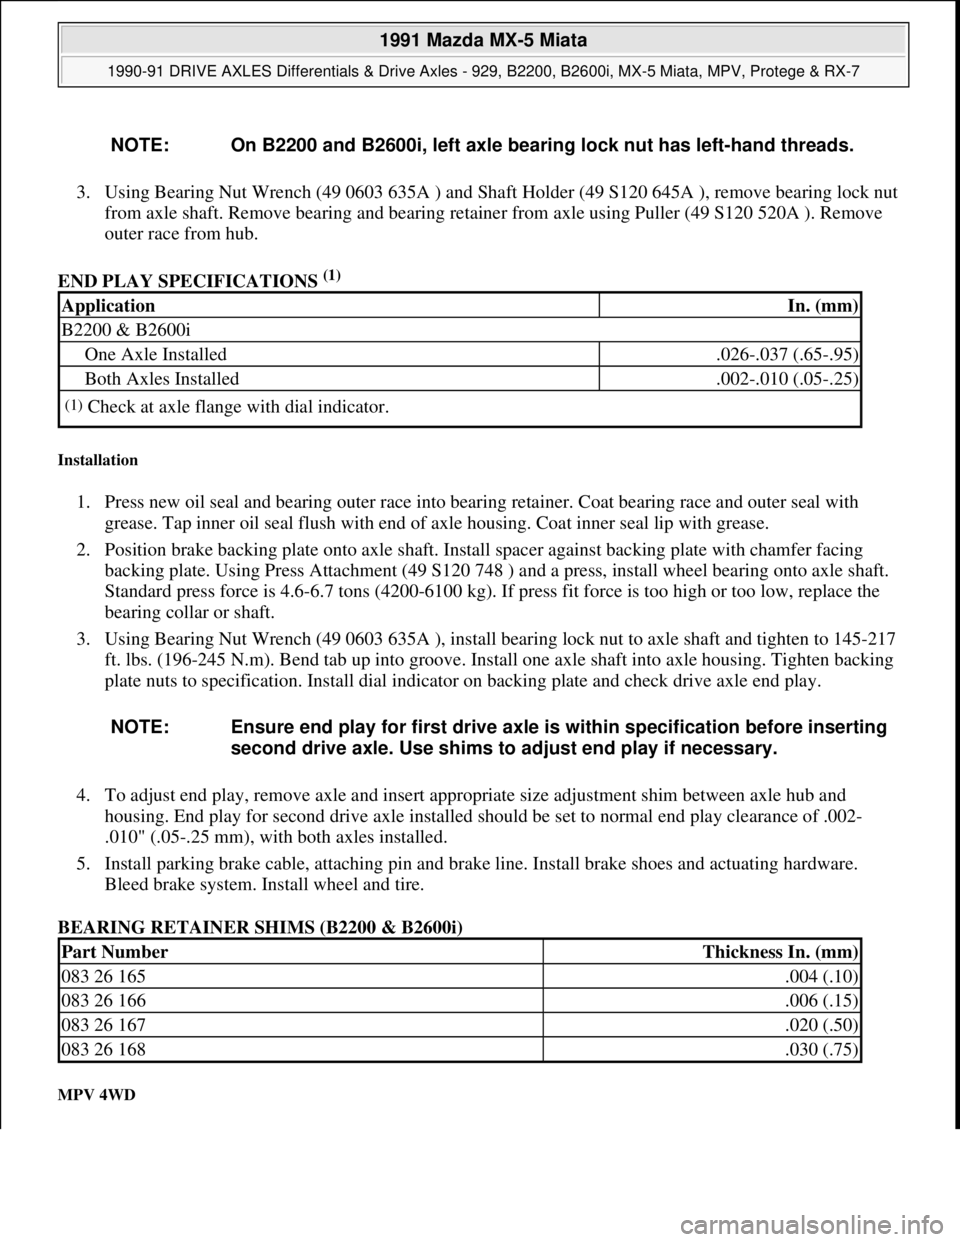
END PLAY SPECIFICATIONS
(1)
Installation
1. Press new oil seal and bearing outer race into bearing retainer. Coat bearing race and outer seal with
grease. Tap inner oil seal flush with end of axle housing. Coat inner seal lip with grease.
2. Position brake backing plate onto axle shaft. Install spacer against backing plate with chamfer facing
backing plate. Using Press Attachment (49 S120 748 ) and a press, install wheel bearing onto axle shaft.
Standard press force is 4.6-6.7 tons (4200-6100 kg). If press fit force is too high or too low, replace the
bearing collar or shaft.
3. Using Bearing Nut Wrench (49 0603 635A ), install bearing lock nut to axle shaft and tighten to 145-217
ft. lbs. (196-245 N.m). Bend tab up into groove. Install one axle shaft into axle housing. Tighten backing
plate nuts to specification. Install dial indicator on backing plate and check drive axle end play.
4. To adjust end play, remove axle and insert appropriate size adjustment shim between axle hub and
housing. End play for second drive axle installed should be set to normal end play clearance of .002-
.010" (.05-.25 mm), with both axles installed.
5. Install parking brake cable, attaching pin and brake line. Install brake shoes and actuating hardware.
Bleed brake system. Install wheel and tire.
BEARING RETAINER SHIMS (B2200 & B2600i)
MPV 4WD
NOTE: On B2200 and B2600i, left axle bearing lock nut has left-hand threads.
ApplicationIn. (mm)
B2200 & B2600i
One Axle Installed.026-.037 (.65-.95)
Both Axles Installed.002-.010 (.05-.25)
(1)Check at axle flange with dial indicator.
NOTE: Ensure end play for first drive axle is within specification before inserting
second drive axle. Use shims to adjust end play if necessary.
Part NumberThickness In. (mm)
083 26 165.004 (.10)
083 26 166.006 (.15)
083 26 167.020 (.50)
083 26 168.030 (.75)
1991 Mazda MX-5 Miata
1990-91 DRIVE AXLES Differentials & Drive Axles - 929, B2200, B2600i, MX-5 Miata, MPV, Protege & RX-7
Microsoft
Sunday, July 05, 2009 2:17:01 PMPage 3 © 2005 Mitchell Repair Information Company, LLC.
Page 262 of 392

1. Raise and support vehicle. Remove rear wheels. Remove brake drum and shoes. Using a dial indicator,
measure axle flange lateral movement. Replace bearing if play exceeds If bearing play exceeds .023" (.57
mm). Disconnect brake line from wheel cylinder. Plug line openings. Disconnect parking brake cable.
2. Remove backing plate retaining nuts. Remove axle shaft and backing plate as an assembly. Use puller or
slide hammer to pull axle and bearing from axle housing. With axle removed, remove retaining ring and
bearing collar. See Fig. 1
.
Fig. 1: Exploded View of Rear Drive Axle (MPV; Others Similar)
Courtesy of MAZDA MOTORS CORP.
3. To remove bearing collar, grind collar until a section of it is .020" (.5 mm) and cut through it with a
chisel. Use a puller or press to remove bearing and brake backing plate. Check axle shaft for straightness.
Maximum runout is .059" (1.5 mm).
4. Use a press to replace wheel studs (if necessary), never use a previously used wheel stud as a
replacement. Lubricate seal lips before replacement. DO NOT lubricate bearing retainer collar before
replacement. Use a press to install bearing collar. If press-fit of collar requires less than 2.7 tons (2699
kg.) replace collar or axle shaft. Reverse removal procedures to complete installation.
DIFFERENTIAL ASSEMBLY
1991 Mazda MX-5 Miata
1990-91 DRIVE AXLES Differentials & Drive Axles - 929, B2200, B2600i, MX-5 Miata, MPV, Protege & RX-7
Microsoft
Sunday, July 05, 2009 2:17:01 PMPage 4 © 2005 Mitchell Repair Information Company, LLC.
Page 295 of 392
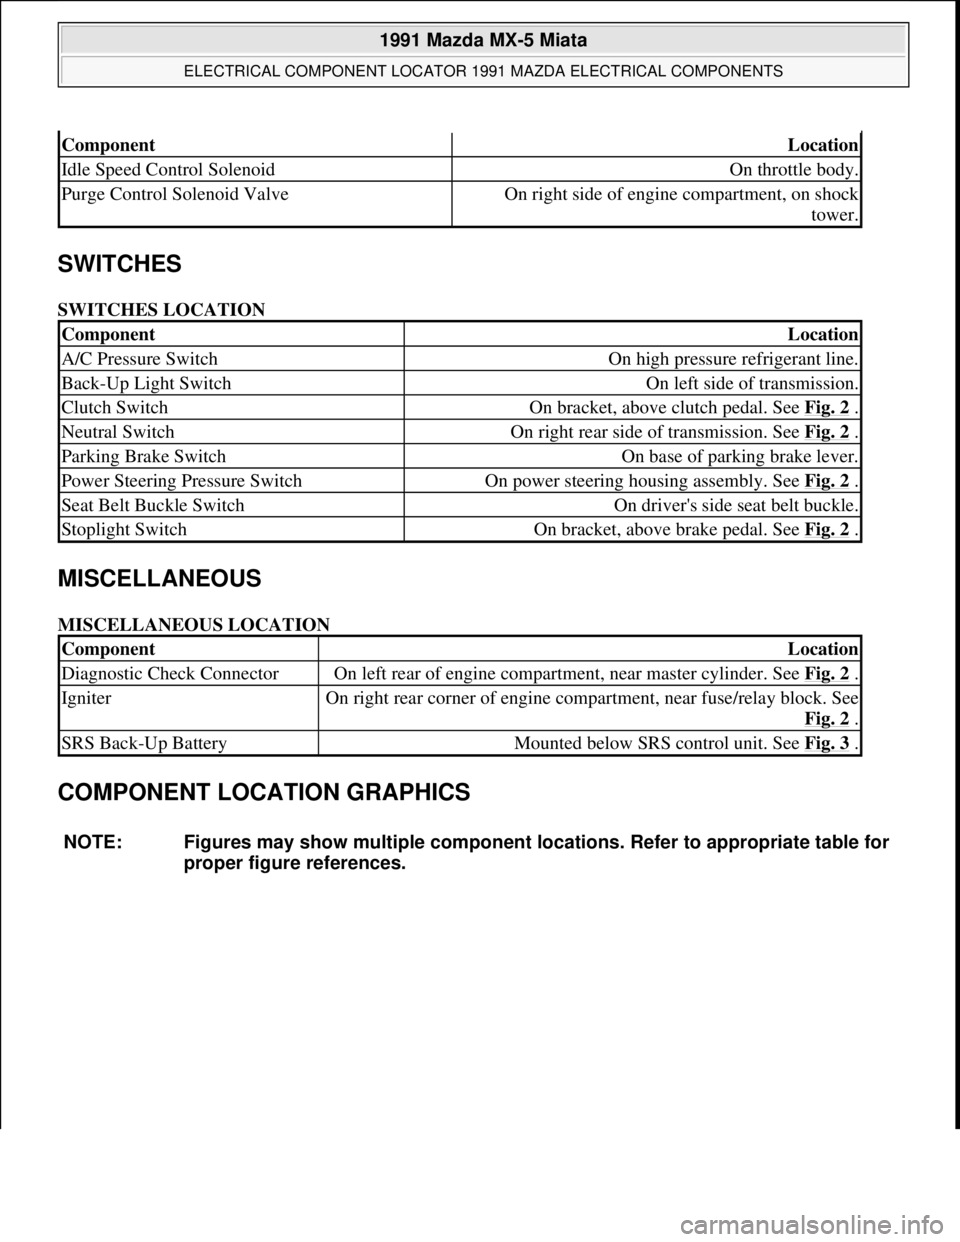
SWITCHES
SWITCHES LOCATION
MISCELLANEOUS
MISCELLANEOUS LOCATION
COMPONENT LOCATION GRAPHICS
ComponentLocation
Idle Speed Control SolenoidOn throttle body.
Purge Control Solenoid ValveOn right side of engine compartment, on shock
tower.
ComponentLocation
A/C Pressure SwitchOn high pressure refrigerant line.
Back-Up Light SwitchOn left side of transmission.
Clutch SwitchOn bracket, above clutch pedal. See Fig. 2 .
Neutral SwitchOn right rear side of transmission. See Fig. 2 .
Parking Brake SwitchOn base of parking brake lever.
Power Steering Pressure SwitchOn power steering housing assembly. See Fig. 2 .
Seat Belt Buckle SwitchOn driver's side seat belt buckle.
Stoplight SwitchOn bracket, above brake pedal. See Fig. 2 .
ComponentLocation
Diagnostic Check ConnectorOn left rear of engine compartment, near master cylinder. See Fig. 2 .
IgniterOn right rear corner of engine compartment, near fuse/relay block. See
Fig. 2
.
SRS Back-Up BatteryMounted below SRS control unit. See Fig. 3 .
NOTE: Figures may show multiple component locations. Refer to appropriate table for
proper figure references.
1991 Mazda MX-5 Miata
ELECTRICAL COMPONENT LOCATOR 1991 MAZDA ELECTRICAL COMPONENTS
Microsoft
Sunday, July 05, 2009 2:15:23 PMPage 3 © 2005 Mitchell Repair Information Company, LLC.