hub MAZDA MODEL 2 2011 Owners Manual
[x] Cancel search | Manufacturer: MAZDA, Model Year: 2011, Model line: MODEL 2, Model: MAZDA MODEL 2 2011Pages: 340, PDF Size: 3.88 MB
Page 48 of 340
Black plate (48,1)
Supplemental Restraint System (SRS) Precautions
The front and side supplemental restraint systems (SRS) include 6 air bags.Please verify
the air bags equipped on your vehicle by locating the “SRS AIRBAG ”location
indicators. These indicators are visible in the area where the air bags are installed.
The air bags are installed in the following locations:
lThe steering wheel hub (driver air bag)lThe front passenger dashboard (front passenger air bag)lThe outboard sides of the front seatbacks (side air bags)lThe front and rear window pillars, and the roof edge along both sides (curtain air bags)
The air bag supplemental restraint systems are designed to provide supplemental protection
in certain situations, so seat belts are always important in the following ways:
Without seat belt usage, the air bags cannot provide adequate protection during an accident.
Seat belt usage is necessary to:
lKeep the occupant from being thrown into an inflating air bag.lReduce the possibility of injuries during an accident that is not designed for air bag
inflation, such as roll-over or rear impact.
lReduce the possibility of injuries in frontal, near frontal, side collisions that are not
severe enough to activate the air bags.
lReduce the possibility of being thrown from your vehicle.lReduce the possibility of injuries to lower body and legs during an accident because the
air bags provide no protection to these parts of the body.
lHold the driver in a position which allows better control of the vehicle.
2-36
Essential Safety Equipment
SRS Air Bags
Mazda2_8BX2-EA-10K_Edition2 Page48
Thursday, December 23 2010 4:47 PM
Form No.8BX2-EA-10K
Page 219 of 340
Black plate (219,1)
To install the nut
1. Place the key on top of the nut, and besure to hold the key square to it. If you
hold the key at an angle, you may
damage both key and nut. Don't use a
power impact wrench.
2. Place the lug wrench on top of the key, apply pressure, and turn it clockwise.
qMounting the Spare Tire
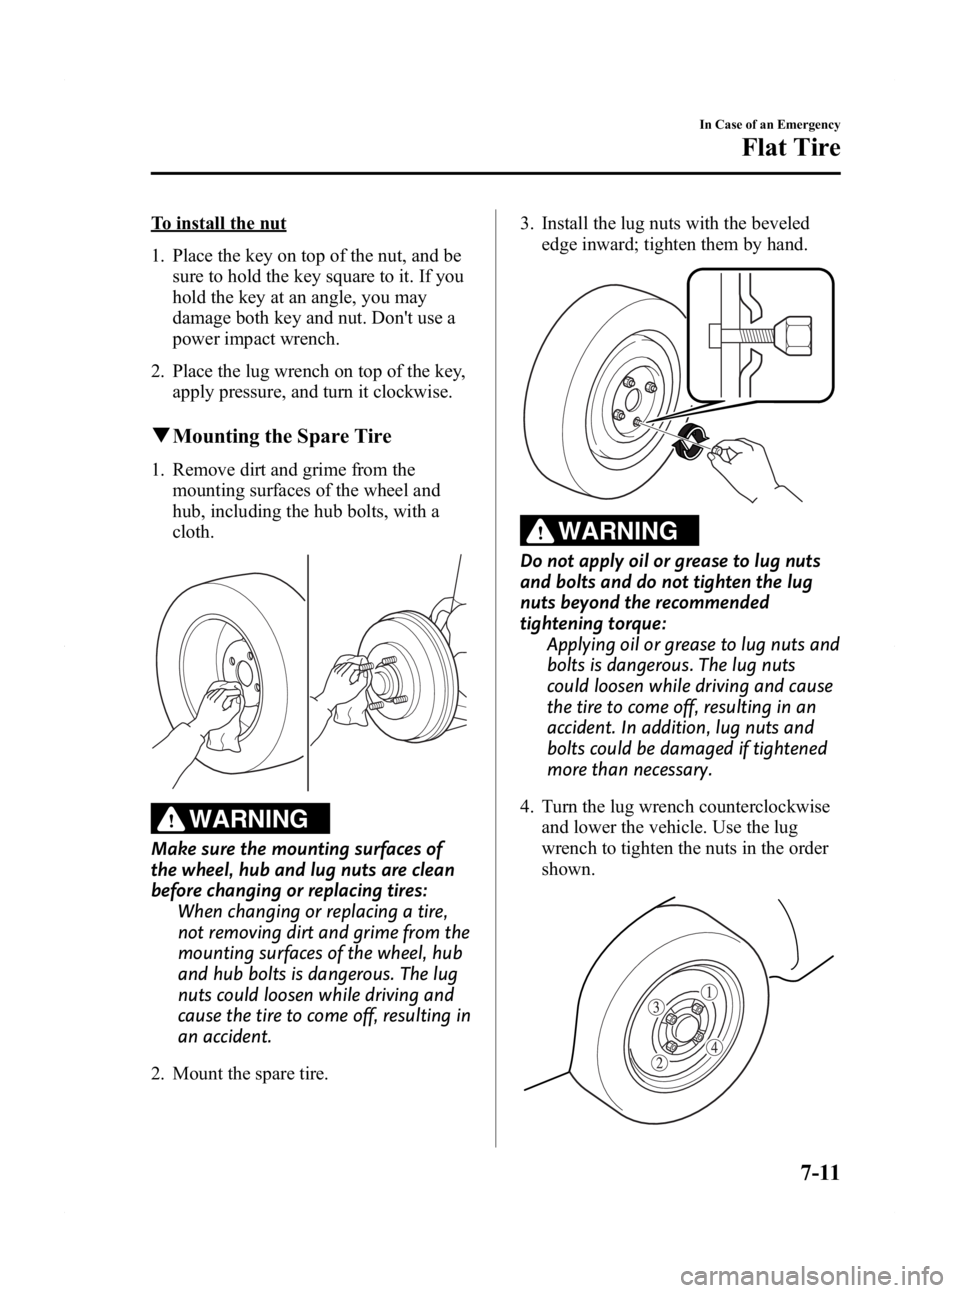
1. Remove dirt and grime from the
mounting surfaces of the wheel and
hub, including the hub bolts, with a
cloth.
WARNING
Make sure the mounting surfaces of
the wheel, hub and lug nuts are clean
before changing or replacing tires: When changing or replacing a tire,
not removing dirt and grime from the
mounting surfaces of the wheel, hub
and hub bolts is dangerous. The lug
nuts could loosen while driving and
cause the tire to come off, resulting in
an accident.
2. Mount the spare tire. 3. Install the lug nuts with the beveled
edge inward; tighten them by hand.
WARNING
Do not apply oil or grease to lug nuts
and bolts and do not tighten the lug
nuts beyond the recommended
tightening torque: Applying oil or grease to lug nuts and
bolts is dangerous. The lug nuts
could loosen while driving and cause
the tire to come off, resulting in an
accident. In addition, lug nuts and
bolts could be damaged if tightened
more than necessary.
4. Turn the lug wrench counterclockwise and lower the vehicle. Use the lug
wrench to tighten the nuts in the order
shown.
In Case of an Emergency
Flat Tire
7-11
Mazda2_8BX2-EA-10K_Edition2 Page219
Thursday, December 23 2010 4:48 PM
Form No.8BX2-EA-10K