clock MAZDA MODEL 2 2017 (in English) Owner's Manual
[x] Cancel search | Manufacturer: MAZDA, Model Year: 2017, Model line: MODEL 2, Model: MAZDA MODEL 2 2017Pages: 711, PDF Size: 17.89 MB
Page 573 of 711
6–55
Maintenance and Care
Owner Maintenance
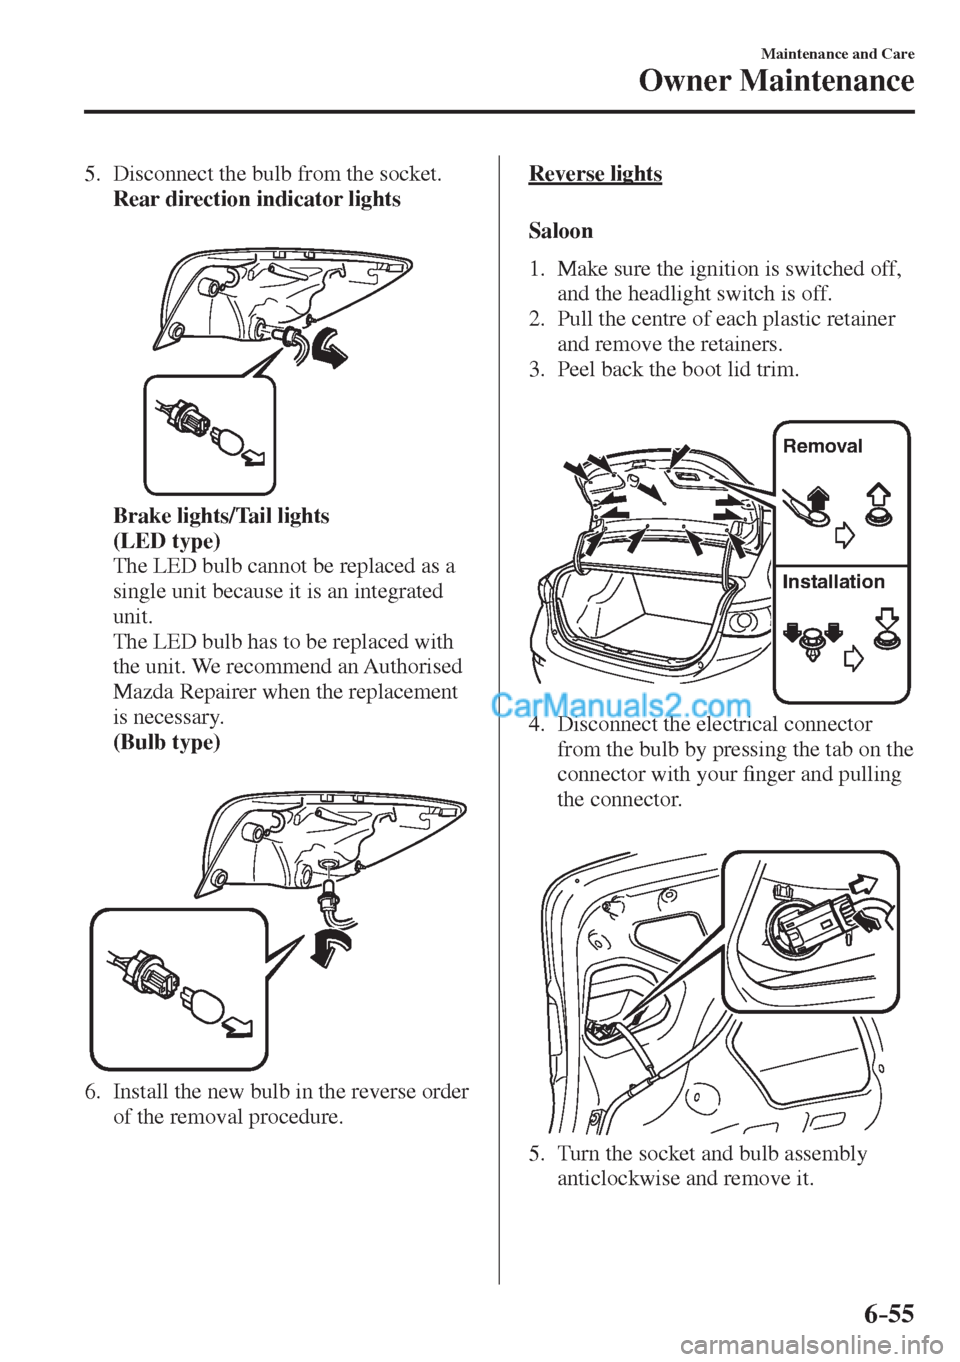
5. Disconnect the bulb from the socket.
Rear direction indicator lights
Brake lights/Tail lights
(LED type)
The LED bulb cannot be replaced as a
single unit because it is an integrated
unit.
The LED bulb has to be replaced with
the unit. We recommend an Authorised
Mazda Repairer when the replacement
is necessary.
(Bulb type)
6. Install the new bulb in the reverse order
of the removal procedure.
Reverse lights
S a l o o n
1. Make sure the ignition is switched off,
and the headlight switch is off.
2. Pull the centre of each plastic retainer
and remove the retainers.
3. Peel back the boot lid trim.
Removal
Installation
4. Disconnect the electrical connector
from the bulb by pressing the tab on the
connector with your �¿ nger and pulling
the connector.
5. Turn the socket and bulb assembly
anticlockwise and remove it.
Page 574 of 711
6–56
Maintenance and Care
Owner Maintenance
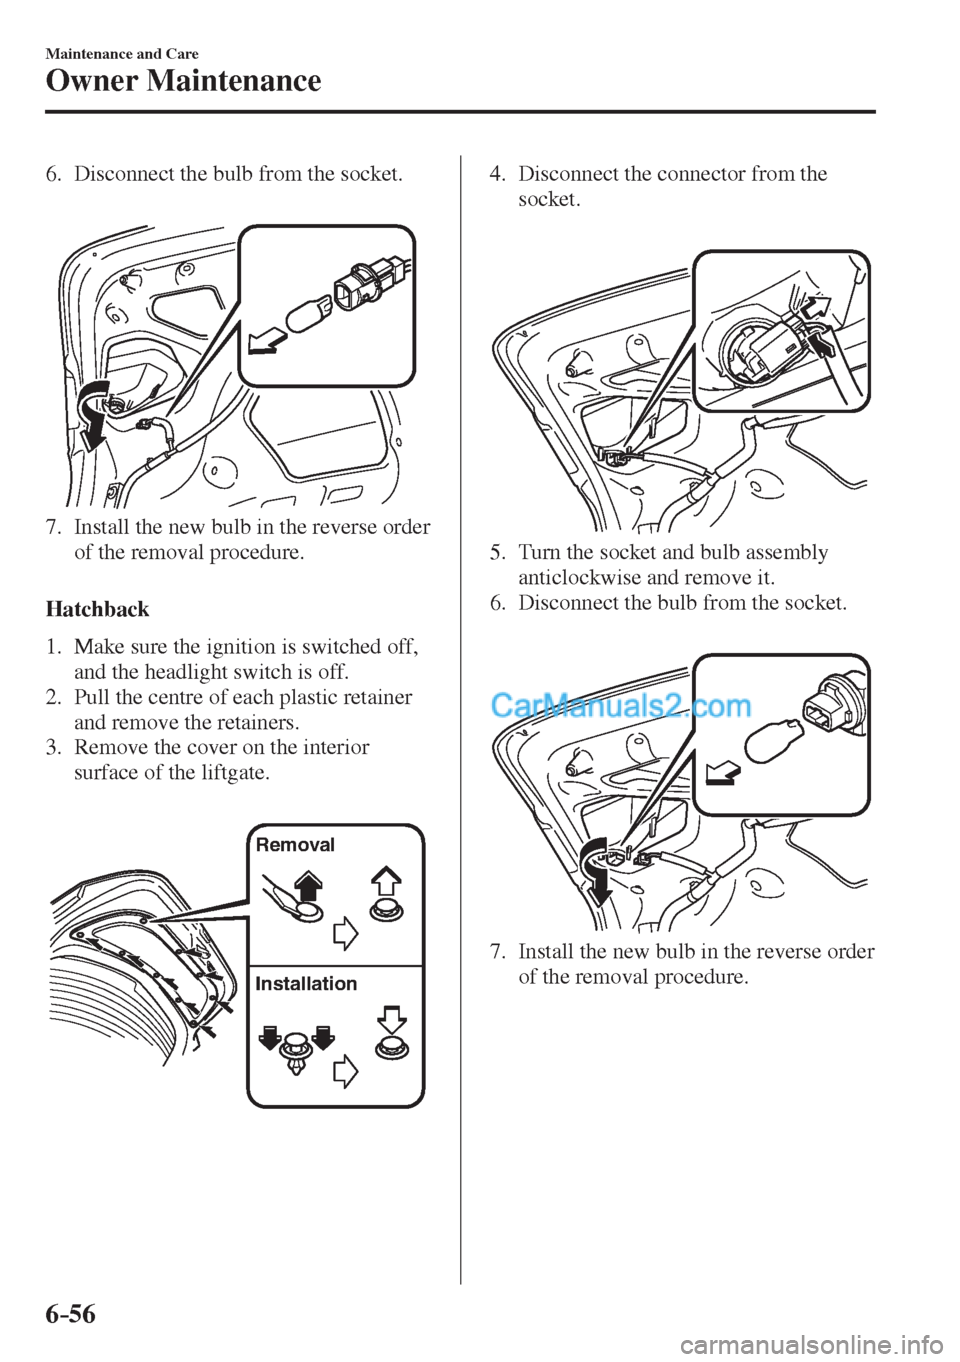
6. Disconnect the bulb from the socket.
7. Install the new bulb in the reverse order
of the removal procedure.
Hatchback
1. Make sure the ignition is switched off,
and the headlight switch is off.
2. Pull the centre of each plastic retainer
and remove the retainers.
3. Remove the cover on the interior
surface of the liftgate.
Removal
Installation
4. Disconnect the connector from the
socket.
5. Turn the socket and bulb assembly
anticlockwise and remove it.
6. Disconnect the bulb from the socket.
7. Install the new bulb in the reverse order
of the removal procedure.
Page 575 of 711
6–57
Maintenance and Care
Owner Maintenance
*Some models.
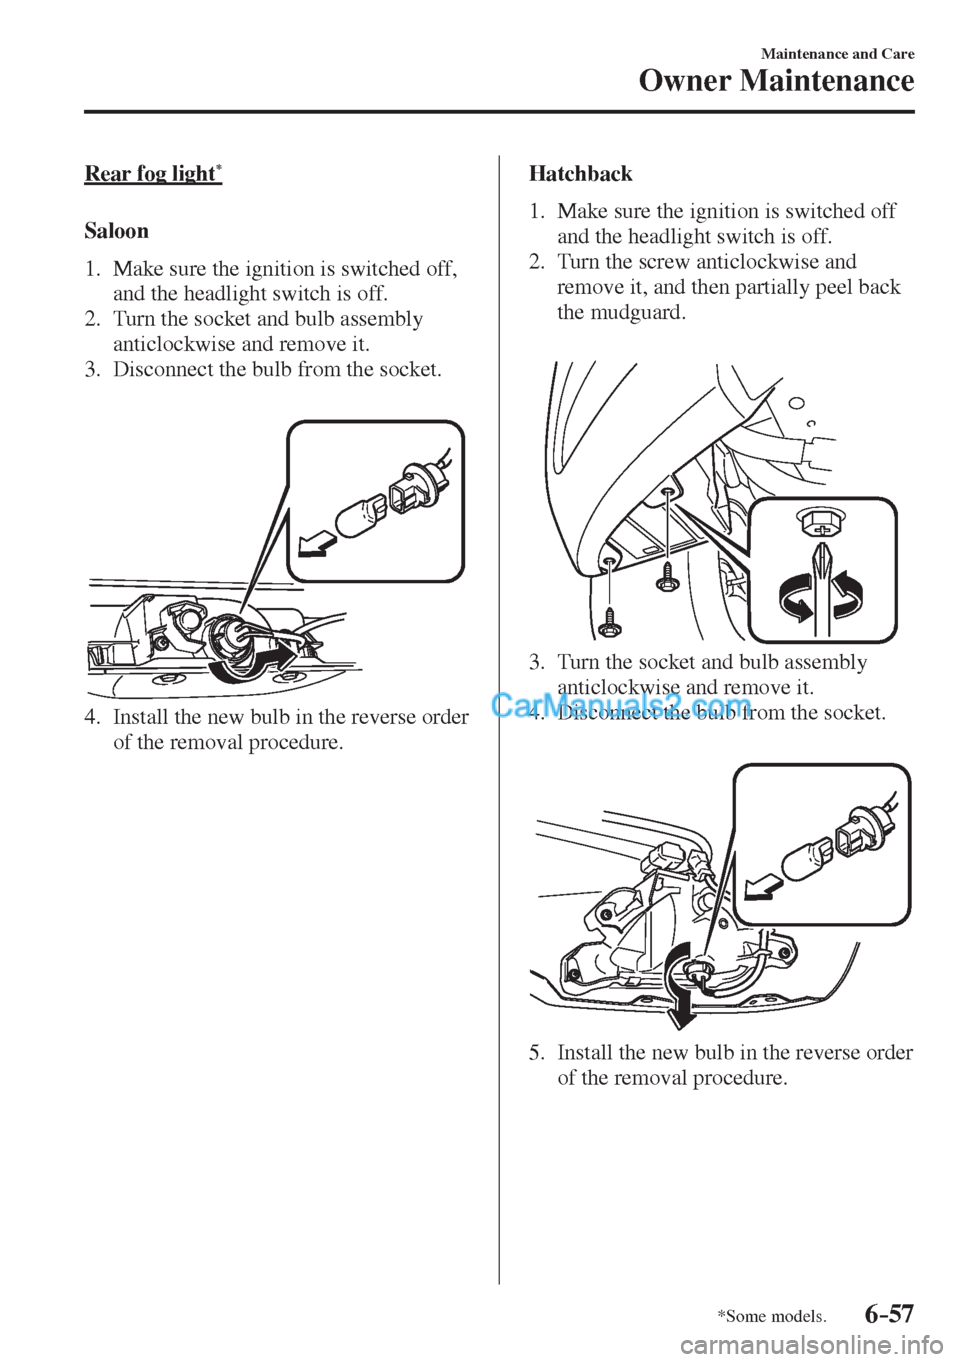
Rear fog light *
S a l o o n
1. Make sure the ignition is switched off,
and the headlight switch is off.
2. Turn the socket and bulb assembly
anticlockwise and remove it.
3. Disconnect the bulb from the socket.
4. Install the new bulb in the reverse order
of the removal procedure.
Hatchback
1. Make sure the ignition is switched off
and the headlight switch is off.
2. Turn the screw anticlockwise and
remove it, and then partially peel back
the mudguard.
3. Turn the socket and bulb assembly
anticlockwise and remove it.
4. Disconnect the bulb from the socket.
5. Install the new bulb in the reverse order
of the removal procedure.
Page 576 of 711
6–58
Maintenance and Care
Owner Maintenance
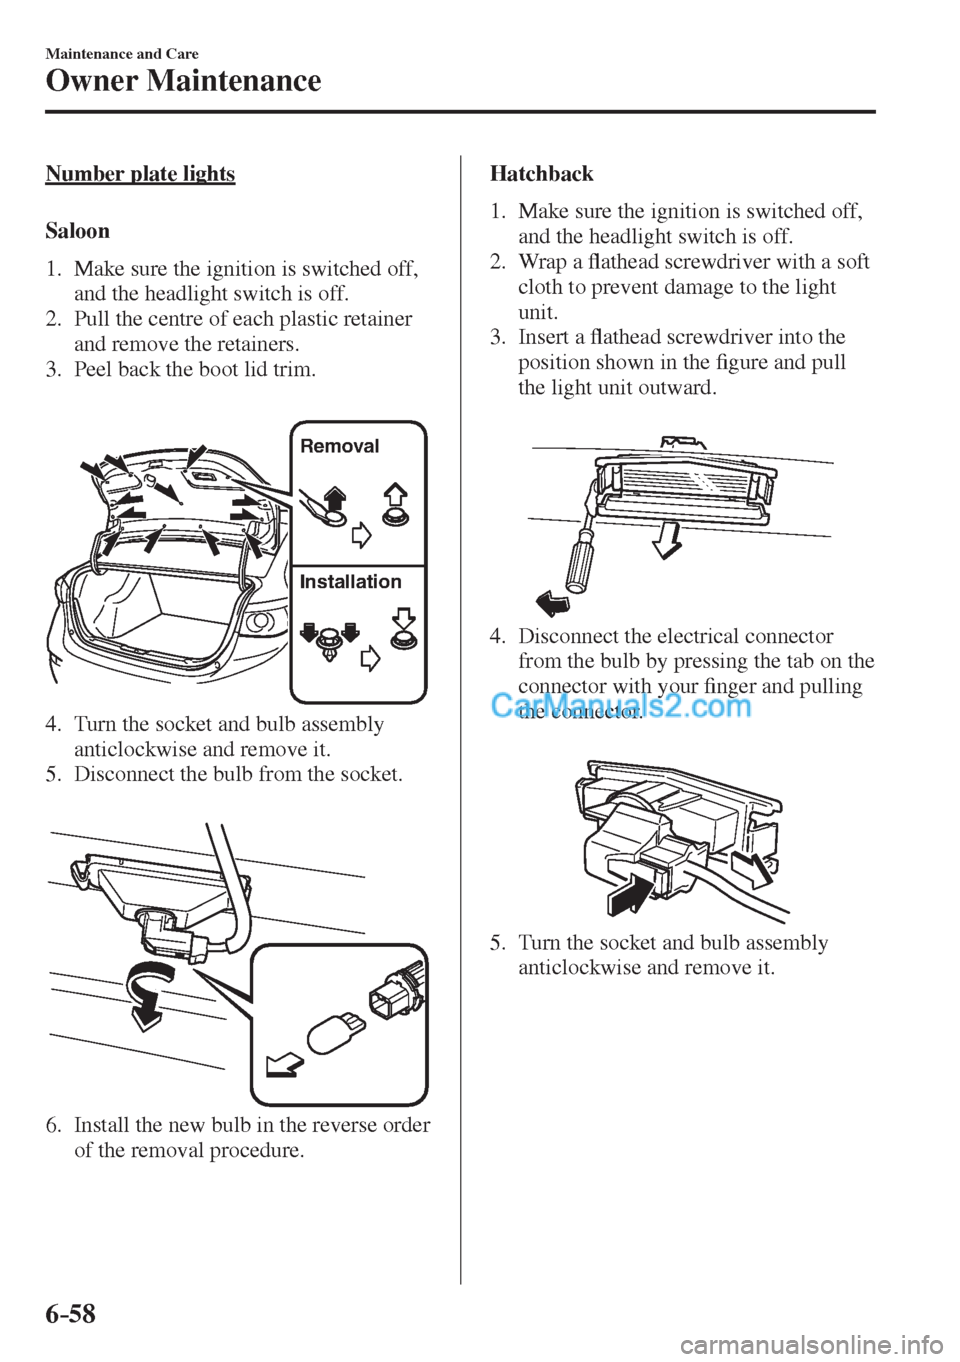
Number plate lights
S a l o o n
1. Make sure the ignition is switched off,
and the headlight switch is off.
2. Pull the centre of each plastic retainer
and remove the retainers.
3. Peel back the boot lid trim.
Removal
Installation
4. Turn the socket and bulb assembly
anticlockwise and remove it.
5. Disconnect the bulb from the socket.
6. Install the new bulb in the reverse order
of the removal procedure.
Hatchback
1. Make sure the ignition is switched off,
and the headlight switch is off.
2. Wrap a �À athead screwdriver with a soft
cloth to prevent damage to the light
unit.
3. Insert a �À athead screwdriver into the
position shown in the �¿ gure and pull
the light unit outward.
4. Disconnect the electrical connector
from the bulb by pressing the tab on the
connector with your �¿ nger and pulling
the connector.
5. Turn the socket and bulb assembly
anticlockwise and remove it.
Page 600 of 711

7–6
If Trouble Arises
Flat Tyre
*Some models.
Jack *
To remove the jack
(With spare tyre)
Saloon
1. Lift the boot mat.
2. Remove the boot board.
3. Turn the wing bolt and jack screw
anticlockwise.
Wing boltJack screw
Hatchback
1. Remove the cover.
Tabs
2. Turn the wing bolt and jack screw
anticlockwise.
Page 601 of 711

7–7
If Trouble Arises
Flat Tyre
(Without spare tyre)
1. Lift the luggage compartment mat.
2. Remove the jack.
To secure the jack
(With spare tyre)
1. Insert the wing bolt into the jack with
the jack screw pointing to the right
(Saloon) or down (Hatchback) and turn
the wing bolt clockwise to temporarily
tighten it. 2. Turn the jack screw in the direction
shown in the �¿ gure.
Saloon
Wing boltJack screw
Hatchback
3. Turn the wing bolt completely to secure
the jack.
NOTE
If the jack is not completely secured, it
could rattle while driving. Make sure the
jack screw is suf�¿ ciently tightened.
Page 603 of 711

7–9
If Trouble Arises
Flat Tyre
*Some models.
To remove the spare tyre
1. Lift the boot/luggage compartment mat.
2. Turn the spare tyre hold-down bolt
anticlockwise.
Spare tyre hold-down bolt
To secure the spare tyre
Store the spare tyre in the reverse order
of removal. After storing, verify that the
spare tyre is stored securely.
Emergency Flat Tyre
Repair Kit
*
The emergency �À at tyre repair kit included
with your Mazda is for a temporary repair
of a slightly damaged �À at tyre resulting
from running over nails or similar sharp
objects on the road surface.
Perform the emergency �À at tyre repair
without removing the nail or similar sharp
object which punctured the tyre.
NOTE
Your vehicle is not equipped with a
spare tyre. In the event of a �À at tyre,
use the emergency �À at tyre repair kit
to repair the tyre temporarily. When
doing the repair, refer to the instructions
included in the emergency �À at tyre
repair kit. If an emergency repair was
performed on a �À at tyre using the
emergency �À at tyre repair kit, have
an expert repairer, we recommend an
Authorised Mazda Repairer, repair or
replace the tyre as soon as possible.
Page 606 of 711
7–12
If Trouble Arises
Flat Tyre
CAUTION
If there is air remaining in the tyre when
the valve core is removed, the valve core
could �À y out. Remove the valve core
carefully.
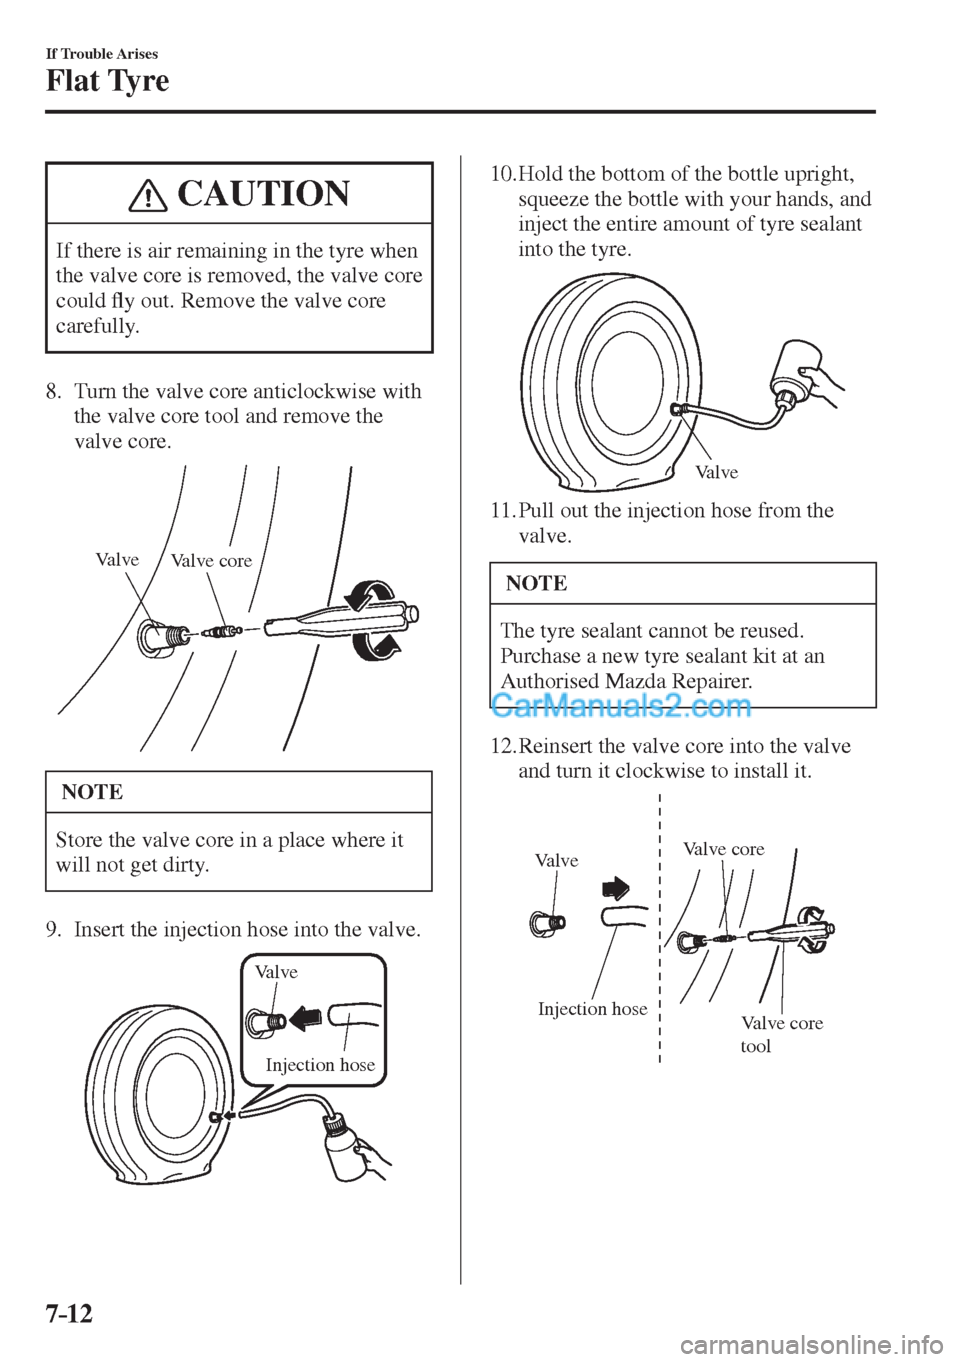
8. Turn the valve core anticlockwise with
the valve core tool and remove the
valve core.
Valve
Valve core
NOTE
Store the valve core in a place where it
will not get dirty.
9. Insert the injection hose into the valve.
Valve
Injection hose
10. Hold the bottom of the bottle upright,
squeeze the bottle with your hands, and
inject the entire amount of tyre sealant
into the tyre.
Valve
11. Pull out the injection hose from the
valve.
NOTE
The tyre sealant cannot be reused.
Purchase a new tyre sealant kit at an
Authorised Mazda Repairer.
12. Reinsert the valve core into the valve
and turn it clockwise to install it.
Injection hose
Valve core
tool Valve
Valve core
Page 612 of 711

7–18
If Trouble Arises
Flat Tyre
CAUTION
Align the notch on the wheel cover with
the valve stem when installing it.
Tyre valve Notch
Damage could occur during installation
if the wheel cover is not properly
aligned.
2. Loosen the wheel nuts by turning them
anticlockwise one turn each, but do not
remove any wheel nuts until the tyre
has been raised off the ground.
3. Place the jack on the ground. 4. Turn the jack screw in the direction
shown in the �¿ gure and adjust the jack
head so that it is close to the jack-up
position.
Jack head
5. Place the jack under the jack-up
position closest to the tyre being
changed with the jack head squarely
under the jack-up point.
Jacking position
Page 614 of 711

7–20
If Trouble Arises
Flat Tyre
7. Insert the jack lever and attach the
wheel brace to tyre jack.
8. Turn the jack handle clockwise and
raise the vehicle high enough so that
the spare tyre can be installed. Before
removing the wheel nuts, make sure
your Mazda is �¿ rmly in position and
that it cannot slip or move.
WARNING
Do not jack up the vehicle higher than
is necessary:
Jacking up the vehicle higher than
is necessary is dangerous as it could
destabilize the vehicle resulting in an
accident.
Do not start the engine or shake the
vehicle while it is jacked up:
Starting the engine or shaking
the vehicle while it is jacked up is
dangerous as it could cause the vehicle
to fall off the jack resulting in an
accident.
Never go under the vehicle while it is
jacked up:
Going under the vehicle while it is
jacked up is dangerous as it could
result in death or serious injury if the
vehicle were to fall off the jack.
9. Remove the wheel nuts by turning
them anticlockwise; then remove the
wheel and centre cap.