four MAZDA MODEL 3 4-DOOR 2016 Owners Manual
[x] Cancel search | Manufacturer: MAZDA, Model Year: 2016, Model line: MODEL 3 4-DOOR, Model: MAZDA MODEL 3 4-DOOR 2016Pages: 598, PDF Size: 30.13 MB
Page 93 of 598

3–17
Before Driving
Doors and Locks
NOTE
Function number 3 in the following
table is the factory setting for your
vehicle.
There are only a total of five auto lock/
unlock settings available for automatic
transaxle vehicles, and three for manual
transaxle vehicles. Be sure to press the
unlock side of the driver's door-lock
switch the correct number of times
according to the selected function
number. If the switch is mistakenly
pressed six times on an automatic
transaxle vehicle or four times on a
manual transaxle, the procedure will
be cancelled. If this occurs, start the
procedure from the beginning.
Function number Function*1
1The auto door-lock function is
disabled.
2 All the doors and the liftgate lock
automatically when the vehicle speed
is about 20 km/h (12 mph) or more.
3 (Factory Setting) All the doors and the liftgate lock
automatically when the vehicle speed
is about 20 km/h (12 mph) or more.
All the doors and the liftgate unlock
when the ignition is switched from
ON to Off.
4 (Automatic transaxle vehicles only)
When the ignition is switched ON
and the shift lever is shifted from
park (P) to any other gear position,
all the doors and the liftgate lock
automatically.
Function
number Function*1
5(Automatic transaxle vehicles only)
When the ignition is switched ON
and the shift lever is shifted from
park (P) to any other gear position,
all the doors and the liftgate lock
automatically.
When the shift lever is shifted to park
(P) while the ignition is switched ON,
all the doors and the liftgate unlock
automatically.
*1 Other settings for the auto door lock function are available at an Authorized Mazda Dealer. For
details consult an Authorized Mazda Dealer. Refer
to Personalization Features on page
9-12.
Settings can be changed using the
following procedure.
1. Safely park the vehicle. All doors must
remain closed.
2. Switch the ignition ON.
3. Press and hold the lock side of the
driver's door-lock switch within 20
seconds of switching the ignition ON,
and make sure a beep sound is heard
about eight seconds afterwards.
4. Refer to the auto lock/unlock function
setting table, determine the function
number for the desired setting. Press
the unlock side of the driver's door-lock
switch the same number of times as the
selected function number (Ex. If you
select function 2, press the unlock side
of the switch only 2 times).
5. Three seconds after the function setting
has been changed, a beep sound will
beep in the amount of the selected
function number. (Ex. Function number
3 = 3 beep sounds)
Mazda3_8FA4-EA-15G_Edition3.indb 172015/12/04 19:22:12
Page 106 of 598
3–30
Before Driving
Fuel and Emission
Fuel-Filler Cap
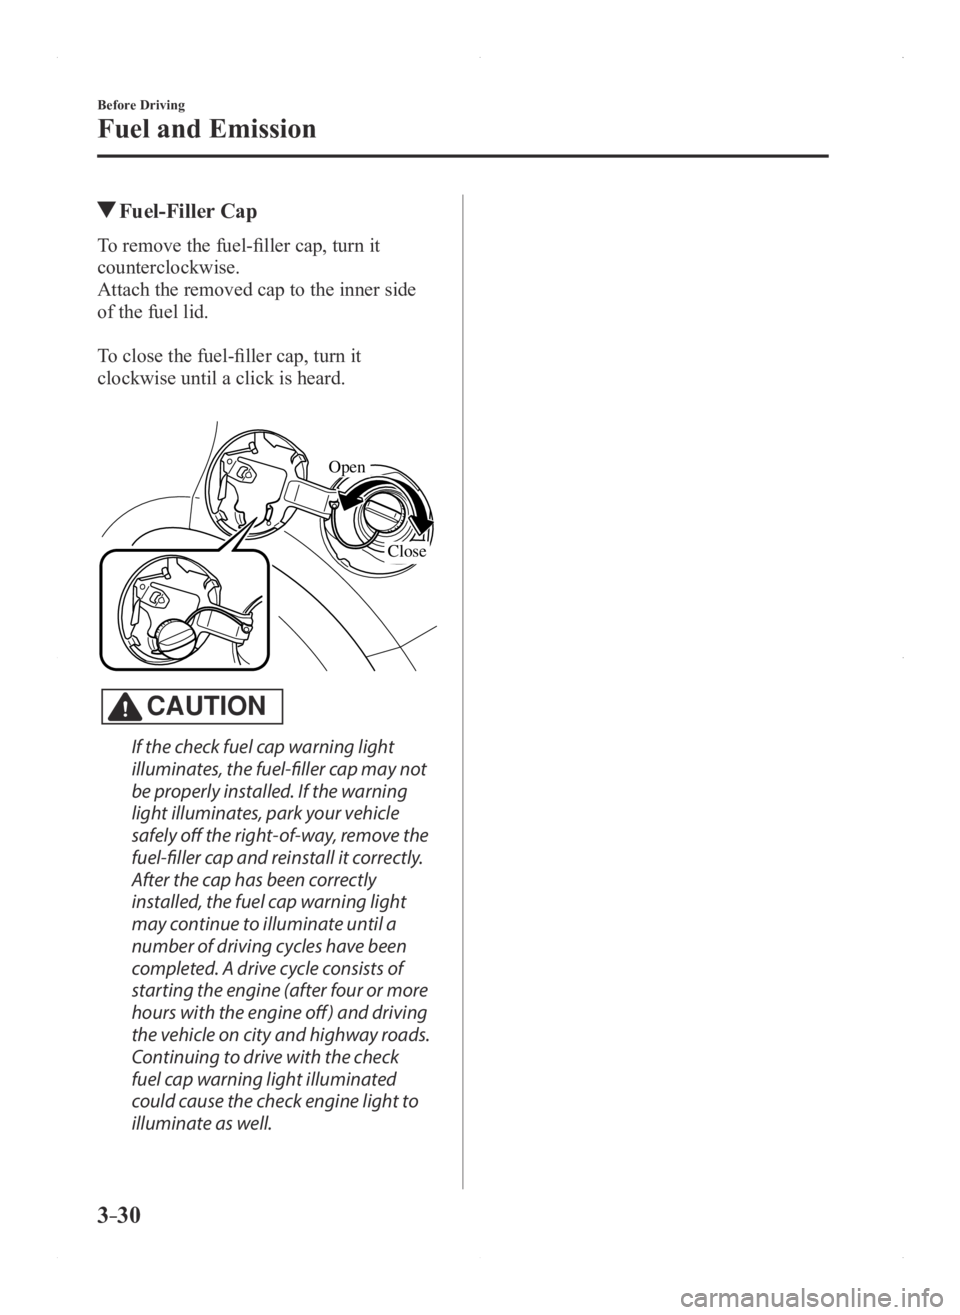
To remove the fuel-filler cap, turn it
counterclockwise.
Attach the removed cap to the inner side
of the fuel lid.
To close the fuel-filler cap, turn it
clockwise until a click is heard.
Open
Close
CAUTION
If the check fuel cap warning light
illuminates, the fuel-filler cap may not
be properly installed. If the warning
light illuminates, park your vehicle
safely off the right-of-way, remove the
fuel-filler cap and reinstall it correctly.
After the cap has been correctly
installed, the fuel cap warning light
may continue to illuminate until a
number of driving cycles have been
completed. A drive cycle consists of
starting the engine (after four or more
hours with the engine off ) and driving
the vehicle on city and highway roads.
Continuing to drive with the check
fuel cap warning light illuminated
could cause the check engine light to
illuminate as well.
Mazda3_8FA4-EA-15G_Edition1.indb 302015/05/11 14:00:25
Page 123 of 598
3–47
Before Driving
Driving Tips
Never use warm or hot water for
removing snow or ice from windows and
mirrors as it could result in the glass
cracking.
Drive slowly. Braking performance
can be adversely affected if snow or
ice adheres to the brake components. If
this situation occurs, drive the vehicle
slowly, releasing the accelerator pedal
and lightly applying the brakes several
times until the brake performance
returns to normal.
Snow Tires
Use snow tires on all four wheels
Do not go faster than 120 km/h (75 mph)
while driving with snow tires. Inflate snow
tires 30 kPa (0.3 kgf/cm
2, 4.3 psi) more
than recommended on the tire pressure
label (driver's door frame), but never
more than the maximum cold-tire pressure
shown on the tires.
Except Mexico
The vehicle is originally equipped with
all season radials designed to be used all
year around. In some extreme climates you
may find it necessary to replace them with
snow tires during the winter months to
further improve traction on snow and ice
covered roads.
Mexico
The vehicle is originally equipped with
summer tires designed for optimum
traction on wet and dry roads. If your
vehicle is to be used on snow and ice
covered roads, Mazda recommends that
you replace the tires originally equipped
on your vehicle with snow tires during the
winter months.
WARNING
Use only the same size and type tires
(snow, radial, or non-radial) on all four
wheels: Using tires different in size or type is
dangerous. Your vehicle's handling
could be greatly affected and result in
an accident.
CAUTION
Check local regulations before using
studded tires.
Tire Chains
Check local regulations before using tire
chains.
CAUTION
Chains may a ffect handling. Do not go faster than 50 km/h (30
mph) or the chain manufacturer's
recommended limit, whichever is lower.
Drive carefully and avoid bumps, holes,
and sharp turns. Avoid locked-wheel braking. Do not use chains on a temporary spare
tire; it may result in damage to the
vehicle and to the tire.
Do not use chains on roads that are free
of snow or ice. The tires and chains could
be damaged.
Chains may scr atch or chip aluminum
wheels.
NOTE
The tire pressure monitoring system may
not function correctly when using tire
chains.
Mazda3_8FA4-EA-15G_Edition1.indb 472015/05/11 14:00:31
Page 192 of 598

4–64
When Driving
ABS/TCS/DSC
Dynamic Stability
Control (DSC)
The Dynamic Stability Control (DSC)
automatically controls braking and engine
torque in conjunction with systems such
as ABS and TCS to help control side slip
when driving on slippery surfaces, or
during sudden or evasive maneuvering,
enhancing vehicle safety.
Refer to ABS (page 4-62) and TCS
(page 4-63).
DSC operation is possible at speeds
greater than 20 km/h (12 mph).
The warning light turns on when the
system has a malfunction.
Refer to Warning Lights on page 4-21.
WARNING
Do not rely on the Dynamic Stability
Control as a substitute for safe driving:
The Dynamic Stability Control (DSC)
cannot compensate for unsafe and
reckless driving, excessive speed,
tailgating (following another vehicle
too closely), and hydroplaning
(reduced tire friction and road contact
because of water on the road surface).
You can still have an accident.
CAUTION
The DSC may not operate correctly
unless the following are observed:
Use tires of the correct size specified
for your Mazda on all four wheels. Use tires of the same manufacturer,
brand and tread pattern on all four
wheels.
Do not mix worn tires.
The DSC may not operate correctly when
tire chains are used or a temporary spare
tire is installed because the tire diameter
changes.
TCS/DSC Indicator Light
This indicator light stays on for a few
seconds when the ignition is switched
ON. If the TCS or DSC is operating, the
indicator light flashes.
If the light stays on, the TCS, DSC
or the brake assist system may have a
malfunction and they may not operate
correctly. Take your vehicle to an
Authorized Mazda Dealer.
Mazda3_8FA4-EA-15G_Edition1.indb 642015/05/11 14:00:56
Page 231 of 598
4–103
When Driving
i-ACTIVSENSE
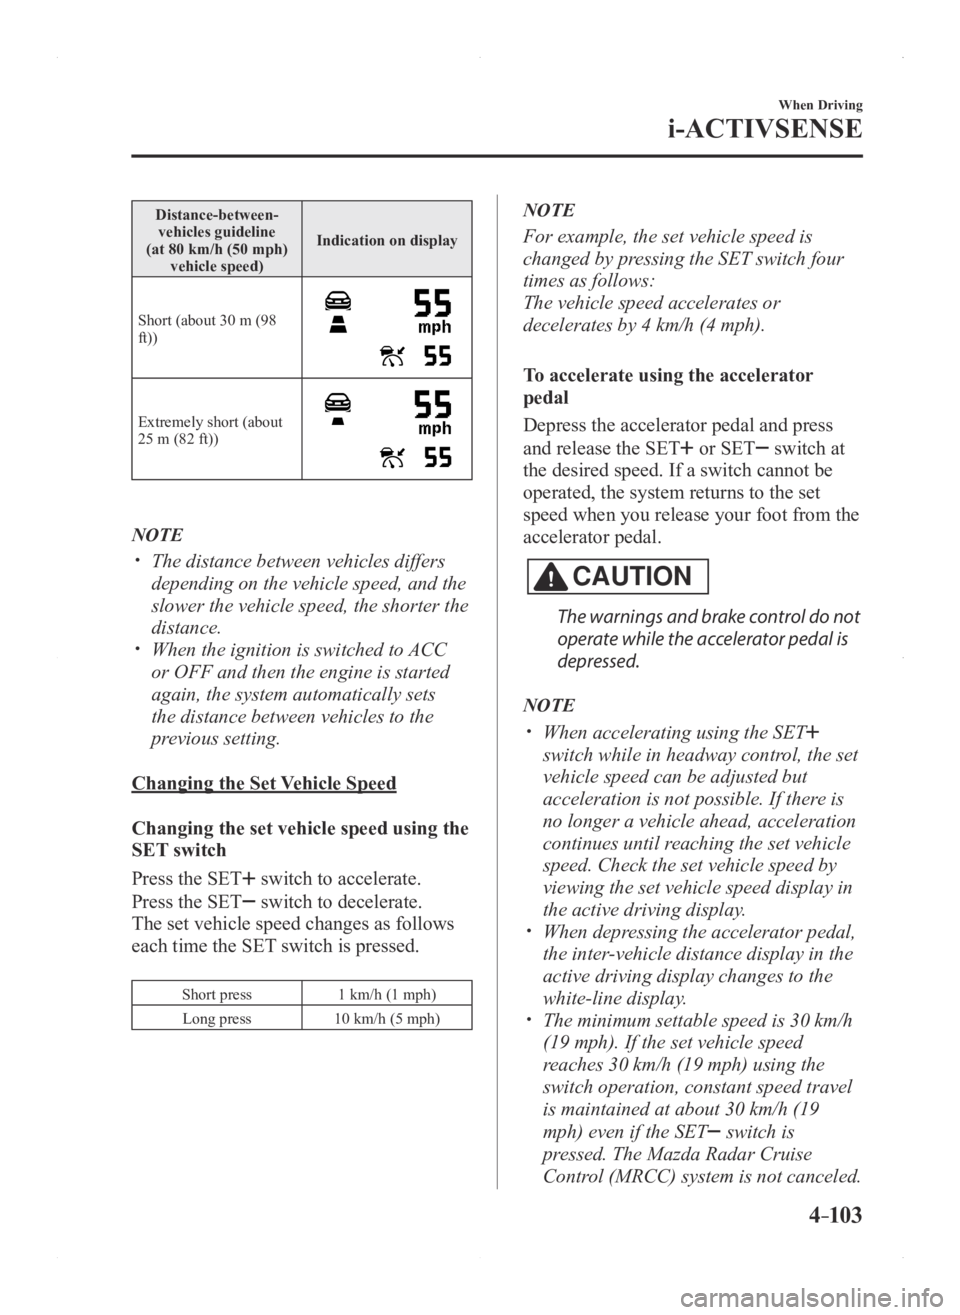
Distance-between-vehicles guideline
(at 80 km/h (50 mph) vehicle speed) Indication on display
Short (about 30 m (98
ft))
Extremely short (about 25 m (82 ft))
NOTE
The distance between vehicles differs
depending on the vehicle speed, and the
slower the vehicle speed, the shorter the
distance.
When the ignition is switched to ACC
or OFF and then the engine is started
again, the system automatically sets
the distance between vehicles to the
previous setting.
Changing the Set Vehicle Speed
Changing the set vehicle speed using the
SET switch
Press the SET
switch to accelerate.
Press the SET
switch to decelerate.
The set vehicle speed changes as follows
each time the SET switch is pressed.
Short press 1 km/h (1 mph)
Long press 10 km/h (5 mph)
NOTE
For example, the set vehicle speed is
changed by pressing the SET switch four
times as follows:
The vehicle speed accelerates or
decelerates by 4 km/h (4 mph).
To accelerate using the accelerator
pedal
Depress the accelerator pedal and press
and release the SET
or SET switch at
the desired speed. If a switch cannot be
operated, the system returns to the set
speed when you release your foot from the
accelerator pedal.
CAUTION
The warnings and brake control do not
operate while the accelerator pedal is
depressed.
NOTE
When accelerating using the SET
switch while in headway control, the set
vehicle speed can be adjusted but
acceleration is not possible. If there is
no longer a vehicle ahead, acceleration
continues until reaching the set vehicle
speed. Check the set vehicle speed by
viewing the set vehicle speed display in
the active driving display.
When depressing the accelerator pedal,
the inter-vehicle distance display in the
active driving display changes to the
white-line display.
The minimum settable speed is 30 km/h
(19 mph). If the set vehicle speed
reaches 30 km/h (19 mph) using the
switch operation, constant speed travel
is maintained at about 30 km/h (19
mph) even if the SET
switch is
pressed. The Mazda Radar Cruise
Control (MRCC) system is not canceled.
Mazda3_8FA4-EA-15G_Edition1.indb 1032015/05/11 14:01:07
Page 243 of 598

4–115
When Driving
i-ACTIVSENSE
NOTE
In the following cases, the radar sensor (front) may not be able to detect vehicles ahead
or obstructions.
The rear surface of a vehicle ahead does not reflect radio waves effectively, such as
an unloaded trailer or an automobile with a loading platform covered by a soft top,
vehicles with a hard plastic tailgate, and round-shaped vehicles.
Vehicles ahead with low vehicle height and thus less area for reflecting radio waves. Visibility is reduced due to a vehicle ahead casting off water, snow, or sand from its
tires and onto your windshield. The trunk/luggage compartment is loaded with heavy objects or the r ear passenger
seats are occupied. Ice, snow, or soiling is on the front surface of the front emblem. During inclement weather such as rain, snow, or sand storms. When driving near facilities or objects emitting str ong radio waves.
In the following cases, the radar sensor (front) may detect vehicles in the opposite lane or
surrounding obstructions, or it may not be able to detect vehicles ahead or \
obstructions.
The beginning and end of a curve. Roads with continuous curves. Narrow lane roads due to road construction or lane closures. The vehicle ahead enters the radar sensor's blind spot. The vehicle ahead is running abnormally due to accident or vehicle damag\
e. Roads with repeated up and down slopes Driving on poor r oads or unpaved roads. The distance between your vehicle and the vehicle ahead is extr emely short. A vehicle suddenly comes close such as by cutting into the lane.
To prevent incorrect operation of the system, use tires of the same specified size,
manufacturer, brand, and tread pattern on all four wheels. In addition, do not use tires
with significantly different wear patterns or tire pressures on the same vehicle. (Including
the temporary spare tire)
If the battery power is weak, the system may not operate correctly. When driving on roads with little traffic and few vehicles ahead or obstructions for the
radar sensor (front) to detect, Forward Obstruction Warning/Smart City Brake Support
(FOW/SCBS) warning light (amber) temporarily illuminates, however, this does not
indicate a problem.
Mazda3_8FA4-EA-15G_Edition1.indb 1152015/05/11 14:01:09
Page 251 of 598
 monitors the air pressure of all\
four tires. If
the ai")
4–123
When Driving
Tire Pressure Monitoring System
*Some models.
Tire Pressure Monitoring System*
The Tire Pressure Monitoring System (TPMS) monitors the air pressure of all\
four tires. If
the air pressure of one or more tires is too low, the system warns the driver by indicating the
tire pressure monitoring system warning light in the instrument cluster \
and operating a beep
sound. The system monitors the tire pressures indirectly using the data sent from the ABS
wheel speed sensors.
To allow the system to operate correctly, the system needs to be initialized with the specified
tire pressure (value on the tire pressure label). Follow the procedure\
and perform the
initialization.
Refer to Tire Pressure Monitoring System Initialization on page 4-126.
The warning light flashes when the system has a malfunction.
Refer to Warning Lights on page 4-21.
ABS wheel speed sensor
Mazda3_8FA4-EA-15G_Edition1.indb 1232015/05/11 14:01:11
Page 254 of 598
4–126
When Driving
Tire Pressure Monitoring System
Tire Pressure Monitoring System
Initialization
In the following cases, system
initialization must be performed so that the
system operates normally.
A tire pressure is adjusted. Tire rotation is performed. A tire or wheel is replaced. The battery is replaced or completely
drained. The tire pressure monitoring system
warning light is illuminated.
Initialization method
1. Park the car in a safe place and firmly
apply the parking brake.
2. Let the tires cool, then adjust the tire
pressure of all four (4) tires to the
specified pressure indicated on the tire
pressure label located on the driver's
door frame (door open).
Refer to Tires on page 9-10.
3. Switch the ignition ON.
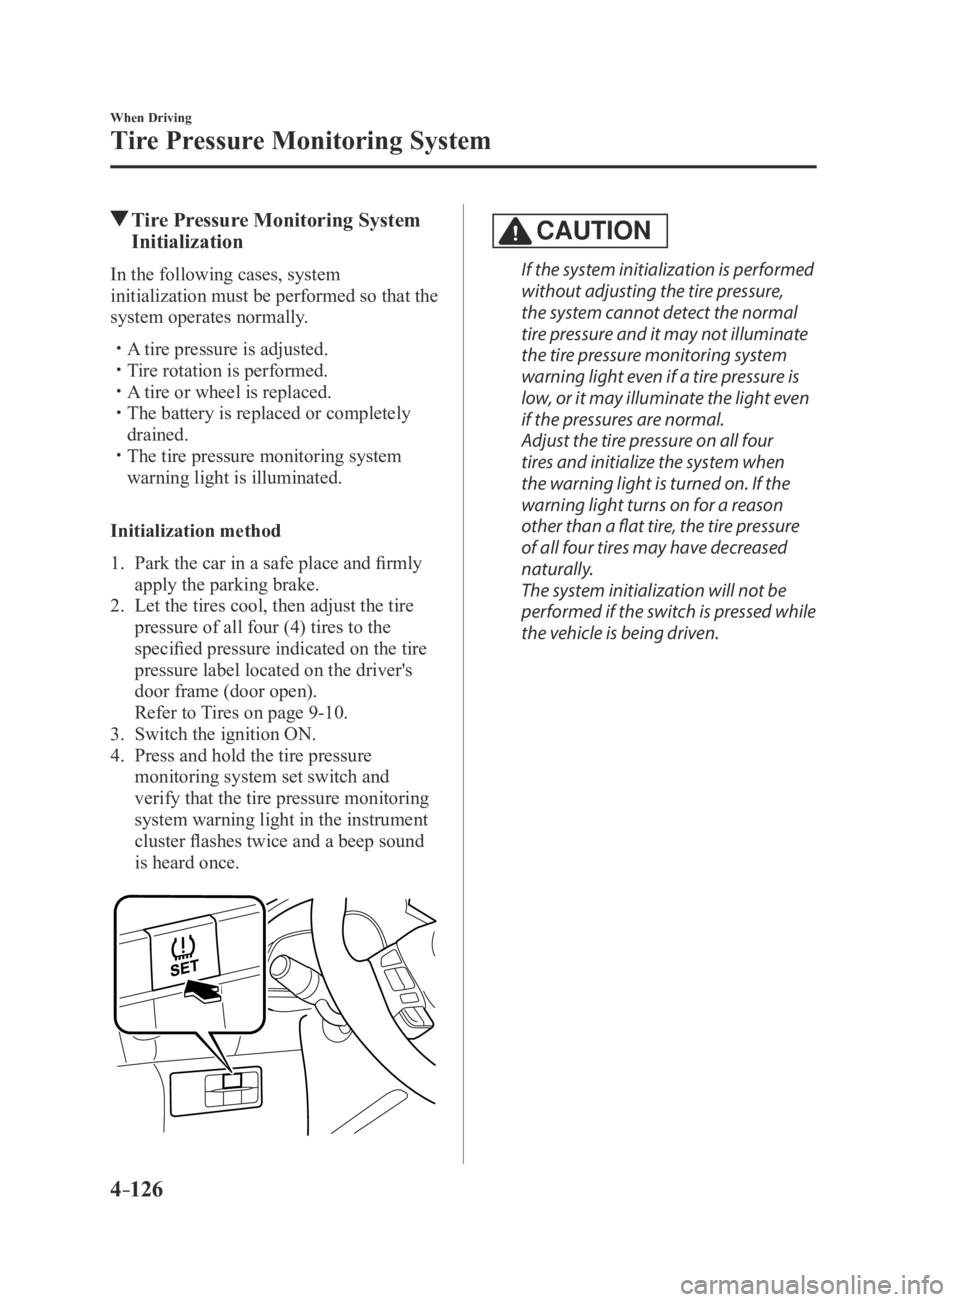
4. Press and hold the tire pressure
monitoring system set switch and
verify that the tire pressure monitoring
system warning light in the instrument
cluster flashes twice and a beep sound
is heard once.
CAUTION
If the system initialization is performed
without adjusting the tire pressure,
the system cannot detect the normal
tire pressure and it may not illuminate
the tire pressure monitoring system
warning light even if a tire pressure is
low, or it may illuminate the light even
if the pressures are normal.
Adjust the tire pressure on all four
tires and initialize the system when
the warning light is turned on. If the
warning light turns on for a reason
other than a flat tire, the tire pressure
of all four tires may have decreased
naturally.
The system initialization will not be
performed if the switch is pressed while
the vehicle is being driven.
Mazda3_8FA4-EA-15G_Edition3.indb 1262015/12/04 19:23:30
Page 262 of 598

4–134
When Driving
Rear View Monitor
Three-dimensional object on vehicle rear
Because the distance guide lines are displayed based on a flat surface, the distance to the
three-dimensional object displayed on the screen is different from the actual distance.
A
A
C B
CB
(Actual distance) B>C=A
Sensed distance on screen A>B>C (Screen display)
(Actual condition)
Picture Quality Adjustment
WARNING
Always adjust the picture quality of the rear view monitor while the vehicle is stopped:
Do not adjust the picture quality of the rear view monitor while driving the vehicle.
Adjusting the picture quality of the rear view monitor such as brightness, contrast, color,
and tint while driving the vehicle is dangerous as it could distract your attention from the
vehicle operation which could lead to an accident.
Picture quality adjustment can be done while the shift lever is in reverse (R).
There are four settings which can be adjusted including, brightness, con\
trast, tint, and color.
When adjusting, pay sufficient attention to the vehicle surroundings.
1. Select the icon on the screen to display the tabs.
2. Select the desired tab item.
3. Adjust the brightness, contrast, tint, and color using the slider .
If you need to reset, press the reset button.
4. Select the icon on the screen to close the tab.
Mazda3_8FA4-EA-15G_Edition1.indb 1342015/05/11 14:01:14
Page 347 of 598

5–85
Interior Features
Bluetooth®
NOTE
If a Bluetooth® device has already been
paired to the vehicle as a hands-free
mobile phone, it does not need to be
paired again when using the device as
a Bluetooth
® audio device. Conversely,
it does not need to be paired again as
a hands-free mobile phone if it has
already been paired as a Bluetooth
®
audio device.
Device registration can also be done
using voice recognition.
Concerning the operation of a Bluetooth
®
audio device itself, refer to its instruction
manual.
Some Bluetooth
® audio devices have PIN
codes (four digits). Refer to the audio
device's instruction manual because the
pairing procedure differs depending on
whether it has a PIN code or not.
Pairing a Bluetooth
® audio device which
has a four-digit PIN code
1. Using the audio control dial, select
the pairing mode “PAIR DEVICE”
in the “BT SETUP” mode. (Refer to
“Bluetooth
® audio device set-up” for
details.)
2. Press the audio control dial to
determine the mode. After “ENTER
PIN” is displayed on the audio display
for three seconds, “PIN 0000” is
displayed and the PIN code can be
input.
3. Input the PIN code of your Bluetooth®
audio device by pressing channel preset
buttons 1 to 4 while “PIN 0000” is
displayed.
Press channel preset button 1 to input
the first digit, 2 for the second, 3 for the
third, and 4 for the forth. For example,
if the PIN code were “4213” press
channel preset button 1 four times (1,
2, 3, 4), button 2 twice (1, 2), button
3 once (1), and button 4 three times
(1, 2, 3). If the “PIN 0000” display
disappears before finishing the PIN
code input, repeat the procedure from
Step 1.
NOTE
Some devices accept only a particular
pairing code (Usually, “0000” or
“1234”).
If pairing cannot be completed, refer to the
owner's manual of your mobile device, and
try those numbers if necessary.
4. Press the audio control dial while
the input PIN code is displayed.
“PAIRING” flashes on the audio
display.
5. Operate the Bluetooth® audio device
and set it to the pairing mode while
“PAIRING” is flashing.
6. When the pairing is completed, and
“PAIR SUCCESS” are displayed after
about 10-30 seconds, after which
“PAIR SUCCESS” continues to be
displayed for three seconds, and then
the unit returns to the normal display.
Mazda3_8FA4-EA-15G_Edition1.indb 852015/05/11 14:01:47