ignition MAZDA MODEL 3 HATCHBACK 2004 Quick Tips (in English)
[x] Cancel search | Manufacturer: MAZDA, Model Year: 2004, Model line: MODEL 3 HATCHBACK, Model: MAZDA MODEL 3 HATCHBACK 2004Pages: 12, PDF Size: 1.26 MB
Page 3 of 12

GETTING STARTED
Always check the Owner’s Manual for more operating information and safety features
Getting Started
MAZDA3 Quick Tips®are
designed to quickly familiarize
you with some important
features of your MAZDA3
The Driver’s View tab is your
index to the Quick Tips
®, locate
the item you would like to
learn more about and then
turn to the listed tab
This Getting Started section
contains important operating
tips about your MAZDA3
Items identified with
this symbol call out
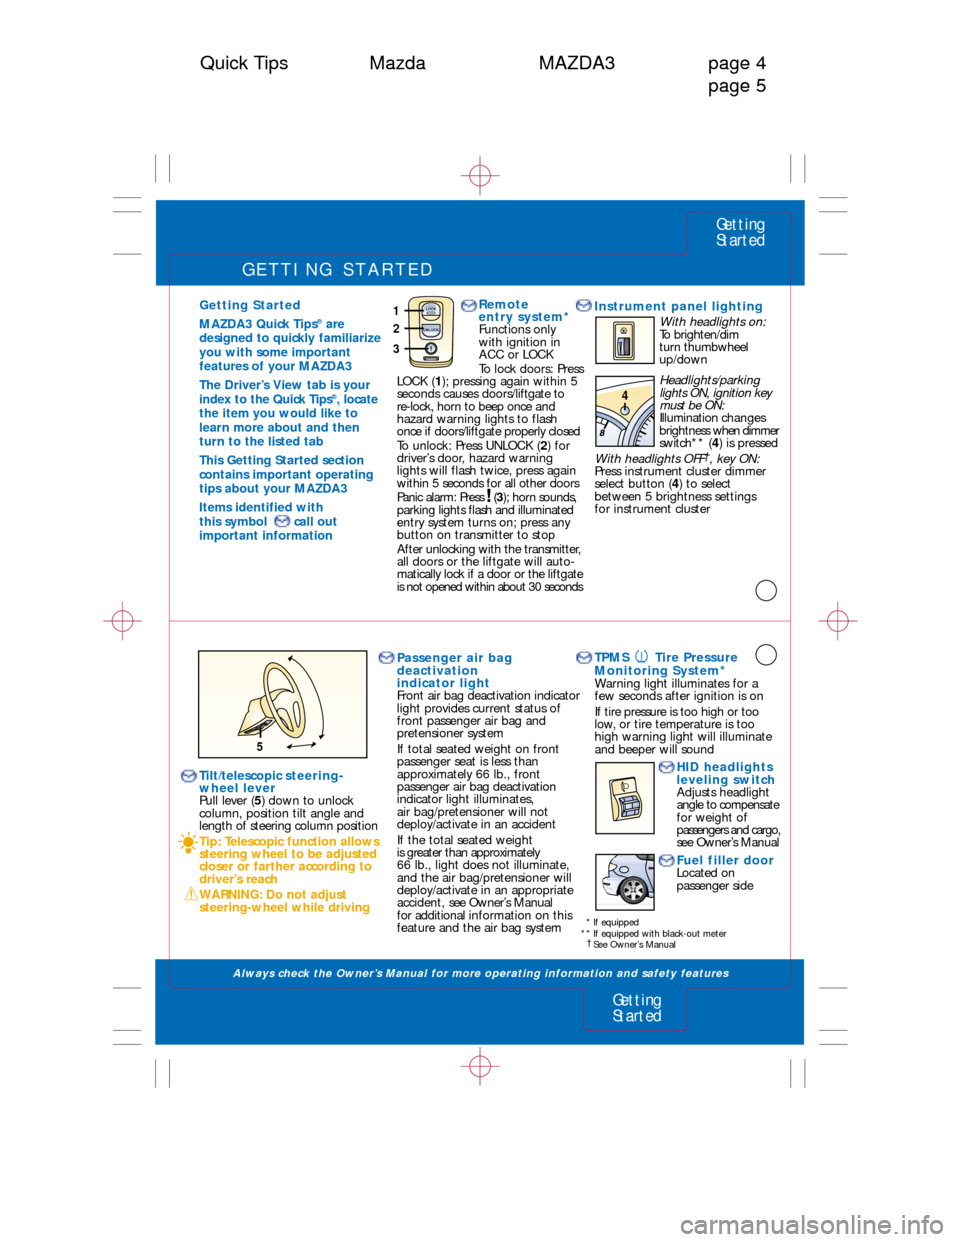
important information Remote
entry system*
Functions only
with ignition in
ACC or LOCK
To lock doors: Press
LOCK ( 1); pressing again within 5
seconds causes doors/ liftgate to
re-lock, horn to beep once and
hazard warning lights to flash
once if doors/liftgate properly closed
To unlock: Press UNLOCK ( 2) for
driver’s door, hazard warning
lights will flash twice, press again
within 5 seconds for all other doors
Panic alarm: Press ( 3); horn sounds,
parking lights flash and illuminated
entry system turns on; press any
button on transmitter to stop
After unlocking with the transmitter,
all doors or the liftgate will auto-
matically lock if a door or the liftgate
is not opened within about 30 seconds Instrument panel lighting
With headlights on:
To brighten/dim
turn thumbwheel
up/down
Headlights/parking
lights ON, ignition key
must be ON:
Illumination changes
brightness when dimmer
switch** ( 4) is pressed
With headlights OFF
†, key ON:
Press instrument cluster dimmer
select button ( 4) to select
between 5 brightness settings
for instrument cluster
Tilt/telescopic steering-
wheel lever
Pull lever ( 5) down to unlock
column, position tilt angle and
length of steering column position
Tip: Telescopic function allows
steering wheel to be adjusted
closer or farther according to
driver’s reach
WARNING: Do not adjust
steering-wheel while driving Passenger air bag
deactivation
indicator light
Front air bag deactivation indicator
light provides current status of
front passenger air bag and
pretensioner system
If total seated weight on front
passenger seat is less than
approximately 66 lb., front
passenger air bag deactivation
indicator
light illuminates,
air bag/pretensioner will not
deploy/activate in an accident
If the total seated weight
is greater than approximately
66 lb., light does not illuminate,
and the air bag/pretensioner will
deploy/activate in an appropriate
accident, see Owner’s Manual
for additional information on this
feature and the air bag system
Getting
Started
Getting
Started
Quick Tips Mazda MAZDA3 page 4 page 5
LOCK
UNLOCK1
2
3
4
5
* If equipped
** If equipped with black-out meter
†See Owner’s Manual
TPMS Tire Pressure
Monitoring System*
Warning light illuminates for a
few seconds after ignition is on
If tire pressure is too high or too
low, or tire temperature is too
high warning light will illuminate
and beeper will sound
HID headlights
leveling switch
Adjusts headlight
angle to compensate
for weight of
passengers and cargo,
see Owner’s Manual
Fuel filler door
Located on
passenger side
Page 6 of 12

LOCKS
Always check the Owner’s Manual for more operating information and safety features
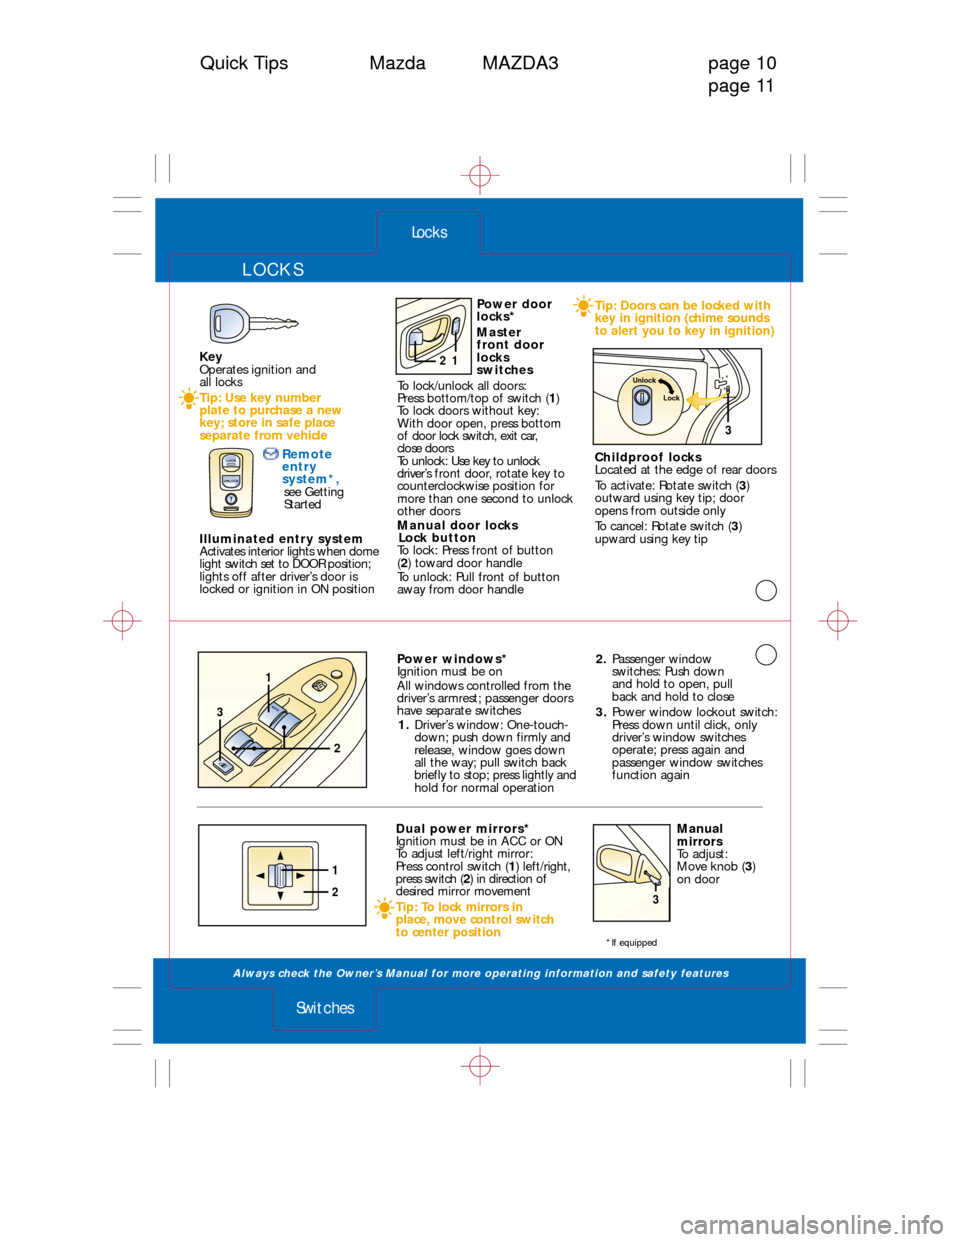
Power windows*
Ignition must be on
All windows controlled from the
driver’s armrest; passenger doors
have separate switches1. Driver’s window: One-touch-
down; push down firmly and
release, window goes down
all the way; pull switch back
briefly to stop; press lightly and
hold for normal operation 2.
Passenger window
switches: Push down
and hold to open, pull
back and hold to close
3. Power window lockout switch:
Press down until click, only
driver’s window switches
operate; press again and
passenger window switches
function again
Locks
Switches
Quick Tips Mazda MAZDA3 page 10 page 11
AUTO
1
3
2
*If equipped
Dual power mirrors*
Ignition must be in ACC or ON
To adjust left/right mirror:
Press control switch (1) left/ right,
press switch ( 2) in direction of
desired mirror movement
Tip: To lock mirrors in
place, move control switch
to center position Manual
mirrors
To adjust:
Move knob (
3)
on door
1
23
Key
Operates ignition and
all locks
Tip: Use key number
plate to purchase a new
key; store in safe place
separate from vehicle
Remote
entry
system*,see Getting
Started
Illuminated entry system
Activates interior lights when dome
light switch set to DOOR position;
lights off after driver’s door is
locked or ignition in ON position Power door
locks*
Master
front door
locks
switches
To lock/unlock all doors:
Press bottom/top of switch ( 1)
To lock doors without key:
With door open, press bottom
of door lock switch, exit car,
close doors
To unlock: Use key to unlock
driver’s front door, rotate key to
counterclockwise position for
more than one second to unlock
other doors
Manual door locks Lock button
To lock: Press front of button
( 2 ) toward door handle
To unlock: Pull front of button
away from door handle Childproof locks
Located at the edge of rear doors
To activate: Rotate switch (
3)
outward using key tip; door
opens from outside only
To cancel: Rotate switch ( 3)
upward using key tip
Tip: Doors can be locked with
key in ignition (chime sounds
to alert you to key in ignition)
Unlock
Lock
3
LOCK
UNLOCK
L O CK
U
N
LO C
K
12
Page 7 of 12

INTERIOR LIGHTS
Always check the Owner’s Manual for more operating information and safety features
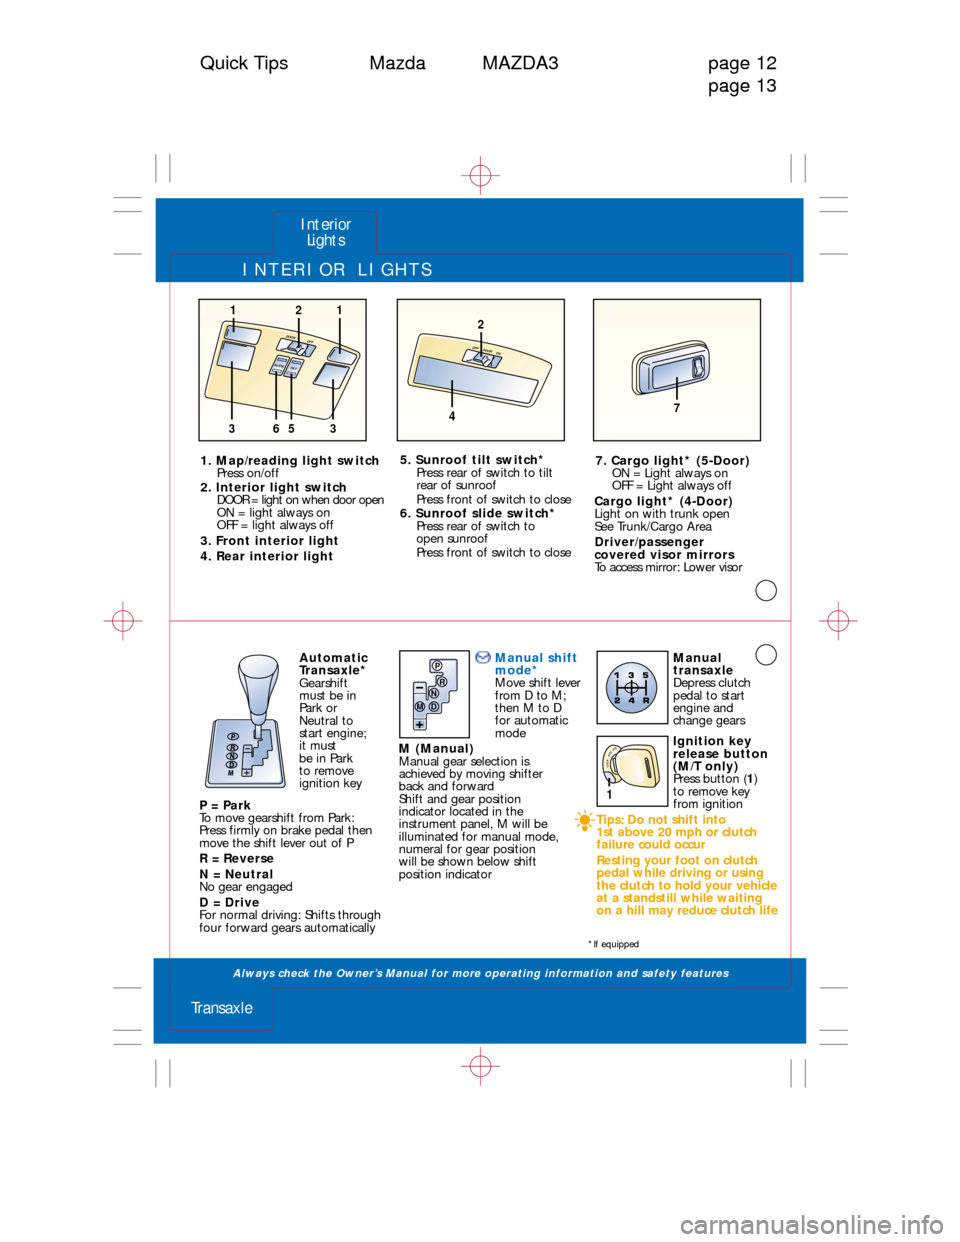
Automatic
Transaxle*
Gearshift
must be in
Park or
Neutral to
start engine;
it must
be in Park
to remove
ignition key
P = Park
To move gearshift from Park:
Press firmly on brake pedal then
move the shift lever out of P
R = Reverse
N = Neutral
No gear engaged
D = Drive
For normal driving: Shifts through
four forward gears automatically
Interior Lights
Transaxle
Quick Tips Mazda MAZDA3 page 12 page 13
*If equipped
1. Map/reading light switchPress on/off
2. Interior light switch DOOR = light on when door open
ON = light always on
OFF = light always off
3. Front interior light
4. Rear interior light 5. Sunroof tilt switch*
Press rear of switch to tilt
rear of sunroof
Press front of switch to close
6. Sunroof slide switch* Press rear of switch to
open sunroof
Press front of switch to close 7. Cargo light* (5-Door)
ON = Light always on
OFF = Light always off
Cargo light* (4-Door)
Light on with trunk open
See Trunk/Cargo Area
Driver/passenger
covered visor mirrors
To access mirror: Lower visor
OFFD OO R
T
IL
TS LID
E
121
3356
ONO FF D
OO R
2
47
Manual shift
mode*
Move shift lever
from D to M;
then M to D
for automatic
mode
M (Manual)
Manual gear selection is
achieved by moving shifter
back and forward
Shift and gear position
indicator located in the
instrument panel, M will be
illuminated for manual mode,
numeral for gear position
will be shown below shift
position indicator Manual
transaxle
Depress clutch
pedal to start
engine and
change gears
Ignition key
release button
(M/T only)
Press button (
1)
to remove key
from ignition
Tips: Do not shift into
1st above 20 mph or clutch
failure could occur
Resting your foot on clutch
pedal while driving or using
the clutch to hold your vehicle
at a standstill while waiting
on a hill may reduce clutch lifeP
R
N
D
M
LOCKACCON
1
Page 10 of 12

RADIO/COMPACT DISC
Always check the Owner’s Manual for more operating information and safety features
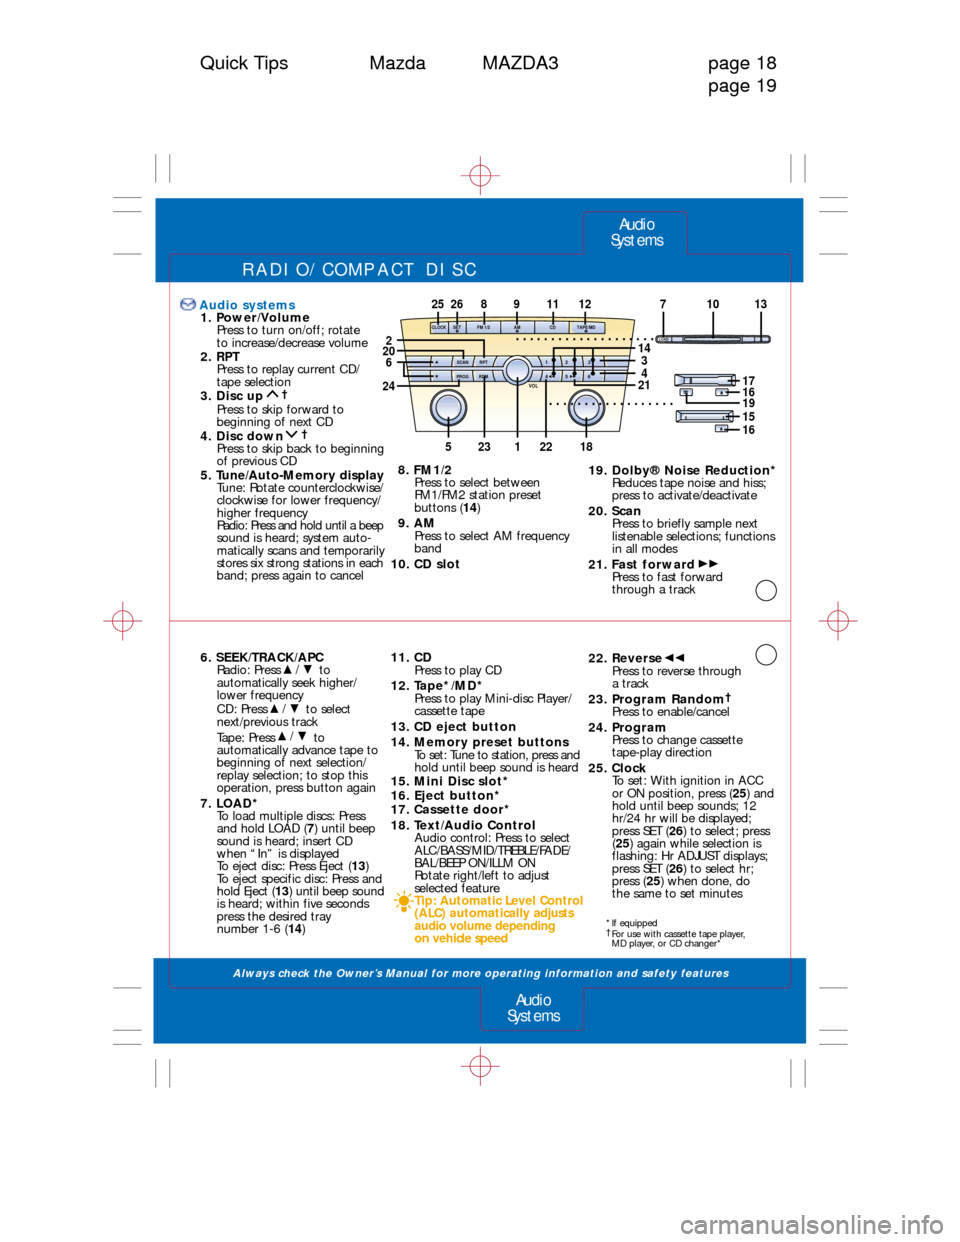
6. SEEK/TRACK/APCRadio: Press to
automatically seek higher/
lower frequency
CD: Press to select
next/previous track
Tape: Press to
automatically advance tape to
beginning of next selection/
replay selection; to stop this
operation, press button again
7. LOAD* To load multiple discs: Press
and hold LOAD ( 7) until beep
sound is heard; insert CD
when “In” is displayed
To eject disc: Press Eject ( 13)
To eject specific disc: Press and
hold Eject ( 13) until beep sound
is heard; within five seconds
press the desired tray
number 1-6 ( 14)
/
/
/
Audio systems
1. Power/Volume Press to turn on/off; rotate
to increase/decrease volume
2. RPT Press to replay current CD/
tape selection
3. Disc up
†
Press to skip forward to
beginning of next CD
4. Disc down
†Press to skip back to beginning
of previous CD
5. Tune/Auto-Memory display Tune: Rotate counterclockwise/
clockwise for lower frequency/
higher frequency
Radio: Press and hold until a beep
sound is heard; system auto-
matically scans and temporarily
stores six strong stations in each
band; press again to cancel
11. CD Press to play CD
12. Tape*/MD* Press to play Mini-disc Player/
cassette tape
13. CD eject button
14. Memory preset buttons To set: Tune to station, press and
hold until beep sound is heard
15. Mini Disc slot*
16. Eject button*
17. Cassette door*
18. Text/Audio Control Audio control: Press to select
ALC/BASS/MID/TREBLE/FADE/
BAL/BEEP ON/ILLM ON
Rotate right/left to adjust
selected feature
Tip: Automatic Level Control
(ALC) automatically adjusts
audio volume depending
on vehicle speed
8. FM1/2
Press to select between
FM1/FM2 station preset
buttons ( 14)
9. AM Press to select AM frequency
band
10. CD slot
22. ReversePress to reverse through
a track
23. Program Random
†Press to enable/cancel
24. Program Press to change cassette
tape-play direction
25. Clock To set: With ignition in ACC
or ON position, press ( 25) and
hold until beep sounds; 12
hr/24 hr will be displayed;
press SET ( 26) to select; press
( 25 ) again while selection is
flashing: Hr ADJUST displays;
press SET ( 26) to select hr;
press ( 25) when done, do
the same to set minutes
19. Dolby® Noise Reduction* Reduces tape noise and hiss;
press to activate/deactivate
20. Scan Press to briefly sample next
listenable selections; functions
in all modes
21. Fast forward Press to fast forward
through a track
Audio
Systems
Audio
Systems
Quick Tips Mazda MAZDA3 page 18
page 19
*If equipped†For use with cassette tape player,
MD player, or CD changer*
LOADCLOCK
SCAN
PROG RPT
RDM
1
4 2
5 3
6
VOL
FM 1/2SETAM CDTAPE/MD
51232218
252689117101312
206
2
24 34211619
1615
17
14 . . . . . . . . . . . . . . . . . . . .
. . . . . . . . . . . . . . . . . .