trunk MAZDA MODEL 3 HATCHBACK 2005 (in English) User Guide
[x] Cancel search | Manufacturer: MAZDA, Model Year: 2005, Model line: MODEL 3 HATCHBACK, Model: MAZDA MODEL 3 HATCHBACK 2005Pages: 322, PDF Size: 4.7 MB
Page 205 of 322

Black plate (205,1)
qCenter Console
To open, pull the lower release catch.
Small items can be placed in the tray of
the center console lid.
To open it, pull the upper release catch.
qCargo Securing Loops (5 Door)
WARNING
Not Securing Luggage and Cargo:
Not securing cargo while driving is
dangerous as it could move or be
crushed during sudden braking or a
collision and cause injury. Make sure
luggage and cargo is secured before
driving.Use the loops in the luggage compartment
to secure cargo with a rope or net. The
tensile strength of the loops is 196 N (20
kgf, 44 lbf). Do not apply excessive force
to the loops as it will damage them.
NOTE
To secure cargo with a rope or net, the
trunk board loops can be used in the
same way as the cargo securing loops
(page 6-44).
qCargo Sub-Compartment (5
Door)
With flexible floor board
To use the cargo sub-compartment,
partially open or remove the trunk boards.
Trunk board
Cargo sub-
compartment
Interior Comfort
Interior Equipment
6-43
Mazda3_8T97-EC-04J_Edition1 Page205
Saturday, September 25 2004 2:14 PM
Form No.8T97-EC-04J
Page 206 of 322

Black plate (206,1)
Without flexible floor board
To use the cargo sub-compartment,
remove or lift the trunk board.
Trunk board
Cargo sub-
compartment
qFlexible Floor Board (5 Door)í
The luggage compartment can be
separated vertically and/or horizontally,
using the trunk board and the trunk board
loops.
CAUTION
Make sure the trunk board is firmly
secured when it is fitted into the trunk
board loops. If it is not firmly secured,
it could unexpectedly disengage
causing damage to the trunk board
loops or the trunk board.
NOTE
The trunk board loops can be used in
the same way as the cargo securing
loops. The tensile strength of the loops
is 147 N (15 kgf, 33 lbf). Do not apply
excessive force to the trunk board loops
as it will damage them (page 6-43).
Compartment
divider loops
Rear trunk board
Front trunk board
To separate vertically
Use the rear trunk board to separate the
luggage compartment vertically.
1. Pull the trunk board loops out.
Compartment
divider loop
6-44
Interior Comfort
íSome models.
Interior Equipment
Mazda3_8T97-EC-04J_Edition1 Page206
Saturday, September 25 2004 2:14 PM
Form No.8T97-EC-04J
Page 207 of 322

Black plate (207,1)
2. Insert the trunk board loops into the
trunk board slits.
Front
Trunk
board
NOTE
To facilitate insertion of the trunk board
loops into the trunk board slits, first
insert the bottom of the rear trunk board
into the groove of the luggage sub-
compartment.
GrooveCargo sub-
compartment
3. Rock the trunk board to make sure the
board is installed securely.
To separate horizontally
Use the front trunk board to separate the
luggage compartment horizontally.
CAUTION
lDo not place heavy objects on the
trunk board or apply excessive force
as they could damage the trunk
board. The permissible weight is
about 5 kg (11 lb).
lDo not use the rear trunk board to
separate the luggage compartment
horizontally. The rear trunk board
cannot be locked to the trunk board
loops and it could move and cause
injury while the vehicle is moving.
1. Pull the trunk board loops out.
Compartment
divider loop
2. Insert the trunk board loop into slit A.
Slit A
Interior Comfort
Interior Equipment
6-45
Mazda3_8T97-EC-04J_Edition1 Page207
Saturday, September 25 2004 2:14 PM
Form No.8T97-EC-04J
Page 208 of 322

Black plate (208,1)
3. Insert the other trunk board loop into
slit B until a click sound is heard.
Slit B
4. Rock the trunk board to make sure the
board is installed securely.
CAUTION
Do not place or remove luggage via the
rear passenger seat area while the
vehicle is moving. The trunk board or
luggage could move and cause injury.
6-46
Interior Comfort
Interior Equipment
Mazda3_8T97-EC-04J_Edition1 Page208
Saturday, September 25 2004 2:14 PM
Form No.8T97-EC-04J
Page 213 of 322

Black plate (213,1)
NOTE
(With Tire Pressure Monitoring
System)
A tire pressure sensor is not installed to
the temporary spare tire. The warning
light will flash continuously while the
temporary spare tire is being used (page
5-22).
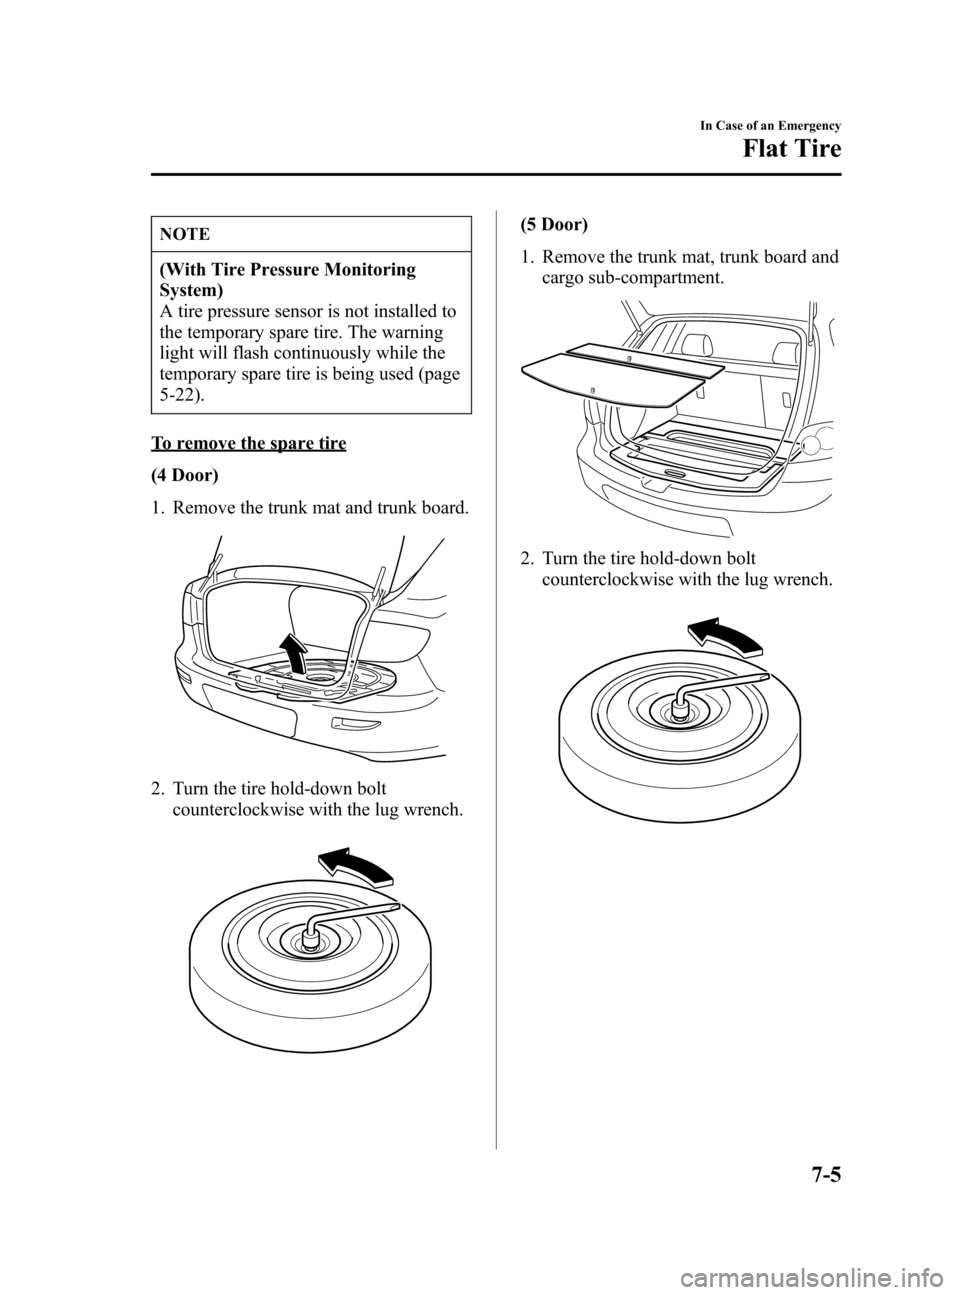
To remove the spare tire
(4 Door)
1. Remove the trunk mat and trunk board.
2. Turn the tire hold-down bolt
counterclockwise with the lug wrench.
(5 Door)
1. Remove the trunk mat, trunk board and
cargo sub-compartment.
2. Turn the tire hold-down bolt
counterclockwise with the lug wrench.
In Case of an Emergency
Flat Tire
7-5
Mazda3_8T97-EC-04J_Edition1 Page213
Saturday, September 25 2004 2:15 PM
Form No.8T97-EC-04J
Page 228 of 322

Black plate (228,1)
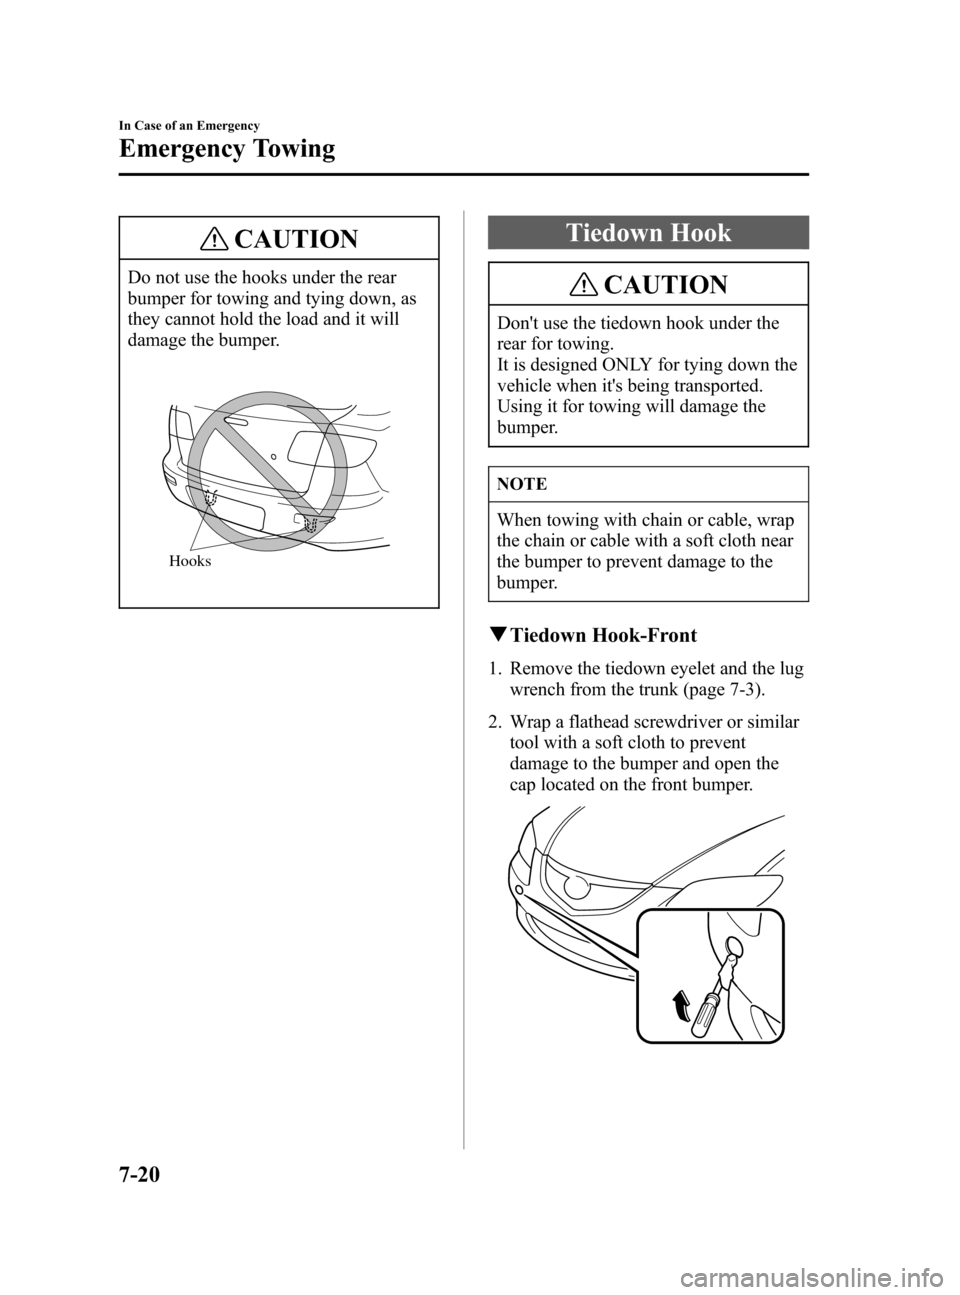
CAUTION
Do not use the hooks under the rear
bumper for towing and tying down, as
they cannot hold the load and it will
damage the bumper.
Hooks
Tiedown Hook
CAUTION
Don't use the tiedown hook under the
rear for towing.
It is designed ONLY for tying down the
vehicle when it's being transported.
Using it for towing will damage the
bumper.
NOTE
When towing with chain or cable, wrap
the chain or cable with a soft cloth near
the bumper to prevent damage to the
bumper.
qTiedown Hook-Front
1. Remove the tiedown eyelet and the lug
wrench from the trunk (page 7-3).
2. Wrap a flathead screwdriver or similar
tool with a soft cloth to prevent
damage to the bumper and open the
cap located on the front bumper.
7-20
In Case of an Emergency
Emergency Towing
Mazda3_8T97-EC-04J_Edition1 Page228
Saturday, September 25 2004 2:15 PM
Form No.8T97-EC-04J
Page 265 of 322

Black plate (265,1)
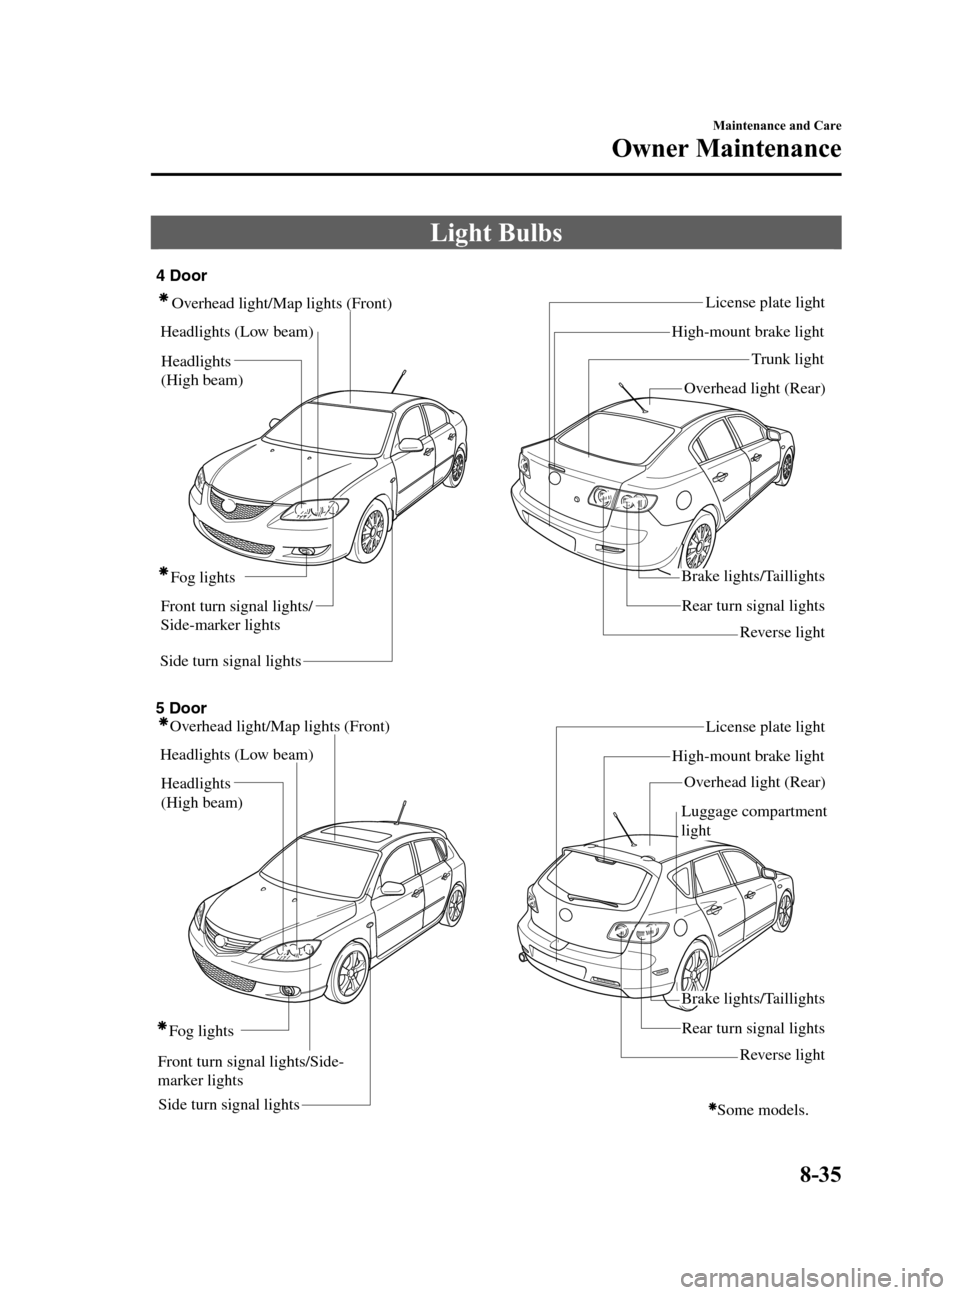
Light Bulbs
Side turn signal lightsFront turn signal lights/
Side-marker lightsRear turn signal lightsLicense plate light
Overhead light/Map lights (Front)
Headlights (Low beam)
Headlights
(High beam)
Fog lightsBrake lights/Taillights
Reverse light High-mount brake light
Trunk light 4 Door
5 DoorOverhead light (Rear)
Overhead light/Map lights (Front)
Headlights (Low beam)
Headlights
(High beam)
Side turn signal lightsFog lights
License plate light
High-mount brake light
Luggage compartment
lightOverhead light (Rear)
Rear turn signal lights Brake lights/Taillights
Reverse light
Some models.
Front turn signal lights/Side-
marker lights
Maintenance and Care
Owner Maintenance
8-35
Mazda3_8T97-EC-04J_Edition1 Page265
Saturday, September 25 2004 2:16 PM
Form No.8T97-EC-04J
Page 269 of 322

Black plate (269,1)
2. Detach the electrical connector from
the unit by pulling it to the rear.
3. Install the new side turn signal unit in
the reverse order of removal.
NOTE
Bulb replacement is not possible
because it is built into the unit. Replace
the unit.
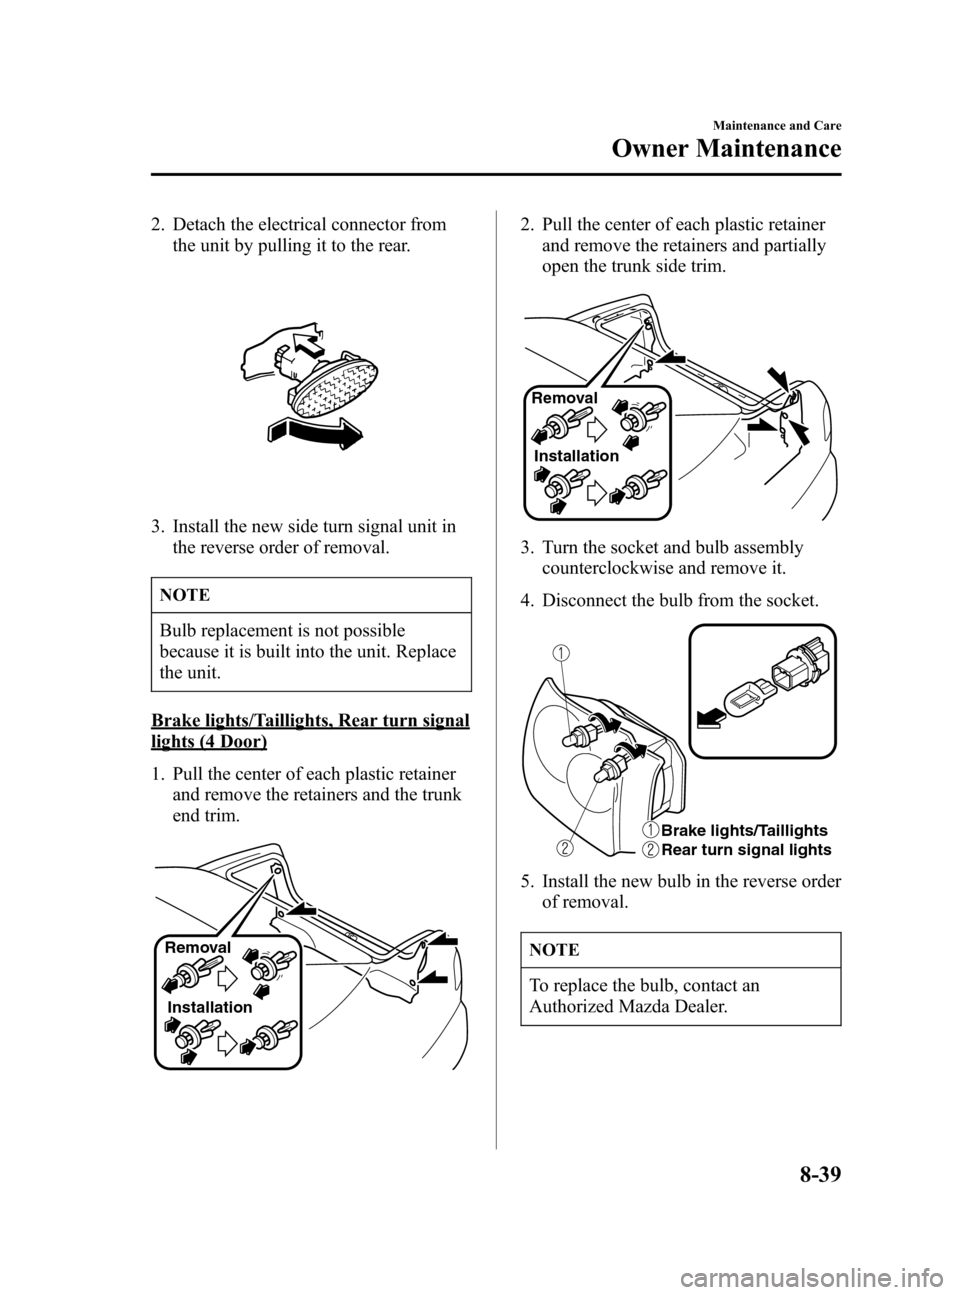
Brake lights/Taillights, Rear turn signal
lights (4 Door)
1. Pull the center of each plastic retainer
and remove the retainers and the trunk
end trim.
Removal
Installation
2. Pull the center of each plastic retainer
and remove the retainers and partially
open the trunk side trim.
Removal
Installation
3. Turn the socket and bulb assembly
counterclockwise and remove it.
4. Disconnect the bulb from the socket.
Brake lights/Taillights
Rear turn signal lights
5. Install the new bulb in the reverse order
of removal.
NOTE
To replace the bulb, contact an
Authorized Mazda Dealer.
Maintenance and Care
Owner Maintenance
8-39
Mazda3_8T97-EC-04J_Edition1 Page269
Saturday, September 25 2004 2:17 PM
Form No.8T97-EC-04J
Page 271 of 322

Black plate (271,1)
Right side
2. Turn the socket and bulb assembly
counterclockwise and remove it.
3. Disconnect the bulb from the socket.
4. Install the new bulb in the reverse order
of removal.
NOTE
To replace the bulb, contact an
Authorized Mazda Dealer.
Reverse light
4 Door
1. Pull the center section of the plastic
retainer and remove the retainers, then
remove the trunk rear trim.
Removal
Installation
2. Turn the socket and bulb assembly
counterclockwise and remove it.
3. Disconnect the bulb from the socket.
4. Install the new bulb in the reverse order
of removal.
NOTE
To replace the bulb, contact an
Authorized Mazda Dealer.
Maintenance and Care
Owner Maintenance
8-41
Mazda3_8T97-EC-04J_Edition1 Page271
Saturday, September 25 2004 2:17 PM
Form No.8T97-EC-04J
Page 272 of 322

Black plate (272,1)
5 Door
1. Remove the cover.
2. Turn the socket and bulb assembly
counterclockwise and remove it.
3. Disconnect the bulb from the socket.
4. Install the new bulb in the reverse order
of removal.
NOTE
To replace the bulb, contact an
Authorized Mazda Dealer.
High-mount brake light
4 Door
1. Pull the center of each plastic retainer
and remove the retainers and the trunk
rear trim.
Removal
Installation
2. Disconnect the electrical connector
from the socket.
3. Turn the socket and bulb assembly
counterclockwise and remove it.
4. Disconnect the bulb from the socket.
5. Install the new bulb in the reverse order
of removal.
NOTE
To replace the bulb, contact an
Authorized Mazda Dealer.
8-42
Maintenance and Care
Owner Maintenance
Mazda3_8T97-EC-04J_Edition1 Page272
Saturday, September 25 2004 2:17 PM
Form No.8T97-EC-04J