set clock MAZDA MODEL 3 HATCHBACK 2007 Quick Tips (in English)
[x] Cancel search | Manufacturer: MAZDA, Model Year: 2007, Model line: MODEL 3 HATCHBACK, Model: MAZDA MODEL 3 HATCHBACK 2007Pages: 14, PDF Size: 2.24 MB
Page 7 of 14

LOCKS
Always check the Owner’s Manual for more operating information and safety features
Locks
Locks
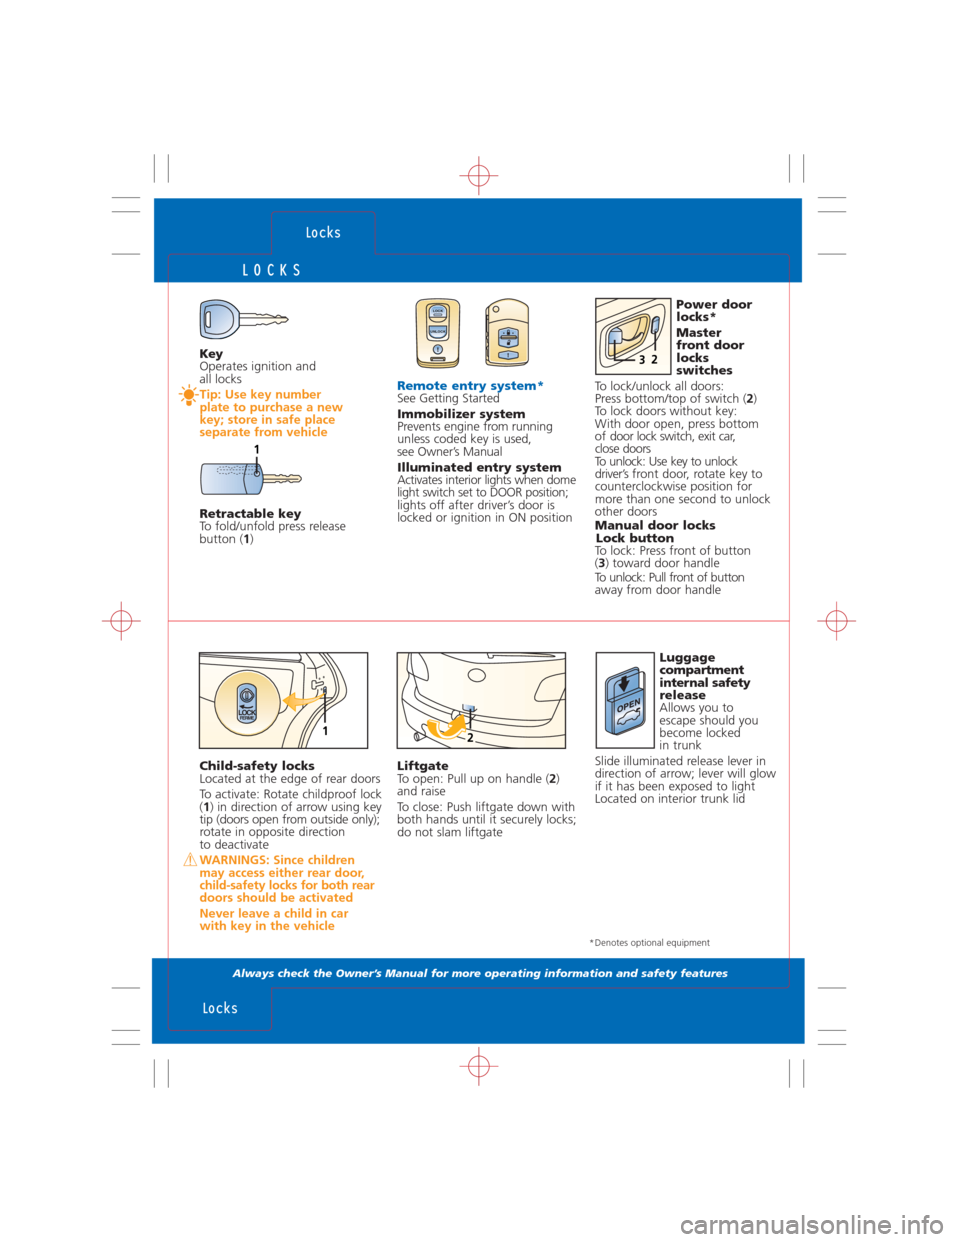
Key
Operates ignition and
all locks
Tip: Use key number
plate to purchase a new
key; store in safe place
separate from vehicle
Retractable key
To fold/unfold press release
button (1)
Remote entry system*See Getting Started
Immobilizer system
Prevents engine from running
unless coded key is used,
see Owner’s Manual
Illuminated entry system
Activates interior lights when dome
light switch set to DOOR position;
lights off after driver’s door is
locked or ignition in ON positionPower door
locks*
Master
front door
locks
switches
To lock/unlock all doors:
Press bottom/top of switch (2)
To lock doors without key:
With door open, press bottom
of door lock switch, exit car,
close doors
To unlock: Use key to unlock
driver’s front door, rotate key to
counterclockwise position for
more than one second to unlock
other doors
Manual door locks
Lock button
To lock: Press front of button
(3) toward door handle
To unlock: Pull front of button
away from door handle
LOCK
UNLOCK
Child-safety locks
Located at the edge of rear doors
To activate: Rotate childproof lock
(1) in direction of arrow using key
tip (doors open from outside only);
rotate in opposite direction
to deactivate
WARNINGS: Since children
may access either rear door,
child-safety locks for both rear
doors should be activated
Never leave a child in car
with key in the vehicle
Liftgate
To open: Pull up on handle (2)
and raise
To close: Push liftgate down with
both hands until it securely locks;
do not slam liftgateLuggage
compartment
internal safety
release
Allows you to
escape should you
become locked
in trunk
Slide illuminated release lever in
direction of arrow; lever will glow
if it has been exposed to light
Located on interior trunk lid
LOCKFERME12
LOCK UNLOCK
23
1
*Denotes optional equipment
Page 11 of 14

CLIMATE CONTROLS
Always check the Owner’s Manual for more operating information and safety features
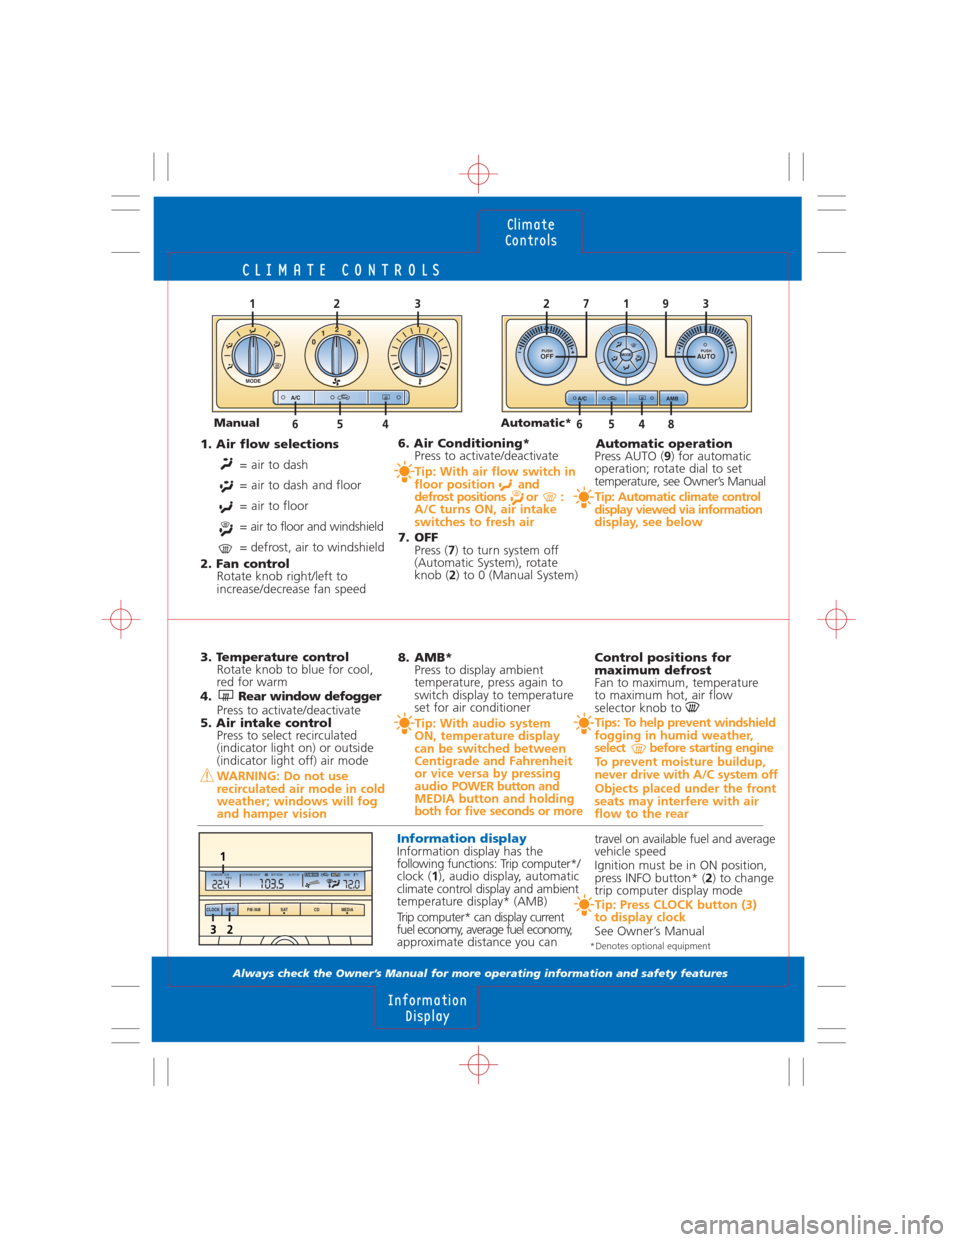
1. Air flow selections
= air to dash
= air to dash and floor
= air to floor
= air to floor and windshield
= defrost, air to windshield
2. Fan control
Rotate knob right/left to
increase/decrease fan speed6. Air Conditioning*
Press to activate/deactivate
Tip: With air flow switch in
floor position and
defrost positions or :
A/C turns ON, air intake
switches to fresh air
7. OFF
Press (7) to turn system off
(Automatic System), rotate
knob (2) to 0 (Manual System) Automatic operation
Press AUTO (9) for automatic
operation; rotate dial to set
temperature, see Owner’s Manual
Tip: Automatic climate control
display viewed via information
display, see below
3. Temperature control
Rotate knob to blue for cool,
red for warm
4. Rear window defogger
Press to activate/deactivate
5. Air intake control
Press to select recirculated
(indicator light on) or outside
(indicator light off) air mode
WARNING: Do not use
recirculated air mode in cold
weather; windows will fog
and hamper vision
8. AMB*
Press to display ambient
temperature, press again to
switch display to temperature
set for air conditioner
Tip: With audio system
ON, temperature display
can be switched between
Centigrade and Fahrenheit
or vice versa by pressing
audio POWER button and
MEDIA button and holding
both for five seconds or more
Control positions for
maximum defrost
Fan to maximum, temperature
to maximum hot, air flow
selector knob to
Tips: To help prevent windshield
fogging in humid weather,
select before starting engine
To prevent moisture buildup,
never drive with A/C system off
Objects placed under the front
seats may interfere with air
flow to the rear
Information displayInformation display has the
following functions: Trip computer*/
clock (1), audio display, automatic
climate control display and ambient
temperature display* (AMB)
Trip computer* can display current
fuel economy, average fuel economy,
approximate distance you cantravel on available fuel and average
vehicle speed
Ignition must be in ON position,
press INFO button* (2) to change
trip computer display mode
Tip: Press CLOCK button (3)
to display clock
See Owner’s Manual
Climate
Controls
Information
Display
PUSH OFF PUSH AUTO MODE
AMB A/C
2 7 9 1
MODE
04132
A/C
564
1233
6 5 4 8 Manual Automatic*
CLOCK INFO FM /AM SAT CD MEDIA
23
AMB CD IN MD IN ST CONSUM CUR
mpgRPT RDM AUTO-M FO72.0103.522.4AUTOA/C ECO1
*Denotes optional equipment
Page 12 of 14

RADIO/COMPACT DISC
Always check the Owner’s Manual for more operating information and safety features
CD: Press to select
next/beginning of current track
Tape: Press to automatically
advance tape to beginning of
next selection/replay selection;
to stop this operation, press
button again
6. Scan
Press to briefly sample next
listenable selections; functions
in all modes
7. RPT
Press to replay current selection
8. Clock
To set: With ignition in ACC or
ON position, press (8) and hold
until beep sounds; 12 hr/24 hr
will be displayed; press (9)to
select; press (8) again while
selection is flashing: Hr ADJUST
displays; press (9) to select hr;
press (8) when done, do
the same to set minutes
/
/
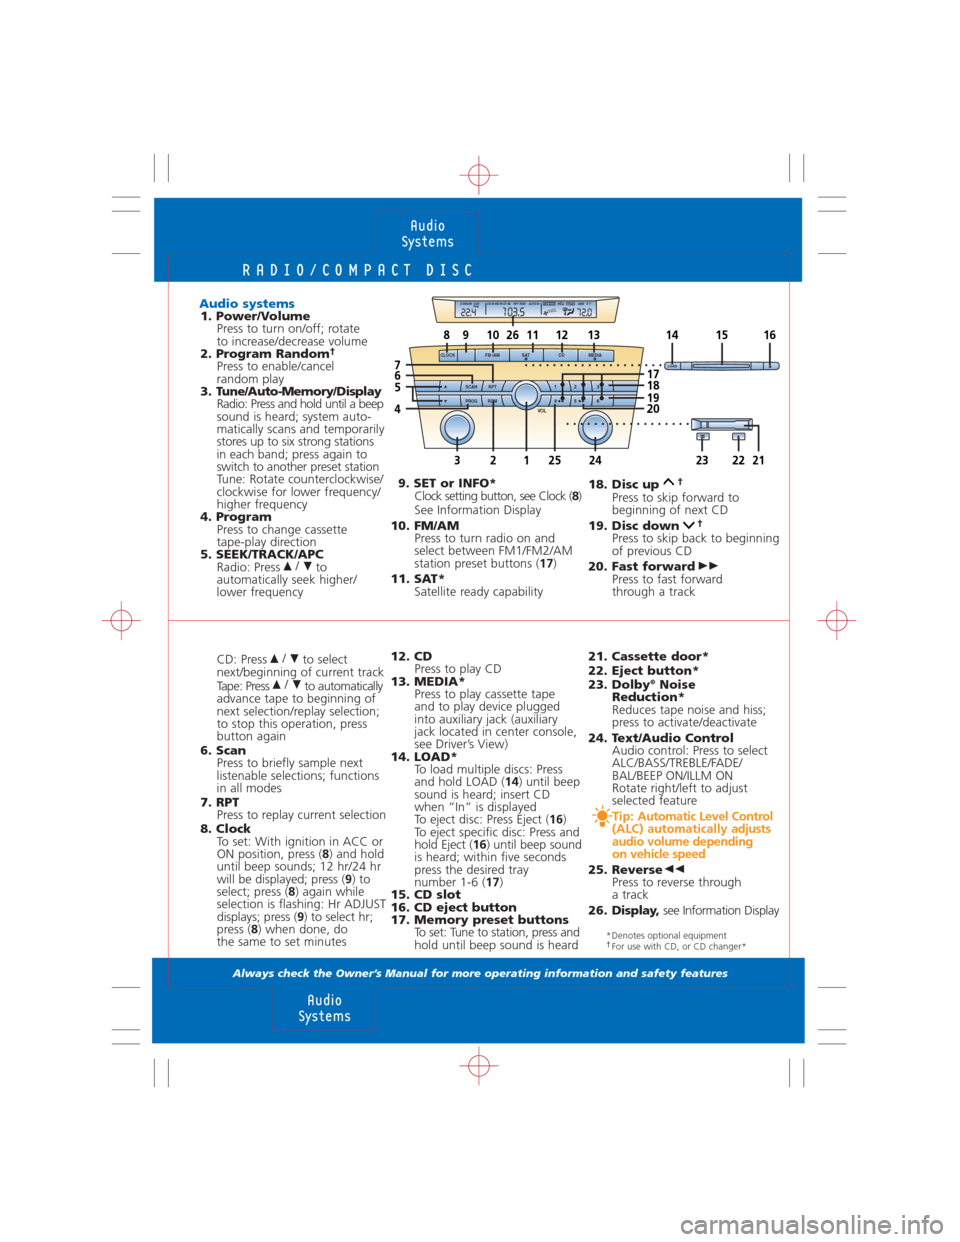
Audio systems1. Power/Volume
Press to turn on/off; rotate
to increase/decrease volume
2. Program Random
†Press to enable/cancel
random play
3. Tune/Auto-Memory/Display
Radio: Press and hold until a beep
sound is heard; system auto-
matically scans and temporarily
stores up to six strong stations
in each band; press again to
switch to another preset station
Tune: Rotate counterclockwise/
clockwise for lower frequency/
higher frequency
4. Program
Press to change cassette
tape-play direction
5. SEEK/TRACK/APC
Radio: Press to
automatically seek higher/
lower frequency
/
12. CD
Press to play CD
13. MEDIA*
Press to play cassette tape
and to play device plugged
into auxiliary jack (auxiliary
jack located in center console,
see Driver’s View)
14. LOAD*
To load multiple discs: Press
and hold LOAD (14) until beep
sound is heard; insert CD
when “In” is displayed
To eject disc: Press Eject (16)
To eject specific disc: Press and
hold Eject (16) until beep sound
is heard; within five seconds
press the desired tray
number 1-6 (17)
15. CD slot
16. CD eject button
17. Memory preset buttons
To set: Tune to station, press and
hold until beep sound is heard 9. SET or INFO*
Clock setting button, see Clock (8)
See Information Display
10. FM/AM
Press to turn radio on and
select between FM1/FM2/AM
station preset buttons (17)
11. SAT*
Satellite ready capability
21. Cassette door*
22. Eject button*
23. Dolby
®Noise
Reduction*
Reduces tape noise and hiss;
press to activate/deactivate
24. Text/Audio Control
Audio control: Press to select
ALC/BASS/TREBLE/FADE/
BAL/BEEP ON/ILLM ON
Rotate right/left to adjust
selected feature
Tip: Automatic Level Control
(ALC) automatically adjusts
audio volume depending
on vehicle speed
25. Reverse
Press to reverse through
a track
26. Display, see Information Display
18. Disc up†
Press to skip forward to
beginning of next CD
19. Disc down
†Press to skip back to beginning
of previous CD
20. Fast forward
Press to fast forward
through a track
Audio
Systems
Audio
Systems
*Denotes optional equipment†For use with CD, or CD changer*
LOADCLOCK
SCAN
PROGRPT
RDM
1
42
53
6
VOL
FM /AM SAT CD MEDIA
3242322211225
8910111214151613
65
7
4
181920
17 . . . . . . . . . . . . . . . . . . . .
. . . . . . . . . . . . . . . . . .
AMB CD IN MD IN ST CONSUM CUR
mpgRPT RDM AUTO-M FO72.0103.522.4AU TOA/C ECO
26