warning lights MAZDA MODEL 3 HATCHBACK 2007 Quick Tips (in English)
[x] Cancel search | Manufacturer: MAZDA, Model Year: 2007, Model line: MODEL 3 HATCHBACK, Model: MAZDA MODEL 3 HATCHBACK 2007Pages: 14, PDF Size: 2.24 MB
Page 4 of 14

GETTING STARTED
Always check the Owner’s Manual for more operating information and safety features
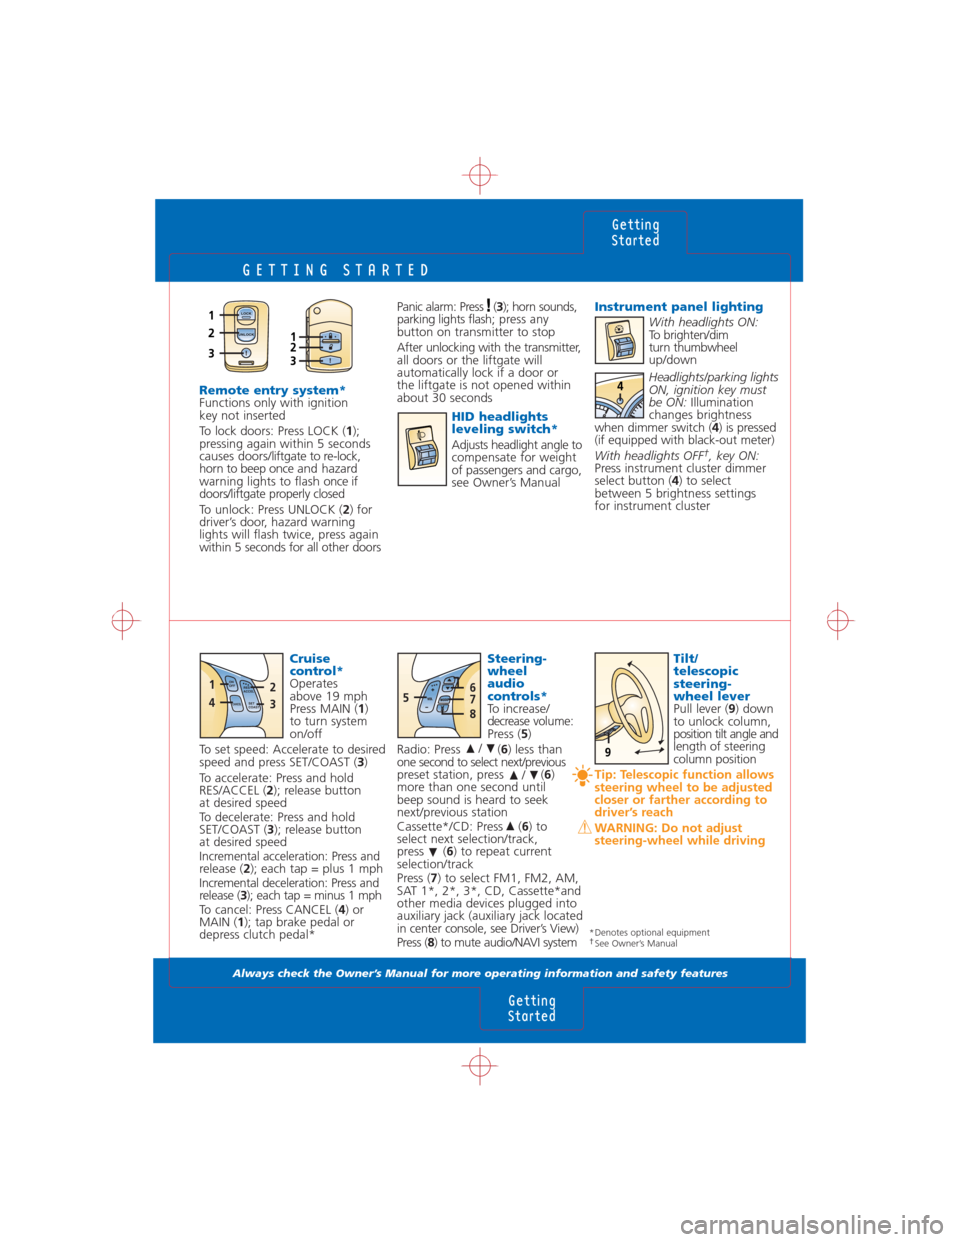
Steering-
wheel
audio
controls*
To increase/
decreasevolume:
Press (5)
Radio: Press (6) less than
one second to select next/previous
preset station, press (6)
more than one second until
beep sound is heard to seek
next/previous station
Cassette*/CD: Press (6) to
select next selection/track,
press (6) to repeat current
selection/track
Press (7) to select FM1, FM2, AM,
SAT 1*, 2*, 3*, CD, Cassette*and
other media devices plugged into
auxiliary jack (auxiliary jack located
in center console, see Driver’s View)
Press (8) to mute audio/NAVI system
/
/
Tilt/
telescopic
steering-
wheel lever
Pull lever (9) down
to unlock column,
position tilt angle and
length of steering
column position
Tip: Telescopic function allows
steering wheel to be adjusted
closer or farther according to
driver’s reach
WARNING: Do not adjust
steering-wheel while driving
Panic alarm: Press (3); horn sounds,
parking lights flash; press any
button on transmitter to stop
After unlocking with the transmitter,
all doors or the liftgate will
automatically lock if a door or
the liftgate is not opened within
about 30 seconds
HID headlights
leveling switch*
Adjusts headlight angle to
compensate for weight
of passengers and cargo,
see Owner’s Manual
Getting
Started
Getting
Started
Instrument panel lighting
With headlights ON:
To brighten/dim
turn thumbwheel
up/down
Headlights/parking lights
ON, ignition key must
be ON: Illumination
changes brightness
when dimmer switch (4) is pressed
(if equipped with black-out meter)
With headlights OFF
†, key ON:
Press instrument cluster dimmer
select button (4) to select
between 5 brightness settings
for instrument cluster
Cruise
control*
Operates
above 19 mph
Press MAIN (1)
to turn system
on/off
To set speed: Accelerate to desired
speed and press SET/COAST (3)
To accelerate: Press and hold
RES/ACCEL (2); release button
at desired speed
To decelerate: Press and hold
SET/COAST (3); release button
at desired speed
Incremental acceleration: Press and
release (2); each tap = plus 1 mph
Incremental deceleration: Press and
release (3); each tap = minus 1 mph
To cancel: Press CANCEL (4) or
MAIN (1); tap brake pedal or
depress clutch pedal*
Remote entry system* Functions only with ignition
key not inserted
To lock doors: Press LOCK (1);
pressing again within 5 seconds
causes doors/liftgate to re-lock,
horn to beep onceand hazard
warning lights to flash once if
doors/liftgate properly closed
To unlock: Press UNLOCK (2) for
driver’s door, hazard warning
lights will flash twice, press again
within 5 seconds for all other doors
576
8
RES
ACCEL
SET
COAST ON
OFF
CANCEL
1
42
3
9
4
LOCK
UNLOCK1
2
3
123
*Denotes optional equipment†See Owner’s Manual
Page 6 of 14

INSTRUMENT CLUSTER
Always check the Owner’s Manual for more operating information and safety features
WARNING LIGHTS
• Cruise control on*,Amber light: Cruise control
system activated
Green light: Cruising speed set;
see Getting Started
• Tire Pressure Monitoring
System (TPMS)*,
see Getting Started
• Turn signals/hazard
warning on
• High beams on
• Engine oil-pressure
warning light
Stop car when safe and turn
off engine; check oil level
• Brake system
Parking brake on/low brake fluid
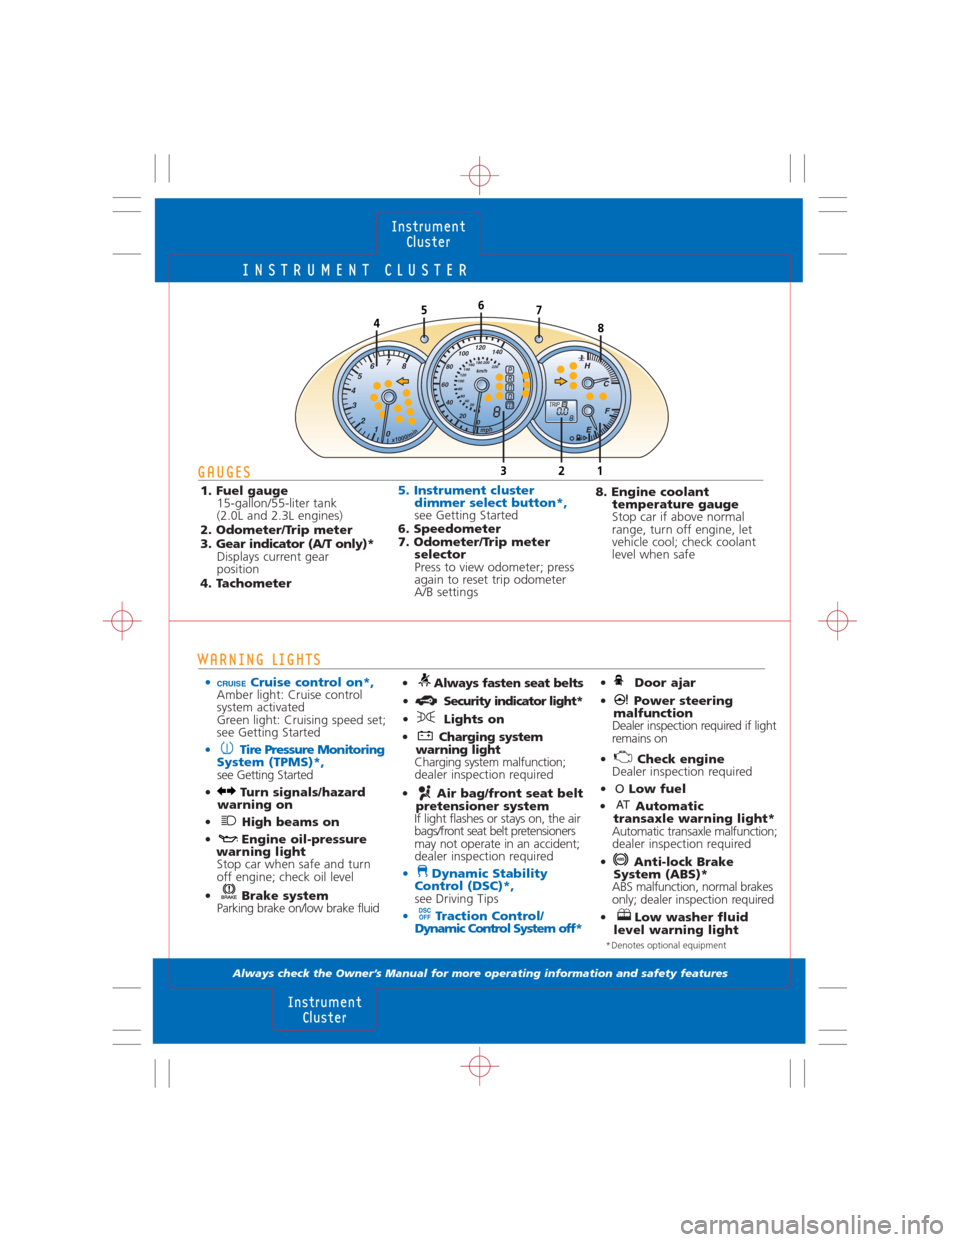
GAUGES
1. Fuel gauge
15-gallon/55-liter tank
(2.0L and 2.3L engines)
2. Odometer/Trip meter
3. Gear indicator (A/T only)*
Displays current gear
position
4. Tachometer
• Always fasten seat belts
• Security indicator light*
• Lights on
• Charging system
warning light
Charging system malfunction;
dealer inspection required
• Air bag/front seat belt
pretensioner system
If light flashes or stays on, the air
bags/front seat belt pretensioners
may not operate in an accident;
dealer inspection required
• Dynamic Stability
Control (DSC)*,
see Driving Tips
• Traction Control/
Dynamic Control System off*DSC
OFF
5. Instrument cluster
dimmer select button*,
see Getting Started
6. Speedometer
7. Odometer/Trip meter
selector
Press to view odometer; press
again to reset trip odometer
A/B settings
Instrument
Cluster
Instrument
Cluster
nim/0001x
H
P
TRIPA80.0
RNDM8
C
F
E
5748
6
1 32
hpm
km/h
80220 200 180
160
140
120
100
60
40
20
0
0 20 40 6080100120
1400 1 2 3 4567
8
• Door ajar
• Power steering
malfunction
Dealer inspection required if light
remains on
• Check engine
Dealer inspection required
• OLow fuel
• Automatic
transaxle warning light*
Automatic transaxle malfunction;
dealer inspection required
• Anti-lock Brake
System (ABS)*
ABS malfunction, normal brakes
only; dealer inspection required
• Low washer fluid
level warning light
8. Engine coolant
temperature gauge
Stop car if above normal
range, turn off engine, let
vehicle cool; check coolant
level when safe
CRUISE
*Denotes optional equipment
Page 7 of 14

LOCKS
Always check the Owner’s Manual for more operating information and safety features
Locks
Locks
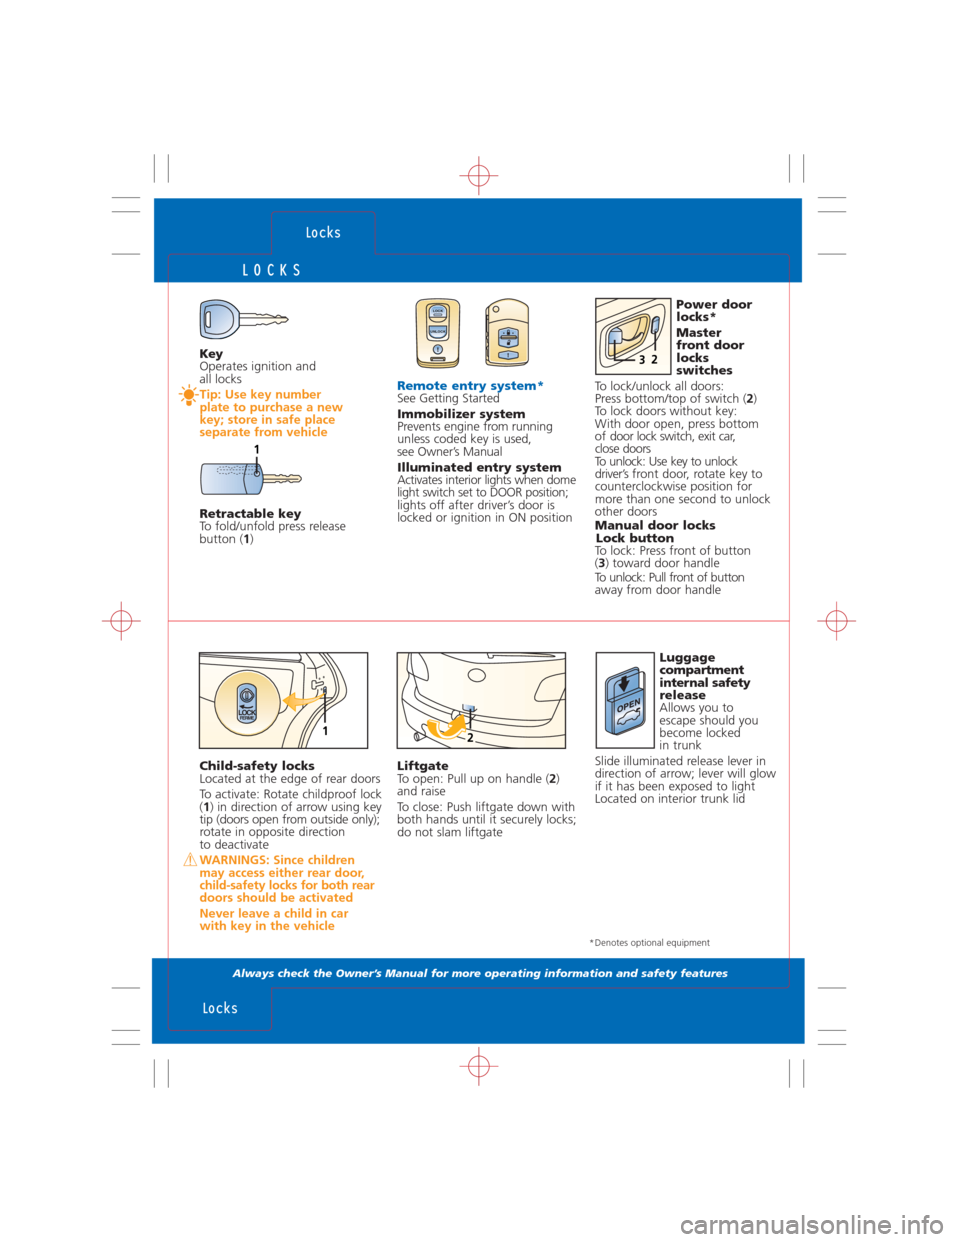
Key
Operates ignition and
all locks
Tip: Use key number
plate to purchase a new
key; store in safe place
separate from vehicle
Retractable key
To fold/unfold press release
button (1)
Remote entry system*See Getting Started
Immobilizer system
Prevents engine from running
unless coded key is used,
see Owner’s Manual
Illuminated entry system
Activates interior lights when dome
light switch set to DOOR position;
lights off after driver’s door is
locked or ignition in ON positionPower door
locks*
Master
front door
locks
switches
To lock/unlock all doors:
Press bottom/top of switch (2)
To lock doors without key:
With door open, press bottom
of door lock switch, exit car,
close doors
To unlock: Use key to unlock
driver’s front door, rotate key to
counterclockwise position for
more than one second to unlock
other doors
Manual door locks
Lock button
To lock: Press front of button
(3) toward door handle
To unlock: Pull front of button
away from door handle
LOCK
UNLOCK
Child-safety locks
Located at the edge of rear doors
To activate: Rotate childproof lock
(1) in direction of arrow using key
tip (doors open from outside only);
rotate in opposite direction
to deactivate
WARNINGS: Since children
may access either rear door,
child-safety locks for both rear
doors should be activated
Never leave a child in car
with key in the vehicle
Liftgate
To open: Pull up on handle (2)
and raise
To close: Push liftgate down with
both hands until it securely locks;
do not slam liftgateLuggage
compartment
internal safety
release
Allows you to
escape should you
become locked
in trunk
Slide illuminated release lever in
direction of arrow; lever will glow
if it has been exposed to light
Located on interior trunk lid
LOCKFERME12
LOCK UNLOCK
23
1
*Denotes optional equipment