engine MAZDA MODEL 3 HATCHBACK 2010 Owner's Manual (in English)
[x] Cancel search | Manufacturer: MAZDA, Model Year: 2010, Model line: MODEL 3 HATCHBACK, Model: MAZDA MODEL 3 HATCHBACK 2010Pages: 488, PDF Size: 6.52 MB
Page 383 of 488
Black plate (385,1)
CAUTION
ØRadiator coolant will damage
paint.
Rinse it off quickly if spilled.
ØUse only soft (demineralized)
water in the coolant mixture.
Water that contains minerals will
cut down on the coolant's
effectiveness.
ØDon't add only water. Always add
a proper coolant mixture.
ØThe engine has aluminum parts
and must be protected by an
ethylene-glycol-based coolant to
prevent corrosion and freezing.
ØDO NOT USE coolants Containing
Alcohol, methanol, Borate or
Silicate.
These coolants could damage the
cooling system.
ØDO NOT MIX alcohol or methanol
with the coolant. This could
damage the cooling system.
ØDon't use a solution that contains
more than 60% antifreeze.
This would reduce effectiveness.NOTE
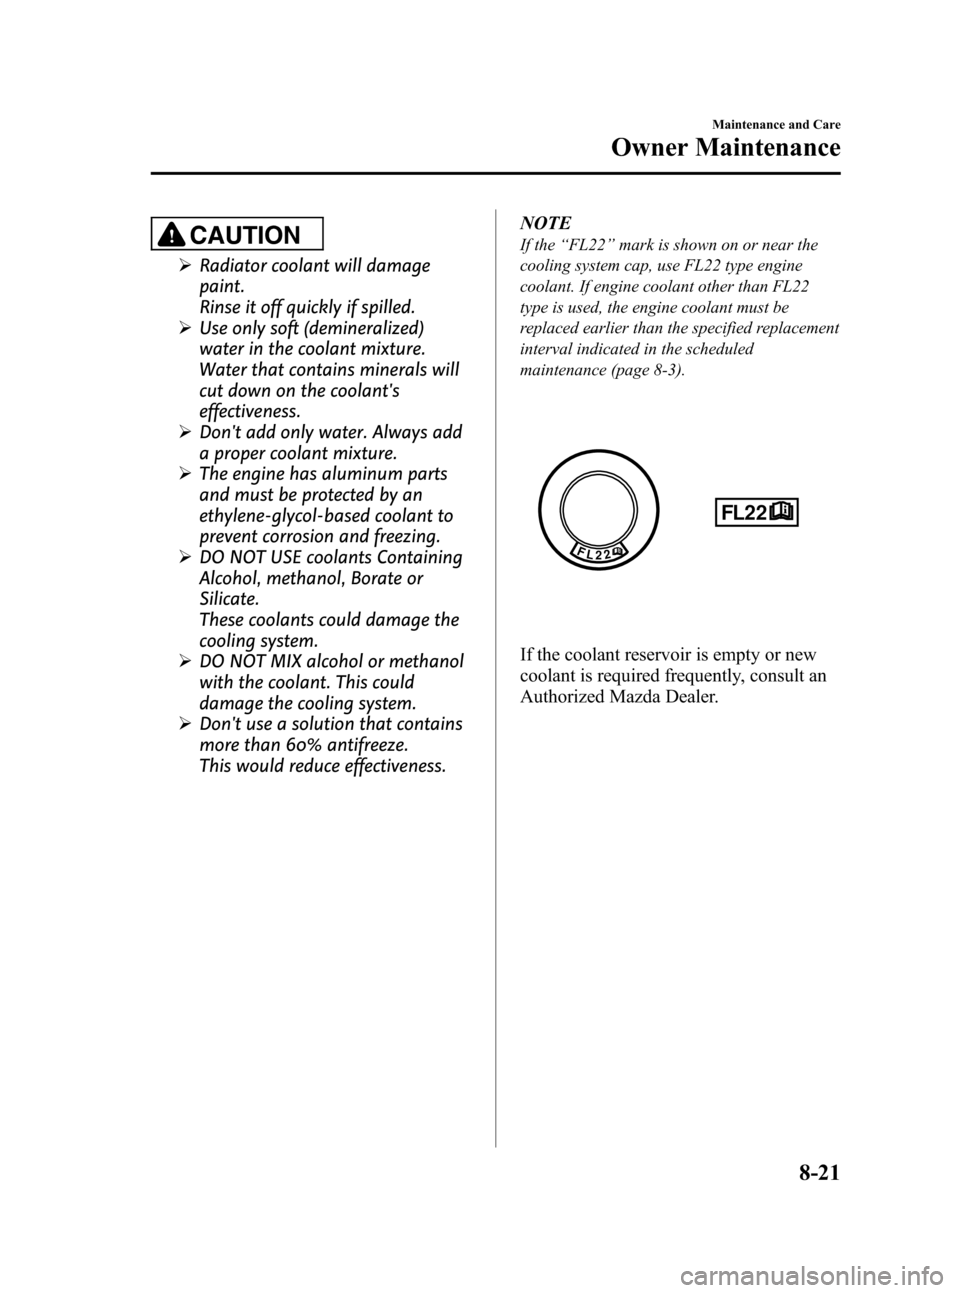
If the“FL22”mark is shown on or near the
cooling system cap, use FL22 type engine
coolant. If engine coolant other than FL22
type is used, the engine coolant must be
replaced earlier than the specified replacement
interval indicated in the scheduled
maintenance (page 8-3).
If the coolant reservoir is empty or new
coolant is required frequently, consult an
Authorized Mazda Dealer.
Maintenance and Care
Owner Maintenance
8-21
Mazda3_8AD6-EC-09A_Edition1 Page385
Tuesday, December 2 2008 2:28 PM
Form No.8AD6-EC-09A
Page 384 of 488
Black plate (386,1)
Brake/Clutch Fluid
qInspecting Brake/Clutch Fluid Level
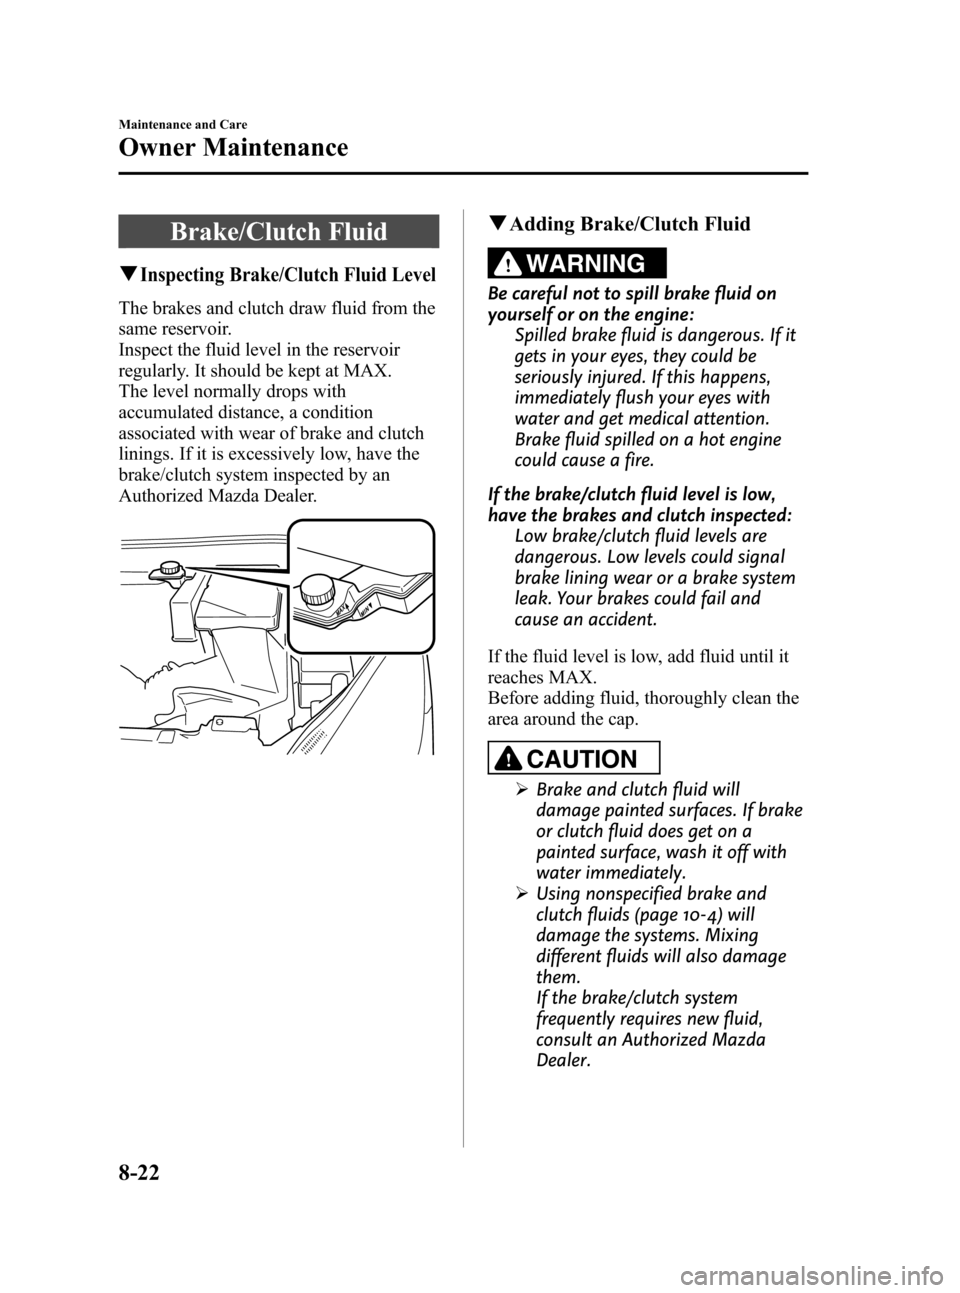
The brakes and clutch draw fluid from the
same reservoir.
Inspect the fluid level in the reservoir
regularly. It should be kept at MAX.
The level normally drops with
accumulated distance, a condition
associated with wear of brake and clutch
linings. If it is excessively low, have the
brake/clutch system inspected by an
Authorized Mazda Dealer.
qAdding Brake/Clutch Fluid
WARNING
Be careful not to spill brake fluid on
yourself or on the engine:
Spilled brake fluid is dangerous. If it
gets in your eyes, they could be
seriously injured. If this happens,
immediately flush your eyes with
water and get medical attention.
Brake fluid spilled on a hot engine
could cause a fire.
If the brake/clutch fluid level is low,
have the brakes and clutch inspected:
Low brake/clutch fluid levels are
dangerous. Low levels could signal
brake lining wear or a brake system
leak. Your brakes could fail and
cause an accident.
If the fluid level is low, add fluid until it
reaches MAX.
Before adding fluid, thoroughly clean the
area around the cap.
CAUTION
ØBrake and clutch fluid will
damage painted surfaces. If brake
or clutch fluid does get on a
painted surface, wash it off with
water immediately.
ØUsing nonspecified brake and
clutch fluids (page 10-4) will
damage the systems. Mixing
different fluids will also damage
them.
If the brake/clutch system
frequently requires new fluid,
consult an Authorized Mazda
Dealer.
8-22
Maintenance and Care
Owner Maintenance
Mazda3_8AD6-EC-09A_Edition1 Page386
Tuesday, December 2 2008 2:28 PM
Form No.8AD6-EC-09A
Page 385 of 488
Black plate (387,1)
Power Steering Fluid
qInspecting Power Steering Fluid
Level
CAUTION
To avoid damage to the power
steering pump, don't operate the
vehicle for long periods when the
power steering fluid level is low.
NOTE
Use specified power steering fluid (page 10-4).
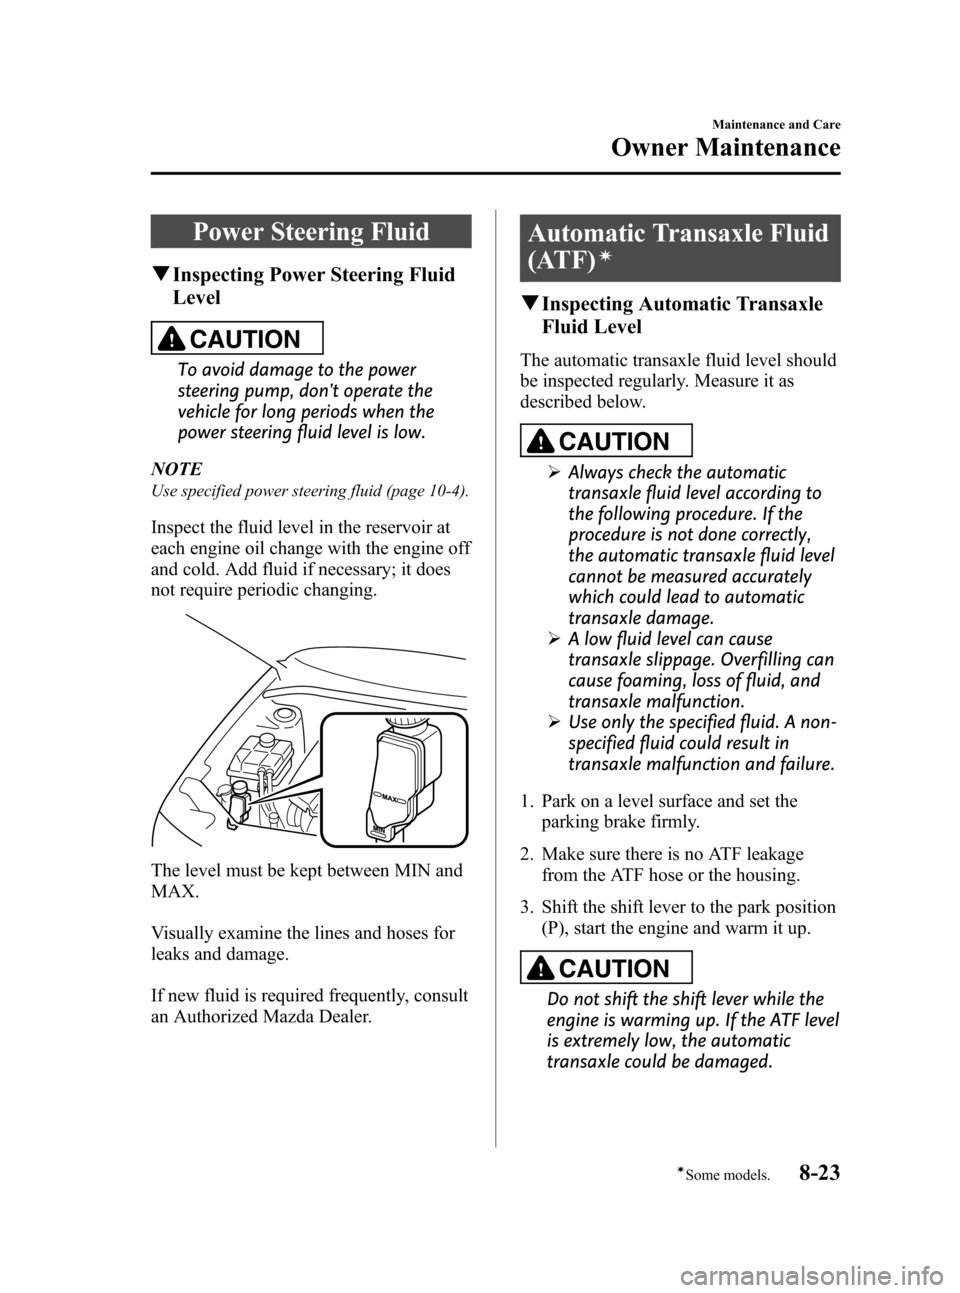
Inspect the fluid level in the reservoir at
each engine oil change with the engine off
and cold. Add fluid if necessary; it does
not require periodic changing.
The level must be kept between MIN and
MAX.
Visually examine the lines and hoses for
leaks and damage.
If new fluid is required frequently, consult
an Authorized Mazda Dealer.
Automatic Transaxle Fluid
(ATF)
í
qInspecting Automatic Transaxle
Fluid Level
The automatic transaxle fluid level should
be inspected regularly. Measure it as
described below.
CAUTION
ØAlways check the automatic
transaxle fluid level according to
the following procedure. If the
procedure is not done correctly,
the automatic transaxle fluid level
cannot be measured accurately
which could lead to automatic
transaxle damage.
ØA low fluid level can cause
transaxle slippage. Overfilling can
cause foaming, loss of fluid, and
transaxle malfunction.
ØUse only the specified fluid. A non-
specified fluid could result in
transaxle malfunction and failure.
1. Park on a level surface and set the
parking brake firmly.
2. Make sure there is no ATF leakage
from the ATF hose or the housing.
3. Shift the shift lever to the park position
(P), start the engine and warm it up.
CAUTION
Do not shift the shift lever while the
engine is warming up. If the ATF level
is extremely low, the automatic
transaxle could be damaged.
Maintenance and Care
Owner Maintenance
8-23íSome models. Mazda3_8AD6-EC-09A_Edition1 Page387
Tuesday, December 2 2008 2:28 PM
Form No.8AD6-EC-09A
Page 386 of 488
Black plate (388,1)
4. While the engine is still idling, pull out
the dipstick and wipe it clean, and then
put it back.
5. Check the ATF level. If there is no ATF
adhering 5 mm from the end of the
dipstick, add ATF.
CAUTION
If there is no ATF adhering to the
dipstick even after the engine has
been warmed up, do not drive the
vehicle. Otherwise, the automatic
transaxle could be damaged.
6. Shift the shift lever to each range and
position, and make sure there is no
abnormality.
7. Drive the vehicle on city roads for
5 km (3.1 mile) or more.
8. Park on a level surface and set the
parking brake firmly.
9. Shift the shift lever to the park position
(P), check the ATF level while the
engine is idling, and make sure that the
ATF level is within the proper level. If
the ATF level is not within the proper
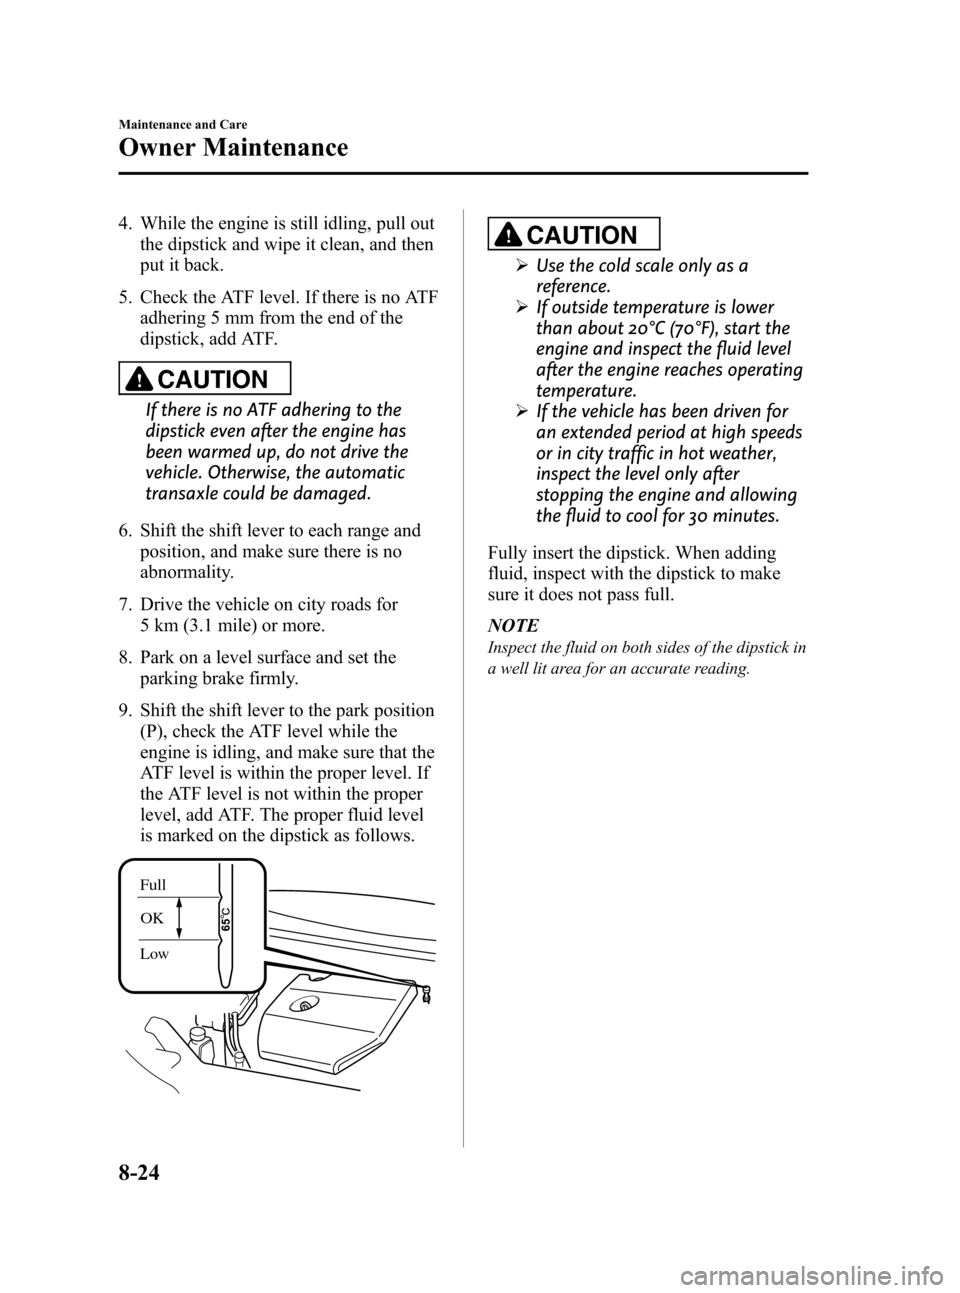
level, add ATF. The proper fluid level
is marked on the dipstick as follows.
Full
OK
Low
CAUTION
ØUse the cold scale only as a
reference.
ØIf outside temperature is lower
than about 20°C (70°F), start the
engine and inspect the fluid level
after the engine reaches operating
temperature.
ØIf the vehicle has been driven for
an extended period at high speeds
or in city traffic in hot weather,
inspect the level only after
stopping the engine and allowing
the fluid to cool for 30 minutes.
Fully insert the dipstick. When adding
fluid, inspect with the dipstick to make
sure it does not pass full.
NOTE
Inspect the fluid on both sides of the dipstick in
a well lit area for an accurate reading.
8-24
Maintenance and Care
Owner Maintenance
Mazda3_8AD6-EC-09A_Edition1 Page388
Tuesday, December 2 2008 2:28 PM
Form No.8AD6-EC-09A
Page 388 of 488
Black plate (390,1)
Body Lubrication
All moving points of the body, such as
door and hood hinges and locks, should
be lubricated each time the engine oil is
changed. Use a nonfreezing lubricant on
locks during cold weather.
Make sure the hood's secondary latch
keeps the hood from opening when the
primary latch is released.
Wiper Blades
CAUTION
ØHot waxes applied by automatic
car washers have been known to
affect the wiper's ability to clean
windows.
ØTo prevent damage to the wiper
blades, don't use gasoline,
kerosene, paint thinner, or other
solvents on or near them.
ØWhen the wiper lever is in the
AUTO position and the ignition
switch is in the ON position, the
wipers may move automatically in
the following cases:
ØIf the windshield above the rain
sensor is touched.
ØIf the windshield above the rain
sensor is wiped with a cloth.
ØIf the windshield is struck with
a hand or other object.
ØIf the rain sensor is struck with
a hand or other object from
inside the vehicle.
Be careful not to pinch hands or
fingers as it may cause injury, or
damage the wipers. When
washing or servicing your Mazda,
make sure the wiper lever is in the
OFF position.
Contamination of either the windshield or
the blades with foreign matter can reduce
wiper effectiveness. Common sources are
insects, tree sap, and hot wax treatments
used by some commercial car washes.
If the blades are not wiping properly,
clean the window and blades with a good
cleaner or mild detergent; then rinse
thoroughly with clean water. Repeat if
necessary.
8-26
Maintenance and Care
Owner Maintenance
Mazda3_8AD6-EC-09A_Edition1 Page390
Tuesday, December 2 2008 2:28 PM
Form No.8AD6-EC-09A
Page 401 of 488

Black plate (403,1)
3. Turn the socket and bulb assembly to
remove it. Carefully remove the bulb
from its socket in the reflector by
gently pulling it straight backward out
of the socket.
4. Install the new bulb in the reverse order
of the removal procedure.
Front turn signal lights/Front side-
marker lights
1. Make sure the ignition switch is turned
off and the headlight switch is off.
2. If you are changing the right bulb, start
the engine, turn the steering wheel all
the way to the left, and turn off engine.
If you are changing the left bulb, turn
the steering wheel to the right.3. Turn the center section of the plastic
retainer counterclockwise and remove
the retainers and partially peel back the
mudguard.
Installation Removal
4. Turn the socket and bulb assembly
counterclockwise and remove it.
5. Disconnect the bulb from the socket.
6. Install the new bulb in the reverse order
of the removal procedure.
Halogen bulb
High-beam bulbs/Daytime running
lights (Canada)
1. Make sure the ignition is switched off,
and the headlight switch is off.
Maintenance and Care
Owner Maintenance
8-39
Mazda3_8AD6-EC-09A_Edition1 Page403
Tuesday, December 2 2008 2:28 PM
Form No.8AD6-EC-09A
Page 402 of 488
Black plate (404,1)
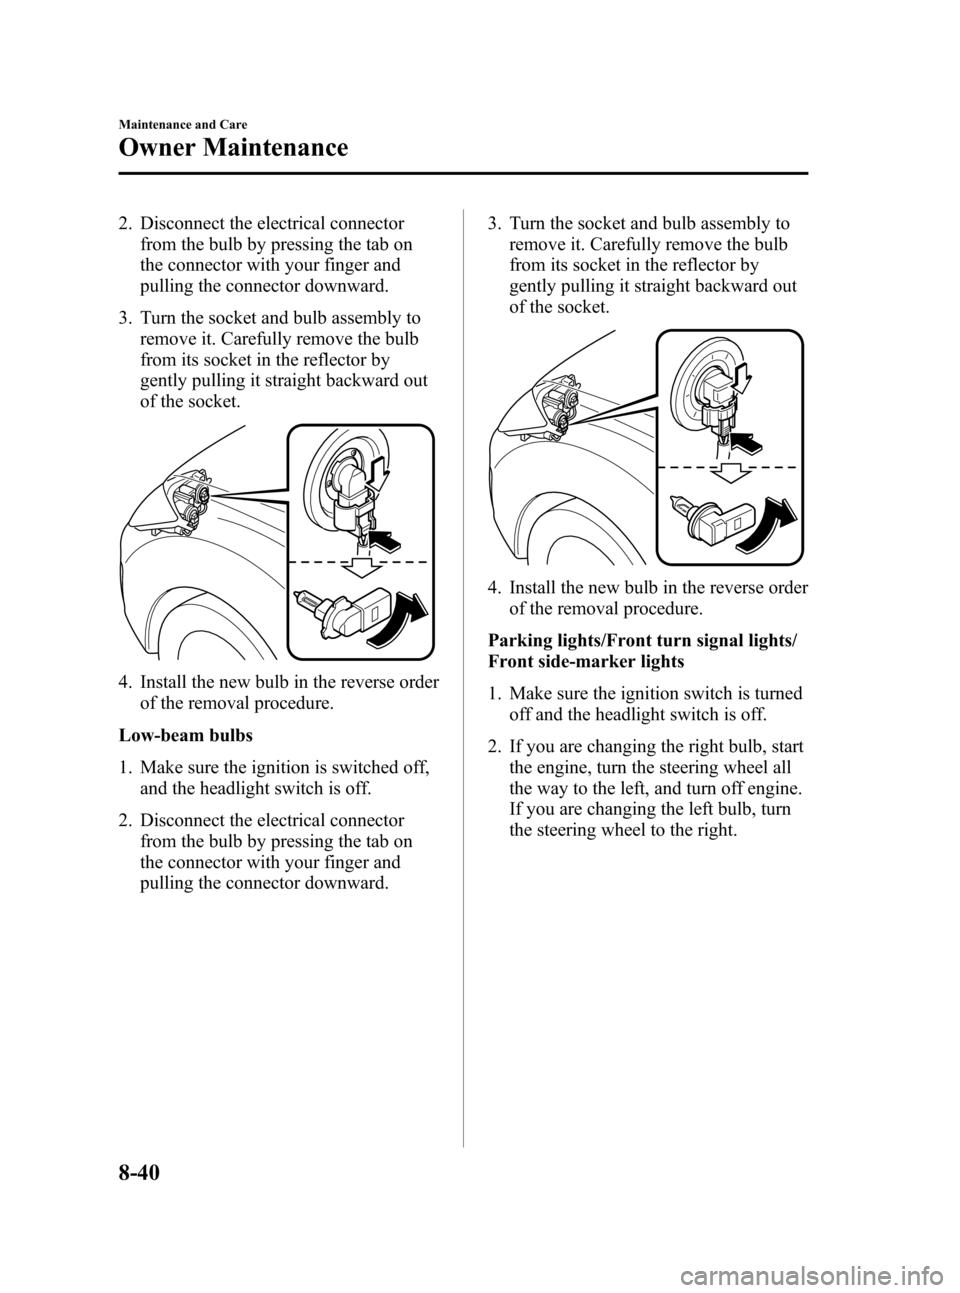
2. Disconnect the electrical connector
from the bulb by pressing the tab on
the connector with your finger and
pulling the connector downward.
3. Turn the socket and bulb assembly to
remove it. Carefully remove the bulb
from its socket in the reflector by
gently pulling it straight backward out
of the socket.
4. Install the new bulb in the reverse order
of the removal procedure.
Low-beam bulbs
1. Make sure the ignition is switched off,
and the headlight switch is off.
2. Disconnect the electrical connector
from the bulb by pressing the tab on
the connector with your finger and
pulling the connector downward.3. Turn the socket and bulb assembly to
remove it. Carefully remove the bulb
from its socket in the reflector by
gently pulling it straight backward out
of the socket.
4. Install the new bulb in the reverse order
of the removal procedure.
Parking lights/Front turn signal lights/
Front side-marker lights
1. Make sure the ignition switch is turned
off and the headlight switch is off.
2. If you are changing the right bulb, start
the engine, turn the steering wheel all
the way to the left, and turn off engine.
If you are changing the left bulb, turn
the steering wheel to the right.
8-40
Maintenance and Care
Owner Maintenance
Mazda3_8AD6-EC-09A_Edition1 Page404
Tuesday, December 2 2008 2:28 PM
Form No.8AD6-EC-09A
Page 410 of 488
Black plate (412,1)
Fuses
Your vehicle's electrical system is
protected by fuses.
If any lights, accessories, or controls don't
work, inspect the appropriate circuit
protector. If a fuse has blown, the inside
element will be melted.
If the same fuse blows again, avoid using
that system and consult an Authorized
Mazda Dealer as soon as possible.
qFuse Replacement
Replacing the fuses on the vehicle's left
side
If the electrical system does not work,
first inspect the fuses on the vehicle's left
side.
1. Turn off the ignition switch and other
switches.
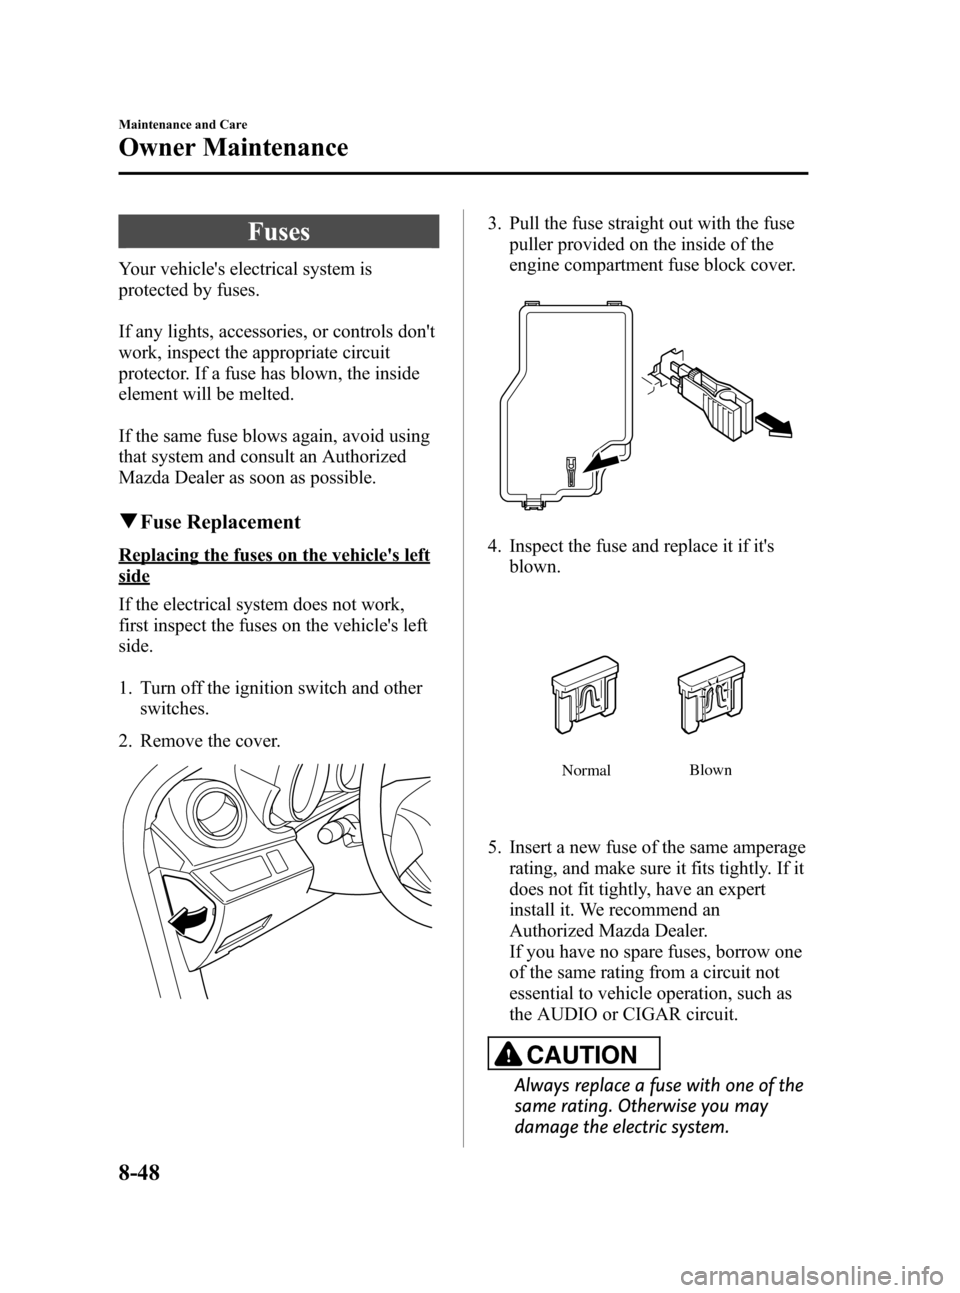
2. Remove the cover.
3. Pull the fuse straight out with the fuse
puller provided on the inside of the
engine compartment fuse block cover.
4. Inspect the fuse and replace it if it's
blown.
NormalBlown
5. Insert a new fuse of the same amperage
rating, and make sure it fits tightly. If it
does not fit tightly, have an expert
install it. We recommend an
Authorized Mazda Dealer.
If you have no spare fuses, borrow one
of the same rating from a circuit not
essential to vehicle operation, such as
the AUDIO or CIGAR circuit.
CAUTION
Always replace a fuse with one of the
same rating. Otherwise you may
damage the electric system.
8-48
Maintenance and Care
Owner Maintenance
Mazda3_8AD6-EC-09A_Edition1 Page412
Tuesday, December 2 2008 2:28 PM
Form No.8AD6-EC-09A
Page 412 of 488
Black plate (414,1)
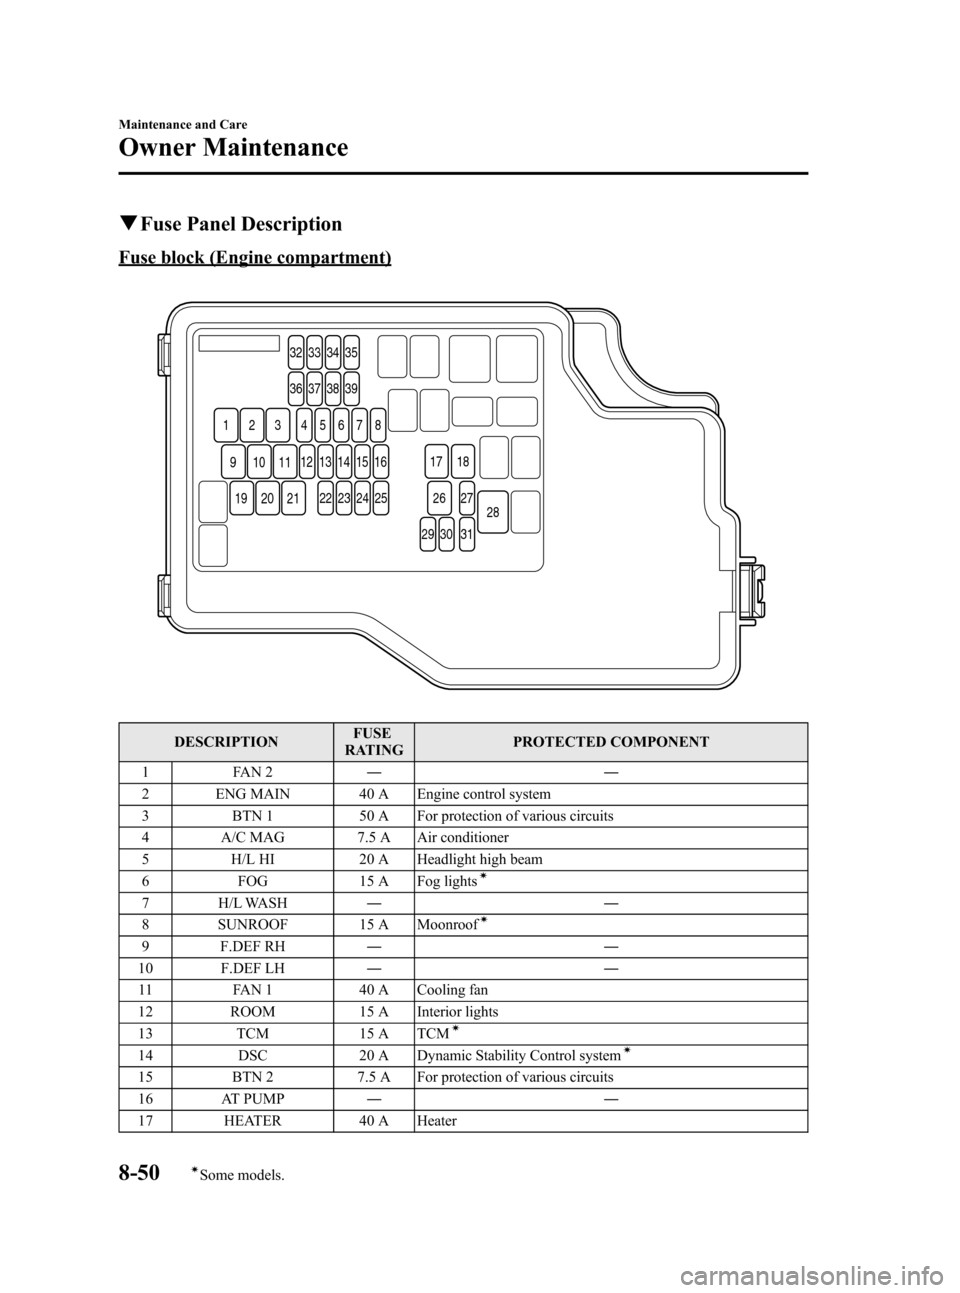
qFuse Panel Description
Fuse block (Engine compartment)
32 33 34 35
36 37 38 39
5 4 1 2 3 678
13 12 14 15 16
22
11 10 9
21 20 19
23 24 25
29 30 3127
28 26 17 18
DESCRIPTIONFUSE
RATINGPROTECTED COMPONENT
1 FAN 2――
2 ENG MAIN 40 A Engine control system
3 BTN 1 50 A For protection of various circuits
4 A/C MAG 7.5 A Air conditioner
5 H/L HI 20 A Headlight high beam
6 FOG 15 A Fog lights
í
7 H/L WASH――
8 SUNROOF 15 A Moonroofí
9 F.DEF RH――
10 F.DEF LH――
11 FAN 1 40 A Cooling fan
12 ROOM 15 A Interior lights
13 TCM 15 A TCM
í
14 DSC 20 A Dynamic Stability Control systemí
15 BTN 2 7.5 A For protection of various circuits
16 AT PUMP――
17 HEATER 40 A Heater
8-50
Maintenance and Care
íSome models.
Owner Maintenance
Mazda3_8AD6-EC-09A_Edition1 Page414
Tuesday, December 2 2008 2:28 PM
Form No.8AD6-EC-09A
Page 413 of 488
Black plate (415,1)
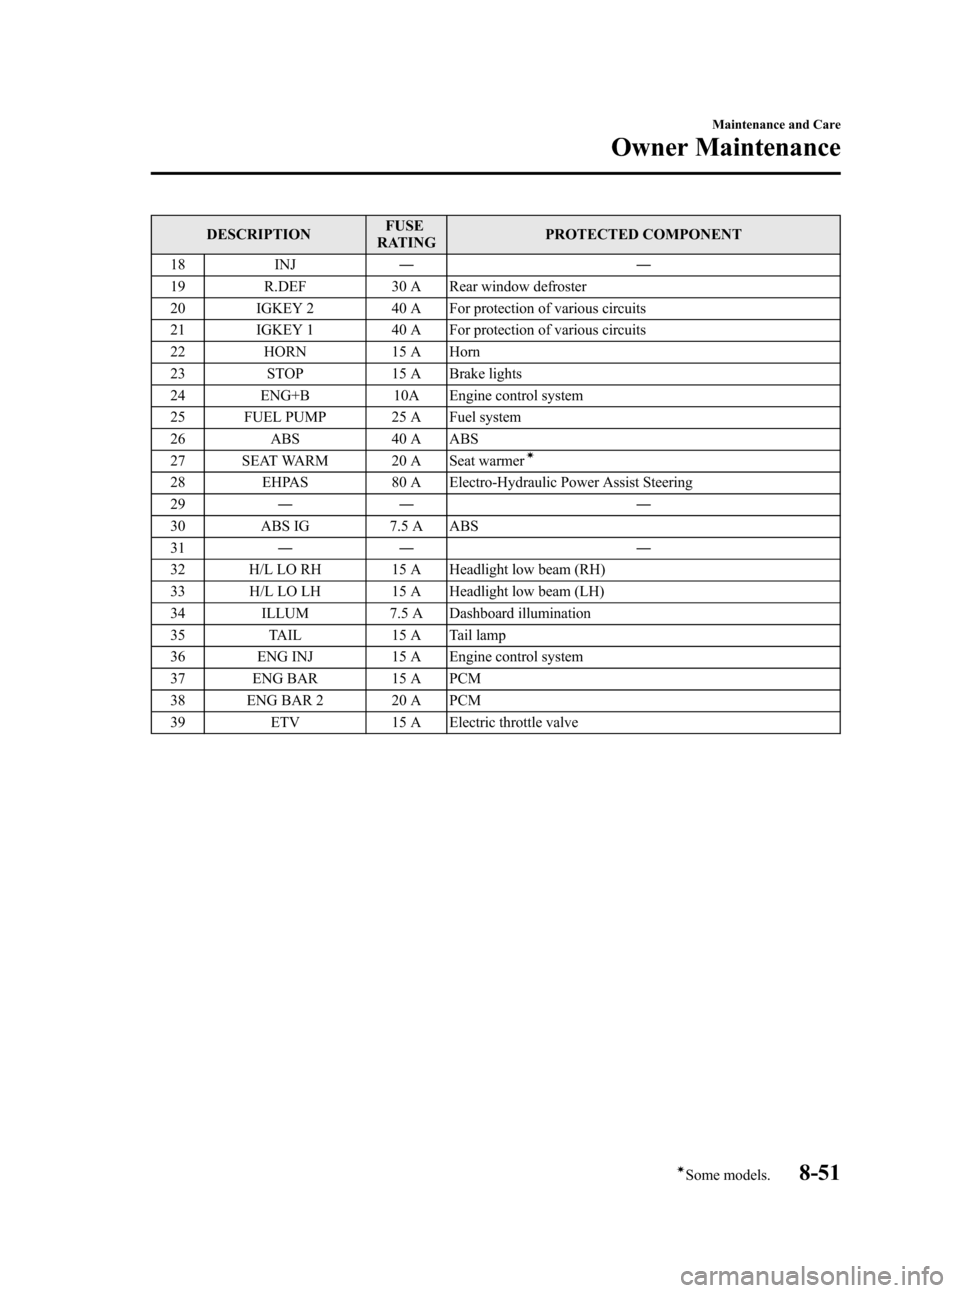
DESCRIPTIONFUSE
RATINGPROTECTED COMPONENT
18 INJ――
19 R.DEF 30 A Rear window defroster
20 IGKEY 2 40 A For protection of various circuits
21 IGKEY 1 40 A For protection of various circuits
22 HORN 15 A Horn
23 STOP 15 A Brake lights
24 ENG+B 10A Engine control system
25 FUEL PUMP 25 A Fuel system
26 ABS 40 A ABS
27 SEAT WARM 20 A Seat warmer
í
28 EHPAS 80 A Electro-Hydraulic Power Assist Steering
29―― ―
30 ABS IG 7.5 A ABS
31―― ―
32 H/L LO RH 15 A Headlight low beam (RH)
33 H/L LO LH 15 A Headlight low beam (LH)
34 ILLUM 7.5 A Dashboard illumination
35 TAIL 15 A Tail lamp
36 ENG INJ 15 A Engine control system
37 ENG BAR 15 A PCM
38 ENG BAR 2 20 A PCM
39 ETV 15 A Electric throttle valve
Maintenance and Care
Owner Maintenance
8-51íSome models. Mazda3_8AD6-EC-09A_Edition1 Page415
Tuesday, December 2 2008 2:28 PM
Form No.8AD6-EC-09A