steering MAZDA MODEL 3 HATCHBACK 2010 (in English) Service Manual
[x] Cancel search | Manufacturer: MAZDA, Model Year: 2010, Model line: MODEL 3 HATCHBACK, Model: MAZDA MODEL 3 HATCHBACK 2010Pages: 488, PDF Size: 6.52 MB
Page 373 of 488
Black plate (375,1)
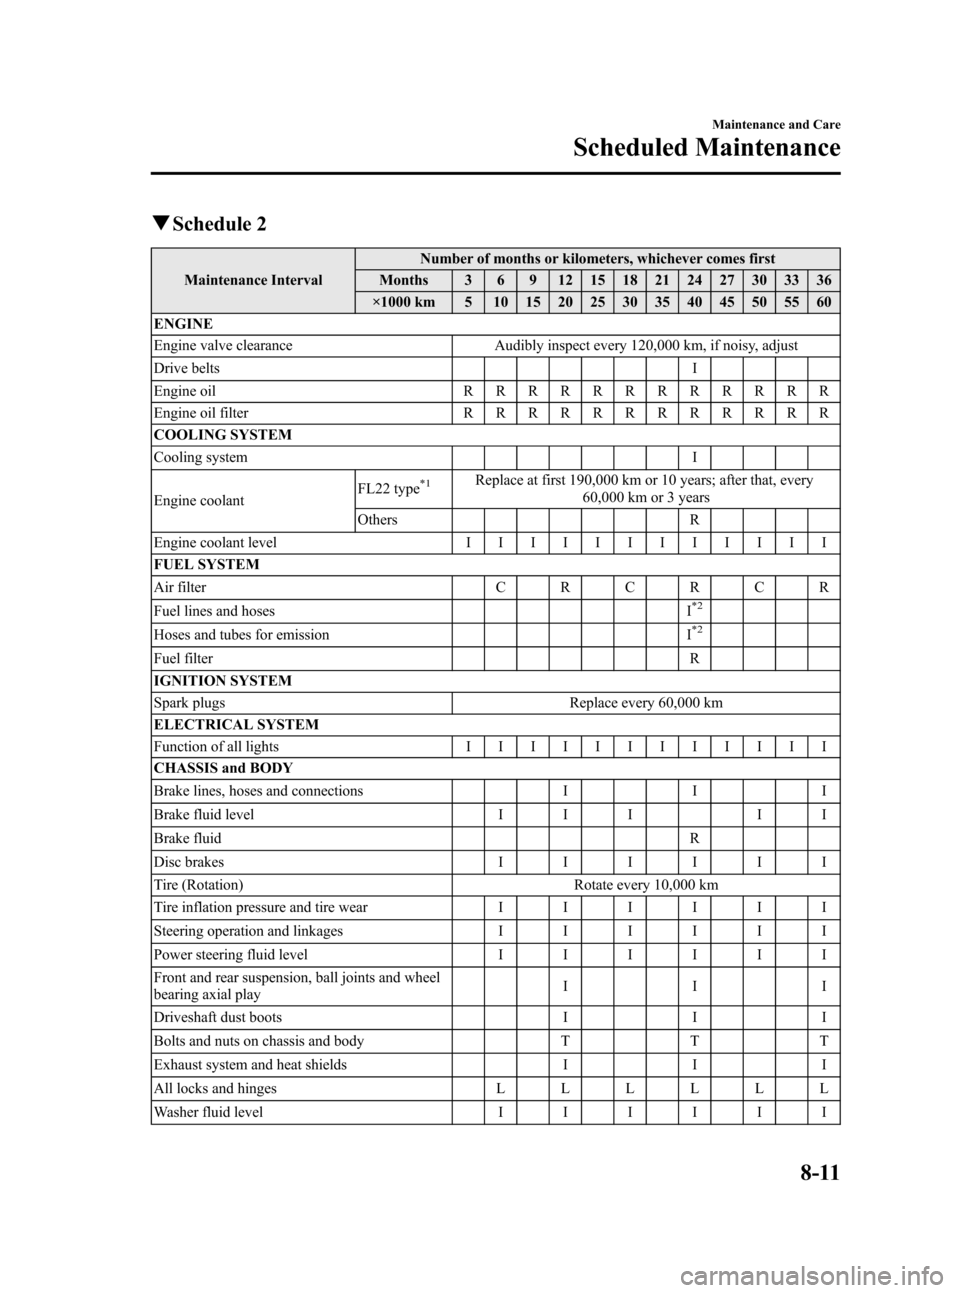
qSchedule 2
Maintenance IntervalNumber of months or kilometers, whichever comes first
Months 3 6 9 12 15 18 21 24 27 30 33 36
×1000 km 5 10 15 20 25 30 35 40 45 50 55 60
ENGINE
Engine valve clearance Audibly inspect every 120,000 km, if noisy, adjust
Drive belts I
Engine oilRRRRRRRRRRRR
Engine oil filterRRRRRRRRRRRR
COOLING SYSTEM
Cooling system I
Engine coolantFL22 type
*1Replace at first 190,000 km or 10 years; after that, every
60,000 km or 3 years
Others R
Engine coolant levelIIIIIIIIIIII
FUEL SYSTEM
Air filterCRCRCR
Fuel lines and hoses I
*2
Hoses and tubes for emission I*2
Fuel filter R
IGNITION SYSTEM
Spark plugs Replace every 60,000 km
ELECTRICAL SYSTEM
Function of all lightsIIIIIIIIIIII
CHASSIS and BODY
Brake lines, hoses and connections I I I
Brake fluid level I I I I I
Brake fluid R
Disc brakesIIIIII
Tire (Rotation) Rotate every 10,000 km
Tire inflation pressure and tire wearIIIIII
Steering operation and linkagesIIIIII
Power steering fluid levelIIIIII
Front and rear suspension, ball joints and wheel
bearing axial playIII
Driveshaft dust boots I I I
Bolts and nuts on chassis and body T T T
Exhaust system and heat shields I I I
All locks and hingesLLLLLL
Washer fluid levelIIIIII
Maintenance and Care
Scheduled Maintenance
8-11
Mazda3_8AD6-EC-09A_Edition1 Page375
Tuesday, December 2 2008 2:28 PM
Form No.8AD6-EC-09A
Page 375 of 488
Black plate (377,1)
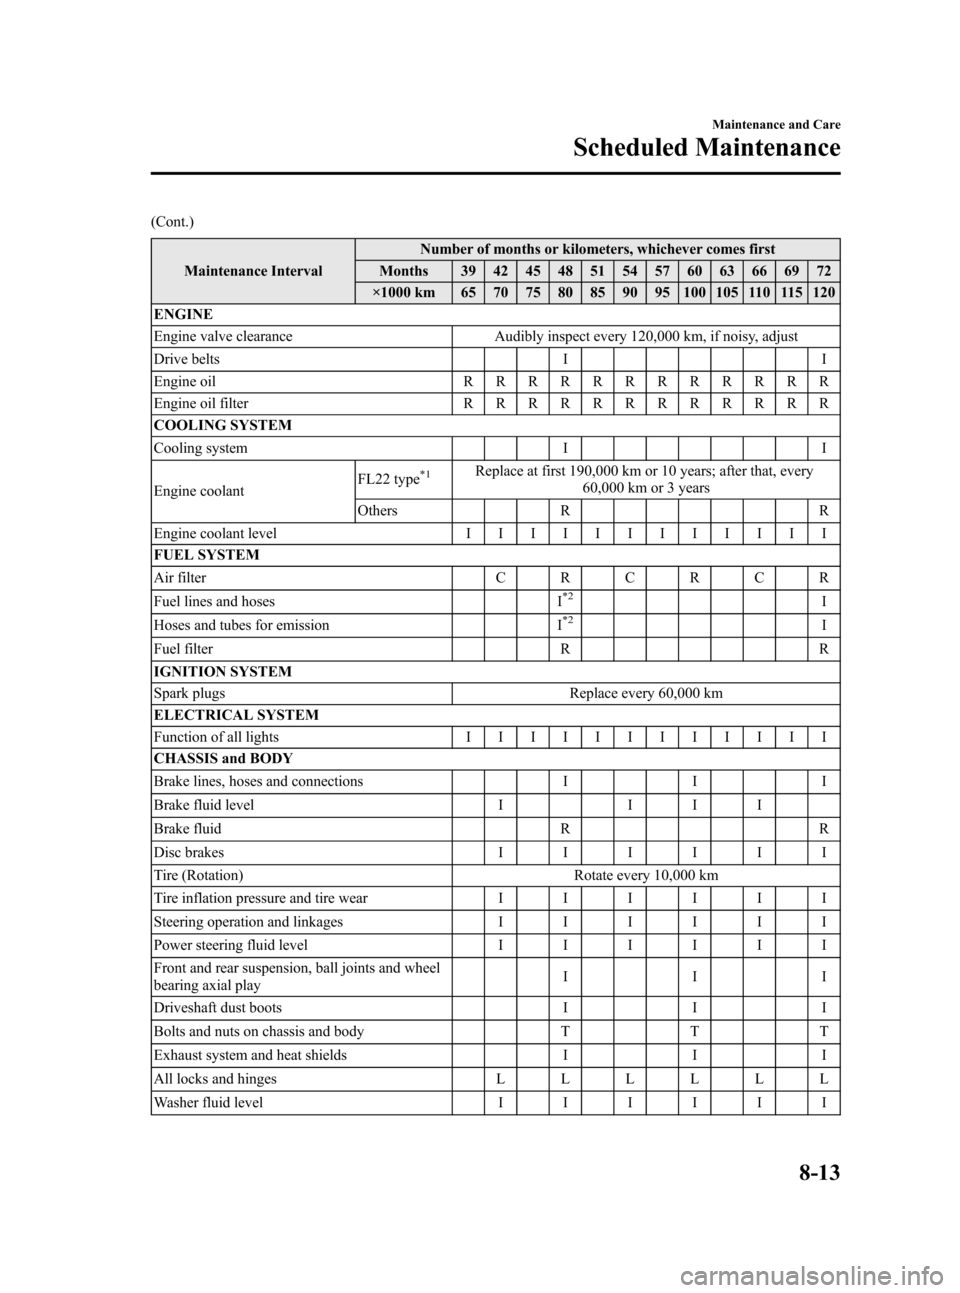
(Cont.)
Maintenance IntervalNumber of months or kilometers, whichever comes first
Months 39 42 45 48 51 54 57 60 63 66 69 72
×1000 km 65 70 75 80 85 90 95 100 105 110 115 120
ENGINE
Engine valve clearance Audibly inspect every 120,000 km, if noisy, adjust
Drive belts I I
Engine oilRRRRRRRRRRRR
Engine oil filterRRRRRRRRRRRR
COOLING SYSTEM
Cooling system I I
Engine coolantFL22 type
*1Replace at first 190,000 km or 10 years; after that, every
60,000 km or 3 years
Others R R
Engine coolant levelIIIIIIIIIIII
FUEL SYSTEM
Air filterCRCRCR
Fuel lines and hoses I
*2I
Hoses and tubes for emission I*2I
Fuel filter R R
IGNITION SYSTEM
Spark plugs Replace every 60,000 km
ELECTRICAL SYSTEM
Function of all lightsIIIIIIIIIIII
CHASSIS and BODY
Brake lines, hoses and connections I I I
Brake fluid level I I I I
Brake fluid R R
Disc brakesIIIIII
Tire (Rotation) Rotate every 10,000 km
Tire inflation pressure and tire wearIIIIII
Steering operation and linkagesIIIIII
Power steering fluid levelIIIIII
Front and rear suspension, ball joints and wheel
bearing axial playIII
Driveshaft dust boots I I I
Bolts and nuts on chassis and body T T T
Exhaust system and heat shields I I I
All locks and hingesLLLLLL
Washer fluid levelIIIIII
Maintenance and Care
Scheduled Maintenance
8-13
Mazda3_8AD6-EC-09A_Edition1 Page377
Tuesday, December 2 2008 2:28 PM
Form No.8AD6-EC-09A
Page 377 of 488
Black plate (379,1)
Owner Maintenance Schedule
The owner or a qualified service technician should make these vehicle inspections at the
indicated intervals to ensure safe and dependable operation.
Bring any problem to the attention of an Authorized Mazda Dealer or qualified service
technician as soon as possible.
qWhen Refueling
lBrake and clutch fluid level (page 8-22)lEngine coolant level (page 8-20)lEngine oil level (page 8-19)lWasher fluid level (page 8-25)
qAt Least Monthly
Tire inflation pressures (page 8-33)
qAt Least Twice a Year (For Example, Every Spring and Fall)
lAutomatic transaxle fluid level (page 8-23)lPower steering fluid level (page 8-23)
You can do the following scheduled maintenance items if you have some mechanical
ability and a few basic tools and if you closely follow the directions in this manual.
lEngine coolant (page 8-20)lEngine oil (page 8-18)
Maintenance and Care
Owner Maintenance
8-15
Mazda3_8AD6-EC-09A_Edition1 Page379
Tuesday, December 2 2008 2:28 PM
Form No.8AD6-EC-09A
Page 379 of 488
Black plate (381,1)
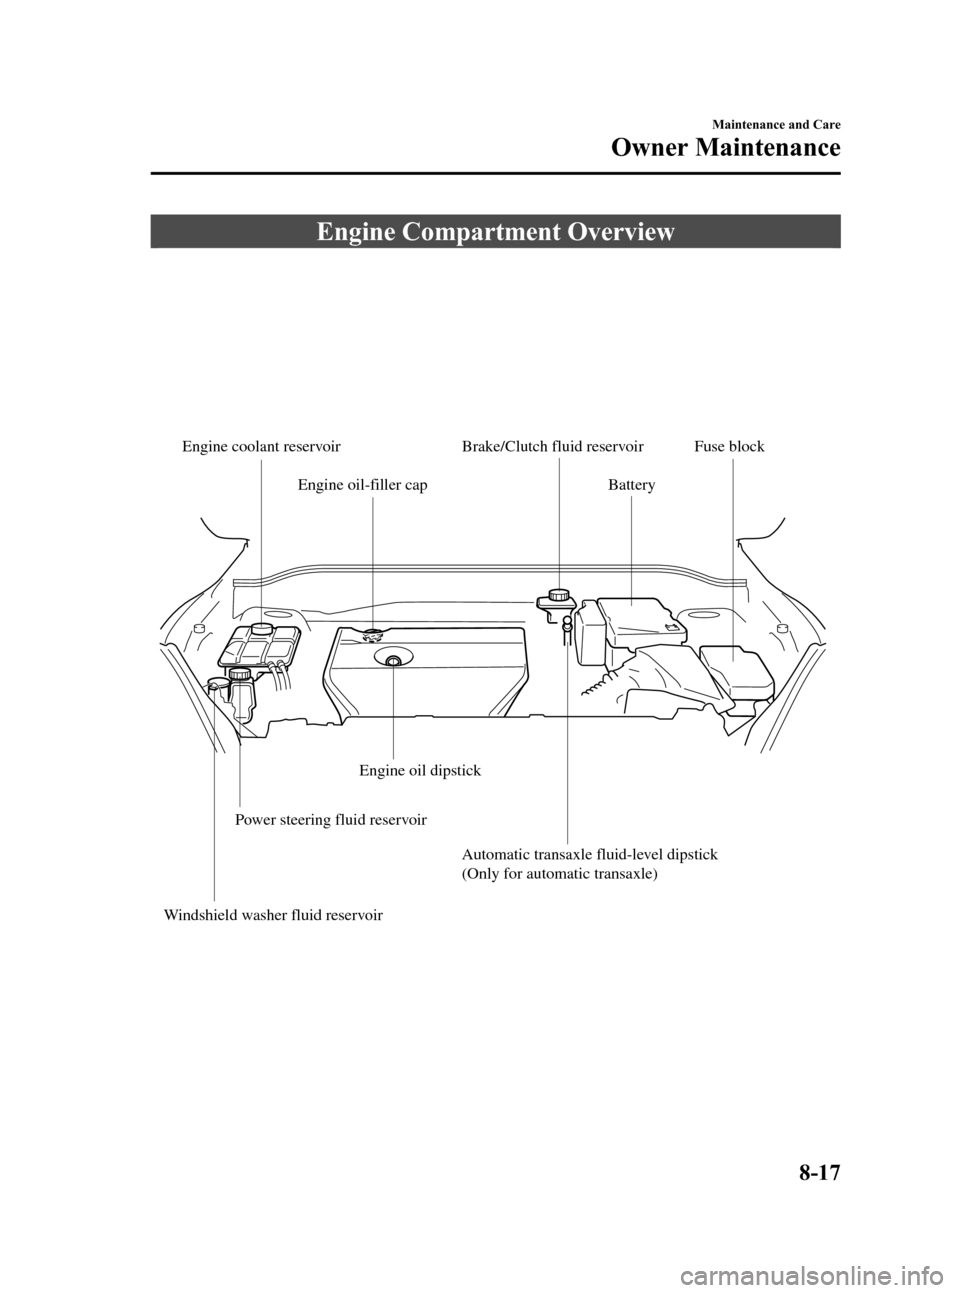
Engine Compartment Overview
Power steering fluid reservoir
Windshield washer fluid reservoir
Engine coolant reservoir Fuse block
Engine oil-filler cap
Engine oil dipstick
Brake/Clutch fluid reservoir
Battery
Automatic transaxle fluid-level dipstick
(Only for automatic transaxle)
Maintenance and Care
Owner Maintenance
8-17
Mazda3_8AD6-EC-09A_Edition1 Page381
Tuesday, December 2 2008 2:28 PM
Form No.8AD6-EC-09A
Page 385 of 488
Black plate (387,1)
Power Steering Fluid
qInspecting Power Steering Fluid
Level
CAUTION
To avoid damage to the power
steering pump, don't operate the
vehicle for long periods when the
power steering fluid level is low.
NOTE
Use specified power steering fluid (page 10-4).
Inspect the fluid level in the reservoir at
each engine oil change with the engine off
and cold. Add fluid if necessary; it does
not require periodic changing.
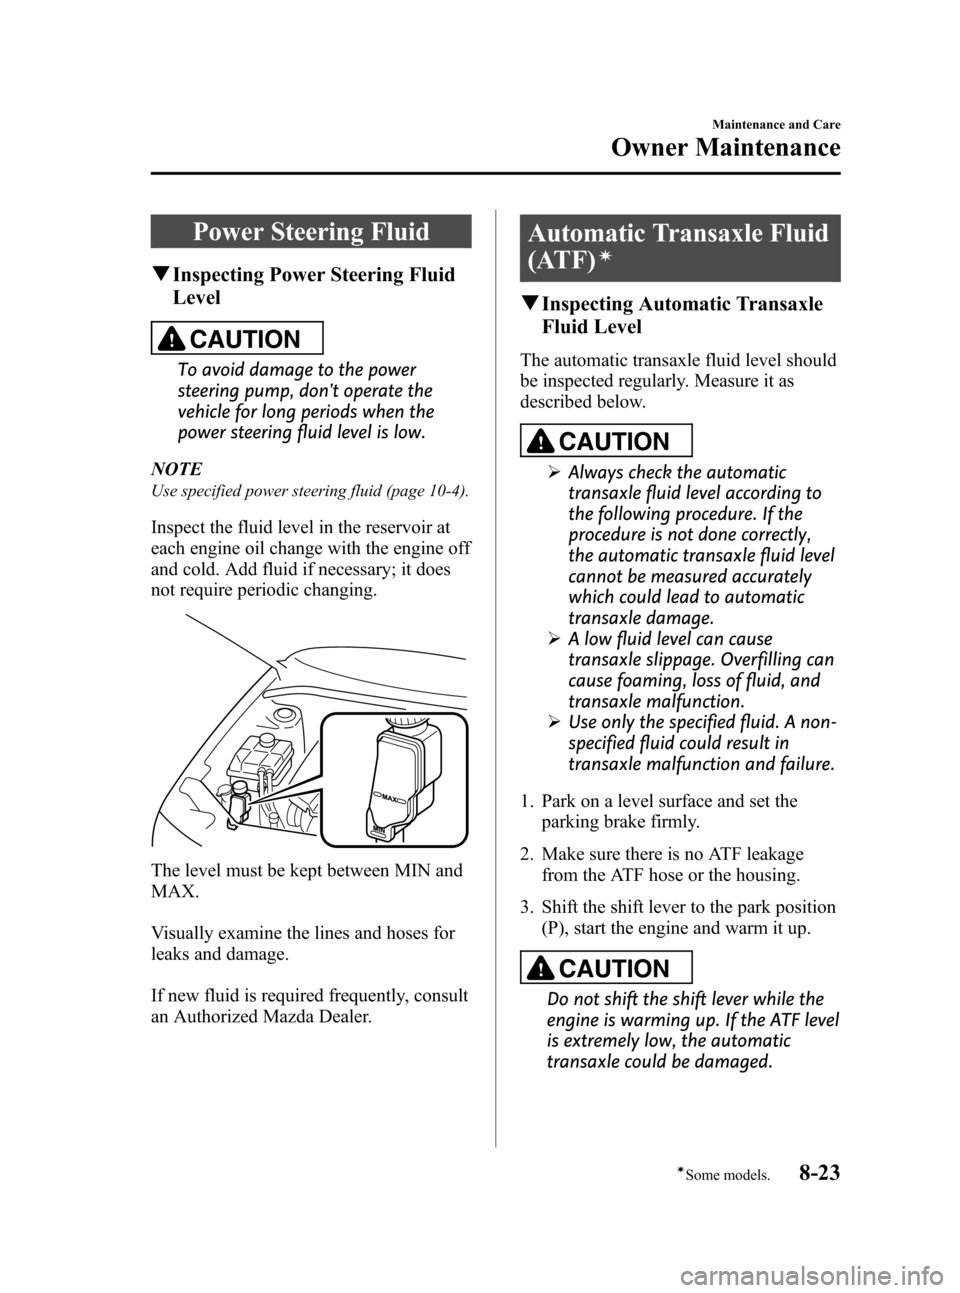
The level must be kept between MIN and
MAX.
Visually examine the lines and hoses for
leaks and damage.
If new fluid is required frequently, consult
an Authorized Mazda Dealer.
Automatic Transaxle Fluid
(ATF)
í
qInspecting Automatic Transaxle
Fluid Level
The automatic transaxle fluid level should
be inspected regularly. Measure it as
described below.
CAUTION
ØAlways check the automatic
transaxle fluid level according to
the following procedure. If the
procedure is not done correctly,
the automatic transaxle fluid level
cannot be measured accurately
which could lead to automatic
transaxle damage.
ØA low fluid level can cause
transaxle slippage. Overfilling can
cause foaming, loss of fluid, and
transaxle malfunction.
ØUse only the specified fluid. A non-
specified fluid could result in
transaxle malfunction and failure.
1. Park on a level surface and set the
parking brake firmly.
2. Make sure there is no ATF leakage
from the ATF hose or the housing.
3. Shift the shift lever to the park position
(P), start the engine and warm it up.
CAUTION
Do not shift the shift lever while the
engine is warming up. If the ATF level
is extremely low, the automatic
transaxle could be damaged.
Maintenance and Care
Owner Maintenance
8-23íSome models. Mazda3_8AD6-EC-09A_Edition1 Page387
Tuesday, December 2 2008 2:28 PM
Form No.8AD6-EC-09A
Page 396 of 488
Black plate (398,1)
NOTElAlways check tire pressure when tires are
cold.
lWarm tires normally exceed recommended
pressures. Don't release air from warm tires
to adjust the pressure.
lUnderinflation can cause reduced fuel
economy, uneven and accelerated tire wear,
and poor sealing of the tire bead, which
will deform the wheel and cause separation
of tire from rim.
lOverinflation can produce a harsh ride,
uneven and accelerated tire wear, and a
greater possibility of damage from road
hazards.
Keep your tire pressure at the correct
levels. If one frequently needs inflating,
have it inspected.
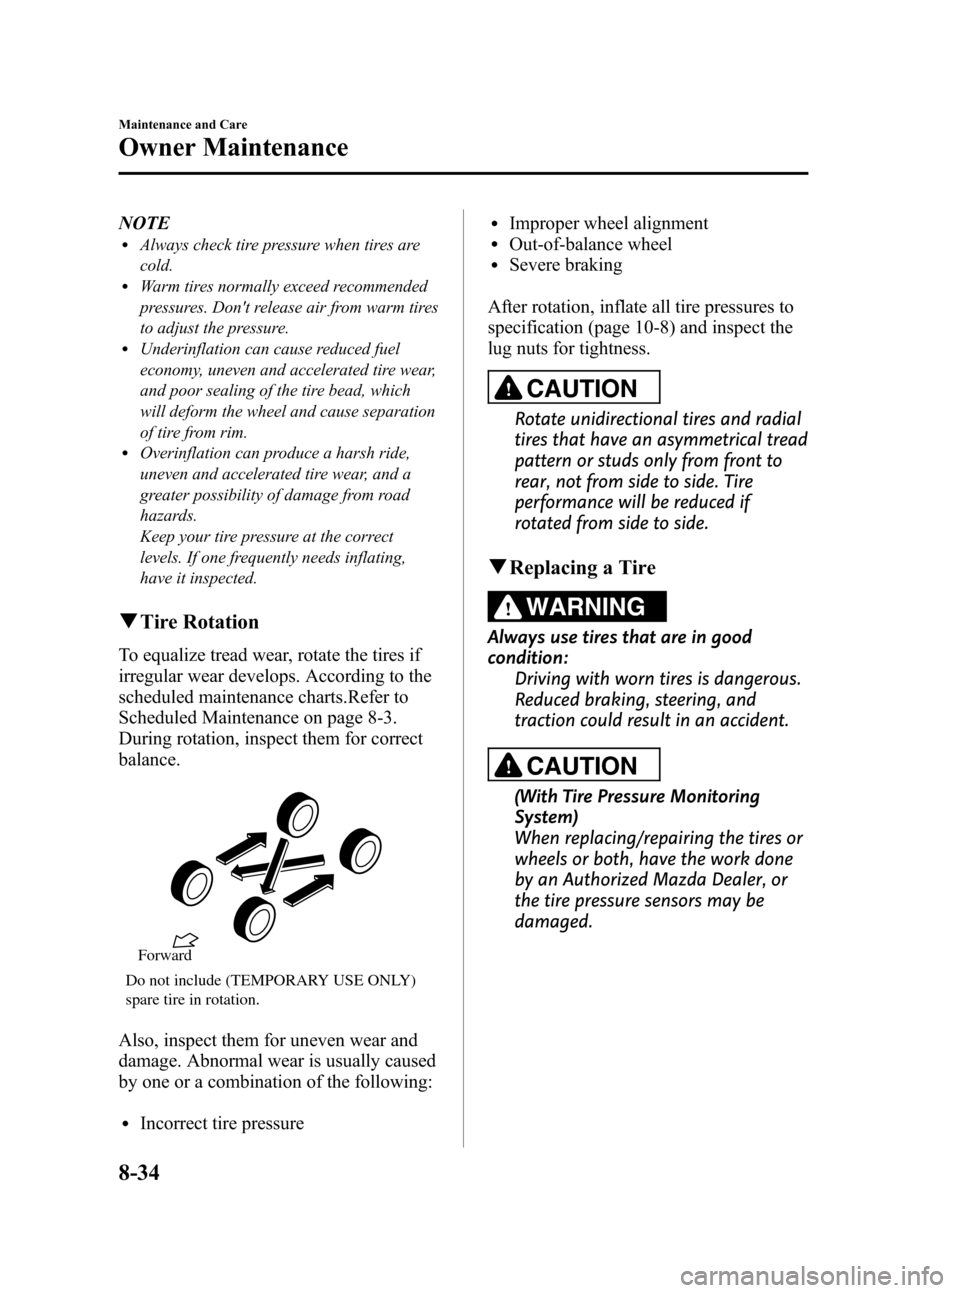
qTire Rotation
To equalize tread wear, rotate the tires if
irregular wear develops. According to the
scheduled maintenance charts.Refer to
Scheduled Maintenance on page 8-3.
During rotation, inspect them for correct
balance.
Do not include (TEMPORARY USE ONLY)
spare tire in rotation.Forward
Also, inspect them for uneven wear and
damage. Abnormal wear is usually caused
by one or a combination of the following:
lIncorrect tire pressure
lImproper wheel alignmentlOut-of-balance wheellSevere braking
After rotation, inflate all tire pressures to
specification (page 10-8) and inspect the
lug nuts for tightness.
CAUTION
Rotate unidirectional tires and radial
tires that have an asymmetrical tread
pattern or studs only from front to
rear, not from side to side. Tire
performance will be reduced if
rotated from side to side.
qReplacing a Tire
WARNING
Always use tires that are in good
condition:
Driving with worn tires is dangerous.
Reduced braking, steering, and
traction could result in an accident.
CAUTION
(With Tire Pressure Monitoring
System)
When replacing/repairing the tires or
wheels or both, have the work done
by an Authorized Mazda Dealer, or
the tire pressure sensors may be
damaged.
8-34
Maintenance and Care
Owner Maintenance
Mazda3_8AD6-EC-09A_Edition1 Page398
Tuesday, December 2 2008 2:28 PM
Form No.8AD6-EC-09A
Page 401 of 488

Black plate (403,1)
3. Turn the socket and bulb assembly to
remove it. Carefully remove the bulb
from its socket in the reflector by
gently pulling it straight backward out
of the socket.
4. Install the new bulb in the reverse order
of the removal procedure.
Front turn signal lights/Front side-
marker lights
1. Make sure the ignition switch is turned
off and the headlight switch is off.
2. If you are changing the right bulb, start
the engine, turn the steering wheel all
the way to the left, and turn off engine.
If you are changing the left bulb, turn
the steering wheel to the right.3. Turn the center section of the plastic
retainer counterclockwise and remove
the retainers and partially peel back the
mudguard.
Installation Removal
4. Turn the socket and bulb assembly
counterclockwise and remove it.
5. Disconnect the bulb from the socket.
6. Install the new bulb in the reverse order
of the removal procedure.
Halogen bulb
High-beam bulbs/Daytime running
lights (Canada)
1. Make sure the ignition is switched off,
and the headlight switch is off.
Maintenance and Care
Owner Maintenance
8-39
Mazda3_8AD6-EC-09A_Edition1 Page403
Tuesday, December 2 2008 2:28 PM
Form No.8AD6-EC-09A
Page 402 of 488
Black plate (404,1)
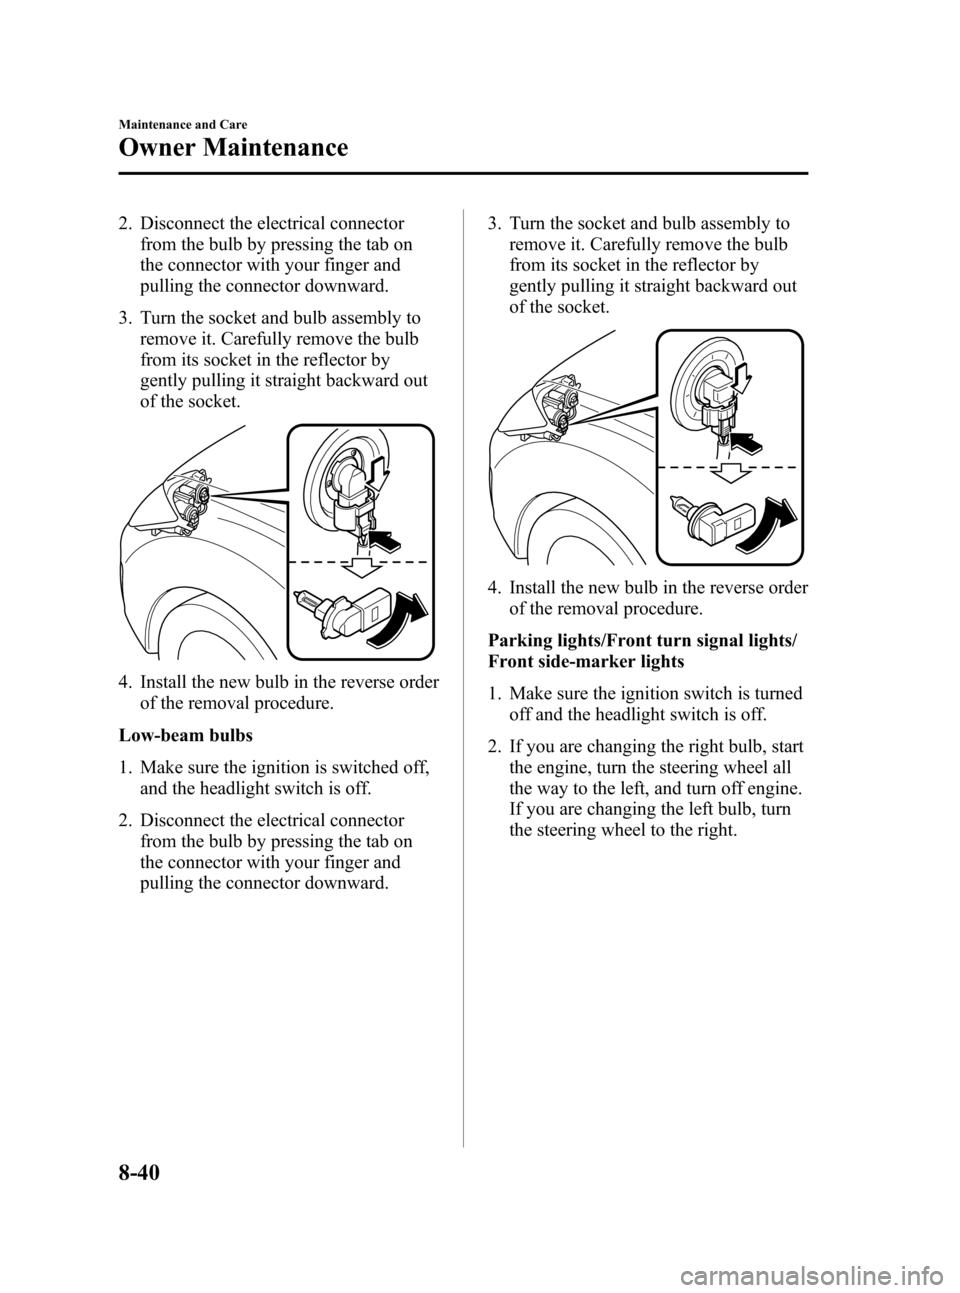
2. Disconnect the electrical connector
from the bulb by pressing the tab on
the connector with your finger and
pulling the connector downward.
3. Turn the socket and bulb assembly to
remove it. Carefully remove the bulb
from its socket in the reflector by
gently pulling it straight backward out
of the socket.
4. Install the new bulb in the reverse order
of the removal procedure.
Low-beam bulbs
1. Make sure the ignition is switched off,
and the headlight switch is off.
2. Disconnect the electrical connector
from the bulb by pressing the tab on
the connector with your finger and
pulling the connector downward.3. Turn the socket and bulb assembly to
remove it. Carefully remove the bulb
from its socket in the reflector by
gently pulling it straight backward out
of the socket.
4. Install the new bulb in the reverse order
of the removal procedure.
Parking lights/Front turn signal lights/
Front side-marker lights
1. Make sure the ignition switch is turned
off and the headlight switch is off.
2. If you are changing the right bulb, start
the engine, turn the steering wheel all
the way to the left, and turn off engine.
If you are changing the left bulb, turn
the steering wheel to the right.
8-40
Maintenance and Care
Owner Maintenance
Mazda3_8AD6-EC-09A_Edition1 Page404
Tuesday, December 2 2008 2:28 PM
Form No.8AD6-EC-09A
Page 413 of 488
Black plate (415,1)
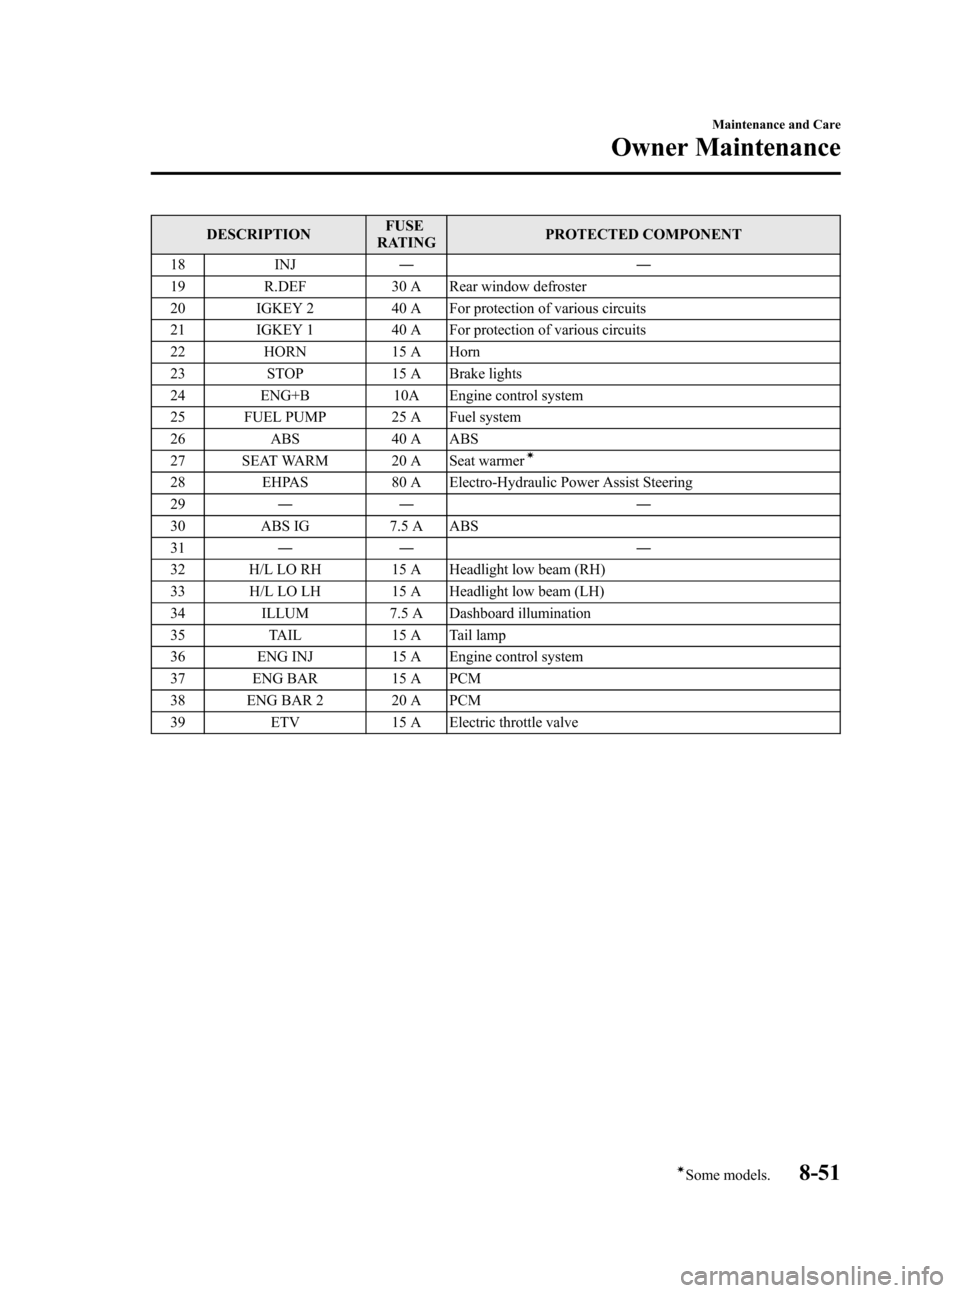
DESCRIPTIONFUSE
RATINGPROTECTED COMPONENT
18 INJ――
19 R.DEF 30 A Rear window defroster
20 IGKEY 2 40 A For protection of various circuits
21 IGKEY 1 40 A For protection of various circuits
22 HORN 15 A Horn
23 STOP 15 A Brake lights
24 ENG+B 10A Engine control system
25 FUEL PUMP 25 A Fuel system
26 ABS 40 A ABS
27 SEAT WARM 20 A Seat warmer
í
28 EHPAS 80 A Electro-Hydraulic Power Assist Steering
29―― ―
30 ABS IG 7.5 A ABS
31―― ―
32 H/L LO RH 15 A Headlight low beam (RH)
33 H/L LO LH 15 A Headlight low beam (LH)
34 ILLUM 7.5 A Dashboard illumination
35 TAIL 15 A Tail lamp
36 ENG INJ 15 A Engine control system
37 ENG BAR 15 A PCM
38 ENG BAR 2 20 A PCM
39 ETV 15 A Electric throttle valve
Maintenance and Care
Owner Maintenance
8-51íSome models. Mazda3_8AD6-EC-09A_Edition1 Page415
Tuesday, December 2 2008 2:28 PM
Form No.8AD6-EC-09A
Page 414 of 488
Black plate (416,1)
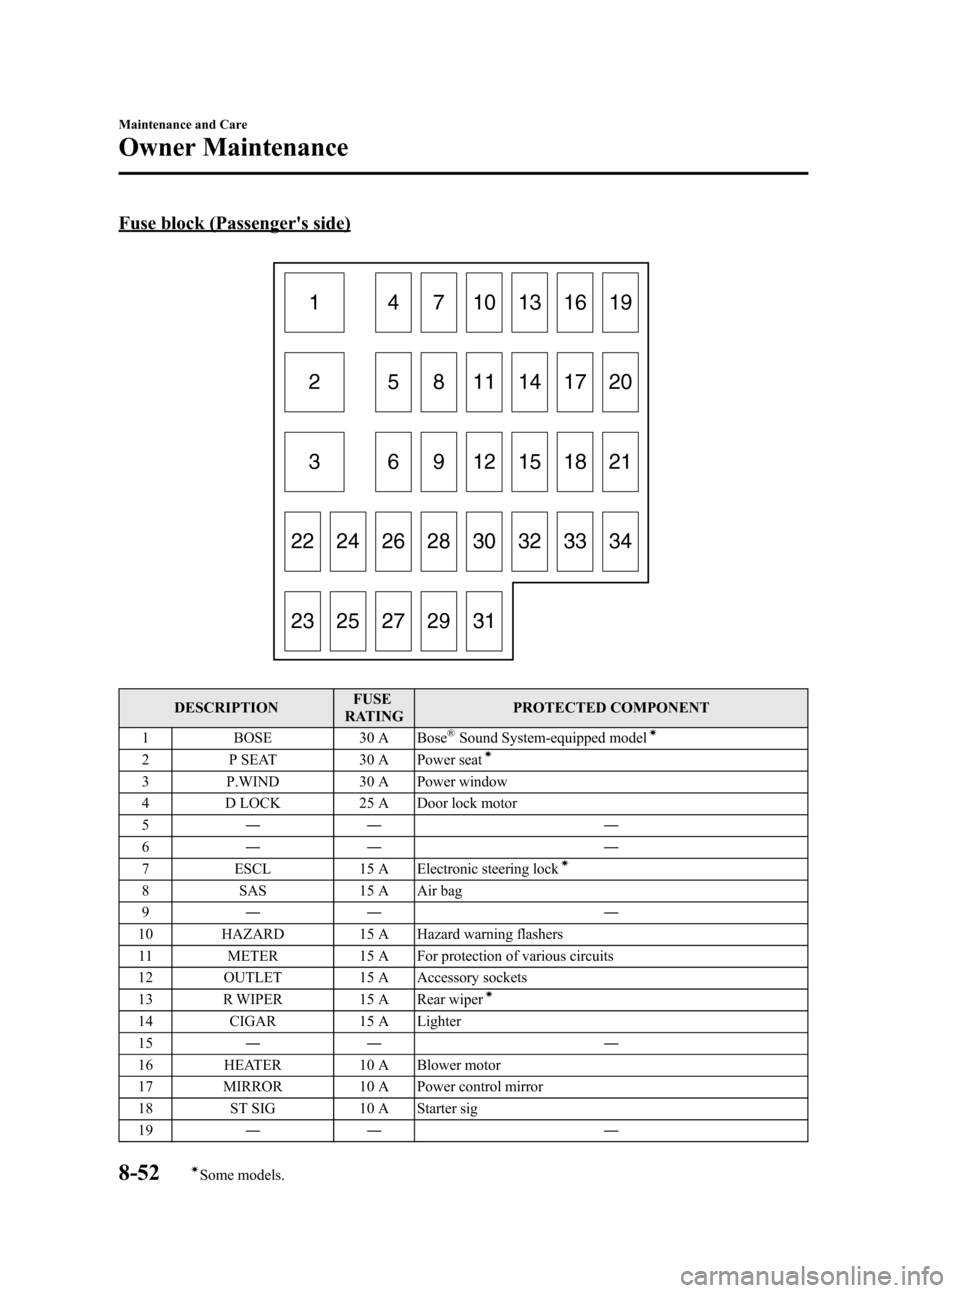
Fuse block (Passenger's side)
1 4 7 10131619
5 8 11 14 17 20
6 9 12 15 18 21
28 30 22 24 26
29 31 23 25 2732 33 34 2
3
DESCRIPTIONFUSE
RATINGPROTECTED COMPONENT
1 BOSE 30 A Bose
®Sound System-equipped modelí
2 P SEAT 30 A Power seatí
3 P.WIND 30 A Power window
4 D LOCK 25 A Door lock motor
5―― ―
6―― ―
7 ESCL 15 A Electronic steering lock
í
8 SAS 15 A Air bag
9―― ―
10 HAZARD 15 A Hazard warning flashers
11 METER 15 A For protection of various circuits
12 OUTLET 15 A Accessory sockets
13 R WIPER 15 A Rear wiper
í
14 CIGAR 15 A Lighter
15―― ―
16 HEATER 10 A Blower motor
17 MIRROR 10 A Power control mirror
18 ST SIG 10 A Starter sig
19―― ―
8-52
Maintenance and Care
íSome models.
Owner Maintenance
Mazda3_8AD6-EC-09A_Edition1 Page416
Tuesday, December 2 2008 2:28 PM
Form No.8AD6-EC-09A