ECU MAZDA MODEL 3 HATCHBACK 2010 (in English) Workshop Manual
[x] Cancel search | Manufacturer: MAZDA, Model Year: 2010, Model line: MODEL 3 HATCHBACK, Model: MAZDA MODEL 3 HATCHBACK 2010Pages: 488, PDF Size: 6.52 MB
Page 309 of 488
![MAZDA MODEL 3 HATCHBACK 2010 (in English) Workshop Manual Black plate (311,1)
NOTE
Say“All”to delete all devices (Mobile phone).
9.Prompt:“Deleting XXXXX... (Ex.
device B...) (Registered device tag). Is
this correct?”
10.Say:[Beep]“Ye s”
11.Promp MAZDA MODEL 3 HATCHBACK 2010 (in English) Workshop Manual Black plate (311,1)
NOTE
Say“All”to delete all devices (Mobile phone).
9.Prompt:“Deleting XXXXX... (Ex.
device B...) (Registered device tag). Is
this correct?”
10.Say:[Beep]“Ye s”
11.Promp](/img/28/13459/w960_13459-308.png)
Black plate (311,1)
NOTE
Say“All”to delete all devices (Mobile phone).
9.Prompt:“Deleting XXXXX... (Ex.
device B...) (Registered device tag). Is
this correct?”
10.Say:[Beep]“Ye s”
11.Prompt:“Deleted”
Registered device editing
1. Press the pick-up button or talk button
with a short press.
2.Say: [Beep]“Setup”
3.Prompt:“Select one of the following:
Pairing options, confirmation prompts,
language, passcode, select phone or
select music player.”
4.Say: [Beep]“Pairing options”
5.Prompt:“Select one of the following:
Pair, edit, delete, or list.”
6.Say: [Beep]“Edit”
7.Prompt:“Please say 1 for XXXXX...
(Ex. device A), 2 for XXXXX... (Ex.
device B...), which device please?”
(The device tag of the registered device
is read out by the HFP.)
8.Say: [Beep]“X”(Say the number of
the device to be edited.)
9.Prompt:“New name please?”
10.Say: [Beep]“XXXXX... (Ex. device
C)”(Speak a“device tag”,an
arbitrary name for the device.)
11.Prompt:“XXXXX... (Ex. device C)
(Device tag), is this correct?”
12.Say: [Beep]“Ye s”
13.Prompt:“New name saved, returning
to main menu.”
qSecurity Setting
If a passcode is set, the system cannot be
activated unless the passcode is input.
NOTE
Do this function only when parked. It is too
distracting to attempt while driving and you
may make too many errors to be effective.
Passcode setting
1. Press the pick-up button or talk button
with a short press.
2.Say:[Beep]“Setup”
3.Prompt:“Select one of the following:
Pairing options, confirmation prompts,
language, passcode, select phone or
select music player.”
4.Say:[Beep]“Passcode”
5.Prompt:“Passcode is disabled. Would
you like to enable it?”
6.Say:[Beep]“Ye s”
7.Prompt:“Please say a 4-digit passcode.
Remember this passcode. It will be
required to use this system.”
8.Say:[Beep]“XXXX”(Say a desired 4-
digit passcode,“PCode”.)
9.Prompt:“Passcode XXXX (Passcode,
PCode). Is this correct?”
10.Say:[Beep]“Ye s”
11.Prompt:“Passcode is enabled,
returning to main menu.”
Using Bluetooth Hands-Free with a
passcode
1. Press the pick-up button or talk button
with a short press.
Interior Comfort
Bluetooth Hands-Free
6-87
Mazda3_8AD6-EC-09A_Edition1 Page311
Tuesday, December 2 2008 2:28 PM
Form No.8AD6-EC-09A
Page 310 of 488
![MAZDA MODEL 3 HATCHBACK 2010 (in English) Workshop Manual Black plate (312,1)
2.Prompt:“Hands-Free system is locked.
State the passcode to continue.”
3.Say:[Beep]“XXXX”(Say the set
passcode“PCode”.)
4. If the correct passcode is input, voice
guid MAZDA MODEL 3 HATCHBACK 2010 (in English) Workshop Manual Black plate (312,1)
2.Prompt:“Hands-Free system is locked.
State the passcode to continue.”
3.Say:[Beep]“XXXX”(Say the set
passcode“PCode”.)
4. If the correct passcode is input, voice
guid](/img/28/13459/w960_13459-309.png)
Black plate (312,1)
2.Prompt:“Hands-Free system is locked.
State the passcode to continue.”
3.Say:[Beep]“XXXX”(Say the set
passcode“PCode”.)
4. If the correct passcode is input, voice
guidance“XXXXXX... (Ex.“Mary's
device) (Device tag) is connected”is
announced.
If the passcode is incorrect, voice
guidance“XXXX (4-digit passcode,
Pcode) incorrect passcode, please try
again”is announced.
Canceling the passcode
NOTE
Do this function only when parked. It is too
distracting to attempt while driving and you
may make too many errors to be effective.
1. Press the pick-up button or talk button
with a short press.
2.Say:[Beep]“Setup”
3.Prompt:“Select one of the following:
Pairing options, confirmation prompts,
language, passcode, select phone or
select music player.”
4.Say:[Beep]“Passcode”
5.Prompt:“Passcode is enabled. Would
you like to disable it?”
6.Say:[Beep]“Ye s”
7.Prompt:“Passcode is disabled,
returning to main menu.”
Confirmation Prompts
The confirmation prompt confirms the
command content to the user before
advancing to the operation requested by
the user. When this function is turned on,
the system reads out the voice input
command previously received and
confirms whether the command is correct
before advancing to the command
execution.
When the confirmation prompt function is
turned on:
(Ex.“Calling John's device. Is this
correct?”)
When the confirmation prompt function is
turned off:
(Ex.“Calling John's device.”)
NOTE
If the confirmation prompt function is turned
off when making an emergency call, the system
reads out and confirms the command before
executing it.
1. Press the pick-up button or talk button
with a short press.
2.Say:[Beep]“Setup”
3.Prompt:“Select one of the following:
Pairing options, confirmation prompts,
language, passcode, select phone or
select music player.”
4.Say:[Beep]“Confirmation prompts”
5.Prompt:“Confirmation prompts are
on/off. Would you like to turn
confirmation prompts off/on?”
6.Say:[Beep]“Ye s”
7.Prompt:“Confirmation prompts are
off/on, returning to main menu.”
6-88
Interior Comfort
Bluetooth Hands-Free
Mazda3_8AD6-EC-09A_Edition1 Page312
Tuesday, December 2 2008 2:28 PM
Form No.8AD6-EC-09A
Page 332 of 488

Black plate (334,1)
Storage trayí
The storage tray can be installed to the
left/right side of the center console.
Storage tray
Using the armrestí
CAUTION
ØWhen sliding the armrest, be
careful not to hit a drink cup
placed in a cup holder and spill its
contents. Remove cups or other
drink containers from the cup
holders before pulling out the
armrest.
ØBefore opening the center console,
store the armrest first. Otherwise,
the armrest or center console may
be damaged.Press the button to slide the armrest
frontward.
When storing the armrest, press and hold
the button while pulling the armrest back,
and remove your hand once it is in its
stored position.
qCargo Securing Loops (5 Door)
WARNING
Make sure luggage and cargo is
secured before driving:
Not securing cargo while driving is
dangerous as it could move or be
crushed during sudden braking or a
collision and cause injury.
6-110
Interior Comfort
íSome models.
Interior Equipment
Mazda3_8AD6-EC-09A_Edition1 Page334
Tuesday, December 2 2008 2:28 PM
Form No.8AD6-EC-09A
Page 333 of 488

Black plate (335,1)
Use the loops in the luggage compartment
to secure cargo with a rope or net. The
tensile strength of the loops is 196 N (20
kgf, 44 lbf). Do not apply excessive force
to the loops as it will damage them.
qShopping Bag Hook (5 Door)
The shopping bag hook can be used for
hanging shopping bags.
CAUTION
Do not hang excessive weight on the
shopping bag hook as it could be
damaged.
Shopping bag hook
(tensile strength: 3 kg
(6.6 lb))
qRear Coat Hooks
WARNING
Never hang heavy or sharp objects on
the assist grips and coat hooks:
Hanging heavy or sharp-ended
objects such as a coat hanger from
the assist grips or coat hooks is
dangerous as they can fly off and hit
an occupant in the cabin if a curtain
air bag was to deploy, which could
result in serious injury or death.
Always hang clothes on the coat hooks
and the assist grips without hangers.
Coat hook
Interior Comfort
Interior Equipment
6-111
Mazda3_8AD6-EC-09A_Edition1 Page335
Tuesday, December 2 2008 2:28 PM
Form No.8AD6-EC-09A
Page 342 of 488

Black plate (344,1)
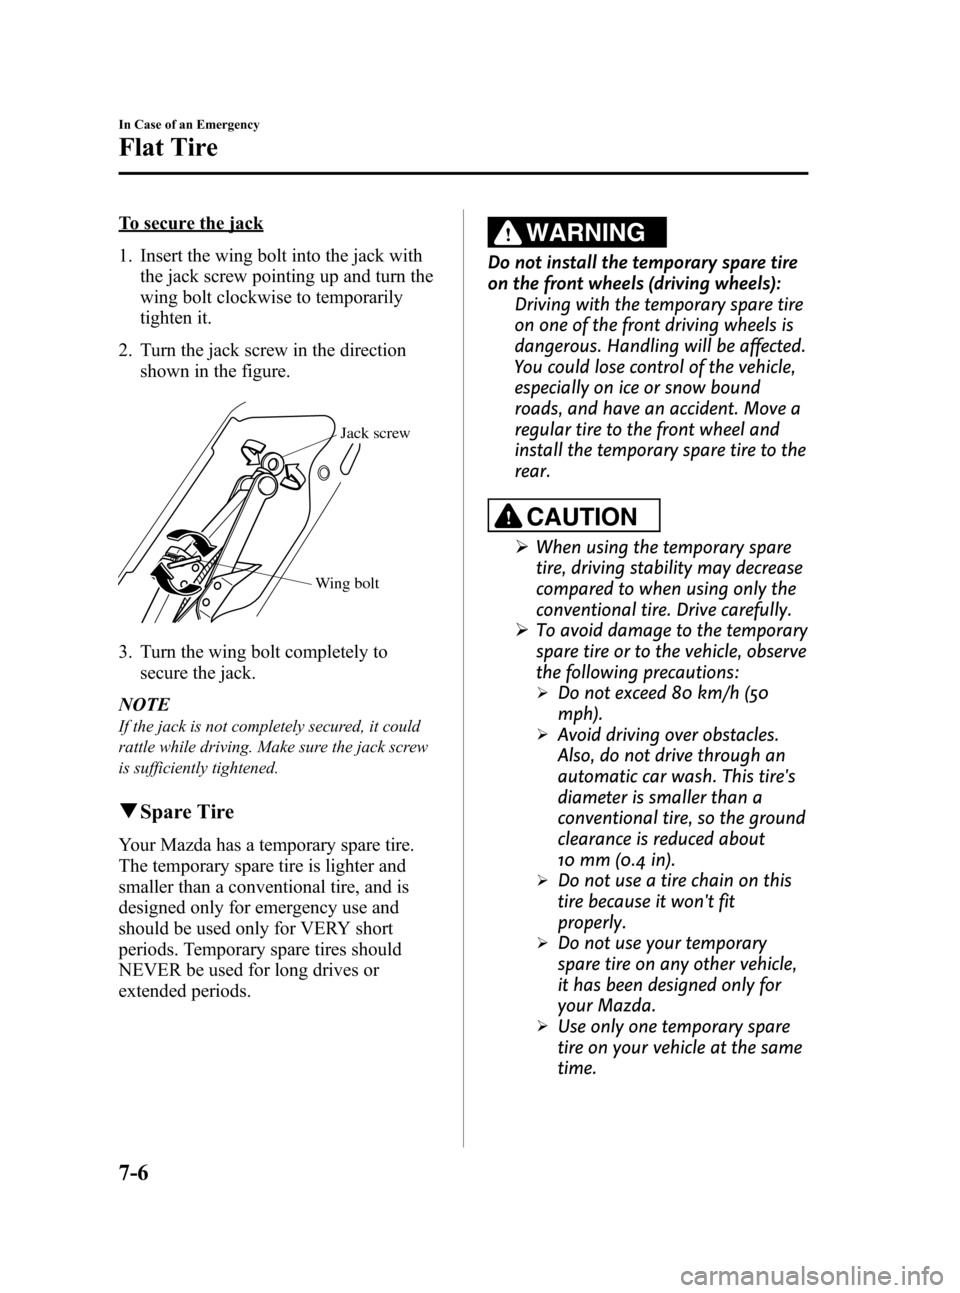
To secure the jack
1. Insert the wing bolt into the jack with
the jack screw pointing up and turn the
wing bolt clockwise to temporarily
tighten it.
2. Turn the jack screw in the direction
shown in the figure.
Wing boltJack screw
3. Turn the wing bolt completely to
secure the jack.
NOTE
If the jack is not completely secured, it could
rattle while driving. Make sure the jack screw
is sufficiently tightened.
qSpare Tire
Your Mazda has a temporary spare tire.
The temporary spare tire is lighter and
smaller than a conventional tire, and is
designed only for emergency use and
should be used only for VERY short
periods. Temporary spare tires should
NEVER be used for long drives or
extended periods.
WARNING
Do not install the temporary spare tire
on the front wheels (driving wheels):
Driving with the temporary spare tire
on one of the front driving wheels is
dangerous. Handling will be affected.
You could lose control of the vehicle,
especially on ice or snow bound
roads, and have an accident. Move a
regular tire to the front wheel and
install the temporary spare tire to the
rear.
CAUTION
ØWhen using the temporary spare
tire, driving stability may decrease
compared to when using only the
conventional tire. Drive carefully.
ØTo avoid damage to the temporary
spare tire or to the vehicle, observe
the following precautions:
ØDo not exceed 80 km/h (50
mph).
ØAvoid driving over obstacles.
Also, do not drive through an
automatic car wash. This tire's
diameter is smaller than a
conventional tire, so the ground
clearance is reduced about
10 mm (0.4 in).
ØDo not use a tire chain on this
tire because it won't fit
properly.
ØDo not use your temporary
spare tire on any other vehicle,
it has been designed only for
your Mazda.
ØUse only one temporary spare
tire on your vehicle at the same
time.
7-6
In Case of an Emergency
Flat Tire
Mazda3_8AD6-EC-09A_Edition1 Page344
Tuesday, December 2 2008 2:28 PM
Form No.8AD6-EC-09A
Page 344 of 488

Black plate (346,1)
For vehicles not equipped with a sub-
woofer, loosen the hold-down bolt and
remove the spare tire.
To secure the spare tire
Perform the removal procedure in reverse.
Secure the spare tire using the hold-down
bolt and tire clamp in the correct position
as illustrated.
NOTE
(5 Door)
When storing a conventional tire in a vehicle
equipped with a sub-woofer, you cannot
connect the connector on the trunk board.
(Without sub-woofer)
Tire clampTire hold-down bolt
(With sub-woofer)
Sub-woofer
Tire hold-down bolt
7-8
In Case of an Emergency
Flat Tire
Mazda3_8AD6-EC-09A_Edition1 Page346
Tuesday, December 2 2008 2:28 PM
Form No.8AD6-EC-09A
Page 349 of 488

Black plate (351,1)
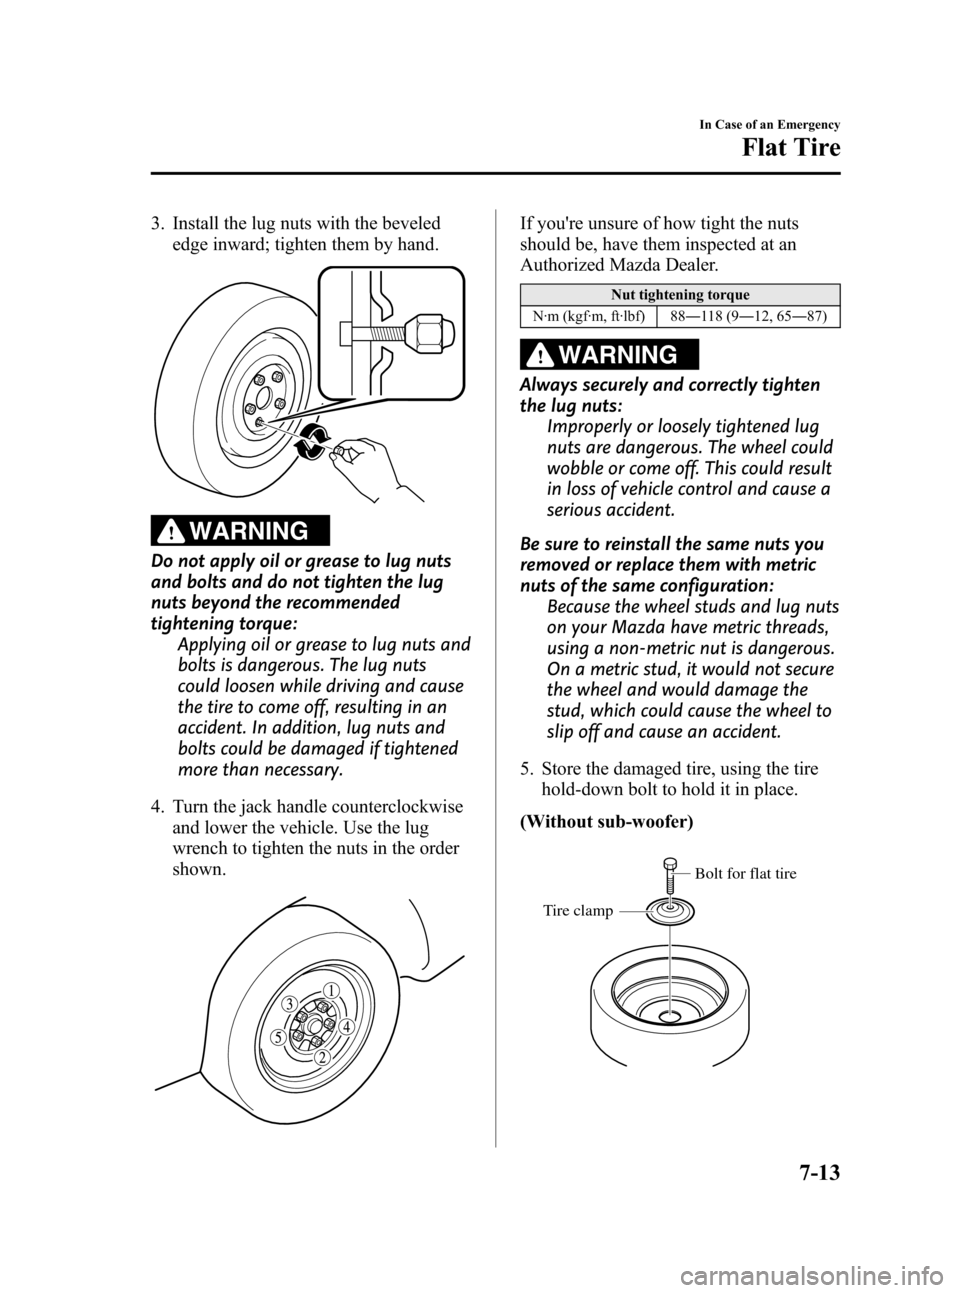
3. Install the lug nuts with the beveled
edge inward; tighten them by hand.
WARNING
Do not apply oil or grease to lug nuts
and bolts and do not tighten the lug
nuts beyond the recommended
tightening torque:
Applying oil or grease to lug nuts and
bolts is dangerous. The lug nuts
could loosen while driving and cause
the tire to come off, resulting in an
accident. In addition, lug nuts and
bolts could be damaged if tightened
more than necessary.
4. Turn the jack handle counterclockwise
and lower the vehicle. Use the lug
wrench to tighten the nuts in the order
shown.
If you're unsure of how tight the nuts
should be, have them inspected at an
Authorized Mazda Dealer.
Nut tightening torque
N·m (kgf·m, ft·lbf) 88―118 (9―12, 65―87)
WARNING
Always securely and correctly tighten
the lug nuts:
Improperly or loosely tightened lug
nuts are dangerous. The wheel could
wobble or come off. This could result
in loss of vehicle control and cause a
serious accident.
Be sure to reinstall the same nuts you
removed or replace them with metric
nuts of the same configuration:
Because the wheel studs and lug nuts
on your Mazda have metric threads,
using a non-metric nut is dangerous.
On a metric stud, it would not secure
the wheel and would damage the
stud, which could cause the wheel to
slip off and cause an accident.
5. Store the damaged tire, using the tire
hold-down bolt to hold it in place.
(Without sub-woofer)
Tire clamp
Bolt for flat tire
In Case of an Emergency
Flat Tire
7-13
Mazda3_8AD6-EC-09A_Edition1 Page351
Tuesday, December 2 2008 2:28 PM
Form No.8AD6-EC-09A
Page 356 of 488

Black plate (358,1)
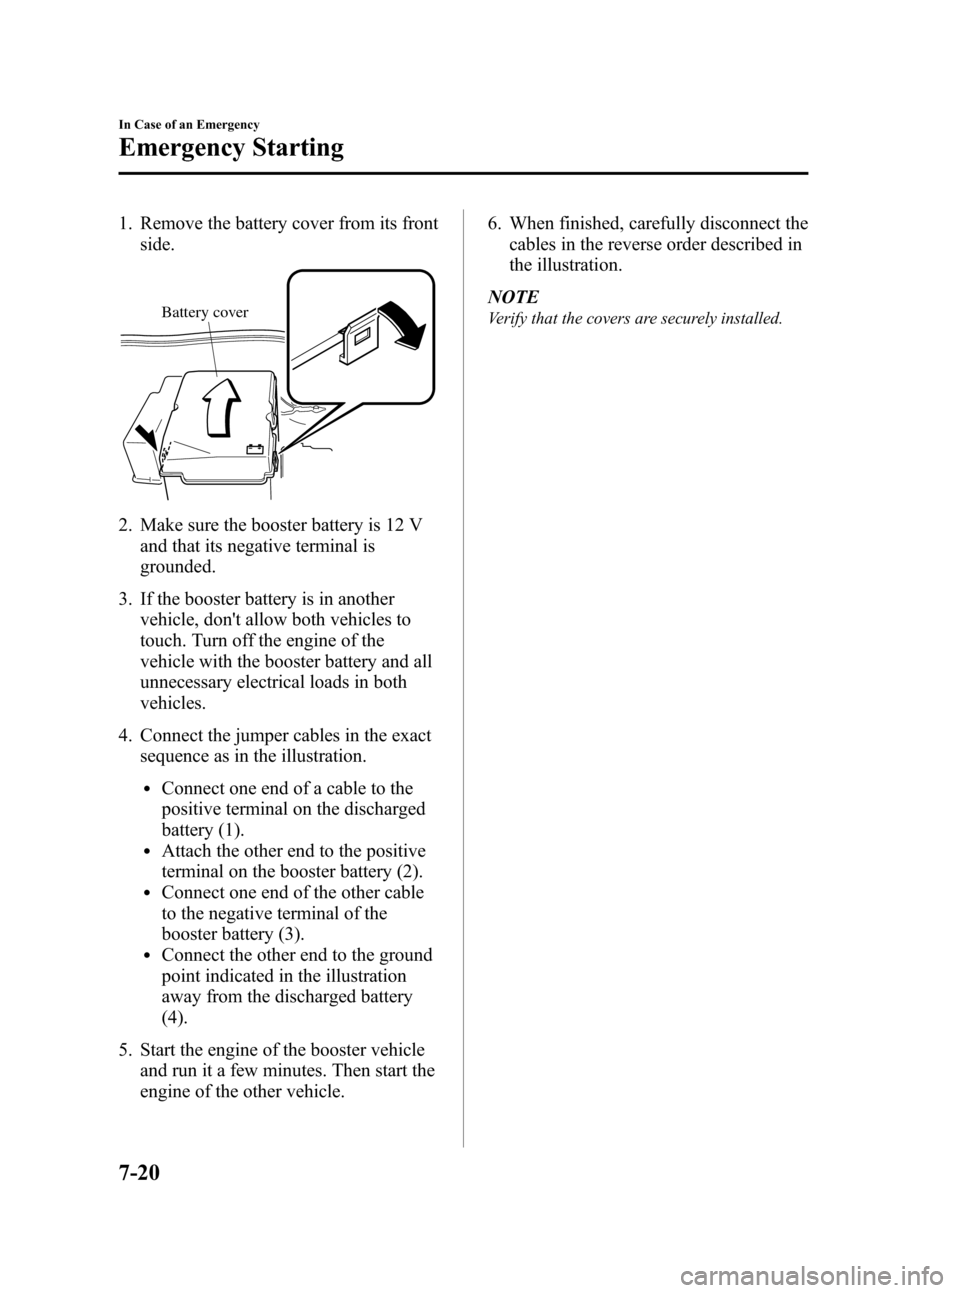
1. Remove the battery cover from its front
side.
Battery cover
2. Make sure the booster battery is 12 V
and that its negative terminal is
grounded.
3. If the booster battery is in another
vehicle, don't allow both vehicles to
touch. Turn off the engine of the
vehicle with the booster battery and all
unnecessary electrical loads in both
vehicles.
4. Connect the jumper cables in the exact
sequence as in the illustration.
lConnect one end of a cable to the
positive terminal on the discharged
battery (1).
lAttach the other end to the positive
terminal on the booster battery (2).
lConnect one end of the other cable
to the negative terminal of the
booster battery (3).
lConnect the other end to the ground
point indicated in the illustration
away from the discharged battery
(4).
5. Start the engine of the booster vehicle
and run it a few minutes. Then start the
engine of the other vehicle.6. When finished, carefully disconnect the
cables in the reverse order described in
the illustration.
NOTE
Verify that the covers are securely installed.
7-20
In Case of an Emergency
Emergency Starting
Mazda3_8AD6-EC-09A_Edition1 Page358
Tuesday, December 2 2008 2:28 PM
Form No.8AD6-EC-09A
Page 360 of 488

Black plate (362,1)
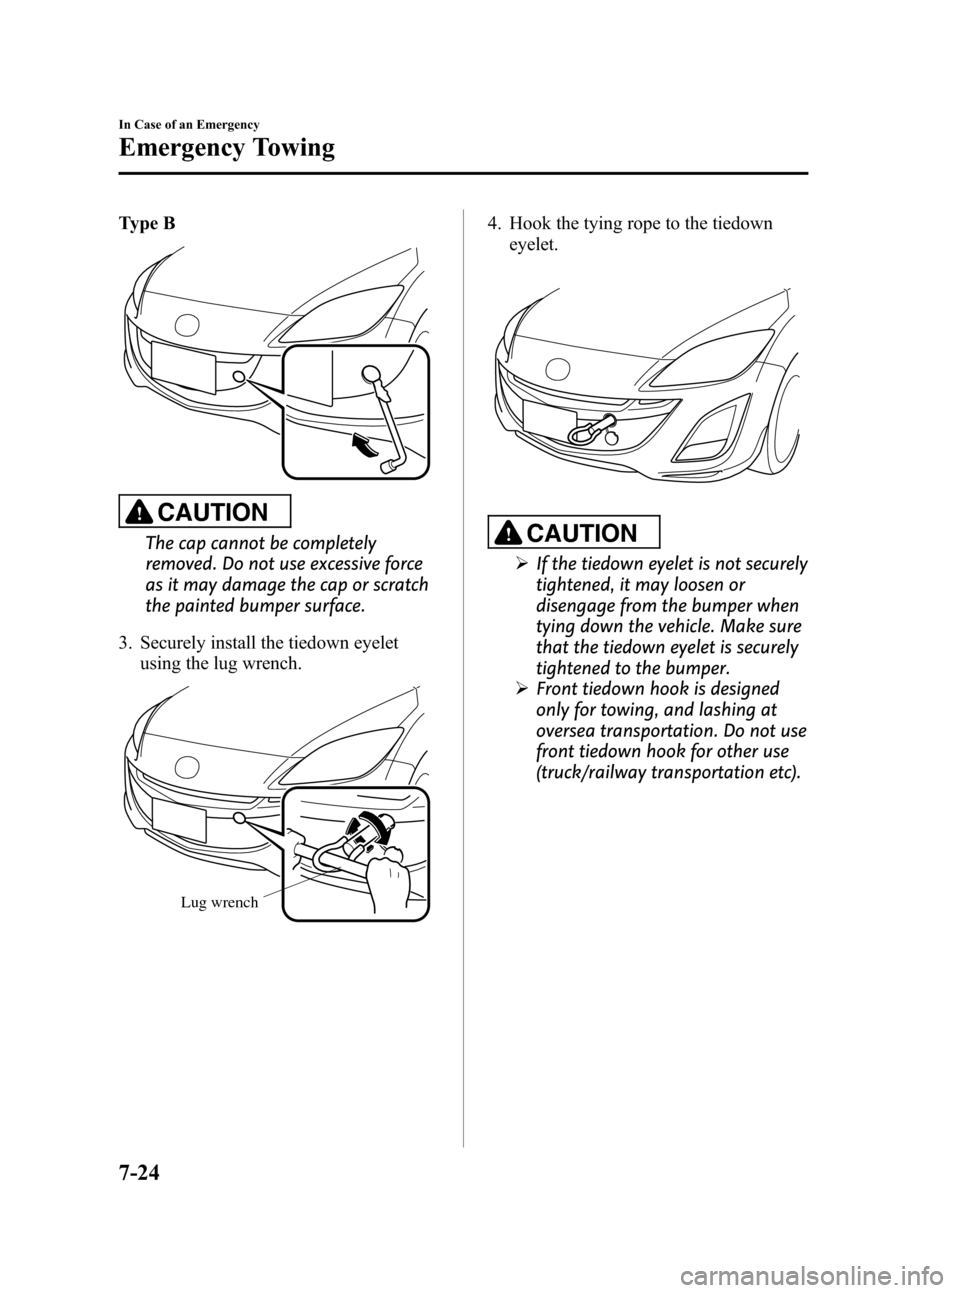
Type B
CAUTION
The cap cannot be completely
removed. Do not use excessive force
as it may damage the cap or scratch
the painted bumper surface.
3. Securely install the tiedown eyelet
using the lug wrench.
Lug wrench
4. Hook the tying rope to the tiedown
eyelet.
CAUTION
ØIf the tiedown eyelet is not securely
tightened, it may loosen or
disengage from the bumper when
tying down the vehicle. Make sure
that the tiedown eyelet is securely
tightened to the bumper.
ØFront tiedown hook is designed
only for towing, and lashing at
oversea transportation. Do not use
front tiedown hook for other use
(truck/railway transportation etc).
7-24
In Case of an Emergency
Emergency Towing
Mazda3_8AD6-EC-09A_Edition1 Page362
Tuesday, December 2 2008 2:28 PM
Form No.8AD6-EC-09A
Page 394 of 488

Black plate (396,1)
NOTE
Remove the battery cover before performing
battery maintenance.
Battery cover
qBattery Maintenance
To get the best service from a battery:lKeep it securely mounted.lKeep the top clean and dry.lKeep terminals and connections clean,
tight, and coated with petroleum jelly
or terminal grease.
lRinse off spilled electrolyte
immediately with a solution of water
and baking soda.
lIf the vehicle will not be used for an
extended time, disconnect the battery
cables.
qInspecting Electrolyte Level
A low level of electrolyte fluid will cause
the battery to discharge quickly.
Upper level
Lower level
Inspect the electrolyte level at least once a
week. If it's low, remove the caps and add
enough distilled water to bring the level
between the upper and lower level
(illustration).
Don't overfill.
Examine the specific gravity of the
electrolyte with a hydrometer, especially
during cold weather. If it's low, recharge
the battery.
8-32
Maintenance and Care
Owner Maintenance
Mazda3_8AD6-EC-09A_Edition1 Page396
Tuesday, December 2 2008 2:28 PM
Form No.8AD6-EC-09A