lights MAZDA MODEL 3 HATCHBACK 2010 (in English) Workshop Manual
[x] Cancel search | Manufacturer: MAZDA, Model Year: 2010, Model line: MODEL 3 HATCHBACK, Model: MAZDA MODEL 3 HATCHBACK 2010Pages: 488, PDF Size: 6.52 MB
Page 329 of 488

Black plate (331,1)
4. Select the desired setting by pressing
the Enter (up/down) switch up or
down, and then press the Enter (up/
down) switch.
NOTE
The buzzer volume for both the ignition key
reminder and the lights-on reminder is
changed simultaneously. If you prefer separate
buzzer volume settings, consult an Authorized
Mazda Dealer. If separate buzzer volume
settings have been done at an Authorized
Mazda Dealer, you will be unable to change
the settings.
Resetting the data for the trip computer
average fuel economy and the average
vehicle speed
1. Press the INFO switch until the
SETTINGS screen is displayed.
2. Select RESET AVERAGES and press
the Enter (up/down) switch.
3. Select FUEL ECONOMY or SPEED,
and press the Enter (up/down) switch.
Cup Holder
WARNING
Never use a cup holder to hold hot
liquids while the vehicle is moving:
Using a cup holder to hold hot liquids
while the vehicle is moving is
dangerous. If the contents spill, you
could be scalded.
CAUTION
To reduce the possibility of injury in
an accident or a sudden stop, keep
the cup holders closed when they are
not in use, or when using them for
storage.
qFront
To use, open the cover.
Interior Comfort
Interior Equipment
6-107
Mazda3_8AD6-EC-09A_Edition1 Page331
Tuesday, December 2 2008 2:28 PM
Form No.8AD6-EC-09A
Page 338 of 488

Black plate (340,1)
Parking in an Emergency
The hazard warning lights should always
be used when you stop on or near a
roadway in an emergency.
The hazard warning lights warn other
drivers that your vehicle is a traffic hazard
and that they must take extreme caution
when near it.
Hazard warning flasher
Depress the hazard warning flasher and all
the turn signals will flash.
NOTE
lThe turn signals do not work when the
hazard warning lights are on.
lCheck local regulations about the use of
hazard warning lights while the vehicle is
being towed to verify that it is not in
violation of the law.
7-2
In Case of an Emergency
Parking in an Emergency
Mazda3_8AD6-EC-09A_Edition1 Page340
Tuesday, December 2 2008 2:28 PM
Form No.8AD6-EC-09A
Page 368 of 488
Black plate (370,1)
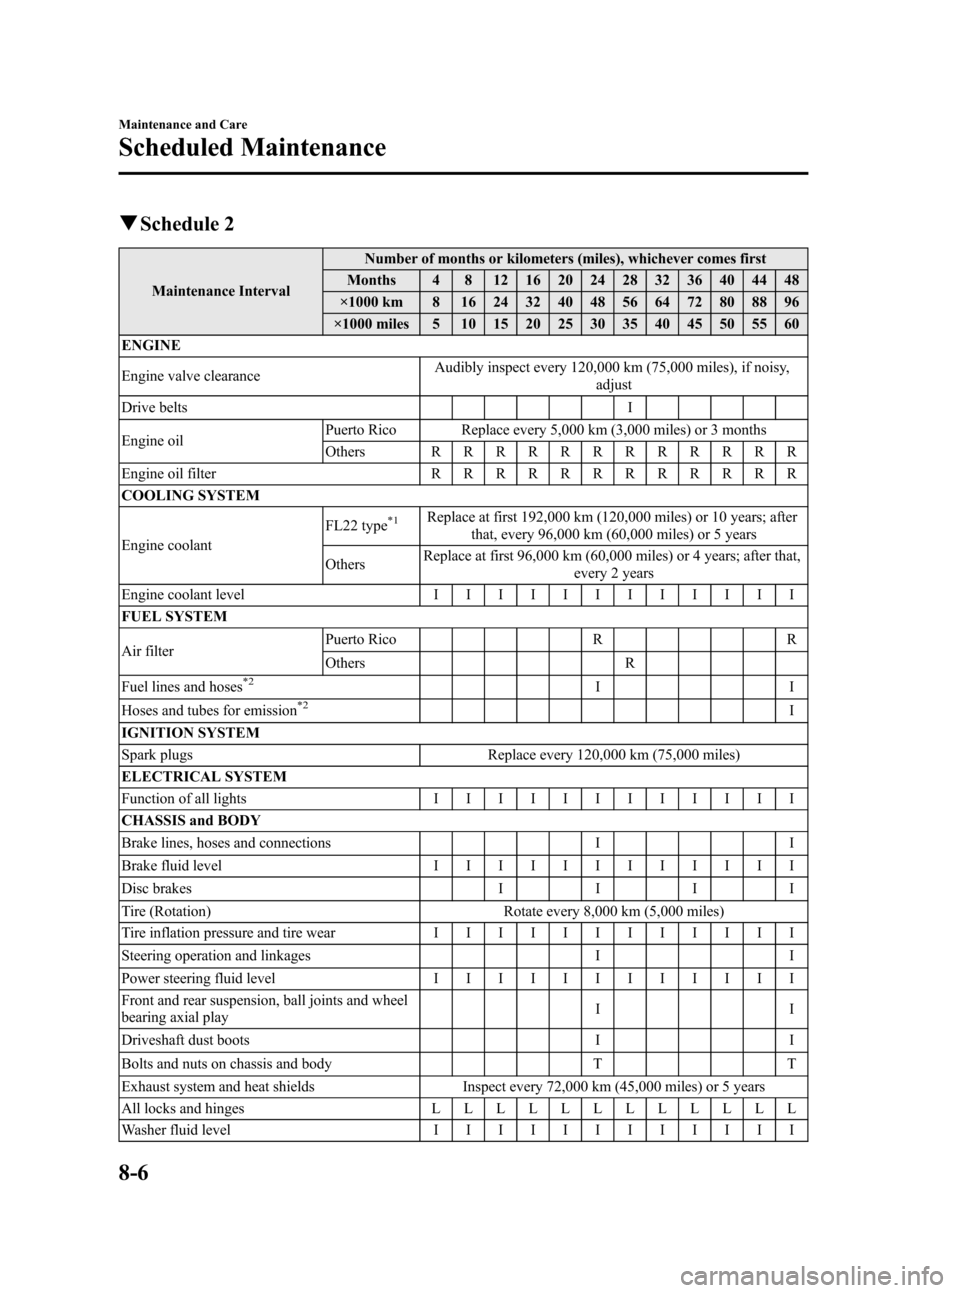
qSchedule 2
Maintenance IntervalNumber of months or kilometers (miles), whichever comes first
Months 4 8 12 16 20 24 28 32 36 40 44 48
×1000 km 8 16 24 32 40 48 56 64 72 80 88 96
×1000 miles 5 10 15 20 25 30 35 40 45 50 55 60
ENGINE
Engine valve clearanceAudibly inspect every 120,000 km (75,000 miles), if noisy,
adjust
Drive belts I
Engine oilPuerto Rico Replace every 5,000 km (3,000 miles) or 3 months
OthersRRRRRRRRRRRR
Engine oil filterRRRRRRRRRRRR
COOLING SYSTEM
Engine coolantFL22 type
*1Replace at first 192,000 km (120,000 miles) or 10 years; after
that, every 96,000 km (60,000 miles) or 5 years
OthersReplace at first 96,000 km (60,000 miles) or 4 years; after that,
every 2 years
Engine coolant levelIIIIIIIIIIII
FUEL SYSTEM
Air filterPuerto Rico R R
Others R
Fuel lines and hoses
*2II
Hoses and tubes for emission*2I
IGNITION SYSTEM
Spark plugs Replace every 120,000 km (75,000 miles)
ELECTRICAL SYSTEM
Function of all lightsIIIIIIIIIIII
CHASSIS and BODY
Brake lines, hoses and connections I I
Brake fluid levelIIIIIIIIIIII
Disc brakesIIII
Tire (Rotation) Rotate every 8,000 km (5,000 miles)
Tire inflation pressure and tire wearIIIIIIIIIIII
Steering operation and linkages I I
Power steering fluid levelIIIIIIIIIIII
Front and rear suspension, ball joints and wheel
bearing axial playII
Driveshaft dust boots I I
Bolts and nuts on chassis and body T T
Exhaust system and heat shields Inspect every 72,000 km (45,000 miles) or 5 years
All locks and hingesLLLLLLLLLLLL
Washer fluid levelIIIIIIIIIIII
8-6
Maintenance and Care
Scheduled Maintenance
Mazda3_8AD6-EC-09A_Edition1 Page370
Tuesday, December 2 2008 2:28 PM
Form No.8AD6-EC-09A
Page 373 of 488
Black plate (375,1)
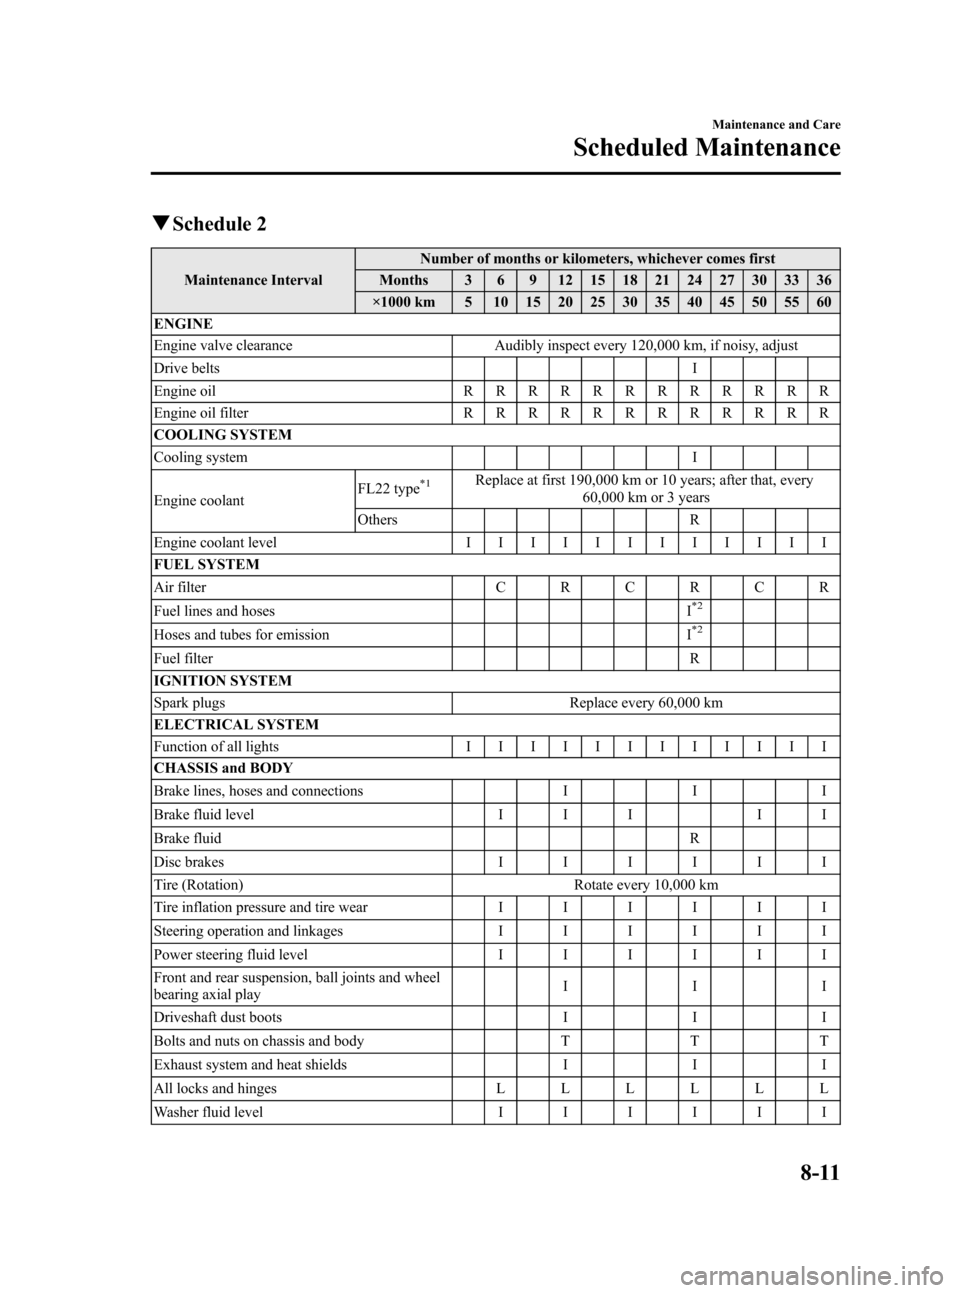
qSchedule 2
Maintenance IntervalNumber of months or kilometers, whichever comes first
Months 3 6 9 12 15 18 21 24 27 30 33 36
×1000 km 5 10 15 20 25 30 35 40 45 50 55 60
ENGINE
Engine valve clearance Audibly inspect every 120,000 km, if noisy, adjust
Drive belts I
Engine oilRRRRRRRRRRRR
Engine oil filterRRRRRRRRRRRR
COOLING SYSTEM
Cooling system I
Engine coolantFL22 type
*1Replace at first 190,000 km or 10 years; after that, every
60,000 km or 3 years
Others R
Engine coolant levelIIIIIIIIIIII
FUEL SYSTEM
Air filterCRCRCR
Fuel lines and hoses I
*2
Hoses and tubes for emission I*2
Fuel filter R
IGNITION SYSTEM
Spark plugs Replace every 60,000 km
ELECTRICAL SYSTEM
Function of all lightsIIIIIIIIIIII
CHASSIS and BODY
Brake lines, hoses and connections I I I
Brake fluid level I I I I I
Brake fluid R
Disc brakesIIIIII
Tire (Rotation) Rotate every 10,000 km
Tire inflation pressure and tire wearIIIIII
Steering operation and linkagesIIIIII
Power steering fluid levelIIIIII
Front and rear suspension, ball joints and wheel
bearing axial playIII
Driveshaft dust boots I I I
Bolts and nuts on chassis and body T T T
Exhaust system and heat shields I I I
All locks and hingesLLLLLL
Washer fluid levelIIIIII
Maintenance and Care
Scheduled Maintenance
8-11
Mazda3_8AD6-EC-09A_Edition1 Page375
Tuesday, December 2 2008 2:28 PM
Form No.8AD6-EC-09A
Page 375 of 488
Black plate (377,1)
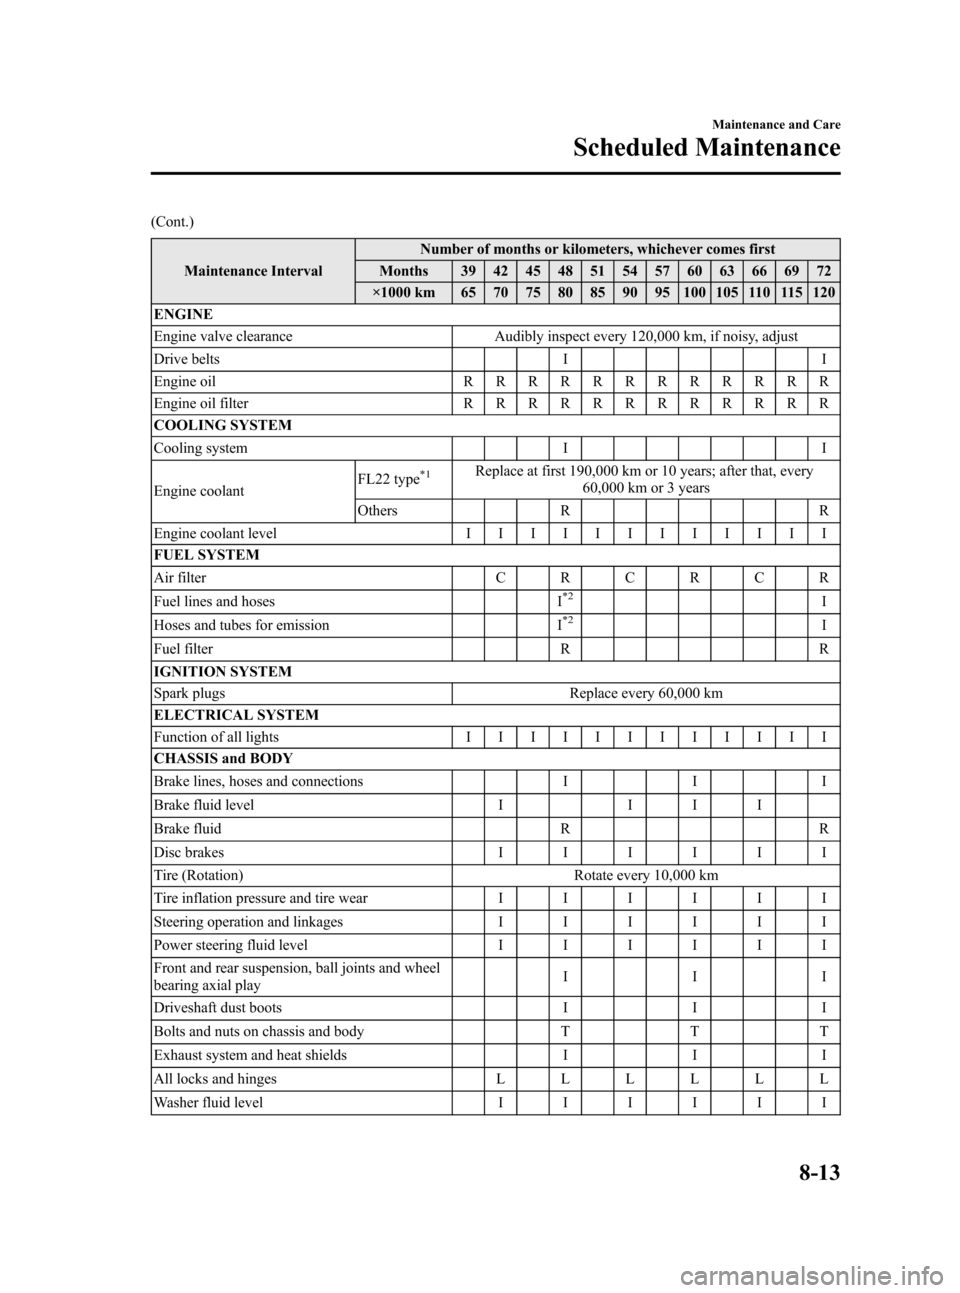
(Cont.)
Maintenance IntervalNumber of months or kilometers, whichever comes first
Months 39 42 45 48 51 54 57 60 63 66 69 72
×1000 km 65 70 75 80 85 90 95 100 105 110 115 120
ENGINE
Engine valve clearance Audibly inspect every 120,000 km, if noisy, adjust
Drive belts I I
Engine oilRRRRRRRRRRRR
Engine oil filterRRRRRRRRRRRR
COOLING SYSTEM
Cooling system I I
Engine coolantFL22 type
*1Replace at first 190,000 km or 10 years; after that, every
60,000 km or 3 years
Others R R
Engine coolant levelIIIIIIIIIIII
FUEL SYSTEM
Air filterCRCRCR
Fuel lines and hoses I
*2I
Hoses and tubes for emission I*2I
Fuel filter R R
IGNITION SYSTEM
Spark plugs Replace every 60,000 km
ELECTRICAL SYSTEM
Function of all lightsIIIIIIIIIIII
CHASSIS and BODY
Brake lines, hoses and connections I I I
Brake fluid level I I I I
Brake fluid R R
Disc brakesIIIIII
Tire (Rotation) Rotate every 10,000 km
Tire inflation pressure and tire wearIIIIII
Steering operation and linkagesIIIIII
Power steering fluid levelIIIIII
Front and rear suspension, ball joints and wheel
bearing axial playIII
Driveshaft dust boots I I I
Bolts and nuts on chassis and body T T T
Exhaust system and heat shields I I I
All locks and hingesLLLLLL
Washer fluid levelIIIIII
Maintenance and Care
Scheduled Maintenance
8-13
Mazda3_8AD6-EC-09A_Edition1 Page377
Tuesday, December 2 2008 2:28 PM
Form No.8AD6-EC-09A
Page 399 of 488
Black plate (401,1)
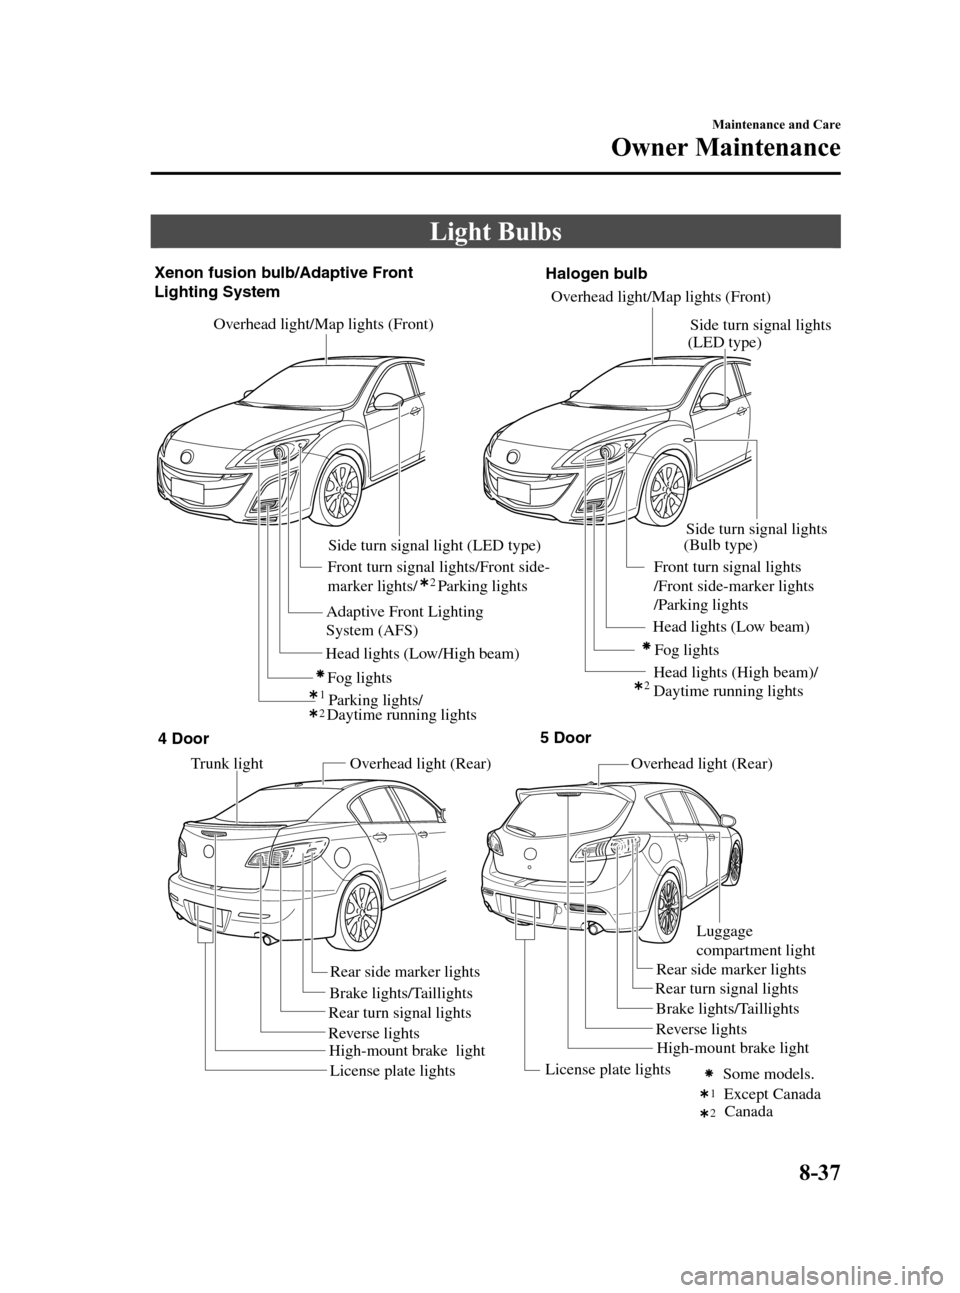
Light Bulbs
Overhead light/Map lights (Front)
Overhead light (Rear) Overhead light (Rear) Front turn signal lights/Front side-
marker lights/ Parking lights Xenon fusion bulb/Adaptive Front
Lighting System
Fog lights
Parking lights/ Adaptive Front Lighting
System (AFS)
Overhead light/Map lights (Front)
Front turn signal lights
/Front side-marker lights
/Parking lights
Head lights (Low beam)
Head lights (High beam)/
Daytime running lights Head lights (Low/High beam)Fog lights
Side turn signal light (LED type)
Trunk light
Brake lights/Taillights
Brake lights/Taillights
Rear turn signal lightsRear turn signal lights Rear side marker lightsRear side marker lights
Except Canada Some models. Reverse lightsReverse lights
License plate lightsLicense plate lights High-mount brake lightHalogen bulb
212
2
1
2
High-mount brake lightSide turn signal lights
(Bulb type)Side turn signal lights
(LED type)
Luggage
compartment light 4 Door5 Door
Canada Daytime running lights
Maintenance and Care
Owner Maintenance
8-37
Mazda3_8AD6-EC-09A_Edition1 Page401
Tuesday, December 2 2008 2:28 PM
Form No.8AD6-EC-09A
Page 400 of 488
Black plate (402,1)
WARNING
Do not replace the xenon fusion bulbs
yourself:
Replacing the xenon fusion bulbs
yourself is dangerous. Because the
xenon fusion bulbs require high
voltage, you could receive an electric
shock if the bulbs are handled
incorrectly. Consult an Authorized
Mazda Dealer when the replacement
is necessary.
Never touch the glass portion of a
halogen bulb with your bare hands and
always wear eye protection when
handling or working around the bulbs:
When a halogen bulb breaks, it is
dangerous. These bulbs contain
pressurized gas. If one is broken, it
will explode and serious injuries
could be caused by the flying glass.
If the glass portion is touched with
bare hands, body oil could cause the
bulb to overheat and explode when
lit.
Always keep halogen bulbs out of the
reach of children:
Playing with a halogen bulb is
dangerous. Serious injuries could be
caused by dropping a halogen bulb
or breaking it some other way.
qReplacing Exterior Light Bulbs
NOTElTo replace the bulb, contact an Authorized
Mazda Dealer.
lIf the halogen bulb is accidentally touched,
it should be cleaned with rubbing alcohol
before being used.
lUse the protective cover and carton for the
replacement bulb to dispose of the old bulb
promptly and out of the reach of children.
Xenon fusion bulb/Adaptive front
lighting system
Replacing the headlight bulbs
(Low/High beam bulbs)
You cannot replace the low/high beam
bulbs by yourself. The bulbs must be
replaced at an expert repairer, we
recommend an Authorized Mazda Dealer.
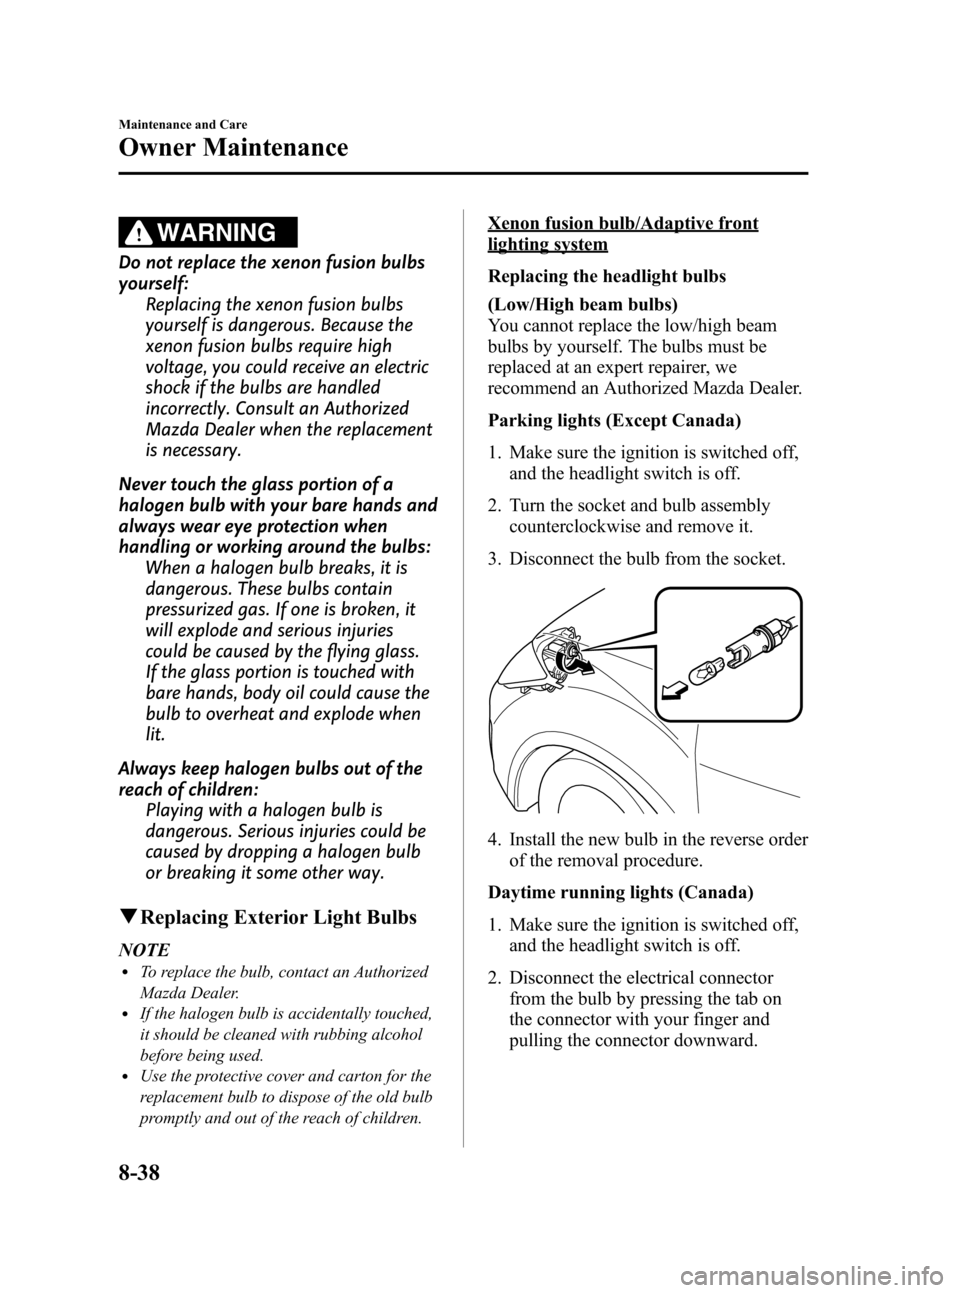
Parking lights (Except Canada)
1. Make sure the ignition is switched off,
and the headlight switch is off.
2. Turn the socket and bulb assembly
counterclockwise and remove it.
3. Disconnect the bulb from the socket.
4. Install the new bulb in the reverse order
of the removal procedure.
Daytime running lights (Canada)
1. Make sure the ignition is switched off,
and the headlight switch is off.
2. Disconnect the electrical connector
from the bulb by pressing the tab on
the connector with your finger and
pulling the connector downward.
8-38
Maintenance and Care
Owner Maintenance
Mazda3_8AD6-EC-09A_Edition1 Page402
Tuesday, December 2 2008 2:28 PM
Form No.8AD6-EC-09A
Page 401 of 488

Black plate (403,1)
3. Turn the socket and bulb assembly to
remove it. Carefully remove the bulb
from its socket in the reflector by
gently pulling it straight backward out
of the socket.
4. Install the new bulb in the reverse order
of the removal procedure.
Front turn signal lights/Front side-
marker lights
1. Make sure the ignition switch is turned
off and the headlight switch is off.
2. If you are changing the right bulb, start
the engine, turn the steering wheel all
the way to the left, and turn off engine.
If you are changing the left bulb, turn
the steering wheel to the right.3. Turn the center section of the plastic
retainer counterclockwise and remove
the retainers and partially peel back the
mudguard.
Installation Removal
4. Turn the socket and bulb assembly
counterclockwise and remove it.
5. Disconnect the bulb from the socket.
6. Install the new bulb in the reverse order
of the removal procedure.
Halogen bulb
High-beam bulbs/Daytime running
lights (Canada)
1. Make sure the ignition is switched off,
and the headlight switch is off.
Maintenance and Care
Owner Maintenance
8-39
Mazda3_8AD6-EC-09A_Edition1 Page403
Tuesday, December 2 2008 2:28 PM
Form No.8AD6-EC-09A
Page 402 of 488
Black plate (404,1)
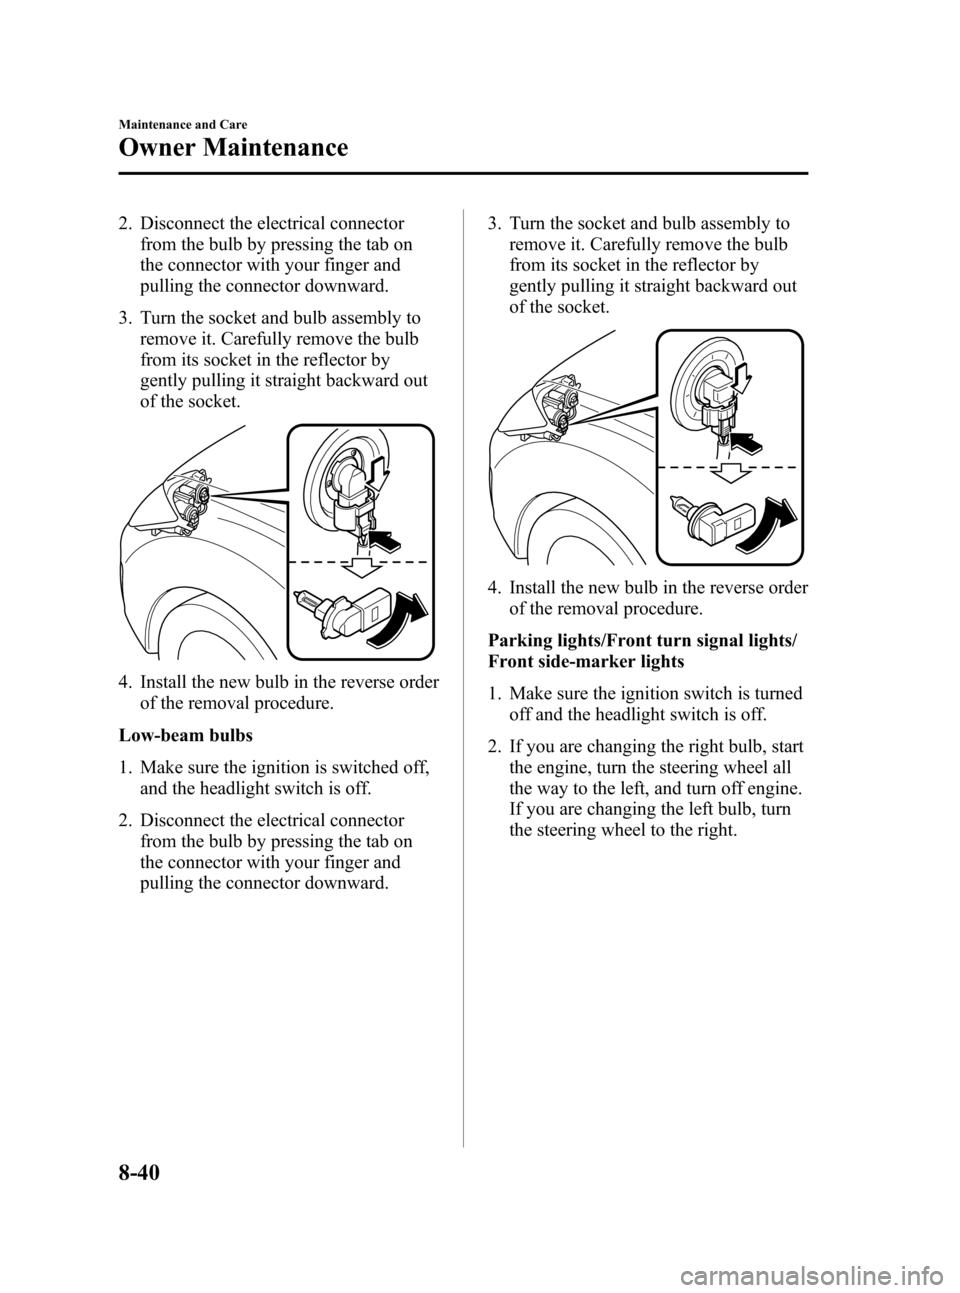
2. Disconnect the electrical connector
from the bulb by pressing the tab on
the connector with your finger and
pulling the connector downward.
3. Turn the socket and bulb assembly to
remove it. Carefully remove the bulb
from its socket in the reflector by
gently pulling it straight backward out
of the socket.
4. Install the new bulb in the reverse order
of the removal procedure.
Low-beam bulbs
1. Make sure the ignition is switched off,
and the headlight switch is off.
2. Disconnect the electrical connector
from the bulb by pressing the tab on
the connector with your finger and
pulling the connector downward.3. Turn the socket and bulb assembly to
remove it. Carefully remove the bulb
from its socket in the reflector by
gently pulling it straight backward out
of the socket.
4. Install the new bulb in the reverse order
of the removal procedure.
Parking lights/Front turn signal lights/
Front side-marker lights
1. Make sure the ignition switch is turned
off and the headlight switch is off.
2. If you are changing the right bulb, start
the engine, turn the steering wheel all
the way to the left, and turn off engine.
If you are changing the left bulb, turn
the steering wheel to the right.
8-40
Maintenance and Care
Owner Maintenance
Mazda3_8AD6-EC-09A_Edition1 Page404
Tuesday, December 2 2008 2:28 PM
Form No.8AD6-EC-09A
Page 404 of 488

Black plate (406,1)
Side-turn signal lights
With LED bulb
Due to the complexity and difficulty of
the procedure, the LED bulbs should be
replaced by an Authorized Mazda Dealer.
NOTE
LED bulb replacement is not possible. The
rear combination component must be replaced.
With Non-LED bulb
1. Make sure the ignition is switched off,
and the turn signal switch is off.
2. Slide the unit as shown in the figure to
remove it.
3. Detach the electrical connector from
the unit by pulling it to the rear.
4. Install the new side turn signal unit in
the reverse order of removal.
Brake lights/Taillights (Rear side
marker lights)
With LED bulb
Due to the complexity and difficulty of
the procedure, the LED bulbs should be
replaced by an Authorized Mazda Dealer.
NOTE
LED bulb replacement is not possible. The
rear combination component must be replaced.
With Non-LED bulb
(4 Door)
1. Pull the center of each plastic retainer
and remove the retainers and the trunk
end trim.
Removal
Installation
2. Turn the socket and bulb assembly
counterclockwise and remove it.
3. Disconnect the bulb from the socket.
4. Install the new bulb in the reverse order
of removal.
(5 Door)
1. Make sure the ignition is switched off,
and the headlight switch is off.
8-42
Maintenance and Care
Owner Maintenance
Mazda3_8AD6-EC-09A_Edition1 Page406
Tuesday, December 2 2008 2:28 PM
Form No.8AD6-EC-09A