engine MAZDA MODEL 3 HATCHBACK 2012 Owners Manual (in English)
[x] Cancel search | Manufacturer: MAZDA, Model Year: 2012, Model line: MODEL 3 HATCHBACK, Model: MAZDA MODEL 3 HATCHBACK 2012Pages: 525, PDF Size: 5.95 MB
Page 407 of 525
Black plate (406,1)
NOTE
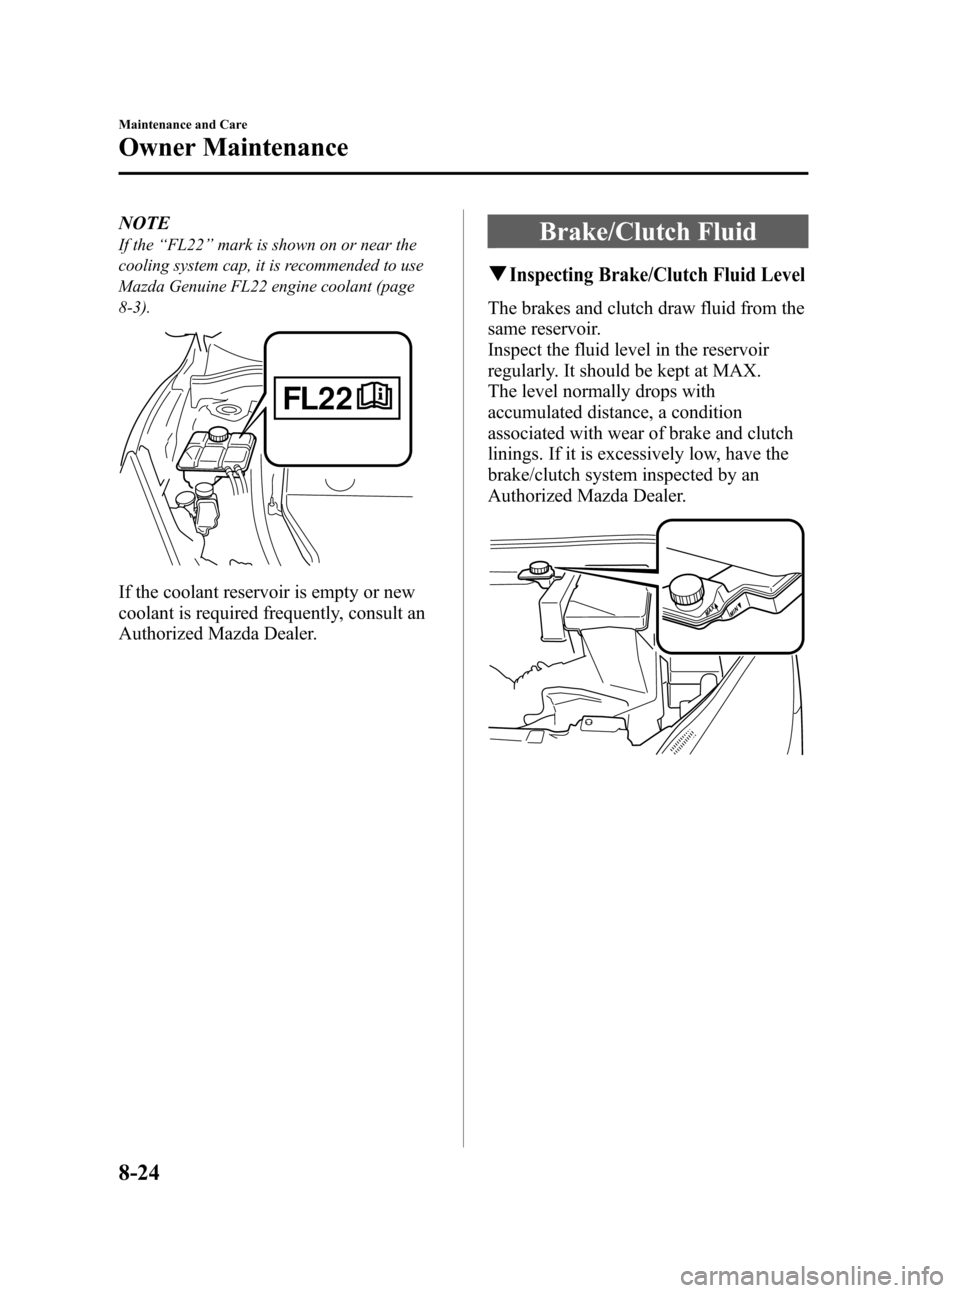
If the“FL22” mark is shown on or near the
cooling system cap, it is recommended to use
Mazda Genuine FL22 engine coolant (page
8-3).
If the coolant reservoir is empty or new
coolant is required frequently, consult an
Authorized Mazda Dealer.
Brake/Clutch Fluid
qInspecting Brake/Clutch Fluid Level
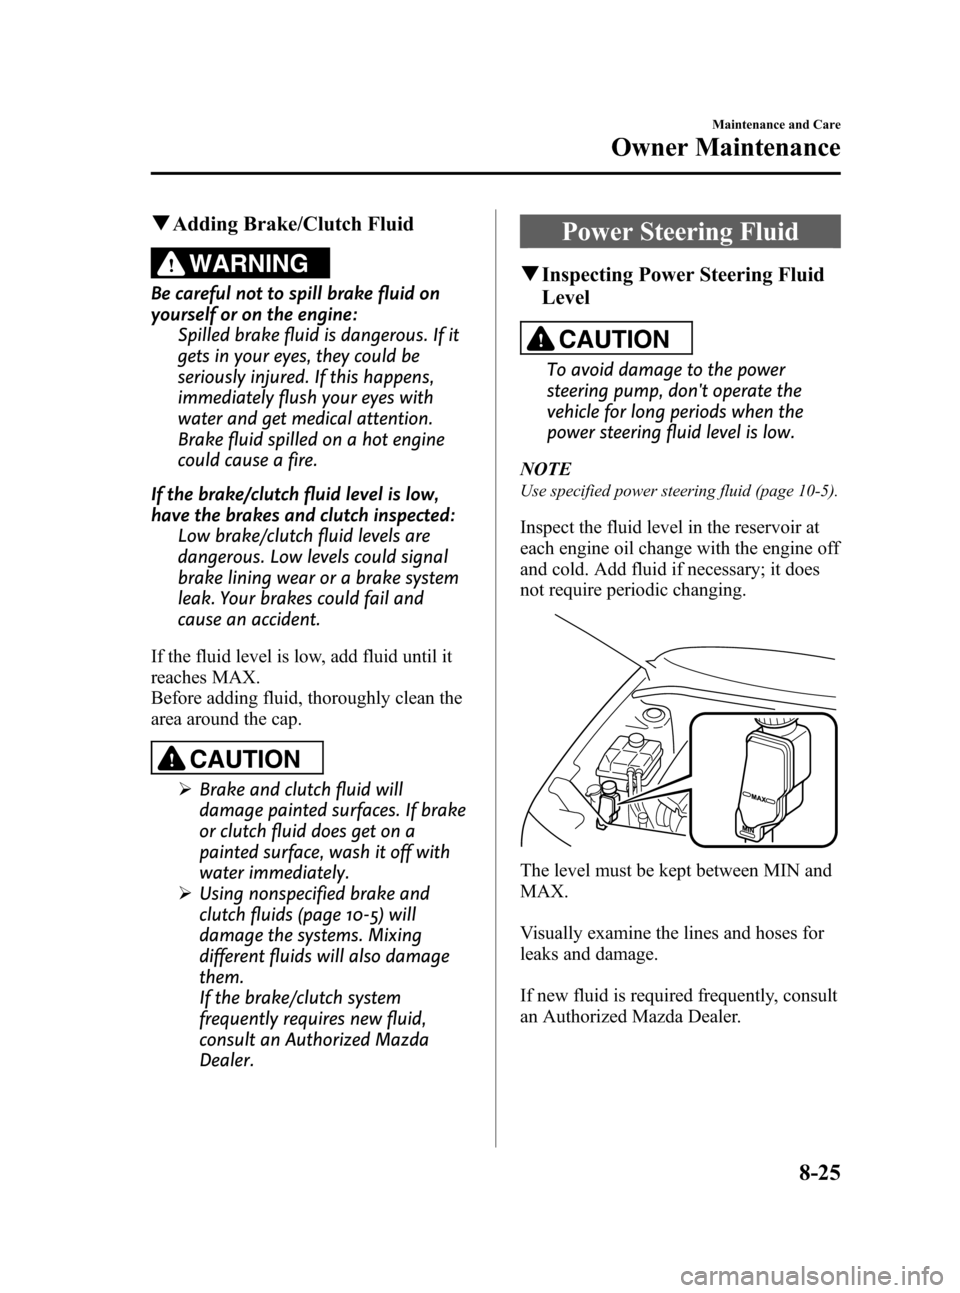
The brakes and clutch draw fluid from the
same reservoir.
Inspect the fluid level in the reservoir
regularly. It should be kept at MAX.
The level normally drops with
accumulated distance, a condition
associated with wear of brake and clutch
linings. If it is excessively low, have the
brake/clutch system inspected by an
Authorized Mazda Dealer.
8-24
Maintenance and Care
Owner Maintenance
Mazda3_8BY7-EC-11F_Edition1 Page406
Friday, June 17 2011 2:57 PM
Form No.8BY7-EC-11F
Page 408 of 525
Black plate (407,1)
qAdding Brake/Clutch Fluid
WARNING
Be careful not to spill brake fluid on
yourself or on the engine:
Spilled brake fluid is dangerous. If it
gets in your eyes, they could be
seriously injured. If this happens,
immediately flush your eyes with
water and get medical attention.
Brake fluid spilled on a hot engine
could cause a fire.
If the brake/clutch fluid level is low,
have the brakes and clutch inspected: Low brake/clutch fluid levels are
dangerous. Low levels could signal
brake lining wear or a brake system
leak. Your brakes could fail and
cause an accident.
If the fluid level is low, add fluid until it
reaches MAX.
Before adding fluid, thoroughly clean the
area around the cap.
CAUTION
Ø Brake and clutch fluid will
damage painted surfaces. If brake
or clutch fluid does get on a
painted surface, wash it off with
water immediately.
Ø Using nonspecified brake and
clutch fluids (page 10-5) will
damage the systems. Mixing
different fluids will also damage
them.
If the brake/clutch system
frequently requires new fluid,
consult an Authorized Mazda
Dealer.
Power Steering Fluid
qInspecting Power Steering Fluid
Level
CAUTION
To avoid damage to the power
steering pump, don't operate the
vehicle for long periods when the
power steering fluid level is low.
NOTE
Use specified power steering fluid (page 10-5).
Inspect the fluid level in the reservoir at
each engine oil change with the engine off
and cold. Add fluid if necessary; it does
not require periodic changing.
The level must be kept between MIN and
MAX.
Visually examine the lines and hoses for
leaks and damage.
If new fluid is required frequently, consult
an Authorized Mazda Dealer.
Maintenance and Care
Owner Maintenance
8-25
Mazda3_8BY7-EC-11F_Edition1 Page407
Friday, June 17 2011 2:57 PM
Form No.8BY7-EC-11F
Page 409 of 525

Black plate (408,1)
Automatic Transaxle Fluid
(ATF)
í
qInspecting Automatic Transaxle
Fluid Level (5-speed transaxle)
The automatic transaxle fluid level should
be inspected regularly. Measure it as
described below.
CAUTION
Ø Always check the automatic
transaxle fluid level according to
the following procedure. If the
procedure is not done correctly,
the automatic transaxle fluid level
cannot be measured accurately
which could lead to automatic
transaxle damage.
Ø A low fluid level can cause
transaxle slippage. Overfilling can
cause foaming, loss of fluid, and
transaxle malfunction.
Ø It is recommended to use Mazda
Genuine automatic transaxle fluid
(page 10-5).
1. Park on a level surface and set the parking brake firmly.
2. Make sure there is no ATF leakage from the ATF hose or the housing.
3. Shift the shift lever to the park position (P), start the engine and warm it up.
CAUTION
Do not shift the shift lever while the
engine is warming up. If the ATF level
is extremely low, the automatic
transaxle could be damaged. 4. While the engine is still idling, pull out
the dipstick and wipe it clean, and then
put it back.
5. Check the ATF level. If there is no ATF adhering 5 mm from the end of the
dipstick, add ATF.
CAUTION
If there is no ATF adhering to the
dipstick even after the engine has
been warmed up, do not drive the
vehicle. Otherwise, the automatic
transaxle could be damaged.
6. Shift the shift lever to each range and position, and make sure there is no
abnormality.
7. Drive the vehicle on city roads for 5 km (3.1 mile) or more.
8. Park on a level surface and set the parking brake firmly.
9. Shift the shift lever to the park position (P), check the ATF level while the
engine is idling, and make sure that the
ATF level is within the proper level. If
the ATF level is not within the proper
level, add ATF. The proper fluid level
is marked on the dipstick as follows.
Full
OK
Low
8-26
Maintenance and Care
íSome models.
Owner Maintenance
Mazda3_8BY7-EC-11F_Edition1 Page408
Friday, June 17 2011 2:57 PM
Form No.8BY7-EC-11F
Page 410 of 525

Black plate (409,1)
CAUTION
ØUse the cold scale only as a
reference.
Ø If outside temperature is lower
than about 20 °C (70 °F), start the
engine and inspect the fluid level
after the engine reaches operating
temperature.
Ø If the vehicle has been driven for
an extended period at high speeds
or in city traffic in hot weather,
inspect the level only after
stopping the engine and allowing
the fluid to cool for 30 minutes.
Fully insert the dipstick. When adding
fluid, inspect with the dipstick to make
sure it does not pass full.
NOTE
Inspect the fluid on both sides of the dipstick in
a well lit area for an accurate reading.
Washer Fluid
q Inspecting Washer Fluid Level
WARNING
Use only windshield washer fluid or
plain water in the reservoir:
Using radiator antifreeze as washer
fluid is dangerous. If sprayed on the
windshield, it will dirty the
windshield, affect your visibility, and
could result in an accident.
Using Washer Fluid Without Anti-freeze
Protection in Cold Weather: Operating your vehicle in
temperatures below 4 degrees C (40
degrees F) using washer fluid without
anti-freeze protection is dangerous
as it could cause impaired windshield
vision and result in an accident. In
cold weather, always use washer
fluid with anti-freeze protection.
NOTE
State or local regulations may restrict the use
of volatile organic compounds (VOCs), which
are commonly used as anti-freeze agents in
washer fluid. A washer fluid with limited VOC
content should be used only if it provides
adequate freeze resistance for all regions and
climates in which the vehicle will be operated.
Maintenance and Care
Owner Maintenance
8-27
Mazda3_8BY7-EC-11F_Edition1 Page409
Friday, June 17 2011 2:57 PM
Form No.8BY7-EC-11F
Page 411 of 525
Black plate (410,1)
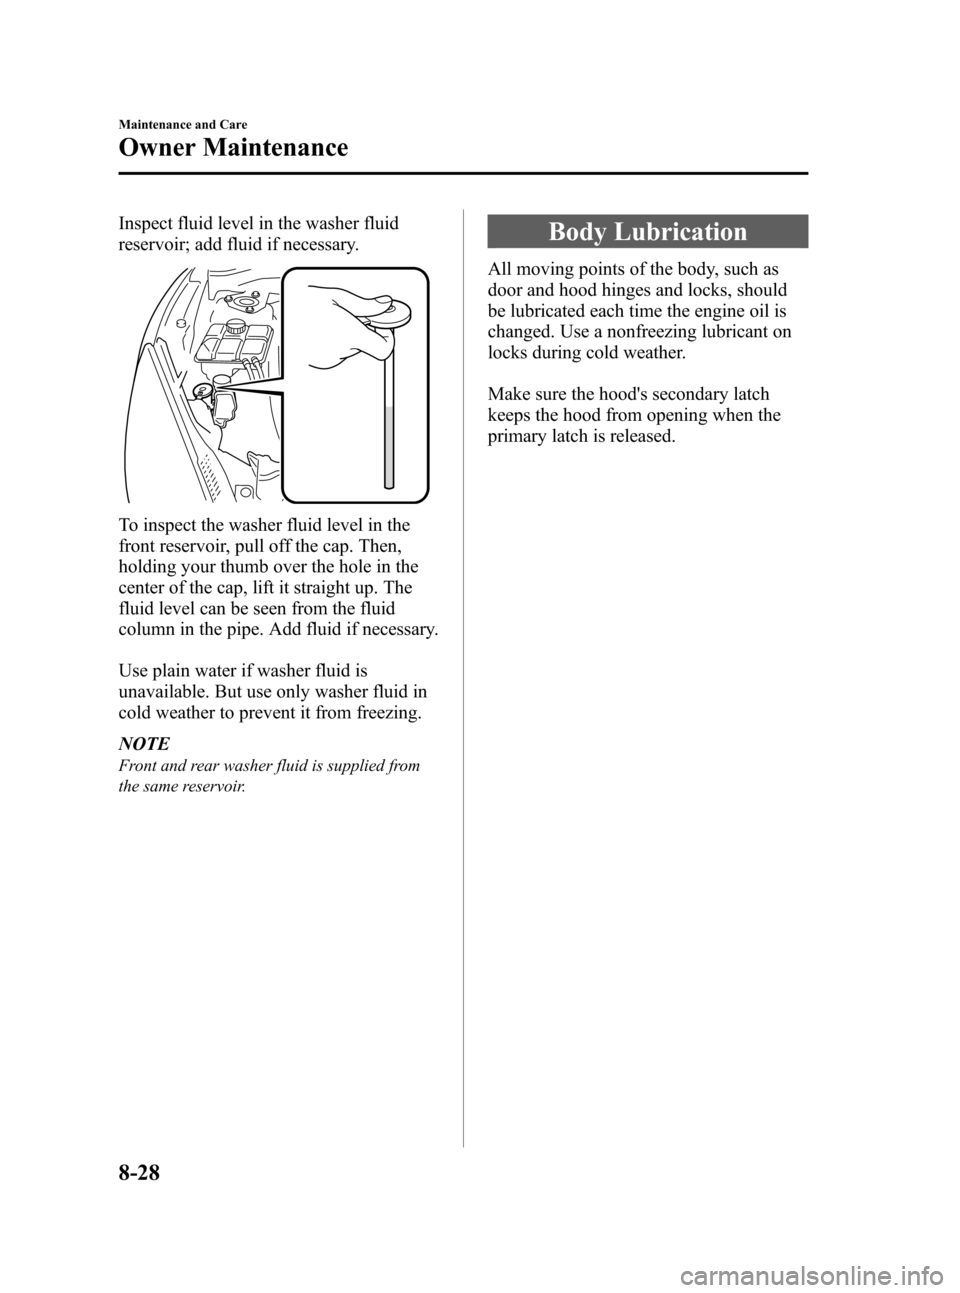
Inspect fluid level in the washer fluid
reservoir; add fluid if necessary.
To inspect the washer fluid level in the
front reservoir, pull off the cap. Then,
holding your thumb over the hole in the
center of the cap, lift it straight up. The
fluid level can be seen from the fluid
column in the pipe. Add fluid if necessary.
Use plain water if washer fluid is
unavailable. But use only washer fluid in
cold weather to prevent it from freezing.
NOTE
Front and rear washer fluid is supplied from
the same reservoir.
Body Lubrication
All moving points of the body, such as
door and hood hinges and locks, should
be lubricated each time the engine oil is
changed. Use a nonfreezing lubricant on
locks during cold weather.
Make sure the hood's secondary latch
keeps the hood from opening when the
primary latch is released.
8-28
Maintenance and Care
Owner Maintenance
Mazda3_8BY7-EC-11F_Edition1 Page410
Friday, June 17 2011 2:57 PM
Form No.8BY7-EC-11F
Page 429 of 525

Black plate (428,1)
2. Disconnect the electrical connectorfrom the bulb by pressing the tab on
the connector with your finger and
pulling the connector downward.
3. Turn the socket and bulb assembly toremove it. Carefully remove the bulb
from its socket in the reflector by
gently pulling it straight backward out
of the socket.
4. Install the new bulb in the reverse order
of the removal procedure.
(Type B)
1. Make sure the ignition is switched off and the headlight switch is off.
2. Turn the socket and bulb assembly counterclockwise and remove it. 3. Disconnect the bulb from the socket.
4. Install the new bulb in the reverse order
of the removal procedure.
Front turn signal lights/Front side-
marker lights/Parking lights (Canada)
1. Make sure the ignition is switched off and the headlight switch is off.
2. If you are changing the right bulb, start the engine, turn the steering wheel all
the way to the left, and turn off engine.
If you are changing the left bulb, turn
the steering wheel to the right.
3. Turn the center section of the plastic retainer counterclockwise and remove
the retainers and partially peel back the
mudguard.
Installation Removal
8-46
Maintenance and Care
Owner Maintenance
Mazda3_8BY7-EC-11F_Edition1 Page428
Friday, June 17 2011 2:57 PM
Form No.8BY7-EC-11F
Page 431 of 525

Black plate (430,1)
2. Disconnect the electrical connectorfrom the bulb by pressing the tab on
the connector with your finger and
pulling the connector downward.
3. Turn the socket and bulb assembly toremove it. Carefully remove the bulb
from its socket in the reflector by
gently pulling it straight backward out
of the socket.
4. Install the new bulb in the reverse order
of the removal procedure.
Front turn signal lights/Front side-
marker lights/Parking lights
1. Make sure the ignition is switched off and the headlight switch is off. 2. If you are changing the right bulb, start
the engine, turn the steering wheel all
the way to the left, and turn off engine.
If you are changing the left bulb, turn
the steering wheel to the right.
3. Turn the center section of the plastic retainer counterclockwise and remove
the retainers and partially peel back the
mudguard.
Installation Removal
4. Turn the socket and bulb assembly
counterclockwise and remove it.
8-48
Maintenance and Care
Owner Maintenance
Mazda3_8BY7-EC-11F_Edition1 Page430
Friday, June 17 2011 2:57 PM
Form No.8BY7-EC-11F
Page 440 of 525
Black plate (439,1)
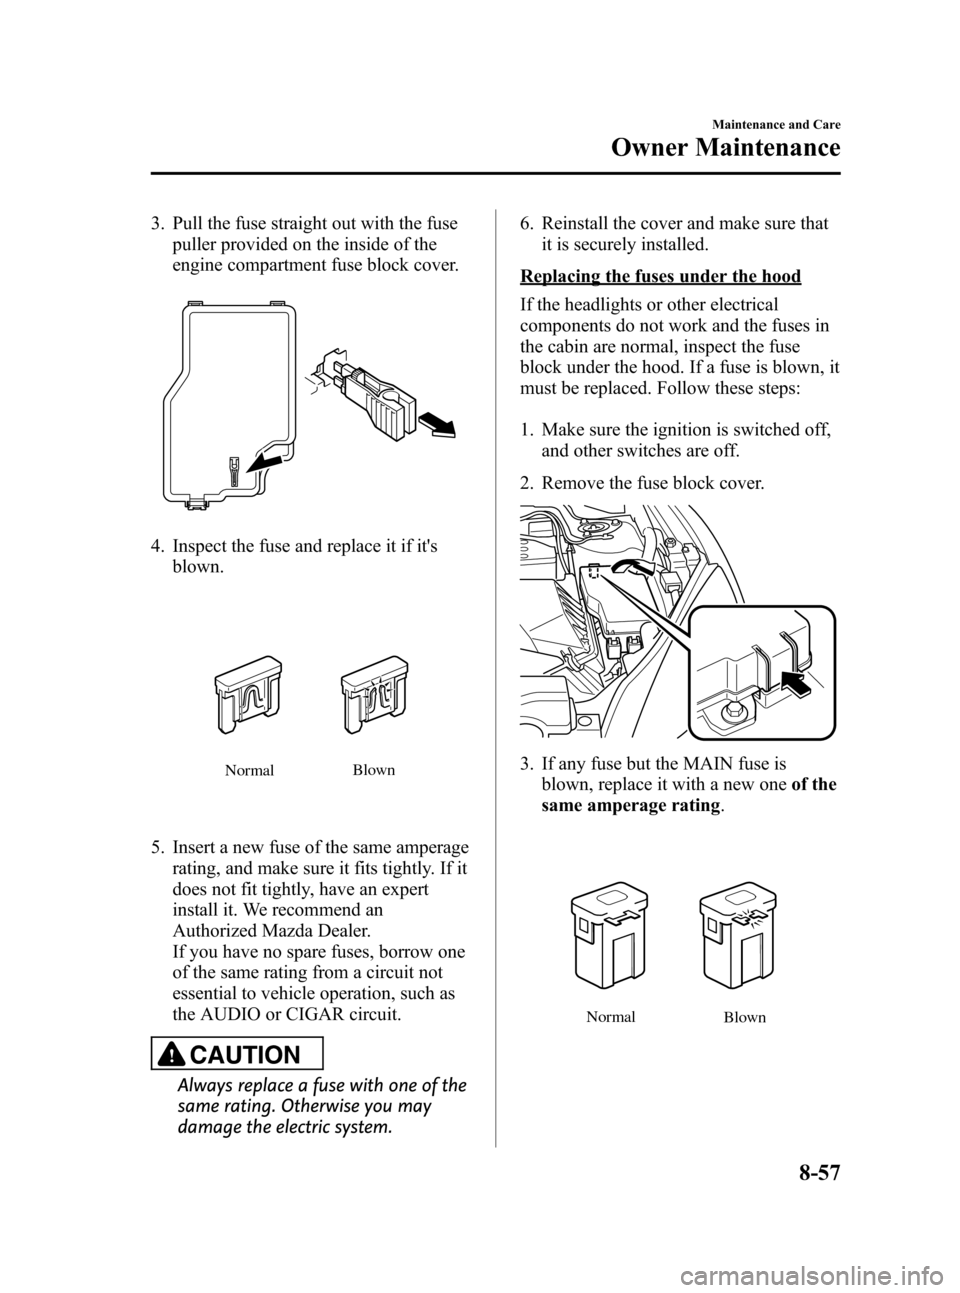
3. Pull the fuse straight out with the fusepuller provided on the inside of the
engine compartment fuse block cover.
4. Inspect the fuse and replace it if it'sblown.
Normal Blown
5. Insert a new fuse of the same amperage
rating, and make sure it fits tightly. If it
does not fit tightly, have an expert
install it. We recommend an
Authorized Mazda Dealer.
If you have no spare fuses, borrow one
of the same rating from a circuit not
essential to vehicle operation, such as
the AUDIO or CIGAR circuit.
CAUTION
Always replace a fuse with one of the
same rating. Otherwise you may
damage the electric system. 6. Reinstall the cover and make sure that
it is securely installed.
Replacing the fuses under the hood
If the headlights or other electrical
components do not work and the fuses in
the cabin are normal, inspect the fuse
block under the hood. If a fuse is blown, it
must be replaced. Follow these steps:
1. Make sure the ignition is switched off,
and other switches are off.
2. Remove the fuse block cover.
3. If any fuse but the MAIN fuse is blown, replace it with a new one of the
same amperage rating .
Normal
Blown
Maintenance and Care
Owner Maintenance
8-57
Mazda3_8BY7-EC-11F_Edition1 Page439
Friday, June 17 2011 2:57 PM
Form No.8BY7-EC-11F
Page 442 of 525
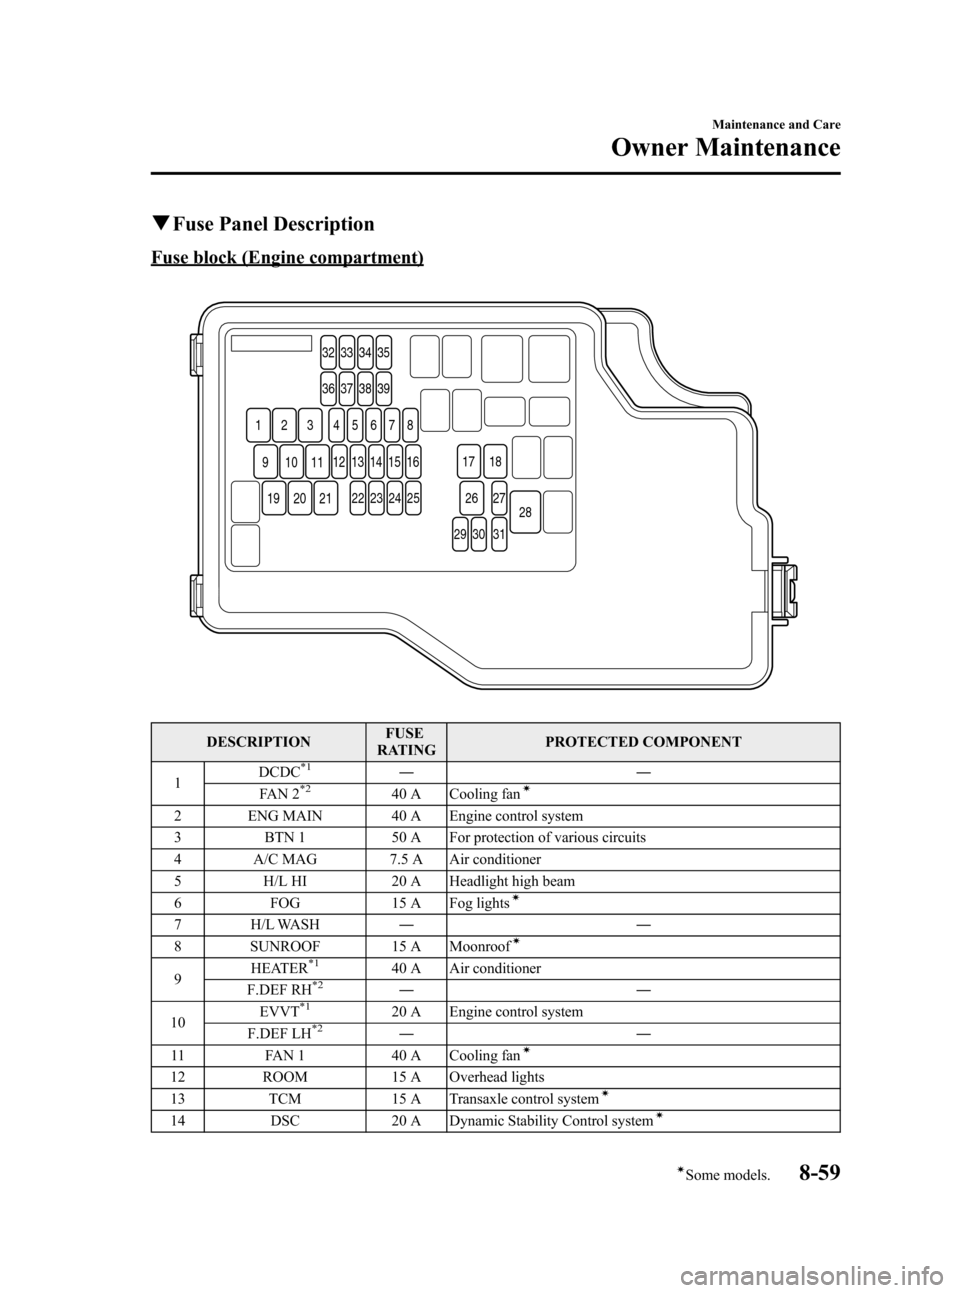
Black plate (441,1)
qFuse Panel Description
Fuse block (Engine compartment)
32 33 34 35
36 37 38 39
54
1 2 3 678
1312 14 15 16
22
11109
212019
23 24 25
29 30 3127
28
26
17 18
DESCRIPTION
FUSE
RATING PROTECTED COMPONENT
1 DCDC
*1――
FA N 2*240 A Cooling faní
2 ENG MAIN 40 A Engine control system
3 BTN 1 50 A For protection of various circuits
4 A/C MAG 7.5 A Air conditioner
5 H/L HI 20 A Headlight high beam
6 FOG 15 A Fog lights
í
7 H/L WASH ――
8 SUNROOF 15 A Moonroofí
9 HEATER*140 A Air conditioner
F.DEF RH*2――
10 EVVT*120 A Engine control system
F.DEF LH*2――
11 FAN 1 40 A Cooling faní
12 ROOM 15 A Overhead lights
13 TCM 15 A Transaxle control systemí
14DSC 20 A Dynamic Stability Control systemí
Maintenance and Care
Owner Maintenance
8-59íSome models.
Mazda3_8BY7-EC-11F_Edition1 Page441
Friday, June 17 2011 2:57 PM
Form No.8BY7-EC-11F
Page 443 of 525
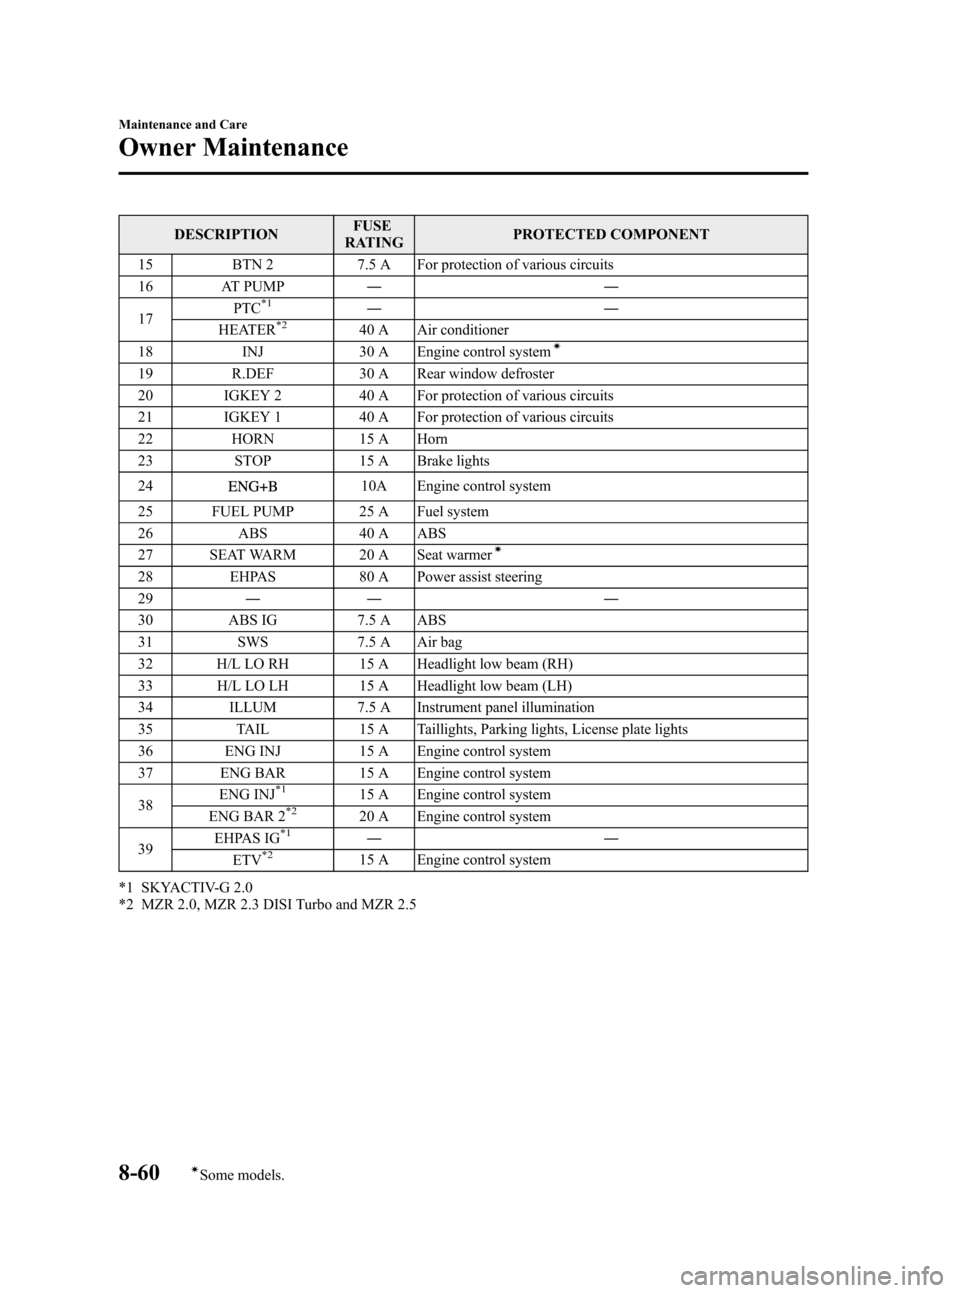
Black plate (442,1)
DESCRIPTIONFUSE
RATING PROTECTED COMPONENT
15 BTN 2 7.5 A For protection of various circuits
16 AT PUMP ――
17 PTC
*1――
HEATER*240 A Air conditioner
18 INJ 30 A Engine control systemí
19 R.DEF 30 A Rear window defroster
20 IGKEY 2 40 A For protection of various circuits
21 IGKEY 1 40 A For protection of various circuits
22 HORN 15 A Horn
23 STOP 15 A Brake lights
24
10A Engine control system
25 FUEL PUMP 25 A Fuel system
26 ABS 40 A ABS
27 SEAT WARM 20 A Seat warmer
í
28 EHPAS 80 A Power assist steering
29 ―― ―
30 ABS IG 7.5 A ABS
31 SWS 7.5 A Air bag
32 H/L LO RH 15 A Headlight low beam (RH)
33 H/L LO LH 15 A Headlight low beam (LH)
34 ILLUM 7.5 A Instrument panel illumination
35 TAIL 15 A Taillights, Parking lights, License plate lights
36 ENG INJ 15 A Engine control system
37 ENG BAR 15 A Engine control system
38 ENG INJ
*115 A Engine control system
ENG BAR 2*220 A Engine control system
39 EHPAS IG*1――
ETV*215 A Engine control system
*1 SKYACTIV-G 2.0
*2 MZR 2.0, MZR 2.3 DISI Turbo and MZR 2.5
8-60
Maintenance and Care
íSome models.
Owner Maintenance
Mazda3_8BY7-EC-11F_Edition1 Page442
Friday, June 17 2011 2:57 PM
Form No.8BY7-EC-11F