display MAZDA MODEL 3 HATCHBACK 2013 (in English) Owner's Manual
[x] Cancel search | Manufacturer: MAZDA, Model Year: 2013, Model line: MODEL 3 HATCHBACK, Model: MAZDA MODEL 3 HATCHBACK 2013Pages: 611, PDF Size: 5.61 MB
Page 277 of 611
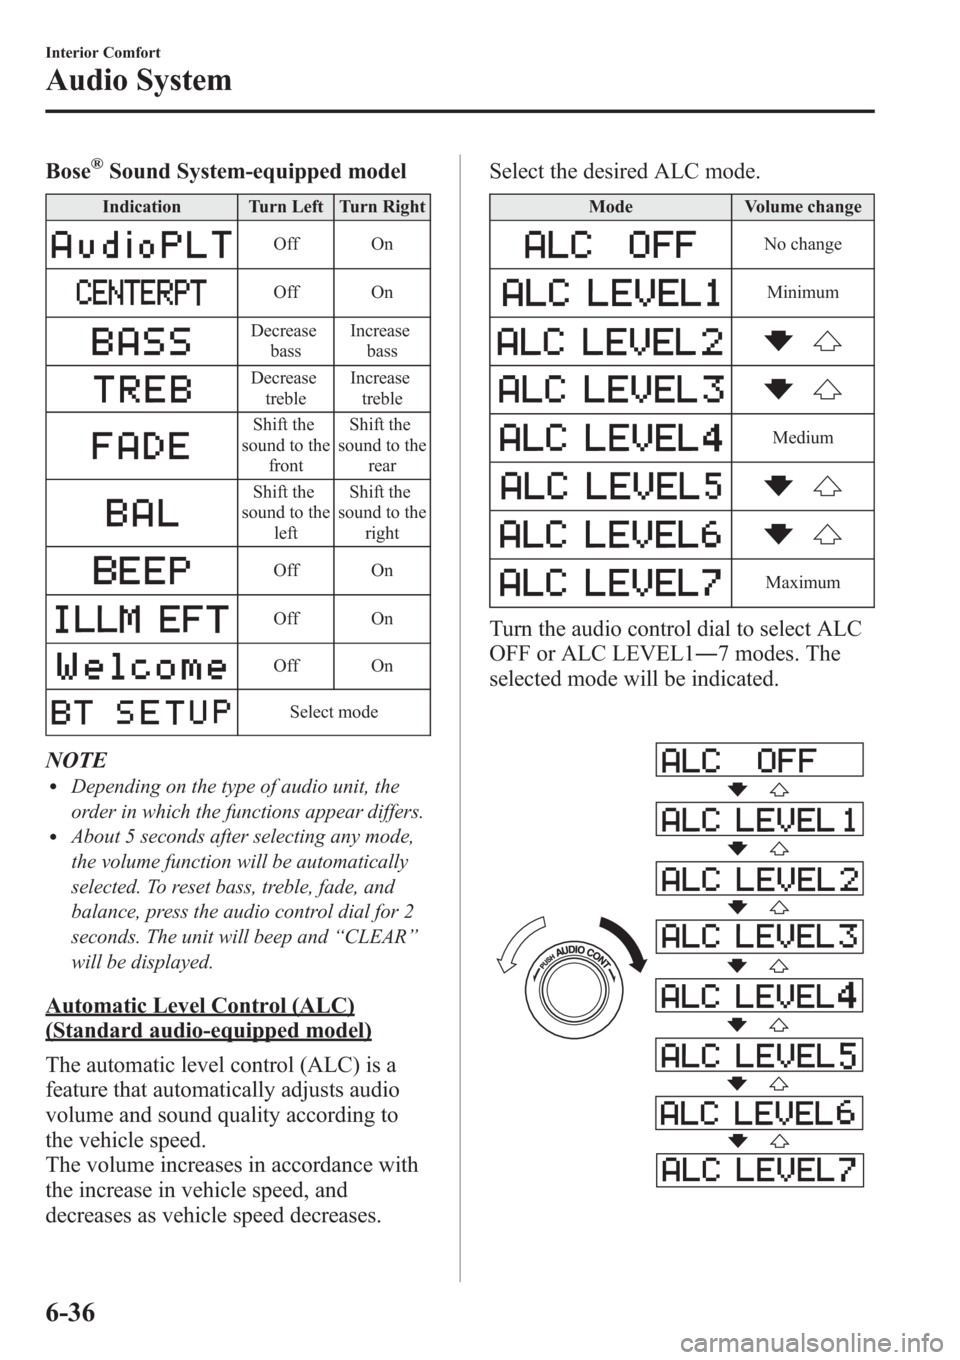
Bose®Sound System-equipped model
Indication Turn Left Turn Right
Off On
Off On
Decrease
bassIncrease
bass
Decrease
trebleIncrease
treble
Shift the
sound to the
frontShift the
sound to the
rear
Shift the
sound to the
leftShift the
sound to the
right
Off On
Off On
Off On
Select mode
NOTElDepending on the type of audio unit, the
order in which the functions appear differs.
lAbout 5 seconds after selecting any mode,
the volume function will be automatically
selected. To reset bass, treble, fade, and
balance, press the audio control dial for 2
seconds. The unit will beep and“CLEAR”
will be displayed.
Automatic Level Control (ALC)
(Standard audio-equipped model)
The automatic level control (ALC) is a
feature that automatically adjusts audio
volume and sound quality according to
the vehicle speed.
The volume increases in accordance with
the increase in vehicle speed, and
decreases as vehicle speed decreases.Select the desired ALC mode.
Mode Volume change
No change
Minimum
Medium
Maximum
Turn the audio control dial to select ALC
OFF or ALC LEVEL1―7 modes. The
selected mode will be indicated.
6-36
Interior Comfort
Audio System
Page 279 of 611
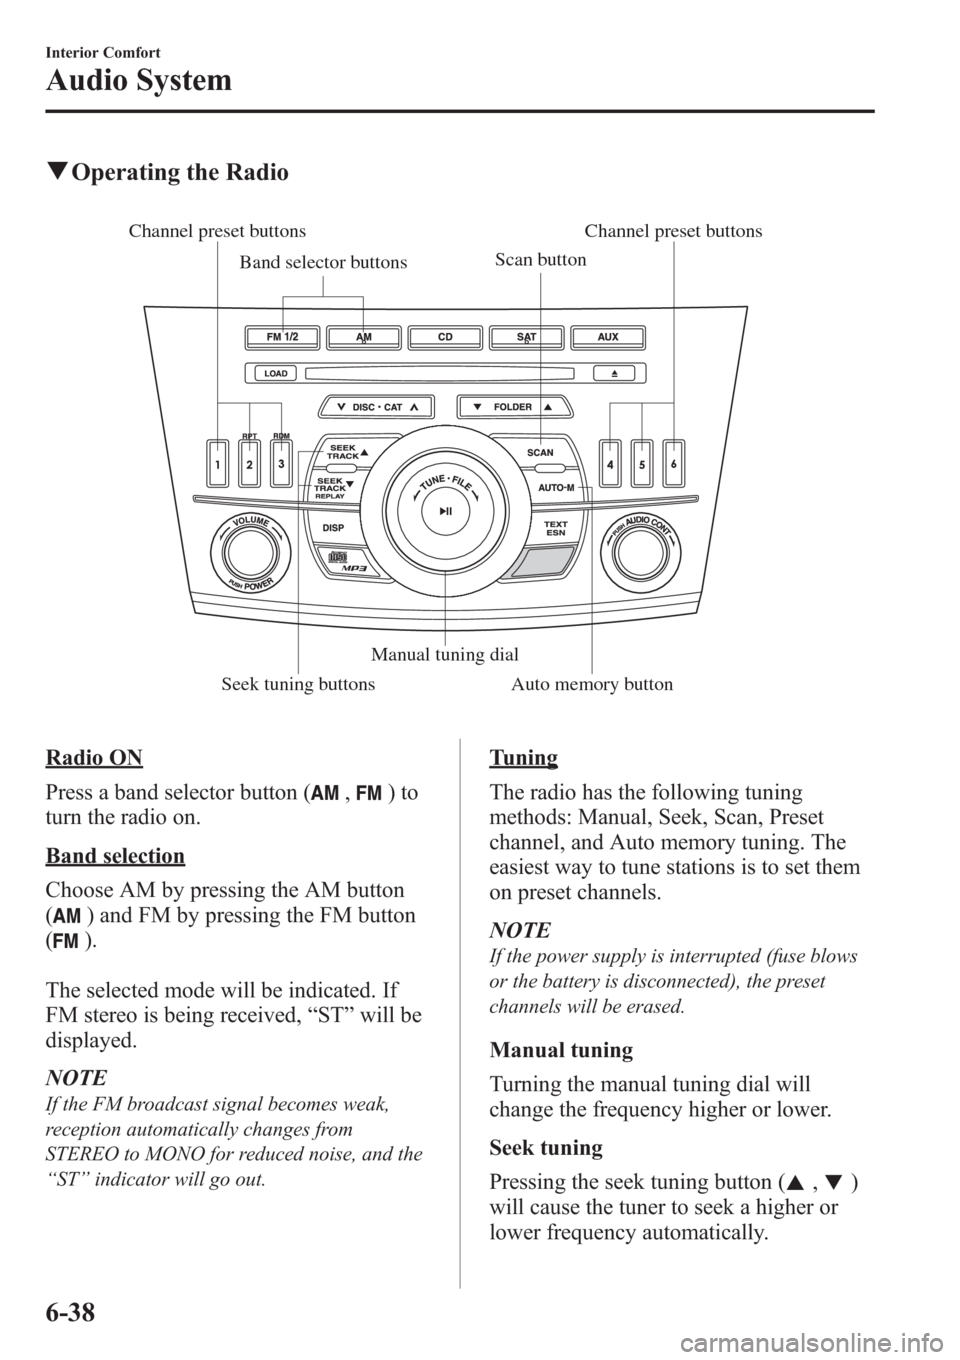
qOperating the Radio
Channel preset buttons
Seek tuning buttonsManual tuning dial Band selector buttonsScan buttonChannel preset buttons
Auto memory button
Radio ON
Press a band selector button (
,)to
turn the radio on.
Band selection
Choose AM by pressing the AM button
(
) and FM by pressing the FM button
(
).
The selected mode will be indicated. If
FM stereo is being received,“ST”will be
displayed.
NOTE
If the FM broadcast signal becomes weak,
reception automatically changes from
STEREO to MONO for reduced noise, and the
“ST”indicator will go out.
Tuning
The radio has the following tuning
methods: Manual, Seek, Scan, Preset
channel, and Auto memory tuning. The
easiest way to tune stations is to set them
on preset channels.
NOTE
If the power supply is interrupted (fuse blows
or the battery is disconnected), the preset
channels will be erased.
Manual tuning
Turning the manual tuning dial will
change the frequency higher or lower.
Seek tuning
Pressing the seek tuning button (
,)
will cause the tuner to seek a higher or
lower frequency automatically.
6-38
Interior Comfort
Audio System
Page 280 of 611
NOTE
If you continue to press and hold the button,
the frequency will continue changing without
stopping.
Scan tuning
Press the scan button (
)to
automatically sample strong stations.
Scanning stops at each station for about 5
seconds. To hold a station, press the scan
button (
) again during this interval.
Preset channel tuning
The 6 preset channels can be used to store
6 AM and 12 FM stations.
1. To set a channel first select AM, FM1,
or FM2. Tune to the desired station.
2. Depress a channel preset button for
about 2 seconds until a beep sound is
heard. The preset channel number and
station frequency will be displayed.
The station is now held in the memory.
3. Repeat this operation for the other
stations and bands you want to store.
To tune one in the memory, select AM,
FM1, or FM2 and then press its
channel preset button. The station
frequency and the channel number will
be displayed.
NOTE
If the power supply is interrupted (fuse blows
or the battery is disconnected), the preset
channels will be erased.
Auto memory tuning
This is especially useful when driving in
an area where the local stations are not
known. Additional AM/FM stations can
be stored without disturbing the
previously set channels.Press and hold the auto memory button
(
) for about 2 seconds until a beep
sound is heard; the system will
automatically scan and temporarily store
up to 6 stations with the strongest
frequencies in each selected band in that
area.
After scanning is completed, the station
with the strongest frequency will be tuned
and its frequency displayed.
Press and release the auto memory button
(
) to recall stations from the auto-
stored stations. One stored station will be
selected each time; its frequency and
channel number will be displayed.
NOTE
If no stations can be tuned after scanning
operations,“A”will be displayed.
Interior Comfort
Audio System
6-39
Page 281 of 611
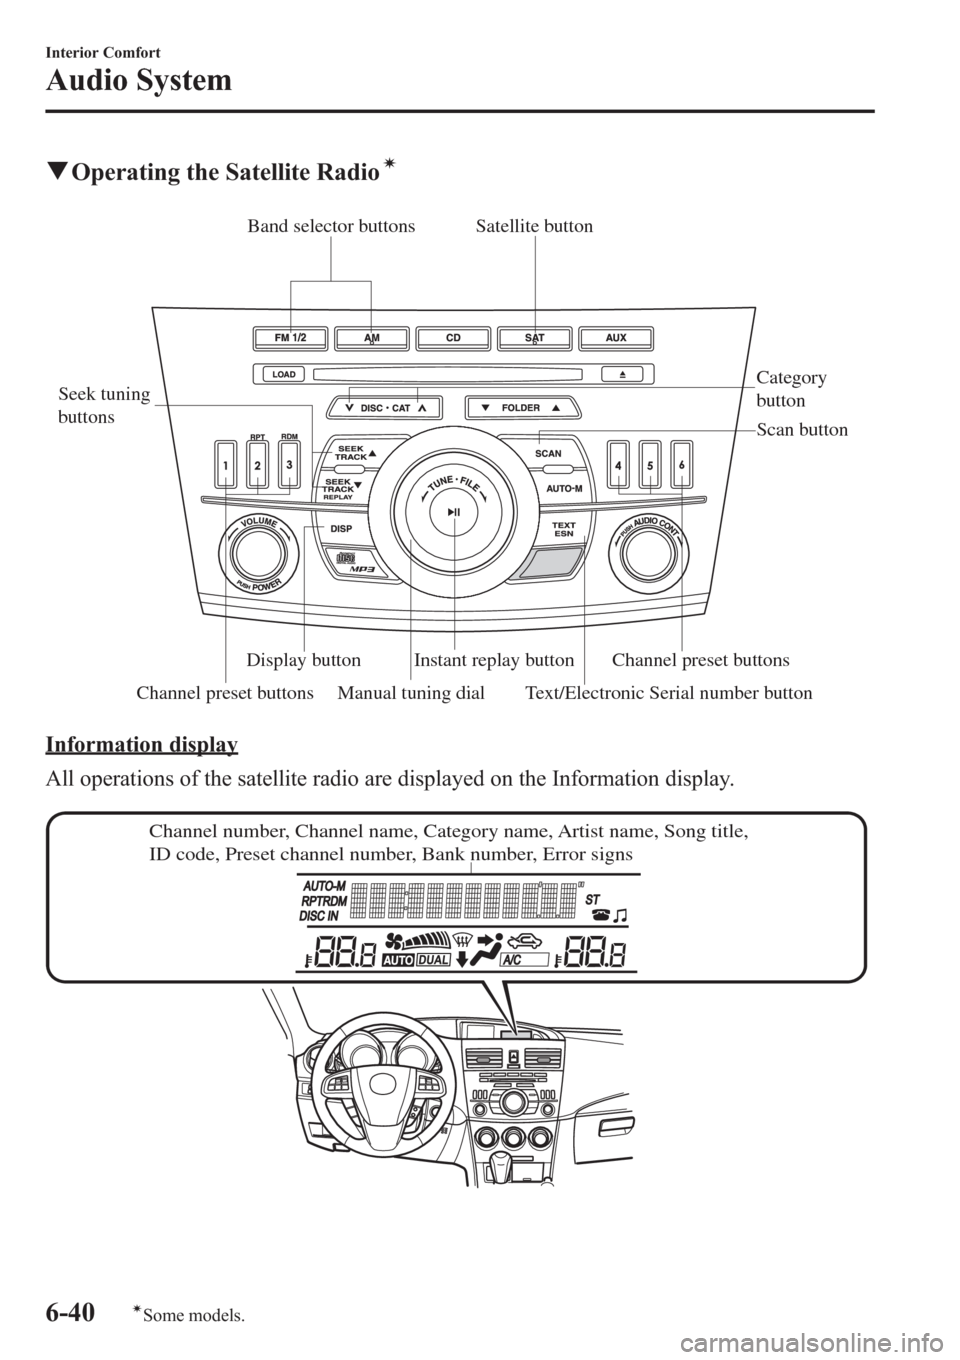
qOperating the Satellite Radioí
Channel preset buttons Seek tuning
buttons
Manual tuning dialCategory
button Band selector buttons
Scan button
Channel preset buttons Text/Electronic Serial number buttonSatellite button
Instant replay button Display button
Information display
All operations of the satellite radio are displayed on the Information display.
Channel number, Channel name, Category name, Artist name, Song title,
ID code, Preset channel number, Bank number, Error signs
6-40
Interior Comfort
íSome models.
Audio System
Page 283 of 611
SIRIUS service uses an ID code to
identify your radio. This code is needed to
activate SIRIUS service, and report any
problems.
To activate you SIRIUS radio tuner, call a
SIRIUS customer service specialist at 1-
888-539-7474 or you can visit SIRIUS
online at www.siriusxm.com.
Please have the following information
ready:
lSIRIUS ID (12-digit electronic serial
no., or ESN*)lValid credit card information (may not
be required at initial sign-up)
*ESN: Electronic Serial Number
Displaying the SIRIUS ID (ESN)
When the ESN button (
) is pressed
for 1.5 seconds or longer, or the manual
tuning dial is turned to channel 0, a 12-
digit Electronic Serial Number (ESN) for
the SIRIUS tuner is displayed.
(If the SIRIUS ID (ESN) for the tuner
does not display)
If“ESN
FAIL”is displayed after
pressing the ESN button (
) for 1.5
seconds or longer, contact an Authorized
Mazda Dealer.
Be sure you are parked outside with a
clear view of open sky, you will be
instructed to turn on your radio (in SAT
mode and tuned to channel 184).
Activation typically takes only 2―5
minutes.
SIRIUS operation
All operations of the satellite radio are
conducted by means of the audio unit.SIRIUS radio mode selection
When the satellite button (
)is
pressed during ACC ON, it will play the
last SIRIUS channel in use before the
mode was switched over to another mode
or the power was turned off.
When the satellite button (
)is
pressed in a mode other than the SIRIUS
mode, the last channel in use will be
received.
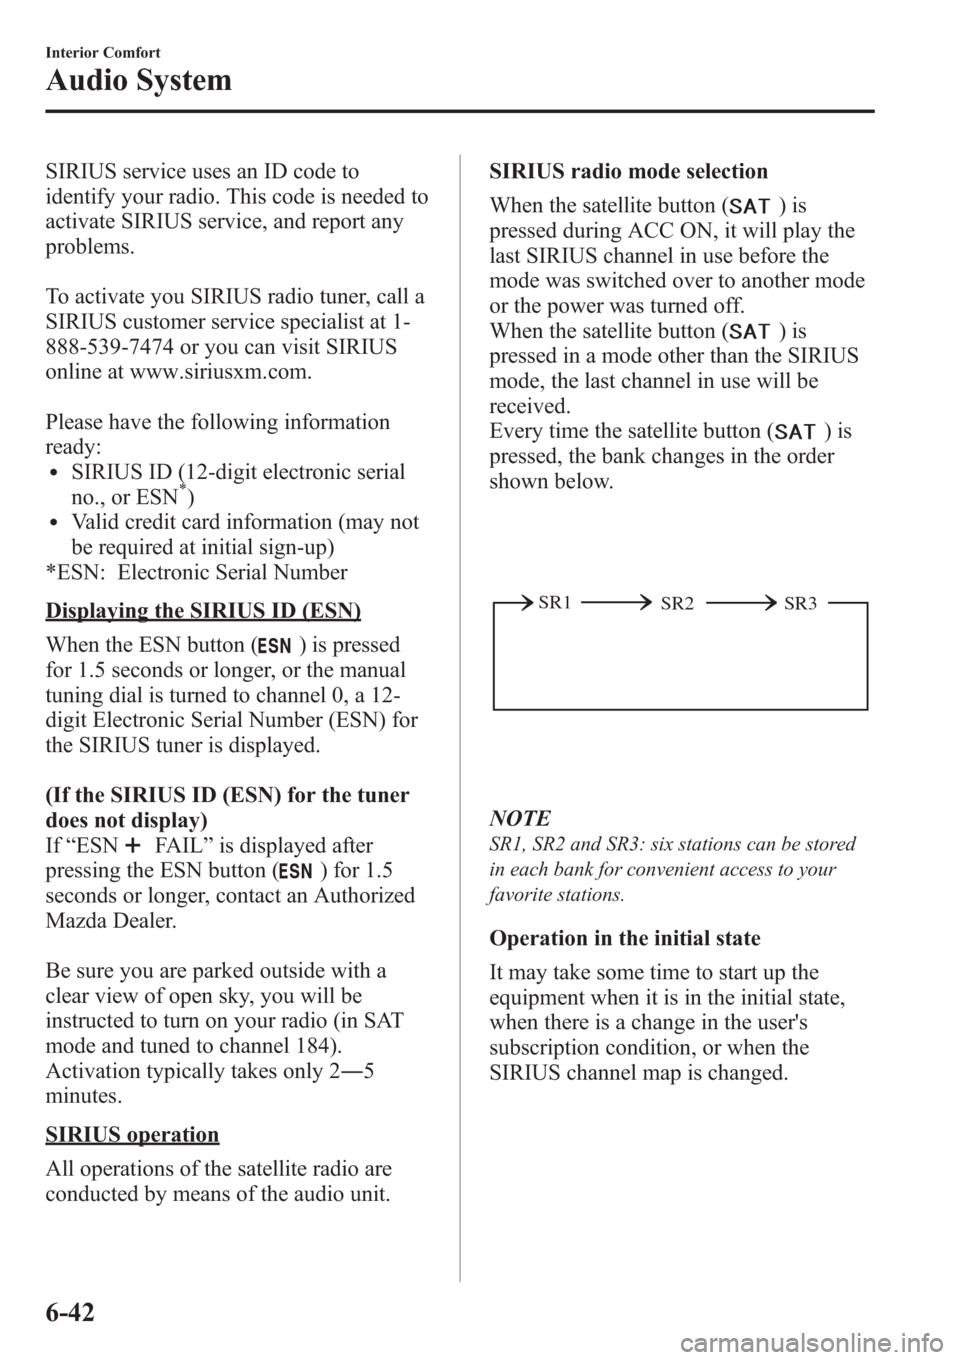
Every time the satellite button (
)is
pressed, the bank changes in the order
shown below.
SR2 SR1
SR3
NOTE
SR1, SR2 and SR3: six stations can be stored
in each bank for convenient access to your
favorite stations.
Operation in the initial state
It may take some time to start up the
equipment when it is in the initial state,
when there is a change in the user's
subscription condition, or when the
SIRIUS channel map is changed.
6-42
Interior Comfort
Audio System
Page 284 of 611
“UPDATING xx%”is displayed when the
SIRIUS channel map is changed. If the
unit is initialized or the user contract
content is changed,“UPDATING”is
displayed. Updating could take as long as
three minutes depending on the
geographical area. When the unit is in an
initialized state, channel 184 is displayed
after the display indicates
“UPDATING 100%”. If the SIRIUS
channel map or the user contract content
is changed, the channel prior to the
change is displayed after“UPDATING”is
displayed. After the initialization display,
it may take as long as 12 seconds to
receive channel 184.
NOTE
Do not perform the following operation while
“UPDATING”is displayed. Otherwise, the
updating procedure will be cancelled.
lTurning off the audio powerlSwitching to other modeslSwitching the ignition off
When the SIRIUS mode is switched to
another mode, or when the power is
turned off, the present channel which is
being received is stored as the last
channel.
Channel selection
Turning the manual tuning dial allows you
to select the desired receiving channel.
lTurn the knob clockwise: Channel UplTurn the knob counterclockwise:
Channel Down
Unsubscribed channel
When a selected station has not been
subscribed to, the display indicates the
following:
After the channel number is displayed,
[CALL
888] and [539SIRI]
(Flashes alternately) is displayed.NOTE
When the subscription contract is canceled, all
of the channels including channel 184 appear
as unsubscribed.
Invalid channel
The display switches between [SR
(bank number)INVALID] and [SR
(bank number)CHANNEL] only when
a selected channel is not broadcasting.
NOTE
If the last channel selected has become
unavailable because of a channel update the
above indication is displayed until any button
is pressed.
Preset channel programming
(Programming with“channel number”
display)
1. Select the desired channel to be
programmed. At this point, the
following is displayed:
[SR
(bank number)(channel
number)]
2. Keep pressing the channel preset
button for 1.5 seconds or more.
The programming process is complete
after the channel number flashes. Then,
[SR
(bank number)] is displayed
and a beep sound is heard at the same
time.
3. [SR
(bank number)CH
(preset number)(channel number)]
are displayed.
Interior Comfort
Audio System
6-43
Page 285 of 611
![MAZDA MODEL 3 HATCHBACK 2013 (in English) Owners Manual (Programming with“text”display (e.g.
channel name))
1. Select the desired channel to be
programmed. At this point, the
following is displayed:
[SR
(bank number)(selected text
(e.g. channel name))] MAZDA MODEL 3 HATCHBACK 2013 (in English) Owners Manual (Programming with“text”display (e.g.
channel name))
1. Select the desired channel to be
programmed. At this point, the
following is displayed:
[SR
(bank number)(selected text
(e.g. channel name))]](/img/28/13455/w960_13455-284.png)
(Programming with“text”display (e.g.
channel name))
1. Select the desired channel to be
programmed. At this point, the
following is displayed:
[SR
(bank number)(selected text
(e.g. channel name))]
2. Keep pressing the channel preset
button for 1.5 seconds or more.
The programming process is complete
after the text (e.g. channel name)
flashes. Then, [SR
(bank number)]
is displayed and you will hear beep
sound at the same time.
3. [SR
(bank number)CH
(preset number)(channel number)]
are displayed.
4. Three seconds later, it returns to normal
display. [SR
(bank number)(text
(e.g. channel name))]
NOTE
Six stations can be stored in each bank, SR1,
SR2, and SR3 for convenient access to your
favorite stations.
Preset channel call-up
Press and release the channel preset
button,
[SR
(bank number)CH(preset
number)
(channel number)] appears.
When the preset button is pressed during
text mode, its channel number is
displayed first for three second and then
its text is displayed.
NOTE
In the initial setting, all channels are preset to
184.
Category change
Press the category button (
or) and
select the desired category.
lPress the category button ():
Category up
lPress the category button ():
Category down
Every time the category button (
)is
pressed, the category is changed over in
the order shown below.
At this time, the lowest (smallest-number)
channel within the category indicated is
received.
When the highest (or lowest) category is
reached, the category is changed over in
the order shown below.
Highest category→All categories→
Lowest category
NOTE
While all categories are selected, all channels
covering a category can be accessed
(Category off condition).
Channel selection within a category
If you are in a selected category and the
channel number is displayed, turning the
manual tuning dial moves the channel
number up/down in that category.
lTurn the manual tuning dial clockwise:
Channel Up
lTurn the manual tuning dial
counterclockwise: Channel Down
NOTE
The channel number needs to be indicated in
the display to use manual tuning dial for this
function.
6-44
Interior Comfort
Audio System
Page 286 of 611
Scan tuning
Press the scan button (
)to
automatically sample stations. Scanning
stops at each station for about five
seconds. To hold a station, press the scan
button (
) again during this interval.
NOTE
lUnsubscribed channels, invalid channels,
parental lock channels and channel 0 are
not subject to the scan, therefore these
channels will be skipped automatically.
lYou can scan all channels while all
categories are selected. If you are in a
selected category, you can only scan the
channels in that category.
Channel number, channel name,
category, artist, song titles and info
display
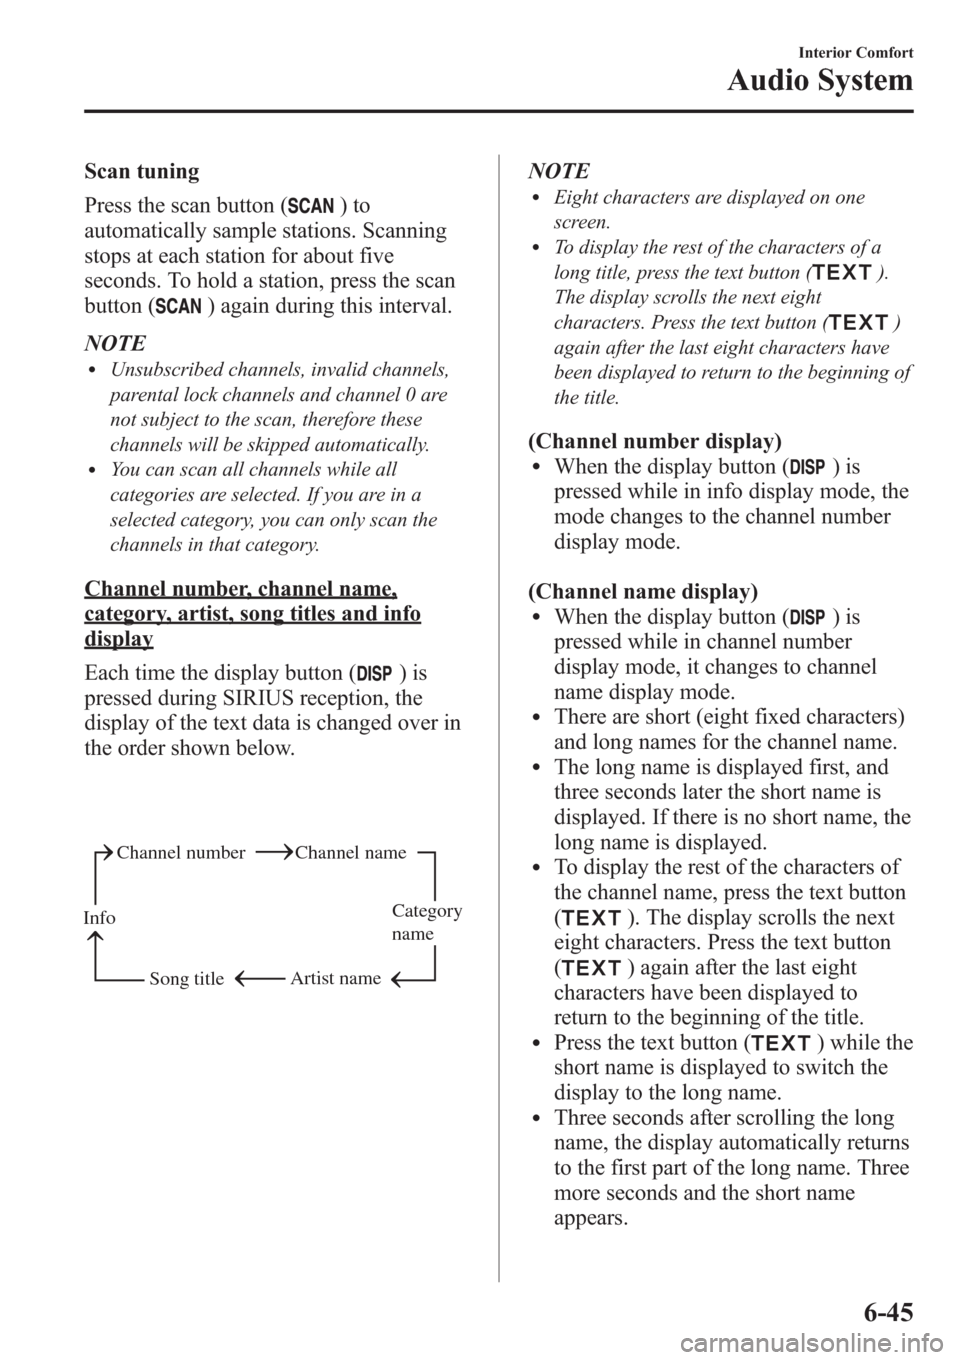
Each time the display button (
)is
pressed during SIRIUS reception, the
display of the text data is changed over in
the order shown below.
Channel number Channel name
Category
name
Artist name
Info
Song title
NOTElEight characters are displayed on one
screen.
lTo display the rest of the characters of a
long title, press the text button (
).
The display scrolls the next eight
characters. Press the text button (
)
again after the last eight characters have
been displayed to return to the beginning of
the title.
(Channel number display)lWhen the display button ()is
pressed while in info display mode, the
mode changes to the channel number
display mode.
(Channel name display)
lWhen the display button ()is
pressed while in channel number
display mode, it changes to channel
name display mode.
lThere are short (eight fixed characters)
and long names for the channel name.
lThe long name is displayed first, and
three seconds later the short name is
displayed. If there is no short name, the
long name is displayed.
lTo display the rest of the characters of
the channel name, press the text button
(
). The display scrolls the next
eight characters. Press the text button
(
) again after the last eight
characters have been displayed to
return to the beginning of the title.
lPress the text button () while the
short name is displayed to switch the
display to the long name.
lThree seconds after scrolling the long
name, the display automatically returns
to the first part of the long name. Three
more seconds and the short name
appears.
Interior Comfort
Audio System
6-45
Page 287 of 611
lIf there is no channel name,
“NO TITLE”is displayed.
(Category name display)
lWhen the display button ()is
pressed while in channel name display
mode, it changes to the category name
display mode.
lThere are short (eight fixed characters)
and long names for the category name.
lThe long name is displayed first, and
three seconds later the short name is
displayed. If there is no short name, the
long name is displayed.
lTo display the rest of the characters of
the category name, press the text
button (
). The display scrolls the
next eight characters. Press the text
button (
) again after the last
eight characters have been displayed to
return to the beginning of the title.
lPress the text button () while the
short name is displayed to switch the
display to the long name.
lThree seconds after scrolling the long
name, the display automatically returns
to display the first part of the long
name. Three more seconds and the
short name appears.
lIf there is no category name,
“NO CATEGORY”is displayed.
(Artist name display)
lWhen the display button ()is
pressed while in category name display
mode, it changes to the artist name
display mode.
lTo display the rest of the characters of
the artist's name, press the text button
(
). The display scrolls the next
eight characters. Press the text button
(
) again after the last eight
characters have been displayed to
return to the beginning of the title.
lThree seconds after scrolling the artist
name, the display automatically return
to display the first part of the artist's
name.
lIf there is no artist's name,
“NO ARTIST”is displayed.
(Song title display)
lWhen the display button ()is
pressed while in artist name display
mode, it changes to the song title
display mode.
lTo display the rest of the characters of
the song title, press the text button
(
). The display scrolls the next
eight characters. Press the text button
(
) again after the last eight
characters have been displayed to
return to the beginning of the title.
lThree more seconds after scrolling the
song title, the display automatically
returns to display the first part of the
song title.
lIf there is no song title,“NO SONG”is
displayed.
(INFO (such as composer's name)
display)
lWhen the display button ()is
pressed while in song title display
mode, it changes to the INFO display
mode.
lTo display the rest of the characters of
the composer's name, press the text
button (
). The display scrolls the
next eight characters. Press the text
button (
) again after the last
eight characters have been displayed to
return to the beginning of the title.
lThree seconds after scrolling the text,
the display automatically returns to
display the first part of the text.
lIf there is no composer name,
“NO INFO”is displayed.
6-46
Interior Comfort
Audio System
Page 289 of 611
![MAZDA MODEL 3 HATCHBACK 2013 (in English) Owners Manual 6.“PIN CLEARED”appears which
indicates that the master code input has
been completed.
7. The ID code is set to the default [0000]
and the initialization process is
completed.
NOTE
Master code:
The MAZDA MODEL 3 HATCHBACK 2013 (in English) Owners Manual 6.“PIN CLEARED”appears which
indicates that the master code input has
been completed.
7. The ID code is set to the default [0000]
and the initialization process is
completed.
NOTE
Master code:
The](/img/28/13455/w960_13455-288.png)
6.“PIN CLEARED”appears which
indicates that the master code input has
been completed.
7. The ID code is set to the default [0000]
and the initialization process is
completed.
NOTE
Master code:
The Master Code is used to initialize or re-
initialize the ID code in the event that the code
is not set to [0000] and/or the personalized ID
code is not known. The initialization process
resets the ID code to [0000]. The master code
can potentially defeat the intent of the security
of the parental lock if it is located by persons
not authorized by the owner to access certain
channels.
SIRIUS Satellite Radio Master Code: [0913]
NOTElWhen a numeric value other than the
master code is input and the auto memory
button or scan button (
) is pressed,
“SR1 Err”is displayed and then it returns
to the“SR1----”display again.
lIf an ID code is not input for ten seconds,
“Err”is displayed and it returns to the
former display.
lChannel preset buttons 1, 2, 3, 4 and the
auto memory button or scan button (
)
are used for inputting the ID code. Buttons
5 and 6 cannot be used.
Change of ID code
Setting condition: SAT mode
When changing the ID code, the new ID
code is input after the previous one is
input first.NOTE
The scan button refers to the operation for an
In-dash CD changer-equipped vehicle, and the
auto memory button refers to the operation for
a CD player-equipped vehicle.
(Registered ID code input)
1. Press and hold the auto memory button
or scan button (
), then press
channel preset button 5. Hold both
buttons together for 1.5 seconds.
2.“ENTER PIN”appears for three
seconds which indicates that it is in
code input mode.
3.“SR1 - - - -”appears, which indicates
that it is ready for code input.
4. Input the registered ID code using
channel preset buttons 1-4.
Example: When the registered ID code
is“2323”, input“2323”. At this time
“SR1 2323”is displayed.
Press 1 for the first digit, 2 for the
second, 3 for the third, and 4 for the
last digit. For example, if your number
is 2323, press 1 three times (includes
0), 2 four times, 3 three times, and 4
four times. If the display goes off while
inputting, begin from Step 1.
NOTE
The registered ID code is the default [0000] at
the time of factory shipment. If [0000] results
in“Err”on the display, go to the
“INITIALIZATION OF ID CODE”section to
reset to [0000].
(Verification with the registered ID
code)
5. Determine the input code by pressing
the auto memory button or scan button
(
).
6-48
Interior Comfort
Audio System