ECU MAZDA MODEL 3 HATCHBACK 2013 (in English) Workshop Manual
[x] Cancel search | Manufacturer: MAZDA, Model Year: 2013, Model line: MODEL 3 HATCHBACK, Model: MAZDA MODEL 3 HATCHBACK 2013Pages: 611, PDF Size: 5.61 MB
Page 331 of 611

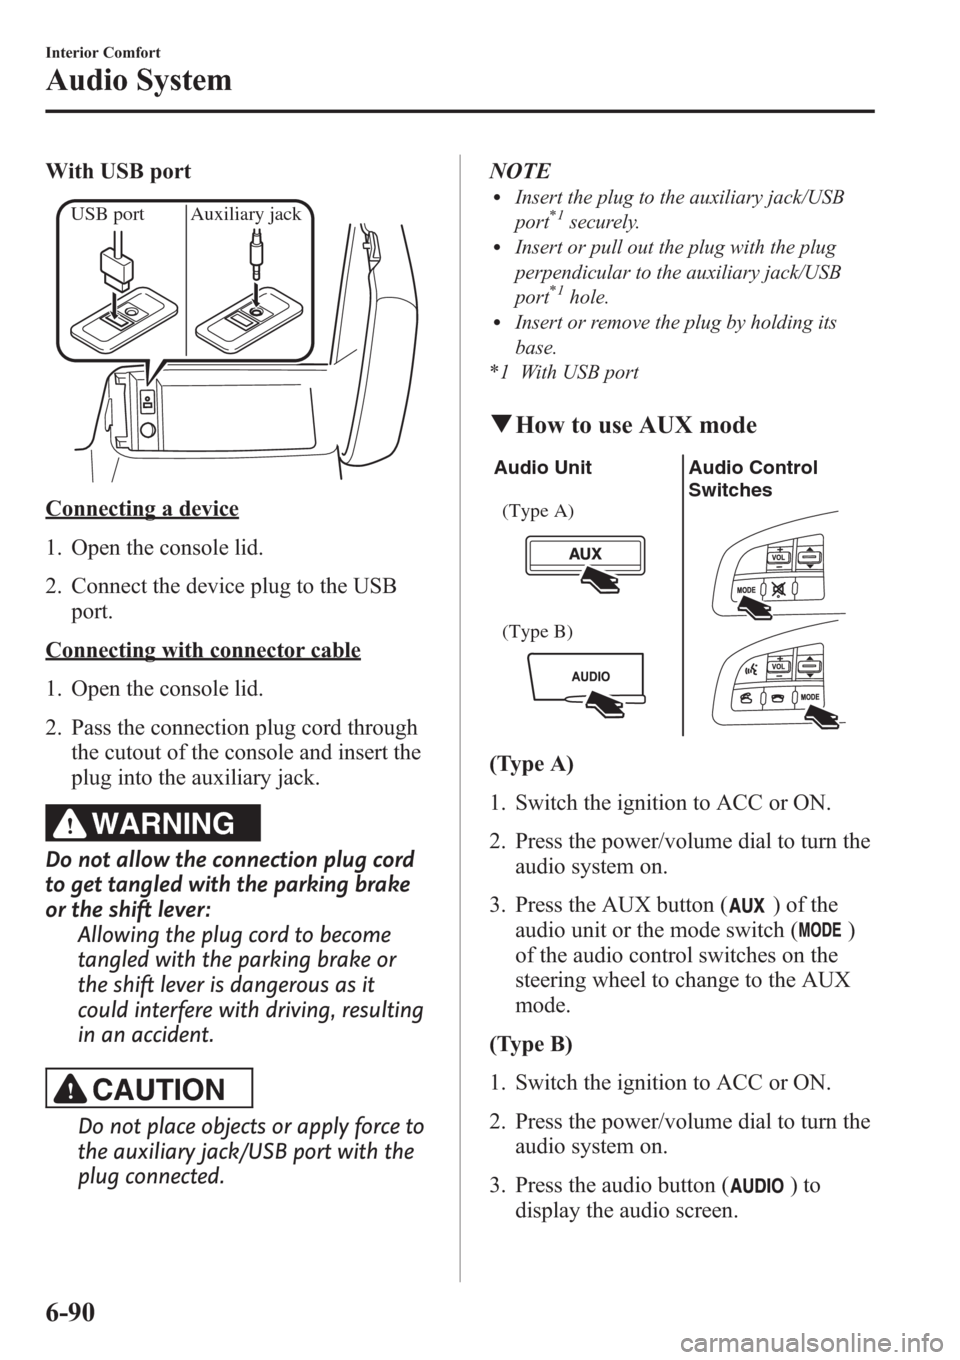
With USB port
USB port Auxiliary jack
Connecting a device
1. Open the console lid.
2. Connect the device plug to the USB
port.
Connecting with connector cable
1. Open the console lid.
2. Pass the connection plug cord through
the cutout of the console and insert the
plug into the auxiliary jack.
WARNING
Do not allow the connection plug cord
to get tangled with the parking brake
or the shift lever:
Allowing the plug cord to become
tangled with the parking brake or
the shift lever is dangerous as it
could interfere with driving, resulting
in an accident.
CAUTION
Do not place objects or apply force to
the auxiliary jack/USB port with the
plug connected.NOTE
lInsert the plug to the auxiliary jack/USB
port*1securely.lInsert or pull out the plug with the plug
perpendicular to the auxiliary jack/USB
port
*1hole.lInsert or remove the plug by holding its
base.
*1 With USB port
qHow to use AUX mode
Audio Unit Audio Control
Switches
(Type A)
(Type B)
(Type A)
1. Switch the ignition to ACC or ON.
2. Press the power/volume dial to turn the
audio system on.
3. Press the AUX button (
) of the
audio unit or the mode switch (
)
of the audio control switches on the
steering wheel to change to the AUX
mode.
(Type B)
1. Switch the ignition to ACC or ON.
2. Press the power/volume dial to turn the
audio system on.
3. Press the audio button (
)to
display the audio screen.
6-90
Interior Comfort
Audio System
Page 366 of 611
![MAZDA MODEL 3 HATCHBACK 2013 (in English) Workshop Manual 14.Prompt:“XXXXXX - - - (Ex.
“Stans device”) (Device tag). Is this
correct?”
15.Say:[Beep]“Ye s”
16.Prompt:“Pairing complete”
After a device is registered, the system
automatically id MAZDA MODEL 3 HATCHBACK 2013 (in English) Workshop Manual 14.Prompt:“XXXXXX - - - (Ex.
“Stans device”) (Device tag). Is this
correct?”
15.Say:[Beep]“Ye s”
16.Prompt:“Pairing complete”
After a device is registered, the system
automatically id](/img/28/13455/w960_13455-365.png)
14.Prompt:“XXXXXX - - - (Ex.
“Stan's device”) (Device tag). Is this
correct?”
15.Say:[Beep]“Ye s”
16.Prompt:“Pairing complete”
After a device is registered, the system
automatically identifies the device. By
activating Bluetooth
®Hands-Free again,
or by activating Bluetooth®Hands-Free
first after switching the ignition from OFF
to ACC, the system reads out a voice
guidance,“XXXXXX - - - (Ex.“Stan's
device”) (Device tag) is connected”.
NOTE
lDevice registration can also be done by
operating the audio unit.
Refer to Bluetooth® Audio Preparation on
page 6-110.
lDepending on the device, the registration
status may be lost after a certain period of
time. If this occurs, repeat the entire
process from Step 1.
qMaking a Call Using a Telephone
Number
NOTE
Practice this while parked until you are
confident you can do it while driving in a non-
taxing road situation. If you are not completely
comfortable, make all calls from a safe
parking position, and move out only when fully
under control and you can devote your eyes
and mind to driving.
1. Press the pick-up button or talk button
with a short press.
2.Say:[Beep]“Dial”
3.Prompt:“Number, please”
4.Say:[Beep]“XXXXXXXXXXX
(Telephone number)”5.Prompt:“XXXXXXXXXXX.
(Telephone number) After the beep,
continue to add numbers, or say Go-
Back to re-enter the last entered
numbers, or press the Pick-Up button
to execute dialing.”
6.(Dialing)
Press the pick-up button or say“Dial”,
then go to Step 7.
(Adding/inputting telephone
number)
Say,“XXXX”(desired telephone
number), then go to Step 5.
(Telephone number correction)
Say,“Go Back”. The prompt replies,
“Go Back. The last entered numbers
have been removed.”. Then go back to
Step 3.
7.Prompt:“Dialing”
NOTE
The“Dial”command and a telephone number
can be combined.
Ex. In Step 2, say,“Dial 123-4567”, then,
Steps 3 and 4 can be skipped.
Interior Comfort
Bluetooth® Hands-Free (Type A)
6-125
Page 371 of 611
![MAZDA MODEL 3 HATCHBACK 2013 (in English) Workshop Manual Method 1
1. Press the pick-up button.
2.Prompt:“Swapping calls.”
Method 2
1. Press the talk button with a short press.
2.Say:[Beep]“Swap calls”
3.Prompt:“Swapping calls”
Three-way call fun MAZDA MODEL 3 HATCHBACK 2013 (in English) Workshop Manual Method 1
1. Press the pick-up button.
2.Prompt:“Swapping calls.”
Method 2
1. Press the talk button with a short press.
2.Say:[Beep]“Swap calls”
3.Prompt:“Swapping calls”
Three-way call fun](/img/28/13455/w960_13455-370.png)
Method 1
1. Press the pick-up button.
2.Prompt:“Swapping calls.”
Method 2
1. Press the talk button with a short press.
2.Say:[Beep]“Swap calls”
3.Prompt:“Swapping calls”
Three-way call function
1. Press the talk button with a short press.
2.Say:[Beep]“Join calls”
3.Prompt:“Joining calls”
Making a call using a telephone
number
1. Press the talk button with a short press.
2.Say:[Beep]“Dial”
3.Prompt:“Number, please”
4.Say:[Beep]“XXXXXXXXXXX
(Telephone number)”
5.Prompt:“XXXXXXXXXXX.
(Telephone number) After the beep,
continue to add numbers, or say Go-
Back to re-enter the last entered
numbers, or press the Pick-Up button
to execute dialing.”6.(Dialing)
Press the pick-up button or say“Dial”,
then go to Step 7.
(Adding/inputting telephone
number)
Say,“XXXX”(desired telephone
number), then go to Step 5.
(Telephone number correction)
Say,“Go Back”. The prompt replies,
“Go Back. The last entered numbers
have been removed.”. Then go back to
Step 3.
7.Prompt:“Dialing”
Making calls using the phonebook
1. Press the talk button with a short press.
2.Say:[Beep]“Call”
3.Prompt:“Name please.”
4.Say:[Beep]“XXXXX... (Ex.“John's
phone”)”(Say a voice tag registered in
the phonebook.)
5.Prompt:“Calling XXXXX... (Ex.
“John's phone”) XXXX (Ex.“at
home”). Is this correct?”(Voice tag and
phone number location registered in
phonebook).
6.Say:[Beep]“Ye s”
7.Prompt:“Dialing”
Redialing function
1. Press the talk button with a short press.
2.Say:[Beep]“Redial”
3.Prompt:“Dialing”
Ending the current call
Press the hang-up button during the call.
6-130
Interior Comfort
Bluetooth® Hands-Free (Type A)
Page 373 of 611
![MAZDA MODEL 3 HATCHBACK 2013 (in English) Workshop Manual 1. Press the pick-up button or talk button
with a short press.
2.Say:[Beep]“Phonebook”
3.Prompt:“Select one of the following:
New entry, edit, list names, delete,
erase all or import contact.” MAZDA MODEL 3 HATCHBACK 2013 (in English) Workshop Manual 1. Press the pick-up button or talk button
with a short press.
2.Say:[Beep]“Phonebook”
3.Prompt:“Select one of the following:
New entry, edit, list names, delete,
erase all or import contact.”](/img/28/13455/w960_13455-372.png)
1. Press the pick-up button or talk button
with a short press.
2.Say:[Beep]“Phonebook”
3.Prompt:“Select one of the following:
New entry, edit, list names, delete,
erase all or import contact.”
4.Say:[Beep]“Delete”
5.Prompt:“Please say the name of the
entry you would like to delete or say,
“List names”.”
6.Say:[Beep]“XXXXX... (Ex.“John's
phone”)”(Say the registered voice tag
to be deleted from the phonebook.)
7.Prompt:“Deleting XXXXX... (Ex.
“John's phone”) (Registered voice tag)
Home (Registered location). Is this
correct?”
8.Say:[Beep]“Ye s”
9.Prompt:“XXXXX... (Ex.“John's
phone”) (Registered voice tag) Home
(Registered location) deleted, returning
to main menu.”
Complete deletion of the phonebook
data
All data registered to the Bluetooth
®
Hands-Free phonebook can be erased.
NOTE
Do this function only when parked. It is too
distracting to attempt while driving and you
may make too many errors to be effective.
1. Press the pick-up button or talk button
with a short press.
2.Say:[Beep]“Phonebook”
3.Prompt:“Select one of the following:
New entry, edit, list names, delete,
erase all or import contact.”4.Say:[Beep]“Erase all”
5.Prompt:“Are you sure you want to
erase everything from your Hands Free
system phonebook?”
6.Say:[Beep]“Ye s”
7.Prompt:“You are about to delete
everything from your Hands Free
system phonebook. Do you want to
continue?”
8.Say:[Beep]“Ye s”
9.Prompt:“Please wait, erasing the
Hands Free system phonebook.”
10.Prompt:“Hands-Free system
phonebook erased, returning to main
menu.”
Read-out of names registered to the
Bluetooth®Hands-Free phonebook
Bluetooth
®Hands-Free can read out the
list of names registered to its phonebook.
1. Press the pick-up button or talk button
with a short press.
2.Say:[Beep]“Phonebook”
3.Prompt:“Select one of the following:
New entry, edit, list names, delete,
erase all or import contact.”
4.Say:[Beep]“List names”
5.Prompt:“XXXXX..., XXXXX...,
XXXXX... (Ex.“John's phone”, Mary's
phone, Bill's phone)”(Voice guidance
reads out the voice tags registered to
the phonebook.)
Press the talk button with a short press
during the read-out at the desired name,
and then say one of the following voice
commands to execute it.
l“Continue”: Continues the list read-
out.
6-132
Interior Comfort
Bluetooth® Hands-Free (Type A)
Page 375 of 611

Press the talk button with a short press
during the read-out at the desired device,
and then say one of the following voice
commands to execute it.
l“Select phone”: Selects device (Mobile
phone) when the talk button is short-
pressed.
l“Select music player”: Selects device
(Music player) when the talk button is
short-pressed.
l“Edit”: Edits device when the talk
button is short-pressed.
l“Continue”: Continues the list read-
out.
l“Delete”: Deletes the registered device
when the talk button is short-pressed.
l“Previous”: Returns to the previous
device in read-out when the talk button
is short-pressed.
8.Prompt:“End of list, would you like
to start from the beginning?”
9.Say:[Beep]“No”
10.Prompt:“Returning to main menu.”
Device selection
If several devices have been programmed,
the Bluetooth
®unit links the device last
connected. If you would like to link a
different programmed device, it is
necessary to change the link. The order of
device priority after the link has been
changed is maintained even when the
ignition is switched off.
Hands-free phone
1. Press the pick-up button or talk button
with a short press.
2.Say:[Beep]“Setup”3.Prompt:“Select one of the following:
Pairing options, confirmation prompts,
language, passcode, select phone or
select music player.”
4.Say:[Beep]“Select phone”
5.Prompt:“Please say the name of the
device you would like to select.
Available devices are XXXXX... (Ex.
device A), XXXXX... (Ex. device B),
XXXXX... (Ex. device C). Which
device please?”
6.Say:[Beep]“XXXXX... (Ex. Device
B)”
7.Prompt:“XXXXX... (Ex. Device B).
Is this correct?”
8.Say:[Beep]“Ye s”or“No”
9. If“Ye s”, go to Step 10. If“No”, the
procedure returns to Step 5.
10.Prompt:“XXXXX... (Ex. Device B)
selected.”
Music player
1. Press the pick-up button or talk button
with a short press.
2.Say:[Beep]“Setup”
3.Prompt:“Select one of the following:
Pairing options, confirmation prompts,
language, passcode, select phone or
select music player.”
4.Say:[Beep]“Select music player”
5.Prompt:“Please say the name of the
device you would like to select.
Available devices are XXXXX... (Ex.
device A), XXXXX... (Ex. device B),
XXXXX... (Ex. device C). Which
device please?”
6-134
Interior Comfort
Bluetooth® Hands-Free (Type A)
Page 377 of 611
![MAZDA MODEL 3 HATCHBACK 2013 (in English) Workshop Manual 10.Say:[Beep]“XXXXX... (Ex. device
C)”(Speak a“device tag”,an
arbitrary name for the device.)
11.Prompt:“XXXXX... (Ex. device C)
(Device tag), is this correct?”
12.Say:[Beep]“Ye s”
13. MAZDA MODEL 3 HATCHBACK 2013 (in English) Workshop Manual 10.Say:[Beep]“XXXXX... (Ex. device
C)”(Speak a“device tag”,an
arbitrary name for the device.)
11.Prompt:“XXXXX... (Ex. device C)
(Device tag), is this correct?”
12.Say:[Beep]“Ye s”
13.](/img/28/13455/w960_13455-376.png)
10.Say:[Beep]“XXXXX... (Ex. device
C)”(Speak a“device tag”,an
arbitrary name for the device.)
11.Prompt:“XXXXX... (Ex. device C)
(Device tag), is this correct?”
12.Say:[Beep]“Ye s”
13.Prompt:“New name saved, returning
to main menu.”
qSecurity Setting
If a passcode is set, the system cannot be
activated unless the passcode is input.
NOTE
Do this function only when parked. It is too
distracting to attempt while driving and you
may make too many errors to be effective.
Passcode setting
1. Press the pick-up button or talk button
with a short press.
2.Say:[Beep]“Setup”
3.Prompt:“Select one of the following:
Pairing options, confirmation prompts,
language, passcode, select phone or
select music player.”
4.Say:[Beep]“Passcode”
5.Prompt:“Passcode is disabled. Would
you like to enable it?”
6.Say:[Beep]“Ye s”
7.Prompt:“Please say a 4-digit
passcode. Remember this passcode. It
will be required to use this system.”
8.Say:[Beep]“XXXX”(Say a desired 4-
digit passcode,“PCode”.)
9.Prompt:“Passcode XXXX (Passcode,
PCode). Is this correct?”10.Say:[Beep]“Ye s”
11.Prompt:“Passcode is enabled,
returning to main menu.”
Using Bluetooth®Hands-Free with a
passcode
1. Press the pick-up button or talk button
with a short press.
2.Prompt:“Hands-Free system is
locked. State the passcode to
continue.”
3.Say:[Beep]“XXXX”(Say the set
passcode“PCode”.)
4. If the correct passcode is input, voice
guidance“XXXXXX... (Ex.“Mary's
device”) (Device tag) is connected”is
announced.
If the passcode is incorrect, voice
guidance“XXXX (4-digit passcode,
Pcode) incorrect passcode, please try
again”is announced.
Canceling the passcode
NOTE
Do this function only when parked. It is too
distracting to attempt while driving and you
may make too many errors to be effective.
1. Press the pick-up button or talk button
with a short press.
2.Say:[Beep]“Setup”
3.Prompt:“Select one of the following:
Pairing options, confirmation prompts,
language, passcode, select phone or
select music player.”
4.Say:[Beep]“Passcode”
5.Prompt:“Passcode is enabled. Would
you like to disable it?”
6.Say:[Beep]“Ye s”
6-136
Interior Comfort
Bluetooth® Hands-Free (Type A)
Page 378 of 611

7.Prompt:“Passcode is disabled,
returning to main menu.”
Confirmation Prompts
The confirmation prompt confirms the
command content to the user before
advancing to the operation requested by
the user. When this function is turned on,
the system reads out the voice input
command previously received and
confirms whether the command is correct
before advancing to the command
execution.
When the confirmation prompt function is
turned on:
(Ex.“Calling John's device. Is this
correct?”)
When the confirmation prompt function is
turned off:
(Ex.“Calling John's device.”)
NOTE
If the confirmation prompt function is turned
off when making an emergency call, the system
reads out and confirms the command before
executing it.
1. Press the pick-up button or talk button
with a short press.
2.Say:[Beep]“Setup”
3.Prompt:“Select one of the following:
Pairing options, confirmation prompts,
language, passcode, select phone or
select music player.”
4.Say:[Beep]“Confirmation prompts”
5.Prompt:“Confirmation prompts are
on/off. Would you like to turn
confirmation prompts off/on?”
6.Say:[Beep]“Ye s”
7.Prompt:“Confirmation prompts are
off/on, returning to main menu.”
qVoice Recognition Learning
Function (Speaker Enrollment)
The voice recognition learning function
enables voice recognition appropriate to
the characteristics of the user's voice.
If the recognition of the voice input
commands to the system is not adequate,
this function can largely improve the
system's voice recognition of the user. If
your voice can be recognized sufficiently
without using this function, you may not
realize the added benefit of the function.
To register your voice, the voice input
command list must be read out. Read out
the list when the vehicle is parked.
Perform the registration in as quiet a place
as possible (page 6-120).
The registration must be performed
completely. The required time is a few
minutes. The user needs to be seated in
the driver's seat with the voice input
command list for voice recognition
learning open to the page indicated below.
When voice recognition learning is
done for the first time
1. Press the pick-up button or talk button
with a short press.
2.Say:[Beep]“Voice training”
3.Prompt:“This operation must be
performed in a quiet environment while
the vehicle is stopped. See the owner's
manual for the list of required training
phrases. Press and release the talk
button when you are ready to begin.
Press the hangup button to cancel at
any time.”
4. Press the talk button with a short press.
Interior Comfort
Bluetooth® Hands-Free (Type A)
6-137
Page 434 of 611

Using the armrestí
CAUTION
ØWhen sliding the armrest, be
careful not to hit a drink cup
placed in a cup holder and spill its
contents. Remove cups or other
drink containers from the cup
holders before pulling out the
armrest.
ØBefore opening the center console,
store the armrest first. Otherwise,
the armrest or center console may
be damaged.
Press the button to slide the armrest
frontward.
To retract the armrest, slide it completely
to the rear.
qCargo Securing Loops (5 Door)
WARNING
Make sure luggage and cargo are
secured before driving:
Not securing cargo while driving is
dangerous as it could move or be
crushed during sudden braking or a
collision and cause injury.
Use the loops in the luggage compartment
to secure cargo with a rope or net. The
tensile strength of the loops is 196 N (20
kgf, 44 lbf). Do not apply excessive force
to the loops as it will damage them.
qShopping Bag Hook (5 Door)
The shopping bag hook can be used for
hanging shopping bags.
CAUTION
Do not hang excessive weight on the
shopping bag hook as it could be
damaged.
Interior Comfort
Interior Equipment
6-193íSome models.
Page 443 of 611

To secure the jack
1. Insert the wing bolt into the jack with
the jack screw pointing up and turn the
wing bolt clockwise to temporarily
tighten it.
2. Turn the jack screw in the direction
shown in the figure.
Wing boltJack screw
3. Turn the wing bolt completely to
secure the jack.
NOTE
If the jack is not completely secured, it could
rattle while driving. Make sure the jack screw
is sufficiently tightened.
Maintenance
lAlways keep the jack clean.lMake sure the moving parts are kept
free from dirt or rust.
lMake sure the screw thread is
adequately lubricated.
qSpare Tire
Your Mazda has a temporary spare tire.
The temporary spare tire is lighter and
smaller than a conventional tire, and is
designed only for emergency use and
should be used only for VERY short
periods. Temporary spare tires should
NEVER be used for long drives or
extended periods.
WARNING
Do not install the temporary spare tire
on the front wheels (driving wheels):
Driving with the temporary spare tire
on one of the front driving wheels is
dangerous. Handling will be affected.
You could lose control of the vehicle,
especially on ice or snow bound
roads, and have an accident. Move a
regular tire to the front wheel and
install the temporary spare tire to the
rear.
7-6
In Case of an Emergency
Flat Tire
Page 445 of 611

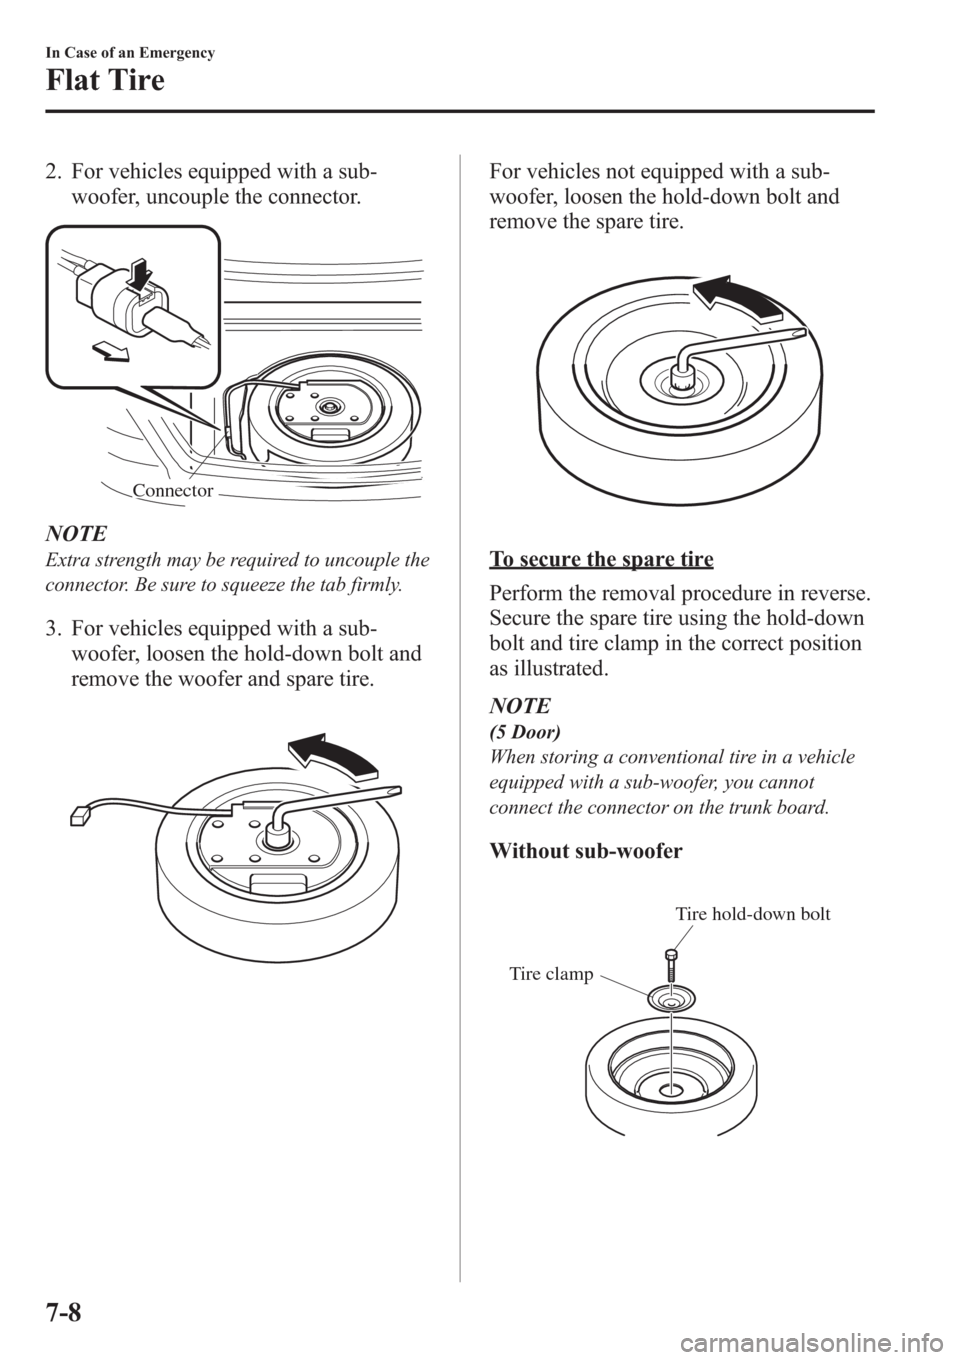
2. For vehicles equipped with a sub-
woofer, uncouple the connector.
Connector
NOTE
Extra strength may be required to uncouple the
connector. Be sure to squeeze the tab firmly.
3. For vehicles equipped with a sub-
woofer, loosen the hold-down bolt and
remove the woofer and spare tire.
For vehicles not equipped with a sub-
woofer, loosen the hold-down bolt and
remove the spare tire.
To secure the spare tire
Perform the removal procedure in reverse.
Secure the spare tire using the hold-down
bolt and tire clamp in the correct position
as illustrated.
NOTE
(5 Door)
When storing a conventional tire in a vehicle
equipped with a sub-woofer, you cannot
connect the connector on the trunk board.
Without sub-woofer
Tire clampTire hold-down bolt
7-8
In Case of an Emergency
Flat Tire